
A Comprehensive Guide to iPhone 15 Pro Blacklist Removal Tips and Tools | Dr.fone
A Comprehensive Guide to Apple iPhone 15 Pro Blacklist Removal: Tips and Tools
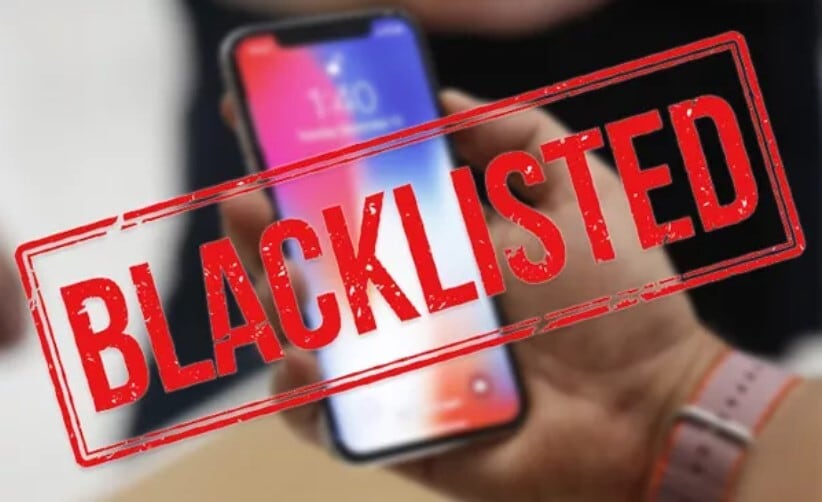
Have you ever wondered what happens when your beloved iPhone gets blacklisted? It’s like a digital timeout and can be a real headache. Imagine not being able to use your Apple iPhone 15 Pro fully because it’s on a blacklist. That means no calls, texts, or internet – not exactly the Apple iPhone 15 Pro experience you signed up for, right?
But don’t fret! This article is here to demystify the Apple iPhone 15 Pro blacklist and show you how to fix it. It will take you on a journey of iPhone blacklist removal. By the end, you’ll be able to bring your Apple iPhone 15 Pro back to life.
Part 1. Decoding the Apple iPhone 15 Pro Blacklist: What You Need To
You might have heard the term “blacklisted iPhone” before, but what does it mean? Well, it’s like your Apple iPhone 15 Pro is in a timeout and can’t play with the other phones. Let’s break it down in simple terms.
What Is a Blacklisted iPhone?
When an iPhone is blacklisted, it’s been labeled as “not-so-friendly” in the digital world. It’s like when you’re not allowed into an establishment because you broke the rules. In this case, the Apple iPhone 15 Pro has done something that makes it unwelcome on specific networks.
Why Does an iPhone Get Blacklisted?
There are a few reasons why an iPhone might end up on this digital naughty list:
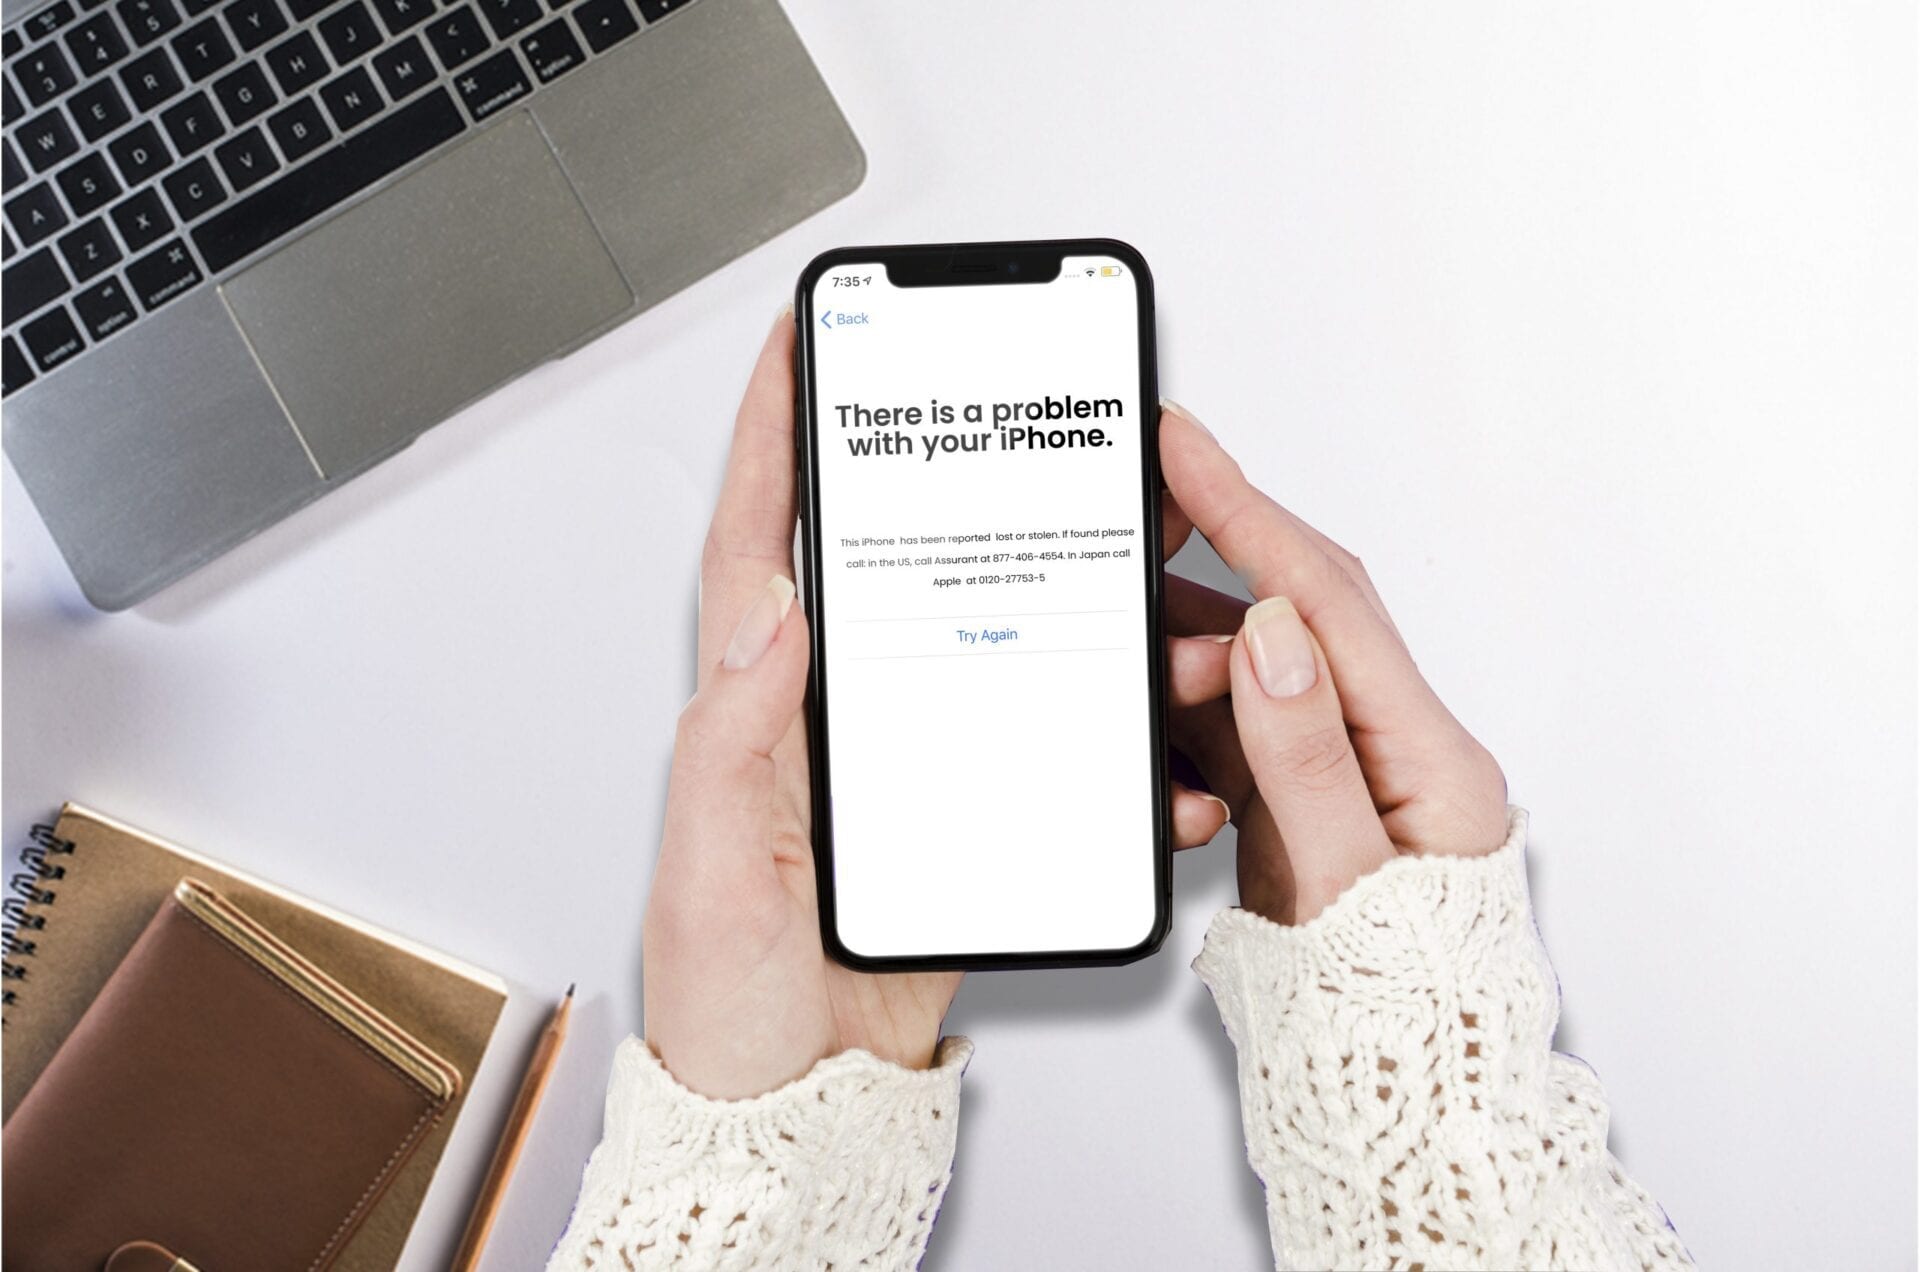
- **Reported as Lost or Stolen.**Imagine if someone reported their iPhone as lost or stolen. If someone else tries to use that phone, it could be blacklisted. That’s because protecting the original owner’s data and privacy is essential.
- **Unpaid Bills.**Sometimes, an iPhone gets blacklisted because the person who had it didn’t pay their bills. Not paying your phone bill can have consequences.
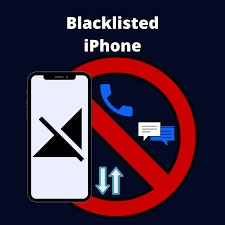
What Happens When Your Apple iPhone 15 Pro Is Blacklisted?
Now, here’s where things get tricky. When your Apple iPhone 15 Pro is blacklisted, it won’t work like it should. Here’s what you might experience:
- **No Calls or Texts.**You won’t be able to make or receive calls and texts. It’s like your Apple iPhone 15 Pro is suddenly mute.
- **No Internet.**Say goodbye to surfing the web or using apps that need an internet connection. Your Apple iPhone 15 Pro will be like a disconnected island.
- **Lower Resale Value.**If you ever decide to sell your Apple iPhone 15 Pro, its value will drop if it’s blacklisted. People are wary of buying blacklisted phones because they come with limitations.
So, in a nutshell, a blacklisted iPhone is like a digital pariah, shunned from regular phone activities. But the good news is, you don’t have to stay in timeout forever. In the next part, this guide will show you how to get your Apple iPhone 15 Pro back in action with some easy-to-follow iPhone blacklist removal steps.
Part 2. How To Remove and Unlock an iPhone Blacklist for Free
Now that you know what it means for an Apple iPhone 15 Pro to be blacklisted and the troubles it can bring, let’s talk about how to set your Apple iPhone 15 Pro free. The good news is there’s a way to do this for free! Yes, you read that right. This section will walk you through the steps.
What Is iPhone Blacklisted Removal?
Going through a blacklist removal service for your Apple iPhone 15 Pro is like giving your device a second chance. It’s taking your Apple iPhone 15 Pro off the “naughty list” and making it work like it should again. And the best part? You can do it without spending a dime.
Guide to Free iPhone Blacklist Removal
The iPhone blacklist removal method is relatively easy. Here’s how you can do it:
Option 1: Contact the Original Owner
One way to remove the blacklist status from your Apple iPhone 15 Pro is by contacting the person who originally owned it. Talking to the previous owner can be a game-changer if your Apple iPhone 15 Pro ended up on the blacklist because it was reported as lost or stolen. They can help you sort things out with the carrier and get the blacklist status lifted.
Option 2: Contact Your Carrier
Your next option is to contact your carrier for an iPhone blacklist removal service. The company provides your phone service, so they have the authority to remove the blacklist status from your Apple iPhone 15 Pro. Be prepared to explain your situation; they will guide you through the process. That means you can get in touch with AT&T, Verizon, Sprint, or T-Mobile.
If your carrier blacklisted the phone in error, you can request it be removed from the list for free. You must repay the bill if the carrier blacklisted the Apple iPhone 15 Pro device due to past-due account payments. Unfortunately, the carrier cannot remove or unlock the phone if the previous owner blacklisted the smartphone by reporting it as lost or stolen.
Both of these methods are free and can work like a charm. However, they might take some time and effort on your part. But if you’re patient and persistent, you could end up with a fully functional iPhone again. Remember, staying polite and patient when dealing with the original owner or the carrier is critical.
Part 3: Preventive Measures To Avoid Getting an iPhone Blacklisted
Now that you’ve learned how to rescue a blacklisted iPhone let’s talk about how to keep it out of trouble in the first place. Prevention is always better than a cure, right? Here are some easy steps to make sure your Apple iPhone 15 Pro stays in the clear.

Check the iPhone’s History Before Buying
Before you hand over your hard-earned money, check the iPhone’s background. Make sure it’s not reported as lost or stolen. You can do this by asking the seller for the phone’s IMEI or serial number and checking it online or with your carrier. A clean history is a green light to go ahead with the purchase.
Keep Your Apple iPhone 15 Pro Secure
Just like you lock your front door, secure your Apple iPhone 15 Pro. Use a strong passcode, Face ID, or Touch ID to protect your phone from unauthorized access. This simple step can prevent it from being misused and reported as stolen.
Pay Your Bills on Time
Your iPhone needs its “phone allowance” paid on time, too. Ensure you pay your monthly bills to your carrier. Unpaid invoices can lead to your Apple iPhone 15 Pro getting blacklisted.
Be Careful With iCloud
iCloud is like a protective bubble for your Apple iPhone 15 Pro’s data. Don’t share your Apple ID and password with just anyone. If someone else has access to your iCloud account and does something shady, it can affect your Apple iPhone 15 Pro’s status.
Report a Lost or Stolen iPhone
If your Apple iPhone 15 Pro ever goes missing, report it to your carrier and the police immediately. The step will help prevent someone else from using it and getting it blacklisted.
Beware of Scams
Stay vigilant for scams and sketchy deals. If something sounds too good to be true, it probably is. Avoid buying iPhones from unreliable sources or individuals you don’t trust.
By following these simple preventive measures, you can keep your device clear and avoid the hassle of dealing with the whole iPhone blacklist removal process. Remember, a little caution goes a long way.
Part 4: The Blacklist Problem Resolved, but What To Do if I Have a Locked SIM?
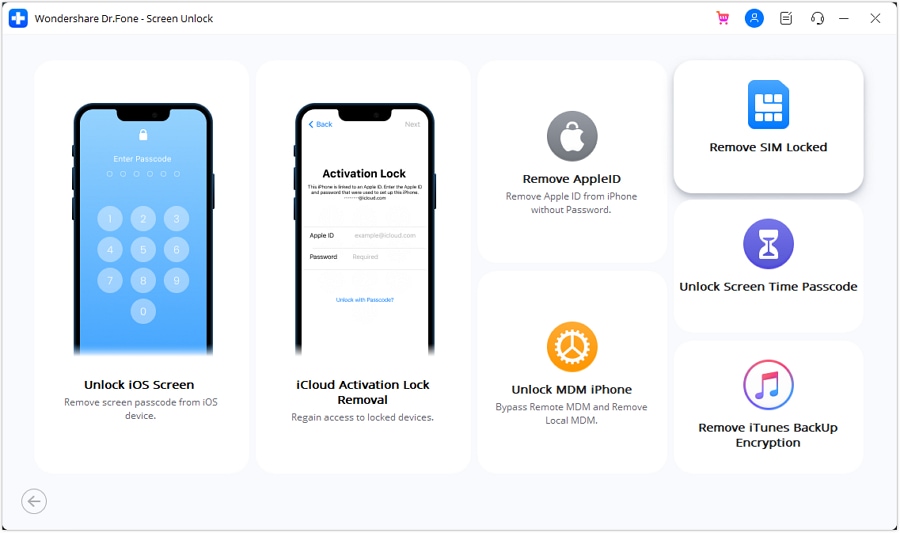
So, this article has talked a lot about iPhone blacklist removal, but what about your trusty SIM card? A little chip plays a significant role in keeping you connected. Sometimes, SIM cards encounter issues, too, and they need a helping hand. Enter Wondershare Dr.Fone – Sim Unlock, your go-to solution for all SIM-related issues like SIMs not supported, locked or invalid SIMs , and SIMs without network service.

Key Features
Check out the marvelous features that Dr.Fone – SIM Unlock can do for your Apple iPhone 15 Pro:
- **Compatibility Galore.**Fone – SIM Unlock works like a charm with various iPhone models and a wide range of carriers. It’s like a universal remote for your SIM troubles.
- **User Friendly.**You don’t need to be a tech wizard to use it. Dr.Fone – SIM Unlock comes with an easy-to-follow interface. It’s like having a friendly guide right on your screen.
- **Quick and Effective.**The best part? It’s quick and efficient. You won’t wait hours to get your SIM back on track. It’s like a fast pass at an amusement park.
- **Anytime, Anywhere.**Fone – Sim Unlock is available whenever you need it. Whether at home or on the go, you can count on it to rescue your SIM.
Step-by-Step Guide
Now, see how you can easily unlock your Apple iPhone 15 Pro’s SIM by following the guide given below:
- Step 1: After downloading and installing the software on your computer, launch Wondershare Dr.Fone. Continue to the Toolbox section, then choose Screen Unlock and click iOS to open the tool in a new window.
- Step 2: Once in the new window, click the Remove SIM Locked function to begin the process.
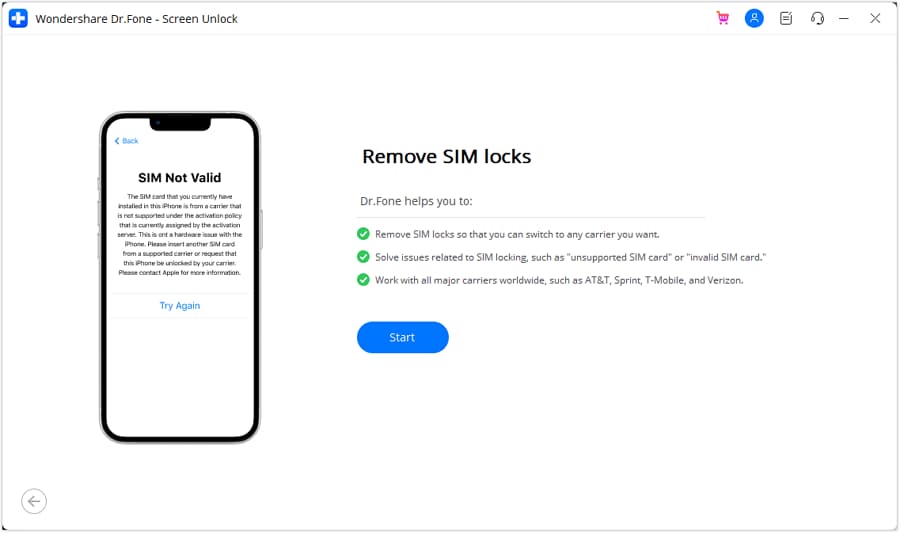
- Step 3: Click Start to begin the process on the next Remove SIM locks page.
- Step 4: The platform will recognize your device and display all its details on the next screen. Continue the unlocking process by clicking the Unlock Now button.
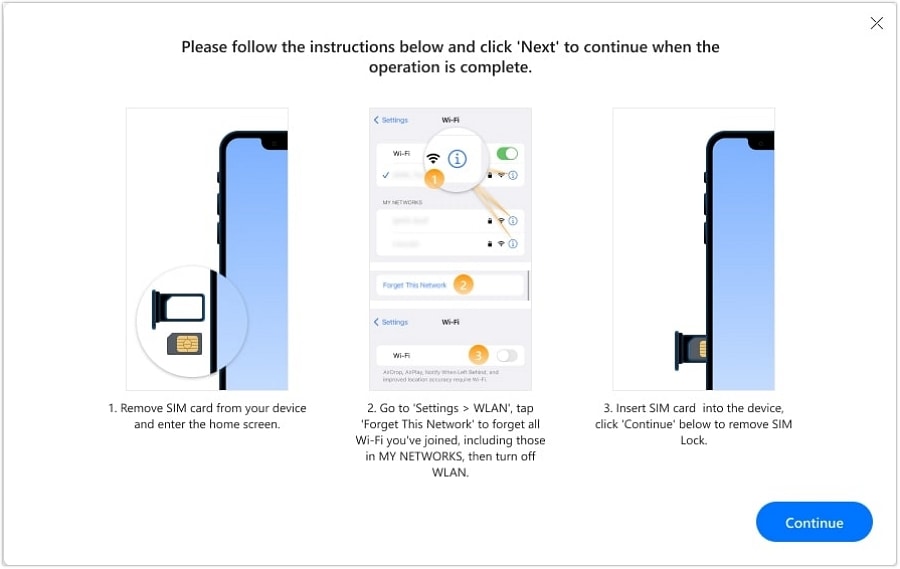
- Step 5: Because this technique requires you to jailbreak your iOS device, you will be prompted to do so first. Click on Jailbreak Guide if you wish to follow a guide. If you want to follow a video guide instead, click on Watch Video.
- Step 6: After that, the screen will prompt you to conduct a series of actions, beginning with removing the SIM card from the iDevice. Continue to Settings, then WLAN, to access the Apple iPhone 15 Pro device’s network settings. Locate the Wi-Fi networks you have joined and select Forget This Network. Remove all linked networks from My Networks and disable Wi-Fi. After that, re-insert your SIM card and tap Continue.
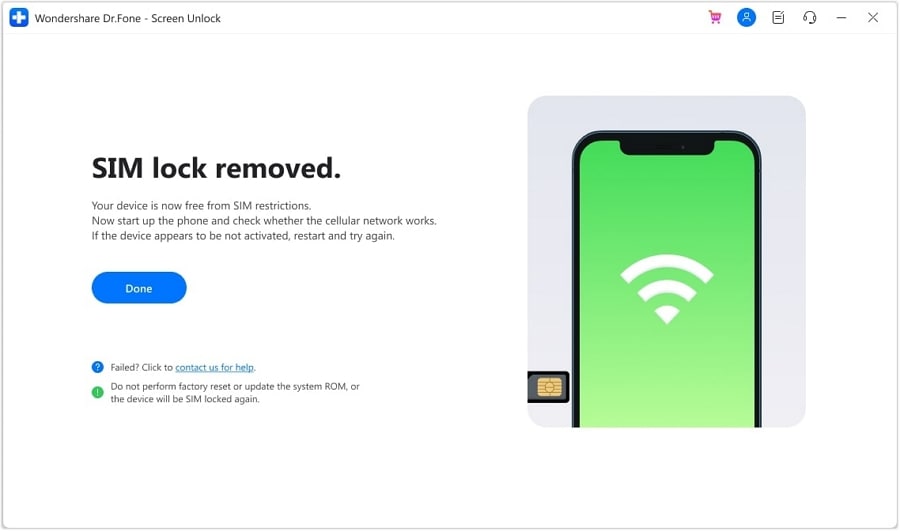
- Step 7: The next screen will display a prompt box showing the unlocking process’s status. After a short while, the window will display the completion notification, and you must click Done to end the process.
Conclusion
In a world where staying connected is vital, understanding and fixing iPhone blacklist issues is crucial. You’ve learned that a blacklisted iPhone can mean no calls, texts, or internet – a frustrating experience. But fear not because you have free iPhone blacklist removal options at your disposal. And remember, prevention is the key. By checking an iPhone’s history before purchase and keeping your device secure, you can avoid blacklist troubles altogether.
Lastly, trust Dr.Fone iPhone SIM Unlocker to rescue you when your SIM card acts up. It’s your go-to solution for SIM-related woes, ensuring you stay connected effortlessly.
4 Ways to Unlock Apple iPhone 15 Pro to Use USB Accessories Without Passcode
How do I unlock my Apple iPhone 15 Pro? I know you’re supposed to connect it to the computer and put it in recovery mode but when I do, it says “unlock Apple iPhone 15 Pro to use accessories.”

You may have had the experience of connecting your Apple iPhone 15 Pro to a computer with USB accessories. Usually, “Unlock Apple iPhone 15 Pro to use accessories“ will appear on the screen. In most cases, enter the passcode to unlock the phone, and you can then proceed with data transfer and management. What to do if you forget your screen lock passcode? Here come the most effective methods for you!
Part 1: Why You Need to “Unlock Apple iPhone 15 Pro to Use Accessories”?
The command comes from Apple’s significant privacy safeguard “USB Restricted Mode”. It means after an hour of your iOS device is unlocked, the system cuts off the lightning port and limits it to charging only. Simply put, when your Apple iPhone 15 Pro is locked for more than an hour, it needs to be unlocked to allow the connection of USB accessories. Sometimes, when you unlock your Apple iPhone 15 Pro screen to use USB accessories, it can’t charge anymore.
In 2017, a password cracking tool called GrayKey was launched, which can bypass any iPhone screen lock passcode. The FBI, the police, and some government agencies have all become GrayKey customers. To combat hackers including GrayKey and protect iOS users’ data security, the USB Restricted Mode feature arrived with iOS 11.4.1 in July 2018 and be improved in iOS12.
Part 2: How to Disable USB Restricted Mode?
If you find this warning annoying or your Apple iPhone 15 Pro not charging when using USB accessories, disabling USB Restricted Mode is an optional solution. However, you have to remember the unlock passcode. All the steps will be presented to you next.
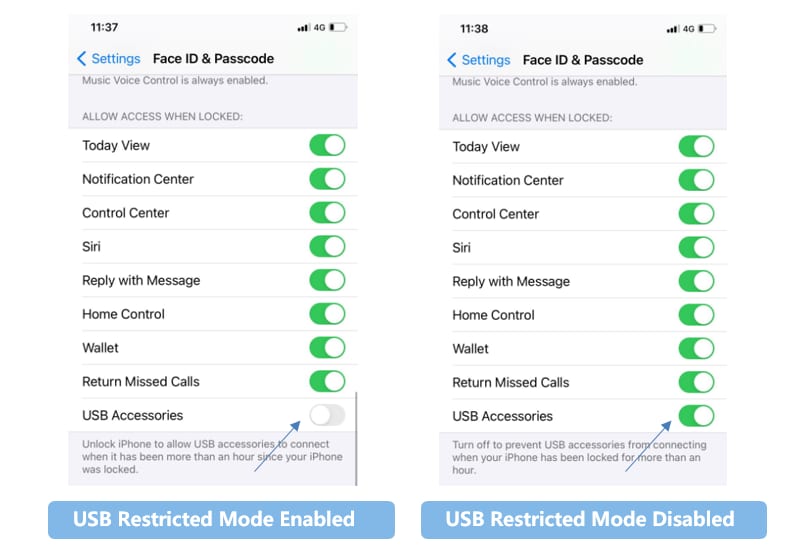
- Step 1: Open Settings on your Apple iPhone 15 Pro.
- Step 2: Click on Face ID & Passcode (or Touch ID & Passcode), and then input your screen passcode.
- Step 3: Scroll to the bottom of the page and find “USB accessories“ in the “Allow access when locked“ column.
- Step 4: Click the toggle button on the right to disable this feature.
After completing all the steps, your Apple iPhone 15 Pro can connect USB accessories anytime, anywhere. However, it is very common to forget to unlock the passcode. Next, we will recommend four solutions to help you use USB accessories without a passcode.
Part 3: How to Unlock Apple iPhone 15 Pro to Use USB Accessories without Passcode via Dr.Fone?
Now, here comes an amazing App with many benefits to solving the problem for you. This is Dr.Fone-Screen Unlock, which is very convenient and fast to use. You must be curious about it. More of its advantages will be introduced to you.
- The application is available on both Mac and Windows.
- No technical skills are required.
- It fully supports iPhone X, iPhone 11, and the latest iPhone models.
- Dr.Fone - Screen Unlock can easily unlock 4-digit or even 6-digit screen passcode, Face ID, or Touch ID.
- No Apple ID and password are needed.
Step 1: The first step, of course, is to download Dr.Fone to your computer and click on “Screen Unlock”.
 safe & secure
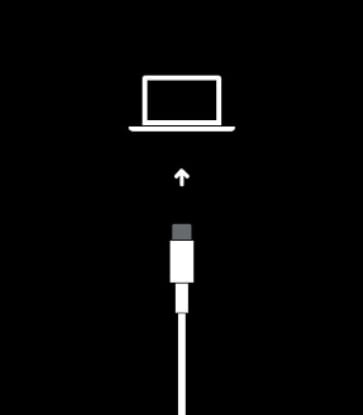
Step 2: Connect your Apple iPhone 15 Pro to the computer with a lightning cable, and choose “Unlock iOS Screen”.

Step 3: Follow the guides to boot your device in Recovery or DFU mode. The Recovery mode is recommended for iOS lock screen removal by default. If you fail to turn on recovery mode, you can turn to activate DFU mode. DFU means Device Firmware Upgrade, and the operation is more mandatory.

Step 4: Click “Start” to download the firmware. After the download is successful, select “Unlock now” and wait a few minutes, the passcode will be removed from your device.

After that, you could set up your Apple iPhone 15 Pro as a new one and unlock your screen to use USB accessories without a passcode.

There is no doubt that you may worry about losing all your data while bypassing the Apple iPhone 15 Pro lock screen. But honestly, there is no tool on the market today that can preserve data to unlock an iPhone. Therefore, it is necessary to back up data in your daily life. Dr.Fone-Phone Backup provides you with a full range of data backup solutions, you can click the link below to learn more.
This guide will teach you about how to unlock iphone using 5 feasible ways.
Part 4: How to Unlock Apple iPhone 15 Pro to Use USB Accessories without Passcode via iCloud?
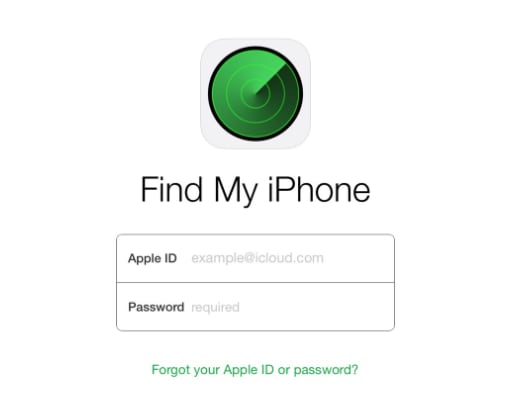
With iCloud, you can quickly clean up your Apple iPhone 15 Pro, remove screen locks, and help unlock your device. But, you have to know that all your data will be erased. Make sure your Apple iPhone 15 Pro has the “Find My iPhone” function enabled, otherwise your device will be offline.
Step 1: Open your computer or another iOS device, and sign in with your Apple account.
Step 2: Click on “All Devices”, choose your Apple iPhone 15 Pro, and then “Erase iPhone”.
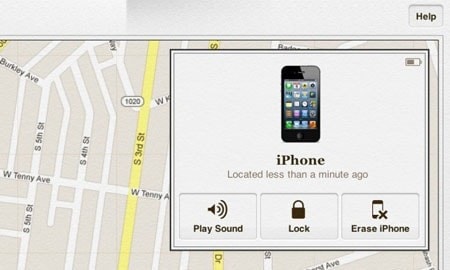
Now, your Apple iPhone 15 Pro will reboot without a passcode. Then, you can unlock Apple iPhone 15 Pro to use accessories and bypass the passcode.
Part 5: How to Unlock Apple iPhone 15 Pro to Use USB Accessories without Passcode via iTunes?
There is currently no way to unlock an iPhone without erasing all data. Luckily, iTunes can help back up your data before removing it. Please note that this way is only possible if the Apple iPhone 15 Pro device has synced data in iTunes before.
- Step 1: Connect Apple iPhone 15 Pro to a computer with a USB accessory and turn on iTunes. Then iTunes will make a backup for your phone.
- Step 2: Choose “Restore iPhone”.

Wait for a while and you could unlock the screen to use USB accessories. However, in step one, you may need to enter your passcode to get stuck during the process. Therefore, this method is not the most efficient.
Part 6: How to Unlock Apple iPhone 15 Pro to Use USB Accessories without Passcode via Recovery Mode?
If you have forgotten your Apple ID or password and have not synced iCloud and iTunes, you can choose recovery mode. It will remove all your passcode and data as well.
- Step 1: You need to prepare a Mac or PC (Windows 8 or later).
- Step 2: Turn off your Apple iPhone 15 Pro.
- Step 3: Put your device in recovery mode. This step might be a little complicated, but don’t worry, we’ll walk you through it step by step.
1. Find the button on your device, it will be useful then.
- iPhone SE (1st generation), iPhone 6s, and earlier: The Home button.
- iPhone 7 and iPhone 7 Plus: The Volume down button.
- iPhone SE (2nd and 3rd generation), iPhone 8, iPhone 8 Plus, iPhone X, and later devices: The side button.
2. Quickly press and hold the button while connecting your phone and computer until the recovery mode appears.
Step 4: Find your tool in iTunes on the computer. Choose Restore and this process will take a few minutes.
Step 5: Unplug your tool and use your Apple iPhone 15 Pro without a passcode.
Now, you’ll get an iPhone which is like being factory reset. And you could unlock the screen to use USB accessories when you forget the passcode.
Part 7: Hot FAQ about USB Accessories on iPhone
Q1: What is the feature of USB Accessories on iPhone?
From USB-A to the latest, USB-C. Also, most iPhones use a proprietary Lightning port.
Q2: Why does My iPhone Think My Charger is a USB Accessory?
It is related to the capacity of the charger. If a low-capacity charger is used, your device must regard it as a USB port because the USB port charges at a lower rate than a good wall charger. Another possibility is that the cable being used is flaky.
Q3: What to Do If My iPhone Not Charging after Unlock to Use Accessories?
- Step 1: Disconnect your tool from the accessory.
- Step 2: Unlock your device.
- Step 3: Connect the USB accessory again.
If it doesn’t work, please contact customer service of Apple.
Conclusion
It is very common to use USB accessories to connect iPhone and computer. Sometimes, we may forget the password, or cannot unlock the screen due to system failure. There are many ways to unlock Apple iPhone 15 Pro to use the accessories in the article. Finally, we recommend everyone to use Dr.Fone - Screen Unlock, a helpful and convenient tool.
 safe & secure
How To Change Your Apple ID on Apple iPhone 15 Pro With or Without Password
The Apple ID is a unique identifier used to log in to all Apple services, including iCloud, the App Store, Apple Music, and more. You can track purchases and manage your account settings through your Apple ID. But what if you need a new one for security or moving to a new location?
Whatever the reason, learning how to change your Apple ID on your iPad is straightforward. And this guide will show the steps and provide some tips at the end.

Part 1: Reasons Why You Might Need To Change Your Apple ID
Your iOS devices contain most of your digital data. That includes your contact list, email, financial information, and social media passwords. All this data is valuable - others can use it to do identity theft, fraud, and other crimes.
If you feel the existing Apple ID isn’t secure enough, it’s a good idea to change your Apple ID on your iPad or other devices. Aside from this, there are a few scenarios where you might find yourself needing to change your details:
You No Longer Use the Email Address or Phone Number Associated With Your Apple ID
Life moves fast, and sometimes contact info changes. If the email or phone number linked to your Apple ID becomes outdated, it’s a good idea to update it. That way, you won’t miss out on vital notifications or have trouble recovering your account if needed.
You Want To Simplify Your Online Life
If you have multiple email addresses, you may want to consolidate them into one email address. It can make it easier to manage and remember your online accounts, including your Apple ID.
You Are Relocating to a Different Region or Country
Moving abroad? Your Apple ID may need an update to match your new location. It ensures access to region-specific apps and services. You need to have a few things in place before you can do that: add a payment method for your new location, cancel your subscriptions, and spend your store credit. Aside from that, you will also need to change your Apple ID country or region.
Changing your Apple ID can be smart, ensuring your digital life stays up-to-date, secure, and tailored to your needs. It’s not complicated, and it’s all about making your Apple experience better suited to you. So, go ahead and learn how to change your Apple ID on your iPad in the following sections.
Part 2: How To Change Apple ID on iPad Without Losing Data?
If you receive a notification from Apple about suspicious account activity, it’s time to act. Before you learn how to change the Apple ID on an iPad – for yourself or others, here are some common signs of a compromised Apple ID:
- A login attempt from a device or location that you don’t recognize
- A password change that you didn’t know about
- Unauthorized messages or purchases
- A password that no longer works
- Unfamiliar account details
If you suspect unauthorized access to your Apple ID, below is what you can do.
Steps To Change Your Apple ID to a Different Email Address
If you are worried about losing data such as purchases and contacts, don’t worry. You can update your Apple ID account anytime without disrupting your data. Here’s a step-by-step guide on how to change your Apple ID email address. Just sign out of all Apple services and devices that use your account first.
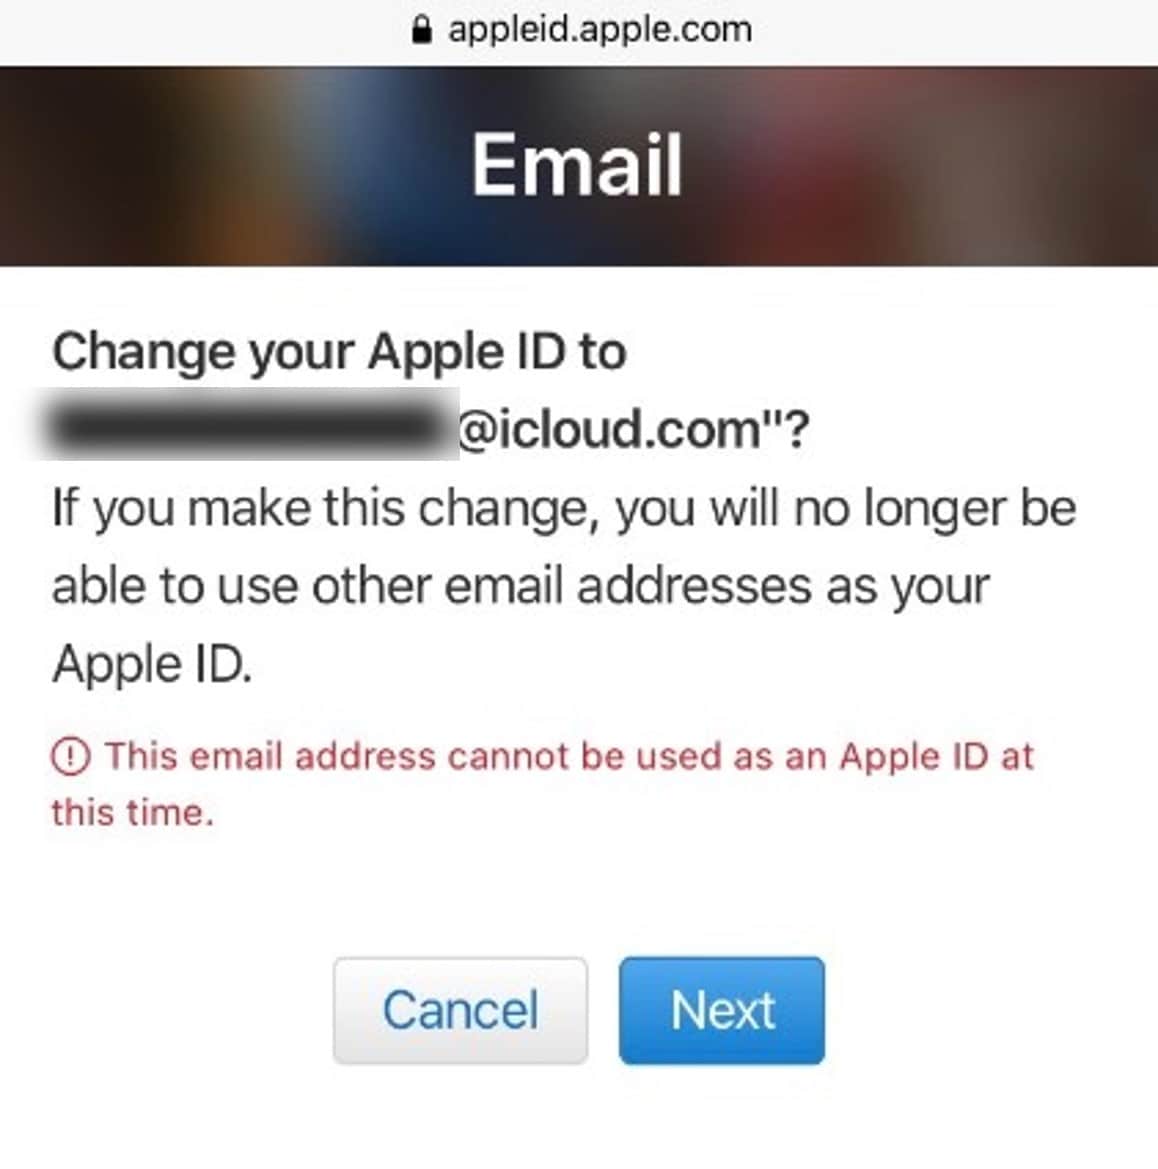
- Step 1: Visit the Apple ID official website and log in to your account credentials.
- Step 2: Once logged in, select Apple ID in the Sign-In and Security section.
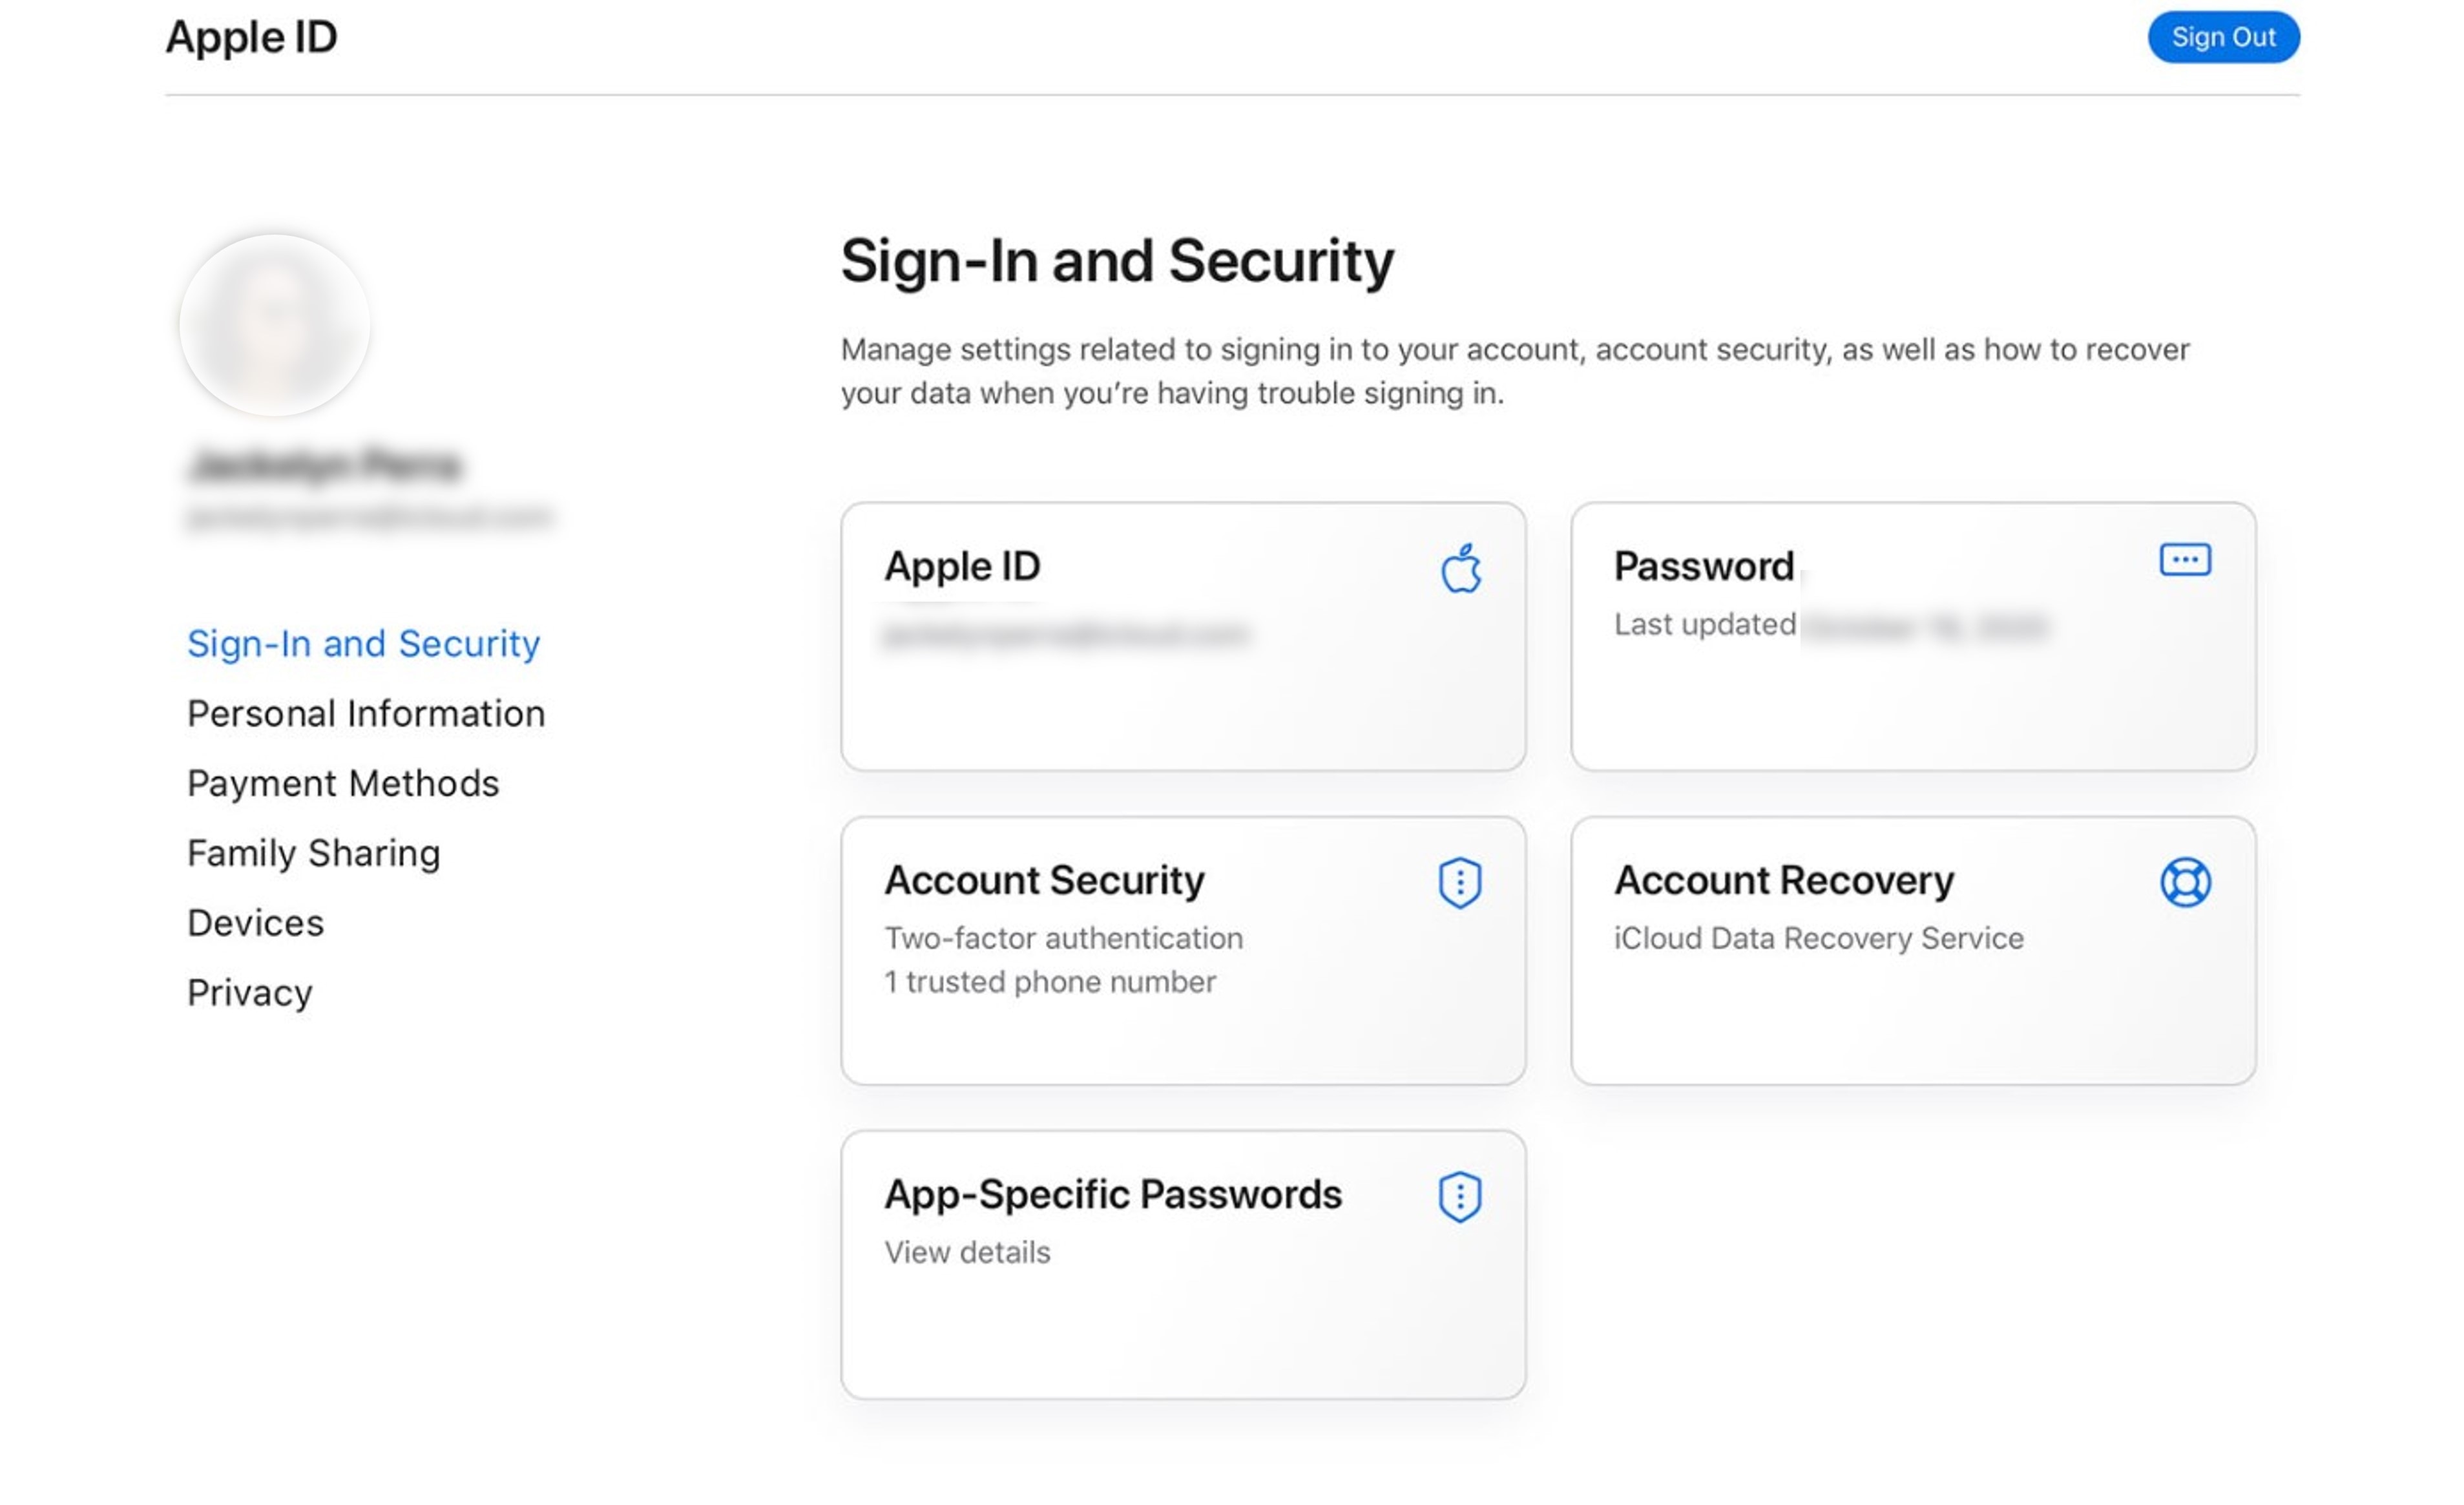
- Step 3: From the Apple ID pop-up window, enter your new Apple ID in the Change your Apple ID text field.
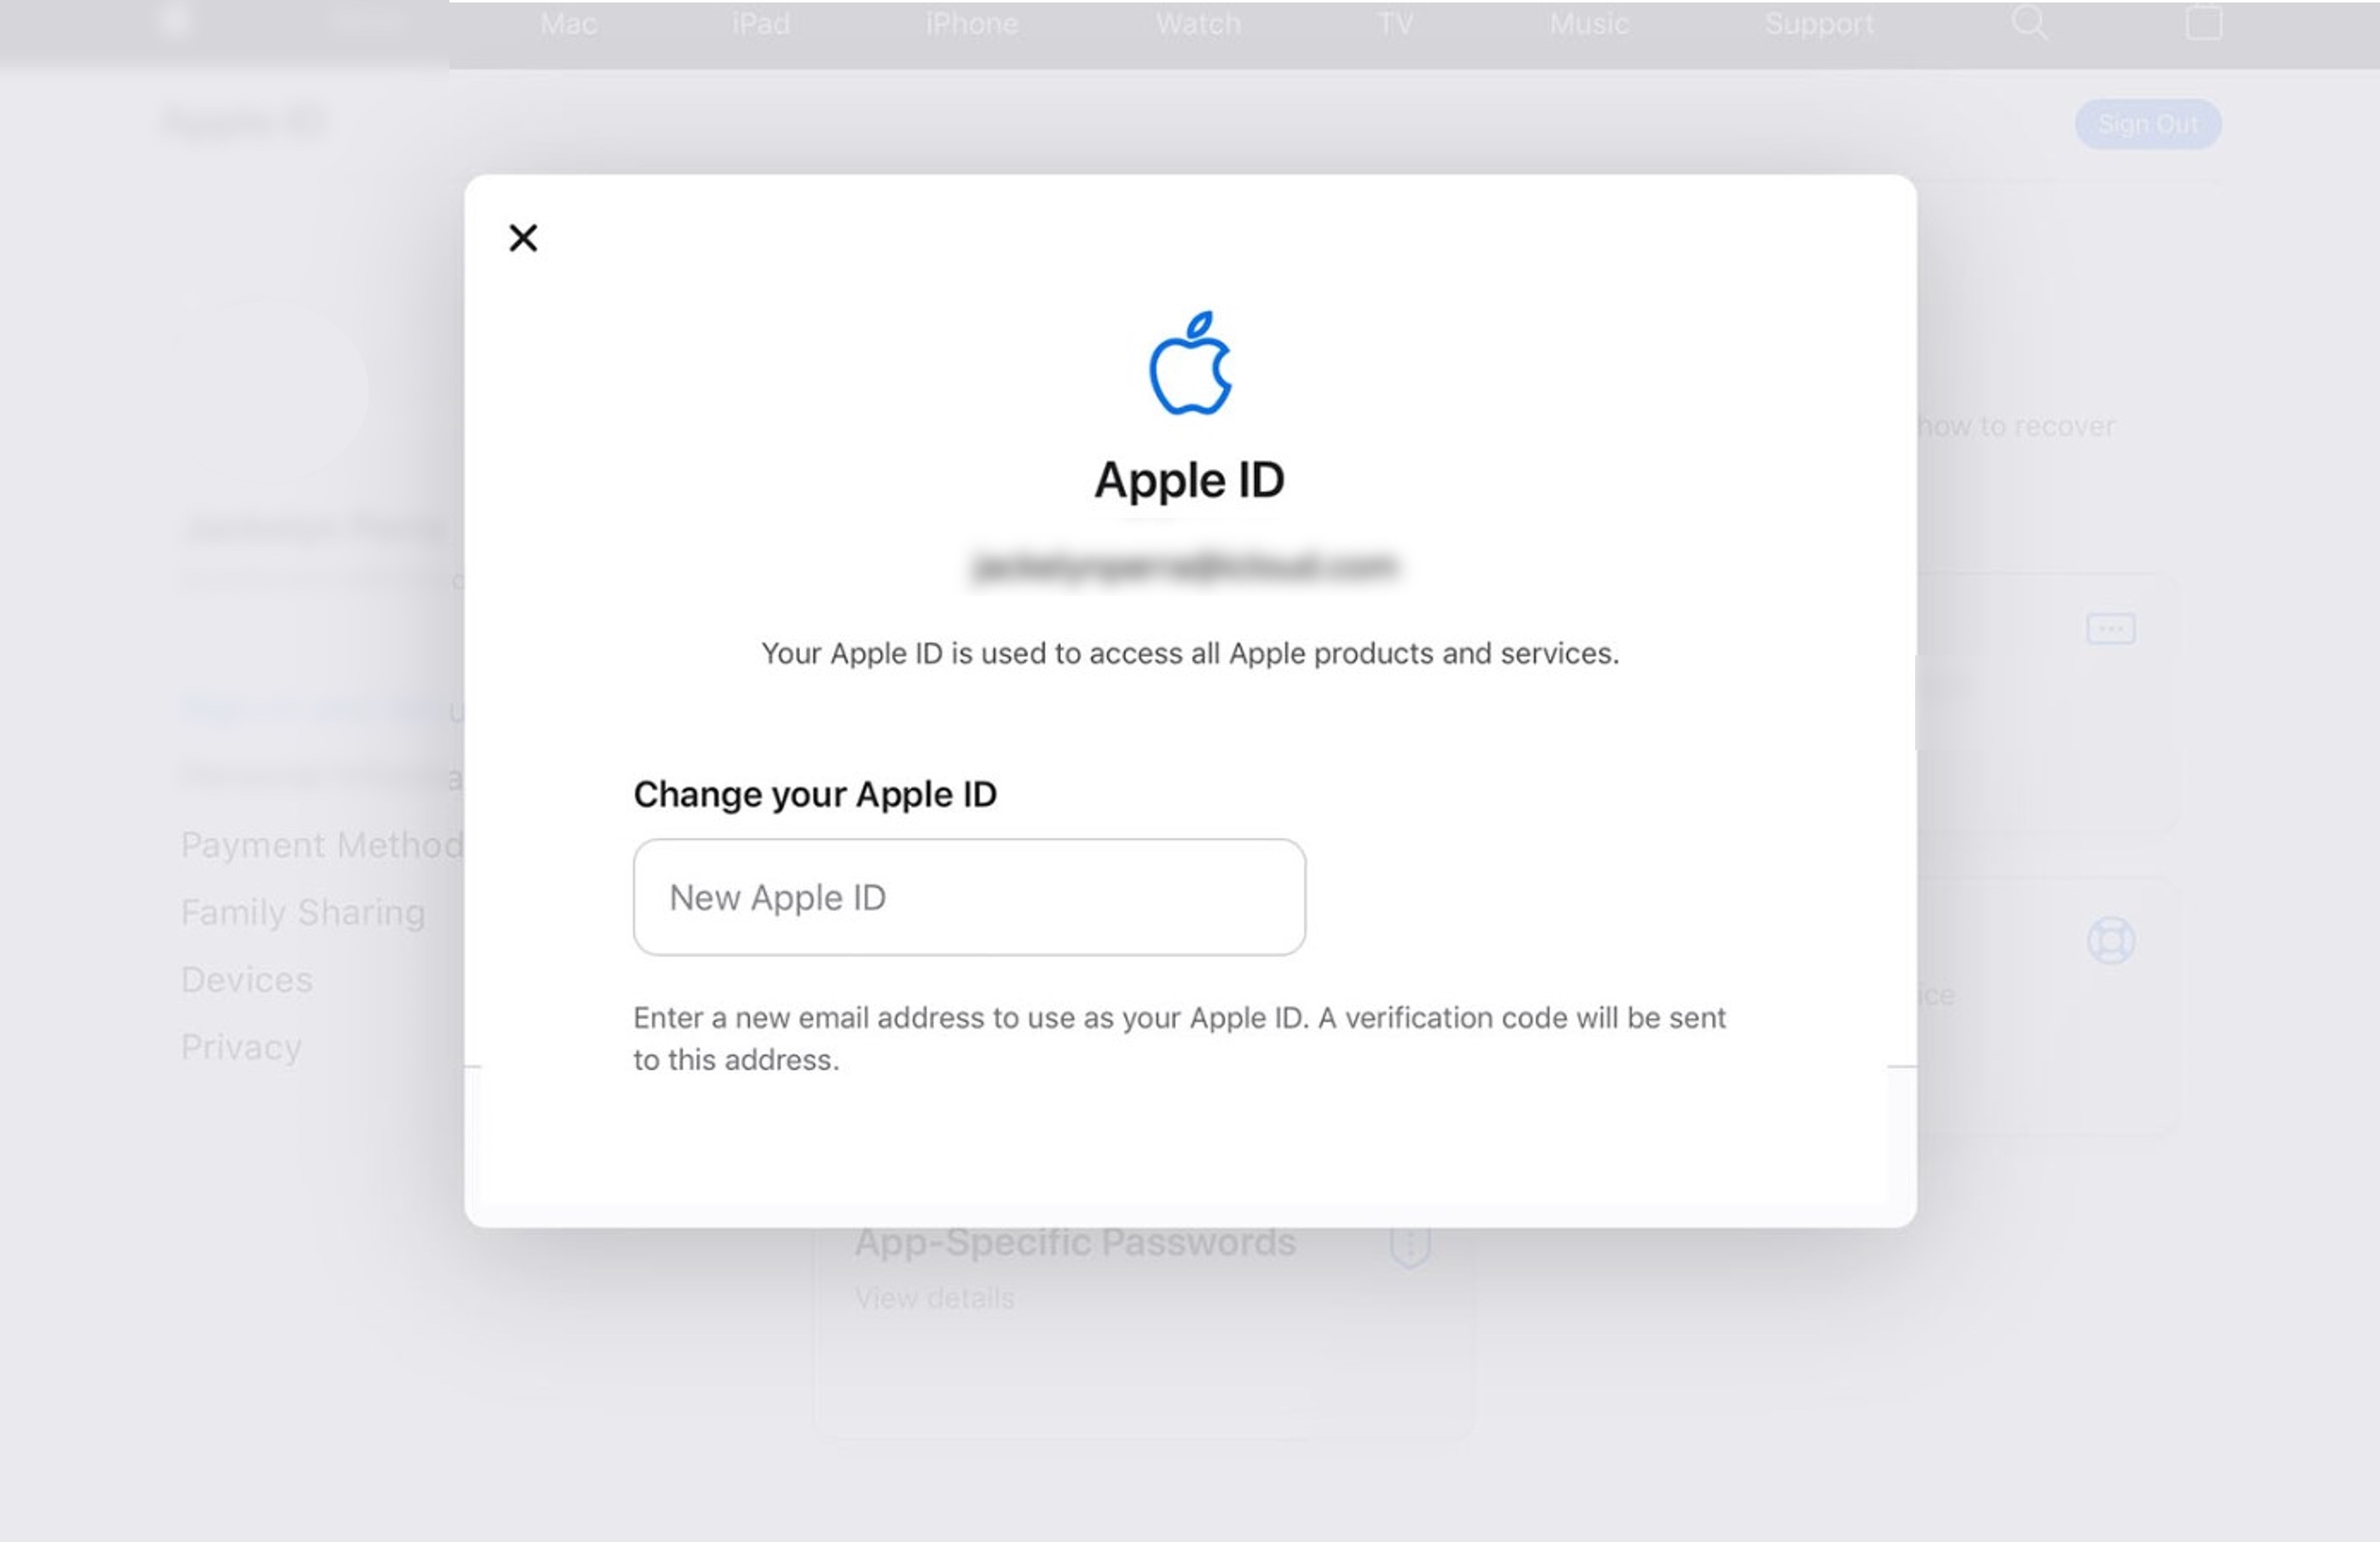
- Step 4: Select Change Apple ID to proceed.
- Step 5: Check your email to get a verification code sent by Apple to ensure that only you can change it to a third-party email address. Enter the code to complete the update.
Step 6: Sign in to Apple services such as iCloud and Messages, using your new Apple ID to continue sharing with others.
Steps To Change Your Apple ID to a Different Mobile Number
Do you want to use Your Apple iPhone 15 Pro number as your Apple ID username? It’s possible, but it depends on your location, how you created your account, and what version of iOS you’re using.
If you’re in China mainland or India, and you’re using iOS 11 or later, you can create a new Apple ID with Your Apple iPhone 15 Pro number as the username. However, Your Apple iPhone 15 Pro number must be (+86) or (+91). So, if you’re thinking of, “How can I change my Apple ID on my iPad if it’s a mobile phone number?” then this guide is for you:
- Step 1: Log out of all Apple services and devices currently signed in with your Apple ID, except the one you’re using to change your Apple ID.
- Step 2: On your iPad, go to Settings > [your account name] > Sign-in & Security.
- Step 3: Tap Edit next to Email & Phone Numbers.
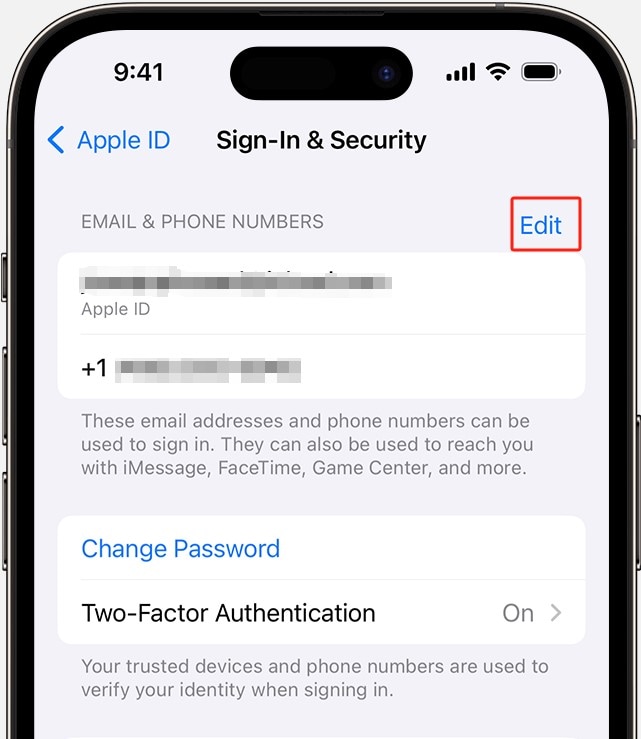
- Step 4: Go to the Delete icon next to your mobile number and follow the directions given.
- Step 5: Enter the code sent to the mobile number you added as your new Apple ID to verify it.
- Step 6: Log into all Apple services using your new Apple ID.
Even if you can’t change your Apple ID on your iPad to a mobile phone number, you can still associate it with a phone number on your account page. It means you can use a different email address or mobile phone number to log in to your Apple ID. See the next sections for more information on the workarounds you can try.
Part 3: What To Do if You Cannot Change Your Apple ID on iPad?
Changing your Apple ID on an iPad is usually easy. However, there can be setbacks during the process. Now, here’s what to do if you find yourself unable to do it and why it might be happening:
Try Again Later
If you encounter errors during the process, give it a little time and try again. Mayne it is because you changed your Apple ID on your iPad to an iCloud email address within 30 days.
Check if Apple ID Is Already in Use
Apple IDs are unique, and you can’t have two identical ones. If you’re trying to change your Apple ID to one that’s already in use, you’ll hit a roadblock. Ensure that the new Apple ID you want isn’t already taken. Remove it from the family member’s account if they are using it.
Your Apple ID Is an Email Address
If your current Apple ID is an email address, you won’t be able to change it to a mobile phone number directly. Instead, you can add an email or phone number to your account for contact purposes.
If you’ve addressed these issues and still can’t change your Apple ID, don’t worry. Apple customer support is available to assist you with account-related challenges. Contact them for guidance and solutions tailored to your situation.
However, if you can’t change your Apple ID on your iPad because you forgot or don’t have access to the password, you can use a third-party tool such as Dr.Fone. This tool is easy to use and can help you unlock your iPad and remove the Apple ID in a few clicks.
Part 4: Using Wondershare Dr.Fone
Dr.Fone Screen Unlock (iOS) tool is your go-to solution for unlocking iOS devices without a passcode. The best part? It is easy to use for users of all technical backgrounds. With Dr.Fone, you can unlock iOS screens protected by 4 to 6-digit passcodes, Face ID, Touch ID, and more.
But it doesn’t stop there; Dr.Fone can also help remove the iCloud activation lock, unlock Apple ID without a password, and much more. This powerful tool is a lifesaver for iOS users, supporting the latest iPadOS 17, iOS 17, and iPhone 14.
Step-by-Step Guide to Removing Apple ID on iPad Using Dr.Fone
Dr.Fone can bypass the Find My/Find My iPhone feature to remove your Apple ID from your iPad, iPhone, or iPod Touch. Follow the steps below to learn how to use this feature on your iOS device.
Step 1: Get Wondershare Dr.Fone from their website and install it on your computer.
Step 2: From the app’s Toolbox homepage, click Screen Unlock, and select iOS.
- Step 3: Select Remove AppleID from the available Screen Unlock tools.

- Step 4: Connect your iPad or other iOS device to your computer, then click Unlock Now to continue.

- Step 5: Click Yes to confirm your device has a screen lock. Otherwise, it won’t work.

- Step 6: Enable the Two-Factor Authentication on your iPad so you can unlock your Apple ID. Then, click Yes to proceed.

- Step 7: Follow the on-screen instructions to put your iPad in Recovery Mode.

- Step 8: The next screen will demonstrate the Device Model information. Select an option from the System Version dropdown list and click Start.
- Step 9: The iOS firmware will start downloading, and you can see the progress on the next screen. If you’re experiencing slow download speeds, click Copy to get the link and download it.

- Step 10: Review the Device Model and System Version, then click Unlock Now to proceed.

- Step 11: From the Warning dialogue box, enter the code shown in the text field, then click Unlock.

- Step 12: Wait and refrain from using your device while it’s connected to avoid a bricked device.

- Step 13: Once finished, click Done, then check your iPad. If your Apple ID is not unlocked, you may need to click Try again to restart.

Best Practices To Secure Your iOS Data
Changing your Apple ID on your iPad can be a great way to protect your privacy and security. However, it’s important to take steps to ensure that your iOS data remains safe during the process. Here are some tips to help you do just that:
- Backup Your Files
Before you change your Apple ID on your iPad, create a backup of your data so you don’t lose important files. You can create a backup using iCloud or Dr.Fone.
Dr.Fone also allows you to view the contents of your backup before you restore it, so you can ensure that you’re getting back exactly what you want. This way, you can restore your data to your new Apple ID if needed.
- Password Check
Review your current passwords. Change any weak or compromised ones, including your Apple ID password, and never share it with anyone.
- Avoid Sharing an Apple ID
It’s best practice for each family member to have their own Apple ID. Sharing one can lead to problems with app purchases, data syncing, and privacy.
- Enable Two-Factor Authentication (2FA)
If not already enabled, turn on 2FA for an extra layer of security. It’s simple and highly effective.
Conclusion
Changing your Apple ID on your iPad or other iOS devices is a simple process that can help you protect your privacy and information. With the tips above, you can ensure your iOS data is safe and secure during the switch.
And if you need to remove your Apple ID without a password, Dr.Fone is a good option. Dr.Fone is a powerful iOS toolkit that can help you with various phone solutions. It’s easy to use and can help you solve mobile problems in just a few minutes.
Also read:
- [New] 2024 Approved Achieve Professional-Grade Aesthetics Top 10 Insta Grid Makers
- [New] Free Recording Exploring Apowersoft's Screen Capture
- [New] In 2024, Channel Labeling 101 How to Make Yourself Hard to Ignore
- 4 Steps to Transfer Pre-Booked Disk Partitions to a New Drive
- Detailed Analysis of YouTubes Versus DailyMentions for 2024
- How To Change Your Apple ID on Apple iPhone 14 Pro With or Without Password | Dr.fone
- How to Unlock Apple iPhone SE Without Passcode? | Dr.fone
- In 2024, Complete Guide For Apple iPhone 6s Plus Lock Screen | Dr.fone
- In 2024, Converting ZIP to SubRip (SRT) Format A Step-by-Step Guide
- In 2024, Disabled Apple iPhone 12 How to Unlock a Disabled Apple iPhone 12? | Dr.fone
- In 2024, Forgot Locked Apple iPhone 12 Pro Max Password? Learn the Best Methods To Unlock | Dr.fone
- In 2024, How to Unlock Disabled Apple iPhone 6/iPad Without Computer | Dr.fone
- Revolutionizing Portability: A Deep Dive Into the Lenovo ThinkPad X1 Fold
- Secure Settings for Teen & Kid’s PlayStation 5
- Title: A Comprehensive Guide to iPhone 15 Pro Blacklist Removal Tips and Tools | Dr.fone
- Author: Amelia
- Created at : 2024-10-18 16:44:46
- Updated at : 2024-10-20 18:33:07
- Link: https://iphone-unlock.techidaily.com/a-comprehensive-guide-to-iphone-15-pro-blacklist-removal-tips-and-tools-drfone-by-drfone-ios/
- License: This work is licensed under CC BY-NC-SA 4.0.