
Apple iPhone XS Max Backup Password Never Set But Still Asking? Heres the Fix | Dr.fone
Apple iPhone XS Max Backup Password Never Set But Still Asking? Here’s the Fix
Part 1: Why Do iTunes Ask Me for iPhone Backup Password?
When you use iTunes to create a backup, the backup will probably have a password that iTunes automatically create. This is for privacy reasons. Hence, it might ask for an iTunes backup password never set by you!
In most cases, this occurs when the Encrypt Backup option is activated. As an official iOS feature, its purpose is to provide iOS users with the iTunes backup encryption for further security.
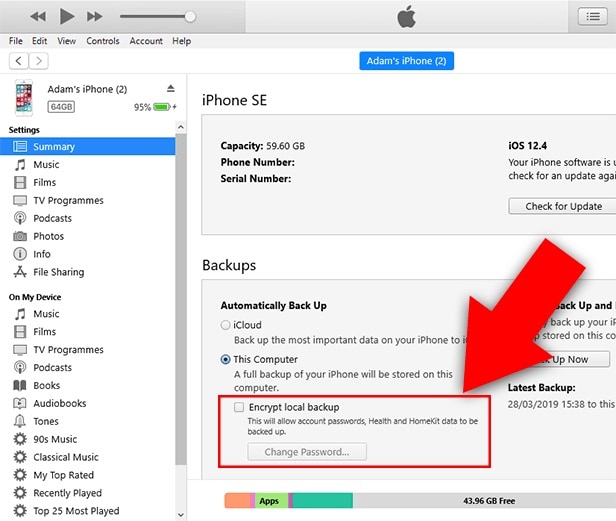
Unfortunately, this capability may also become problematic if you inadvertently take a backup without being able to provide the password. For example, you may have to enter the password for your Apple iPhone XS Max backup unlocking never set by you.
But the good news is you have some possible fixes. So, let’s talk about them.
Part 2: 4 Possible Ways to Fix Asking for iPhone Backup Password
Many iPhone users have problems with iTunes when they back up their devices.
One of the most common issues is that people are asked for their iPhone backup password never set, but they need to know what it is. This can be frustrating because you can only back up your device if you have the password.
There are a few possible ways to fix this problem. Try resetting your password or using a different computer to back up your device. You could also try using a third-party software tool like Dr.Fone - Screen Unlock.
1. Try all passwords you use on iPhone
When iTunes prompts you for an iPhone backup password never set, what should your initial course of action be?
To get out of this predicament in the simplest way possible, try entering every potential password you will likely have used. In most cases, individuals will use the same password for many accounts.
A significant possibility is that you encrypted the iTunes backup with the same password from the iCloud account.
Therefore, before doing anything further, try all passwords to configure your iTunes account. For example, try entering 0000, 123456, name123, or 1111.
2. Find the password from Keychain on macOS
You may also attempt to find the password for the iTunes backup using the keychain approach if you are working on a Mac.
The likelihood of success with this approach is relatively low. However, it is still worthwhile to try it, particularly if you have also synchronized your iTunes account with your Mac.
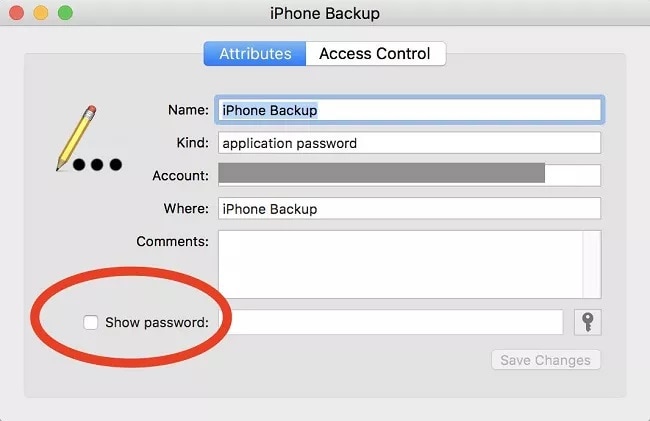
- On your macOS, go to Utilities by clicking the Applications menu item. At this point, launch the Keychain Access app and look for your Apple iPhone XS Max backup.
- To open a new dialogue box, double-click the most recent backup file, and you will see one appear before you.
- On this page, choose Show Password to get the password for the Apple iPhone XS Max backup. However, you will first be prompted to provide the administrator password associated with your iCloud account to recover the password.
3. “Reset All Settings”
Resetting the password is another option at your disposal if you encounter the Apple iPhone XS Max backup password never set problem. How you do this will be different depending on the version of iOS that you have installed.
Here are what you can do with your iOS smartphone if it has iOS 11 or a later version:
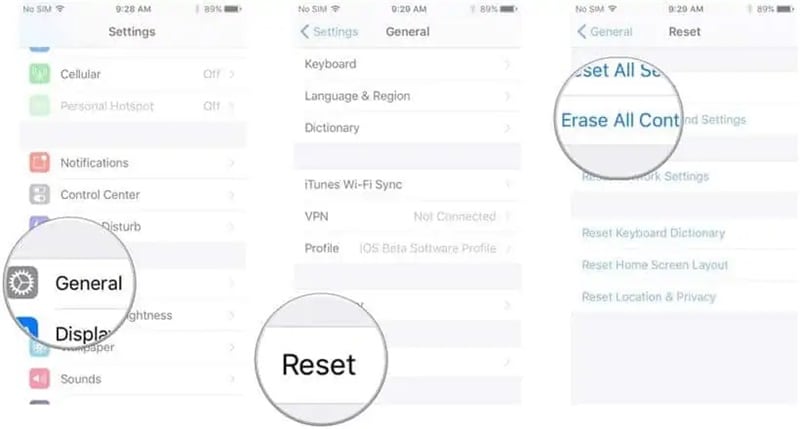
Step 1: Unlock your Apple iPhone XS Max, and then open the Settings app on your device.
Step 2: After locating the General menu, go to the Reset menu and then hit the Reset All Settings button. Please confirm your action by providing the password for your Apple iPhone XS Max.
Step 3: Once the reset has been completed, your previous password will be deleted.
Step 4: The next thing you should do is take a fresh backup of your Apple iPhone XS Max using iTunes, and then establish a new password for the backup that iTunes creates.
You will need to use an alternative strategy, which includes a factory reset if you use an older version of the iOS firmware than iOS 11.
Step 1: Before continuing, it is highly recommended that you create a backup of the data on your Apple iPhone XS Max using iCloud.
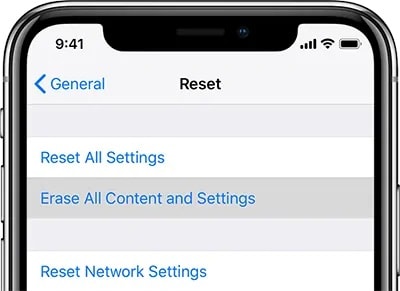
Step 2: After you have opened the Settings app, go to the General menu, then to the Reset menu, and finally to the Erase All Content and Settings option.
Step 3: Confirm that you want to reset your Apple iPhone XS Max to factory settings, and wait until it is done.
Step 4: Once the factory data reset is finished, you must restore your iCloud backup. To do this, follow the steps for setting up iOS until you reach the Apps & Data option.
Step 5: Create a new backup in iTunes and change the password for the existing backup in iTunes.
You should be aware that resetting the Apple iPhone XS Max device to factory settings will not make your encrypted backups accessible again.
On the other hand, it does make it possible for you to generate a fresh backup in iTunes that is not encrypted.
4. Dr.Fone-Screen Unlock
First step: After installing Dr.Fone on your device, please run the program and look for the red button labeled “Screen Unlock.”

Step 2: While in the interface for Screen Unlock, navigate to the bottom right of the screen and tap on the feature labeled “Remove iTunes BackUp Encryption.” This will allow you to proceed.

Step 3: When brought to this screen, please use a USB cord to connect your iOS device to your personal computer. If Dr.Fone can identify this relationship, the following picture will appear for you to see.
Please read the following three notes carefully before clicking the “Remove Now” button:
- Check to ensure that “Find My iPhone” is not turned on.
- During this procedure, you should not launch “iTunes.”
- During the process, your Apple iPhone XS Max will restart.

Step 4: If you have an iTunes backup, Dr.Fone may automatically verify it and delete it. This encryption will be removed once the percentage on the progress meter reaches the end. This procedure won’t take a lot of time at all.

Step 5: The encryption of the iTunes backup has been successfully erased! Your backed-up data may be quickly restored, transferred, wiped clean, and backed up again. Hence, you can enter the password to unlock your Apple iPhone XS Max backup never set in the first place!

The Bottom Line
There are four ways to fix the problem if iTunes keeps asking for your Apple iPhone XS Max backup password. The first method is to try all the passwords you use on your Apple iPhone XS Max. You can try finding the password from Keychain on macOS if this does not work. Another option is to “Reset All Settings” on your Apple iPhone XS Max.
Lastly, Dr.Fone-Screen Unlock is a program that can help you bypass the passcode and get into your backups. So, what are you waiting for? It’s time to avoid the problem of iTunes backup password never set.
How to Unlock Apple iPhone XS Max Passcode Screen?
Apple offers numerous ways to protect users’ iPhone data from other people, such as Face ID, Touch ID, and screen passcode. Screen passcode has its own significance. Usually, it comes to adoption if your Face ID and Touch ID may not work. In other cases, if you restart your device, and didn’t unlock it for 48 hours, or reset it, you may require to unlock your device through a screen passcode.
What would happen if you accidentally forgot your Apple iPhone XS Max screen passcode? After entering it about 5 times, your Apple iPhone XS Max will get locked for a few minutes with a message on top. It usually gets frustrating when you cannot unlock it with your screen passcode.
This article comes up with different resolutions and techniques for unlocking your Apple iPhone XS Max. Go through the methods to figure out how you can bypass iPhone screen passcode with ease.
Part 1: Unlock iPhone Passcode Screen by Screen Unlock
You might be anxious if you have locked your Apple iPhone XS Max and forgotten the passcode. However, there is no need to worry, Dr.Fone - Screen Unlock is here at your service. The tool handles the Apple iPhone XS Max passcode screen problem and removes it effortlessly. The user doesn’t need any technical knowledge beforehand to use the tool.
Dr.Fone - Screen Unlock (iOS)
Unlock iPhone Passcode Screen.
- Completely compatible with different lock screens to get you out of the problem.
- It helps the iOS user bypass iPhone passcode and iCloud activation locks
- If you have forgotten your Apple ID password, Dr.Fone Screen Unlock enables you to unlock your phone and log into a new account in seconds.
- Dr.Fone also helps the user bypass the MDM to access the Apple iPhone XS Max device effectively.
3981454 people have downloaded it
Step-by-Step Guide to Bypass iPhone Lock Screen
If you are unfamiliar with using the Screen Unlock feature to get rid of the problem, allow us to walk you through the procedure.
Step 1: Launch Wondershare Dr.Fone
First, download and launch Dr.Fone – Screen Unlock on the computer. Then, click on “Screen Unlock” from the interface. After that, connect your iOS device to the system via lightning cable.
Step 2: Booting the Apple iPhone XS Max device
Tap on “Unlock iOS Screen” afterward. Now, Follow the on-screen instructions to boot your phone in Recovery or DFU mode. If you cannot activate the recovery mode, click the button line to work on the DFU mode.

Step 3: Unlocking the iPhone/iPad
After the DFU mode is activated, confirm the Apple iPhone XS Max device information, and click on “Download.” After it is downloaded, tap on “Unlock Now.”

Step 4: Device Unlocked Successfully
After the DFU mode is activated, confirm the Apple iPhone XS Max device information, and click on “Download.” After it is downloaded, tap on “Unlock Now.”
Part 2: How to Remove iPhone Screen Lock Using the Recovery Mode
There are other ways to unlock screen passcode. For starters, you can consider resolving this issue using the Recovery mode. It is a troubleshooting operation that lets iTunes fix the issue and erase the old passcode. Follow the procedure below vividly:
Step 1: Connecting Process
The first step is to connect the Apple iPhone XS Max to computer and then launch iTunes. Force restart the phone after the phone is connected.
Step 2: Activating the Recovery Mode
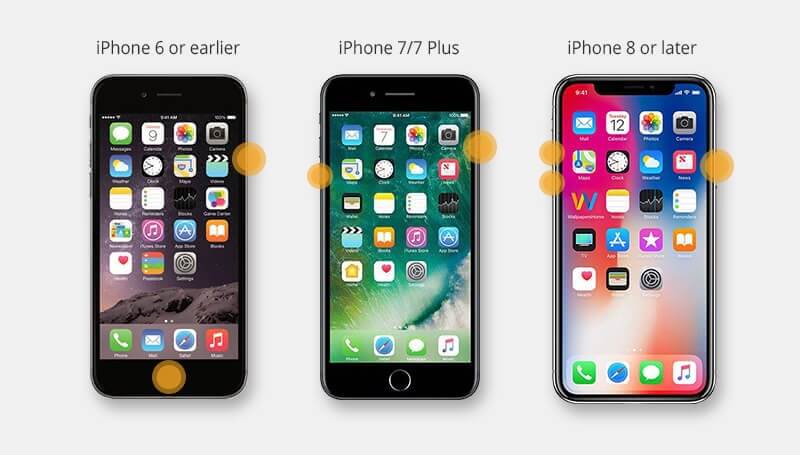
There are different ways to activate the Recovery mode based on your Apple iPhone XS Max models.
- Press and release the Volume Up button if you are on iPhone 13/12/11/XS/XR/X/8 or iPhone 8 Plus. Again, press and release the Volume Down button. Now, press and hold the Side button to activate the Recovery Mode.
- Similarly, if you are an iPhone 7 or iPhone 7 Plus user, press and hold the Volume Down and Side button simultaneously until the Recovery Mode screen doesn’t show.
- Suppose you own an iPhone 6S or earlier, an iPad, or iPod Touch. Press and hold the Home button and the Side buttons. Until the Recovery Mode enables, you need to hold these buttons off.
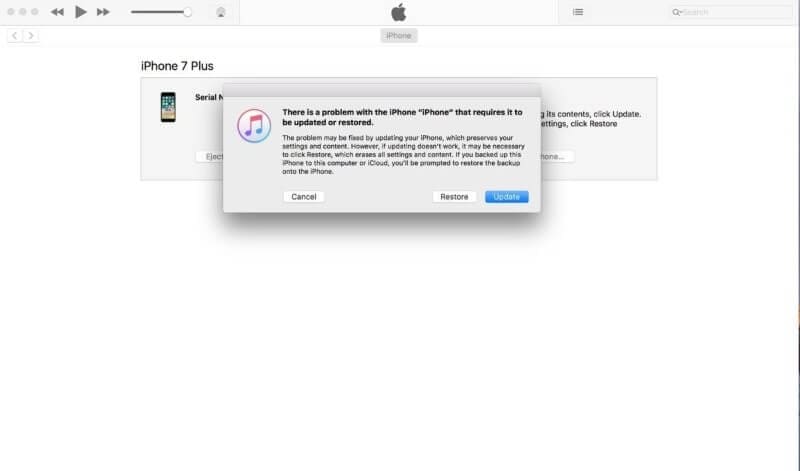
Step 3: Restoring Process
Click on Restore, and iTunes will download the software for the Apple iPhone XS Max device after the process is concluded, set up your Apple iPhone XS Max.
Pros
- The Apple iPhone XS Max is restored to the previous settings, and all messages and emails will be retrieved.
- There is no damage attached with using the Recovery mode to bypass iPhone lock screen.
Cons
- All the data will be lost and erased.
- The non-iTunes app such as music will be lost.
Part 3: How to Unlock iPhone without Screen Passcode Via iCloud
Another viable method to solve the problem is to erase your Apple iPhone XS Max with iCloud and remove the passcode. Following are the detailed steps:
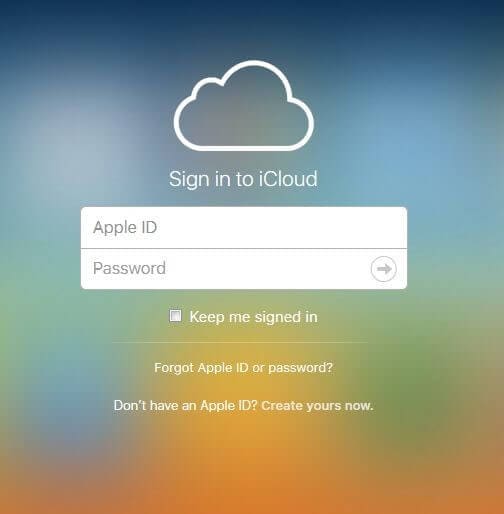
Step 1: Signing In
Open iCloud.com on your computer and sign with your Apple ID. All the Apple iPhone XS Max devices that are linked with your Apple account will appear.
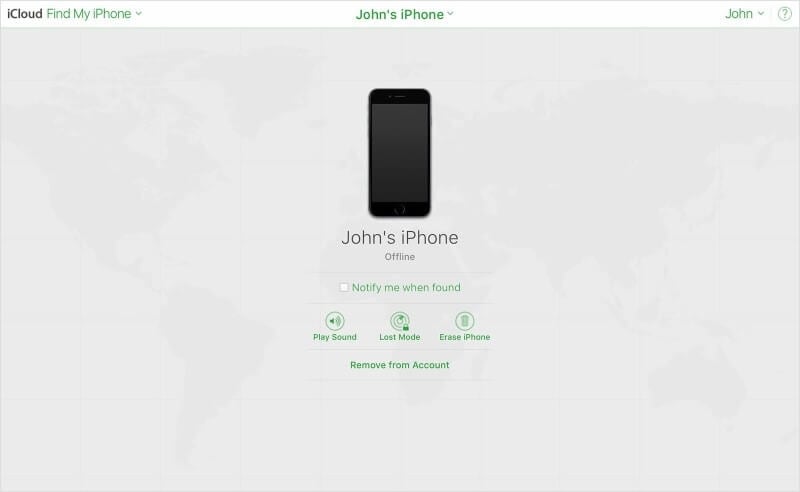
Step 2: Erasing iPhone
Click on the Apple iPhone XS Max device that needs to be removed. Then click on “Erase iPhone”. Now, you can restore the Apple iPhone XS Max from the backup or set up a new one.
Pros
- The user is free to access all the Apple iPhone XS Max devices through iCloud, whether iPad, iPhone, or iPod.
- The location of the lost device can also be tracked effortlessly.
Cons
- One cannot access iCloud without an Apple ID.
- If your iCloud is hacked, your data becomes a liability for them and can be erased at any time.
Part 4: How to Unlock iPhone without Passcode Via Find My iPhone
You can also consider unlocking your Apple iPhone XS Max through Find My iPhone. This platform is suitable for many cases where you can find the distance of your device from yourself with its last recorded location. You can also use it to access and control all the data across your Apple iPhone XS Max. To unlock your device with this method, you need to:
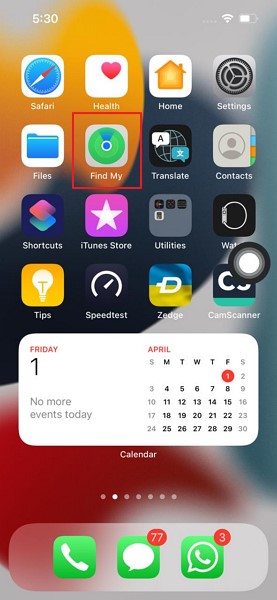
Step 1: Launch the Find My application on your secondary iPhone and log in with your Apple ID credentials. Click on “Sign In” and proceed.
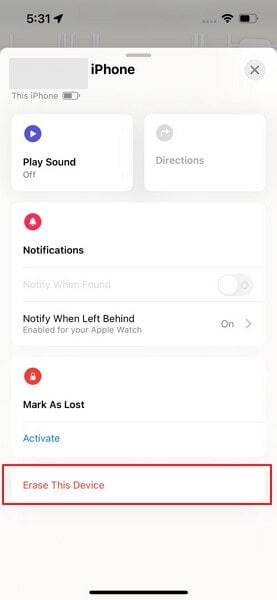
Step 2: You need to select the “Devices” tab and locate your device in the list. After finding the Apple iPhone XS Max device, scroll down and click on the “Erase This Device” button.
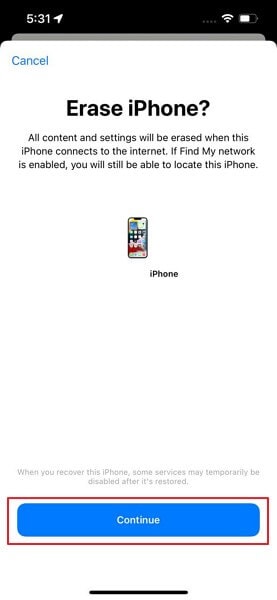
Step 3: A confirmation message will be provided where you need to tap “Continue” to proceed. When that particular device connects to the internet, the data across it will start to delete automatically.
Pros
- On activating Lost Mode, you will be notified of the availability of the Apple iPhone XS Max device’s location. Your Apple iPhone XS Max and data will be protected and will not be accessed until provided with the Activation Lock and screen passcode.
- Using this platform, you can manage all your devices, such as Apple Watch and MacBook.
Cons
- Your device needs to be connected to the internet to be erased.
- If you do not remember your Apple ID and password, it would be impossible for you to reactivate the Apple iPhone XS Max device.
Part 5: How to Bypass iPhone Lock Screen Using Siri
If you do not have any potential source for unlocking your Apple iPhone XS Max, you can consider using Siri for this purpose. Here are the steps to bypass the Apple iPhone XS Max lock screen using Siri.
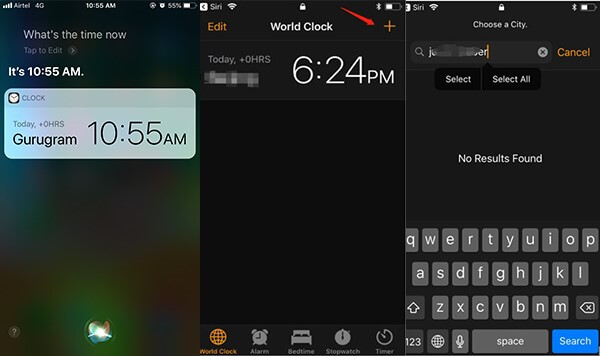
Step 1: You need to activate Siri on your Apple iPhone XS Max. Keep holding the Home button or Side button according to your Apple iPhone XS Max model for activating it. When activated, speak “What time is it” to it.
Step 2: Siri will display the time with a clock icon on the front. Click on the icon to open the associated interface. Click on the “+” icon and proceed to the next screen. You will find a search box on the next screen. Type random characters and hold the tab until it shows the option of “Select All.”
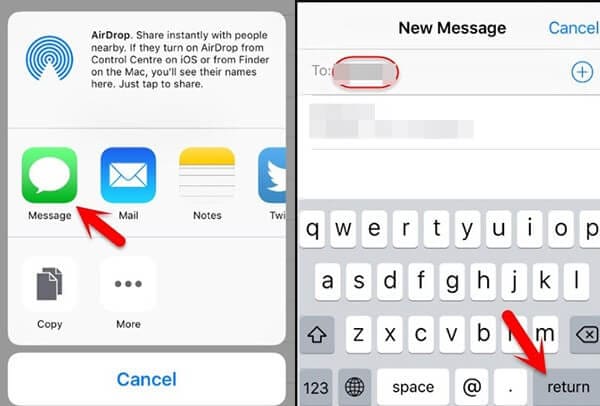
Step 3: You will find the option of the “Share” button soon. A pop-up opens after tapping on the button, which shows different options that can be accessed. Click on “Messages” to move to the next screen.
Step 4: Fill out the “To” box with some characters and click on “Return” on your keyboard. You need to press the Home button or swipe up according to your Apple iPhone XS Max model. The home page of your Apple iPhone XS Max will be accessed successfully.
Pros
- The data across your Apple iPhone XS Max will not get erased with this process.
- You do not need to access any other third-party tool for unlocking your Apple iPhone XS Max.
Cons
- If you have a version of iOS except 3.2 and 10.3.3, you cannot use this method.
- This method is not applicable if Siri is not activated across your Apple iPhone XS Max.
Part 6: FAQs about iPhone Screen Lock
- How many counts do I have to unlock my iPhone?
You have around ten entries to unlock your Apple iPhone XS Max, after which the Apple iPhone XS Max device will be completely locked. After the 5th wrong entry, you are expected to wait for a minute until you try again. After the 10th wrong entry, the Apple iPhone XS Max device gets locked out and allows you to connect to iTunes.
- Is it possible to reset the Apple iPhone XS Max passcode with an Apple ID?
No, you cannot reset the Apple iPhone XS Max passcode using Apple ID. Both are different security measures and cannot reset one using another.
- What should I know about the screen time passcode?
Parental controls on iPhones use a different passcode to restrict content. It includes restricting things like privacy, game center, web content, explicit content, iTunes app and purchases. It is also known as a restriction passcode.
- Can Apple reset a forgotten iPhone passcode?
No, Apple cannot reset the forgotten iPhone passcode. However, they will help you with the steps to erase, reset, and recover the phone. You must prove yourself to be the Apple iPhone XS Max device owner, so keep the purchase receipt with you.
Conclusion
Human beings are clumsy, and they often forget passcodes to their devices. However, there is no need to panic as technology has progressed enough to offer loopholes in the situations. The article presented multiple methods to bypass iPhone passcode and steer clear of this mess. Some frequently asked questions were also answered regarding the Apple iPhone XS Max screen lock.
Easy Steps on How To Create a New Apple ID Account On Apple iPhone XS Max
Your Apple ID is your gateway to a world of apps and services, making it an essential part of your Apple experience. Whether you’re a new Apple user or simply looking to start fresh, creating a new Apple ID can open the doors to endless possibilities.
This guide will walk you through creating a new account for Apple devices in an easy-to-understand manner. From setting up your email address to securing your account, this article covered you every step of the way. Embark on this journey and learn how to create a new Apple ID account effortlessly.
Part 1: Why Create a New Apple ID?
You might need to create a new Apple ID to enhance your Apple experience. Let’s dive into why it’s a good idea:
A. Reasons for Creating a New Apple ID Account
Here’s a breakdown of the reasons why you should create a new Apple ID for your Apple iPhone XS Max:
- Your Apple ID is like your digital identity. Creating a new one lets you choose a unique email address that suits you, adding a personal touch to your Apple journey.
- Maybe you’ve been using an email for your Apple ID that you don’t want to use anymore. Creating a new one helps keep your personal and Apple-related emails separate.
- **Switching Devices.**When you switch to a new Apple device, like getting a new iPhone or iPad, creating a unique Apple ID ensures a fresh start tailored to your new gadget.
- **Separation of Accounts.**Sometimes, you may want to keep your work-related apps and data separate from your ones. Creating a new Apple ID helps you achieve this separation.
- If you’re using Apple services for different purposes, such as work and personal use, having separate Apple IDs can help keep everything organized and distinct.
B. Scenarios Where a New ID Is Needed
Below are the common scenarios where a new Apple ID might be needed:
- **New Apple Device.**When you purchase a new Apple device, like an iPhone or iPad, you’ll need a new Apple ID to set it up and make it truly yours.
- **Shared Device.**If multiple people use the same device, creating a new Apple ID for each user ensures that everyone has their own personalized experience.
- **Change of Email.**If your current email address associated with your Apple ID is changed or you prefer a new one, creating a unique Apple ID with the updated email is the solution.
- **Work and Personal.**To keep your work-related apps and data separate from your personal ones, having separate Apple IDs for each purpose is practical and organized.
- **Starting Fresh.**Sometimes, you might want a fresh start with your Apple experience, and creating a new Apple ID provides a clean slate.
Creating a new Apple ID isn’t just about getting a new email; it’s about tailoring your Apple experience to your needs, whether for personalization, privacy, or organization. Now that you know why it’s essential, let’s explore how to create it in the next section.
Part 2: Step-by-Step Guide: How To Create a New Apple ID Account
Creating a new Apple ID for free is a straightforward process. Let’s break it down into simple steps:
A. Registering a New Apple ID
These are the steps for registering a new Apple ID:
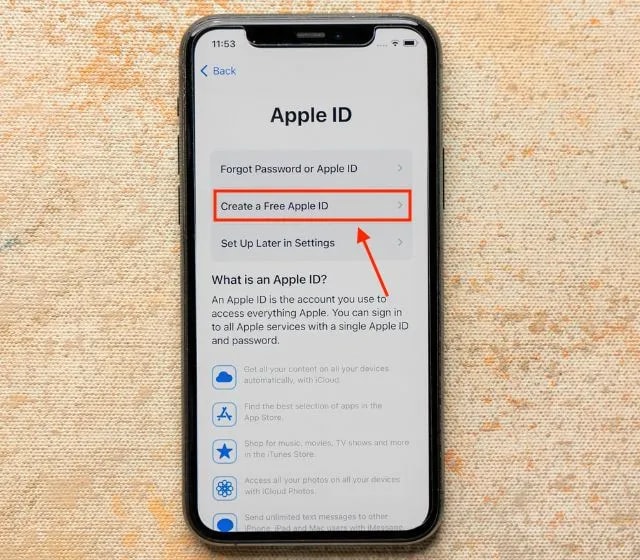
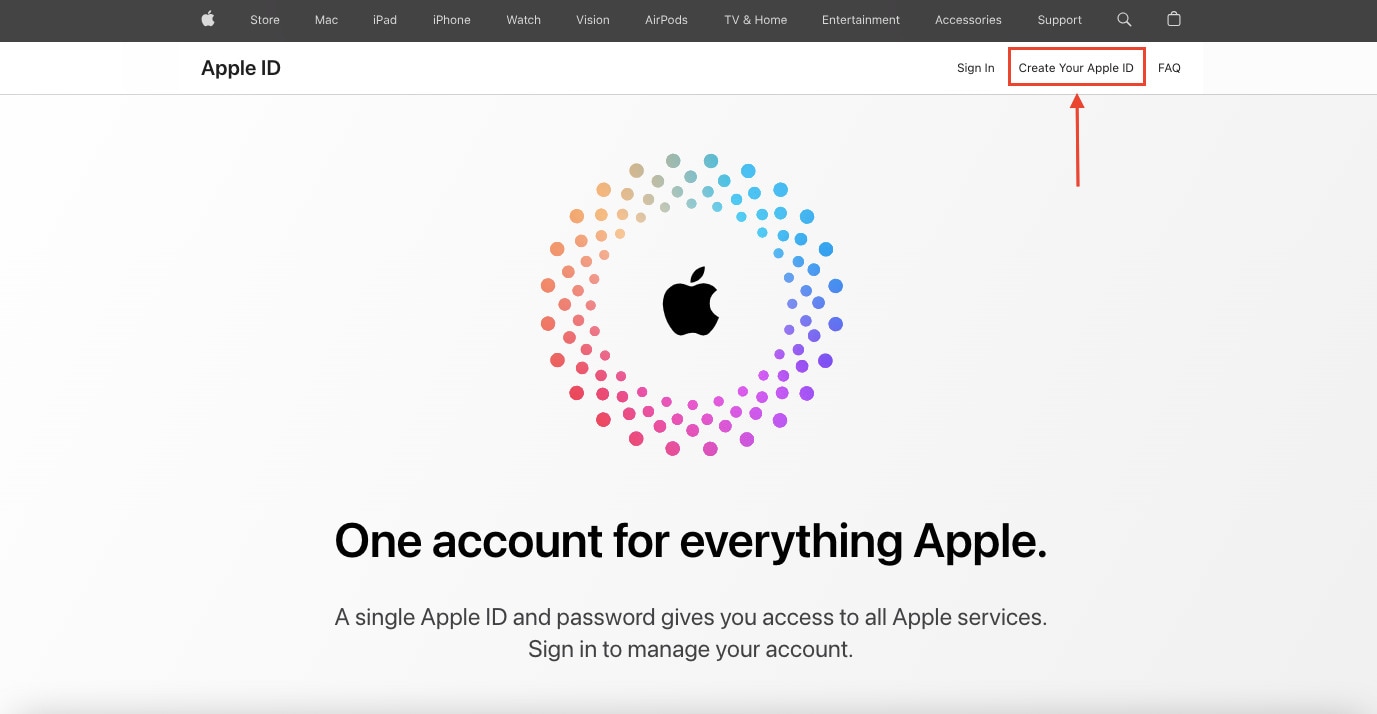
- Step 1: Open your web browser and visit the Apple ID account management page. Click the Create Your Apple ID button to begin.
- Step 2: On the registration page, you’ll be asked to provide your First name and Last name. Make sure to use the name associated with your new Apple ID. Next, you’ll need to enter your preferred email address. This one will be your new Apple ID.
Tip: Choose an email that’s easy to remember and access.
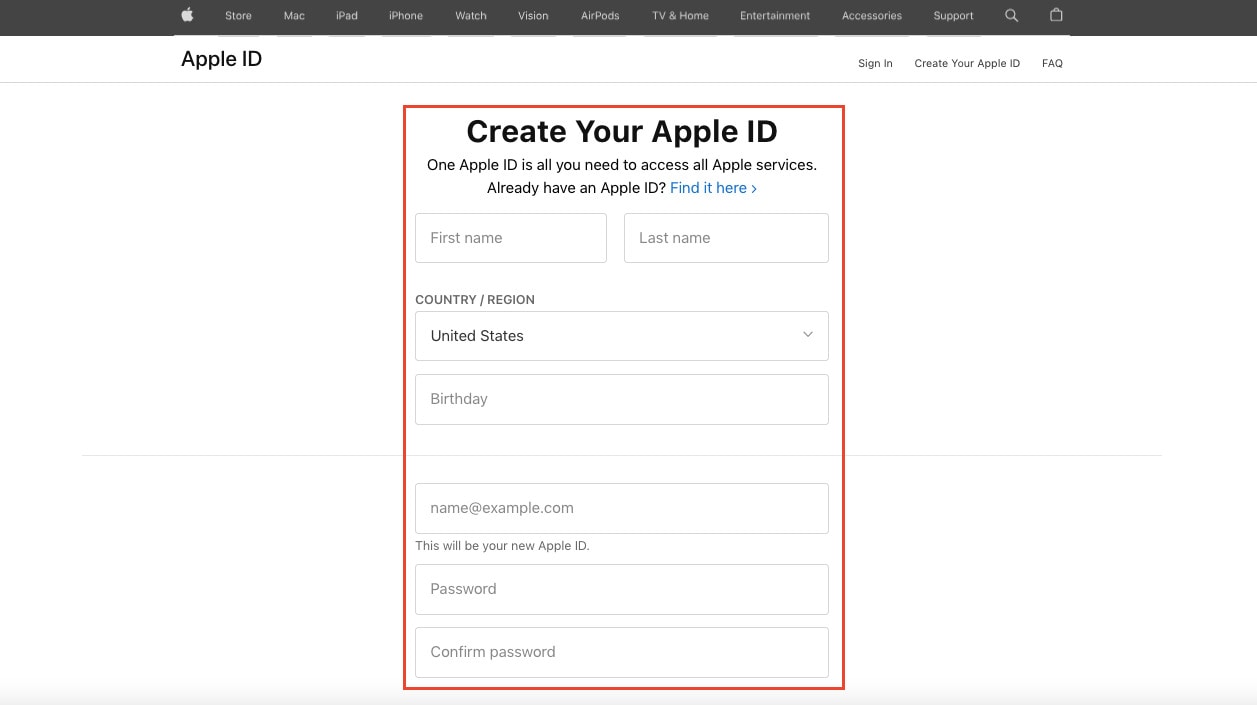
- Step 3: Create a strong password that combines letters, numbers, and symbols. This password is essential for the security of your account, so make it unique and hard to guess. Confirm your password by entering it again in the designated field.
B. Verifying Your Identity
The next step is verifying your identity. Check out the steps below:
- Step 4: Apple takes your security seriously. You may be asked to provide a phone number to verify your identity. This number can be used for account recovery or two-factor authentication. The phone number you provided will receive a verification code. Enter this code in the space provided to confirm your identity.
Note: It’s crucial to ensure that your phone number is accurate and accessible. This number will help you recover your account in case you forget your password or encounter any issues. Apple may use this phone number for two-factor authentication, adding an extra layer of security to your account.
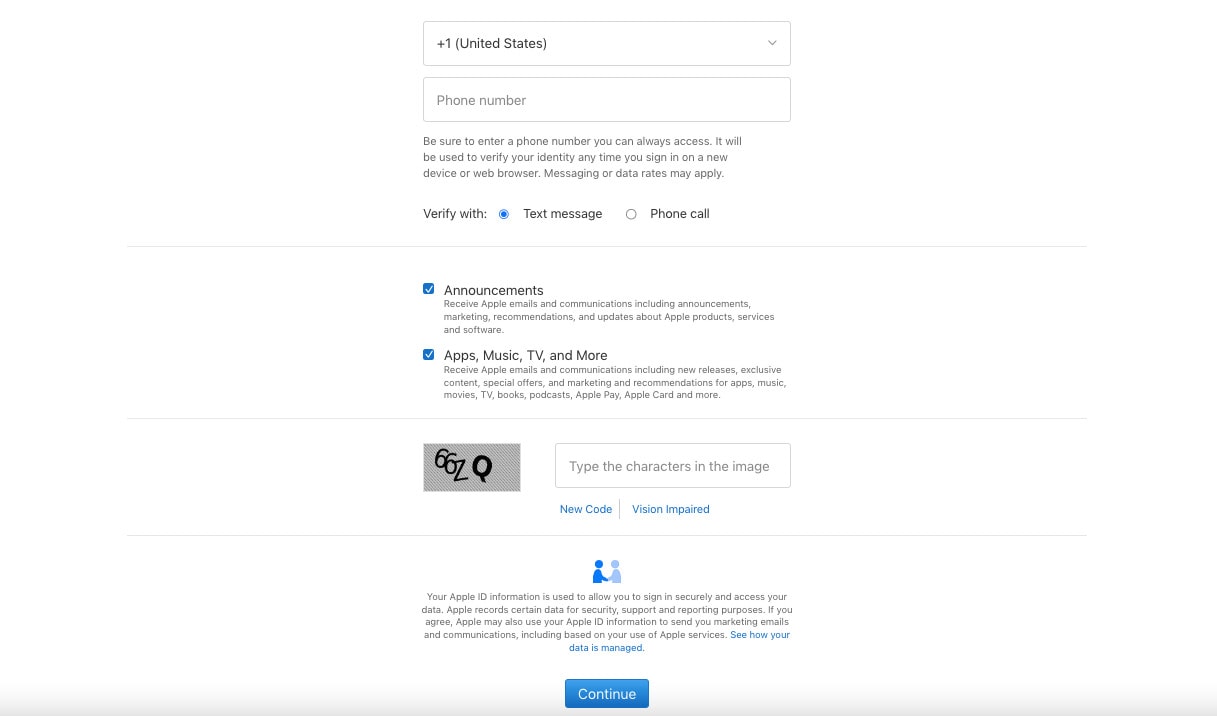
- Step 5: Apple may sometimes ask you to complete a CAPTCHA or verify your identity to prevent automated account creation.
C. Setting Up Security Questions
The next process will be setting up security questions for your account:
- Step 6: Apple asks you to choose and answer security questions. These questions provide an additional layer of protection for your account. Select questions that you can easily remember and that others can’t guess.
D. Finalizing the Process
To finalize the creation process, refer to the steps given below:
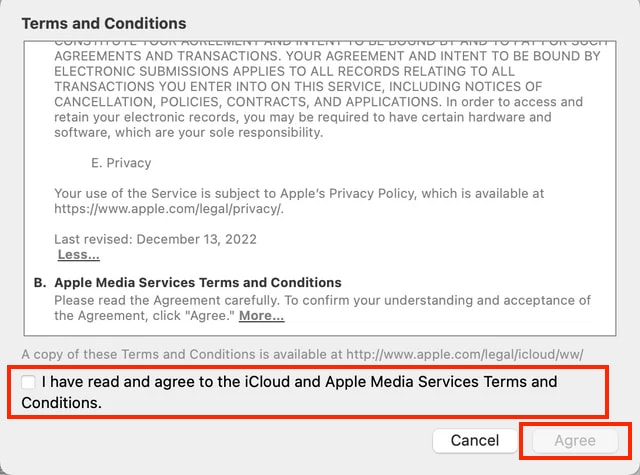
- Step 7: Read through Apple’s Terms and Conditions and Privacy Policy. Once you’ve understood them, tick the box to confirm that you’ve read and agree to the iCloud and Apple Media Services Terms and Conditions. Then click Agree to proceed. Remember that it’s essential to be familiar with Apple’s policies to ensure a secure and smooth experience.
- Step 8: After completing these steps, Apple will send a confirmation email to the address you provided. Go to your email and open the verification link to confirm your new Apple ID.
Congratulations! You’ve successfully created a new Apple ID. With this account, you can now access Apple’s services, including the App Store, iCloud, and more. Remember to keep your login credentials secure and use them to personalize your Apple experience fully.
Part 3: Effortlessly Remove Your Apple ID Using Wondershare Dr.Fone - Screen Unlock (iOS)
You can embark on an enhanced Apple experience after successfully creating your new Apple ID. Removing the previous one is essential when you create it, especially if you’ve acquired a second-hand device or no longer want the previous user’s associated credentials.
This step ensures that your new Apple ID takes center stage, granting you full control over your device and its associated services. But if you encounter difficulties when removing the previous Apple ID from your device, Dr.Fone - Screen Unlock (iOS) is a reliable and user-friendly solution.

Key Features of Dr.Fone - Screen Unlock (iOS)
This versatile tool offers the following key features in the context of Apple ID issues:
- **User-Friendly Interface.**Fone - Screen Unlock (iOS) is designed to be straightforward, making it accessible to users of all levels of technical expertise.
- It is usable with a wide range of iOS devices, ensuring you can remove the previous Apple ID from your device, regardless of the model.
- **Multiple Unlock Modes.**Fone offers various unlock modes to cater to different scenarios, including removing the previous Apple ID. This flexibility ensures that you have the right solution for your specific situation.
- **Data Security.**Fone - Screen Unlock (iOS) prioritizes data security, ensuring that your personal information and content remain intact during the Apple ID removal process.
Step-by-Step Guide on Using Dr.Fone Screen Unlock (iOS)
Check out the steps on how to remove an Apple ID account using Dr.Fone below:
- Step 1: Launch Wondershare Dr.Fone on your PC to use the Screen Unlock function and then navigate to Toolbox. Click the Screen Unlock section, then choose iOS.
- Step 2: If you want to proceed with deleting your Apple ID, you’ll need to go to the next window and select the Remove AppleID option from the menu.
- Step 3: When you hook up your iOS device to a computer, the next screen will report on its connectivity. Select the Unlock Now button to proceed.

- Step 4: Before the Apple ID can be unlocked, the next step is for the platform to ask a series of questions. Verify that a screen lock is active on your iOS device. However, please lock your iOS device before proceeding with the Yes option.

- Step 5: Check if Two-Factor Authentication is set up on all your iOS devices. If not, switch it on before confirming your decision to unlock your Apple ID.

- Step 6: After you have confirmed these settings, you will be taken to a screen with on-screen instructions for entering Recovery Mode on your iDevice. If the steps for your specific iOS device don’t work, try tapping Try DFU Mode in the app’s bottom left corner. To continue with the unlocking process, this will launch the DFU Mode instructions.

- Step 7: Once Recovery Mode has been activated, the Apple iPhone XS Max device’s information will be shown on the subsequent screen. Once the Device Model has been identified, all that remains is to choose the appropriate System Version and click Start. However, if there are disagreements in recognition, pick the details by hand and move forward.

- Step 8: The appropriate iOS firmware begins downloading, showing its status on the following screen. Click the Copy button to copy the direct URL to download iOS firmware for systems with sluggish firmware download speeds.
- Step 9: The platform checks the downloaded firmware and displays its details on the following screen. To proceed with unlocking your Apple ID, click the Unlock Now button. To proceed, you will be prompted to input a code into a confirmation window. Enter the code and then click the Unlock button.

- Step 10: The following screen shows the unlocking status of your Apple ID. Don’t let the Apple iPhone XS Max device lose its connection under any circumstances. The screen prompts the process of completing the Apple ID once the ID has been unlocked. If the Apple ID has been unlocked, click Done to proceed. If that fails, click the Try Again button and give it another shot.

Conclusion
This guide has simplified the process of creating a new Apple ID, ensuring you can effortlessly personalize, secure, and organize your digital experience. Creating a new Apple ID is easy, and it allows you to tailor your Apple journey to your preferences. Remember, it’s all about you, your privacy, and your convenience.
Should you encounter any challenges while managing your Apple ID, such as removing a previous one, consider Dr.Fone - iOS Screen Unlock tool. This user-friendly resource stands ready to assist, ensuring a seamless and secure Apple experience. Explore the possibilities and make the most of your Apple adventure!
Also read:
- [New] Maximizing Your Monetary Gains on Social Media with Snapchat
- [New] Unbeatable Top 10 Video Editors on Your PC/Windows (TikTok)
- [Updated] Bright Future in HD A Fit or Overstepping for HDR, In 2024
- [Updated] Supercharge Your YouTube Videos Best Mac MP4 Tools
- Achieve Balance in Visuals Through Aspect Choices
- How to Fix Apple iPhone 13 Passcode not Working? | Dr.fone
- How to Make the Most of Your iPhone 12 Pro Lock Screen with Notifications? | Dr.fone
- How To Remove Passcode From Apple iPhone 12 Pro Max? Complete Guide | Dr.fone
- In 2024, Camera Excellence The Top 10 4K-Ready Shoulder Rigs
- In 2024, How to Fix My Oppo Reno 8T 5G Location Is Wrong | Dr.fone
- In 2024, How to Unlock Apple iPhone 14 Pro Max? | Dr.fone
- In 2024, How to Unlock Apple iPhone 8 Without Passcode? | Dr.fone
- Online Wijziging Van MPEG Naar MKV Met Gratis Convertereertool - Zorgvuldig Gecurat Door Movavi
- PassFab iPhone 6 Plus Backup Unlocker Top 4 Alternatives | Dr.fone
- PassFab iPhone SE (2022) Backup Unlocker Top 4 Alternatives | Dr.fone
- Unlock Your Disabled Apple iPhone 12 Without iTunes in 5 Ways | Dr.fone
- Unveiling the Performance of the Netgear Nighthawk AX8 as a Next-Gen Wi-Fi 6 Mesh Extender Solution.
- Title: Apple iPhone XS Max Backup Password Never Set But Still Asking? Heres the Fix | Dr.fone
- Author: Amelia
- Created at : 2025-02-24 20:35:26
- Updated at : 2025-03-04 08:21:59
- Link: https://iphone-unlock.techidaily.com/apple-iphone-xs-max-backup-password-never-set-but-still-asking-heres-the-fix-drfone-by-drfone-ios/
- License: This work is licensed under CC BY-NC-SA 4.0.