
Complete Guide For Apple iPhone 14 Lock Screen | Dr.fone
Complete Guide For Apple iPhone 14 Lock Screen
Like most iPhone users, you rely on your lock screen to keep your data safe and protected. But with the release of iOS 17, there are a few new features and changes that you need to know about. This complete guide will clarify everything you need to know about the iOS 17 lock screen.
We’ll explain to you how to use the new features, protect your data, and more. So don’t waste any time - read on for all the details!
How to Have a Customized iOS 17 Lock Screen?
Before we get started, you should know that there are three ways to have a customized lock screen in iOS 17. Let’s get to know more about them.
1. How to select your favorite wallpaper
The first way is to use a pre-made wallpaper from the Apple Wallpaper Gallery.
To do this, go to Settings > Wallpapers & Brightness > Choose a New Wallpaper. Then, select the Apple Wallpaper Gallery and choose the image you want to use.
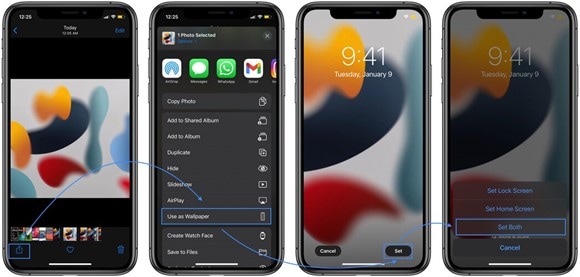
The second way to have a customized lock screen is to use a Live Photo. To do this, go to Settings > Wallpapers & Brightness > Choose a New Wallpaper. Then, select the Live Photo option and choose the image you want to use.
Note: You can only use Live Photos for your lock screen if your Apple iPhone 14 is unlocked.
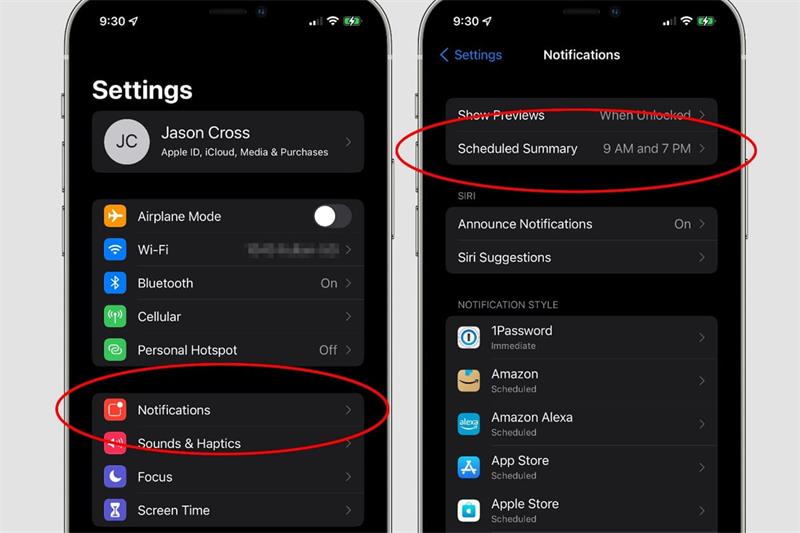
2. How to manage notifications
If you want to manage notifications on the iOS 17 lock screen, there are two ways to do it.
At first, you can go to Settings > Notifications. Here, you can choose how many notifications you want to see on your lock screen and which apps can send you notifications.
The Do Not Disturb feature is the second way to manage notifications. To do this, go to Settings > Do Not Disturb and enable the feature. You can also schedule when Do Not should turn on and off. This feature work like a charm if you want to silence all notifications at night.
3. How to set Auto-Lock time
If you want to set the Auto-Lock time, go to Settings > Display & Brightness > Auto-Lock. Here, you can choose how long it should take for your Apple iPhone 14 to lock automatically.
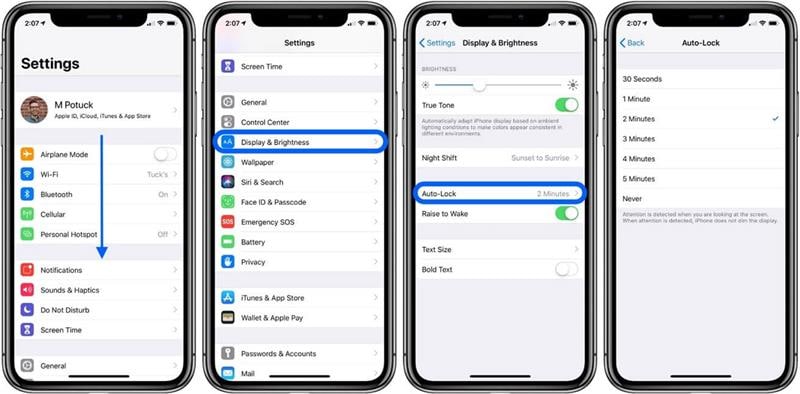
By default, the Auto-Lock time is set to 30 seconds. But you can choose to lock it immediately, after 1 minute, 5 minutes, or never.
How to Turn Off/On Lock Screen in iOS 17?
If you want to turn off the lock screen, go to Settings > Touch ID & Passcode (or Face ID & Passcode). Then, scroll down and disable the Unlock with Passcode (or Unlock with Face ID) option.
Enable the Unlock with Passcode (or Unlock with Face ID) to turn ON the lock screen.

But if you have forgotten your passcode, don’t worry. The next section will show you how to bypass the lock screen.
How to Bypass the iOS 17 Lock Screen Passcode?
Different methods can help you bypass the iOS 17 lock screen passcode. Let’s discuss them in detail.
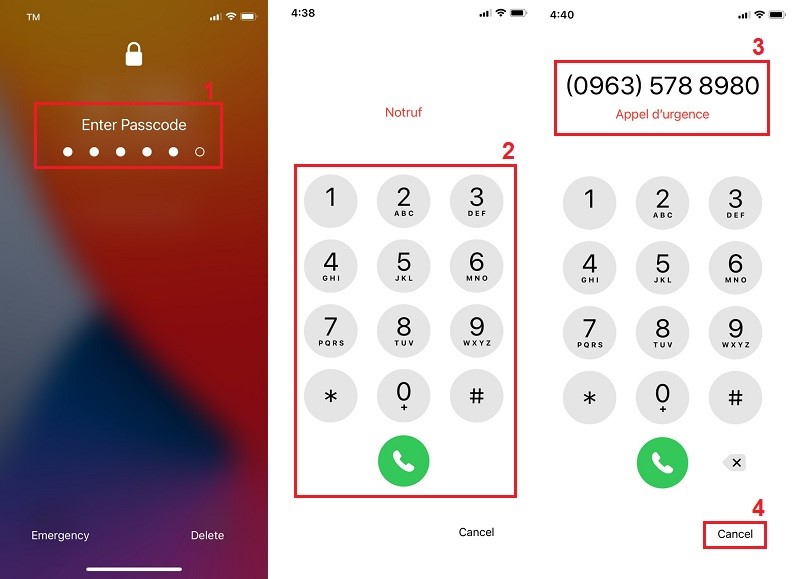
1. Use Emergency call
The first method to bypass the passcode is to use the emergency call feature.
To do this, access your device with five wrong passcodes attempts. This will trigger the emergency call feature. All you need to do is, dial an emergency number and then tap on the cancel button, and you’ll be taken to the home screen.
That’s how you bypass the lock screen without losing any data.
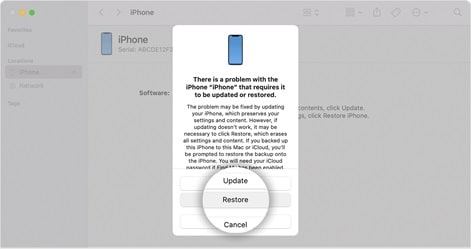
2. Bypass passcode with iTunes restore
If your Apple iPhone 14 needs to be backed up with iTunes sync feature, you can use this method to bypass the passcode.
To do this, connect your Apple iPhone 14 to a computer and open iTunes. Then, click the Restore button and follow the on-screen instructions to restore your Apple iPhone 14.
It will take some time, but you can use your Apple iPhone 14 without a passcode once it’s done.
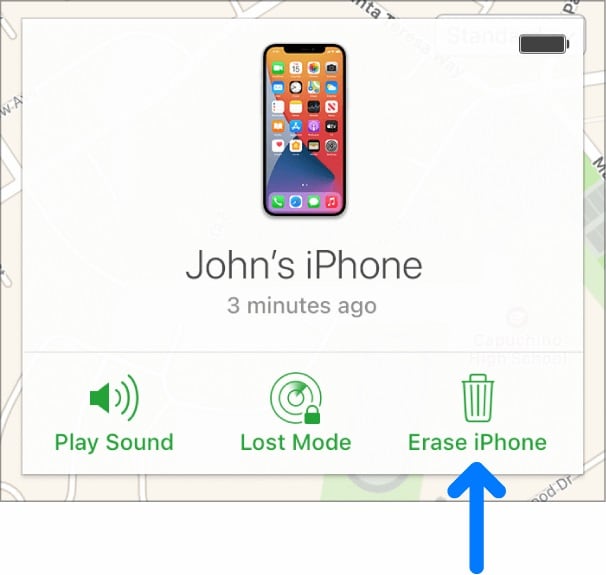
3. Use Find My in iCloud
If you have synced your Apple iPhone 14 with iCloud, you can try the Find My feature to bypass the lock screen.
To do this, go to icloud.com/#find and sign in with your Apple ID. Then, select your device from the list of devices and click on the Erase button.
To do this, go to icloud.com/#find and sign in with your Apple ID. Then, select your device from the list of devices and click on the Erase button.
All the data will disappear on your Apple iPhone 14, and you’ll be able to access it without a passcode.
This process can also take some time, so be patient.
4. Dr.Fone-Screen Unlock
If all mentioned methods don’t work for you, the ultimate solution is to use Wondershare Dr.Fone-Screen Unlock and bypass the passcode. To finish it, you can follow the steps given below carefully.
Step #1: Download/Install Dr.Fone on your Computer or MacBook
A third-party tool named Dr.Fone-Screen Unlock can help you in this regard. The wonderful part is that you don’t have to learn any technical knowledge.
First, download/install Dr.Fone-Screen Unlock on your computer or MacBook. You can get it from here:
After downloading the tool, install launch it on your PC.
Step #2: Launch the Application and Go for Screen Unlock
Once you have installed the tool, launch it and go to its main window. Here, you will see different features. Select the Screen Unlock feature from the list.

Step #3: Connect your Apple iPhone 14 and Activate DFU Mode
Now, you need to connect your Apple iPhone 14 to the computer using an Apple original cable. Once done, you need to put your Apple iPhone 14 into DFU mode.
To do this, you need to press and hold the Home button and Sleep/Wake button simultaneously for 10 seconds.
After that, release the Sleep/Wake button but keep holding the Home button until Dr.Fone detects your device in DFU mode.

Step #4: Download the Appropriate Firmware
Once Dr.Fone detects your Apple iPhone 14, it will ask you to continue. So, proceed to the next, and here you will be asked to download the correct firmware package for your device.
So, choose the firmware carefully and hit the download button.
Depending on your internet connection, you may have to wait for a longer time. But once the firmware is downloaded successfully, you can proceed to the next step.

Step #5: Unlock your Apple iPhone 14
After the firmware is downloaded, you need to press the Unlock Now button, and Dr.Fone will start to unlock your Apple iPhone 14 without a passcode. Once it is done, you can get into your device without any restriction.

FAQs
Why iOS 17 Lock Screen is not working?
There could be many reasons for the malfunction of the Lock Screen in iOS 17. The most common reason is the installation of incompatible jailbreak tweaks. Therefore, it is recommended to remove all the jailbreak tweaks and check whether the problem persists.
You can try resetting your device to factory settings if the problem still exists. But make sure to back up your data before doing so, as it will erase all your data.
How do I fix my iOS 17 lock screen bugs?
There are various ways to fix the lock screen bugs in iOS 17. You can try resetting your device to factory settings, or you can also try restoring your device from a previous backup.
If none of these methods work, you can try using a third-party tool like Dr.Fone-Screen Unlock to bypass the lock screen.
How do you unlock a locked iPhone iOS 17?
There are various ways to unlock a locked iPhone running on iOS 17. You can try the feature of Find My iPhone, or you can also use a third-party tool like Dr.Fone-Screen Unlock.
How do you fix an unresponsive lock screen on iPhone running on iOS 17?
If your lock screen is unresponsive on iPhone running on iOS 17, you can try force restarting your device. To do this, you need to press and hold the Home button and Sleep/Wake button simultaneously for 10 seconds.
After that, release the Sleep/Wake button but keep holding the Home button until you see the Apple logo. Once your device is restarted, check if the problem persists or not.
If the problem still bothers you, you can try using a third-party tool like Dr.Fone-Screen Unlock to reset the phone, eventually fixing the issue.
The Bottom Line
So this is what we want to talk about the iOS 17 Lock Screen with you. We have tried to cover everything in this article, including the new features, lock screen bugs, and how to fix them.
All the fixes mentioned above are tested and proven to be working. So you can try them without any hesitation.
But if you are still facing problems with your lock screen, then the greatest thing you can do is to use a third-party tool like Dr.Fone-Screen Unlock. This tool is very easy to use and will unlock your device within minutes.
So, if you are looking for a hassle-free solution to fix your lock screen issues, then this is the best one you should never miss.
8 Safe and Effective Methods to Unlock Your Apple iPhone 14 Without a Passcode
You may get stuck with any emergency if you do not know how to unlock your Apple iPhone 14/iPad without a passcode. It can happen under various circumstances; let’s say, if you change the passcode too often, you may forget the Apple iPhone 14 passcode later; your spouse may change your passcode without telling you; your naughty child accidentally locks your Apple iPhone 14. So, what to do then?
Normally, you don’t believe what you see and start to try entering the passcode to unlock your Apple iPhone 14. However, if you entered an incorrect passcode 10 times, you will receive a messag “iPhone is disabled, connect to iTunes “. In this case, the only way to unlock your disabled iPhone is to restore it. And that is a situation none of us would like to be in right? Hence, in this article, today, we will elaborate ways on how to unlock iPhone without passcode or restore it.
Part 1: Unlocking Your Apple iPhone 14: What Are the 4 Main Causes of Failure?
Unlocking your Apple iPhone 14 can be a frustrating experience, especially when you just want to access the Apple iPhone 14 device. Unfortunately, there are several common reasons why an iPhone may not unlock.
Before you go ahead and take it to a technician for repair, let’s look at the main causes of why you cannot unlock your Apple iPhone 14:
- If you input the wrong passcode too many times, your Apple iPhone 14 will be disabled and locked. To unlock iPhone, you will need to enter the correct passcode. If you don’t remember your passcode, you can try using recovery mode to reset your device.
- When someone else has your Apple iPhone 14 passcode, they can easily reset your Apple iPhone 14 passcode. And you have no idea why you cannot access your Apple iPhone 14. This is a relatively common problem.
- If your Apple iPhone 14 screen is broken, it may be difficult or impossible to unlock the Apple iPhone 14 device. In this case, you may need to take it to an Apple store or authorized service provider to have the screen repaired.
- If your Apple iPhone 14 is in Lost Mode, it will be locked by others, and you will input enter the passcode associated with the Apple ID that was used to set up the Apple iPhone 14 device. If you don’t remember the passcode, then Dr.Fone - Screen Unlock (iOS) will be your ideal choice.
Learn about all the solutions to unlock iPhone quickly through the video below:
 safe & secure
For more tutorial videos about how to unlock your Apple iPhone 14, you can explore more from Wondershare Video Community .
Keep reading to learn more feasible ways to unlock iPhone without passcode in detail!
Part 2: How to Unlock iPhone/iPad Without a Passcode? (iOS 7.0 or later)
Dr.Fone - iPhone Unlocker is a powerful software that can help you open your iDevice without a passcode. It supports all iPhone models from iPhone 6 to iPhone 15, and all iPad models. Dr.Fone-Screen Unlock is easy to use and can be used to bypass the lock screen in just a few simple steps. It can also be used to reset the Apple iPhone 14 device to its factory settings, allowing you to start fresh. In this section, we will learn about this important tool for iPhone lock screen removal. Thus, instead of thinking hard about how to unlock iPhone without a passcode, you can use Dr.Fone - Screen Unlock (iOS) to do the needful.
Dr.Fone - Screen Unlock (iOS)
Remove iPhone Lock Screen without Hassle.
- Unlock an iPhone whenever the passcode is forgotten.
- Save your Apple iPhone 14 quickly from the disabled state.
- Free your sim out of any carrier worldwide.
- Works for all models of iPhone, iPad, and iPod touch.
- Fully compatible with the latest iOS.


3981454 people have downloaded it
To use Dr.Fone - Screen Unlock to unlock your Apple iPhone 14 or iPad without a passcode, follow these steps:
- Step 1. Download and install Dr.Fone - Screen Unlock (Windows version ) or (Mac Version ) on your computer.
- Step 2. Go to “Toolbox” > “Screen Unlock” > “iOS” > “Unlock iOS Screen”, then connect your Apple iPhone 14 to your PC.

- Step 3. Follow the instructions to put your Apple iPhone 14 into Recovery mode. When your Apple iPhone 14 is in Recovery mode, the software will begin downloading firmware.
- Step 4. When the process is complete, click “Unlock Now”, and Dr.Fone will start unlocking. After a while, your device will be unlocked, and you can access your device without a passcode.

Unlock your Apple iPhone 14/iPad without a passcode now!
Part 3: The TikTok Method to iPhone Unlocking Without Using a Passcode or Face ID
There has been a viral trend on TikTok about how to unlock your Apple iPhone 14 without using a passcode or your face ID, no matter which iPhone model you use. These themes of videos quickly racked up almost 9 million views.
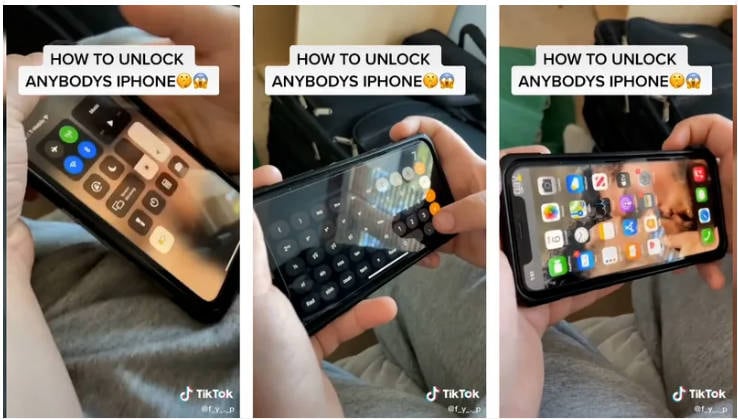
This method states that it can enter your phone camera or calculator from the control panel, then without face ID unlocks, your phone can be used as normal.
The concrete steps of this TikTok viral method are below if you want to have a try. Maybe that’s a practical way for your emergency:
- Step 1: Swipe down on your control center (if you just want to test this way whether it works or not, cover your camera). If you are on an older iPhone 5, iPhone 6, iPhone 7, or iPhone 8, then swipe up.
- Step 2: Turn off your Wi-Fi, Data and Bluetooth, and Cellular data. Then turn on Aeroplane mode.
- Step 3: Next, you can open up the calculator app, which is also accessible from the Control Center and doesn’t require any password or fingerprint ID.
- Step 4: Please flip the phone horizontally to access the scientific calculator and type in a decimal place: 7 + 4 + EE = 280,000.
- Step 5: Turn your phone sideways to enter scientific mode, press “IN,” then Press “Rand.”
- Step 6: Swipe up on your device, and it’s unlocked.
Now you should unlock iPhone without passcode without computer or iTunes!
You May Also Like:
What To Do If You Bought A Locked iPhone?
Bypass iPhone Lock Screen Using Emergency Call
Unlock iPhone If It Doesn’t Happen With Correct Password
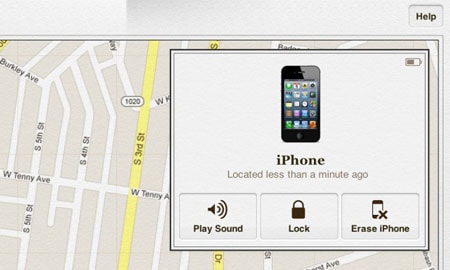
Part 4: Click “Erase iPhone” on the Lock Screen
This method may be a better choice for unlocking your Apple iPhone 14 than using the TikTok method. It is more secure and reliable, but it works on iOS 15.2 or devices with the latest version. This method can unlock iPhone without computer.

- Step 1: Type a wrong passcode on the Lock Screen.
- Step 2: When the message appears, click “Erase iPhone” and click on it.
- Step 3: Enter your Apple ID credentials.
- Step 4: Click “Erase” to confirm that you want to erase your Apple iPhone 14.
- Step 5: Wait for the process to complete, and your Apple iPhone 14 will be unlocked.
Part 5: Use the Voice Control to Unlock iPhone (iOS 13 or later)
The use of Voice Control to unlock iPhone without passcode is a feature available in iOS 13 or later. Voice Control is a feature that lets you navigate your Apple iPhone 14 using just your voice. It allows you to unlock your Apple iPhone 14 without having to enter a passcode or use Touch ID.
Instead, you can simply say “Hey Siri” followed by a command. Voice Control also allows you to take other actions, such as launching apps and setting reminders.
To use the Voice Control feature to unlock iPhone (iOS 13 or later), you will need to set it up first. To do this, follow these steps:

- Step 1. To set up Voice Control on your Apple iPhone 14, open the Settings app and tap Accessibility.
- Step 2. Tap Voice Control and then tap Set Up Voice Control.
- Step 3. Follow the on-screen instructions to create a voice profile.
When you’re finished, you can use your voice to unlock your Apple iPhone 14. To unlock your Apple iPhone 14:
- Step 1. Say “Hey Siri” followed by “Unlock my iPhone”.
- Step 2. You will then see authenticate using Face ID, Touch ID, or your passcode.
- Step 3. Once you’ve authenticated, your Apple iPhone 14 will be unlocked.
Part 6: How to Unlock iPhone Without a Passcord Using Find My iPhone?
How to unlock iPhone without Siri and passcode using “Find My iPhone” is another method. It just takes several minutes to clean up your device. It securely removes your Apple iPhone 14 lock screen without tapping the passcode. If you want to restore your Apple iPhone 14 data, this is another great method to enable the features in all terms specifically.
You can perform the steps from your Apple iPhone 14 directly to turn on “Find My iPhone.” Follow the below methods for the best result:
- Step 1: Use your computer or someone else’s iOS device, visit icloud.com/find, and sign in with your Apple credentials.
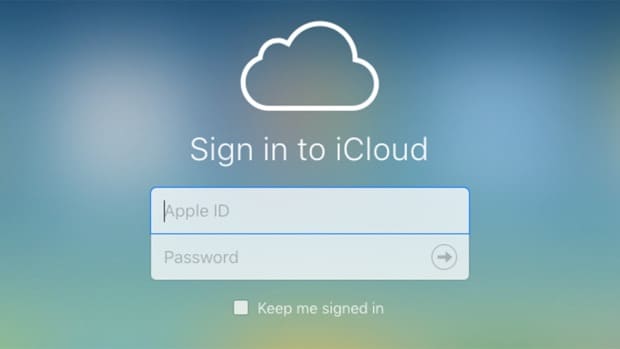
- Step 2: Then, you need to choose the option “All Devices”. If my iPhone is already enabled on your device, you will see your Apple iPhone 14 listed. Simply click on it and choose the option “Erase iPhone.” Then all the data, including the passcode, will be removed from your Apple iPhone 14. Thus, this process unlocks the Apple iPhone 14 without Siri.
Note: Now, your device will reboot without a passcode. It has a strategy to restore your data and reboot into a new iPhone, thus going for a secret passcode to unlock any iPhone.
Part 7: How to Unlock iPhone Without a Passcode With the Finder or iTunes?
After looking at the maybe-trick way of the TikTok viral method and other unlock ways, an official solution from Apple, we also let you know how to fix the disabled iPhone. This method puts your phone into recovery mode with the help of iTunes or Finder on the computer. However, a small lousy side of this method is that it will erase your data along with the passcode.
Before you start, please ensure you have a computer (Mac or PC). If you’re using a PC, ensure it has Windows 8 or later and that iTunes is installed. Then, just follow the steps below to unlock your Apple iPhone 14 without a password with iTunes.
- Step 1: Turn off your Apple iPhone 14 through the following methods according to your Apple iPhone 14 model.

Notice: If your phone is connected to the computer, please unplug your Apple iPhone 14.
- Step 2: Get ready by finding the button on your Apple iPhone 14, as shown in the pictures below. You’ll need to hold in the following step.

- Step 3: Connect your Apple iPhone 14 to the computer where the Finder or iTunes is enabled > Click on iTunes and restore your Apple iPhone 14.

- Step 4: Choose the Restore option when you see a pop-up. Your computer downloads software for your Apple iPhone 14 and begins the restore process. If the download takes more than 15 minutes and your device exits the recovery mode screen, let the download finish, turn off your Apple iPhone 14, and start again.
Notice: Before the Finder or iTunes restores your Apple iPhone 14, it will back up the Apple iPhone 14 data in iCloud. Thus, you can download the restored files after the Apple iPhone 14 device restarts.
Now, you have learned how to unlock a disabled iPhone with iTunes.
Part 8: Try DFU Mode to Bypass iPhone Passcode
DFU mode (Device Firmware Update) is a special mode on an iPhone that allows you to install firmware or software updates. It can also be utilized to bypass the passcode on an iPhone. To use DFU mode to bypass the passcode on an iPhone, follow these steps:
- Step 1. Connect your iDevice to your PC and launch the iTunes app.
- Step 2. Switch off your Apple iPhone 14 and press and hold the Home and the Side/Power button for 10 seconds.
- Step 3. Release the Side/Power button, but continue to hold the Home button until iTunes recognizes your Apple iPhone 14 in recovery mode.
- Step 4. When your iDevice is in recovery mode, you can use iTunes to restore your Apple iPhone 14 and bypass the passcode.
Remember that using DFU mode to bypass your Apple iPhone 14 passcode will erase all data from your device.
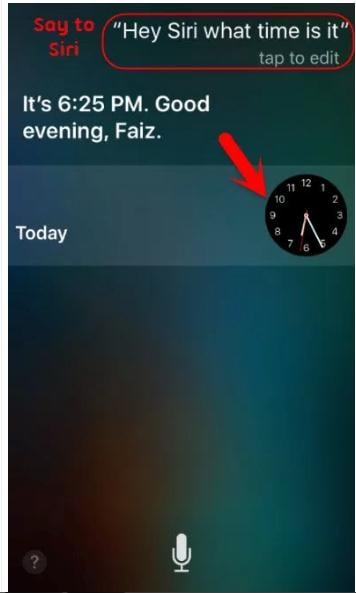
Part 9: How to Unlock iPhone Without Passcode by Tricking Siri?
In this part, we give you the solution to unlock your Apple iPhone 14 without a password using Siri. You can consider it a trick or a tip as you wouldn’t be losing your Apple iPhone 14 data. It works to give 100% results in even the most tricky situations.
We had a survey for the iOS 10.3.2 and 10.3.3 versions, and Siri certainly ensured one of the best ways to unlock the Apple iPhone 14 without a passcode. It’s a simple way, and with it, you will have the possibility to be capable of posting and reading messages on Facebook using this Siri concept.
Let us go through the steps below to learn about how to unlock iPhone without passcode by Siri:
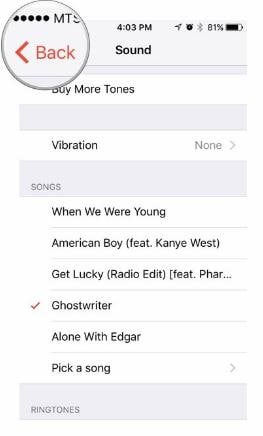
- Step 1: To enable the Siri feature on your Apple iPhone 14 device, press and hold the home button. It will immediately activate Siri on your Apple iPhone 14 device. Once it gets activated, it is ready to respond to your voice. Now, ask Siri to open the clock to rectify how to unlock a disabled iPhone. Once it displays the clock on your iOS screen, just touch it to proceed.
- Step 2: The World clock appears with the list of tunes you have to select for the alarm clock.
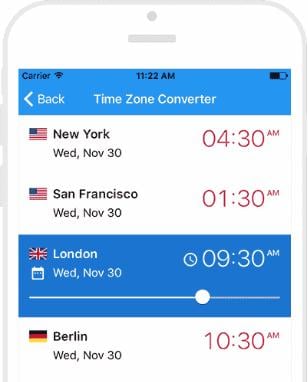
- Step 3: From that option, you will see the tab “buy more tunes” which straight away informs you to reach the iTunes store.
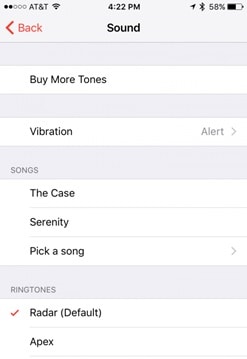
- Step 4: Just click on the home button to go to the phone’s main screen.
You will see that you can now access your Apple iPhone 14 without the passcode as Siri helped unlock iPhone.
Tips: This is only used for iOS 10.3.2 and 10.3.3. If you have updated your iOS system, we recommend you try the previous methods. To make it easier, just use Dr.Fone - Screen Unlock .
FAQs about iPhone Unlock Issues
1. How to unlock iPhone without the Home button?
You can unlock your device without the Home button if you have an iPhone with a Face ID or Touch ID. To unlock iPhone without Home button:
- Step 1: Simply press and hold the Side/Top button along with either the Volume (+ or -) button until the power off slider appears on the screen.
- Step 2: Drag this slider to turn off your Apple iPhone 14 completely.
- Step 3: Once it is off, press and hold the Side/Top button until you see the Apple logo.
- Step 4: This will then unlock your device.
2. How to unlock the Apple iPhone 14 passcode without data loss?
You can’t unlock an iPhone passcode without losing your data, as doing so would require restoring your device to its factory settings. This will erase all of your personal data, including photos, contacts, and any installed apps. You can use iTunes or iCloud to back up your phone before restoring it.
Once you have backed up your device, you can then restore it using the backup information. That’s how to unlock iPhone without passcode.
3. How to unlock iPhone using the camera?
If you have an older version of iOS (version 9 or earlier), then there is a bug that allows you to unlock your device using the camera. To do this, simply open the Camera app and make sure it’s in selfie mode. Then, hold the Home button until you hear a clicking sound. This will unlock your device without requiring a passcode.
The Bottom Line
Dr.Fone - Screen Unlock (iOS) is a well-known featured software to unlock iPhone without passcode and works instantly after download. We have proven results, and all the methods listed above are user-friendly to the extent that no knowledge of technology is required to unlock the Apple iPhone 14 without Siri. We advise you to use Dr.Fone as it will work on your Apple iPhone 14 without any damage and give the desired result. However, you may choose any of the above iOS unlocking methods as you see fit.
How To Bypass the Required Apple Store Verification For Apple iPhone 14
The Apple App Store is a familiar place for anyone with an iPhone or iPad. It’s where you find all sorts of useful and fun apps. However, one thing that can be a hassle is the store’s strict verification process. Every time you make a purchase, you need to go through this step.
It’s there for a good reason – to stop fraud – but it can get annoying, especially if you forget your Apple ID or have other issues. This article will explore the ways to stop the Apple Store “Verification Required” prompt, making your app downloading experience smoother.

Part 1: Why Does Apple Require Verification in the Apple Store?
When browsing the App Store on your Apple iPhone 14 or iPad and looking to download the latest game or productivity tool, you might have noticed that Apple often asks for some form of verification before you can proceed with your purchase. This is not just a random step; there’s a solid reason behind it.
The primary reason Apple requires verification for App Store purchases is to ensure that you are the person authorizing the purchase. This security measure prevents unauthorized transactions and protects your account from fraud.
What does this verification usually involve? It could be entering your Apple ID password or using Face ID or Touch ID if your device supports these features. These methods are designed to confirm your identity quickly and securely.

Reasons Why the Verification Required Message Might Appear
There are several reasons why you might see an Apple Store’ Verification Required’ message when trying to download an app or make a purchase:
- New Apple ID. If you’ve just created a new Apple ID and need to download or pay for apps, Apple must verify your payment information. Thus, you’ll have to prove everything, especially on a new phone.
- **Payment method needs to be corrected.**Suppose there’s an issue with your Apple ID’s payment method, such as outdated or incorrect details. In that case, verification is required to ensure the account is secure and ready for transactions.
- Invalid credit card. Unsupported or invalid credit cards can trigger the verification notice, as Apple can’t process payments with these cards.
- Unpaid balance. If there’s an outstanding balance on your Apple ID, you can download or pay for new apps once this balance is cleared.
- Family Sharing restrictions. For those using Family Sharing, if the family organizer has placed restrictions on your account, this could result in a verification prompt.
Understanding these reasons is the first step in addressing the ‘Verification Required’ message. It’s not just a random or annoying hurdle; it’s there for your security and to ensure a smooth, safe experience when using the App Store.
Part 2: How To Fix Verification Required Prompt Using Apple ID
Having to deal with the ‘Verification Required’ prompt in the App Store can be a bit of a hassle, especially when you’re eager to get your hands on a new app or game. Fortunately, there are several methods you can use to resolve this issue, most of which are pretty straightforward and can be done right from your device. Here’s how to tackle it:
Update Payment Method
One of the most common reasons for the verification prompt is a problem with your payment method. To fix this, go to your Apple ID settings on your Apple iPhone 14 or iPad. Tap your name at the top of the Settings app, then go to Payment & Shipping. You can update your payment information or add a new payment method here. Make sure the details are correct and up to date.
Check Unpaid Subscriptions
Sometimes, unpaid subscriptions can trigger the verification prompt. Tap the App Store > your profile icon, and select Subscriptions. Here, you can view all your subscriptions, active or expired. Check if there are any unpaid ones and clear any outstanding payments.

Don’t Require Password for Purchases
For less frequent purchases, you should change the settings so you don’t always have to enter your password. Go to Settings, then to Screen Time. Under Content & Privacy Restrictions, select iTunes & App Store Purchases. Here, you can change the settings to Don’t Require for purchases. However, be cautious with this method as it reduces security.

Sign Out of Apple ID and Re-Sign In
Sometimes, simply signing out of your Apple ID and then signing back in can resolve the issue. Go to the Settings app, tap your name at the top, and scroll down to Sign Out. After signing out, restart your device and then sign back in. This can help refresh your account settings and clear up any minor glitches.
Remember, these methods are about bypassing the verification process and ensuring your account is up-to-date and secure. Regularly checking your Apple ID settings and payment information can prevent many common issues with the App Store, including the frustrating ‘Verification Required’ prompt.
Part 3: How To Bypass Verification Required Prompt Without Apple ID
If you need to learn how to bypass the ‘Verification Required’ prompt in the App Store but don’t have access to the Apple ID or password, there’s an alternative approach using third-party software. One such tool that can assist in this situation is Wondershare Dr.Fone - Screen Unlock (iOS), which offers a feature specifically designed for this purpose.
Introducing Dr. Fone’s Screen Unlock (iOS) Feature
Dr.Fone - Screen Unlock (iOS) function includes an Apple ID remover tool. This feature is handy when you cannot remember your Apple ID or password but need to download apps from the App Store. Here’s a step-by-step guide on how to use this feature.
Step-by-Step Guide To Bypass Verification Without Apple ID With Dr.Fone
Here’s a complete guide on bypassing the verification required on the App Store.
Step 1: Install and open Wondershare Dr.Fone on your computer.
Step 2: Navigate to Toolbox and select Screen Unlock followed by iOS.
- Step 3: In the next window, choose Remove Apple ID to proceed.

- Step 4: A connectivity status will appear on the screen with your iOS device connected to the computer. Click Unlock Now to start the process.

- Step 5: Confirm if your iOS device has a screen lock and two-factor authentication enabled. This is crucial for the process to continue smoothly.

- Step 6: Follow the on-screen instructions to put your iOS device in Recovery Mode. If necessary, you can also opt for DFU Mode by following the provided instructions. Once in Recovery Mode, the tool will recognize your device model. You’ll need to select the correct system version to proceed.

- Step 7: The tool will download the appropriate iOS firmware for your device. After the download, it will verify the firmware.

- Step 8: After firmware verification, click Unlock Now. You’ll be prompted to enter a code for confirmation. Once entered, the unlocking process will begin.

- Step 9: You’ll receive a notification once the process is complete. You may try again if the process fails to succeed the first time.

Note: After Apple ID removal, you must re-enter a new Apple ID to access the App Store. Take note of the password now if you forgot your previous one.
Conclusion
In this article, you’ve learned how to remove ‘Verification Required’ in the App Store. The primary takeaway is to try solving the issue using your Apple ID, as this approach typically prevents data loss. However, if you’re in a tight spot without access to your Apple ID, Dr.Fone - Screen Unlock (iOS) offers a reliable alternative to bypass this hurdle.
While it’s an effective solution, always consider it a secondary option to safeguard your data. Additionally, Dr.Fone can be a handy tool for various other phone-related challenges, making it a useful resource for tackling different tech problems.
Tips: Are you searching for a powerful Screen Unlock tool? No worries as Dr.Fone is here to help you. Download it and start a seamless unlock experience!
Also read:
- [New] Efficient Name Alteration for Meet Sessions (Laptop/Mobile) for 2024
- [New] In 2024, Expedite Your Social Media Presence Streamlined Video Upload Methods for Instagram Desktop
- [Updated] 2024 Approved Superior Smartphone Editors Elevating Your GoPro Shots
- [Updated] Revolutionize Your Memories Old Photos, New Video Life
- An Examination of the Public Domain: The Free-to-Access Digital Information Landscape
- Easy Steps on How To Create a New Apple ID Account On Apple iPhone 14 Plus | Dr.fone
- Getting Started on Discord A Comprehensive Guide to Broadcasting for 2024
- In 2024, Different Methods To Unlock Your iPhone 6s Plus
- In 2024, Disabled Apple iPhone 8 How to Unlock a Disabled Apple iPhone 8? | Dr.fone
- In 2024, How To Unlock iPhone 13 Without Passcode? 4 Easy Methods | Dr.fone
- In 2024, How to Unlock iPhone XR Passcode Screen? | Dr.fone
- In 2024, Unlock iPhone 14 With Forgotten Passcode Different Methods You Can Try | Dr.fone
- The Ultimate Walkthrough to Offline Minecraft Gaming on Windows 11 Systems
- Things You Should Know When Unlocking Total Wireless Of Apple iPhone 13 Pro | Dr.fone
- Unlock Your Disabled iPhone 11 Pro Max Without iTunes in 5 Ways | Dr.fone
- Unlocking Apple iPhone 6s Plus Passcode without a Computer | Dr.fone
- 무료 ORF 변환기 - Movavi 이용자 것임: 원거리에서 쉽게 제공
- Title: Complete Guide For Apple iPhone 14 Lock Screen | Dr.fone
- Author: Amelia
- Created at : 2024-11-06 00:21:02
- Updated at : 2024-11-07 05:03:55
- Link: https://iphone-unlock.techidaily.com/complete-guide-for-apple-iphone-14-lock-screen-drfone-by-drfone-ios/
- License: This work is licensed under CC BY-NC-SA 4.0.