
Complete Guide For Apple iPhone X Lock Screen | Dr.fone
Complete Guide For Apple iPhone X Lock Screen
Like most iPhone users, you rely on your lock screen to keep your data safe and protected. But with the release of iOS 17, there are a few new features and changes that you need to know about. This complete guide will clarify everything you need to know about the iOS 17 lock screen.
We’ll explain to you how to use the new features, protect your data, and more. So don’t waste any time - read on for all the details!
How to Have a Customized iOS 17 Lock Screen?
Before we get started, you should know that there are three ways to have a customized lock screen in iOS 17. Let’s get to know more about them.
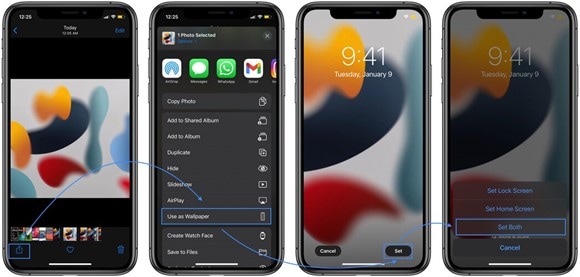
1. How to select your favorite wallpaper
The first way is to use a pre-made wallpaper from the Apple Wallpaper Gallery.
To do this, go to Settings > Wallpapers & Brightness > Choose a New Wallpaper. Then, select the Apple Wallpaper Gallery and choose the image you want to use.
The second way to have a customized lock screen is to use a Live Photo. To do this, go to Settings > Wallpapers & Brightness > Choose a New Wallpaper. Then, select the Live Photo option and choose the image you want to use.
Note: You can only use Live Photos for your lock screen if your Apple iPhone X is unlocked.
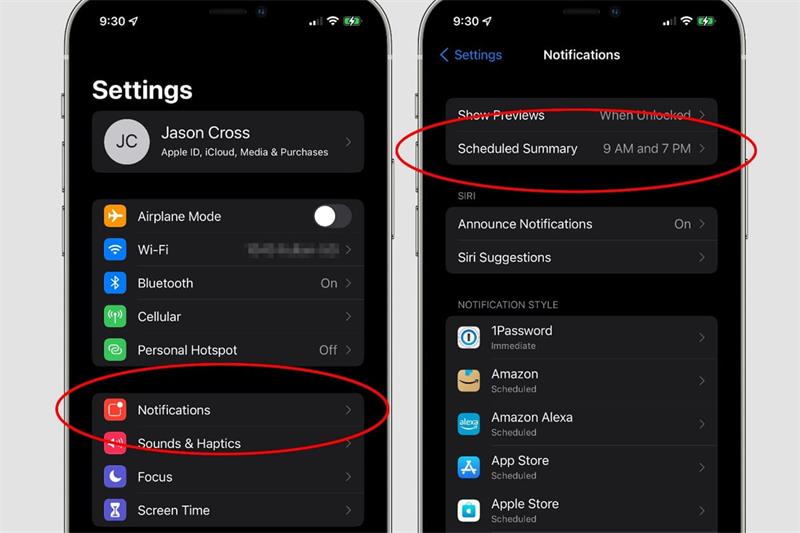
2. How to manage notifications
If you want to manage notifications on the iOS 17 lock screen, there are two ways to do it.
At first, you can go to Settings > Notifications. Here, you can choose how many notifications you want to see on your lock screen and which apps can send you notifications.
The Do Not Disturb feature is the second way to manage notifications. To do this, go to Settings > Do Not Disturb and enable the feature. You can also schedule when Do Not should turn on and off. This feature work like a charm if you want to silence all notifications at night.
3. How to set Auto-Lock time
If you want to set the Auto-Lock time, go to Settings > Display & Brightness > Auto-Lock. Here, you can choose how long it should take for your Apple iPhone X to lock automatically.
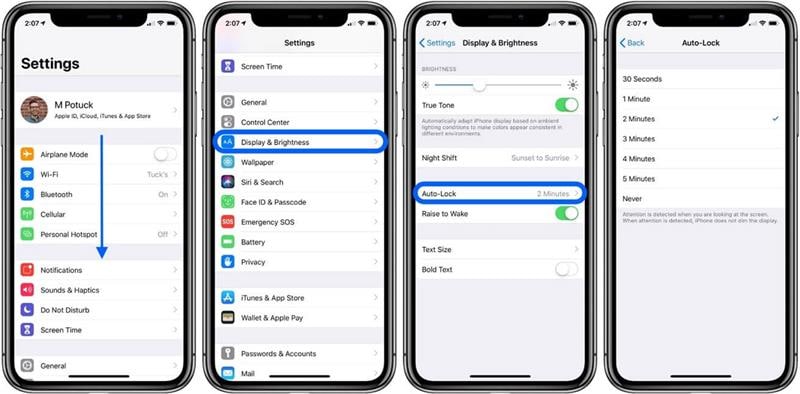
By default, the Auto-Lock time is set to 30 seconds. But you can choose to lock it immediately, after 1 minute, 5 minutes, or never.
How to Turn Off/On Lock Screen in iOS 17?
If you want to turn off the lock screen, go to Settings > Touch ID & Passcode (or Face ID & Passcode). Then, scroll down and disable the Unlock with Passcode (or Unlock with Face ID) option.
Enable the Unlock with Passcode (or Unlock with Face ID) to turn ON the lock screen.

But if you have forgotten your passcode, don’t worry. The next section will show you how to bypass the lock screen.
How to Bypass the iOS 17 Lock Screen Passcode?
Different methods can help you bypass the iOS 17 lock screen passcode. Let’s discuss them in detail.
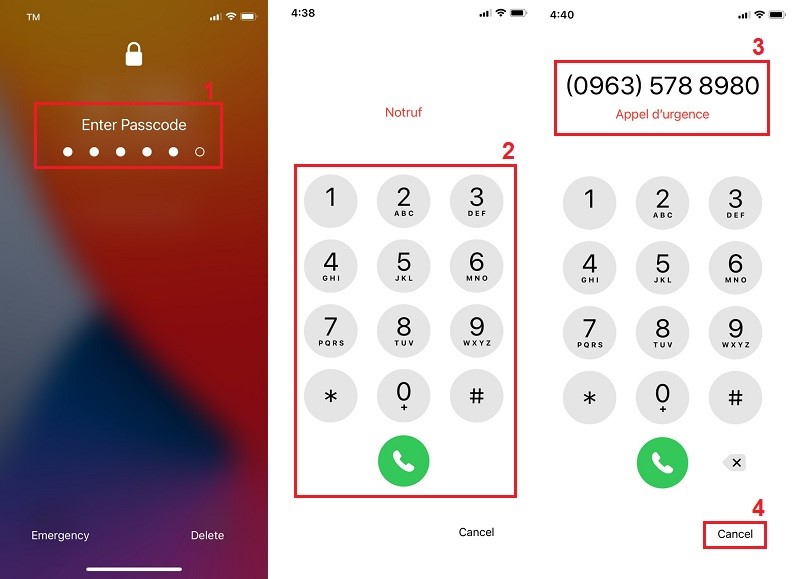
1. Use Emergency call
The first method to bypass the passcode is to use the emergency call feature.
To do this, access your device with five wrong passcodes attempts. This will trigger the emergency call feature. All you need to do is, dial an emergency number and then tap on the cancel button, and you’ll be taken to the home screen.
That’s how you bypass the lock screen without losing any data.
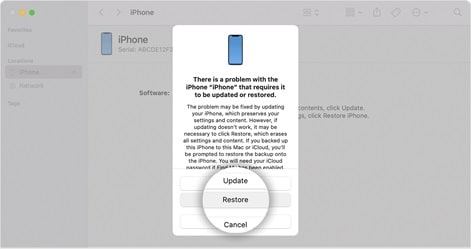
2. Bypass passcode with iTunes restore
If your Apple iPhone X needs to be backed up with iTunes sync feature, you can use this method to bypass the passcode.
To do this, connect your Apple iPhone X to a computer and open iTunes. Then, click the Restore button and follow the on-screen instructions to restore your Apple iPhone X.
It will take some time, but you can use your Apple iPhone X without a passcode once it’s done.
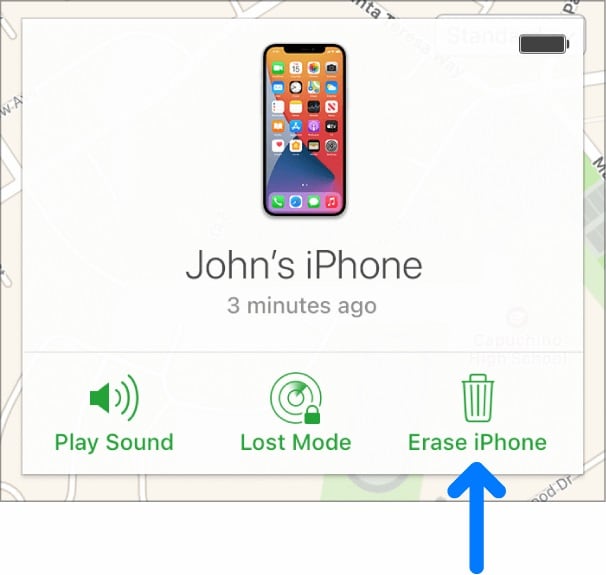
3. Use Find My in iCloud
If you have synced your Apple iPhone X with iCloud, you can try the Find My feature to bypass the lock screen.
To do this, go to icloud.com/#find and sign in with your Apple ID. Then, select your device from the list of devices and click on the Erase button.
To do this, go to icloud.com/#find and sign in with your Apple ID. Then, select your device from the list of devices and click on the Erase button.
All the data will disappear on your Apple iPhone X, and you’ll be able to access it without a passcode.
This process can also take some time, so be patient.
4. Dr.Fone-Screen Unlock
If all mentioned methods don’t work for you, the ultimate solution is to use Wondershare Dr.Fone-Screen Unlock and bypass the passcode. To finish it, you can follow the steps given below carefully.
Step #1: Download/Install Dr.Fone on your Computer or MacBook
A third-party tool named Dr.Fone-Screen Unlock can help you in this regard. The wonderful part is that you don’t have to learn any technical knowledge.
First, download/install Dr.Fone-Screen Unlock on your computer or MacBook. You can get it from here:
After downloading the tool, install launch it on your PC.
Step #2: Launch the Application and Go for Screen Unlock
Once you have installed the tool, launch it and go to its main window. Here, you will see different features. Select the Screen Unlock feature from the list.

Step #3: Connect your Apple iPhone X and Activate DFU Mode
Now, you need to connect your Apple iPhone X to the computer using an Apple original cable. Once done, you need to put your Apple iPhone X into DFU mode.
To do this, you need to press and hold the Home button and Sleep/Wake button simultaneously for 10 seconds.
After that, release the Sleep/Wake button but keep holding the Home button until Dr.Fone detects your device in DFU mode.

Step #4: Download the Appropriate Firmware
Once Dr.Fone detects your Apple iPhone X, it will ask you to continue. So, proceed to the next, and here you will be asked to download the correct firmware package for your device.
So, choose the firmware carefully and hit the download button.
Depending on your internet connection, you may have to wait for a longer time. But once the firmware is downloaded successfully, you can proceed to the next step.

Step #5: Unlock your Apple iPhone X
After the firmware is downloaded, you need to press the Unlock Now button, and Dr.Fone will start to unlock your Apple iPhone X without a passcode. Once it is done, you can get into your device without any restriction.

FAQs
Why iOS 17 Lock Screen is not working?
There could be many reasons for the malfunction of the Lock Screen in iOS 17. The most common reason is the installation of incompatible jailbreak tweaks. Therefore, it is recommended to remove all the jailbreak tweaks and check whether the problem persists.
You can try resetting your device to factory settings if the problem still exists. But make sure to back up your data before doing so, as it will erase all your data.

How do I fix my iOS 17 lock screen bugs?
There are various ways to fix the lock screen bugs in iOS 17. You can try resetting your device to factory settings, or you can also try restoring your device from a previous backup.
If none of these methods work, you can try using a third-party tool like Dr.Fone-Screen Unlock to bypass the lock screen.
How do you unlock a locked iPhone iOS 17?
There are various ways to unlock a locked iPhone running on iOS 17. You can try the feature of Find My iPhone, or you can also use a third-party tool like Dr.Fone-Screen Unlock.
How do you fix an unresponsive lock screen on iPhone running on iOS 17?
If your lock screen is unresponsive on iPhone running on iOS 17, you can try force restarting your device. To do this, you need to press and hold the Home button and Sleep/Wake button simultaneously for 10 seconds.
After that, release the Sleep/Wake button but keep holding the Home button until you see the Apple logo. Once your device is restarted, check if the problem persists or not.
If the problem still bothers you, you can try using a third-party tool like Dr.Fone-Screen Unlock to reset the phone, eventually fixing the issue.
The Bottom Line
So this is what we want to talk about the iOS 17 Lock Screen with you. We have tried to cover everything in this article, including the new features, lock screen bugs, and how to fix them.
All the fixes mentioned above are tested and proven to be working. So you can try them without any hesitation.
But if you are still facing problems with your lock screen, then the greatest thing you can do is to use a third-party tool like Dr.Fone-Screen Unlock. This tool is very easy to use and will unlock your device within minutes.
So, if you are looking for a hassle-free solution to fix your lock screen issues, then this is the best one you should never miss.
How to Access Your Apple iPhone X When You Forget the Passcode?
We all have secrets in our iPhone or some important financial or business data that we all wish to protect from unwanted access. For this, we set up a passcode. But what if Apple iPhone X passcode is forgotten by you? Well, you may now wonder how to perform Apple iPhone X passcode bypass, right? Worry no more! We’re right here to help you with the proven solutions for Apple iPhone X passcode reset without iTunes or with it too. Let’s explore.
Part 1. Unlock Apple iPhone X screen passcode in one click (unlock tool needed)
The first and the ultimate measure for Apple iPhone X passcode removal in just a matter of a single click is Dr.Fone - Screen Unlock (iOS) . With the help of this mighty tool, performing Apple iPhone X passcode reset is even easier than any other alternative. Not only it can perform Apple iPhone X passcode bypass, you can also make use of this tool to bypass lock screen of an Android smartphone too. Isn’t it amazing? Moreover, this powerful tool works effortlessly with the latest iOS 13 version and even with the most recent iPhone models as well. Here is the step by step tutorial on Apple iPhone X passcode bypass.
Step 1: Install and launch Dr.Fone - Screen Unlock (iOS)
Get the tool Dr.Fone - Screen Unlock (iOS) downloaded and installed over your computer system. Then establish a connection between your computer and iPhone.
Now, launch the tool and then opt for the “Unlock” tile from the main screen.
Step 2: Boot in Recovery/DFU mode
Next move that you need to perform is to opt for the correct mode, i.e. “Unlock iOS Screen”. Then, you’ll be prompted to boot your device in Recovery/DFU mode. The on-screen instructions will guide you on how to do it.

Step 3: Double-Check iPhone information
On the upcoming screen, you’ll be displayed the “Device Model” and most recent “System Version” which is compatible with your Apple iPhone X. Simply, hit the “Start” button here.
Step 4: Perform Apple iPhone X passcode removal
Once, the software downloads the firmware automatically, you can then proceed to Apple iPhone X passcode reset. Hit the “Unlock Now” button over the next screen and in a short while you’ll be notified that Apple iPhone X passcode removal is completed.


 safe & secure
Part 2. Restore an iTunes backup for Apple iPhone X
Here we’re going to be familiar with the Apple iPhone X passcode reset using the renowned iOS data management tool, iTunes. But be sure that iTunes version installed over your computer is up to date or else unknown errors may crop up in between. Eventually, your all-new Apple iPhone X may even get bricked. Think this is it? Well, here’s another problem with iTunes, you need to get your Apple iPhone X connected only to a pre-synced or pre-trusted computer. Or else, this tutorial won’t bring any good to you.
Step 1: First, get your Apple iPhone X connected to your PC. Then, launch the iTunes most recent version. It will automatically detect your Apple iPhone X. Once detected, tap the “Device” icon over the left top corner of iTunes.
Step 2: Then, hit the “Summary” option from the left panel and then you need to hit the “Restore iPhone” button. Confirm your actions by simply pushing the “Restore” button on the pop-up message and you’re done. Now, just wait for the process to complete.

Part 3. Restore Apple iPhone X in recovery mode to remove screen passcode
If somehow, the above solution fails and you’re just not able to get Apple iPhone X passcode reset. You need to boot your device into recovery mode and then perform the factory reset. This would certainly wipe off everything from your Apple iPhone X including the passcode as well. Here are the steps involved in booting your Apple iPhone X in recovery mode.
- First things first, power off your Apple iPhone X by pushing the “Side” button down along with either of the “Volume” button. Keep them pressed till you get to see “Power-off” slider over your screen. Now, simply drag it to power off your device.
- Next, connect your Apple iPhone X and your computer firmly with the help of an authentic cable. Please make sure to press and hold the “Side” button meanwhile.
- Ensure not to let go the Side button till the recovery mode screen appears over your Apple iPhone X.

- Once the Apple iPhone X device is booted in recovery mode, iTunes will throw a pop up message that “iTunes has detected an iPhone in recovery mode”. Simply, hit the “OK” button over the message and then push the “Restore iPhone” button followed by confirming your actions.

Part 4. Use “Find iPhone” from iCloud
The next pro tutorial for Apple iPhone X passcode removal is via iCloud. For this, grad access to any computer available on your side. Or, you can also make use of any other smartphone device but ensure it must be connected to a WiFi network or have an active data pack. Moreover, the locked iPhone on which you’re going to perform Apple iPhone X passcode reset should also have an active internet connection to make this tutorial work.
Note: Since we’re going to unlock your Apple iPhone X using Find My iPhone service of iCloud. It is important that “Find My iPhone” service was enabled beforehand over your Apple iPhone X.
Step 1: Launch the browser over any other smartphone device or computer. Then, visit the official web page iCloud.com.
Step 2: Now, make use of same Apple account configured with your Apple iPhone X to sign in to iCloud. Then, opt for the “Find My iPhone” icon over the launch pad.

Step 3: Next, tap on the “All Devices” drop-down menu available over the top midsection and then select the Apple iPhone X that you wish to bypass the passcode off.
Step 4: Then, you’ll get to witness a pop-up window over your screen. Tap the “Erase iPhone” button over it and then confirm your actions. All the settings and data will be wiped off remotely from your Apple iPhone X now.

Step 5: Lastly, wait for the process to complete and upon completion set up your device as usual.
Part 5. How about Apple iPhone X restrictions passcode?
Apple iPhone X restrictions is a vital setting that is used to lock down a set of functions of the iPhone. These iPhone restrictions are also known as Parental Controls. That implies one can make use of these settings to block or hide songs that have explicit lyrics/content or barring YouTube from running, etc.
It is vital to set up a 4 digit passcode if you want to use iPhone restriction settings. Now, if you somehow forgot the passcode that was set to make use of iPhone restrictions, you need to restore your Apple iPhone X with the help of iTunes to remove the previous passcode. But ensure not to restore an old backup of iPhone or else, the old passcode which you may not know will also get activated. Eventually, making your situation even worse.
Reset/Change Apple iPhone X restrictions passcode
Now, in case you know the Apple iPhone X restrictions passcode and just wish to reset it. Then follow the streak of steps mentioned below.
- Launch “Settings” of your Apple iPhone X and then get into “General” followed by “Restrictions”. Now, you’ll be asked to key in the current passcode.

- Once you’ve entered the current passcode, hit on the “Disable Restrictions” and to confirm your actions, key in your passcode when prompted.

- Lastly, hit on “Enable Restrictions”. You’ll be asked to set up a new passcode now. Do it and you’re done.

How to Make the Most of Your Apple iPhone X Lock Screen with Notifications?
The Apple iPhone X lock screen has certainly changed a lot over the last few updates of iOS. Not only it provides an added security to the Apple iPhone X device, but with iPhone lock screen notifications, we can also save our time and efforts. With the introduction of iOS 18, we can also see a change in iPhone lock screen with notifications as well. To help you make the most out of lock screen notifications iPhone, we have come up with this ultimate guide. Read on and know all sorts of things you can do with iPhone notification lock screen.
Part 1: How to use iPhone lock screen notifications?
When it comes to iPhone lock screen with notifications, there are so many things that you can do. For instance, here are a handful of things you can do with iPhone lock screen notifications.
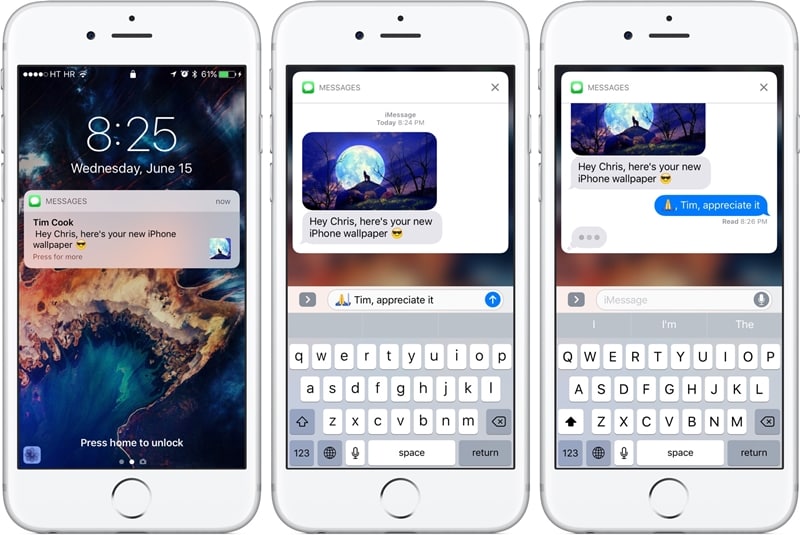
Reply to messages quickly
If you aren’t using this iPhone notification lock screen feature, then you are certainly missing out on something. You might already know that you can get a preview of messages on your home screen. Simply long press it (or 3D Touch) to interact with it. From here, you can reply to your messages without unlocking your device.
Interact with apps without unlocking your phone
Not just your messages, you can interact with other apps as well right from the lock screen notifications iPhone. After getting a list of notifications, you can simply tap on the “x” button to close them.
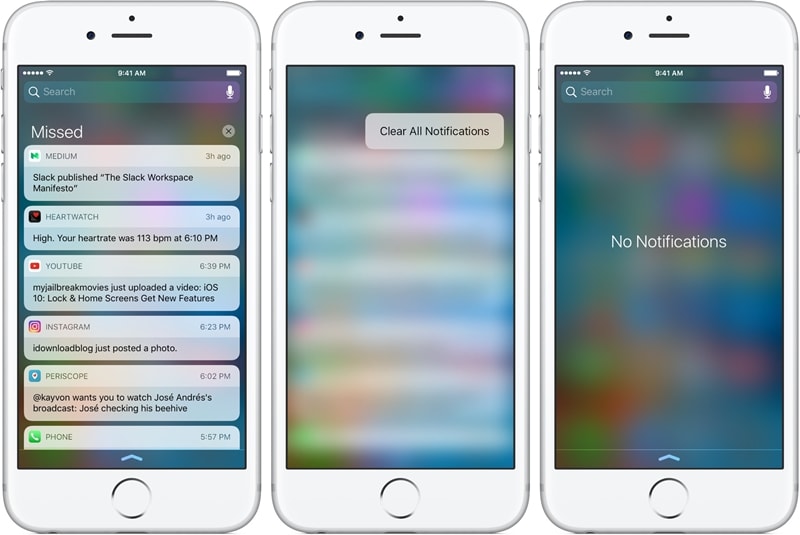
Though, if you want to know more, then just long press the notification. For instance, if you have got a notification for an email, then you can get various options just by long pressing it.

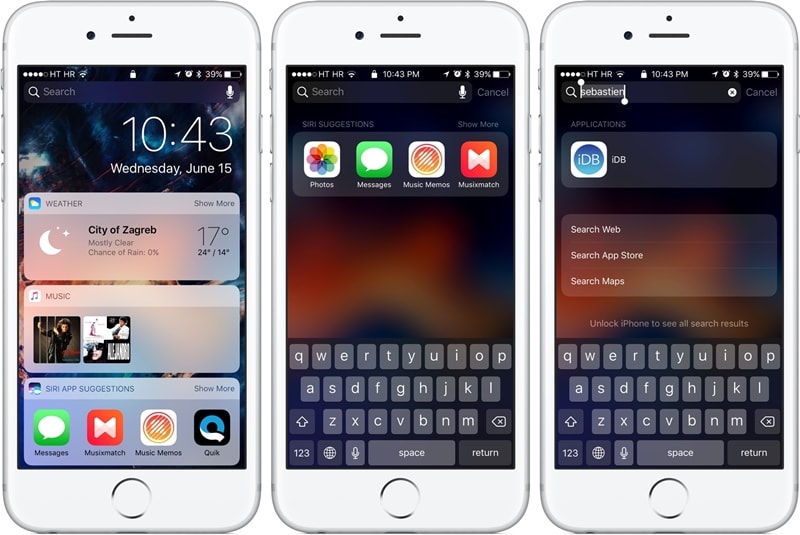
Search for anything
Besides interacting with widgets and apps, you can also search for something on your device and that too without unlocking it. Simply tap on the search bar to make it work.
Part 2: How to turn off notifications on iPhone lock screen?
Sometimes, people can access our private information just by looking at our notifications. In this way, they can get read your crucial information and that too without unlocking your device. By simply visiting your device’s settings, you can customize iPhone lock screen with notifications. In this way, you can turn on or off iPhone lock screen notifications for the apps of your choice.
1. Unlock your device and go to its Settings > Notifications to access all the features related to its notifications.
2. From here, you can view a list of all the apps that can access notifications.
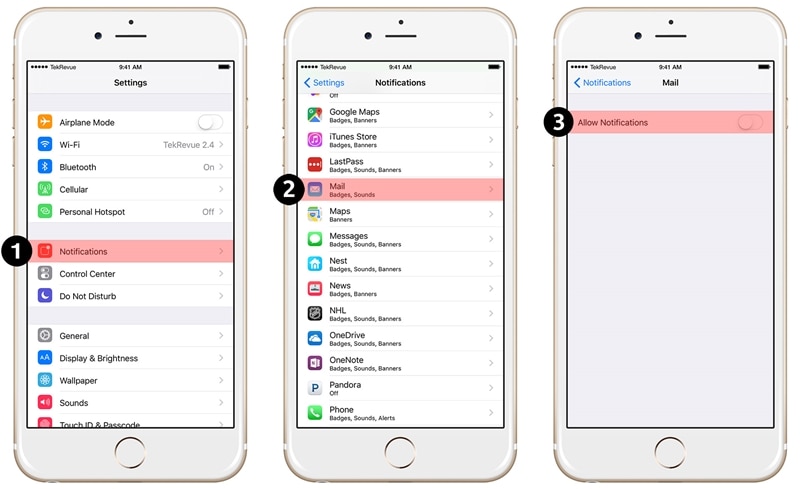
3. Simply tap on the app of your choice (Mail, Message, Photos, iTunes, etc).
4. From here, turn off the option of “Allow Notification” to completely turn off the notifications for the app.
5. If you simply want to turn off notifications on lock screen, then switch off the option of “Show on Lock Screen”.
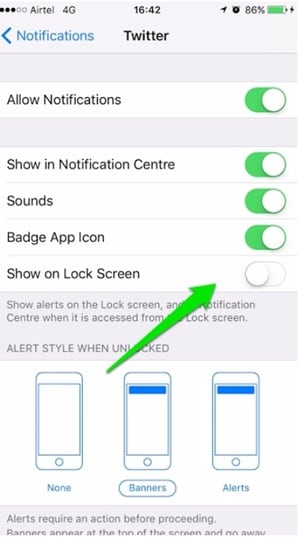
Besides that, there are a few other options as well that you can either enable or disable to customize your lock screen notifications iPhone.
Part 3: How to turn off notification view on iPhone lock screen?
The notification view can be used to see previous notifications on the Apple iPhone X device without unlocking it. Needless to say, most of the users don’t like to include this iPhone notification lock screen feature. To turn off the notification view of iPhone lock screen notifications, follow these steps:
1. Firstly, unlock your device and got to its Settings > Touch ID & Passcode option.
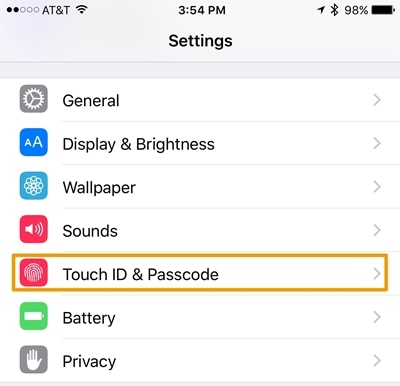
2. You would be needed to provide the passcode or your fingerprint in order to access these settings.
3. This will provide a list of features related to your passcode. Go to the section of “Allow Access When Locked”.
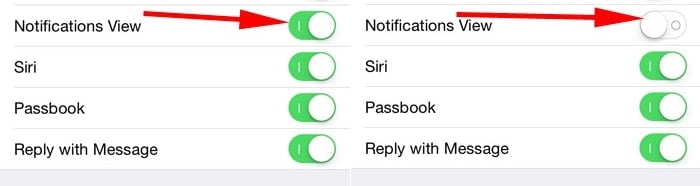
4. From here, make sure that the option of “Notification View” is turned off.
After turning the option off, you can exit from the Settings interface. In this way, your device won’t display the notification view.
Part 4: Changes on iPhone lock screen notifications on iOS 18
With the new update of iOS 18, we can see a drastic change in the Apple iPhone X lock screen notifications as well. Since the Apple iPhone X lock screen with notifications have been integrated into one, it becomes quite easier for users to access it.
Access iPhone notification lock screen on iOS 18
Some people find it a little tricky to access the lock screen notifications iPhone after the iOS 18 update. Instead of sliding the screen from the top, you need to swipe it from the middle. By swiping it from the bottom, you might get its control center.
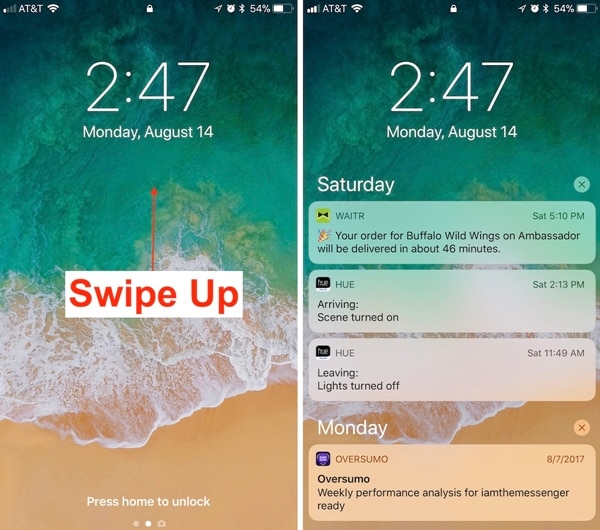
Simply swipe up from the middle of the screen to get a list of all the notifications. Now, you can slide them to access the old notifications.
Nevertheless, you can swipe from the top to access the cover sheet.
Swipe left or right
This is undoubtedly one of the most evident new features of the Apple iPhone X notification lock screen of iOS 18. Now, you can swipe left or right to access various features. By swiping left, you can access the Camera on your device and by swiping right, you can access your Today View.
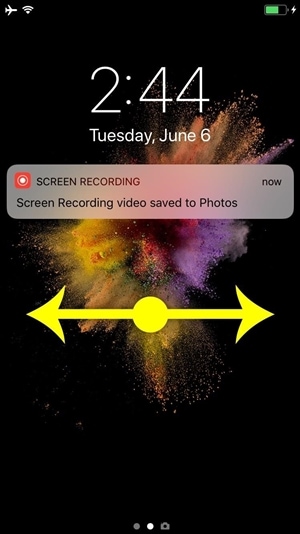
If you want to click pictures instantly, then simply swipe left the lock screen. This will launch the Camera on your device, letting you click pictures on the go. Similarly, by swiping right, you can access your Today View. This includes vital data from apps and widgets that your smartphone assumes is important for you regarding the day.
We hope that after following this guide, you would be able to gain in-depth information regarding iPhone lock screen with notifications. Apart from all the basic things you can do on the lock screen, we have also provided easy ways to customize it. Furthermore, there are so many things that you can do with the iOS 18 iPhone lock screen notifications. While most of the users loved the feature, some are quite hesitant about its application. What is your take on this? Let us know about it in the comments.
- Title: Complete Guide For Apple iPhone X Lock Screen | Dr.fone
- Author: Amelia
- Created at : 2024-07-15 05:28:27
- Updated at : 2024-07-16 05:28:27
- Link: https://iphone-unlock.techidaily.com/complete-guide-for-apple-iphone-x-lock-screen-drfone-by-drfone-ios/
- License: This work is licensed under CC BY-NC-SA 4.0.