
Complete Guide on Unlocking Apple iPhone 13 Pro Max with a Broken Screen? | Dr.fone
Complete Guide on Unlocking Apple iPhone 13 Pro Max with a Broken Screen?
Is your Apple iPhone 13 Pro Max screen broken, and you’re wondering how to unlock iPhone with broken screen? Then don’t worry; this guide is all you need to unlock iPhone with broken screen.
Locking an iPhone with a passcode is a great way to prevent it from getting into the wrong hands. However, some misfortunes can happen, and you might be left with a broken screen. In such cases, you won’t be able to get the data inside your phone. So, to get back at your files or to reset your device, you will need to unlock your phone first.
In this detailed guide, we will elaborate on the best possible methods you can employ to unlock iPhone with broken screen. Moreover, we will introduce you to the best unlocking tools available for your situation. So stay with us till the end.
Part 1: Use the Feature “Find My iPhone” to Unlock an iPhone with Broken Screen
Find My is a famous component in Apple devices that allows you to find your lost devices through GPS. The option has been revitalized much from that point forward. Presently it can be utilized to erase your Apple iPhone 13 Pro Max from a distance. You can erase your information without a password) to save its data.
Also, if your Apple iPhone 13 Pro Max screen is broken, you can use this feature to unlock or erase it. We will call this feature “Erase it effortlessly,” as it erases iPhones without a password.
Prerequisites:
- The locked iPhone ought to have the Find My element enabled.
- The locked iPhone ought to be signed in to your iCloud account
- It must have an internet connection.
- Apple ID and password are also required.
Step 1. Open iCloud.com on an internet browser.
Step 2. Enter your Apple account details as inquired.
Step 3. After signing in effectively, click on Find My and enter your Apple ID and password. Click on Sign In.
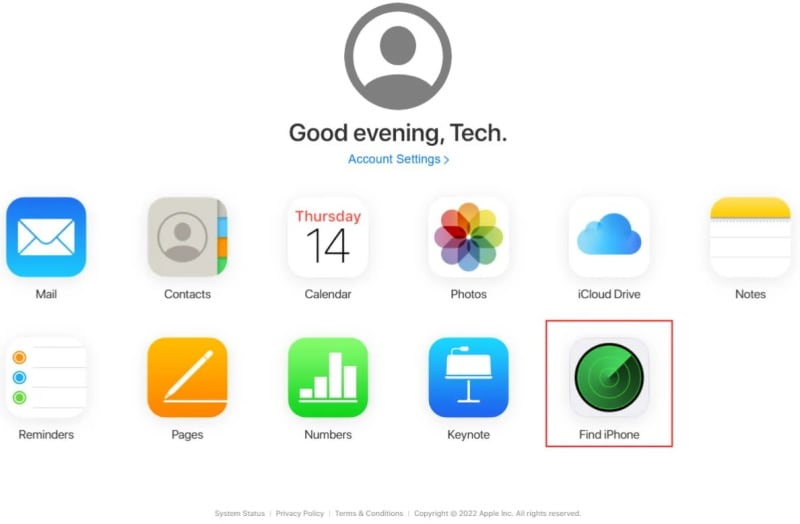
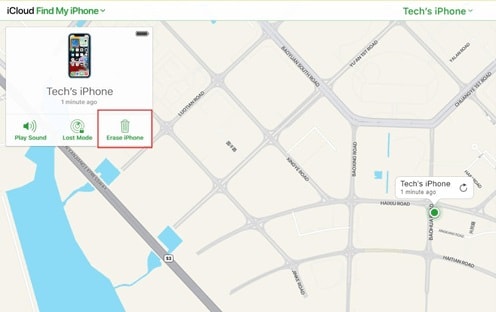
Step 4. Pick your locked phone under the “All Devices” segment.

Step 5. Click on ‘Erase iPhone’. Click on ‘Erase’ again after the confirmation text.
Step 6. Enter the password to proceed.
Step 7. A code will be sent to you. Enter the code to proceed.
Step 8. Presently, enter your mobile number. Then, click on the Next button and then “Done.”
Step 9. The iCloud will effectively begin the deletion, and you can see the Apple logo with a white bar noticeable on your locked iPhone. After an effective erase process, your Apple iPhone 13 Pro Max will restart.
Step 10. Swipe up on the Apple iPhone 13 Pro Max screen to begin once more.
Again, iPhone will show the Apple iPhone 13 Pro Max locked message. You then need to remerge your Apple ID details and click on Next. You will then get the chance to make your new passcode.
Step 1. To begin, you ought to put your gadget in Recovery Mode. Here’s what you must do:
On iPhone 8 or Above: Long-press the side/power button until the phone gives you the slider to close down. Drag the slider across the screen and turn it off. Then, press the volume (+) button, then the volume (-). Then, at that point, long-press the side button again while connecting it to your PC to put your phone in recovery mode.
On iPhone 7: Connect it to your system while tapping the volume down button. Hold the button until this mode appears.
On iPhone 6S or Older: Switch off your Apple iPhone 13 Pro Max, plug it into your PC and hold the home button until the phone shows this screen.
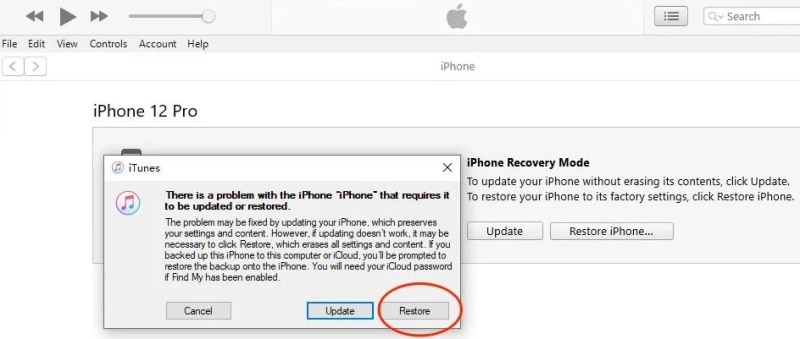
Step 2. Connect your Apple iPhone 13 Pro Max and your system and open iTunes. After clicking, force restarts it by holding down both the volume and power buttons. You’ll then get an option to Restore. Select this choice, and your Apple iPhone 13 Pro Max will download the required software. When done, you can set up and use your Apple iPhone 13 Pro Max.
Use iTunes
You can erase your Apple iPhone 13 Pro Max and its password once you synchronize it with iTunes. Follow these steps:
- Connect it to the PC you sync with, and open iTunes. If they request a password, use another PC you’ve connected with. If that also doesn’t work, go for the recovery mode.
- iTunes will coordinate your Apple iPhone 13 Pro Max and make a backup. When the sync and backup are done, click Restore iPhone.
- Select your Apple iPhone 13 Pro Max in iTunes and pick the latest backup.
- You’ll then see the “Set Up” screen after that. Here, tape on the “Restore from iTunes Backup” choice.
Part 3: How to Unlock iPhone with Siri If its Screen is broken
Siri is a voice assistant on Apple devices. Like other devices have Alexa and Google Assistant, iPhone has Siri. It empowers you to use the Apple iPhone 13 Pro Max through voice commands. You can converse with Siri to unlock your Apple iPhone 13 Pro Max password.
How might Siri unlock iPhone? One can use bugs in Siri to unlock iPhone. However, it is only possible in a few iOS versions.
Step 1. First and foremost, enable Siri. You should hold the home button of your locked iPhone and say ‘Hello Siri’ to enact her.
You need to ask Siri, “Siri, what time is it?” or “Siri, what time is it in the USA”? That will permit Siri to open the World Clock on your home screen.
Step 2. Presently, tap on the world clock symbol. Now, tap on the + sign in the upper right corner to add the clock feature to the home screen.

Step 3. At the point when another clock is added, you will have the choice to share the new clock.
Step 4. Click on the share button and Pick the Message choice.
Step 5. You don’t need to text a message. Instead, add something arbitrary in the “To” field.
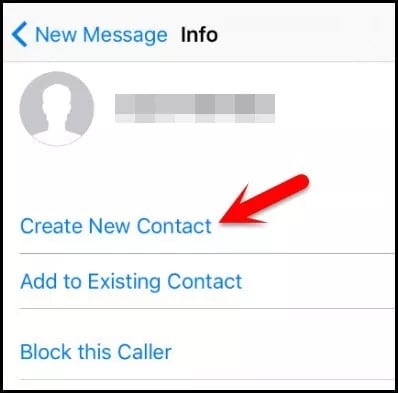
Step 6. Add Siri to make another contact by tapping on the new or + symbol. Siri will open the New Contact interface with details like adding the name, photo, etc.
Step 7. Add the photo from the photo library. Tap on “Add Photo,” and it will open the library for you. Tap on Select Photo, and Siri will unlock the Apple iPhone 13 Pro Max device and let you pick a photo.
Step 8. When the photo library is open, tap on the home button or return button to get back to the unlock screen to get to the Settings symbol.
Step 9. When you open your settings, you can now refresh your credentials. This might work by making a Face ID rather than a password to unlock your Apple iPhone 13 Pro Max.
Besides, it works for iPhones with iOS 8.0 to 10.1. These bugs are fixed in the later versions of the Apple iPhone 13 Pro Max and won’t assist you with fooling Siri into unlocking your Apple iPhone 13 Pro Max.
Bonus Tips: Easy Broken iPhone Unlock Tool
Dr.Fone-Screen Unlock
The quickest way to unlock iPhone with broken screen is to use an unlocking tool. However, there are tons of tools available in the market, but it is our responsibility to suggest you the best way.
We strongly recommend you install the Wondershare Dr.Fone-Screen Unlock tool. It is a safe and easy-to-use tool with an excellent success rate. With years of service in the unlocking industry, the experts at Wondershare thrive to provide outstanding services to its customers.
Moreover, Dr.Fone will keep your data from being exposed to threats. It is a fast tool that requires no prior knowledge to use. However, this tool will erase your data forever. So before further ado, let’s see how to unlock iPhone with broken screen:
Step 1. Launch the Software and Connect your Device
Click the “Screen Unlock” option from the main homepage and connect your iDevice to your computer. Then go for the “Unlock iOS Screen” option on the program.

Step 2. Access the Recovery or DFU mode
Removing the lock screen requires you to boot your Apple iPhone 13 Pro Max in Recovery or DFU mode. The Recuperation mode is suggested for iOS devices. But if you can’t, you can go for the DFU mode.

Step 3. Confirm your Phone Model
Dr.Fone will now show you the phone Model and OS version. You can choose the right information from the dropdown menu if the one on your screen isn’t right. Then, at that point, download and install the required firmware for your Apple iPhone 13 Pro Max.

Step 4. Unlock the Screen Now
After the firmware is downloaded effectively, click Unlock Now.

In almost no time, the software will unlock your Apple iPhone 13 Pro Max effectively. However, note that this unlocking will likewise wipe your user data.
The Bottom Line
Having an iPhone with a broken screen can make your life hard. It keeps you from communicating and carrying out important tasks on the phone. But we can make this situation work your way. Therefore, we have furnished the above list to help you unlock iPhone with broken screen. Even if none of the methods work, Dr.Fone can still get our phone unlocked.
Learn How To Lock Stolen Your Apple iPhone 13 Pro Max Properly
When it comes to security in smartphones, Apple stands at the forefront. The Activation Lock is a robust barrier to preventing unauthorized access and device theft. Losing your Apple iPhone 13 Pro Max can be a disturbing event, as accidents are inevitable. Taking prompt action to stop unauthorized data access becomes important. This guide offers a step-by-step approach to how to lock a stolen iPhone.

Part 1. Major Threats To Consider When iPhone Is Stolen
A lost iPhone can become susceptible to a myriad of threats. It could compromise your privacy, security, and personal data. Here are the reasons why learning how to lock your Apple iPhone 13 Pro Max when lost is essential:
- Unauthorized Access to Personal Data: Thieves can exploit an unsecured Apple iPhone 13 Pro Max to gain unauthorized access to personal information. These include contacts, messages, emails, and photos.
- **Financial Exploitation:**With access to your Apple iPhone 13 Pro Max, thieves may attempt to get stored payment methods.
- Identity Theft: Stolen iPhones often contain a wealth of sensitive information. This makes them a prime target for identity theft.
- Compromised Social Media Accounts: Using social media applications on your smartphone carries potential risks in the event of device loss. Unauthorized access to your social media accounts can lead to many problems, including misinformation and compromised privacy.
Part 2. Use Find My To Locate Stolen iPhone
On learning about how do I lock my stolen iPhone, Apple’s robust Find My feature emerges as a beacon of hope. It uses a combination of GPS, Wi-Fi, and Bluetooth signals to locate your Apple iPhone 13 Pro Max accurately.

Key Scenarios Where Find My Works
Find My can be a source to track stolen iPhones, but certain scenarios are associated with its operations. To know more about these scenarios, this section continues the discussion further below:
- iPhone Turned On:Find My can provide real-time location tracking when your stolen iPhone is still powered on and connected to the internet.
- **iPhone Turned Off or In Airplane Mode:**The last known location before the Apple iPhone 13 Pro Max device was powered down or put in Airplane Mode is accessible, offering a starting point for recovery efforts.
- **Offline Finding with Bluetooth:**The Find My service leverages Bluetooth technology to create a vast network of Apple devices. With these, it can securely help locate your Apple iPhone 13 Pro Max, even offline.
- **Activation Lock Integration:**This service is also integrated with Activation Lock, adding an extra layer of security. The Activation Lock remains active if a thief attempts to erase your device.
How To Use Find My To Locate Your Stolen iPhone
- Step 1. Access the Find My app on a trusted device and open it. If you can’t access one, use the iCloud website to access Find My service.

- Step 2. After logging in, select the lost device, and you can see its last recorded location on the map.

Part 3. Using Lost Mode To Lock Stolen iPhone
Lost Mode locks the Apple iPhone 13 Pro Max device and allows users to showcase a personalized message on the screen. This can help greatly in the safe return of the smartphone. The following are the simple steps you need to follow to learn how to block stolen iPhone with Lost Mode:
Activating Lost Mode Using Your Smartphone
- Step 1. Within the Find My app, tap “Devices” from the bottom toolbar and select your lost device. Now, scroll down to “Mark As Lost” and tap “Activate.”

- Step 2. You will now be given a summary of the Lost Mode; tap “Continue” to proceed. On the following screen, add a phone number, tap “Next,” and add a message that will be displayed on the lost device.

- Step 3. After adding a message, tap “Next” on the following screen and press “Activate” from the top right corner.

Activating Lost Mode Using iCloud Website
- Step 1. Access the iCloud website via your computer’s web browser. Sign in using your Apple ID, continue to click the “Grid” icon in the top right corner, and select “Find My.”

- Step 2. In Find My, add your Apple ID password again to access “All Devices.” Now, choose the lost device from the list of all devices in the top left corner. Then, click “Mark As Lost,” and the following pop-up Lost Mode prompt, tap “Next.”

- Step 3. Now go on to add your phone number and tap “Next.” Follow it by providing the message you want to display and click “Activate” to enable Lost Mode.

Part 4. Can’t Find Stolen Phone? Erase iPhone Completely
When efforts to locate a stolen iPhone fail, the need to protect sensitive data intensifies. As a result, the option to erase the Apple iPhone 13 Pro Max device becomes a crucial step instead of how to lock the Apple iPhone 13 Pro Max when lost. Here’s how to protect against the potential misuse of your information by erasing your device via Find My:
- Step 1. After accessing Find My service, choose the lost device from the list and click “Erase This Device.”

- Step 2. Select “Continue” on the erased iPhone screen for the Find My app. Once you’ve added the number, press “Erase” in the top right corner and follow the on-screen instructions to finish the procedure.

- Step 3. If using the iCloud website, tap “Erase This Device” and click “Next” on the upcoming prompt. You will be asked to enter the Apple ID password, after which you can use the on-screen guidelines to finish the process.

Part 5. Other Things To Do iPhone Is Stolen
There are additional measures you can take to enhance your overall security apart from understanding how do I lock my stolen iPhone. The following are some options you should utilize in case of device loss:
To Do List #1. Report to Police
If your Apple iPhone 13 Pro Max is stolen, it is crucial to immediately inform your local law enforcement agency. It facilitates the recovery process and assists in combatting criminal activities. Provide essential details about your Apple iPhone 13 Pro Max, such as the Model, color, and IMEI number. Share information about your efforts to locate the stolen iPhone using Find My.

To Do List #2. Make an Insurance Claim With AppleCare
You can claim insurance if you have AppleCare+ coverage for your Apple iPhone 13 Pro Max. AppleCare+ with Theft and Loss for iPhone includes protection against theft and loss incidents. It offers up to two incidents of such coverage every 12 months.
To qualify for theft or loss coverage, it is necessary for Find My to be enabled on your device at the time it goes missing. Moreover, it should remain enabled alongside Lost Mode throughout the claims process.

To Do List #3. Remove iPhone From Trusted Devices (2FA)
After your Apple iPhone 13 Pro Max is stolen, it becomes essential to bolster the security of your online accounts. It is particularly essential for those safeguarded by Two-Factor Authentication (2FA), which needs to be removed:
From iOS Device Settings
- Step 1. Access Settings on an iOS device logged in with the same Apple ID as the lost one. Here, tap on your name on the following screen and scroll down.

- Step 2. Simply select the misplaced device, and in the subsequent interface, press “Remove from Account” to eliminate it from the list of trusted devices.

From the Apple ID Website
- Step 1. If you cannot reach a secure device, visit the http://appleid.apple.com website and sign in with the identical Apple ID.

- Step 2. Once logged in, click “Devices” from the left side and select the lost device. To remove this device as a trusted device, click “Remove from Account.”

Part 6. Precautions To Take for Avoiding Losing iPhone
Users can proactively adopt specific measures to reduce the likelihood of such an occurrence. The following essential precautions are recommended while learning how to block your Apple iPhone 13 Pro Max when stolen:
Precaution #1. Enable Find My on Device
Activating Find My increases the likelihood of recovering your device. Take the following steps to enable the Find My feature on your Apple iPhone 13 Pro Max:
- Step 1. On your iOS device, navigate to “Settings” and tap the Apple ID on the top. Now, scroll down and press “Find My” on the following screen.

- Step 2. Next, tap “Find My iPhone,” on the ensuing window, toggle “Find My iPhone.” This will enable the Find My service on your device.

Precaution #2. Enable Separation Alerts on iPhone
Enabling “Separation Alerts” assists in preventing the loss of your Apple iPhone 13 Pro Max by alerting you when you distance yourself from it. Follow these steps to enable Separation Alerts on your Apple iPhone 13 Pro Max:
- Step 1. Navigate to and launch the Find My app on your Apple iPhone 13 Pro Max. Select the Apple iPhone 13 Pro Max device from the “Devices” tab for which you want to enable separation alerts.

- Step 2. From the available options, tap “Notify When Left Behind,” and on the following screen, toggle “Notify When Left Behind.” You can also add locations on this screen by tapping “New Location,” for which you don’t want to receive a left-behind notice.

Precaution #3. Enable 2FA on iPhone
Activating Two-Factor Authentication (2FA) enhances the security of your Apple iPhone 13 Pro Max. The mandatory secondary verification step makes 2FA crucial in securing your accounts. Follow these steps to enable 2FA on your Apple iPhone 13 Pro Max:
- Step 1. Access the Settings app on your iOS device and tap your name/Apple ID. Find and tap “Sign-In & Security” to proceed further.

- Step 2. On the following screen, tap “Turn On Two-Factor Authentication.” Follow it by tapping “Continue” afterward, and use the on-screen instructions to complete the process.

Bonus Tip. Find Stolen iPhone Back but Locked? Unlock With Wondershare Dr.Fone
Recovering your stolen iPhone successfully can be a joyous event. Yet, the frustration of discovering your device locked due to a forgotten password can be disheartening. Wondershare Dr.Fone - Screen Unlock (iOS) offers a solution to regain access to your device. This robust tool is crafted to help users unlock various iOS screen lock scenarios.
It provides a hassle-free solution for those locked out of their devices. This powerful tool effortlessly removes various lock screens on iPhones and iPads. It can bypass the iCloud activation lock without the need for a password.
Key Features of Wondershare Dr.Fone
- If you are using iTunes for backup but have forgotten the iTunes backup encryption passcode, Dr.Fone can remove it without data loss.
- This tool can remove Apple ID from your Apple iPhone 13 Pro Max or iPad if you have forgotten its password.
- You can free up your device by removing MDM and carrier locks using Dr.Fone.
Steps To Unlock Your Locked iOS Device Using Wondershare Dr.Fone
Wondershare Dr.Fone is a comprehensive toolkit that addresses many iOS-related issues. It offers a user-friendly solution to unlock your Apple iPhone 13 Pro Max with the help of the following steps:
- Step 1. Launching Wondershare Dr.Fone and Accessing Toolbox
Once you have installed and launched Wondershare Dr.Fone, access the “Toolbox” tab. Click “Screen Unlock,” and on the following screen, choose “iOS.” Click “Unlock iOS Screen” on the following screen and link your iOS device to the computer.

- Step 2. Entering Recovery Mode and Choosing System Version
The next step requires you to put your device in Recovery Mode, for which you can follow the instructions given on-screen. After your device is in Recovery Mode, Dr.Fone will display its “Model.” Now choose the appropriate “System Version” and click “Start.” Here, Dr.Fone will start downloading the required firmware. Once it is downloaded and verified, tap “Unlock Now.”
- Step 3. Acknowledging Data Loss Warning and Initiating Unlock Process
To show your acknowledgment of the warning, enter the asked code, which is “000000.” Afterward, click “Unlock” to initiate the screen unlocking process. Once the process is complete, tap “Done” to conclude the procedure.

Conclusion
Knowing how to lock stolen iPhones is essential for safeguarding personal and sensitive data. Apple’s Find My empowers users to remotely locate, lock, and erase their lost devices. If you have recovered your stolen device but it is locked, Wondershare Dr.Fone emerges as the top choice to unlock it within minutes.
Tips: Are you searching for a powerful Screen Unlock tool? No worries as Dr.Fone is here to help you. Download it and start a seamless unlock experience!
How To Bypass the Required Apple Store Verification For Apple iPhone 13 Pro Max
The Apple App Store is a familiar place for anyone with an iPhone or iPad. It’s where you find all sorts of useful and fun apps. However, one thing that can be a hassle is the store’s strict verification process. Every time you make a purchase, you need to go through this step.
It’s there for a good reason – to stop fraud – but it can get annoying, especially if you forget your Apple ID or have other issues. This article will explore the ways to stop the Apple Store “Verification Required” prompt, making your app downloading experience smoother.

Part 1: Why Does Apple Require Verification in the Apple Store?
When browsing the App Store on your Apple iPhone 13 Pro Max or iPad and looking to download the latest game or productivity tool, you might have noticed that Apple often asks for some form of verification before you can proceed with your purchase. This is not just a random step; there’s a solid reason behind it.
The primary reason Apple requires verification for App Store purchases is to ensure that you are the person authorizing the purchase. This security measure prevents unauthorized transactions and protects your account from fraud.
What does this verification usually involve? It could be entering your Apple ID password or using Face ID or Touch ID if your device supports these features. These methods are designed to confirm your identity quickly and securely.

Reasons Why the Verification Required Message Might Appear
There are several reasons why you might see an Apple Store’ Verification Required’ message when trying to download an app or make a purchase:
- New Apple ID. If you’ve just created a new Apple ID and need to download or pay for apps, Apple must verify your payment information. Thus, you’ll have to prove everything, especially on a new phone.
- **Payment method needs to be corrected.**Suppose there’s an issue with your Apple ID’s payment method, such as outdated or incorrect details. In that case, verification is required to ensure the account is secure and ready for transactions.
- Invalid credit card. Unsupported or invalid credit cards can trigger the verification notice, as Apple can’t process payments with these cards.
- Unpaid balance. If there’s an outstanding balance on your Apple ID, you can download or pay for new apps once this balance is cleared.
- Family Sharing restrictions. For those using Family Sharing, if the family organizer has placed restrictions on your account, this could result in a verification prompt.
Understanding these reasons is the first step in addressing the ‘Verification Required’ message. It’s not just a random or annoying hurdle; it’s there for your security and to ensure a smooth, safe experience when using the App Store.
Part 2: How To Fix Verification Required Prompt Using Apple ID
Having to deal with the ‘Verification Required’ prompt in the App Store can be a bit of a hassle, especially when you’re eager to get your hands on a new app or game. Fortunately, there are several methods you can use to resolve this issue, most of which are pretty straightforward and can be done right from your device. Here’s how to tackle it:
Update Payment Method
One of the most common reasons for the verification prompt is a problem with your payment method. To fix this, go to your Apple ID settings on your Apple iPhone 13 Pro Max or iPad. Tap your name at the top of the Settings app, then go to Payment & Shipping. You can update your payment information or add a new payment method here. Make sure the details are correct and up to date.
Check Unpaid Subscriptions
Sometimes, unpaid subscriptions can trigger the verification prompt. Tap the App Store > your profile icon, and select Subscriptions. Here, you can view all your subscriptions, active or expired. Check if there are any unpaid ones and clear any outstanding payments.

Don’t Require Password for Purchases
For less frequent purchases, you should change the settings so you don’t always have to enter your password. Go to Settings, then to Screen Time. Under Content & Privacy Restrictions, select iTunes & App Store Purchases. Here, you can change the settings to Don’t Require for purchases. However, be cautious with this method as it reduces security.

Sign Out of Apple ID and Re-Sign In
Sometimes, simply signing out of your Apple ID and then signing back in can resolve the issue. Go to the Settings app, tap your name at the top, and scroll down to Sign Out. After signing out, restart your device and then sign back in. This can help refresh your account settings and clear up any minor glitches.
Remember, these methods are about bypassing the verification process and ensuring your account is up-to-date and secure. Regularly checking your Apple ID settings and payment information can prevent many common issues with the App Store, including the frustrating ‘Verification Required’ prompt.
Part 3: How To Bypass Verification Required Prompt Without Apple ID
If you need to learn how to bypass the ‘Verification Required’ prompt in the App Store but don’t have access to the Apple ID or password, there’s an alternative approach using third-party software. One such tool that can assist in this situation is Wondershare Dr.Fone - Screen Unlock (iOS), which offers a feature specifically designed for this purpose.
Introducing Dr. Fone’s Screen Unlock (iOS) Feature
Dr.Fone - Screen Unlock (iOS) function includes an Apple ID remover tool. This feature is handy when you cannot remember your Apple ID or password but need to download apps from the App Store. Here’s a step-by-step guide on how to use this feature.
Step-by-Step Guide To Bypass Verification Without Apple ID With Dr.Fone
Here’s a complete guide on bypassing the verification required on the App Store.
Step 1: Install and open Wondershare Dr.Fone on your computer.
Step 2: Navigate to Toolbox and select Screen Unlock followed by iOS.
- Step 3: In the next window, choose Remove Apple ID to proceed.

- Step 4: A connectivity status will appear on the screen with your iOS device connected to the computer. Click Unlock Now to start the process.

- Step 5: Confirm if your iOS device has a screen lock and two-factor authentication enabled. This is crucial for the process to continue smoothly.

- Step 6: Follow the on-screen instructions to put your iOS device in Recovery Mode. If necessary, you can also opt for DFU Mode by following the provided instructions. Once in Recovery Mode, the tool will recognize your device model. You’ll need to select the correct system version to proceed.

- Step 7: The tool will download the appropriate iOS firmware for your device. After the download, it will verify the firmware.

- Step 8: After firmware verification, click Unlock Now. You’ll be prompted to enter a code for confirmation. Once entered, the unlocking process will begin.

- Step 9: You’ll receive a notification once the process is complete. You may try again if the process fails to succeed the first time.

Note: After Apple ID removal, you must re-enter a new Apple ID to access the App Store. Take note of the password now if you forgot your previous one.
Conclusion
In this article, you’ve learned how to remove ‘Verification Required’ in the App Store. The primary takeaway is to try solving the issue using your Apple ID, as this approach typically prevents data loss. However, if you’re in a tight spot without access to your Apple ID, Dr.Fone - Screen Unlock (iOS) offers a reliable alternative to bypass this hurdle.
While it’s an effective solution, always consider it a secondary option to safeguard your data. Additionally, Dr.Fone can be a handy tool for various other phone-related challenges, making it a useful resource for tackling different tech problems.
Tips: Are you searching for a powerful Screen Unlock tool? No worries as Dr.Fone is here to help you. Download it and start a seamless unlock experience!
Also read:
- [New] In 2024, Capturing Attention A Guide to Captivate Videos
- [Updated] Ultimate Mobiles for Cutting & Enhancing DJi Media
- 2024 Approved Combining Visual and Auditory Elements in the Windows Photos App
- 3 Ways for Android Pokemon Go Spoofing On Vivo Y36 | Dr.fone
- Enhance Your Website with Cookiebot-Driven Analytics Solutions
- Evaluating Romer's Rechargeable Illuminator: An Authoritative Guide to the Strongest Outdoor Lighting Gear on the Market
- How Can Google Pixel 7aMirror Share to PC? | Dr.fone
- How to Unlock Apple iPhone 13 Without Passcode? | Dr.fone
- In 2024, DJI's Minis & Air 2 Get 20 Free Custom LUTs for Mixing
- In 2024, Everything You Need To Know About Unlocked iPhone 11 Pro Max | Dr.fone
- In 2024, Forgot Locked Apple iPhone 13 Pro Max Password? Learn the Best Methods To Unlock | Dr.fone
- In 2024, Forgot Your Apple ID Password and Email On Apple iPhone 14 Pro? Heres the Best Fixes
- In 2024, How Many Attempts To Unlock iPhone 7 | Dr.fone
- In 2024, Is Your Apple iPhone 8 in Security Lockout? Proper Ways To Unlock | Dr.fone
- In 2024, PassFab iPhone 11 Pro Backup Unlocker Top 4 Alternatives | Dr.fone
- In 2024, Unlocking Apple iPhone 11 Passcode without a Computer | Dr.fone
- Learn How To Lock Stolen Your Apple iPhone 15 Plus Properly | Dr.fone
- Title: Complete Guide on Unlocking Apple iPhone 13 Pro Max with a Broken Screen? | Dr.fone
- Author: Amelia
- Created at : 2024-12-06 17:18:30
- Updated at : 2024-12-12 16:51:27
- Link: https://iphone-unlock.techidaily.com/complete-guide-on-unlocking-apple-iphone-13-pro-max-with-a-broken-screen-drfone-by-drfone-ios/
- License: This work is licensed under CC BY-NC-SA 4.0.