
Everything You Need To Know About Unlocked Apple iPhone SE | Dr.fone
Everything You Need To Know About Unlocked Apple iPhone SE
Wondershare Dr.Fone
Reset iPhone without Apple ID
- Simple, click-through, process.
- Remove screen passcodes, Face id, Touch id, Apple ID and Bypass iCloud Activation Locks
- No tech knowledge required, everybody can handle it.
- Supports iPhone the latest iPhone and iOS version fully!


Everything You Need To Know About Unlocked iPhone 15 Series

Nowadays, communication, productivity, and entertainment are seamlessly intertwined. The release of the Apple iPhone SE 15 series has marked an important milestone in tech. These devices have proven to be immensely popular among experts and fans alike. It has made understanding the intricacies of this groundbreaking series paramount.
In this article, we delve into everything you need to know about the iPhone 15 unlocked Series. You will learn the benefits and drawbacks of an unlocked iPhone 15 Pro. It will also discuss how to check whether your Apple iPhone SE is locked or not, along with how to unlock a locked iPhone 15.
Part 1: What Is an Unlocked iPhone 15?
An unlocked smartphone, in essence, is a device that isn’t tied to a specific carrier or network. Locked phones come pre-configured to work only with a particular carrier’s SIM card. In comparison, unlocked phones provide users with the freedom to choose their preferred carrier. It also means they can switch between networks at will.
The Apple iPhone SE 15 Series is renowned for its integration of cutting-edge technology. However, what truly sets the unlocked iPhone 15 Series apart is its unlocked status. It enables users to take control of their network choices and redefine their connectivity.
Part 2: What Are the Benefits of Buying an Unlocked iPhone 15?
Purchasing an unlocked iPhone 15 isn’t just about owning a high-end smartphone. It is a strategic decision that unlocks a plethora of advantages tailored to the modern user. Below are some compelling benefits that come with opting for an unlocked iPhone 15 Pro Max:
1. Network Freedom
One of the standout advantages of an unlocked iPhone 15 is the freedom to choose any carrier. Users can easily switch between carriers. It allows them to select the one that offers the best coverage, pricing, and customer service. Thus, avoiding being restricted to a particular carrier’s offerings.
2. Global Accessibility
Unlocked iPhones are a traveler’s dream. With an unlocked device, you can insert a local SIM card when abroad. It lets you sidestep the exorbitant international roaming charges. This feature allows you to maintain connectivity without constraints. This makes it an ideal companion for international adventurers.
3. No Contracts
Locked smartphones often come with binding carrier contracts. These can extend for two years or more. With an unlocked iPhone 15, you can avoid lengthy contracts. It puts you in control of your financial commitments and enables you to change your plan as you see fit.
4. Resale Value
Unlocked iPhones have a higher resale value than their locked counterparts. The broader appeal and flexibility of an unlocked device make it an attractive option. It is true for most potential buyers in the second-hand market.
Part 3: What Are the Drawbacks of Buying an Unlocked iPhone 15?
Unlocked iPhone 15 Series presents a world of advantages. However, it’s essential to approach any decision with a balanced perspective. Given below are the potential drawbacks associated with purchasing an iPhone 15 Pro unlocked:
1. Higher Upfront Cost
Unlocked iPhones often come with a higher upfront cost compared to locked devices. This is because carriers subsidize locked phones to some extent. Moreover, it allows them to offer lower initial prices in exchange for long-term contracts.
2. Limited Trade-In Options
Some carriers offer trade-in programs for older phones when you upgrade to a new device. These programs might be more limited for unlocked devices. This can potentially affect your ability to offset the cost of a new phone.
3. No Carrier Support for Technical Issues
Apple provides technical support for all iPhones. However, carrier-specific issues might be more challenging to resolve with an unlocked device. Carriers may prioritize support for their locked devices. It could potentially lead to delays or complications in addressing certain problems.
4. Limited Carrier-Specific Features
Some carriers offer exclusive features or services. These might not be available to users with unlocked devices. Moreover, such services can include promotions, network plans, etc.
Part 4: How To Check if Your Apple iPhone SE 15 Is Unlocked or Not
Determining whether your Apple iPhone SE 15 is unlocked is a crucial step. It is especially the case if you have bought a second-hand device. This will also help you in making the most of its features and advantages. Below are the simple steps to check the unlocked status of your unlocked iPhone 15 Pro:
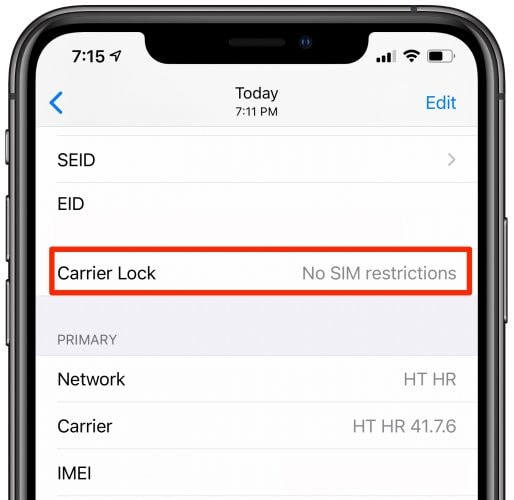
- Step 1: Access your Apple iPhone SE 15’s Settings and navigate to the “General” tab. Click “About” to get an overview of your device.
- Step 2: In the “About” tab, scroll down to find and tap “Carrier Lock.” Here, you can check whether your Apple iPhone SE is locked or not.
\
Part 5: The Best Websites To Buy Unlocked iPhone From the 15 Series
When it comes to purchasing an unlocked iPhone 15 from the latest series, choosing the right platform is crucial. It will ensure a smooth and reliable buying experience. Here, we present a selection of reputable websites that offer unlocked iPhone 15 devices:
Bonus Tip: Is There Any Way To Unlock a Locked iPhone? [iOS 12.0 – iOS 14.8.1]
Unlocking a locked iPhone can be a pressing concern. It can especially be troubling if you have bought a second-hand device and it turns out to be carrier locked. In such situations, your best bet is to use a specialized tool like Wondershare Dr.Fone for unlocking a locked iPhone.
Wondershare Dr.Fone is a comprehensive unlocking tool that can bypass locks ranging from screen locks to carrier locks. This iPhone tool is completely secure and safe to use. You do not need to be a tech expert to use this tool, as it is designed for all users.
Key Points of Wondershare Dr.Fone
- Forgotten your iTunes backup encryption code? Worry no more, as Dr.Fone lets you remove the encryption code without affecting your data.
- If you forget your Apple ID password, you can use Wondershare Dr.Fone to remove the old Apple ID from your device.
- It can bypass all types of iPhone 15 screen locks, such as passcode, Touch ID, and Face ID.
Steps To Remove Carrier Lock From Your Apple iPhone SE 15 via Wondershare Dr.Fone
With the help of Wondershare Dr.Fone, the process of unlocking your device from carrier restriction becomes a lot easier. Here is how you can remove the carrier lock from your Apple iPhone SE with Dr.Fone:
- Step 1: Choose Screen Unlock in Dr.Fone
You begin with installing and launching Wondershare Dr.Fone on your computer. Connect your locked Apple iPhone SE to the computer and click “Screen Unlock.” Afterward, choose “iOS” as your device to proceed further.

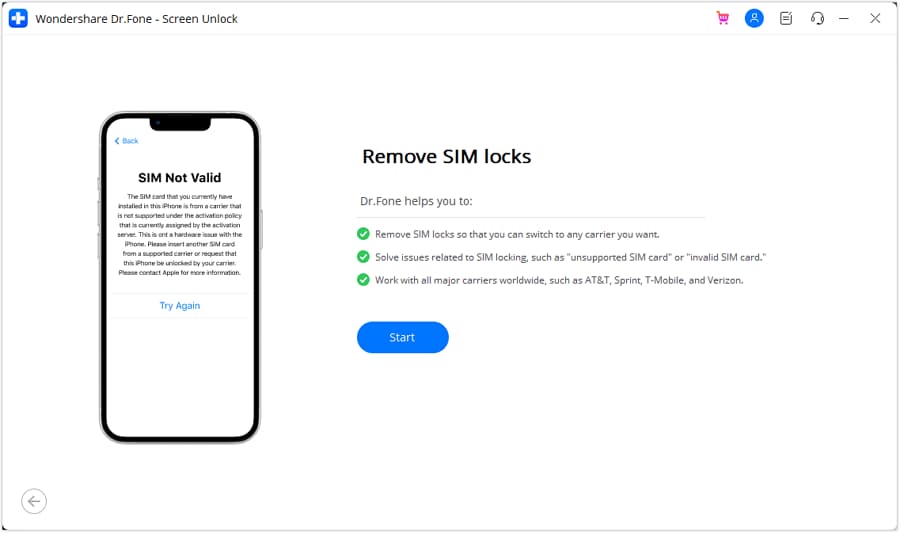
- Step 2: Jailbreak Your Locked iPhone
In the different options available, click on “Remove SIM Locked.” Next, tap “Start” and wait for Wondershare Dr.Fone to recognize your Apple iPhone SE 15. You will now need to jailbreak your device, which you can do by following the on-screen instructions.
- Step 3: Disconnect Wi-Fi and Remove Known Networks
Afterward, remove the SIM card from your Apple iPhone SE and go to “Settings.” Here, tap “WLAN” to open your Apple iPhone SE’s network settings. Find and disconnect from the network you are connected to and forget the network.
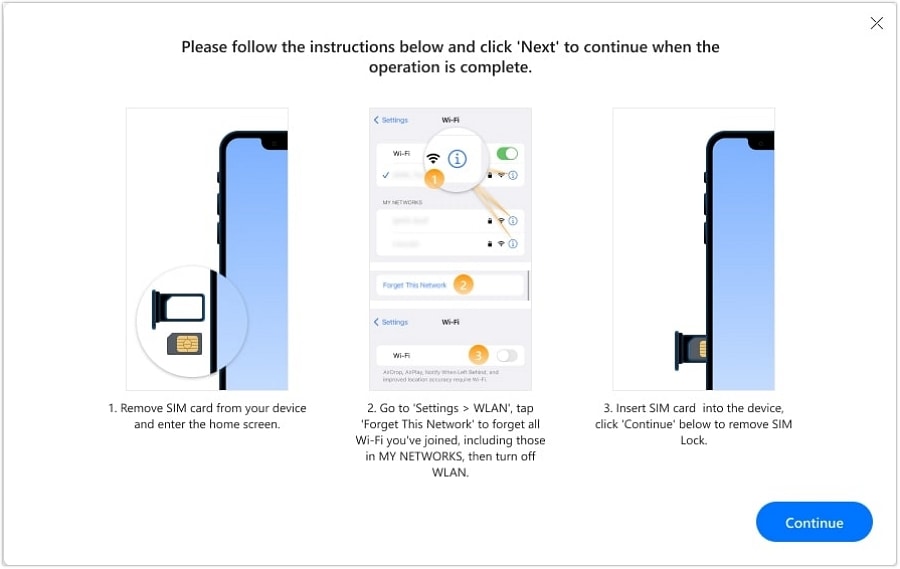
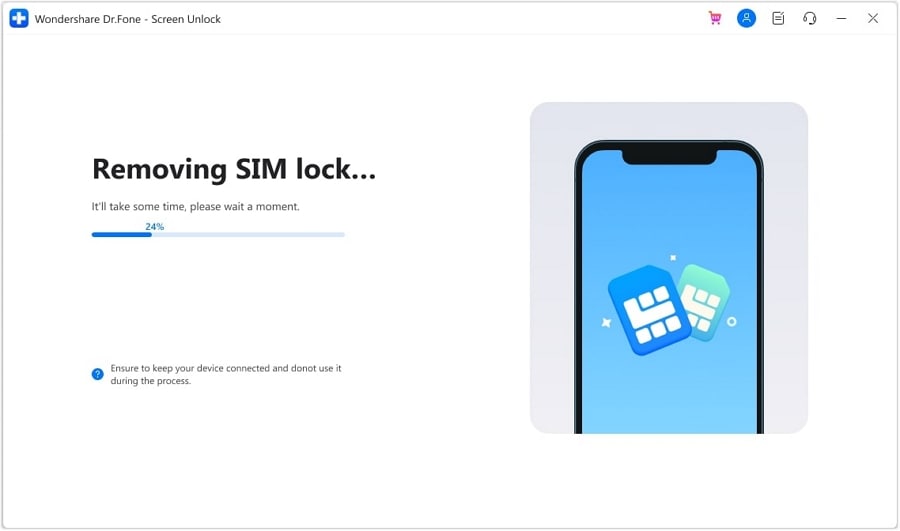
- Step 4: Remove the Carrier Lock from iPhone
Now, forget all known networks from your device one by one. Afterward, disable Wi-Fi and finally reinsert the SIM card. On Wondershare Dr.Fone’s screen, tap “Continue” to start the carrier lock removal process. Once it is finished, press “Done” to close the wizard.
Conclusion
To conclude, the decision to opt for an iPhone 15 unlocked series offers a realm of possibilities. The freedom to choose carriers and avoid international roaming charges are all compelling reasons for an unlocked device.
When it comes to unlocking locked iPhones, a cautious and well-informed approach is essential. It is best to use a specialized tool like Wondershare Dr.Fone for unlocking carrier locks. With the help of Dr.Fone, you can safely remove the carrier lock within no time.
How Many Attempts To Unlock Apple iPhone SE
Unlocking your Apple iPhone SE involves a delicate balance to avoid pitfalls. Knowing how many attempts to unlock an iPhone is vital due to Apple’s security measures. Exceeding the limit triggers consequences, such as temporary disablement or even data erasure.
These restrictions highlight the need to learn how many attempts for iPhone passcodes are allowed before facing potential data loss. When dealing with failed passcode attempts, exploring methods for successful access is essential. Let’s delve into the intricacies of iPhone passcode security and unveil strategies for a seamless unlocking process. Read on to learn more.

Part 1. How Many Times Until the Apple iPhone SE Is Permanently Disabled?
Unlocking an iPhone involves a series of attempts, each with distinct consequences. Here’s a breakdown of how many failed passcode attempts on an iPhone you can do before it locks you out:
First 5 Attempts
- No significant consequences.
- Users have the flexibility to enter their passcode without any penalties.
6th Attempt
- iPhone is disabled for 1 minute.
- An iPhone is Disabled message appears on the screen.

7th Attempt
- Disabled for 5 minutes.
- The same on-screen message persists, but the Apple iPhone SE enforces a longer wait time.
8th Attempt
- Disabled for 15 minutes.
- Users must wait before attempting again. The escalating time delay discourages brute-force attacks.
9th Attempt
- Disabled for 60 minutes.
- A considerable waiting period is imposed. It increases the frustration for unauthorized users attempting to gain access.

10th Attempt
- iPhone is disabled.

Two things can happen on the tenth failed attempt to unlock your Apple iPhone SE. If you have Erase Data enabled, your phone’s data gets wiped. If it’s disabled, the Apple iPhone SE is permanently locked, requiring a connection to iTunes for restoration. It’s crucial to back up your data on iCloud or locally to avoid permanent loss.
## Part 2. What Are the Consequences After Consecutive Failed Attempts?When you exceed ten unsuccessful passcode entries, the Apple iPhone SE device takes stringent actions to protect sensitive data. It can initiate a data wipe or lock the iPhone, needing a connection to iTunes for restoration. After a series of failed attempts, the Apple iPhone SE can activate a security measure often referred to as a “self-destruct” mode.
To turn this mode on or off, follow these steps:
How To Enable Erase Data Mode
Safeguard your personal information with these simple steps to remotely wipe your device in case of loss or theft.
- Step 1: Go to Settings > Face ID & Passcode or Touch ID & Passcode, depending on your device. Enter your current passcode.

- Step 2: Scroll down and find the Erase Data option. Toggle the button to activate the feature.
How To Disable Erase Data Mode
Here are the steps to disable Erase Data Mode on your Apple iPhone SE, ensuring controlled access to your device.
- Step 1: Follow the same steps to access the Erase Data toggle. Next, disable the toggle to turn off this feature.
- Step 2: Confirm your choice, ensuring the “self-destruct” mode is deactivated to prevent accidental data loss.
Part 3. Top 5 Methods To Unlock an iPhone After Too Many Attempts
When wondering how many tries to unlock an iPhone, consider the following methods to restore functionality. The section below explores the most effective ways to regain access to your device. Let’s start with the use of a dedicated screen unlock tool.
Method 1: Using a Dedicated Screen Unlock Tool
When facing a disabled iPhone, Wondershare Dr.Fone - Screen Unlock (iOS) stands out as a reliable solution. It’s a comprehensive platform that unlocks iOS devices without a passcode. Here are some of the tool’s key features to help you get started:
- Removes all types of lock screens. Fone Screen Unlock tackles various lock screen types, like pattern lock, etc. It offers a comprehensive solution for different scenarios.
- Unlock Apple ID without a password. The tool provides a secure method to unlock Apple ID without needing a password.
- No data loss. Users can regain access without losing data, a crucial aspect of dealing with a disabled iPhone.
- High success rate.Fone Screen Unlock boasts a high success rate, instilling confidence in users seeking a swift and effective solution.
How To Unlock iPhone With Dr.Fone
After many failed passcode attempts on your Apple iPhone SE,Dr.Fone can help you access it again in no time. Follow the steps:
- Step 1: Download and install Dr.Fone on your computer. Next, click Toolbox > Screen Unlock > iOS to start. In the next window, choose Unlock iOS Screen.

- Step 2: Follow the on-screen instructions. Dr.Fone will automatically detect your Apple iPhone SE model. If necessary, choose the System Version according to your preference. Next, click Start to start the iOS firmware download.

- Step 3: Wait for the iOS firmware to download successfully. Click on Unlock Now to initiate the unlocking process. Follow the on-screen instructions again and wait for Dr.Fone to unlock your device. If unsuccessful, click on the Try again option.

Method 2: Using iTunes To Unlock a Locked or Disabled iPhone
An alternative method to unlock your Apple iPhone SE when locked or disabled involves using iTunes. Note that if your iTunes is not synchronized with the iPhone, you risk losing your existing data. Here’s how:
- Step 1: Launch iTunes on your computer. Connect your locked iPhone using a cable and let iTunes identify the Apple iPhone SE device. Next, navigate to the Summary section and select the Restore iPhone option.

- Step 2: Allow iTunes to identify your device. Start the restoration of previous data by selecting Restore Backup. Your Apple iPhone SE will be unlocked with all the associated data if you have backed up your information on iTunes. Otherwise, you will need to set it up as a new iPhone.
Method 3: Using Recovery Mode To Unlock a Locked or Disabled iPhone
Activating Recovery mode is another useful method for accessing a locked phone. The approach erases all data on the phone, restoring it to factory settings. Any data not backed up will be lost using this method. Follow the steps:
- Step 1: Download and Launch iTunes on your computer. Connect your Apple iPhone SE with a USB cable.
- Step 2: For iPhone 8 models or newer, press and release the volume up button, followed by the volume down button. Next, press and hold the power button. If executed, the iTunes connect screen will appear. For earlier iPhone models, you can refer to here.

- Step 3: iTunes will prompt you to either restore or update your Apple iPhone SE. Choose the Restore iPhone option to reset your device to its factory settings. If the restoration process extends beyond 15 minutes and your Apple iPhone SE exits recovery mode, you’ll need to repeat the steps.
Method 4: Using iCloud To Unlock a Lock or Disabled iPhone
After many failed passcode attempts on your Apple iPhone SE,it got disabled, but iCloud offers a convenient solution. Your phone must have the Find My iPhone option enabled for the method to work. You should be aware of the Apple ID password associated with your iCloud account. Once these prerequisites are fulfilled, access the iCloud account from another device. Here’s how.
- Step 1: Go to iCloud.com using another device, such as a computer, and log in with your Apple ID and password.

- Step 2: Select All Devices, and pick the locked iPhone from the dropdown menu. Once you’ve chosen the Apple iPhone SE device, click the Erase iPhone icon in the lower-right corner. Although the action deletes the data on the phone, you can retrieve it from your iCloud backup once the Apple iPhone SE device is operational again.
Method 5: Contact Apple Support or Visit an Apple Store
If all methods fail or you don’t have access to Dr.Fone, consider contacting Apple Support. You can also try visiting an Apple Store. Apple experts will guide you through the appropriate steps based on your unique situation.
Conclusion
If you are wondering how many passcode attempts on iPhone will lock your device and not sure how to fix this issue, here is the way to go. Methods like iTunes, Recovery Mode, iCloud, or seeking Apple Support all offer potential solutions.
Consider using Dr.Fone Screen Unlock (iOS) for a secure and data-preserving unlock. It safeguards your data even if you forget your passcode. Remember that surpassing the allowed attempts could result in data loss or permanent device disablement. Safeguard your data wisely by exploring these methods.
Tips: Are you searching for a powerful Screen Unlock tool? No worries as Dr.Fone is here to help you. Download it and start a seamless unlock experience!

Disabling Apple iPhone SE Parental Restrictions With/Without Password
Among smartphones, the Apple iPhone SE is well known for its quality and reliability. It is celebrated for its elegant design, robust capabilities, and exceptional security attributes. This device holds innovation within the smartphone industry. Among its array of security features lies the parental controls. These are a specialized set of features and settings crafted to aid parents.
It allows them to manage their children’s access to certain content and functionalities. This article aims to go through the details of how to disable parental controls on iPhones. It will offer a range of methods catering to both scenarios: disabling parental controls with and without a password. Moreover, it will feature an in-depth exploration of the most effective method to disable parental control.

Part 1. Defining Parental Controls on iPhone and Why People Want To Disable/Remove It?
Parental controls on an iPhone refer to features designed to allow parents to track various aspects of the Apple iPhone SE device’s usage. These controls aim to provide younger users with a safer, more regulated digital experience. They include a range of functions, such as screen time limits and app restrictions. Moreover, content filtering and purchase controls also fall under parental control.
Primarily, parental controls serve as a protective measure. They enable parents to safeguard their children from potential online dangers. These include inappropriate content and excessive screen time. It turns out valuable for managing a child’s interaction with digital devices.
Why Do People Want To Disable/Remove Parental Control?
Parental controls can be a great way to manage children’s digital lives. However, there are equally good reasons why users seek how to remove restrictions on iPhone without passcode:
1. Age Appropriateness
As children grow older, they may desire increased independence and responsibility. Parental controls might become restrictive or unnecessary. This leads to the desire for removal to grant them more freedom.
2. Technical Glitches or Restrictions
Sometimes, parental control settings might malfunction or impose unintended restrictions. This can hamper the Apple iPhone SE device’s regular functionality. Users seek removal to rectify these technical issues.
3. Privacy Concerns
Older users may find parental controls intrusive or overly restrictive. These can affect their privacy and autonomy. Disabling these controls allows for a personalized and private user experience.
4. Change in Circumstances
Situations change, and what was once appropriate may no longer apply. Families might undergo changes in dynamics or rules. This can prompt the need to adjust or remove parental controls accordingly.
Part 2. [With Password] How To Disable Parental Controls on iPhone?
Do you have the password to access parental control settings on your Apple iPhone SE? The process of disabling these controls becomes straightforward. Here, we present 2 distinct methods for how to remove parental controls on iPhone:
Way 1. By Turning Off Screen Time Settings
Accessing Screen Time settings allows you to manage and disable parental controls. This method is recommended if you have the passcode. Follow these steps to know how to turn off restrictions on your Apple iPhone SE with the password:
- Step 1. To disable Screen Time settings, navigate to “Settings” and select “Screen Time.” On the following screen, choose “Content & Privacy Restrictions” under the “Restrictions” section.

- Step 2. Now, switch the slider next to “Content & Privacy Restrictions” to turn it off. It will disable all parental control on the targeted device. However, before it disables, the Apple iPhone SE will prompt for the Screen Time passcode, which needs to be added.

Way 2. By Resetting the Entire iPhone
Resetting the entire settings of your Apple iPhone SE is a drastic but effective method. It can disable parental controls by removing all settings, including restrictions and passcodes. Note that this process will erase personalized settings on your device. However, it does not delete data like photos, videos, or apps. Below are the steps on how to remove parental controls iPhone by resetting:
- Step 1. You will need to access the “General” tab within Settings of your Apple iPhone SE. Here, scroll down and tap “Transfer or Reset iPhone.” On the following screen, tap the “Reset” option.

- Step 2. From the available options, after tapping “Reset,” choose “Reset All Settings.” You will be asked to provide the passcode to successfully reset your Apple iPhone SE and disable parental control settings.

Part 3. [Without Password] How Do You Disable Parental Controls on iPhone?
Disabling parental controls on an iPhone is still possible, even without the password. Below, we explore two methods that can be used to bypass parental controls without requiring a password.
Way 1. Wondershare Dr.Fone - Screen Unlock (iOS)
Removing a Screen Time passcode without the associated passcode can be challenging. Utilizing Wondershare Dr.Fone presents a potential solution. It is a robust tool that tackles a range of iOS-related problems. You will discover it as a convenient method to surpass the limitations imposed by Screen Time.
Among its functions, Wondershare Dr.Fone - Screen Unlock (iOS) caters to resolving passcode-related concerns. This also includes the removal of Screen Time passcodes. The best thing about using Dr.Fone to remove the Screen Time passcode is that it bypasses the lock without data loss. Along with Screen Time passcodes, Dr.Fone is also an expert in unlocking various screen locks.
Notable Features of Wondershare Dr.Fone
- It lets users bypass MDM on their iOS devices without losing their data.
- If your iOS device is stuck at the iCloud Activation Lock, Dr.Fone bypasses this lock without requiring a passcode.
- For those facing issues with forgotten Apple ID passwords, Dr.Fone facilitates the removal of Apple ID from devices.
Steps To Disable Parental Controls on iPhone via Wondershare Dr.Fone
Forgetting passwords, be it Screen Time lock or device screen lock, can be a stress-inducing experience. Following are the steps for how to turn off parental controls without a password:
- Step 1. Access Unlock Screen Time Passcode
To initiate the procedure, open Wondershare Dr.Fone on your computer. Navigate to “Toolbox,” tap “Screen Unlock,” and choose “iOS” as the Apple iPhone SE device type. On the following screen, choose “Unlock Screen Time Passcode.” Establish a USB connection between your iOS device and the computer before commencing.

- Step 2. Start Unlocking by Disabling Find My Feature
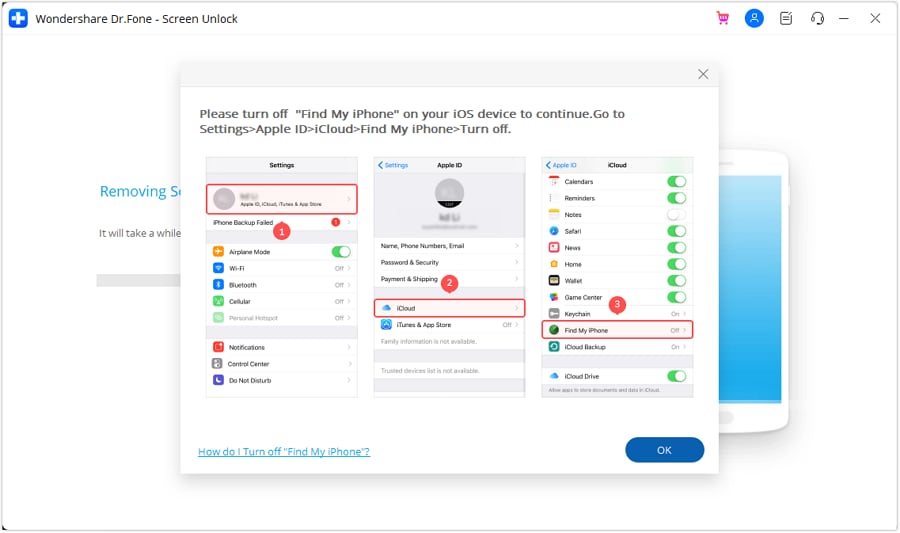
Upon connecting the Apple iPhone SE device, the platform will detect the iDevice and showcase its status on the screen. Afterward, you are required to proceed by clicking on the “Unlock Now” button. However, it is necessary to deactivate the Find My service as indicated in the prompt. Navigate to your Apple iPhone SE’s Settings and select the Apple ID at the top of the settings menu. Access the “Find My” settings and toggle off the “Find My iPhone” feature.
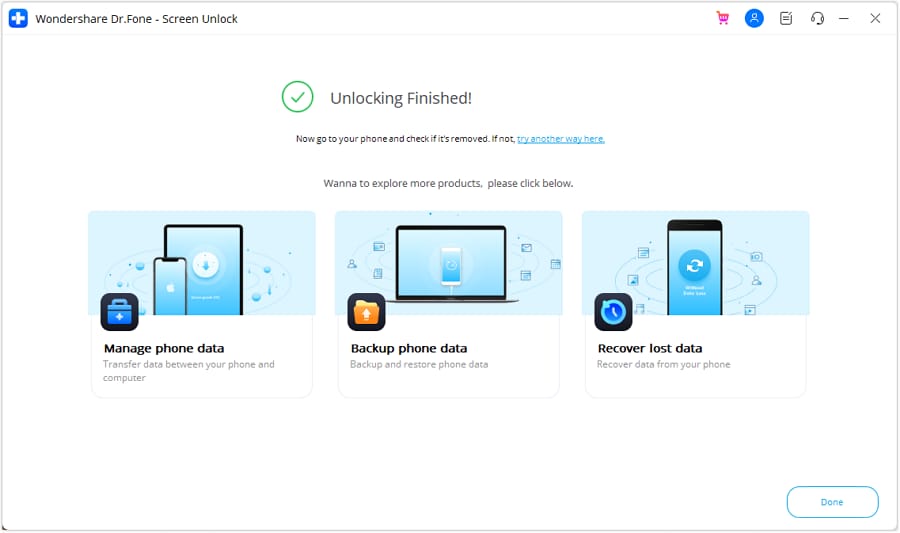
- Step 3: Complete Screen Time Passcode Removal Process
Upon completion, confirm by clicking “OK” on the computer screen. The progress bar on the screen indicates the progress of unlocking the screen time passcode process. When the Apple iPhone SE device is unlocked, the platform will present a confirmation message. To conclude the entire process, click on the “Done” button.
Way 2. Restore iPhone From iTunes
Restoring an iPhone using iTunes is an alternative method for removing parental controls. iTunes is a multimedia management software that is developed by Apple. It provides various functions, including media playback and data synchronization. The most important function is the Apple iPhone SE device backup and restoration. Restoring your Apple iPhone SE via iTunes results in the complete erasure of all data and settings. Here is how to disable restrictions on iPhones without password:
- Step 1. Ensure that iTunes has been updated to the most recent version before opening the application. Connect your Apple iPhone SE to the computer and grant iTunes permission to recognize the Apple iPhone SE device. After detecting the Apple iPhone SE device, access the “Summary” tab by tapping the Apple iPhone SE device icon in iTunes. You can access the “Backups” section to create any backup before restoring.

- Step 2. Afterward, initiate the Apple iPhone SE restoration by selecting “Restore iPhone.” A menu box will appear, asking you to create a “Back Up” or not. Choose the preferred option, and another dialog box will appear, alerting you about the deletion of all content and settings on your Apple iPhone SE. You should proceed by clicking “Restore” to confirm. Then, follow the on-screen instructions to finalize the process.

Conclusion
In summary, this article explored how to disable restrictions on iPhones without a password and with a password. Accessing settings with a passcode simplifies the process. Wondershare Dr.Fone stands out as the optimal solution for those seeking how to delete parental controls without password. When passcode access is limited, Dr.Fone – Screen Unlock (iOS) offers the most efficient solution.
Tips: Are you searching for a powerful iPhone Unlock tool? No worries as Dr.Fone is here to help you. Download it and start a seamless unlock experience!
- Title: Everything You Need To Know About Unlocked Apple iPhone SE | Dr.fone
- Author: Amelia
- Created at : 2024-07-15 05:12:10
- Updated at : 2024-07-16 05:12:10
- Link: https://iphone-unlock.techidaily.com/everything-you-need-to-know-about-unlocked-apple-iphone-se-drfone-by-drfone-ios/
- License: This work is licensed under CC BY-NC-SA 4.0.