
How Many Attempts To Unlock iPhone 14 Plus | Dr.fone
How Many Attempts To Unlock Apple iPhone 14 Plus
Unlocking your Apple iPhone 14 Plus involves a delicate balance to avoid pitfalls. Knowing how many attempts to unlock an iPhone is vital due to Apple’s security measures. Exceeding the limit triggers consequences, such as temporary disablement or even data erasure.
These restrictions highlight the need to learn how many attempts for iPhone passcodes are allowed before facing potential data loss. When dealing with failed passcode attempts, exploring methods for successful access is essential. Let’s delve into the intricacies of iPhone passcode security and unveil strategies for a seamless unlocking process. Read on to learn more.

Part 1. How Many Times Until the Apple iPhone 14 Plus Is Permanently Disabled?
Unlocking an iPhone involves a series of attempts, each with distinct consequences. Here’s a breakdown of how many failed passcode attempts on an iPhone you can do before it locks you out:
First 5 Attempts
- No significant consequences.
- Users have the flexibility to enter their passcode without any penalties.
6th Attempt
- iPhone is disabled for 1 minute.
- An iPhone is Disabled message appears on the screen.

7th Attempt
- Disabled for 5 minutes.
- The same on-screen message persists, but the Apple iPhone 14 Plus enforces a longer wait time.
8th Attempt
- Disabled for 15 minutes.
- Users must wait before attempting again. The escalating time delay discourages brute-force attacks.
9th Attempt
- Disabled for 60 minutes.
- A considerable waiting period is imposed. It increases the frustration for unauthorized users attempting to gain access.

10th Attempt
- iPhone is disabled.

Two things can happen on the tenth failed attempt to unlock your Apple iPhone 14 Plus. If you have Erase Data enabled, your phone’s data gets wiped. If it’s disabled, the Apple iPhone 14 Plus is permanently locked, requiring a connection to iTunes for restoration. It’s crucial to back up your data on iCloud or locally to avoid permanent loss.
Part 2. What Are the Consequences After Consecutive Failed Attempts?
When you exceed ten unsuccessful passcode entries, the Apple iPhone 14 Plus device takes stringent actions to protect sensitive data. It can initiate a data wipe or lock the iPhone, needing a connection to iTunes for restoration. After a series of failed attempts, the Apple iPhone 14 Plus can activate a security measure often referred to as a “self-destruct” mode.
To turn this mode on or off, follow these steps:
How To Enable Erase Data Mode
Safeguard your personal information with these simple steps to remotely wipe your device in case of loss or theft.
- Step 1: Go to Settings > Face ID & Passcode or Touch ID & Passcode, depending on your device. Enter your current passcode.

- Step 2: Scroll down and find the Erase Data option. Toggle the button to activate the feature.
How To Disable Erase Data Mode
Here are the steps to disable Erase Data Mode on your Apple iPhone 14 Plus, ensuring controlled access to your device.
- Step 1: Follow the same steps to access the Erase Data toggle. Next, disable the toggle to turn off this feature.
- Step 2: Confirm your choice, ensuring the “self-destruct” mode is deactivated to prevent accidental data loss.
Part 3. Top 5 Methods To Unlock an iPhone After Too Many Attempts
When wondering how many tries to unlock an iPhone, consider the following methods to restore functionality. The section below explores the most effective ways to regain access to your device. Let’s start with the use of a dedicated screen unlock tool.
Method 1: Using a Dedicated Screen Unlock Tool
When facing a disabled iPhone, Wondershare Dr.Fone - Screen Unlock (iOS) stands out as a reliable solution. It’s a comprehensive platform that unlocks iOS devices without a passcode. Here are some of the tool’s key features to help you get started:

- Removes all types of lock screens. Fone Screen Unlock tackles various lock screen types, like pattern lock, etc. It offers a comprehensive solution for different scenarios.
- Unlock Apple ID without a password. The tool provides a secure method to unlock Apple ID without needing a password.
- No data loss. Users can regain access without losing data, a crucial aspect of dealing with a disabled iPhone.
- High success rate.Fone Screen Unlock boasts a high success rate, instilling confidence in users seeking a swift and effective solution.
How To Unlock iPhone With Dr.Fone
After many failed passcode attempts on your Apple iPhone 14 Plus,Dr.Fone can help you access it again in no time. Follow the steps:
- Step 1: Download and install Dr.Fone on your computer. Next, click Toolbox > Screen Unlock > iOS to start. In the next window, choose Unlock iOS Screen.

- Step 2: Follow the on-screen instructions. Dr.Fone will automatically detect your Apple iPhone 14 Plus model. If necessary, choose the System Version according to your preference. Next, click Start to start the iOS firmware download.

- Step 3: Wait for the iOS firmware to download successfully. Click on Unlock Now to initiate the unlocking process. Follow the on-screen instructions again and wait for Dr.Fone to unlock your device. If unsuccessful, click on the Try again option.

Method 2: Using iTunes To Unlock a Locked or Disabled iPhone
An alternative method to unlock your Apple iPhone 14 Plus when locked or disabled involves using iTunes. Note that if your iTunes is not synchronized with the iPhone, you risk losing your existing data. Here’s how:
- Step 1: Launch iTunes on your computer. Connect your locked iPhone using a cable and let iTunes identify the Apple iPhone 14 Plus device. Next, navigate to the Summary section and select the Restore iPhone option.

- Step 2: Allow iTunes to identify your device. Start the restoration of previous data by selecting Restore Backup. Your Apple iPhone 14 Plus will be unlocked with all the associated data if you have backed up your information on iTunes. Otherwise, you will need to set it up as a new iPhone.
Method 3: Using Recovery Mode To Unlock a Locked or Disabled iPhone
Activating Recovery mode is another useful method for accessing a locked phone. The approach erases all data on the phone, restoring it to factory settings. Any data not backed up will be lost using this method. Follow the steps:
- Step 1: Download and Launch iTunes on your computer. Connect your Apple iPhone 14 Plus with a USB cable.
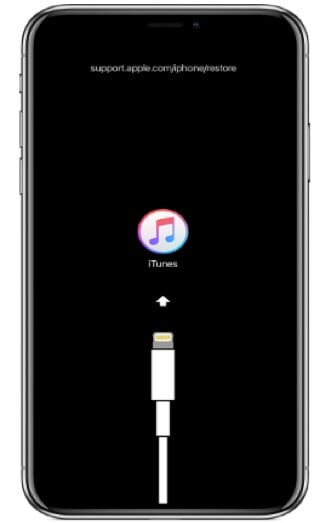
- Step 2: For iPhone 8 models or newer, press and release the volume up button, followed by the volume down button. Next, press and hold the power button. If executed, the iTunes connect screen will appear. For earlier iPhone models, you can refer to here.

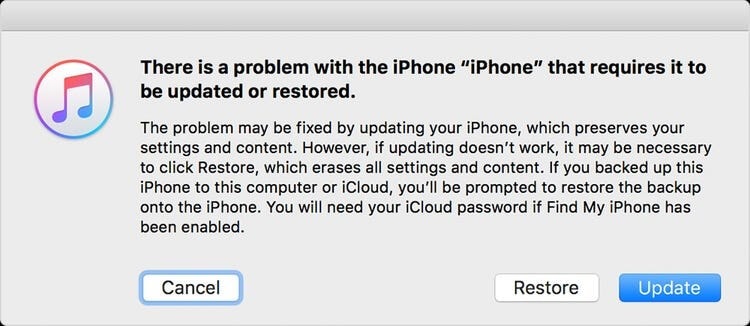
- Step 3: iTunes will prompt you to either restore or update your Apple iPhone 14 Plus. Choose the Restore iPhone option to reset your device to its factory settings. If the restoration process extends beyond 15 minutes and your Apple iPhone 14 Plus exits recovery mode, you’ll need to repeat the steps.
Method 4: Using iCloud To Unlock a Lock or Disabled iPhone
After many failed passcode attempts on your Apple iPhone 14 Plus,it got disabled, but iCloud offers a convenient solution. Your phone must have the Find My iPhone option enabled for the method to work. You should be aware of the Apple ID password associated with your iCloud account. Once these prerequisites are fulfilled, access the iCloud account from another device. Here’s how.
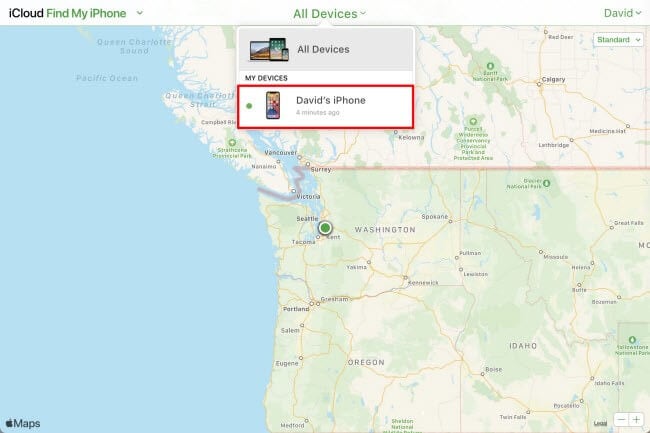
- Step 1: Go to iCloud.com using another device, such as a computer, and log in with your Apple ID and password.

- Step 2: Select All Devices, and pick the locked iPhone from the dropdown menu. Once you’ve chosen the Apple iPhone 14 Plus device, click the Erase iPhone icon in the lower-right corner. Although the action deletes the data on the phone, you can retrieve it from your iCloud backup once the Apple iPhone 14 Plus device is operational again.
Method 5: Contact Apple Support or Visit an Apple Store
If all methods fail or you don’t have access to Dr.Fone, consider contacting Apple Support. You can also try visiting an Apple Store. Apple experts will guide you through the appropriate steps based on your unique situation.
Conclusion
If you are wondering how many passcode attempts on iPhone will lock your device and not sure how to fix this issue, here is the way to go. Methods like iTunes, Recovery Mode, iCloud, or seeking Apple Support all offer potential solutions.
Consider using Dr.Fone Screen Unlock (iOS) for a secure and data-preserving unlock. It safeguards your data even if you forget your passcode. Remember that surpassing the allowed attempts could result in data loss or permanent device disablement. Safeguard your data wisely by exploring these methods.
Tips: Are you searching for a powerful Screen Unlock tool? No worries as Dr.Fone is here to help you. Download it and start a seamless unlock experience!
How to Turn Off Find My Apple iPhone 14 Plus when Phone is Broken?
In today’s world, your phone is your most important asset. Especially when you own an iPhone, you’re much more careful because it is pretty expensive than normal phones. You’re always making sure to keep it safe and secure, but Apple has ways to keep you away from this hassle.
Apple ensures the privacy and security of its customers. For that, it has introduced this excellent feature of Find My iPhone, which keeps track of the location of your device no matter in which part of the world you are. So, if you’ve lost your Apple iPhone 14 Plus or it is stolen, this app is your savior.
Downloading and enabling Find My iPhone can be really easy and cinch but turning it off can be an arduous task. But we have you covered through this article that shall tell you about this app in detail and guide you on how to turn off Find My iPhone even when your Apple iPhone 14 Plus is broken.
Part 1: What is Find My iPhone?
Find My iPhone is an application forged by Apple that keeps track of your Apple iPhone 14 Plus’s location protects your data. Once you enable this application, it requires your iCloud password to unlock your phone to keep your Apple iPhone 14 Plus safe from the wrong hands. This application comes in handy when you accidentally lose or misplace your phone.
The best part about this application is that it is free of cost. It usually comes built-in your Apple iPhone 14 Plus already, but if not, you can easily download it from the app store. Sign in with your Apple ID, and it will automatically locate your Apple iPhone 14 Plus no matter where you go.
Part 2: Efficient Way of Turning Off Find My iPhone Within Second- Dr. Fone
Dr.Fone - Screen Unlock is an excellent data recovery and management software created by Wondershare. However, limiting it to just recovery and management of data will not be just as it offers much more than just that. Transferring files, repairing the operating system, changing the GPS location, and fixing the activation lock are its amazing services.
Dr.Fone - Screen Unlock (iOS)
Turning Off Find My iPhone Within Second.
- Maintains the security of your data and keeps it in its original form.
- Recovers your data from damaged or broken devices.
- Erase’s data in such a way that no other software can recover it.
- Has great integration with iOS and macOS.
3981454 people have downloaded it
Dr.Fone can also be a great solution for how to turn off Find My iPhone when your Apple iPhone 14 Plus is broken.
Step 1: Install Dr. Fone
Launch Wondershare Dr.Fone on your computer and connect your Apple iPhone 14 Plus with it via cable.
Step 2: Unlock Apple ID
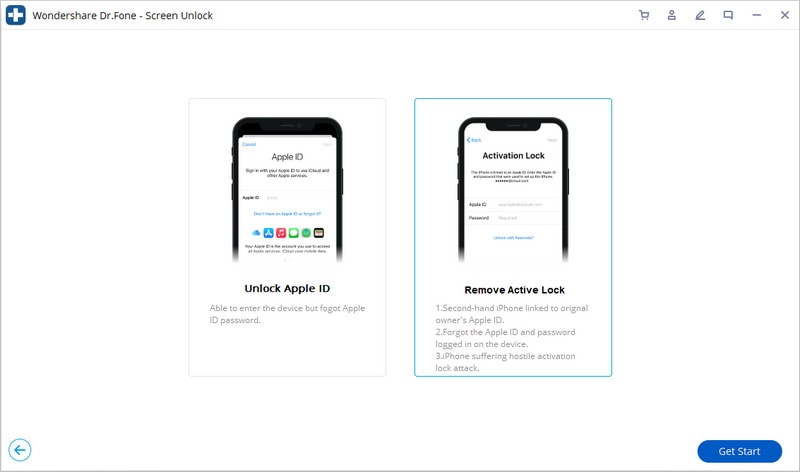
Open Wondershare Dr.Fone and select “Screen Unlock” among the other options on the home interface. Now another interface will appear displaying four options. Click on “Unlock Apple ID.”

Step 3: Remove Active Lock
After choosing the “Unlock Apple ID” option, an interface will be displayed that will show another two options, out of which you have to select “Remove Active Lock” to proceed further.
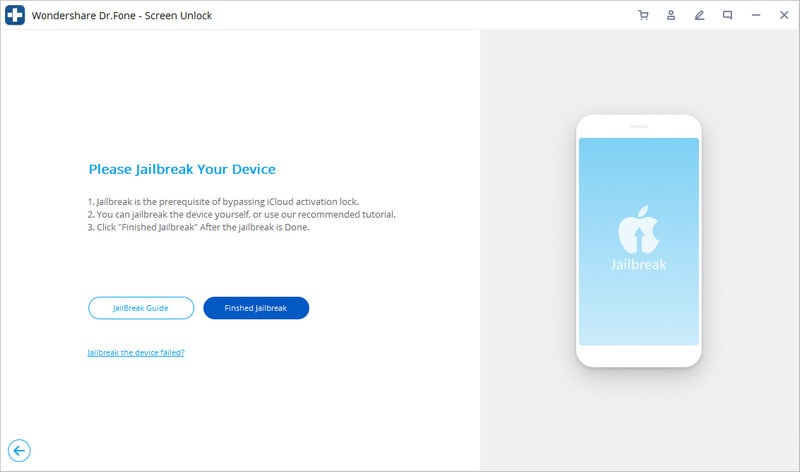
Step 4: Jailbreak your Apple iPhone 14 Plus
Jailbreak your Apple iPhone 14 Plus by following the instructions given by the system. Once you complete them, click on “Finish Jailbreak.”
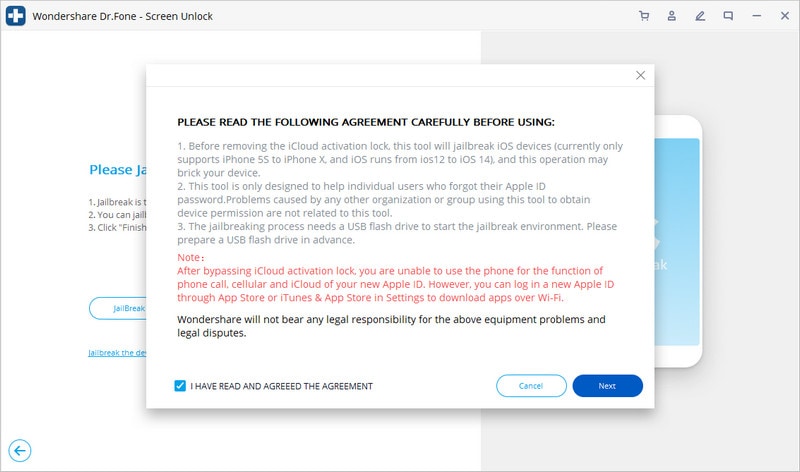
Step 5: Confirmation Window
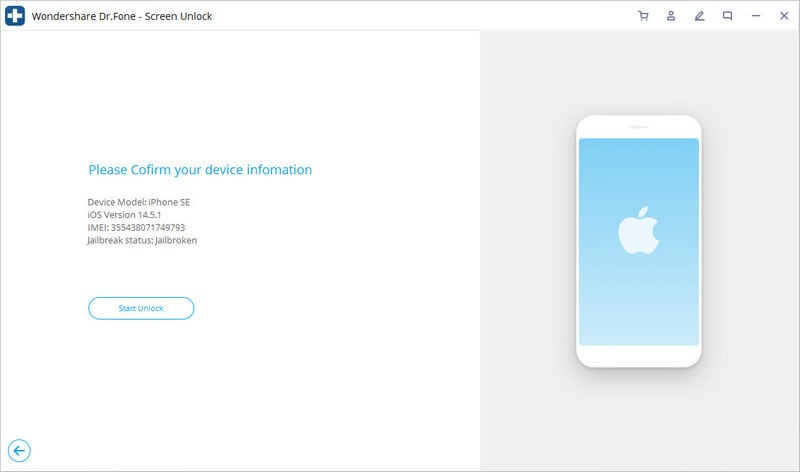
A warning will be displayed on the screen asking for confirmation to remove the active lock. Then again, another confirmation message will pop up confirming the model of your device.
Step 6: Unlock your Apple iPhone 14 Plus
Click on “Start Unlock” to proceed. Once the process is started, you have to wait for a moment until the activation lock is successfully removed.
Step 7: Turn off Find My iPhone
As your activation lock is removed, go to the settings and remove your Apple ID. Consequently, Find My iPhone will be disabled.

Part 3: How to Turn Off Find My iPhone on Broken iPhone Using iCloud?
iCloud is the most secure storage drive introduced by Apple. It keeps your gallery, your reminders, contacts, and your messages up to date. Moreover, it also organizes and stores your files while keeping them private and secure. iCloud strongly integrates your Apple iPhone 14 Plus with other iOS devices so you can share your data, documents, and location with other iCloud users.
As mentioned earlier, turning off Find My iPhone can be very complex. But if your Apple iPhone 14 Plus is damaged in some way, turning it off can be much more stressful. Here, iCloud can come to the rescue as it’s the most effective solution for how to turn off Find My iPhone when your phone is broken.
Here we have explained to you step by step how to turn off Find My iPhone on broken iPhone using iCloud:
Step 1: Go to the official website of iCloud.com and enter your credentials to sign in with your Apple ID.
Step 2: Click on the “Find My iPhone” icon at the end of the page. The app will start locating your device, but as your Apple iPhone 14 Plus is damaged, it might not find anything.

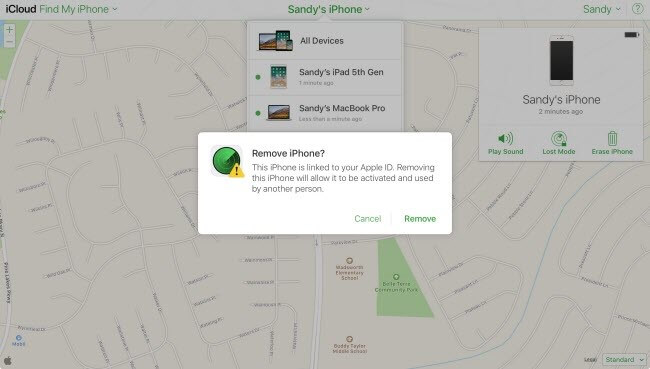
Step 3: Click on the “All Devices” option from the top. Select your Apple iPhone 14 Plus, which you want to remove by clicking on “Remove from account.”
Step 4: Once your device is removed from the account, a window will pop up asking you to delete the option of that device from your iCloud account. Now you may log in Find My iPhone with your iCloud account on another device.
Part 4: Turn off Find My iPhone using Recovery Mode
The recovery model of the Apple iPhone 14 Plus allows you to reset or restore your data. It also offers data cleaning and backing up of apps to keep your Apple iPhone 14 Plus updated and free of glitches. When your phone is lagging or not working properly, then you need to put it into Recovery Mode.
However, Recovery Mode can also be useful to turn off Find My iPhone on your device. Here are the steps that will guide you on how to turn off Find My iPhone on a broken phone using Recovery Mode.
Step 1: Connect your Apple iPhone 14 Plus to your computer via cable and wait for your computer to detect your device.
Step 2: As soon as your Apple iPhone 14 Plus is detected, open iTunes and force restart your phone to activate the Recovery Mode. Activating this mode is different for different models of iPhone.
- For iPhone 8 and the later: Press the Volume Down button and release is immediately. Then press the Volume Up button and release it immediately again. After that, press and hold the Power Button until you see the Apple logo.
- For iPhone 7 and 7+: Press the Power Button and Volume Down button at the same time and hold them until the Apple logo appears on your screen.
- For iPhone 6s, and Previous Models: Press and hold the Home Button and Power button concurrently until your Apple iPhone 14 Plus shows the Apple logo.
Once your Apple iPhone 14 Plus shows the Apple logo, it means the Recovery Mode is activated.
Step 3: Now click on “Restore” so iTunes can download software on your Apple iPhone 14 Plus. Once the process is completed, you can set up your Apple iPhone 14 Plus as new. This means your previous data will be erased, and Find My iPhone will be disabled automatically.
Conclusion
Now we’re done as we’ve provided you the best possible solutions to turn off Find My iPhone when your Apple iPhone 14 Plus is broken. It is obvious that it is a quite complicated process, but you have to be patient and follow the steps correctly to disable Find My Apple iPhone 14 Plus to avoid any inconvenience in the future. We hope this article answers all your queries regarding it.
How to Remove and Reset Face ID on Apple iPhone 14 Plus

Did you go wrong when you set the Face ID the first time? Or are you tired to put off the mask to use Face ID to unlock your Apple iPhone 14 Plus? And now, you want to disable the Face ID. Whatever your reasons are, read this article to learn how to remove Face ID on your Apple iPhone 14 Plus X, iPhone XS, iPhone XR or iPhone 11, iPhone 12, iPhone 13, iPhone 14, anmd iPhone 15.
Part I: What is Face ID?
If the new Apple iPhone 14 Plus is your first-ever iPhone, or if you have neither upgraded your Apple iPhone 14 Plus from the 6/7/8 series nor have kept abreast with the happenings in the Apple world, you might wonder what this newfangled thing called Face ID is.
Face ID is an authentication system that came with iPhone X for the first time, and then the Apple iPhone 14 Plus 13, the Apple iPhone 14 Plus 14, and now the Apple iPhone 14 Plus 15. Like Touch ID that uses your fingerprints, Face ID uses your face metrics to authenticate you for everything, the way Touch ID does.
Face ID is not a new and advanced version of Touch ID, but a completely different authentication system that utilizes a different component what Apple calls a TrueDepth camera to scan your face metrics. Face ID is not available on phones with Touch ID (iPhone SE 2022 today) and Touch ID is not available on iPhones that come with Face ID as their authentication mechanism.
Part II: What Can You Do with Face ID?
Most of us know that we can unlock iPhone with our face via Face ID instead of a thumbprint or passcode. But actually, Face ID does more than just that. Let us learn more cool things you can do with Face ID, which helps you to make a decision if you still want to disable it. Here‘s what you can do on your Apple iPhone 14 Plus 13/12/11 with Face ID:
II.I Unlock Your Apple iPhone 14 Plus
As an authentication mechanism, Face ID enables you to unlock your Apple iPhone 14 Plus 13 /iPhone 12/iPhone 11 with a look. How to do that? Here are the steps:
Step 1: Pick your Apple iPhone 14 Plus up in your hands or tap the screen to wake it up.
Step 2: Look at the iPhone.

When the lock symbol changes to the unlocked position, you can swipe up to unlock your Apple iPhone 14 Plus using Face ID and get to the Home Screen.
Note that Face ID will not work in landscape mode on an iPhone.
II.II Making Purchases Using Face ID on Your Apple iPhone 14 Plus
Face ID allows you to authenticate yourself to make purchases in the App Store, Book Store, and iTunes Store and use Apple Pay wherever supported.
How to use Face ID on Apple iPhone 14 Plus to make purchases in App Store, Book Store, and iTunes Store
Step 1: Check if Face ID is enabled for purchases in these stores by going to Settings > Face ID and Passcode and ensuring that iTunes and App Store are toggled On.

Step 2: On any of these stores, when you tap on the option to buy some content, a payment confirmation popup will be displayed along with instructions to authenticate yourself using Face ID.

The instructions are simple: press the side button twice to authenticate yourself using your Face ID and make the purchase.
When done, a satisfying ting and a checkmark will confirm the action.
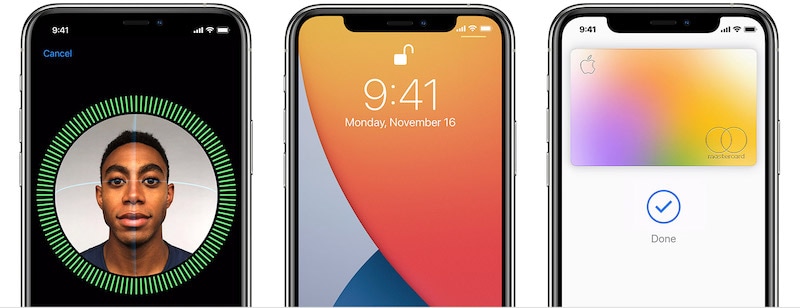
How to use Face ID on Apple iPhone 14 Plus to pay with Apple Pay
Step 1: If Apple Pay is supported by banking institutions in your country, you can set it up by adding a supported bank‘s credit card, debit card, or prepaid card to the Wallet app on your Apple iPhone 14 Plus 13/12/11.
Step 2: When a card is added and ready to use, check that Apple Pay is enabled under Settings > Face ID and Passcode.
Step 3: For App Store/ Book Store/ iTunes Store purchases, it works as always, you double-press the Side Button to authenticate and use your default card.
Step 4: Look at your Apple iPhone 14 Plus to authenticate yourself using your Face ID and make the purchase.
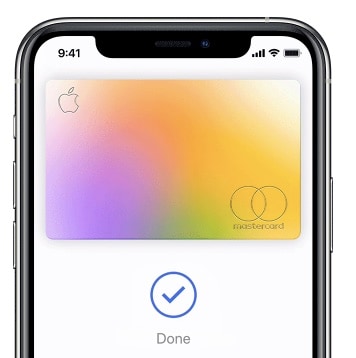
Step 5: When paying at retail outlets, hold your Apple iPhone 14 Plus (top being close to the reader) and wait for the checkmark and Done message.
Step 6: To pay using Apple Pay on websites, choose Apple Pay as the payment method, double press the Side Button, look at your Apple iPhone 14 Plus, and wait for the Done message and checkmark to finish the process.
II.III Lowering Ringer and Alarm Volume Automatically
Face ID also enables what Apple calls Attention Aware features that are conveniences afforded to users who have a Face ID enabled iPhone.

Setting up and using Attention Aware features is easy:
Step 1: Go to Settings > Face ID and passcode.
Step 2: Toggle Require Attention For Face ID On.
Step 3: Toggle Attention Aware Features On.
That‘s it. Now, when you get a call and your Apple iPhone 14 Plus 13 is ringing loud, looking at your Apple iPhone 14 Plus 13/12/11 will cause it to lower the volume. When an alarm goes off, you can lower the volume by simply looking at your Apple iPhone 14 Plus. Additionally, your Apple iPhone 14 Plus screen will not dim or switch off for the duration you are looking at it. This means you can now read those books on Kindle without constantly tapping the screen for it to stay awake.
II.IV Filling Passwords in Safari Automatically Using Face ID
Face ID also allows users to fill passwords in Safari automatically for a faster and more convenient login experience on your Apple iPhone 14 Plus with Face ID.
Step 1: Go to Settings > Face ID and Passcode and toggle Password Autofill On.
Step 2: Now, when you use Safari to open a website that requires a login, tapping the username field or password field will bring up the keyboard, and on top of that keyboard there will be your credentials for the website if you have saved them in iCloud Passwords. Tap the credentials.
Step 3: Look at your Apple iPhone 14 Plus to authenticate yourself with Face ID and Safari will autofill the credentials for you.
II.V Animojis and Memojis
Up until now, we saw how Face ID enables productivity features and how convenient it is to use it. Now, we come to the fun part - Animojis. Apple launched Face ID in 2017 on the Apple iPhone 14 Plus X with much fanfare and a huge part of that fanfare was Animojis. Over time, Apple brought new capabilities to the Apple iPhone 14 Plus and added Memojis alongside Animojis.

Animojis are animated emojis. These are made possible with advanced algorithms enabled by the TrueDepth camera in Face ID. Animated emojis or Animojis can mimic your facial expressions and you can use them in your message conversations in apps.
Here‘s how to send Animojis in conversations on your new iPhone 13/12/11:
Step 1: Open a message conversation in the Messages app.
Step 2: Tap the Memoji button (a character in a yellow frame) and swipe to select the desired Animoji/ Memoji you want to send.

Step 3: Tap the Record button and you now have 30 seconds to do what you want with your face and the character will reproduce it on screen for you.
Step 4: When done, the Record button changes to Send:

Tap Send to send your first Memoji/ Animoji.
Part III: How to Remove Face ID on Apple iPhone 14 Plus
For all the hardware and software that make for a great experience for nearly all users around the world, Face ID can have its fair share of issues. Sometimes, your face might not get recognized, sometimes it might not work altogether.
Lately, with the COVID-19 pandemic, we have seen how Face ID struggles to work for us, and why? Because it cannot scan our faces with masks! So, it makes sense to remove Face ID from our iPhones and rely solely on passcodes. Alternatively, you want to reset your Face ID on your Apple iPhone 14 Plus 13/12/11 and set it again if you have put on some ‘COVID weight’ owing to working from home.
Most of the time, the best and the simplest thing you can do to resolve your hardware and software issues is to restart the Apple iPhone 14 Plus device in question. To restart your Apple iPhone 14 Plus 13/12/11, long-press the Side Button until the power slider appears and drag it to shut the Apple iPhone 14 Plus device off. Then, use the Side Button to start the phone again.
Sometimes, the issues have a way of persisting, and a restart does not resolve them. the TrueDepth system might have developed a fault and Face ID might stop working. Or you got the dreaded “problem detected with TrueDepth camera” message on your Apple iPhone 14 Plus 13/12/11. In that case, you would like to know how to reset and remove Face ID on your Apple iPhone 14 Plus 13 to see if that helps, before you are required to go to an Apple Store for service.
Step 1: Go to Settings > Face ID and Passcode.
Step 2: Scroll and tap the option “Reset Face ID” to remove Face ID on your Apple iPhone 14 Plus 13/12/11.

Part IV: How to Set Up Face ID on Your Apple iPhone 14 Plus
Sometimes, you may just want to disable Face ID temporarily or the issue gets solved, and want to activate Face ID again. Setting up a Face ID on your Apple iPhone 14 Plus 13 is easy. To set up Face ID, sit in a comfortable spot with adequate lighting and follow these steps:
Step 1: Go to Settings > Face ID and Passcode and enter your passcode. If you have not set up a passcode yet, you will necessarily have to create one now before proceeding forward.
Step 2: Tap Set Up Face ID to start the process.
Step 3: Hold your Apple iPhone 14 Plus in the portrait orientation at about an arm‘s length away from your face and then tap Get Started.

Step 4: Adjust to have your face inside the shown circle and then slowly rotate your head in a smooth motion to complete the circle. This step will be done one more time.
Step 5: When done, tap Done.
In case you are getting the following error:

There are a few things you can try to resolve this, you can try to update your Apple iPhone 14 Plus 13/12/11 to the latest iOS. At this point, you may even try running a beta version to see if that helps. If you are running a beta version, you may downgrade back to the release version to see if that resolves the error. Betas can both make and break things.
If this does not resolve it, you need to take the Apple iPhone 14 Plus device to the nearest service center. The TrueDepth camera system has components that might have been damaged or might not be working properly, for whatever reason, and the service personnel is equipped to resolve this issue for you at the earliest.
Part V: The Bottom Line
Face ID is more than a nifty authentication system in iPhones (and iPads) and brings some unique features that are not found in previous Touch ID enabled devices and enable the users to interact with people (Animojis and Memojis) and with the Apple iPhone 14 Plus (user authentication via facial metrics, Attention Aware features) in new ways. There are times when this does not work as expected, and you can reset and remove Face ID if you feel this is not your cup of tea. Apple iPhone 14 Plus can be used solely with passcodes if you want. If you find that your screen is locked and you can‘t unlock it, you can always find help in tools such as Dr.Fone - Screen Unlock (iOS). So go ahead, use the new Face ID on your Apple iPhone 14 Plus with confidence, and enjoy a more secure experience on your new iPhone than ever before.
Dr.Fone - Screen Unlock (iOS)
Unlock iPhone/iPad Lock Screen Without Hassle.
- Simple, click-through, process.
- Unlock screen passwords from all iPhone and iPad.
- No tech knowledge required, everybody can handle it.
- Supports iPhone 13/ iPhone XS (Max) / iPhone XR / iPhone X / 8 (Plus)/ iPhone 7(Plus)/ iPhone6s(Plus), iPhone SE and the latest iOS version fully!


4,395,217 people have downloaded it
Also read:
- 2024 Approved Explore the Top 5 Pick for Windows Screen Snipers
- 2024 Approved Precision in Sound Cutting Out Unwanted Volume
- 8 Safe and Effective Methods to Unlock Your Apple iPhone 15 Pro Max Without a Passcode | Dr.fone
- Bypass Complications: Swiftly Solving Your Elgato HD6n Driver Woes Without Hassle
- Effortless Screen Recording on Modern PCs for 2024
- How To Change Your Apple ID Password On your Apple iPhone SE (2022) | Dr.fone
- How to Quickly Resolve Common Errors in Windows 10 and 11 via Command Line Tools
- How to Stop My Spouse from Spying on My Oppo K11 5G | Dr.fone
- In 2024, 8 Safe and Effective Methods to Unlock Your Apple iPhone 14 Plus Without a Passcode | Dr.fone
- In 2024, Did Your Apple iPhone 15 Plus Passcode Change Itself? Unlock It Now | Dr.fone
- In 2024, Forgot iPhone Passcode Again? Unlock iPhone 13 Pro Max Without Passcode Now | Dr.fone
- In 2024, How to Remove and Reset Face ID on iPhone 12 Pro | Dr.fone
- Network Locked SIM Card Inserted On Your Xiaomi Redmi A2+ Phone? Unlock It Now
- PassFab Apple iPhone 6 Plus Backup Unlocker Top 4 Alternatives | Dr.fone
- Remove Device Supervision From your Apple iPhone 7 | Dr.fone
- Remove Device Supervision From your Apple iPhone XS Max | Dr.fone
- The Truth Behind Unremarkable Smartphone Aesthetics: Quality Over Style
- Troubleshoot and Fix Windows 11 Start Menu Glitches Effectively
- Unveiling the Latest Gadgets and PC Parts at Tom's Computer Store
- Title: How Many Attempts To Unlock iPhone 14 Plus | Dr.fone
- Author: Amelia
- Created at : 2024-11-05 05:42:36
- Updated at : 2024-11-07 02:51:38
- Link: https://iphone-unlock.techidaily.com/how-many-attempts-to-unlock-iphone-14-plus-drfone-by-drfone-ios/
- License: This work is licensed under CC BY-NC-SA 4.0.