
How Many Attempts To Unlock iPhone 6 Plus | Dr.fone
How Many Attempts To Unlock Apple iPhone 6 Plus
Unlocking your Apple iPhone 6 Plus involves a delicate balance to avoid pitfalls. Knowing how many attempts to unlock an iPhone is vital due to Apple’s security measures. Exceeding the limit triggers consequences, such as temporary disablement or even data erasure.
These restrictions highlight the need to learn how many attempts for iPhone passcodes are allowed before facing potential data loss. When dealing with failed passcode attempts, exploring methods for successful access is essential. Let’s delve into the intricacies of iPhone passcode security and unveil strategies for a seamless unlocking process. Read on to learn more.

Part 1. How Many Times Until the Apple iPhone 6 Plus Is Permanently Disabled?
Unlocking an iPhone involves a series of attempts, each with distinct consequences. Here’s a breakdown of how many failed passcode attempts on an iPhone you can do before it locks you out:
First 5 Attempts
- No significant consequences.
- Users have the flexibility to enter their passcode without any penalties.
6th Attempt
- iPhone is disabled for 1 minute.
- An iPhone is Disabled message appears on the screen.

7th Attempt
- Disabled for 5 minutes.
- The same on-screen message persists, but the Apple iPhone 6 Plus enforces a longer wait time.
8th Attempt
- Disabled for 15 minutes.
- Users must wait before attempting again. The escalating time delay discourages brute-force attacks.
9th Attempt
- Disabled for 60 minutes.
- A considerable waiting period is imposed. It increases the frustration for unauthorized users attempting to gain access.

10th Attempt
- iPhone is disabled.

Two things can happen on the tenth failed attempt to unlock your Apple iPhone 6 Plus. If you have Erase Data enabled, your phone’s data gets wiped. If it’s disabled, the Apple iPhone 6 Plus is permanently locked, requiring a connection to iTunes for restoration. It’s crucial to back up your data on iCloud or locally to avoid permanent loss.
Part 2. What Are the Consequences After Consecutive Failed Attempts?
When you exceed ten unsuccessful passcode entries, the Apple iPhone 6 Plus device takes stringent actions to protect sensitive data. It can initiate a data wipe or lock the iPhone, needing a connection to iTunes for restoration. After a series of failed attempts, the Apple iPhone 6 Plus can activate a security measure often referred to as a “self-destruct” mode.
To turn this mode on or off, follow these steps:
How To Enable Erase Data Mode
Safeguard your personal information with these simple steps to remotely wipe your device in case of loss or theft.
- Step 1: Go to Settings > Face ID & Passcode or Touch ID & Passcode, depending on your device. Enter your current passcode.

- Step 2: Scroll down and find the Erase Data option. Toggle the button to activate the feature.
How To Disable Erase Data Mode
Here are the steps to disable Erase Data Mode on your Apple iPhone 6 Plus, ensuring controlled access to your device.
- Step 1: Follow the same steps to access the Erase Data toggle. Next, disable the toggle to turn off this feature.
- Step 2: Confirm your choice, ensuring the “self-destruct” mode is deactivated to prevent accidental data loss.

Part 3. Top 5 Methods To Unlock an iPhone After Too Many Attempts
When wondering how many tries to unlock an iPhone, consider the following methods to restore functionality. The section below explores the most effective ways to regain access to your device. Let’s start with the use of a dedicated screen unlock tool.
Method 1: Using a Dedicated Screen Unlock Tool
When facing a disabled iPhone, Wondershare Dr.Fone - Screen Unlock (iOS) stands out as a reliable solution. It’s a comprehensive platform that unlocks iOS devices without a passcode. Here are some of the tool’s key features to help you get started:

- Removes all types of lock screens. Fone Screen Unlock tackles various lock screen types, like pattern lock, etc. It offers a comprehensive solution for different scenarios.
- Unlock Apple ID without a password. The tool provides a secure method to unlock Apple ID without needing a password.
- No data loss. Users can regain access without losing data, a crucial aspect of dealing with a disabled iPhone.
- High success rate.Fone Screen Unlock boasts a high success rate, instilling confidence in users seeking a swift and effective solution.
How To Unlock iPhone With Dr.Fone
After many failed passcode attempts on your Apple iPhone 6 Plus,Dr.Fone can help you access it again in no time. Follow the steps:
- Step 1: Download and install Dr.Fone on your computer. Next, click Toolbox > Screen Unlock > iOS to start. In the next window, choose Unlock iOS Screen.

- Step 2: Follow the on-screen instructions. Dr.Fone will automatically detect your Apple iPhone 6 Plus model. If necessary, choose the System Version according to your preference. Next, click Start to start the iOS firmware download.

- Step 3: Wait for the iOS firmware to download successfully. Click on Unlock Now to initiate the unlocking process. Follow the on-screen instructions again and wait for Dr.Fone to unlock your device. If unsuccessful, click on the Try again option.

Method 2: Using iTunes To Unlock a Locked or Disabled iPhone
An alternative method to unlock your Apple iPhone 6 Plus when locked or disabled involves using iTunes. Note that if your iTunes is not synchronized with the iPhone, you risk losing your existing data. Here’s how:
- Step 1: Launch iTunes on your computer. Connect your locked iPhone using a cable and let iTunes identify the Apple iPhone 6 Plus device. Next, navigate to the Summary section and select the Restore iPhone option.

- Step 2: Allow iTunes to identify your device. Start the restoration of previous data by selecting Restore Backup. Your Apple iPhone 6 Plus will be unlocked with all the associated data if you have backed up your information on iTunes. Otherwise, you will need to set it up as a new iPhone.
Method 3: Using Recovery Mode To Unlock a Locked or Disabled iPhone
Activating Recovery mode is another useful method for accessing a locked phone. The approach erases all data on the phone, restoring it to factory settings. Any data not backed up will be lost using this method. Follow the steps:
- Step 1: Download and Launch iTunes on your computer. Connect your Apple iPhone 6 Plus with a USB cable.
- Step 2: For iPhone 8 models or newer, press and release the volume up button, followed by the volume down button. Next, press and hold the power button. If executed, the iTunes connect screen will appear. For earlier iPhone models, you can refer to here.

- Step 3: iTunes will prompt you to either restore or update your Apple iPhone 6 Plus. Choose the Restore iPhone option to reset your device to its factory settings. If the restoration process extends beyond 15 minutes and your Apple iPhone 6 Plus exits recovery mode, you’ll need to repeat the steps.
Method 4: Using iCloud To Unlock a Lock or Disabled iPhone
After many failed passcode attempts on your Apple iPhone 6 Plus,it got disabled, but iCloud offers a convenient solution. Your phone must have the Find My iPhone option enabled for the method to work. You should be aware of the Apple ID password associated with your iCloud account. Once these prerequisites are fulfilled, access the iCloud account from another device. Here’s how.
- Step 1: Go to iCloud.com using another device, such as a computer, and log in with your Apple ID and password.

- Step 2: Select All Devices, and pick the locked iPhone from the dropdown menu. Once you’ve chosen the Apple iPhone 6 Plus device, click the Erase iPhone icon in the lower-right corner. Although the action deletes the data on the phone, you can retrieve it from your iCloud backup once the Apple iPhone 6 Plus device is operational again.
Method 5: Contact Apple Support or Visit an Apple Store
If all methods fail or you don’t have access to Dr.Fone, consider contacting Apple Support. You can also try visiting an Apple Store. Apple experts will guide you through the appropriate steps based on your unique situation.
Conclusion
If you are wondering how many passcode attempts on iPhone will lock your device and not sure how to fix this issue, here is the way to go. Methods like iTunes, Recovery Mode, iCloud, or seeking Apple Support all offer potential solutions.
Consider using Dr.Fone Screen Unlock (iOS) for a secure and data-preserving unlock. It safeguards your data even if you forget your passcode. Remember that surpassing the allowed attempts could result in data loss or permanent device disablement. Safeguard your data wisely by exploring these methods.
Tips: Are you searching for a powerful Screen Unlock tool? No worries as Dr.Fone is here to help you. Download it and start a seamless unlock experience!
Trouble with Apple iPhone 6 Plus Swipe-Up? Try These 11 Solutions
Part 1: Why Is My iPhone Screen Not Swiping?
The iPhone’s swipe-up gesture serves as a fundamental navigation tool. It allows users to access various functions and features swiftly. Yet, when this functionality encounters issues, it can be perplexing and disruptive. That’s why learning the reasons behind I can’t swipe up on my iPhone is essential. Summarized below are some of the common reasons behind frozen swipe-up issues:
1. Software Glitches
Updates or software bugs can occasionally interfere with the swipe-up gesture. It leads to unresponsiveness or delays.
2. Touch Screen Calibration
Sometimes, the touch screen may need recalibration. This can cause the swipe-up feature to become unresponsive.
3. Physical Damage
Physical damage, like heavy falls, can impact the phone’s touch sensitivity. Moreover, it affects swipe gestures as a result.
4. Full Memory or Background Apps
Insufficient memory or many background apps running simultaneously can overload the Apple iPhone 6 Plus device. This leads to performance issues, including unresponsive gestures.
5. Water Exposure
Sudden exposure to moisture or water damage can also cause the screen to malfunction. This can cause the screen to become unresponsive, leading to swipe-up issues.
Part 2: 11 Ways To Fix iPhone Swipe up Not Working
Encountering an unresponsive swipe-up gesture on your Apple iPhone 6 Plus can be exasperating. However, you no longer need to worry. There are numerous troubleshooting techniques available to address this problem. Explained below are the 11 effective ways to address the problem:
Fix 1. Fix iOS System Error Without Data Loss: Dr.Fone – System Repair (iOS)
Wondershare Dr.Fone - System Repair (iOS) is a reliable solution designed to resolve iOS system issues. It also includes unresponsive gestures like the swipe-up problem on iPhones. This tool specializes in repairing iOS system errors without causing data loss. It offers a comprehensive solution for resolving iOS system issues conveniently from home. With this tool, you can address over 150 iOS system problems.
![]()
Dr.Fone - System Repair (iOS)
Repair iOS System Errors Without data loss.
- Only fix your iOS to normal, no data loss at all.
- Fix various iOS system issues stuck in recovery mode , white Apple logo , black screen , looping on start, etc.
- Downgrade iOS without iTunes at all.
- Works for all models of iPhone, iPad, and iPod touch.
- Fully compatible with the latest iOS version.

3981454 people have downloaded it
These include the Apple logo, boot loop, and the 1110 error, among others. It enables you to downgrade or update iOS versions without needing to jailbreak your device. Additionally, it allows you to enter or exit DFU and Recovery Mode at no cost.
Key Features of Wondershare Dr.Fone
- This user-friendly iOS system repair solution doesn’t typically lead to data loss.
- It doesn’t require users to have advanced technical skills to operate it.
- Wondershare Dr.Fone is compatible with all iPhone, iPad, and iPod Touch models, regardless of the iOS version.
Steps to Fix iPhone Swipe up Not Working via Wondershare Dr.Fone
Here’s how to use Wondershare Dr.Fone to address the swipe-up not working on iPhone problem:
Step 1: Initiate System Repair with Dr.Fone
After successfully downloading Dr.Fone on your device, navigate towards the left side panel and click “Toolbox.” From the many options appearing on the main window, select “System Repair.” Then, establish a connection between your iOS and your current device.
Step 2: Opt for iOS Restoration and Enable Recovery Mode
Select the Apple iPhone 6 Plus device type from the available options and select “iPhone.” From the new window, select “iOS Repair,” and following that, select “Standard Repair.” Now, follow the instructions available and enable recovery mode for your iOS.

Step 3: Select iOS Firmware to Initiate the Repair Process
After that, you’ll reach a window showing different iOS firmware alternatives. Pick any as per your preferences and click “Download.” Once the download is complete, click “Repair Now” and “Done” to end the repair process.

Fix 2. Force Restart iPhone
Performing a force restart, also known as a hard reset, can troubleshoot minor software glitches. These can cause unresponsive swipe-up issues on your Apple iPhone 6 Plus. Here’s a guide on how to perform a force restart on various iDevice models to fix the iPhone won’t swipe up:
For iPhone 8 and Later Devices
Instructions: Begin by moving your finger towards the left side of your Apple iPhone 6 Plus and tap on the “Volume Up.” Then, release the button after some points. Proceed similarly with the “Volume Down” button. Then, navigate towards the right side and press the “Side” button there. Keep on forcing the “Side” button up until the screen shows the Apple logo. This will indicate that a force restart is initiated.
For iPhone 7 Series
Instructions: Begin by reaching both sides of your Apple iPhone 6 Plus at once. Press the “Volume Down” button situated on the left side using your left hand while simultaneously using your right hand to press the “Sleep/Wake” button on the right side. Stay firm with the grip on both buttons and release them when you see the signature Apple logo glowing on the screen. This will indicate that the force restart operation has been successful.
For iPhone 6 and Older Devices
Instructions: To restart your Apple iPhone 6 Plus 6, press the “Wake/Sleep” button on the top edge of the phone. Hold the other “Home” button at the bottom center screen of the phone. Continue holding the buttons until the Apple logo becomes visible on the display. Then, press the “Wake/Sleep” button and the “Home” button.

Fix 3. Remove the Cover or Case
Sometimes, an unresponsive swipe-up gesture on your Apple iPhone 6 Plus could be due to interference caused by a protective cover or case. The cover might be too thick, improperly aligned, or interfering with the touch sensitivity of the screen. Gently remove the protective cover or case from your Apple iPhone 6 Plus. Inspect the screen for any dust, debris, or smudges while the cover is removed. Utilize a clean, soft cloth to wipe the screen.
Fix 4. Clean iPhone Screen or Remove Screen Protector
An unresponsive swipe-up gesture on your Apple iPhone 6 Plus might be due to dirt, smudges, or interference caused by a screen protector. Power off your Apple iPhone 6 Plus to prevent accidental taps during the cleaning process. Carefully clean the screen by softly rubbing it with a fresh and dry microfiber cloth. In addition, ensure the cloth is soft and free from any debris that might scratch the screen.
Fix 5. Activate Control Center Access on the Lock Screen
If your Apple iPhone 6 Plus swipe-up gesture isn’t working specifically on the lock screen to access the Control Center, it might be due to settings restricting its accessibility. Enabling Control Center access on the lock screen allows you to swipe up from the bottom edge. Follow these steps to ensure Control Center access is enabled on the lock screen and fix the iPhone swipe up not working:
Step 1. On your iOS device, access the “Settings” app and launch it. Now scroll down to find and tap “Face ID & Passcode.”

Step 2. Head to the “Allow Access When Locked” section, toggle on the “Control Center” switch, then return to the lock screen to verify if the problem has been resolved.

Fix 6. Enable Control Center Within Apps
Are you experiencing issues with accessing the Control Center via the swipe-up gesture while using certain apps? If yes, ensuring that Control Center access is enabled within apps is essential. It ensures that the swipe-up gesture from the bottom edge of the screen functions. Here’s how to enable Control Center access within apps:
Instructions: Navigate to Settings on your Apple iPhone 6 Plus and access “Control Center.” On the following screen, activate the toggle next to “Access Within Apps.” It will allow you to access the Control Center when using apps.

Fix 7. Update to the Latest iOS Version
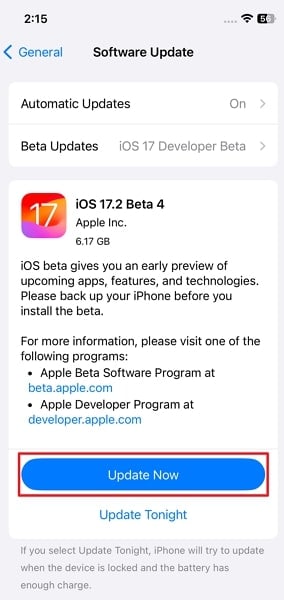
Running an outdated iOS version can sometimes lead to various software issues. These include unresponsive gestures like the swipe-up function on your Apple iPhone 6 Plus. Updating your device to the latest iOS version can often resolve such problems. Here’s how to check for and update your Apple iPhone 6 Plus to the latest iOS version:
Step 1. Unlock your Apple iPhone 6 Plus and open the “Settings” app to access “General” settings. Simply touch the “Software Update” option to verify if an update is accessible.

Step 2. If an update is available, press the “Update Now” button to commence the updating process. During the process, make sure to follow the prompts carefully to avoid issues.
Fix 8. Turn Off VoiceOver
VoiceOver is an accessibility feature on iPhones. It assists users with visual impairments by providing spoken feedback for actions on the Apple iPhone 6 Plus device. Sometimes, VoiceOver settings can interfere with normal touchscreen gestures like the swipe-up function. Here’s how to turn off VoiceOver to resolve iPhone 13 won’t swipe up to unlock:
Step 1. You will need to open the Settings app and scroll down to select the “Accessibility” menu. There, tap “VoiceOver” to get access to the “VoiceOver” settings.

Step 2. On the following screen, toggle off the “VoiceOver” switch if it is enabled. Afterward, check if the swipe-up gesture issue is resolved.

Fix 9. Customize Touch Accommodations
Touch Accommodations is an accessibility feature on iPhones. It is designed to modify touch sensitivity and enhance touchscreen interactions for users. Customizing these settings might resolve issues with unresponsive gestures like the swipe-up function. Here’s how to customize Touch Accommodations to fix the Apple iPhone 6 Plus 12 won’t swipe up to unlock:
Step 1. Move to the “Accessibility” settings of your Apple iPhone 6 Plus and select “Touch.” On the following screen, scroll down and tap “Touch Accommodations.”

Step 2. Now, first, enable the “Touch Accommodation” option from the top of the next screen. Then, scroll down and set the “Tap Assistance” option to “Use Initial Touch Location.”

Fix 10. Turn Off Reduce Motion
Reduce Motion is an accessibility setting on iPhones designed to reduce animations and visual effects. It is particularly for users sensitive to motion effects. However, enabling this feature might affect certain gestures or animations on the Apple iPhone 6 Plus device. Thus potentially causing issues with the swipe-up function. Here’s how to turn off Reduce Motion to fix the iPhone 11 won’t swipe up to unlock:
Step 1. Go through your iOS device Settings to open the “Accessibility” tab. Here, find and tap the “Motion” option to proceed.

Step 2. Now, on the following screen, turn off the toggle next to the “Reduce Motion” option. Then, go and check if the swipe-up gesture issue is fixed or not.

Fix 11. Reset iPhone All Settings
Resetting all settings on your Apple iPhone 6 Plus can help resolve software-related issues. It can help remove conflicts that might be affecting the swipe-up gesture. Note that this action will reset all settings on your device, but it won’t delete your data. Here’s how to reset all settings to fix iPhone swipe not working:
Step 1. Go to your device’s “General” settings and scroll down to tap the second last option, “Transfer or Reset iPhone.” On the following screen, press “Reset” from the available two options.

Step 2. Now, choose “Reset All Settings” from the pop-up options and confirm it by providing the passcode. Then, wait for a few moments as your Apple iPhone 6 Plus is restored to its original settings.

Part 3: Unlock iPhone Without Swiping Up
Encountering swipe not working on iPhone can sometimes lead to difficulties. This is especially the case in unlocking the Apple iPhone 6 Plus device or accessing essential functions. In such scenarios, using Wondershare Dr.Fone - Screen Unlock (iOS) provides a reliable solution. It bypasses the swipe-up need and regains access to your Apple iPhone 6 Plus without relying on the problematic gesture. This tool offers a solution to unlock iPhone/iPad devices without the passcode.
Dr.Fone - Screen Unlock (iOS)
Unlock iPhone/iPad Lock Screen Without Swiping Up.
- Simple, click-through, process.
- Unlock screen passwords from all iPhones and iPads.
- No tech knowledge is required, everybody can handle it.
- Supports iPhone 15 / iPhone 14 / iPhone 13 / 12, iPhone 11, … and the latest iOS version fully!
4,395,216 people have downloaded it
It allows the removal of various lock screens present on iPhone, iPad, and iPod touch. Additionally, it provides the capability to bypass the iCloud activation lock. Users can also bypass MDM and screen time restrictions without experiencing any data loss.
Key Features of Wondershare Dr.Fone
- This software is compatible with the latest iOS 17 and iPadOS 17, including iPhone 15 models.
- The unlocking process involves a simple 3-step procedure.
- With it, you can remove Apple ID from your device without the password.
Steps To Unlock iPhone Without Swiping Up via Wondershare Dr.Fone
You can use the simple steps explained below to unlock your Apple iPhone 6 Plus and fix the Apple iPhone 6 Plus 11 swipe-up not working:
Step 1: Connect Your Device and Choose Unlock iOS Screen
Upon downloading and installing Wondershare Dr.Fone onto your computer, access the “Toolbox” menu. Here, proceed to select “Screen Unlock” followed by “iOS.” Within this window, choose the “Unlock iOS Screen” option to proceed with unlocking your iOS device’s screen. Subsequently, connect your Apple iPhone 6 Plus and click Start to initiate the unlocking process.
Step 2: Ensure Your Device is in Recovery Mode
Now, adhere to the on-screen prompts provided to enter Recovery Mode based on the specific model of your iDevice. Then, the platform automatically recognizes and exhibits the Apple iPhone 6 Plus device Model. If necessary, change the model and choose the system version as per your preferences. Upon completion, click on “Start” to continue the process.

Step 3: Unlock Your iOS Device Successfully
Once the iOS firmware has been successfully downloaded, it undergoes verification. Proceed by selecting the “Unlock Now” button to initiate the unlocking process. A prompt window will emerge on the screen, requesting confirmation of the process. Enter the code and tap “Unlock” to proceed to the final step. Upon successfully unlocking the iDevice, click the “Done” button to finish the process.
Conclusion
Having trouble with swipe up not working on an iPhone can be annoying. It stops you from using important stuff and moving around your phone quickly. This guide has lots of ways to fix it. We’ve covered simple things like restarting your Apple iPhone 6 Plus and cleaning the screen, as well as more complex stuff like changing settings and using unique options for accessibility. These fixes can help make the swipe-up gesture work again.
We’ve also talked about a helpful tool called Wondershare Dr.Fone. It’s made to fix problems with the lock screen, including issues with swiping on your Apple iPhone 6 Plus. Moreover, Dr.Fone - Screen Unlock lets you get into your Apple iPhone 6 Plus even when gestures aren’t working properly.
Learn How To Lock Stolen Your Apple iPhone 6 Plus Properly
When it comes to security in smartphones, Apple stands at the forefront. The Activation Lock is a robust barrier to preventing unauthorized access and device theft. Losing your Apple iPhone 6 Plus can be a disturbing event, as accidents are inevitable. Taking prompt action to stop unauthorized data access becomes important. This guide offers a step-by-step approach to how to lock a stolen iPhone.

Part 1. Major Threats To Consider When iPhone Is Stolen
A lost iPhone can become susceptible to a myriad of threats. It could compromise your privacy, security, and personal data. Here are the reasons why learning how to lock your Apple iPhone 6 Plus when lost is essential:
- Unauthorized Access to Personal Data: Thieves can exploit an unsecured Apple iPhone 6 Plus to gain unauthorized access to personal information. These include contacts, messages, emails, and photos.
- **Financial Exploitation:**With access to your Apple iPhone 6 Plus, thieves may attempt to get stored payment methods.
- Identity Theft: Stolen iPhones often contain a wealth of sensitive information. This makes them a prime target for identity theft.
- Compromised Social Media Accounts: Using social media applications on your smartphone carries potential risks in the event of device loss. Unauthorized access to your social media accounts can lead to many problems, including misinformation and compromised privacy.
Part 2. Use Find My To Locate Stolen iPhone
On learning about how do I lock my stolen iPhone, Apple’s robust Find My feature emerges as a beacon of hope. It uses a combination of GPS, Wi-Fi, and Bluetooth signals to locate your Apple iPhone 6 Plus accurately.

Key Scenarios Where Find My Works
Find My can be a source to track stolen iPhones, but certain scenarios are associated with its operations. To know more about these scenarios, this section continues the discussion further below:
- iPhone Turned On:Find My can provide real-time location tracking when your stolen iPhone is still powered on and connected to the internet.
- **iPhone Turned Off or In Airplane Mode:**The last known location before the Apple iPhone 6 Plus device was powered down or put in Airplane Mode is accessible, offering a starting point for recovery efforts.
- **Offline Finding with Bluetooth:**The Find My service leverages Bluetooth technology to create a vast network of Apple devices. With these, it can securely help locate your Apple iPhone 6 Plus, even offline.
- **Activation Lock Integration:**This service is also integrated with Activation Lock, adding an extra layer of security. The Activation Lock remains active if a thief attempts to erase your device.
How To Use Find My To Locate Your Stolen iPhone
- Step 1. Access the Find My app on a trusted device and open it. If you can’t access one, use the iCloud website to access Find My service.

- Step 2. After logging in, select the lost device, and you can see its last recorded location on the map.

Part 3. Using Lost Mode To Lock Stolen iPhone
Lost Mode locks the Apple iPhone 6 Plus device and allows users to showcase a personalized message on the screen. This can help greatly in the safe return of the smartphone. The following are the simple steps you need to follow to learn how to block stolen iPhone with Lost Mode:
Activating Lost Mode Using Your Smartphone
- Step 1. Within the Find My app, tap “Devices” from the bottom toolbar and select your lost device. Now, scroll down to “Mark As Lost” and tap “Activate.”

- Step 2. You will now be given a summary of the Lost Mode; tap “Continue” to proceed. On the following screen, add a phone number, tap “Next,” and add a message that will be displayed on the lost device.

- Step 3. After adding a message, tap “Next” on the following screen and press “Activate” from the top right corner.


Activating Lost Mode Using iCloud Website
- Step 1. Access the iCloud website via your computer’s web browser. Sign in using your Apple ID, continue to click the “Grid” icon in the top right corner, and select “Find My.”

- Step 2. In Find My, add your Apple ID password again to access “All Devices.” Now, choose the lost device from the list of all devices in the top left corner. Then, click “Mark As Lost,” and the following pop-up Lost Mode prompt, tap “Next.”

- Step 3. Now go on to add your phone number and tap “Next.” Follow it by providing the message you want to display and click “Activate” to enable Lost Mode.

Part 4. Can’t Find Stolen Phone? Erase iPhone Completely
When efforts to locate a stolen iPhone fail, the need to protect sensitive data intensifies. As a result, the option to erase the Apple iPhone 6 Plus device becomes a crucial step instead of how to lock the Apple iPhone 6 Plus when lost. Here’s how to protect against the potential misuse of your information by erasing your device via Find My:
- Step 1. After accessing Find My service, choose the lost device from the list and click “Erase This Device.”

- Step 2. Select “Continue” on the erased iPhone screen for the Find My app. Once you’ve added the number, press “Erase” in the top right corner and follow the on-screen instructions to finish the procedure.

- Step 3. If using the iCloud website, tap “Erase This Device” and click “Next” on the upcoming prompt. You will be asked to enter the Apple ID password, after which you can use the on-screen guidelines to finish the process.

Part 5. Other Things To Do iPhone Is Stolen
There are additional measures you can take to enhance your overall security apart from understanding how do I lock my stolen iPhone. The following are some options you should utilize in case of device loss:
To Do List #1. Report to Police
If your Apple iPhone 6 Plus is stolen, it is crucial to immediately inform your local law enforcement agency. It facilitates the recovery process and assists in combatting criminal activities. Provide essential details about your Apple iPhone 6 Plus, such as the Model, color, and IMEI number. Share information about your efforts to locate the stolen iPhone using Find My.

To Do List #2. Make an Insurance Claim With AppleCare
You can claim insurance if you have AppleCare+ coverage for your Apple iPhone 6 Plus. AppleCare+ with Theft and Loss for iPhone includes protection against theft and loss incidents. It offers up to two incidents of such coverage every 12 months.
To qualify for theft or loss coverage, it is necessary for Find My to be enabled on your device at the time it goes missing. Moreover, it should remain enabled alongside Lost Mode throughout the claims process.

To Do List #3. Remove iPhone From Trusted Devices (2FA)
After your Apple iPhone 6 Plus is stolen, it becomes essential to bolster the security of your online accounts. It is particularly essential for those safeguarded by Two-Factor Authentication (2FA), which needs to be removed:
From iOS Device Settings
- Step 1. Access Settings on an iOS device logged in with the same Apple ID as the lost one. Here, tap on your name on the following screen and scroll down.

- Step 2. Simply select the misplaced device, and in the subsequent interface, press “Remove from Account” to eliminate it from the list of trusted devices.

From the Apple ID Website
- Step 1. If you cannot reach a secure device, visit the http://appleid.apple.com website and sign in with the identical Apple ID.

- Step 2. Once logged in, click “Devices” from the left side and select the lost device. To remove this device as a trusted device, click “Remove from Account.”

Part 6. Precautions To Take for Avoiding Losing iPhone
Users can proactively adopt specific measures to reduce the likelihood of such an occurrence. The following essential precautions are recommended while learning how to block your Apple iPhone 6 Plus when stolen:
Precaution #1. Enable Find My on Device
Activating Find My increases the likelihood of recovering your device. Take the following steps to enable the Find My feature on your Apple iPhone 6 Plus:
- Step 1. On your iOS device, navigate to “Settings” and tap the Apple ID on the top. Now, scroll down and press “Find My” on the following screen.

- Step 2. Next, tap “Find My iPhone,” on the ensuing window, toggle “Find My iPhone.” This will enable the Find My service on your device.

Precaution #2. Enable Separation Alerts on iPhone
Enabling “Separation Alerts” assists in preventing the loss of your Apple iPhone 6 Plus by alerting you when you distance yourself from it. Follow these steps to enable Separation Alerts on your Apple iPhone 6 Plus:
- Step 1. Navigate to and launch the Find My app on your Apple iPhone 6 Plus. Select the Apple iPhone 6 Plus device from the “Devices” tab for which you want to enable separation alerts.

- Step 2. From the available options, tap “Notify When Left Behind,” and on the following screen, toggle “Notify When Left Behind.” You can also add locations on this screen by tapping “New Location,” for which you don’t want to receive a left-behind notice.

Precaution #3. Enable 2FA on iPhone
Activating Two-Factor Authentication (2FA) enhances the security of your Apple iPhone 6 Plus. The mandatory secondary verification step makes 2FA crucial in securing your accounts. Follow these steps to enable 2FA on your Apple iPhone 6 Plus:
- Step 1. Access the Settings app on your iOS device and tap your name/Apple ID. Find and tap “Sign-In & Security” to proceed further.

- Step 2. On the following screen, tap “Turn On Two-Factor Authentication.” Follow it by tapping “Continue” afterward, and use the on-screen instructions to complete the process.

Bonus Tip. Find Stolen iPhone Back but Locked? Unlock With Wondershare Dr.Fone
Recovering your stolen iPhone successfully can be a joyous event. Yet, the frustration of discovering your device locked due to a forgotten password can be disheartening. Wondershare Dr.Fone - Screen Unlock (iOS) offers a solution to regain access to your device. This robust tool is crafted to help users unlock various iOS screen lock scenarios.
It provides a hassle-free solution for those locked out of their devices. This powerful tool effortlessly removes various lock screens on iPhones and iPads. It can bypass the iCloud activation lock without the need for a password.
Key Features of Wondershare Dr.Fone
- If you are using iTunes for backup but have forgotten the iTunes backup encryption passcode, Dr.Fone can remove it without data loss.
- This tool can remove Apple ID from your Apple iPhone 6 Plus or iPad if you have forgotten its password.
- You can free up your device by removing MDM and carrier locks using Dr.Fone.
Steps To Unlock Your Locked iOS Device Using Wondershare Dr.Fone
Wondershare Dr.Fone is a comprehensive toolkit that addresses many iOS-related issues. It offers a user-friendly solution to unlock your Apple iPhone 6 Plus with the help of the following steps:
- Step 1. Launching Wondershare Dr.Fone and Accessing Toolbox
Once you have installed and launched Wondershare Dr.Fone, access the “Toolbox” tab. Click “Screen Unlock,” and on the following screen, choose “iOS.” Click “Unlock iOS Screen” on the following screen and link your iOS device to the computer.

- Step 2. Entering Recovery Mode and Choosing System Version
The next step requires you to put your device in Recovery Mode, for which you can follow the instructions given on-screen. After your device is in Recovery Mode, Dr.Fone will display its “Model.” Now choose the appropriate “System Version” and click “Start.” Here, Dr.Fone will start downloading the required firmware. Once it is downloaded and verified, tap “Unlock Now.”
- Step 3. Acknowledging Data Loss Warning and Initiating Unlock Process
To show your acknowledgment of the warning, enter the asked code, which is “000000.” Afterward, click “Unlock” to initiate the screen unlocking process. Once the process is complete, tap “Done” to conclude the procedure.

Conclusion
Knowing how to lock stolen iPhones is essential for safeguarding personal and sensitive data. Apple’s Find My empowers users to remotely locate, lock, and erase their lost devices. If you have recovered your stolen device but it is locked, Wondershare Dr.Fone emerges as the top choice to unlock it within minutes.
Tips: Are you searching for a powerful Screen Unlock tool? No worries as Dr.Fone is here to help you. Download it and start a seamless unlock experience!
- Title: How Many Attempts To Unlock iPhone 6 Plus | Dr.fone
- Author: Amelia
- Created at : 2024-07-15 04:54:03
- Updated at : 2024-07-16 04:54:03
- Link: https://iphone-unlock.techidaily.com/how-many-attempts-to-unlock-iphone-6-plus-drfone-by-drfone-ios/
- License: This work is licensed under CC BY-NC-SA 4.0.