
How to Access Your Apple iPhone 12 When You Forget the Passcode? | Dr.fone
How to Access Your Apple iPhone 12 When You Forget the Passcode?
We all have secrets in our iPhone or some important financial or business data that we all wish to protect from unwanted access. For this, we set up a passcode. But what if Apple iPhone 12 passcode is forgotten by you? Well, you may now wonder how to perform Apple iPhone 12 passcode bypass, right? Worry no more! We’re right here to help you with the proven solutions for Apple iPhone 12 passcode reset without iTunes or with it too. Let’s explore.
Part 1. Unlock Apple iPhone 12 screen passcode in one click (unlock tool needed)
The first and the ultimate measure for Apple iPhone 12 passcode removal in just a matter of a single click is Dr.Fone - Screen Unlock (iOS) . With the help of this mighty tool, performing Apple iPhone 12 passcode reset is even easier than any other alternative. Not only it can perform Apple iPhone 12 passcode bypass, you can also make use of this tool to bypass lock screen of an Android smartphone too. Isn’t it amazing? Moreover, this powerful tool works effortlessly with the latest iOS 13 version and even with the most recent iPhone models as well. Here is the step by step tutorial on Apple iPhone 12 passcode bypass.
Step 1: Install and launch Dr.Fone - Screen Unlock (iOS)
Get the tool Dr.Fone - Screen Unlock (iOS) downloaded and installed over your computer system. Then establish a connection between your computer and iPhone.
Now, launch the tool and then opt for the “Unlock” tile from the main screen.

Step 2: Boot in Recovery/DFU mode
Next move that you need to perform is to opt for the correct mode, i.e. “Unlock iOS Screen”. Then, you’ll be prompted to boot your device in Recovery/DFU mode. The on-screen instructions will guide you on how to do it.

Step 3: Double-Check iPhone information
On the upcoming screen, you’ll be displayed the “Device Model” and most recent “System Version” which is compatible with your Apple iPhone 12. Simply, hit the “Start” button here.

Step 4: Perform Apple iPhone 12 passcode removal
Once, the software downloads the firmware automatically, you can then proceed to Apple iPhone 12 passcode reset. Hit the “Unlock Now” button over the next screen and in a short while you’ll be notified that Apple iPhone 12 passcode removal is completed.

 safe & secure
Part 2. Restore an iTunes backup for Apple iPhone 12
Here we’re going to be familiar with the Apple iPhone 12 passcode reset using the renowned iOS data management tool, iTunes. But be sure that iTunes version installed over your computer is up to date or else unknown errors may crop up in between. Eventually, your all-new Apple iPhone 12 may even get bricked. Think this is it? Well, here’s another problem with iTunes, you need to get your Apple iPhone 12 connected only to a pre-synced or pre-trusted computer. Or else, this tutorial won’t bring any good to you.
Step 1: First, get your Apple iPhone 12 connected to your PC. Then, launch the iTunes most recent version. It will automatically detect your Apple iPhone 12. Once detected, tap the “Device” icon over the left top corner of iTunes.
Step 2: Then, hit the “Summary” option from the left panel and then you need to hit the “Restore iPhone” button. Confirm your actions by simply pushing the “Restore” button on the pop-up message and you’re done. Now, just wait for the process to complete.

Part 3. Restore Apple iPhone 12 in recovery mode to remove screen passcode
If somehow, the above solution fails and you’re just not able to get Apple iPhone 12 passcode reset. You need to boot your device into recovery mode and then perform the factory reset. This would certainly wipe off everything from your Apple iPhone 12 including the passcode as well. Here are the steps involved in booting your Apple iPhone 12 in recovery mode.
- First things first, power off your Apple iPhone 12 by pushing the “Side” button down along with either of the “Volume” button. Keep them pressed till you get to see “Power-off” slider over your screen. Now, simply drag it to power off your device.
- Next, connect your Apple iPhone 12 and your computer firmly with the help of an authentic cable. Please make sure to press and hold the “Side” button meanwhile.
- Ensure not to let go the Side button till the recovery mode screen appears over your Apple iPhone 12.

- Once the Apple iPhone 12 device is booted in recovery mode, iTunes will throw a pop up message that “iTunes has detected an iPhone in recovery mode”. Simply, hit the “OK” button over the message and then push the “Restore iPhone” button followed by confirming your actions.

Part 4. Use “Find iPhone” from iCloud
The next pro tutorial for Apple iPhone 12 passcode removal is via iCloud. For this, grad access to any computer available on your side. Or, you can also make use of any other smartphone device but ensure it must be connected to a WiFi network or have an active data pack. Moreover, the locked iPhone on which you’re going to perform Apple iPhone 12 passcode reset should also have an active internet connection to make this tutorial work.
Note: Since we’re going to unlock your Apple iPhone 12 using Find My iPhone service of iCloud. It is important that “Find My iPhone” service was enabled beforehand over your Apple iPhone 12.
Step 1: Launch the browser over any other smartphone device or computer. Then, visit the official web page iCloud.com.
Step 2: Now, make use of same Apple account configured with your Apple iPhone 12 to sign in to iCloud. Then, opt for the “Find My iPhone” icon over the launch pad.

Step 3: Next, tap on the “All Devices” drop-down menu available over the top midsection and then select the Apple iPhone 12 that you wish to bypass the passcode off.
Step 4: Then, you’ll get to witness a pop-up window over your screen. Tap the “Erase iPhone” button over it and then confirm your actions. All the settings and data will be wiped off remotely from your Apple iPhone 12 now.

Step 5: Lastly, wait for the process to complete and upon completion set up your device as usual.
Part 5. How about Apple iPhone 12 restrictions passcode?
Apple iPhone 12 restrictions is a vital setting that is used to lock down a set of functions of the iPhone. These iPhone restrictions are also known as Parental Controls. That implies one can make use of these settings to block or hide songs that have explicit lyrics/content or barring YouTube from running, etc.
It is vital to set up a 4 digit passcode if you want to use iPhone restriction settings. Now, if you somehow forgot the passcode that was set to make use of iPhone restrictions, you need to restore your Apple iPhone 12 with the help of iTunes to remove the previous passcode. But ensure not to restore an old backup of iPhone or else, the old passcode which you may not know will also get activated. Eventually, making your situation even worse.
Reset/Change Apple iPhone 12 restrictions passcode
Now, in case you know the Apple iPhone 12 restrictions passcode and just wish to reset it. Then follow the streak of steps mentioned below.
- Launch “Settings” of your Apple iPhone 12 and then get into “General” followed by “Restrictions”. Now, you’ll be asked to key in the current passcode.

- Once you’ve entered the current passcode, hit on the “Disable Restrictions” and to confirm your actions, key in your passcode when prompted.

- Lastly, hit on “Enable Restrictions”. You’ll be asked to set up a new passcode now. Do it and you’re done.

How to Make the Most of Your Apple iPhone 12 Lock Screen with Notifications?
The Apple iPhone 12 lock screen has certainly changed a lot over the last few updates of iOS. Not only it provides an added security to the Apple iPhone 12 device, but with iPhone lock screen notifications, we can also save our time and efforts. With the introduction of iOS 18, we can also see a change in iPhone lock screen with notifications as well. To help you make the most out of lock screen notifications iPhone, we have come up with this ultimate guide. Read on and know all sorts of things you can do with iPhone notification lock screen.
Part 1: How to use iPhone lock screen notifications?
When it comes to iPhone lock screen with notifications, there are so many things that you can do. For instance, here are a handful of things you can do with iPhone lock screen notifications.
Reply to messages quickly
If you aren’t using this iPhone notification lock screen feature, then you are certainly missing out on something. You might already know that you can get a preview of messages on your home screen. Simply long press it (or 3D Touch) to interact with it. From here, you can reply to your messages without unlocking your device.
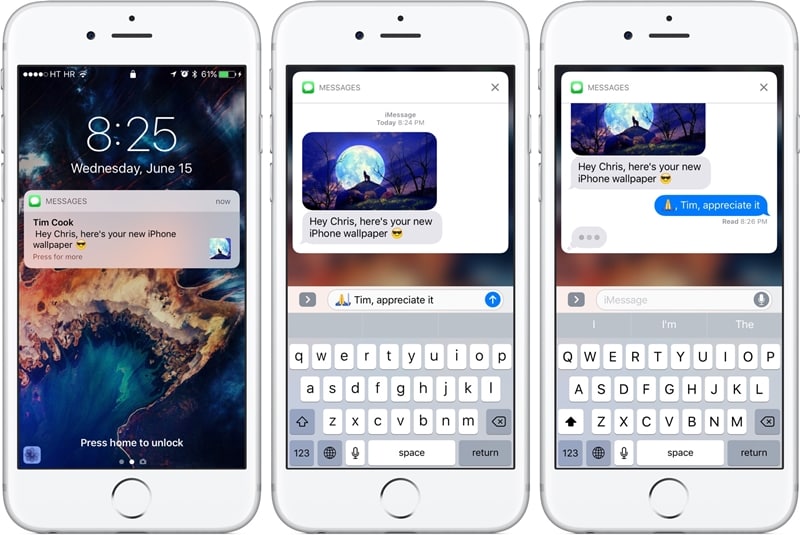
Interact with apps without unlocking your phone
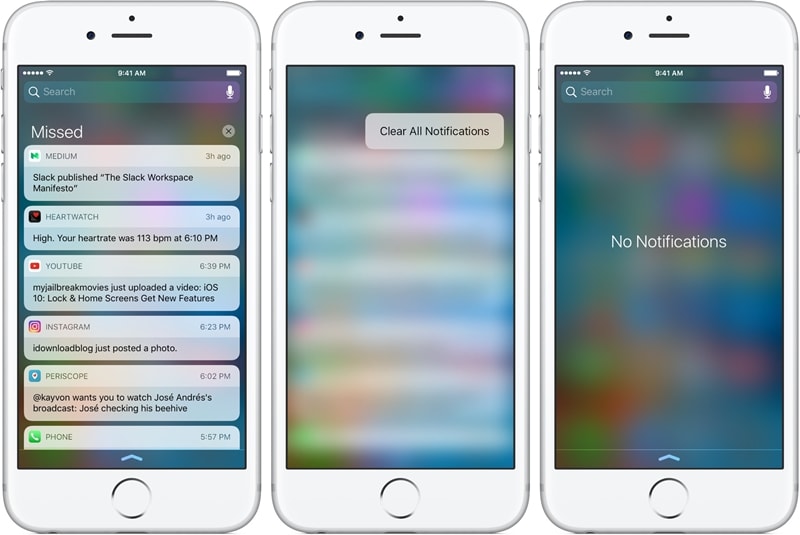
Not just your messages, you can interact with other apps as well right from the lock screen notifications iPhone. After getting a list of notifications, you can simply tap on the “x” button to close them.
Though, if you want to know more, then just long press the notification. For instance, if you have got a notification for an email, then you can get various options just by long pressing it.

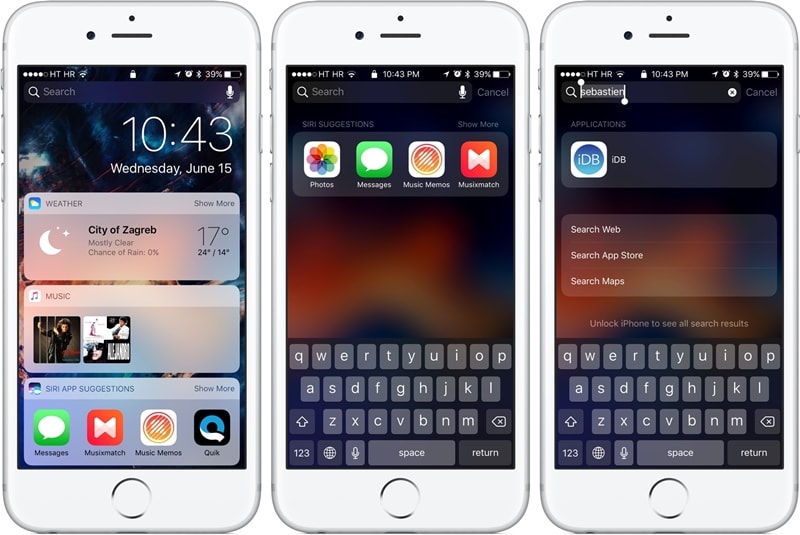
Search for anything
Besides interacting with widgets and apps, you can also search for something on your device and that too without unlocking it. Simply tap on the search bar to make it work.
Part 2: How to turn off notifications on iPhone lock screen?
Sometimes, people can access our private information just by looking at our notifications. In this way, they can get read your crucial information and that too without unlocking your device. By simply visiting your device’s settings, you can customize iPhone lock screen with notifications. In this way, you can turn on or off iPhone lock screen notifications for the apps of your choice.
1. Unlock your device and go to its Settings > Notifications to access all the features related to its notifications.
2. From here, you can view a list of all the apps that can access notifications.
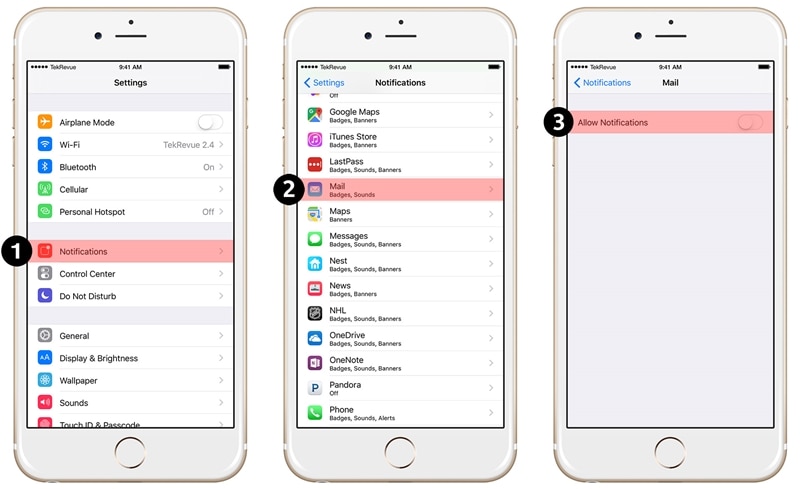
3. Simply tap on the app of your choice (Mail, Message, Photos, iTunes, etc).
4. From here, turn off the option of “Allow Notification” to completely turn off the notifications for the app.
5. If you simply want to turn off notifications on lock screen, then switch off the option of “Show on Lock Screen”.
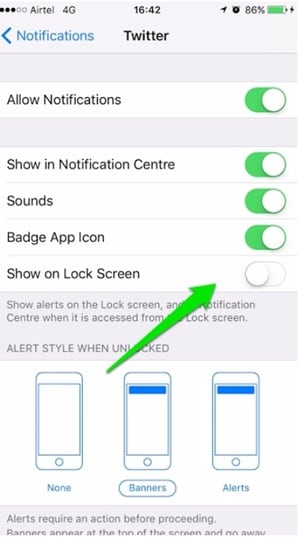
Besides that, there are a few other options as well that you can either enable or disable to customize your lock screen notifications iPhone.
Part 3: How to turn off notification view on iPhone lock screen?
The notification view can be used to see previous notifications on the Apple iPhone 12 device without unlocking it. Needless to say, most of the users don’t like to include this iPhone notification lock screen feature. To turn off the notification view of iPhone lock screen notifications, follow these steps:
1. Firstly, unlock your device and got to its Settings > Touch ID & Passcode option.
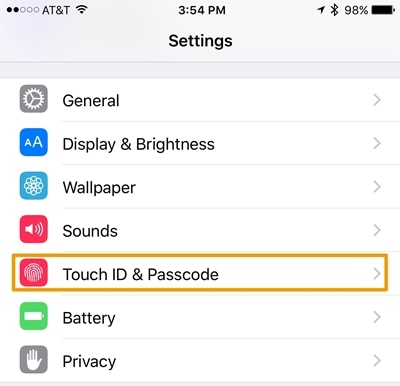
2. You would be needed to provide the passcode or your fingerprint in order to access these settings.
3. This will provide a list of features related to your passcode. Go to the section of “Allow Access When Locked”.
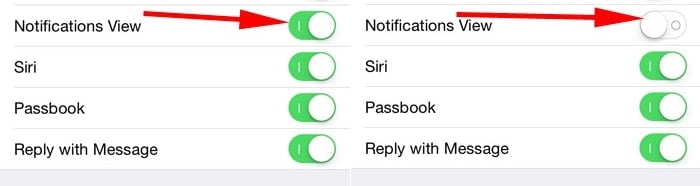
4. From here, make sure that the option of “Notification View” is turned off.
After turning the option off, you can exit from the Settings interface. In this way, your device won’t display the notification view.
Part 4: Changes on iPhone lock screen notifications on iOS 18
With the new update of iOS 18, we can see a drastic change in the Apple iPhone 12 lock screen notifications as well. Since the Apple iPhone 12 lock screen with notifications have been integrated into one, it becomes quite easier for users to access it.
Access iPhone notification lock screen on iOS 18
Some people find it a little tricky to access the lock screen notifications iPhone after the iOS 18 update. Instead of sliding the screen from the top, you need to swipe it from the middle. By swiping it from the bottom, you might get its control center.
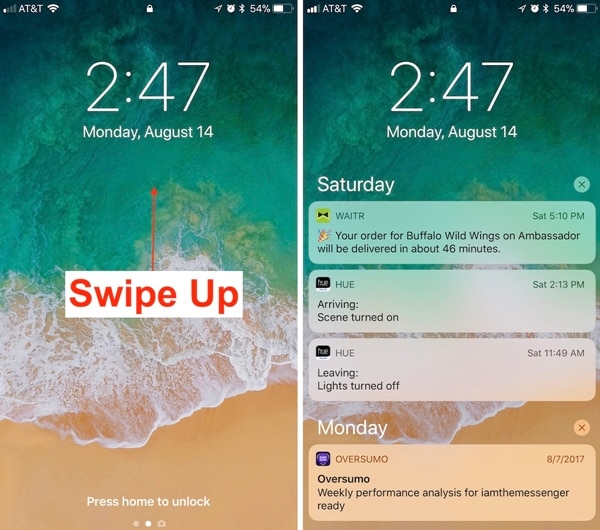
Simply swipe up from the middle of the screen to get a list of all the notifications. Now, you can slide them to access the old notifications.
Nevertheless, you can swipe from the top to access the cover sheet.
Swipe left or right
This is undoubtedly one of the most evident new features of the Apple iPhone 12 notification lock screen of iOS 18. Now, you can swipe left or right to access various features. By swiping left, you can access the Camera on your device and by swiping right, you can access your Today View.
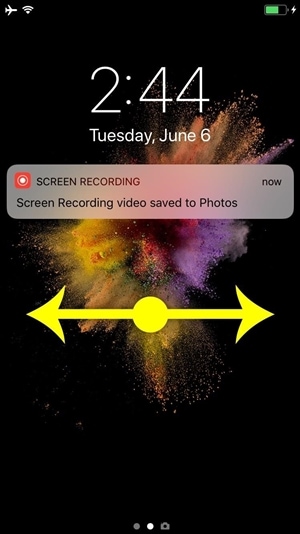
If you want to click pictures instantly, then simply swipe left the lock screen. This will launch the Camera on your device, letting you click pictures on the go. Similarly, by swiping right, you can access your Today View. This includes vital data from apps and widgets that your smartphone assumes is important for you regarding the day.
We hope that after following this guide, you would be able to gain in-depth information regarding iPhone lock screen with notifications. Apart from all the basic things you can do on the lock screen, we have also provided easy ways to customize it. Furthermore, there are so many things that you can do with the iOS 18 iPhone lock screen notifications. While most of the users loved the feature, some are quite hesitant about its application. What is your take on this? Let us know about it in the comments.
Disabled Apple iPhone 12: How to Unlock a Disabled Apple iPhone 12?

Apple iPhone 12 Disabled?
Because of using face masks, Face ID on iPhone does not always work correctly, and we are entering our passcodes more than before. If we enter it incorrectly a few times in succession, the phone will disable itself to prevent unauthorized access. It can seem like the end of the world because in so many ways smartphones have become our world. Here are ways you can unlock your Apple iPhone 12 disabled due to too many incorrect passcode attempts.
Part 1: Unlock Disabled Apple iPhone 12 Without iTunes/ iCloud Using Dr.Fone - Screen Unlock (iOS)
We know and understand that the word troubleshooting can remind you of long telephone calls with support or making appointments and driving down to specialists and spending obscene amounts of money to get solutions. You do not want that. How about a way you could unlock your Apple iPhone 12 in a simple, 1-click way instead?
Dr.Fone - Screen Unlock is a unique tool designed to help you avoid all hassles and get back on track quickly. It comprises modules designed to help you with all the issues that you might encounter during smartphone use. Naturally, there is something to help you when your Apple iPhone 12 is disabled. You don’t need to use anything else, no other software or special cable or support. All you need is this one software you can download on your computer (both macOS and Windows supported) and you’re good to go.
Dr.Fone - Screen Unlock (iOS)
Unlock Disabled Apple iPhone 12 Without iTunes/ iCloud.
- Intuitive instructions to unlock iPhone without the passcode.
- Removes the iPhone’s lock screen whenever it is disabled.
- Easy to use with detailed guides.
- Compatible with the latest iOS/iPadOS version.
3981454 people have downloaded it
Do note that all methods that unlock your Apple iPhone 12 will necessarily wipe your Apple iPhone 12 and remove all data from the Apple iPhone 12 device, essentially booting it up as new.
Step 1: Launch Dr.Fone and click the module titled “Screen Unlock”.
Step 2: Choose the “iOS” option, then select “Unlock iOS Screen” on the subsequent screen to continue unlocking your Apple iPhone 12.
Step 3: Follow the provided instructions to start the disabled Apple iPhone 12 in Recovery Mode to unlock it. If for any reason the phone does not boot in Recovery Mode, there are instructions provided at the bottom to enter what is called DFU mode.

Step 4: Dr.Fone will read and display your phone model and the software installed on it. If the model displayed is incorrect, use the dropdown to pick the correct detail. Click “Start” to download the specific firmware file for your particular Apple iPhone 12 model.
Step 5: After the download completes, please click Unlock Now to start unlocking the disabled Apple iPhone 12.

Your Apple iPhone 12 will be unlocked in a short span of time. Please note that all data would have been wiped out from the Apple iPhone 12 device. When you set the Apple iPhone 12 device up again, if you set it to use iCloud, data such as Contacts, iCloud Photos, iCloud Drive data, etc. will be downloaded onto your device again. The apps you had on your Apple iPhone 12 prior to it getting disabled can be downloaded again from the App Store. If you did not use iCloud but backed up the data manually, you will have to manually restore that data onto the Apple iPhone 12 device again.
safe & secure
Part 2: Unlock Disabled Apple iPhone 12 Using iTunes or macOS Finder
Of course, there is an official way that Apple provides for users to restore device firmware using iTunes or macOS Finder. For this, iPhone is put under Recovery Mode manually and Finder or iTunes is used to reinstall software on it directly from Apple. This process is fine for people who are conversant in tech, since this process can throw up a lot of errors that are just numbers, and people can get confused as to what they mean, resulting in frustration.
Step 1: Connect your Apple iPhone 12 to a Windows/ macOS device and launch iTunes. If you are on a Mac that runs macOS Catalina or higher, open Finder since you would not have access to iTunes anymore.
Step 2: Pick your Apple iPhone 12 and do the following:
(2.1) Press the volume up button and let it go.
(2.2) Press the volume down button and let it go.
(2.3) Press the Side Button (power button, on the right side of your Apple iPhone 12) and keep it pressed till Finder or iTunes detects the phone in Recovery Mode.
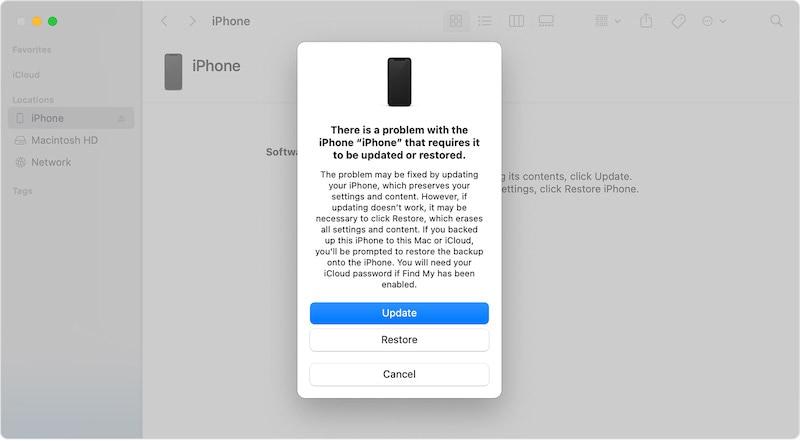
Step 3: Choose Restore to download and reinstall the latest iOS on your Apple iPhone 12 and unlock your Apple iPhone 12.
When the Apple iPhone 12 reboots, it will be reset to factory settings, and you can set it up again as you did when brand new.
Part 3: Unlock Disabled Apple iPhone 12 Using iCloud Website (Find iPhone method)
Another method you may go with to unlock your disabled Apple iPhone 12 is using the iCloud website to gain access back. This is a fairly easy way and doesn’t require going through complex hoops.
Find My is available both online via the iCloud website and on iOS devices and on Macs. In case the only Apple product you own is the currently disabled Apple iPhone 12, you can use Find My on the iCloud website from any other computer you may have to unlock your disabled Apple iPhone 12.
Step 1: Visit https://icloud.com and log in into the same iCloud account/ Apple ID as the disabled Apple iPhone 12.
Step 2: Go to Find My, select your Apple iPhone 12.
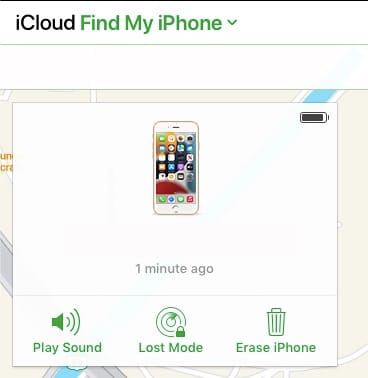
Step 3: Click Erase iPhone and confirm.
This will start the wipe process on your Apple iPhone 12 remotely and your Apple iPhone 12 will be reset to factory settings. You can now proceed to setup your Apple iPhone 12 once again.
Part 4: Unlock Disabled Apple iPhone 12 Using Find My iPhone App
There are times you have another iOS device in the family or just lying around, you can use that device to unlock your disabled Apple iPhone 12. This method is particularly useful if you’re traveling with family or alone, and only have family members with their own iOS devices or, say, your iPad with you. As always, note that all these methods will wipe your data from your Apple iPhone 12.
Step 1: Open the Find My app on your other iOS device or Mac
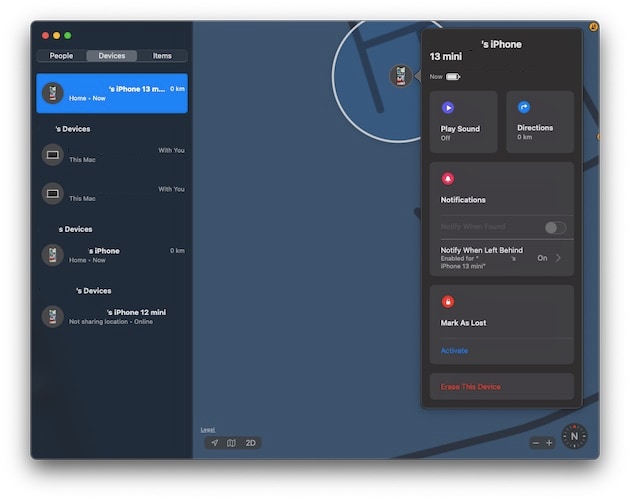
Step 2: Select your disabled Apple iPhone 12 from the Apple iPhone 12 devices from the left pane, click/ tap your disabled Apple iPhone 12 and click/ tap Erase This Device
The disabled iPhone will be wiped and reset to factory settings. You can then set it up again.
Part 5: Unlock Disabled Apple iPhone 12 Without A Computer
There are millions in the world who do not use the traditional computer so to speak. They have entered the post-PC era as they say, and their needs are met without a regular desktop or a laptop. They live wirelessly. They travel the world. Are you one of them? How would you unlock disabled Apple iPhone 12 with no desktop/ laptop computer around? You have a few options.
You can use your other iOS device with Find My iPhone app to unlock your disabled Apple iPhone 12 or you can use the iCloud website from your other device and Find iPhone app to unlock your disabled Apple iPhone 12.
The second option is to get a loaner device from someone you know. A loaner device is a device you borrow from someone to use for a purpose and return it when you are done with it. In this case, you can ask for a computer from someone you know and use it to unlock your disabled Apple iPhone 12 and return the Apple iPhone 12 device back. That way, you can use iTunes or macOS Finder if you’re more favorable to using that method.
When using a computer, the simplest, easiest, most flexible, and robust method to unlock disabled Apple iPhone 12 is using third-party tools such as Dr.Fone – Screen Unlock (iOS). However, Dr.Fone is not just for troubleshooting and unlocking your disabled devices. Dr.Fone is like that multi-utility knife that can do a variety of things.
Using Dr.Fone you can not only unlock your Apple iPhone 12 with ease, you can also use it periodically as a backup and restore tool that gives power in your hands. How does it do that? When you launched Dr.Fone, you had several modules to choose from and you chose Screen Unlock to unlock your disabled device. Instead of that, you can choose the Phone Backup module to backup and restore data from and to your device. Why would you use a third-party tool to backup and restore?
As you may be aware, using iTunes or macOS Finder allows you to backup and restore data onto your Apple iPhone 12 easily, but, the one glaring omission here is that it does not allow you to choose what you want to backup and what you want to restore. This is a much-coveted feature that is glaringly absent from the Apple world so far, and with Dr.Fone’s iOS Phone Backup feature you can have that choice in your hands, just like you do with Android. Dr.Fone allows you to choose what you want to backup, so, you can back up just your photos, just your text messages, just your files, or any combination thereof, for the matter. And, when it comes to restore, you can restore selectively as well. So, suppose you backed up your entire data using Dr.Fone, now you can restore just the text messages if you so want.
safe & secure
Part 6: Prevent iPhone From Getting Disabled Again
After all this to get access back, you might think let’s go passcode-less and prevent the hassle. Don’t do that - that’s worse and unsafe. Instead, here are tips you can use to make sure you don’t accidentally disable your Apple iPhone 12 again.
Tip 1: About Passcodes
- 1.1 Set a passcode that is easier to remember for you but difficult to think of for thieves and others.
- 1.2 Never use birthdates, years, vehicle numbers or any such numbers that may be easily tried by others.
- 1.3 Never use repeating numbers.
- 1.4 Do not use your ATM PIN as your phone passcode either. Think of some digits or combination that makes sense to you and only you. And then use it.
Tip 2: Use Face ID
Along with Passcode comes the option of Face ID on your Apple iPhone 12, so use that. That will minimize instances for you to enter your passcode, and may make you forget it again, though. So, make sure that the passcode you set does make sense to you and you can remember it always without effort.
Conclusion
Not all of us have the memory of elephants. With Touch ID and Face ID on our iPhones minimizing the use of passcodes, we may forget them. Another factor in forgetting passcodes is being too smart for our own good and trying to set up such a secure passcode that even we are not able to remember it. If we enter incorrect passcode too many times, the Apple iPhone 12 disables itself and we need to restore it to factory settings to unlock it again. There are several ways to do that, depending on the time you are willing to spend on the job and your proficiency level, along with the resources that you have with you right now. For example, if a method requires use of another iOS device and you do not have it, that method is not useful to you right now, pick another. Lastly, when the Apple iPhone 12 device is reset, instead of going passcode-less to make sure that you do not forget the passcode again, it is best to set up a passcode that you can somehow remember.
safe & secure
Also read:
- [New] Pro Video Enhancers for Social Media Platforms for 2024
- [New] The Leading Selection No-Cost, Outstanding LUT Links for 2024
- [Updated] In 2024, Leading Photo Backdrop Alternatives List
- Crafting Unified Visuals on Your Computer
- Cutting-Edge Hubs for AI Prompt Sharing
- Effortless Methods to Download Thrilling Horror Flicks
- Exploring Cutting-Edge Devices Through Tom's Electronics Lens
- Forgot Apple iPhone 6 Backup Password? Heres What to Do | Dr.fone
- How To Remove Passcode From iPhone 14? Complete Guide | Dr.fone
- How to Unlock Apple iPhone 6s with a Mask On | Dr.fone
- In 2024, Forgot Locked iPhone 6 Plus Password? Learn the Best Methods To Unlock | Dr.fone
- In 2024, How Can I Unlock My iPhone 8 Plus After Forgetting my PIN Code? | Dr.fone
- In 2024, How To Fix Auto Lock Greyed Out on iPhone 14 | Dr.fone
- Title: How to Access Your Apple iPhone 12 When You Forget the Passcode? | Dr.fone
- Author: Amelia
- Created at : 2025-01-11 17:01:22
- Updated at : 2025-01-12 17:50:31
- Link: https://iphone-unlock.techidaily.com/how-to-access-your-apple-iphone-12-when-you-forget-the-passcode-drfone-by-drfone-ios/
- License: This work is licensed under CC BY-NC-SA 4.0.