
How To Bypass the Required Apple Store Verification For Apple iPhone SE (2020) | Dr.fone
How To Bypass the Required Apple Store Verification For Apple iPhone SE (2020)
The Apple App Store is a familiar place for anyone with an iPhone or iPad. It’s where you find all sorts of useful and fun apps. However, one thing that can be a hassle is the store’s strict verification process. Every time you make a purchase, you need to go through this step.
It’s there for a good reason – to stop fraud – but it can get annoying, especially if you forget your Apple ID or have other issues. This article will explore the ways to stop the Apple Store “Verification Required” prompt, making your app downloading experience smoother.

Part 1: Why Does Apple Require Verification in the Apple Store?
When browsing the App Store on your Apple iPhone SE (2020) or iPad and looking to download the latest game or productivity tool, you might have noticed that Apple often asks for some form of verification before you can proceed with your purchase. This is not just a random step; there’s a solid reason behind it.
The primary reason Apple requires verification for App Store purchases is to ensure that you are the person authorizing the purchase. This security measure prevents unauthorized transactions and protects your account from fraud.
What does this verification usually involve? It could be entering your Apple ID password or using Face ID or Touch ID if your device supports these features. These methods are designed to confirm your identity quickly and securely.

Reasons Why the Verification Required Message Might Appear
There are several reasons why you might see an Apple Store’ Verification Required’ message when trying to download an app or make a purchase:
- New Apple ID. If you’ve just created a new Apple ID and need to download or pay for apps, Apple must verify your payment information. Thus, you’ll have to prove everything, especially on a new phone.
- **Payment method needs to be corrected.**Suppose there’s an issue with your Apple ID’s payment method, such as outdated or incorrect details. In that case, verification is required to ensure the account is secure and ready for transactions.
- Invalid credit card. Unsupported or invalid credit cards can trigger the verification notice, as Apple can’t process payments with these cards.
- Unpaid balance. If there’s an outstanding balance on your Apple ID, you can download or pay for new apps once this balance is cleared.
- Family Sharing restrictions. For those using Family Sharing, if the family organizer has placed restrictions on your account, this could result in a verification prompt.
Understanding these reasons is the first step in addressing the ‘Verification Required’ message. It’s not just a random or annoying hurdle; it’s there for your security and to ensure a smooth, safe experience when using the App Store.
Part 2: How To Fix Verification Required Prompt Using Apple ID
Having to deal with the ‘Verification Required’ prompt in the App Store can be a bit of a hassle, especially when you’re eager to get your hands on a new app or game. Fortunately, there are several methods you can use to resolve this issue, most of which are pretty straightforward and can be done right from your device. Here’s how to tackle it:
Update Payment Method
One of the most common reasons for the verification prompt is a problem with your payment method. To fix this, go to your Apple ID settings on your Apple iPhone SE (2020) or iPad. Tap your name at the top of the Settings app, then go to Payment & Shipping. You can update your payment information or add a new payment method here. Make sure the details are correct and up to date.
Check Unpaid Subscriptions
Sometimes, unpaid subscriptions can trigger the verification prompt. Tap the App Store > your profile icon, and select Subscriptions. Here, you can view all your subscriptions, active or expired. Check if there are any unpaid ones and clear any outstanding payments.

Don’t Require Password for Purchases
For less frequent purchases, you should change the settings so you don’t always have to enter your password. Go to Settings, then to Screen Time. Under Content & Privacy Restrictions, select iTunes & App Store Purchases. Here, you can change the settings to Don’t Require for purchases. However, be cautious with this method as it reduces security.

Sign Out of Apple ID and Re-Sign In
Sometimes, simply signing out of your Apple ID and then signing back in can resolve the issue. Go to the Settings app, tap your name at the top, and scroll down to Sign Out. After signing out, restart your device and then sign back in. This can help refresh your account settings and clear up any minor glitches.
Remember, these methods are about bypassing the verification process and ensuring your account is up-to-date and secure. Regularly checking your Apple ID settings and payment information can prevent many common issues with the App Store, including the frustrating ‘Verification Required’ prompt.
Part 3: How To Bypass Verification Required Prompt Without Apple ID
If you need to learn how to bypass the ‘Verification Required’ prompt in the App Store but don’t have access to the Apple ID or password, there’s an alternative approach using third-party software. One such tool that can assist in this situation is Wondershare Dr.Fone - Screen Unlock (iOS), which offers a feature specifically designed for this purpose.
Introducing Dr. Fone’s Screen Unlock (iOS) Feature
Dr.Fone - Screen Unlock (iOS) function includes an Apple ID remover tool. This feature is handy when you cannot remember your Apple ID or password but need to download apps from the App Store. Here’s a step-by-step guide on how to use this feature.
Step-by-Step Guide To Bypass Verification Without Apple ID With Dr.Fone
Here’s a complete guide on bypassing the verification required on the App Store.
Step 1: Install and open Wondershare Dr.Fone on your computer.
Step 2: Navigate to Toolbox and select Screen Unlock followed by iOS.

- Step 3: In the next window, choose Remove Apple ID to proceed.

- Step 4: A connectivity status will appear on the screen with your iOS device connected to the computer. Click Unlock Now to start the process.

- Step 5: Confirm if your iOS device has a screen lock and two-factor authentication enabled. This is crucial for the process to continue smoothly.

- Step 6: Follow the on-screen instructions to put your iOS device in Recovery Mode. If necessary, you can also opt for DFU Mode by following the provided instructions. Once in Recovery Mode, the tool will recognize your device model. You’ll need to select the correct system version to proceed.

- Step 7: The tool will download the appropriate iOS firmware for your device. After the download, it will verify the firmware.

- Step 8: After firmware verification, click Unlock Now. You’ll be prompted to enter a code for confirmation. Once entered, the unlocking process will begin.

- Step 9: You’ll receive a notification once the process is complete. You may try again if the process fails to succeed the first time.

Note: After Apple ID removal, you must re-enter a new Apple ID to access the App Store. Take note of the password now if you forgot your previous one.
Conclusion
In this article, you’ve learned how to remove ‘Verification Required’ in the App Store. The primary takeaway is to try solving the issue using your Apple ID, as this approach typically prevents data loss. However, if you’re in a tight spot without access to your Apple ID, Dr.Fone - Screen Unlock (iOS) offers a reliable alternative to bypass this hurdle.
While it’s an effective solution, always consider it a secondary option to safeguard your data. Additionally, Dr.Fone can be a handy tool for various other phone-related challenges, making it a useful resource for tackling different tech problems.
Tips: Are you searching for a powerful Screen Unlock tool? No worries as Dr.Fone is here to help you. Download it and start a seamless unlock experience!
Forgot Apple iPhone SE (2020) Backup Password? Here’s What to Do
Forgetting your Apple iPhone SE (2020) backup password can be a real pain. Not only does it mean you can’t access your data, but it also means you can’t restore your phone if something goes wrong.
There are still chances that you could forget your Apple iPhone SE (2020) backup password. Fortunately, you have a chance to recover your password. So, if you’re having trouble remembering your Apple iPhone SE (2020) backup password, don’t despair. There are still ways to get it back!
Part 1: Overview of iPhone Backup Password
The Apple iPhone SE (2020) is secured using a combination that is the backup password. Passwords, Wi-Fi settings, browser history, and health records are sensitive information that an encrypted device may back up.
Remember that this is not the same as your Apple ID or passcode (the sequence you input to unlock the iPhone).
Note:
The encryption of backups is not turned on by default. You will only need to activate the Encrypt Backup option the first time you use either iTunes or Finder. After that, each of your backups will encrypt on its own automatically.
So, if you choose to store your backups in iCloud, it will automatically encrypt all of your data each and every time.
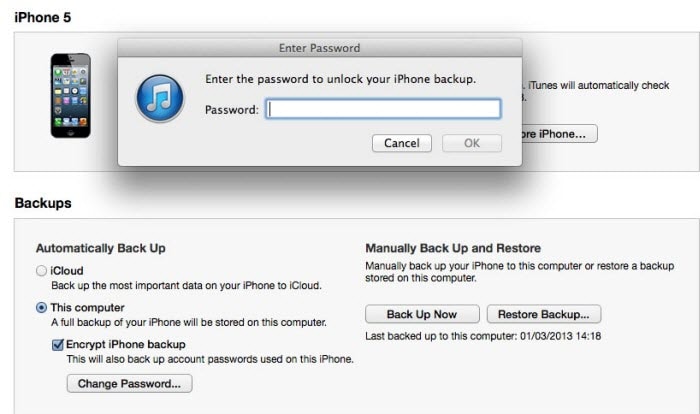
To get the password for the encrypted backup of iTunes:
Step 1: Open iTunes
Launching iTunes is the first thing to do if you have a Mac computer running Mojave 10.14 or an older operating system version. On the other hand, if you use the Mac operating system known as Catalina 10.15, you need to run the Finder application.
Step 2: Link your Apple iPhone SE (2020) to your PC
At this point, a USB cable should be used to connect the Apple iPhone SE (2020) device to a computer. The next step is to find the widget on your desktop computer or portable device.
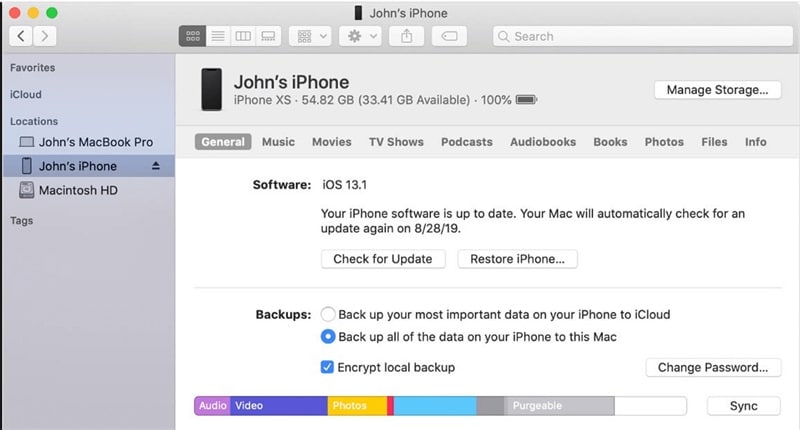
Step 3: Begin the Encryption Process
Select the Encrypt Local Backup option in the Backups section directly from either the Summary or General tab of the Backups section.
Step 4: Create a Password
When prompted in the window, create a password for the account. Make it powerful yet that is simple for you to remember. You might also save it somewhere secure to help you recall it later.
After establishing the password, all your previous backups will immediately undergo an automated overwrite and encryption. Make it a priority to ensure that the encryption procedure is finished effectively.
Part 2: 5 Fixes When We Forgot iPhone Backup Password
1. Try all passwords you used on your Apple iPhone SE (2020)
The typical method that each individual attempts for the first time is to input all of the available passcodes. Even if it is the most straightforward technique, there is still a possibility that you miss one of them. Therefore, think about all of the passwords you may input, which are listed below.
- The password to log in to the computer
- The password to access Apple ID
- The password to access the encrypted data on the hard disk
- The password to access various websites
- The password to log in to the computer
- Password for the wireless network
- Password for the email account
- Passcode for the administrator
- Passcode for the iPhone
2. “Reset All Settings” via “Settings”
To begin, go to the Settings app on your iOS device, then choose General, followed by Reset.
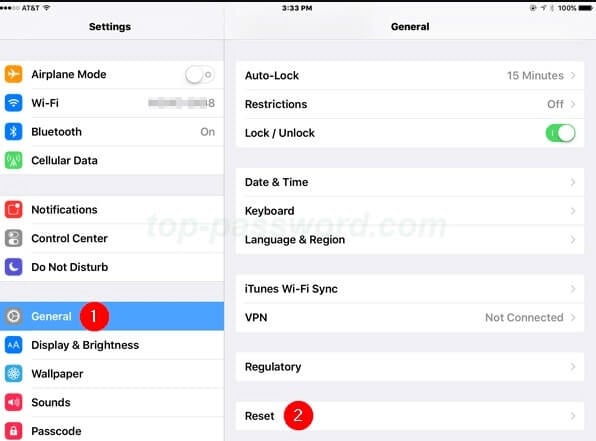
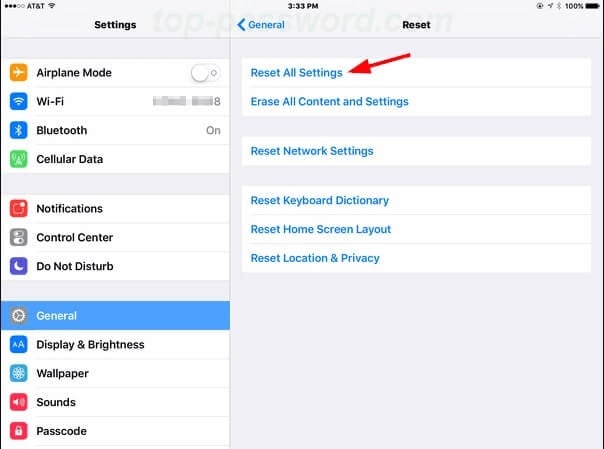
You may now go to Reset All Settings and confirm by entering the security passcode when prompted. Then, your phone will automatically go through the process of resetting and returning to its default settings.
You can also get rid of the password for the last backup without deleting any other apps or data.
Use a USB cable to link your Apple iPhone SE (2020) to your PC. Look at the small iOS icon in the figure below. Just click on it.
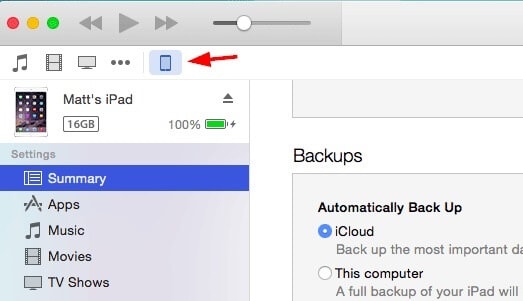
Proceed to the Summary Page and make your selection there for The Computer. After selecting Encrypt Local Backup, you must create a new password. After you have pressed the Backup Now option, wait for iTunes to create a new password for you.
3. Find your password in the macOS keychain
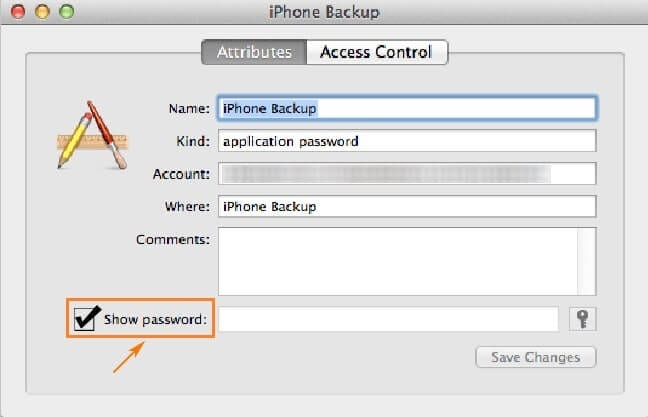
Step 1: Launch Keychain Access by going to Application > Utilities > Keychain Access once your Mac has booted up.
Step 2: Check for a backup of your Apple iPhone SE (2020) by entering it into the search box and looking for it there.
Step 3: Double-click the Show Password option, and then choose it from the drop-down menu. After that, type in the password for the keychain. At long last, the password for your Apple iPhone SE (2020) backup will be shown.
4. Select “Back Up Now” via iCloud to remove password
If you already have a backup stored in iCloud, you may use iCloud for recovery.
First, power up the gadget and look for the “Hello” screen. If you have previously set up your Apple iPhone SE (2020), you must delete or remove all of the material before continuing.
Navigate to the Apps & Data menu and choose the Restore from iCloud Backup option.
After successfully signing in with your Apple ID, choose Backup.

During the time that the system is being restored, it is essential that the Wi-Fi connection remains active.
5. Dr.Fone-Screen Unlock
With Dr.Fone - Screen Unlock, it’s easy to follow all the steps to get rid of the iTunes backup password.
Step 1: After installing Dr.Fone, open it and look for the red Screen Unlock button.
Step 2: In the Screen Unlock interface, tap Remove iTunes BackUp Encryption in the bottom right corner to move forward.

Step 3: When you get to this page, use a USB cable to connect your iOS device to the PC. If Dr.Fone can find this connection, you will see the picture below.
Before you click Remove Now, please carefully read the following three notes:
- Make sure to turn off Find My iPhone.
- Don’t open iTunes while doing this.
- Your device will reboot

Step 4: Dr.Fone can check your iTunes backup and delete it by itself. This encryption will be erased when the progress bar reaches 100%. This will take a short time to do.

Step 5: The encryption on the iTunes backup has been removed successfully! Now you can easily back up, restore, move, or wipe your device.

Part 3: 3 Tricks to Help You Remember the Passwords
If you have an iPhone, you know it can be tricky to keep track of all your passwords. From your email password to your banking login, there are a lot of different codes to remember.
Here are three tricks to help you keep track of your passwords so you don’t have to stress the next time you can’t log in to your account.
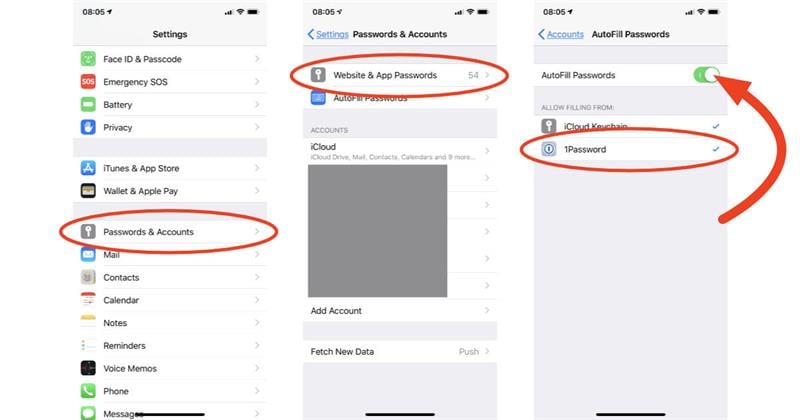
- Turn on “AutoFill” in “Settings”
You can turn on AutoFill in the Settings app. This will allow your Apple iPhone SE (2020) to fill in passwords when you visit websites and apps automatically. All you need to do is ensure you’ve entered the correct username and password once, and your Apple iPhone SE (2020) will save the information, so you don’t have to enter it again.
- Try iCloud Keychain to keep your passwords
iCloud Keychain is a great way to keep all your passwords in one place. Once you’ve turned on the iCloud Keychain, all your passwords will be synced across your devices. That means if you create a new password on your laptop, it will automatically appear on your Apple iPhone SE (2020).
- Use Notes for passwords
If you’re finding a simple way to keep all your passwords, try using the Notes app. Create a new note and title it “Passwords.” Then, add it to the note whenever you create a new password.
You can even add a description of the password, so you remember which account it’s for.
The Bottom Line
As a last piece of advice, please safely save your newly created passwords. Rather than writing them down in the iPhone’s notepad, you should save the passwords in a secure location.
However, no matter how secure your gadget is, password leakage may happen, sending you to unpleasant situations that you can’t even conceive. It’s best to use Dr.Fone - Screen Unlock as soon as you encounter any problem!
Everything You Need To Know About Unlocked Apple iPhone SE (2020)
Wondershare Dr.Fone
Reset iPhone without Apple ID
- Simple, click-through, process.
- Remove screen passcodes, Face id, Touch id, Apple ID and Bypass iCloud Activation Locks
- No tech knowledge required, everybody can handle it.
- Supports iPhone the latest iPhone and iOS version fully!


Everything You Need To Know About Unlocked iPhone 15 Series

Nowadays, communication, productivity, and entertainment are seamlessly intertwined. The release of the Apple iPhone SE (2020) 15 series has marked an important milestone in tech. These devices have proven to be immensely popular among experts and fans alike. It has made understanding the intricacies of this groundbreaking series paramount.
In this article, we delve into everything you need to know about the iPhone 15 unlocked Series. You will learn the benefits and drawbacks of an unlocked iPhone 15 Pro. It will also discuss how to check whether your Apple iPhone SE (2020) is locked or not, along with how to unlock a locked iPhone 15.
Part 1: What Is an Unlocked iPhone 15?
An unlocked smartphone, in essence, is a device that isn’t tied to a specific carrier or network. Locked phones come pre-configured to work only with a particular carrier’s SIM card. In comparison, unlocked phones provide users with the freedom to choose their preferred carrier. It also means they can switch between networks at will.
The Apple iPhone SE (2020) 15 Series is renowned for its integration of cutting-edge technology. However, what truly sets the unlocked iPhone 15 Series apart is its unlocked status. It enables users to take control of their network choices and redefine their connectivity.
Part 2: What Are the Benefits of Buying an Unlocked iPhone 15?
Purchasing an unlocked iPhone 15 isn’t just about owning a high-end smartphone. It is a strategic decision that unlocks a plethora of advantages tailored to the modern user. Below are some compelling benefits that come with opting for an unlocked iPhone 15 Pro Max:
1. Network Freedom
One of the standout advantages of an unlocked iPhone 15 is the freedom to choose any carrier. Users can easily switch between carriers. It allows them to select the one that offers the best coverage, pricing, and customer service. Thus, avoiding being restricted to a particular carrier’s offerings.
2. Global Accessibility
Unlocked iPhones are a traveler’s dream. With an unlocked device, you can insert a local SIM card when abroad. It lets you sidestep the exorbitant international roaming charges. This feature allows you to maintain connectivity without constraints. This makes it an ideal companion for international adventurers.
3. No Contracts
Locked smartphones often come with binding carrier contracts. These can extend for two years or more. With an unlocked iPhone 15, you can avoid lengthy contracts. It puts you in control of your financial commitments and enables you to change your plan as you see fit.
4. Resale Value
Unlocked iPhones have a higher resale value than their locked counterparts. The broader appeal and flexibility of an unlocked device make it an attractive option. It is true for most potential buyers in the second-hand market.
Part 3: What Are the Drawbacks of Buying an Unlocked iPhone 15?
Unlocked iPhone 15 Series presents a world of advantages. However, it’s essential to approach any decision with a balanced perspective. Given below are the potential drawbacks associated with purchasing an iPhone 15 Pro unlocked:
1. Higher Upfront Cost
Unlocked iPhones often come with a higher upfront cost compared to locked devices. This is because carriers subsidize locked phones to some extent. Moreover, it allows them to offer lower initial prices in exchange for long-term contracts.
2. Limited Trade-In Options
Some carriers offer trade-in programs for older phones when you upgrade to a new device. These programs might be more limited for unlocked devices. This can potentially affect your ability to offset the cost of a new phone.
3. No Carrier Support for Technical Issues
Apple provides technical support for all iPhones. However, carrier-specific issues might be more challenging to resolve with an unlocked device. Carriers may prioritize support for their locked devices. It could potentially lead to delays or complications in addressing certain problems.
4. Limited Carrier-Specific Features
Some carriers offer exclusive features or services. These might not be available to users with unlocked devices. Moreover, such services can include promotions, network plans, etc.
Part 4: How To Check if Your Apple iPhone SE (2020) 15 Is Unlocked or Not
Determining whether your Apple iPhone SE (2020) 15 is unlocked is a crucial step. It is especially the case if you have bought a second-hand device. This will also help you in making the most of its features and advantages. Below are the simple steps to check the unlocked status of your unlocked iPhone 15 Pro:
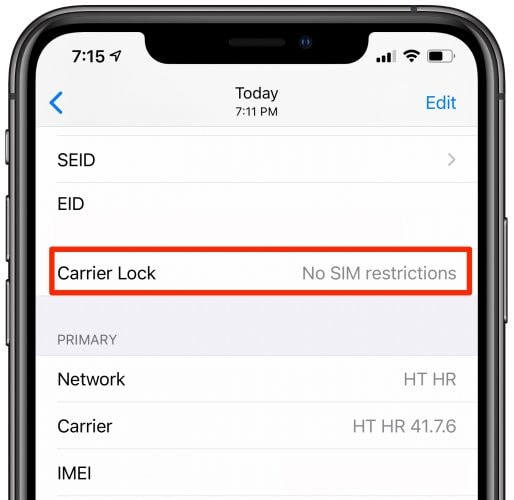
- Step 1: Access your Apple iPhone SE (2020) 15’s Settings and navigate to the “General” tab. Click “About” to get an overview of your device.
- Step 2: In the “About” tab, scroll down to find and tap “Carrier Lock.” Here, you can check whether your Apple iPhone SE (2020) is locked or not.
\
Part 5: The Best Websites To Buy Unlocked iPhone From the 15 Series
When it comes to purchasing an unlocked iPhone 15 from the latest series, choosing the right platform is crucial. It will ensure a smooth and reliable buying experience. Here, we present a selection of reputable websites that offer unlocked iPhone 15 devices:
Bonus Tip: Is There Any Way To Unlock a Locked iPhone? [iOS 12.0 – iOS 14.8.1]
Unlocking a locked iPhone can be a pressing concern. It can especially be troubling if you have bought a second-hand device and it turns out to be carrier locked. In such situations, your best bet is to use a specialized tool like Wondershare Dr.Fone for unlocking a locked iPhone.
Wondershare Dr.Fone is a comprehensive unlocking tool that can bypass locks ranging from screen locks to carrier locks. This iPhone tool is completely secure and safe to use. You do not need to be a tech expert to use this tool, as it is designed for all users.
Key Points of Wondershare Dr.Fone
- Forgotten your iTunes backup encryption code? Worry no more, as Dr.Fone lets you remove the encryption code without affecting your data.
- If you forget your Apple ID password, you can use Wondershare Dr.Fone to remove the old Apple ID from your device.
- It can bypass all types of iPhone 15 screen locks, such as passcode, Touch ID, and Face ID.
Steps To Remove Carrier Lock From Your Apple iPhone SE (2020) 15 via Wondershare Dr.Fone
With the help of Wondershare Dr.Fone, the process of unlocking your device from carrier restriction becomes a lot easier. Here is how you can remove the carrier lock from your Apple iPhone SE (2020) with Dr.Fone:
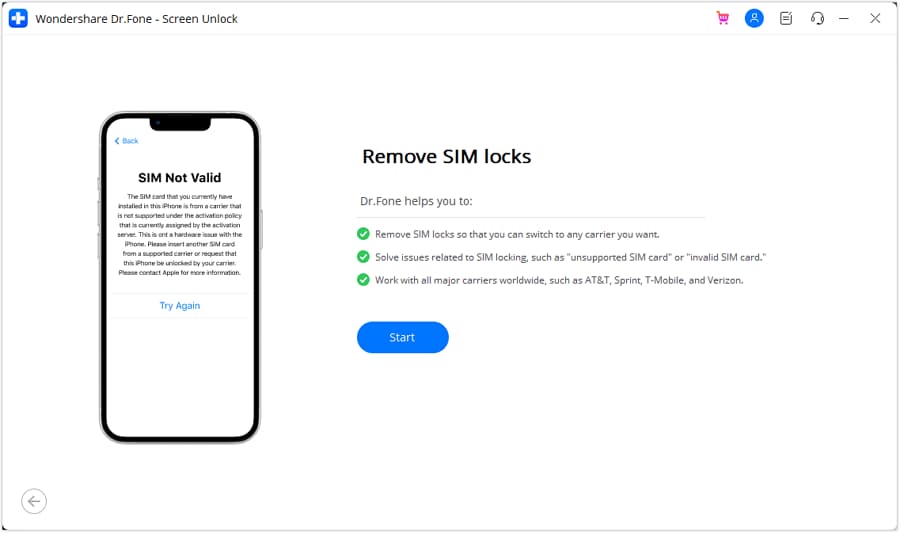
- Step 1: Choose Screen Unlock in Dr.Fone
You begin with installing and launching Wondershare Dr.Fone on your computer. Connect your locked Apple iPhone SE (2020) to the computer and click “Screen Unlock.” Afterward, choose “iOS” as your device to proceed further.
- Step 2: Jailbreak Your Locked iPhone
In the different options available, click on “Remove SIM Locked.” Next, tap “Start” and wait for Wondershare Dr.Fone to recognize your Apple iPhone SE (2020) 15. You will now need to jailbreak your device, which you can do by following the on-screen instructions.
- Step 3: Disconnect Wi-Fi and Remove Known Networks
Afterward, remove the SIM card from your Apple iPhone SE (2020) and go to “Settings.” Here, tap “WLAN” to open your Apple iPhone SE (2020)’s network settings. Find and disconnect from the network you are connected to and forget the network.
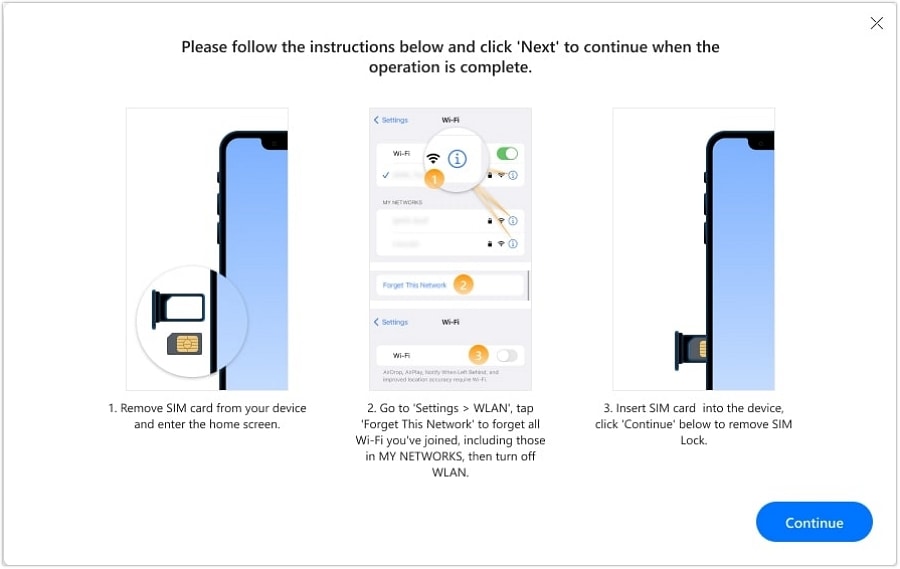
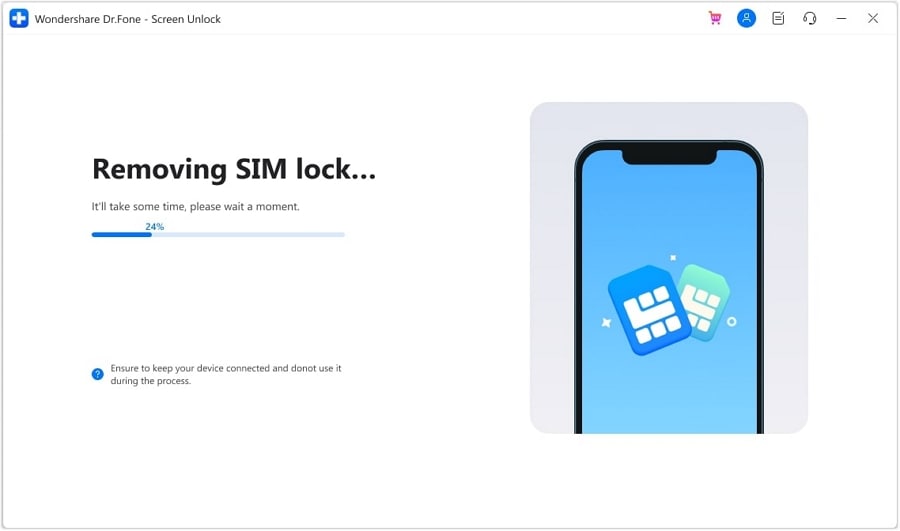
- Step 4: Remove the Carrier Lock from iPhone
Now, forget all known networks from your device one by one. Afterward, disable Wi-Fi and finally reinsert the SIM card. On Wondershare Dr.Fone’s screen, tap “Continue” to start the carrier lock removal process. Once it is finished, press “Done” to close the wizard.
Conclusion
To conclude, the decision to opt for an iPhone 15 unlocked series offers a realm of possibilities. The freedom to choose carriers and avoid international roaming charges are all compelling reasons for an unlocked device.
When it comes to unlocking locked iPhones, a cautious and well-informed approach is essential. It is best to use a specialized tool like Wondershare Dr.Fone for unlocking carrier locks. With the help of Dr.Fone, you can safely remove the carrier lock within no time.
Also read:
- [New] Discovering the Roots of Visual Content Through Reverse Scans (FB) for 2024
- [Updated] 2024 Approved Unveiling the Science of Quantum HDR Enhancement
- Complete Fixes To Solve iPhone 13 Pro Randomly Asking for Apple ID Password | Dr.fone
- Connoisseurs Melding Visionary Sounds & Frames
- How to Unlock iPhone 6s Plus, Apples New iPhone | Dr.fone
- In 2024, Detailed Review of doctorSIM Unlock Service For Apple iPhone 6 | Dr.fone
- In 2024, Everything You Need To Know About Unlocked Apple iPhone 6s | Dr.fone
- In 2024, How To Open Your Apple iPhone 15 Without a Home Button | Dr.fone
- In 2024, Unlock Your Disabled iPhone 8 Plus Without iTunes in 5 Ways | Dr.fone
- In 2024, Unmatched Visual Transformation Toolkit
- MOVファイルをMP4に自由に変換できるオンラインサービス: Movavi
- Understanding Edge's Ongoing Role in Win11 Systems
- Unlock Apple iPhone 13 Without Passcode Easily | Dr.fone
- Waterproof Capabilities of the Latest iPhone 15 Pro Max Revealed
- What To Do if Your Samsung Galaxy A25 5G Auto Does Not Work | Dr.fone
- Title: How To Bypass the Required Apple Store Verification For Apple iPhone SE (2020) | Dr.fone
- Author: Amelia
- Created at : 2025-01-16 22:10:47
- Updated at : 2025-01-17 19:34:11
- Link: https://iphone-unlock.techidaily.com/how-to-bypass-the-required-apple-store-verification-for-apple-iphone-se-2020-drfone-by-drfone-ios/
- License: This work is licensed under CC BY-NC-SA 4.0.