
How To Bypass the Required Apple Store Verification For iPhone 7 Plus | Dr.fone
How To Bypass the Required Apple Store Verification For Apple iPhone 7 Plus
The Apple App Store is a familiar place for anyone with an iPhone or iPad. It’s where you find all sorts of useful and fun apps. However, one thing that can be a hassle is the store’s strict verification process. Every time you make a purchase, you need to go through this step.
It’s there for a good reason – to stop fraud – but it can get annoying, especially if you forget your Apple ID or have other issues. This article will explore the ways to stop the Apple Store “Verification Required” prompt, making your app downloading experience smoother.

Part 1: Why Does Apple Require Verification in the Apple Store?
When browsing the App Store on your Apple iPhone 7 Plus or iPad and looking to download the latest game or productivity tool, you might have noticed that Apple often asks for some form of verification before you can proceed with your purchase. This is not just a random step; there’s a solid reason behind it.
The primary reason Apple requires verification for App Store purchases is to ensure that you are the person authorizing the purchase. This security measure prevents unauthorized transactions and protects your account from fraud.
What does this verification usually involve? It could be entering your Apple ID password or using Face ID or Touch ID if your device supports these features. These methods are designed to confirm your identity quickly and securely.

Reasons Why the Verification Required Message Might Appear
There are several reasons why you might see an Apple Store’ Verification Required’ message when trying to download an app or make a purchase:
- New Apple ID. If you’ve just created a new Apple ID and need to download or pay for apps, Apple must verify your payment information. Thus, you’ll have to prove everything, especially on a new phone.
- **Payment method needs to be corrected.**Suppose there’s an issue with your Apple ID’s payment method, such as outdated or incorrect details. In that case, verification is required to ensure the account is secure and ready for transactions.
- Invalid credit card. Unsupported or invalid credit cards can trigger the verification notice, as Apple can’t process payments with these cards.
- Unpaid balance. If there’s an outstanding balance on your Apple ID, you can download or pay for new apps once this balance is cleared.
- Family Sharing restrictions. For those using Family Sharing, if the family organizer has placed restrictions on your account, this could result in a verification prompt.
Understanding these reasons is the first step in addressing the ‘Verification Required’ message. It’s not just a random or annoying hurdle; it’s there for your security and to ensure a smooth, safe experience when using the App Store.
Part 2: How To Fix Verification Required Prompt Using Apple ID
Having to deal with the ‘Verification Required’ prompt in the App Store can be a bit of a hassle, especially when you’re eager to get your hands on a new app or game. Fortunately, there are several methods you can use to resolve this issue, most of which are pretty straightforward and can be done right from your device. Here’s how to tackle it:
Update Payment Method
One of the most common reasons for the verification prompt is a problem with your payment method. To fix this, go to your Apple ID settings on your Apple iPhone 7 Plus or iPad. Tap your name at the top of the Settings app, then go to Payment & Shipping. You can update your payment information or add a new payment method here. Make sure the details are correct and up to date.
Check Unpaid Subscriptions
Sometimes, unpaid subscriptions can trigger the verification prompt. Tap the App Store > your profile icon, and select Subscriptions. Here, you can view all your subscriptions, active or expired. Check if there are any unpaid ones and clear any outstanding payments.

Don’t Require Password for Purchases
For less frequent purchases, you should change the settings so you don’t always have to enter your password. Go to Settings, then to Screen Time. Under Content & Privacy Restrictions, select iTunes & App Store Purchases. Here, you can change the settings to Don’t Require for purchases. However, be cautious with this method as it reduces security.

Sign Out of Apple ID and Re-Sign In
Sometimes, simply signing out of your Apple ID and then signing back in can resolve the issue. Go to the Settings app, tap your name at the top, and scroll down to Sign Out. After signing out, restart your device and then sign back in. This can help refresh your account settings and clear up any minor glitches.
Remember, these methods are about bypassing the verification process and ensuring your account is up-to-date and secure. Regularly checking your Apple ID settings and payment information can prevent many common issues with the App Store, including the frustrating ‘Verification Required’ prompt.
Part 3: How To Bypass Verification Required Prompt Without Apple ID
If you need to learn how to bypass the ‘Verification Required’ prompt in the App Store but don’t have access to the Apple ID or password, there’s an alternative approach using third-party software. One such tool that can assist in this situation is Wondershare Dr.Fone - Screen Unlock (iOS), which offers a feature specifically designed for this purpose.
Introducing Dr. Fone’s Screen Unlock (iOS) Feature
Dr.Fone - Screen Unlock (iOS) function includes an Apple ID remover tool. This feature is handy when you cannot remember your Apple ID or password but need to download apps from the App Store. Here’s a step-by-step guide on how to use this feature.
Step-by-Step Guide To Bypass Verification Without Apple ID With Dr.Fone
Here’s a complete guide on bypassing the verification required on the App Store.
Step 1: Install and open Wondershare Dr.Fone on your computer.
Step 2: Navigate to Toolbox and select Screen Unlock followed by iOS.

- Step 3: In the next window, choose Remove Apple ID to proceed.

- Step 4: A connectivity status will appear on the screen with your iOS device connected to the computer. Click Unlock Now to start the process.

- Step 5: Confirm if your iOS device has a screen lock and two-factor authentication enabled. This is crucial for the process to continue smoothly.

- Step 6: Follow the on-screen instructions to put your iOS device in Recovery Mode. If necessary, you can also opt for DFU Mode by following the provided instructions. Once in Recovery Mode, the tool will recognize your device model. You’ll need to select the correct system version to proceed.

- Step 7: The tool will download the appropriate iOS firmware for your device. After the download, it will verify the firmware.

- Step 8: After firmware verification, click Unlock Now. You’ll be prompted to enter a code for confirmation. Once entered, the unlocking process will begin.

- Step 9: You’ll receive a notification once the process is complete. You may try again if the process fails to succeed the first time.

Note: After Apple ID removal, you must re-enter a new Apple ID to access the App Store. Take note of the password now if you forgot your previous one.
Conclusion
In this article, you’ve learned how to remove ‘Verification Required’ in the App Store. The primary takeaway is to try solving the issue using your Apple ID, as this approach typically prevents data loss. However, if you’re in a tight spot without access to your Apple ID, Dr.Fone - Screen Unlock (iOS) offers a reliable alternative to bypass this hurdle.
While it’s an effective solution, always consider it a secondary option to safeguard your data. Additionally, Dr.Fone can be a handy tool for various other phone-related challenges, making it a useful resource for tackling different tech problems.
Tips: Are you searching for a powerful Screen Unlock tool? No worries as Dr.Fone is here to help you. Download it and start a seamless unlock experience!
Everything You Need To Know About Unlocked Apple iPhone 7 Plus
Wondershare Dr.Fone

Reset iPhone without Apple ID
- Simple, click-through, process.
- Remove screen passcodes, Face id, Touch id, Apple ID and Bypass iCloud Activation Locks
- No tech knowledge required, everybody can handle it.
- Supports iPhone the latest iPhone and iOS version fully!


Everything You Need To Know About Unlocked iPhone 15 Series

Nowadays, communication, productivity, and entertainment are seamlessly intertwined. The release of the Apple iPhone 7 Plus 15 series has marked an important milestone in tech. These devices have proven to be immensely popular among experts and fans alike. It has made understanding the intricacies of this groundbreaking series paramount.
In this article, we delve into everything you need to know about the iPhone 15 unlocked Series. You will learn the benefits and drawbacks of an unlocked iPhone 15 Pro. It will also discuss how to check whether your Apple iPhone 7 Plus is locked or not, along with how to unlock a locked iPhone 15.
Part 1: What Is an Unlocked iPhone 15?
An unlocked smartphone, in essence, is a device that isn’t tied to a specific carrier or network. Locked phones come pre-configured to work only with a particular carrier’s SIM card. In comparison, unlocked phones provide users with the freedom to choose their preferred carrier. It also means they can switch between networks at will.
The Apple iPhone 7 Plus 15 Series is renowned for its integration of cutting-edge technology. However, what truly sets the unlocked iPhone 15 Series apart is its unlocked status. It enables users to take control of their network choices and redefine their connectivity.
Part 2: What Are the Benefits of Buying an Unlocked iPhone 15?
Purchasing an unlocked iPhone 15 isn’t just about owning a high-end smartphone. It is a strategic decision that unlocks a plethora of advantages tailored to the modern user. Below are some compelling benefits that come with opting for an unlocked iPhone 15 Pro Max:
1. Network Freedom
One of the standout advantages of an unlocked iPhone 15 is the freedom to choose any carrier. Users can easily switch between carriers. It allows them to select the one that offers the best coverage, pricing, and customer service. Thus, avoiding being restricted to a particular carrier’s offerings.
2. Global Accessibility
Unlocked iPhones are a traveler’s dream. With an unlocked device, you can insert a local SIM card when abroad. It lets you sidestep the exorbitant international roaming charges. This feature allows you to maintain connectivity without constraints. This makes it an ideal companion for international adventurers.
3. No Contracts
Locked smartphones often come with binding carrier contracts. These can extend for two years or more. With an unlocked iPhone 15, you can avoid lengthy contracts. It puts you in control of your financial commitments and enables you to change your plan as you see fit.
4. Resale Value
Unlocked iPhones have a higher resale value than their locked counterparts. The broader appeal and flexibility of an unlocked device make it an attractive option. It is true for most potential buyers in the second-hand market.
Part 3: What Are the Drawbacks of Buying an Unlocked iPhone 15?
Unlocked iPhone 15 Series presents a world of advantages. However, it’s essential to approach any decision with a balanced perspective. Given below are the potential drawbacks associated with purchasing an iPhone 15 Pro unlocked:
1. Higher Upfront Cost
Unlocked iPhones often come with a higher upfront cost compared to locked devices. This is because carriers subsidize locked phones to some extent. Moreover, it allows them to offer lower initial prices in exchange for long-term contracts.
2. Limited Trade-In Options
Some carriers offer trade-in programs for older phones when you upgrade to a new device. These programs might be more limited for unlocked devices. This can potentially affect your ability to offset the cost of a new phone.
3. No Carrier Support for Technical Issues
Apple provides technical support for all iPhones. However, carrier-specific issues might be more challenging to resolve with an unlocked device. Carriers may prioritize support for their locked devices. It could potentially lead to delays or complications in addressing certain problems.
4. Limited Carrier-Specific Features
Some carriers offer exclusive features or services. These might not be available to users with unlocked devices. Moreover, such services can include promotions, network plans, etc.
Part 4: How To Check if Your Apple iPhone 7 Plus 15 Is Unlocked or Not
Determining whether your Apple iPhone 7 Plus 15 is unlocked is a crucial step. It is especially the case if you have bought a second-hand device. This will also help you in making the most of its features and advantages. Below are the simple steps to check the unlocked status of your unlocked iPhone 15 Pro:
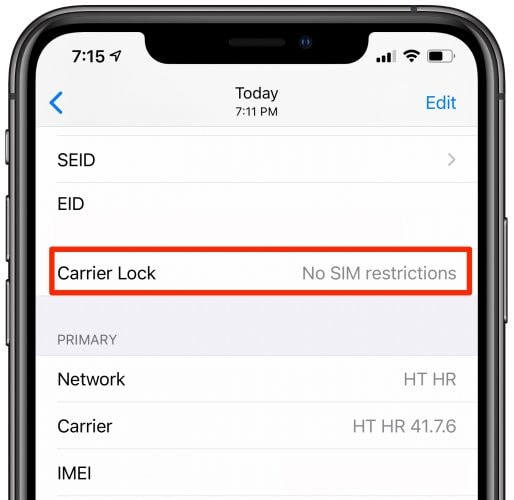
- Step 1: Access your Apple iPhone 7 Plus 15’s Settings and navigate to the “General” tab. Click “About” to get an overview of your device.
- Step 2: In the “About” tab, scroll down to find and tap “Carrier Lock.” Here, you can check whether your Apple iPhone 7 Plus is locked or not.
\
Part 5: The Best Websites To Buy Unlocked iPhone From the 15 Series
When it comes to purchasing an unlocked iPhone 15 from the latest series, choosing the right platform is crucial. It will ensure a smooth and reliable buying experience. Here, we present a selection of reputable websites that offer unlocked iPhone 15 devices:
Bonus Tip: Is There Any Way To Unlock a Locked iPhone? [iOS 12.0 – iOS 14.8.1]
Unlocking a locked iPhone can be a pressing concern. It can especially be troubling if you have bought a second-hand device and it turns out to be carrier locked. In such situations, your best bet is to use a specialized tool like Wondershare Dr.Fone for unlocking a locked iPhone.
Wondershare Dr.Fone is a comprehensive unlocking tool that can bypass locks ranging from screen locks to carrier locks. This iPhone tool is completely secure and safe to use. You do not need to be a tech expert to use this tool, as it is designed for all users.
Key Points of Wondershare Dr.Fone
- Forgotten your iTunes backup encryption code? Worry no more, as Dr.Fone lets you remove the encryption code without affecting your data.
- If you forget your Apple ID password, you can use Wondershare Dr.Fone to remove the old Apple ID from your device.
- It can bypass all types of iPhone 15 screen locks, such as passcode, Touch ID, and Face ID.
Steps To Remove Carrier Lock From Your Apple iPhone 7 Plus 15 via Wondershare Dr.Fone
With the help of Wondershare Dr.Fone, the process of unlocking your device from carrier restriction becomes a lot easier. Here is how you can remove the carrier lock from your Apple iPhone 7 Plus with Dr.Fone:
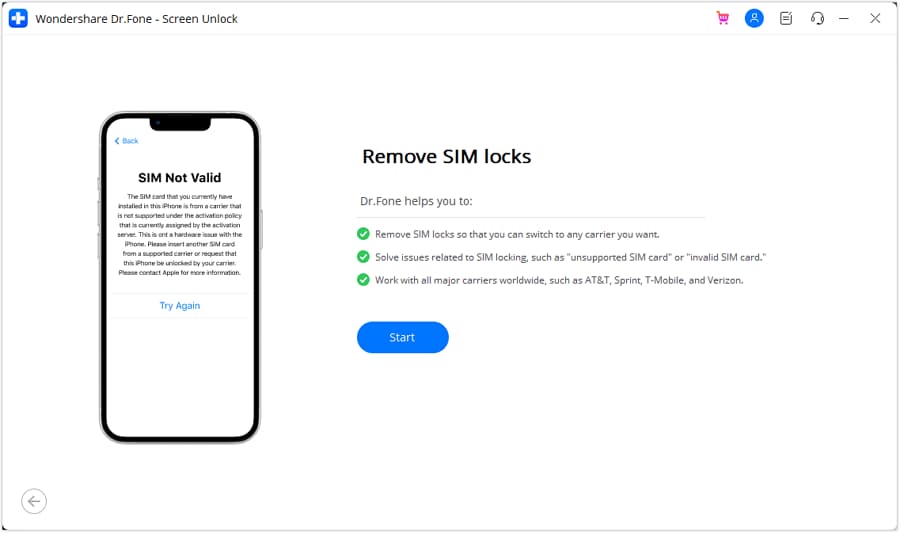
- Step 1: Choose Screen Unlock in Dr.Fone
You begin with installing and launching Wondershare Dr.Fone on your computer. Connect your locked Apple iPhone 7 Plus to the computer and click “Screen Unlock.” Afterward, choose “iOS” as your device to proceed further.
- Step 2: Jailbreak Your Locked iPhone
In the different options available, click on “Remove SIM Locked.” Next, tap “Start” and wait for Wondershare Dr.Fone to recognize your Apple iPhone 7 Plus 15. You will now need to jailbreak your device, which you can do by following the on-screen instructions.
- Step 3: Disconnect Wi-Fi and Remove Known Networks
Afterward, remove the SIM card from your Apple iPhone 7 Plus and go to “Settings.” Here, tap “WLAN” to open your Apple iPhone 7 Plus’s network settings. Find and disconnect from the network you are connected to and forget the network.
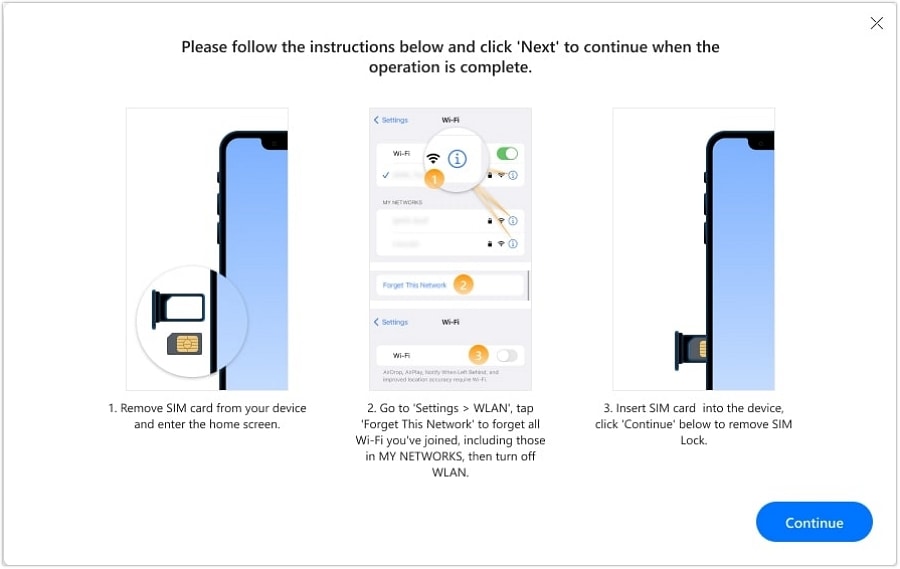
- Step 4: Remove the Carrier Lock from iPhone
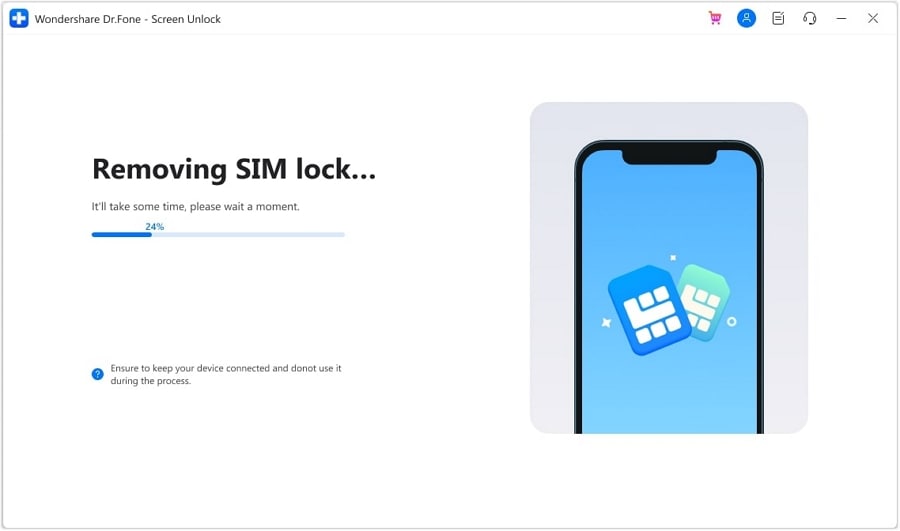
Now, forget all known networks from your device one by one. Afterward, disable Wi-Fi and finally reinsert the SIM card. On Wondershare Dr.Fone’s screen, tap “Continue” to start the carrier lock removal process. Once it is finished, press “Done” to close the wizard.
Conclusion
To conclude, the decision to opt for an iPhone 15 unlocked series offers a realm of possibilities. The freedom to choose carriers and avoid international roaming charges are all compelling reasons for an unlocked device.
When it comes to unlocking locked iPhones, a cautious and well-informed approach is essential. It is best to use a specialized tool like Wondershare Dr.Fone for unlocking carrier locks. With the help of Dr.Fone, you can safely remove the carrier lock within no time.
5 Most Effective Methods to Unlock Apple iPhone 7 Plus in Lost Mode
Numerous security features make all Mac devices like iPhones, iPads, and Macs stand apart from the opposition in terms of user data safety. Lost Mode is one feature that locks your lost iPhone or other Apple devices so nobody can get to them.
If your device is gone, you can use the Find My application on your other Apple device connected to a similar account to unlock the lost iPhone.
If your Apple iPhone 7 Plus is in Lost Mode and you don’t have the foggiest idea of how to restore it, relax. This guide will cover every one of the techniques that you can use for iPhone Lost Mode unlock.
Part 1: What Will Happen When iPhone Is in Lost Mode?
The Apple iPhone 7 Plus Lock feature permits remotely locking a lost Apple iPhone 7 Plus to prevent people from using its data. If you set a password for a device before enabling the Lost Mode, you will need this password to unlock the Apple iPhone 7 Plus once it has returned to its proprietor.
The Lost Mode menu will ask you to set one if it has no password. Password is obligatory to stop Lost Mode once a device is returned to the owner, as Contact ID or Face ID won’t work for this reason.
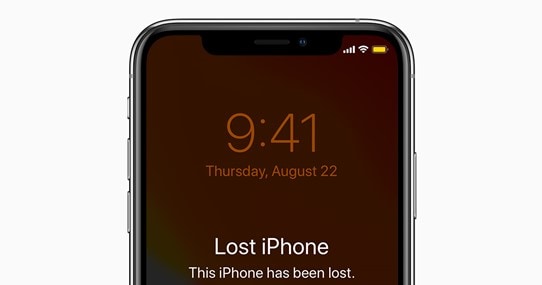
Send a Custom Text Message: When you sort out your lost iPhone and put it in Lost Mode, another supportive feature accessible to you is a custom message shown on the Lock Screen. You can enter any message to let an individual who found it realize this iPhone is lost. This way, you can demonstrate a phone number for the other person. That will expand opportunities to get your device back.
Erase Data Remotely: Lost Mode allows you to delete the Apple iPhone 7 Plus if you believe it’s been some time since it’s gone and you don’t think you can get it back. Doing so will ensure nobody will use your user data.
Track Your Device on Map: An owner can follow their lost iPhone on the map through the Lost Mode menu. The menu additionally gives email warnings to show the last location of your Apple iPhone 7 Plus.
Play Songs: Playing a sound might assist you with finding your lost iPhone if it’s still close by. The Apple iPhone 7 Plus will play a sound at top volume, no matter what volume level was set on the Apple iPhone 7 Plus device when you lost it.
1. Remove lost mode by entering the correct passcode
The most straightforward method for unlocking the Apple iPhone 7 Plus in Lost Mode is entering the password on the actual device. If your device was protected with a password before placing it in Lost Mode, enter it again.
If your device had no password while placing it in Lost Mode and you’ve entered it into iCloud while placing your Apple iPhone 7 Plus into Lost Mode, utilize this password. That will help you unlock lost iPhone, and you can start operating your Apple iPhone 7 Plus again.
2. Remove it from Find My in iCloud
One more method for unlocking the Lost Mode on your Apple iPhone 7 Plus is to utilize the Find My iPhone application on the official iCloud site. Follow the steps underneath to do so:
- Go to <www.icloud.com> and utilize your account details to sign in.
- Click the “Find My iPhone” button and select all iDevices.
- Pick the Apple iPhone 7 Plus device you need to unlock in Lost Mode and tap the “Lost Mode” button.
- Click the “Stop Lost Mode” button to remove the lock from the phone.
- Confirm this activity by clicking the “Stop Lost Mode” button again.
3. Use iCloud DNS Bypass
Domain Name Service is an unsafe technique that utilizes a domain name to an IP address. iCloud stores every iPhone’s information, and when an iPhone is set up, it sends a request through DNS to ensure whether the Apple iPhone 7 Plus device has an activation lock enabled.
The DNS bypass will send a fake “device isn’t locked” message to iCloud through a server. It allows you to go through the setting of your Apple iPhone 7 Plus and access some applications. However, you must remember that this technique works on iOS 11 or older versions. Follow these steps to utilize the iCloud DNS bypassing strategy to unlock lost iPhone:
- Insert SIM in your Apple iPhone 7 Plus, turn it on, and select a preferred language and your location.
- A WiFi screen will spring up. Tap on the “I” icon. If you are now connected with your WiFi, tap “Forget this Network.”
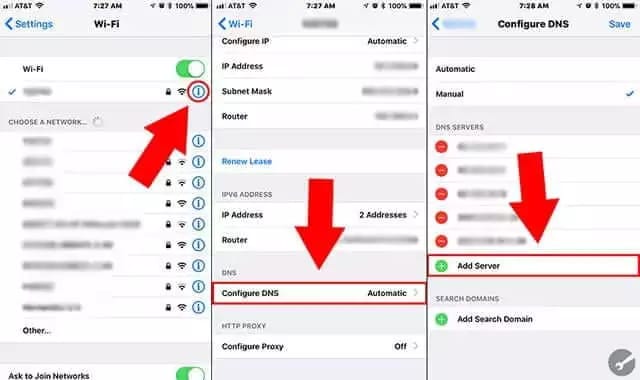
- Tap on “Configure DNS,” and enter a DNS server as per your region from the list underneath:
USA: 104.154.51.7
Asia: 104.155.28.90
Europe: 104.155.28.90
South America: 35.199.88.219
Australia and Oceania: 35.189.47.23
- Clean old DNS server off of ISP modem, select and connect to a WiFi network. Click the Back button when a popup says that the Apple iPhone 7 Plus device is attempting to connect to the Apple servers.
- You will now be on the DNS bypass screen. Pick the applications from the list to keep using your device. However, only a handful of applications are available through this.
4. Use Emergency Call
This technique is the most widely recognized one. You can bypass your iCloud activation by settling on a fake Emergency call. Nonetheless, it is accounted for that this strategy probably won’t work for everyone.
If your Apple iPhone 7 Plus is on lost mode and attempting to unlock it, you can try using this method. Follow these steps for making an Emergency call on your iPhone in Lost Mode unlock:
- Click the “Emergency Call” option on your locked device.
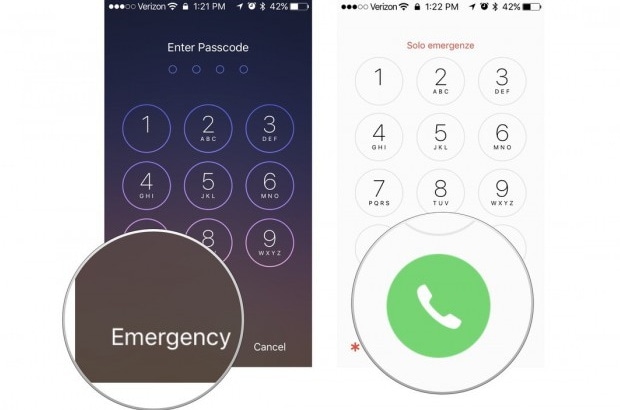
- Dial “*#96274825*0000*1#,” then, at that point, press and hold the dial button for 10 to 15 minutes.
- If it’s not working, try changing the last digit from 1-9. If this doesn’t work, have a go at setting 0 after 9. Remember to hold the dial button.
- Press Home, and it will return you to the beginning screen. Select the language and country, and the activation screen will never appear again. Now create a new password after iPhone Lost Mode unlock.
5. Apple iPhone Unlock
Apple iPhone Unlock is a site that can assist you with iPhone in Lost Mode unlock. You must give them your Apple iPhone 7 Plus’s IMEI and model number to get their services.
The benefit of Apple iPhone Unlock is that they keep themselves updated with the latest technology. They are educated regarding their tool’s advancement by giving updates every time.
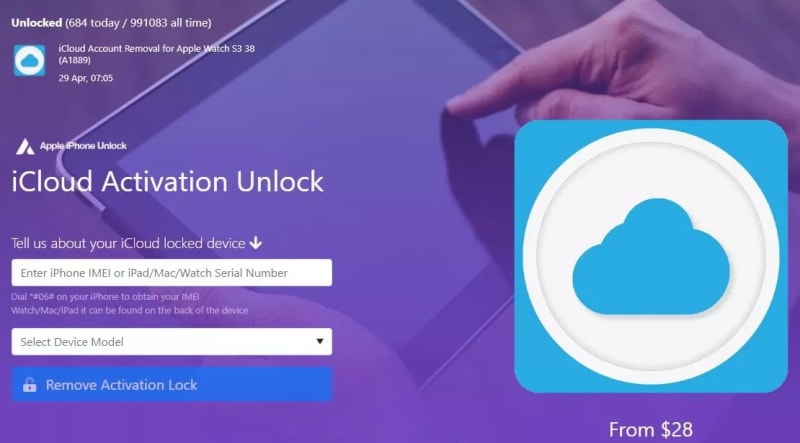
Critical Features of Apple iPhone Unlock:
- As per their site, Apple iPhone Unlock can work with every one of the Apple iPhone 7 Plus devices going from iPhone 4 to iPhone 14 Pro Max.
- Don’t bother downloading anything to your PC or phone like others. Another iPhone lock screen expects you to download their tool or software to work.
Bonus Tips: How to Unlock Our iPhone Screen?
Dr.Fone-Screen Unlock
An expert unlocking tool comes in handy when no other method works. In this case, we strongly suggest you use the Dr.Fone-Screen Unlock tool by Wondershare. Dr.Fone is a reliable tool and has been in the market for a long time. Professional unlock service providers use it because of its ease of use and clean interface.
So, without looking any further, download this tool for a remarkable unlocking experience. The methods below will guide you into unlocking your Apple iPhone 7 Plus within no time:
Step 1. Connect your Apple iPhone 7 Plus/iPad
Open the Dr.Fone software and tap the “Unlock iOS Screen.”
Step 2. Boot iPhone in Recovery/DFU mode
Before bypassing the Apple iPhone 7 Plus lock screen, we want to boot it in Recovery or DFU mode by adhering to the on-screen guidelines. The Recovery mode is suggested for the iOS lock screen. However, if you can’t activate the Recovery mode, you can figure out how to activate the DFU mode from their official site.

Step 3. Affirm Device Information
After getting the phone in DFU mode, Dr.Fone will show the Apple iPhone 7 Plus device information, for example, the Apple iPhone 7 Plus model and other data. You can choose the right information from the dropdown menu if the information isn’t right. Then, at that point, download the firmware for your Apple iPhone 7 Plus.

Step 4. Unlock the Apple iPhone 7 Plus Screen Lock
After downloading the required firmware effectively, click Unlock Now to remove the lock. However, note that this unlocking system will wipe the user data on your Apple iPhone 7 Plus. Truly, there is no answer for iPhone Lost Mode unlock without losing your data.

The Bottom Line
You might forget the password used before placing your Apple iPhone 7 Plus in Lost Mode. It is also likely to purchase a locked device, and then you can’t contact the owner to unlock it and don’t know your Apple ID details. Some might think this is a dead situation, and you can’t use the iPhone.
Luckily, we’re here to provide a series of dependable and secure solutions that will help your iPhone in Lost Mode unlock.
- Title: How To Bypass the Required Apple Store Verification For iPhone 7 Plus | Dr.fone
- Author: Amelia
- Created at : 2024-07-15 05:23:56
- Updated at : 2024-07-16 05:23:56
- Link: https://iphone-unlock.techidaily.com/how-to-bypass-the-required-apple-store-verification-for-iphone-7-plus-drfone-by-drfone-ios/
- License: This work is licensed under CC BY-NC-SA 4.0.