
How To Change Country on App Store for iPhone 14 With 7 Methods | Dr.fone
How To Change Country on App Store for Apple iPhone 14 With 7 Methods
Changing your App Store country can give you access to apps that are not available in your region. Whether getting region-specific apps, accessing exclusive content, or switching to a country with better app offerings, it’s a valuable capability.
The article below guides you through seven methods on how to change the country of your App Store.Following the guide ensures access to a world of apps and content tailored to your preferences. Keep reading the page below to achieve this.

Part 1. Pros and Cons of Changing Your App Store Country
Changing your App Store country on your Apple iPhone 14 can offer various benefits, but it also comes with certain drawbacks. It’s necessary to consider the pros and cons before making this decision.
Pros
- **Access to Region-Specific Apps.**Different countries have unique apps tailored to their markets. By changing your App Store country, you can access apps that might not be available in your current region. For example, some popular Chinese and Japanese apps are unavailable in the US App Store. If you want to use these apps, you will need to change your App Store country.
- **Getting App Updates.**Sometimes, apps receive updates and features in certain regions before others. Changing your App Store country can give you early access to these updates, improving your app experience. For example, a gaming app might first release new levels or features in select countries.
- **Access Exclusive Content.**Some apps and content are exclusive to certain countries. By switching your App Store country, you can enjoy movies, music, or TV shows unavailable in your current region. For instance, certain Netflix shows are restricted to specific countries due to licensing agreements.
Cons
- **Loss of Access to Purchases.**If you’ve made purchases in your current App Store country, changing it can result in losing access to those purchases. The loss includes paid apps, in-app purchases, and subscriptions. For example, if you switch from the US to the UK store, you may lose access to US-specific subscriptions.
- **Offload Apps.**When you change your App Store country, your device may prompt you to offload apps that are not available in your new region. This can be inconvenient if you rely on specific apps for daily use. For instance, a banking app may be region-specific and unavailable in your new country.
- **Family Sharing Issues.**If you’re part of a Family Sharing group, changing your App Store country can affect the access and sharing of purchased apps and subscriptions. Family members may lose access to content tied to your previous country. For example, if you switch from the UK to the US store, your family members might no longer have access to UK-specific content.
Part 2. Different Methods to Change Your App Store Country
Changing your App Store country can be done through various methods. Below are different ways to achieve that, along with step-by-step instructions for each technique.
Method 1: Changing Apple ID Region via iPhone
It is the most common and straightforward way to change your App Store country. To do this, follow these steps:
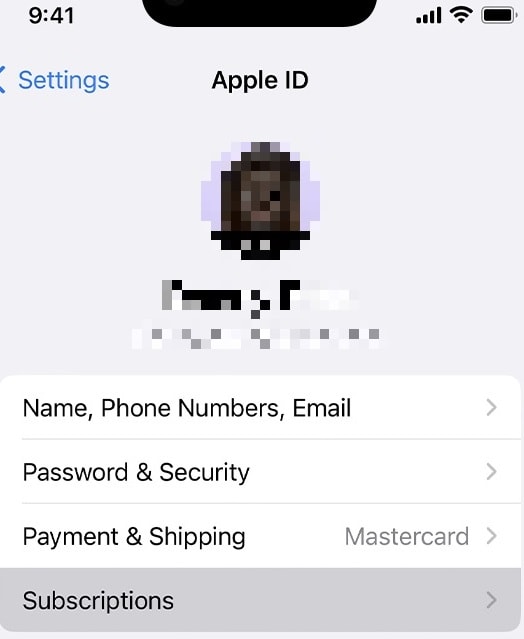
- Step 1: Open Settings on your Apple iPhone 14 and tap your Apple ID at the top.
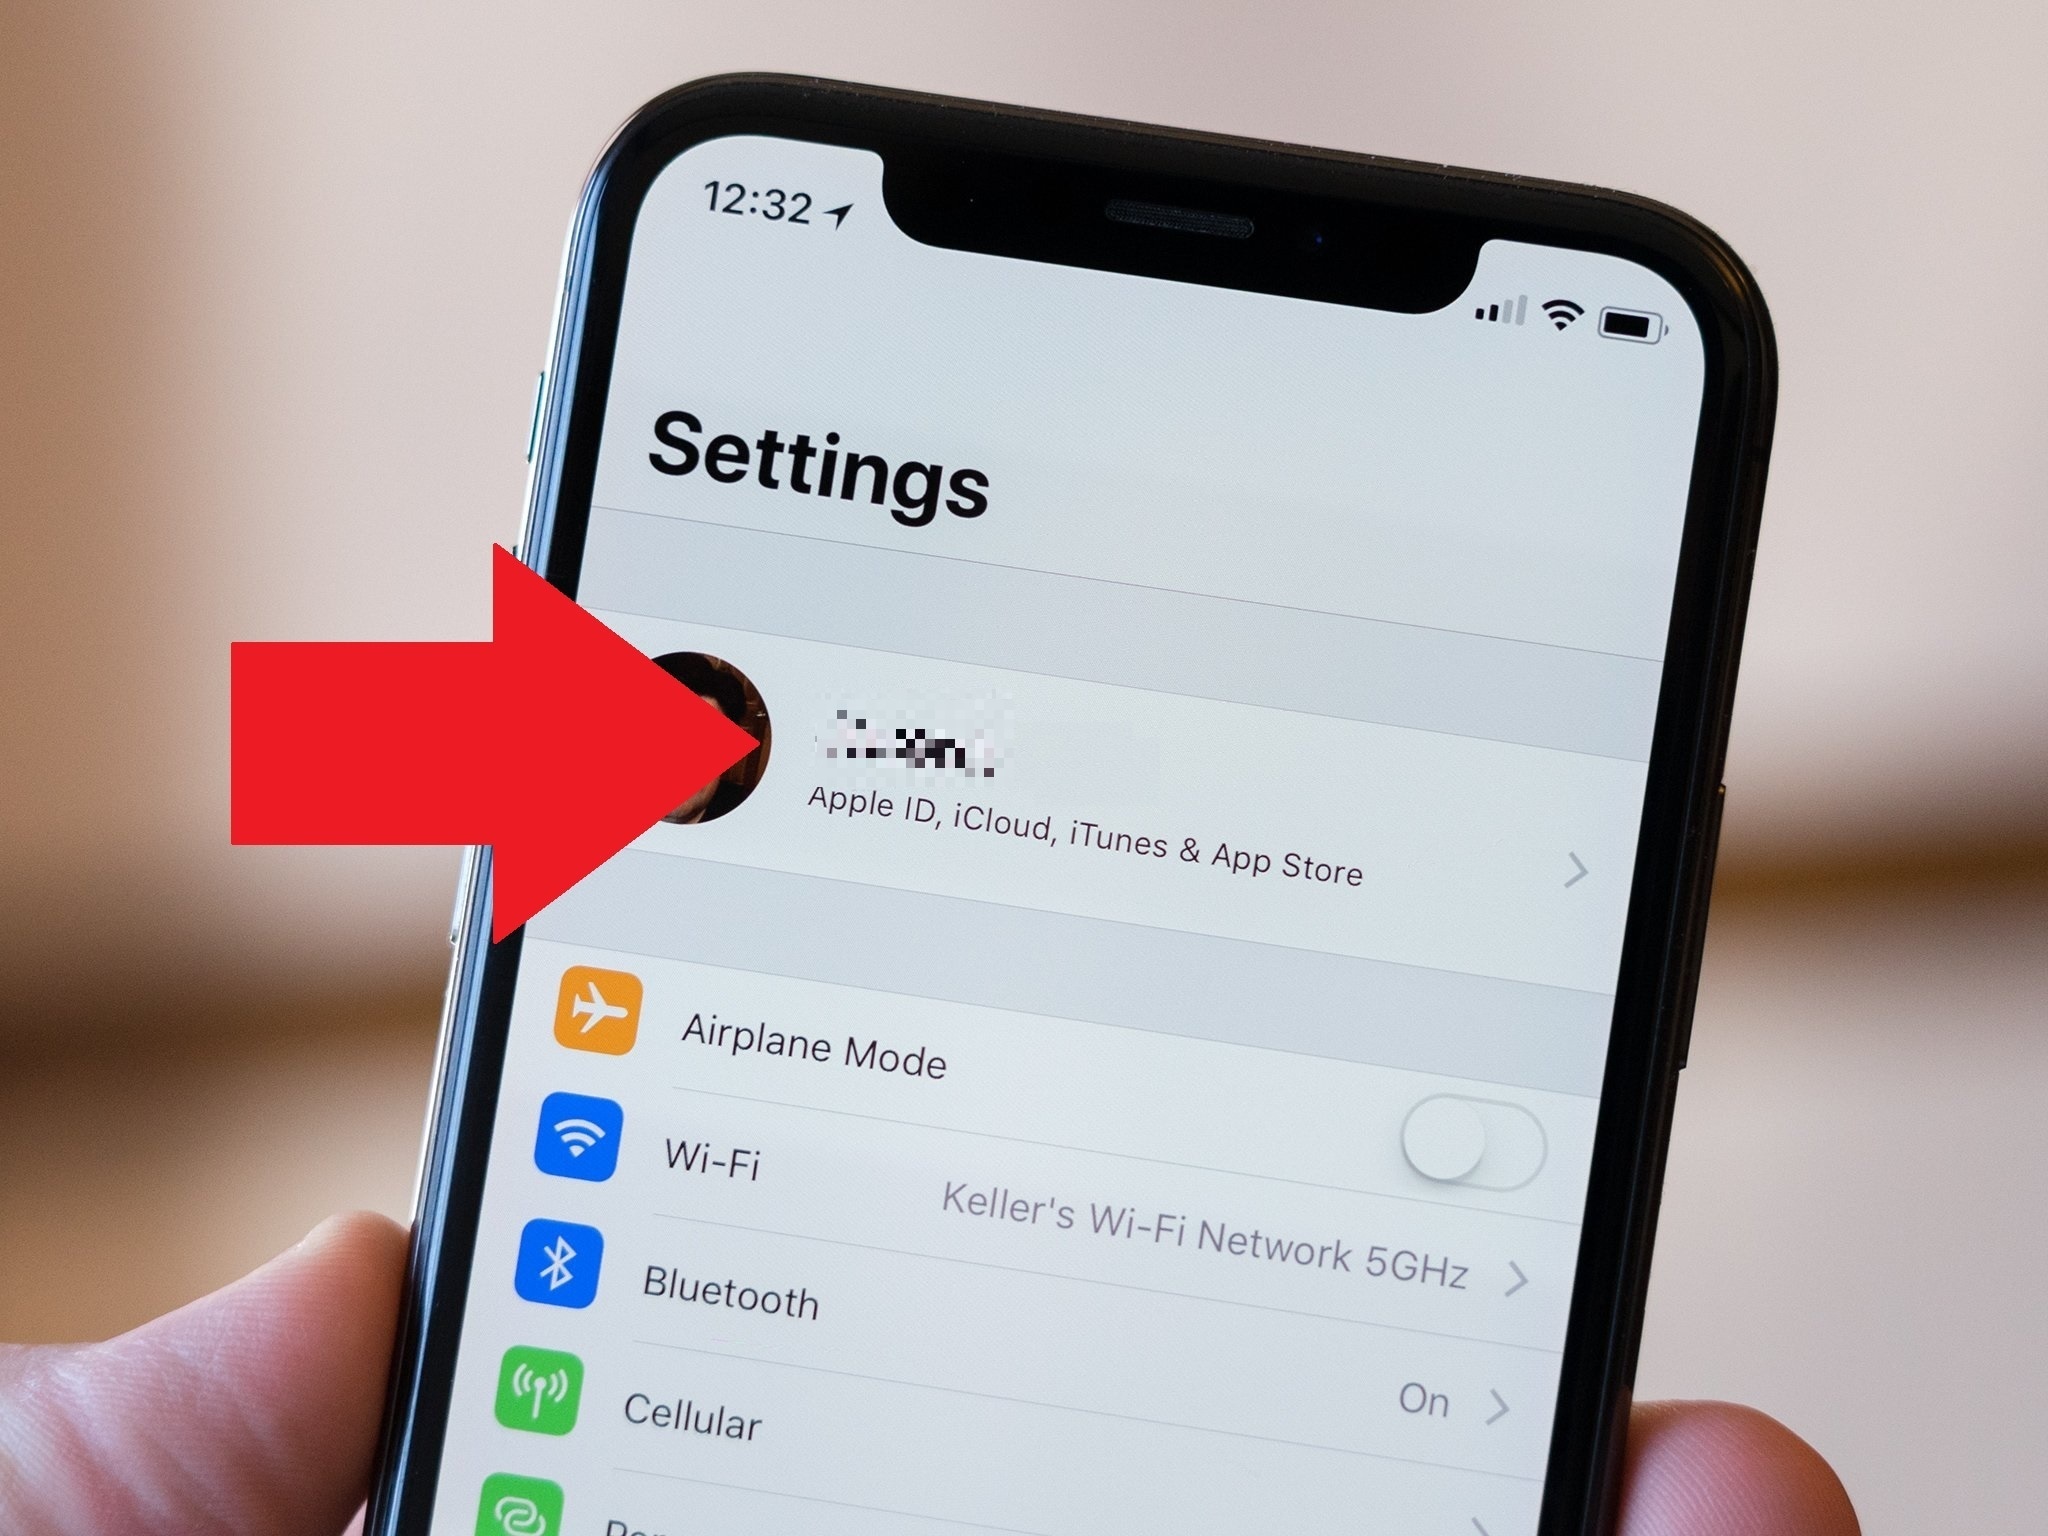
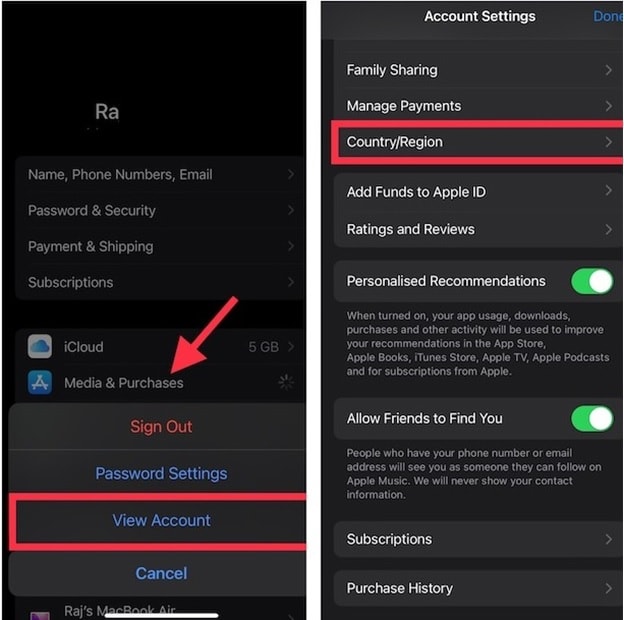
- Step 2: Tap on Media & Purchases > View Account. Sign in with your Apple ID. Next, Tap Country/Region > Change Country or Region and choose your desired country. Follow the on-screen prompts.
Method 2: Changing Apple ID Region via Mac/Windows
To change your Apple ID region via Mac/Windows, follow these steps:
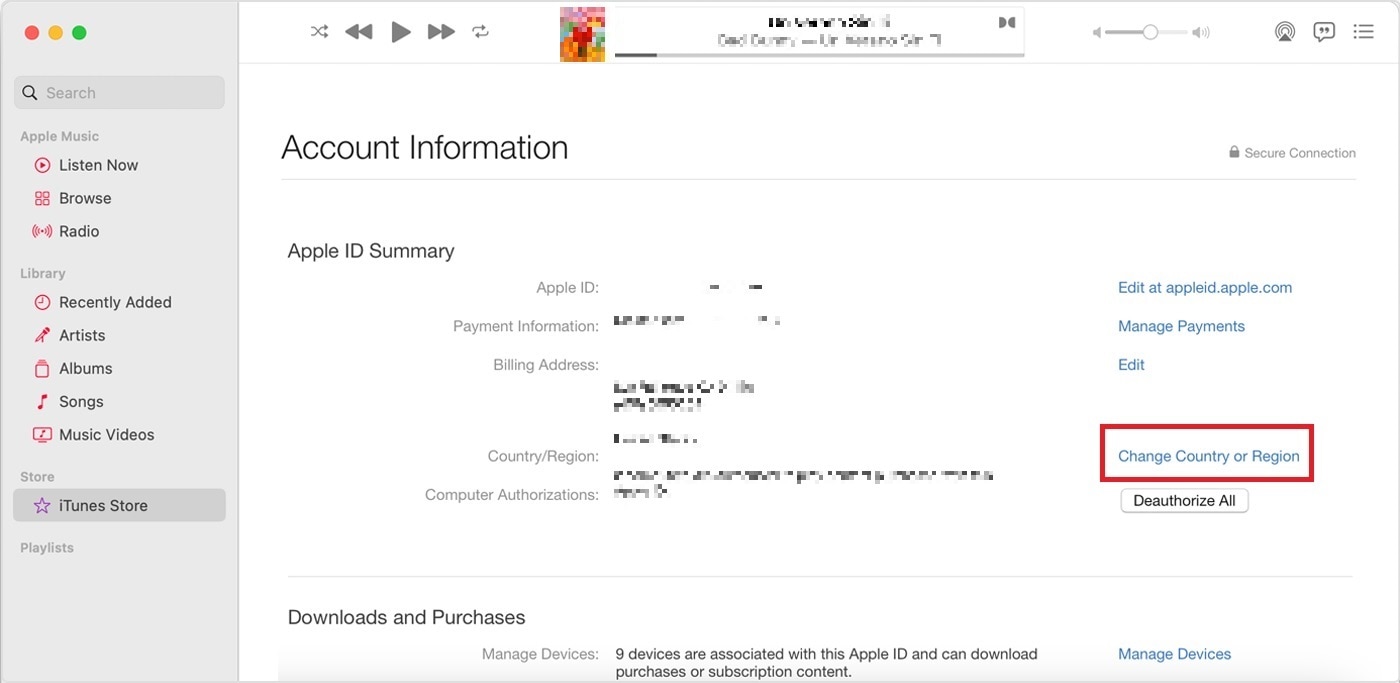
- Step 1: Open iTunes (on Windows) or Music (on Mac). Sign in with your Apple ID.
- Step 2: Go to Account > View My Account. Under Apple ID Summary, click Change Country or Region. Click your desired country and follow the instructions.
Method 3: Changing Apple ID Region via Web
The steps below are to change your Apple ID region via the web.
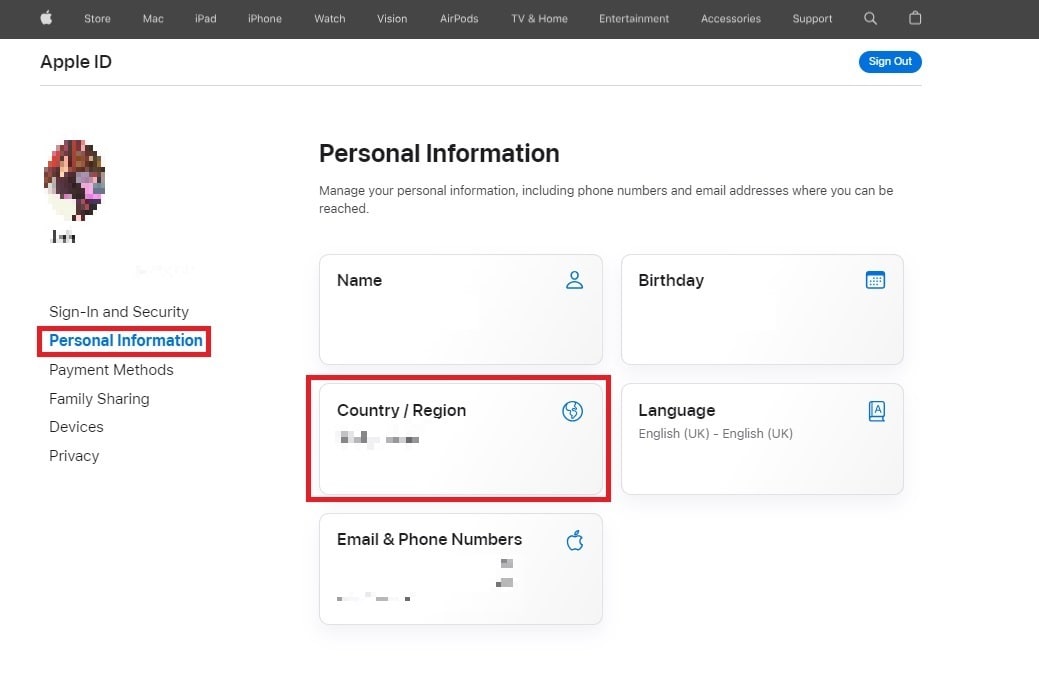
- Step 1: Open a web browser on your desktop or mobile device. Next, go to appleid.apple.com. Sign in with your Apple ID.
- Step 2: Under Personal Information, click the Country/Region button. Next, click the Change country or region and choose your preferred country.
Method 4: Leaving a Family-Sharing Group
If you’re part of a family sharing group, you need to leave the group before you can change your App Store country. To leave a family sharing group and change your app store country, follow the steps below.
- Step 1: Open the Settings app on your Apple iPhone 14 and tap Family.
- Step 2: Tap your name and tap Stop Using Family Sharing. Once you have left the family sharing group, you can change your App Store country by following the aforementioned manners.

Method 5: Cancel All Subscriptions
If you have any subscriptions, you must cancel them before changing your App Store country. Here are the steps below.
- Step 1: Open Settings on your Apple iPhone 14. Next, tap your name at the top of the screen.
- Step 2: Tap Subscriptions > Cancel Subscription. Once you cancel all of your subscriptions, you can change your App Store country.
Method 6: Using a VPN
You can also use a VPN to change your App Store country. However, this method is not recommended, as it can be unreliable and may result in your account being banned. Here are the steps below.
- Step 1: Install a VPN app from the App Store.
- Step 2: Connect to a server in your desired country. Open the App Store and see content from the connected country.
Method 7: Creating a New Apple ID
Finally, you can create a new Apple ID account with the country you want your App Store country to be. Here are the steps below.
- Step 1: Sign out of your current Apple ID in Settings.
- Step 2: Create a new Apple ID with your desired country as the region.
Sometimes, changing your App Store country can lead to issues. It can lock you out of your Apple ID, or you’re forgetting your password. During these events, it can restrict your App Store access. In such cases, a tool like Dr.Fone - Screen Unlock (iOS) can come to the rescue.
Part 3. Changing Countries Not Going Your Way? Use Wondershare Dr.Fone – Screen Unlock
Dr.Fone - Screen Unlock (iOS) helps you regain access to your Apple ID and fix any login-related problems. It ensures that you can continue enjoying your App Store without any hindrance. It’s a safe and reliable software tool that is used by millions of people to unlock their devices. It is also easy to use, even if you are not tech-savvy.

Key Features
Dr.Fone - Screen Unlock (iOS) is a powerful tool that can help you to:
- **Unlock iOS Device Without Passcode.**Regain access to your locked iPhone or iPad without needing the passcode.
- **Remove All Lock Screen Types.**Versatile unlock support for 4-digit/6-digit passcodes, Touch ID, and Face ID lock screens.
- **Unlock Apple ID Without Password.**Effortlessly unlock your Apple ID without requiring the password, simplifying access.

How To Unlock Your Apple iPhone 14 in Seconds
Dr.Fone’s Screen Unlock tool offers a streamlined solution to get you back into your device within seconds. Here’s a simple guide on how to do it.
- Step 1: Download Dr.Fone - Screen Unlock (iOS) on your computer and install it. Next, launch the app.
- Step 2: Connect your locked Apple iPhone 14 to your computer using a compatible USB cable. Afterward, click Start on the program. Follow the on-screen prompts on Dr.Fone. It will tell you to boot differently into DFU mode. Once your device enters DFU mode, Dr.Fone will present device details, including phone generation, iOS version, and more.
- Step 3: Dr.Fone will download the necessary firmware for your device. Follow the on-screen instructions to finish the unlocking process. Once done, Dr.Fone will remove the activation lock from your device.

Conclusion
Changing your App Store country can open doors to region-specific apps, exclusive content, and timely updates. However, it’s important to consider the potential drawbacks, such as losing previous purchases.
When changing the App Store country on your Apple iPhone 14, it’s important to consider Apple ID access issues. You never know when you will get locked out or suddenly forget your password. Wondershare Dr.Fone - Screen Unlock (iOS) offers a reliable solution during these instances. The tool ensures uninterrupted access to your App Store and Apple ID account, making it a valuable resource for managing your digital experience seamlessly.
Complete Guide For Apple iPhone 14 Lock Screen
Like most iPhone users, you rely on your lock screen to keep your data safe and protected. But with the release of iOS 17, there are a few new features and changes that you need to know about. This complete guide will clarify everything you need to know about the iOS 17 lock screen.
We’ll explain to you how to use the new features, protect your data, and more. So don’t waste any time - read on for all the details!
How to Have a Customized iOS 17 Lock Screen?
Before we get started, you should know that there are three ways to have a customized lock screen in iOS 17. Let’s get to know more about them.
1. How to select your favorite wallpaper
The first way is to use a pre-made wallpaper from the Apple Wallpaper Gallery.
To do this, go to Settings > Wallpapers & Brightness > Choose a New Wallpaper. Then, select the Apple Wallpaper Gallery and choose the image you want to use.
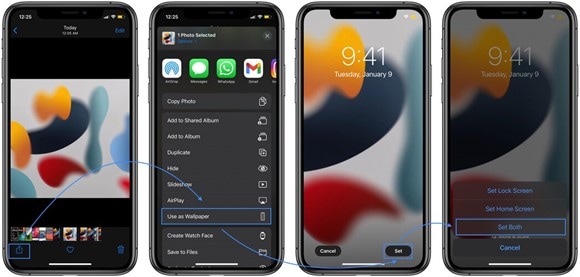
The second way to have a customized lock screen is to use a Live Photo. To do this, go to Settings > Wallpapers & Brightness > Choose a New Wallpaper. Then, select the Live Photo option and choose the image you want to use.
Note: You can only use Live Photos for your lock screen if your Apple iPhone 14 is unlocked.
2. How to manage notifications
If you want to manage notifications on the iOS 17 lock screen, there are two ways to do it.
At first, you can go to Settings > Notifications. Here, you can choose how many notifications you want to see on your lock screen and which apps can send you notifications.
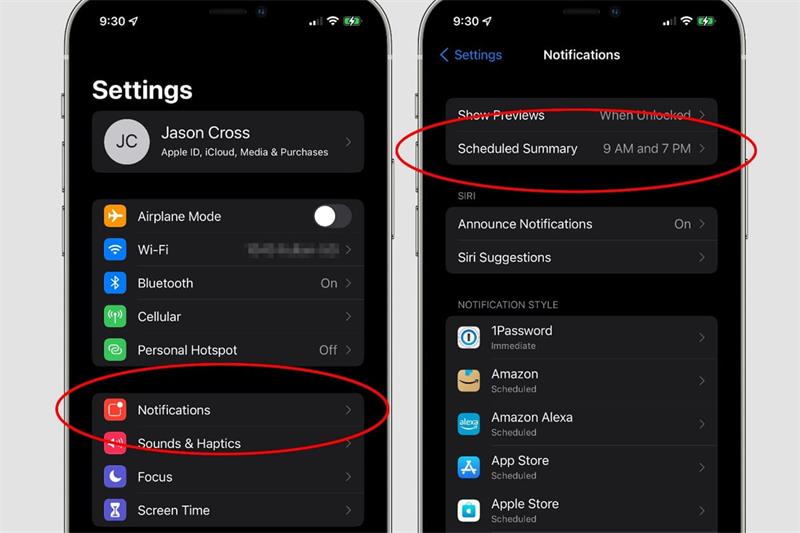
The Do Not Disturb feature is the second way to manage notifications. To do this, go to Settings > Do Not Disturb and enable the feature. You can also schedule when Do Not should turn on and off. This feature work like a charm if you want to silence all notifications at night.
3. How to set Auto-Lock time
If you want to set the Auto-Lock time, go to Settings > Display & Brightness > Auto-Lock. Here, you can choose how long it should take for your Apple iPhone 14 to lock automatically.
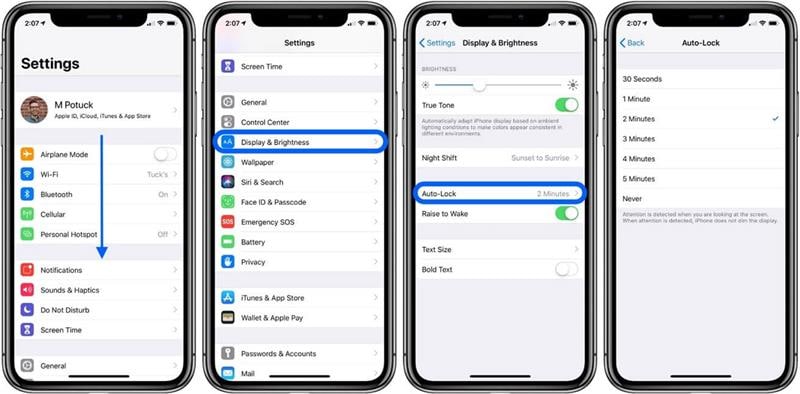
By default, the Auto-Lock time is set to 30 seconds. But you can choose to lock it immediately, after 1 minute, 5 minutes, or never.
How to Turn Off/On Lock Screen in iOS 17?
If you want to turn off the lock screen, go to Settings > Touch ID & Passcode (or Face ID & Passcode). Then, scroll down and disable the Unlock with Passcode (or Unlock with Face ID) option.
Enable the Unlock with Passcode (or Unlock with Face ID) to turn ON the lock screen.

But if you have forgotten your passcode, don’t worry. The next section will show you how to bypass the lock screen.
How to Bypass the iOS 17 Lock Screen Passcode?
Different methods can help you bypass the iOS 17 lock screen passcode. Let’s discuss them in detail.
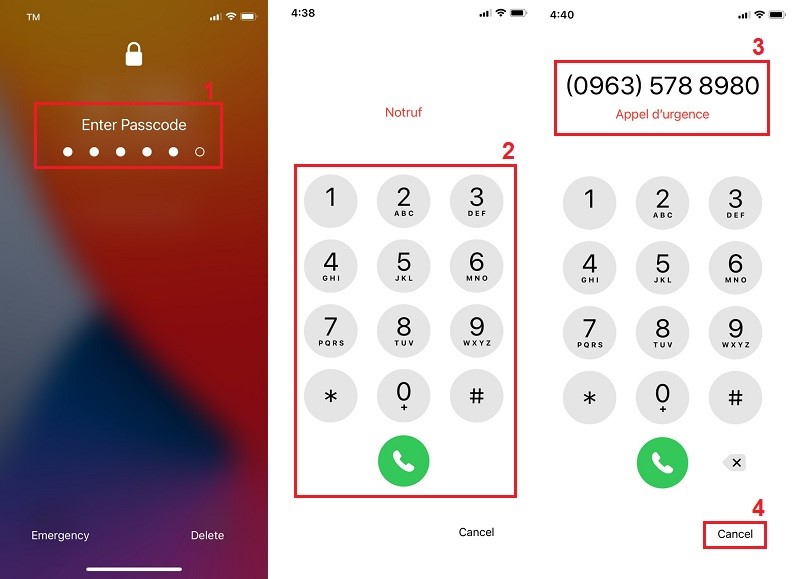
1. Use Emergency call
The first method to bypass the passcode is to use the emergency call feature.
To do this, access your device with five wrong passcodes attempts. This will trigger the emergency call feature. All you need to do is, dial an emergency number and then tap on the cancel button, and you’ll be taken to the home screen.
That’s how you bypass the lock screen without losing any data.
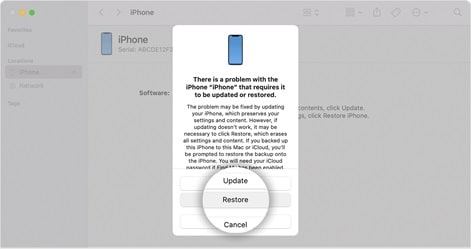
2. Bypass passcode with iTunes restore
If your Apple iPhone 14 needs to be backed up with iTunes sync feature, you can use this method to bypass the passcode.
To do this, connect your Apple iPhone 14 to a computer and open iTunes. Then, click the Restore button and follow the on-screen instructions to restore your Apple iPhone 14.
It will take some time, but you can use your Apple iPhone 14 without a passcode once it’s done.
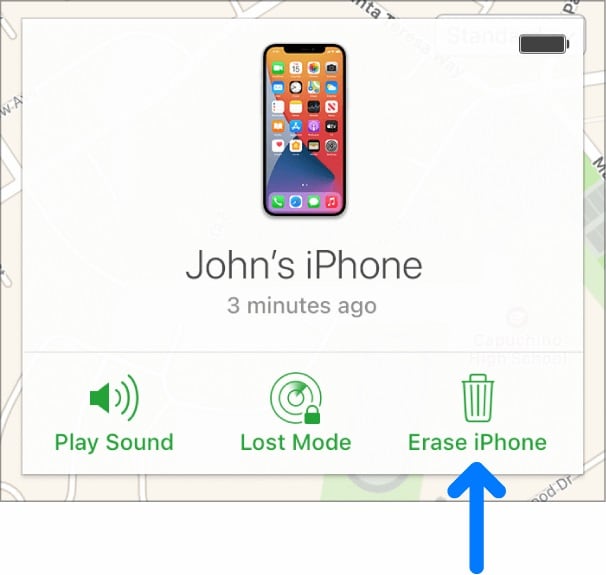
3. Use Find My in iCloud
If you have synced your Apple iPhone 14 with iCloud, you can try the Find My feature to bypass the lock screen.
To do this, go to icloud.com/#find and sign in with your Apple ID. Then, select your device from the list of devices and click on the Erase button.
To do this, go to icloud.com/#find and sign in with your Apple ID. Then, select your device from the list of devices and click on the Erase button.
All the data will disappear on your Apple iPhone 14, and you’ll be able to access it without a passcode.
This process can also take some time, so be patient.
4. Dr.Fone-Screen Unlock
If all mentioned methods don’t work for you, the ultimate solution is to use Wondershare Dr.Fone-Screen Unlock and bypass the passcode. To finish it, you can follow the steps given below carefully.
Step #1: Download/Install Dr.Fone on your Computer or MacBook
A third-party tool named Dr.Fone-Screen Unlock can help you in this regard. The wonderful part is that you don’t have to learn any technical knowledge.
First, download/install Dr.Fone-Screen Unlock on your computer or MacBook. You can get it from here:
After downloading the tool, install launch it on your PC.
Step #2: Launch the Application and Go for Screen Unlock
Once you have installed the tool, launch it and go to its main window. Here, you will see different features. Select the Screen Unlock feature from the list.
Step #3: Connect your Apple iPhone 14 and Activate DFU Mode
Now, you need to connect your Apple iPhone 14 to the computer using an Apple original cable. Once done, you need to put your Apple iPhone 14 into DFU mode.
To do this, you need to press and hold the Home button and Sleep/Wake button simultaneously for 10 seconds.
After that, release the Sleep/Wake button but keep holding the Home button until Dr.Fone detects your device in DFU mode.

Step #4: Download the Appropriate Firmware
Once Dr.Fone detects your Apple iPhone 14, it will ask you to continue. So, proceed to the next, and here you will be asked to download the correct firmware package for your device.
So, choose the firmware carefully and hit the download button.
Depending on your internet connection, you may have to wait for a longer time. But once the firmware is downloaded successfully, you can proceed to the next step.

Step #5: Unlock your Apple iPhone 14
After the firmware is downloaded, you need to press the Unlock Now button, and Dr.Fone will start to unlock your Apple iPhone 14 without a passcode. Once it is done, you can get into your device without any restriction.

FAQs
Why iOS 17 Lock Screen is not working?
There could be many reasons for the malfunction of the Lock Screen in iOS 17. The most common reason is the installation of incompatible jailbreak tweaks. Therefore, it is recommended to remove all the jailbreak tweaks and check whether the problem persists.
You can try resetting your device to factory settings if the problem still exists. But make sure to back up your data before doing so, as it will erase all your data.
How do I fix my iOS 17 lock screen bugs?
There are various ways to fix the lock screen bugs in iOS 17. You can try resetting your device to factory settings, or you can also try restoring your device from a previous backup.
If none of these methods work, you can try using a third-party tool like Dr.Fone-Screen Unlock to bypass the lock screen.
How do you unlock a locked iPhone iOS 17?
There are various ways to unlock a locked iPhone running on iOS 17. You can try the feature of Find My iPhone, or you can also use a third-party tool like Dr.Fone-Screen Unlock.
How do you fix an unresponsive lock screen on iPhone running on iOS 17?
If your lock screen is unresponsive on iPhone running on iOS 17, you can try force restarting your device. To do this, you need to press and hold the Home button and Sleep/Wake button simultaneously for 10 seconds.
After that, release the Sleep/Wake button but keep holding the Home button until you see the Apple logo. Once your device is restarted, check if the problem persists or not.
If the problem still bothers you, you can try using a third-party tool like Dr.Fone-Screen Unlock to reset the phone, eventually fixing the issue.
The Bottom Line
So this is what we want to talk about the iOS 17 Lock Screen with you. We have tried to cover everything in this article, including the new features, lock screen bugs, and how to fix them.
All the fixes mentioned above are tested and proven to be working. So you can try them without any hesitation.
But if you are still facing problems with your lock screen, then the greatest thing you can do is to use a third-party tool like Dr.Fone-Screen Unlock. This tool is very easy to use and will unlock your device within minutes.
So, if you are looking for a hassle-free solution to fix your lock screen issues, then this is the best one you should never miss.
Apple iPhone 14 Backup Password Never Set But Still Asking? Here’s the Fix
Part 1: Why Do iTunes Ask Me for iPhone Backup Password?
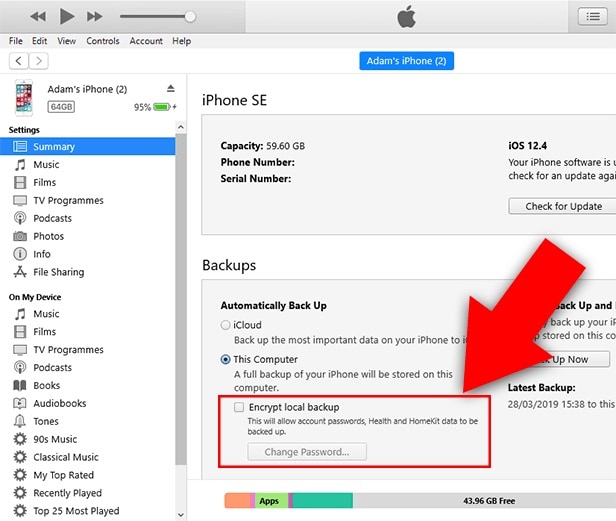
When you use iTunes to create a backup, the backup will probably have a password that iTunes automatically create. This is for privacy reasons. Hence, it might ask for an iTunes backup password never set by you!
In most cases, this occurs when the Encrypt Backup option is activated. As an official iOS feature, its purpose is to provide iOS users with the iTunes backup encryption for further security.
Unfortunately, this capability may also become problematic if you inadvertently take a backup without being able to provide the password. For example, you may have to enter the password for your Apple iPhone 14 backup unlocking never set by you.
But the good news is you have some possible fixes. So, let’s talk about them.
Part 2: 4 Possible Ways to Fix Asking for iPhone Backup Password
Many iPhone users have problems with iTunes when they back up their devices.
One of the most common issues is that people are asked for their iPhone backup password never set, but they need to know what it is. This can be frustrating because you can only back up your device if you have the password.
There are a few possible ways to fix this problem. Try resetting your password or using a different computer to back up your device. You could also try using a third-party software tool like Dr.Fone - Screen Unlock.
1. Try all passwords you use on iPhone
When iTunes prompts you for an iPhone backup password never set, what should your initial course of action be?
To get out of this predicament in the simplest way possible, try entering every potential password you will likely have used. In most cases, individuals will use the same password for many accounts.
A significant possibility is that you encrypted the iTunes backup with the same password from the iCloud account.
Therefore, before doing anything further, try all passwords to configure your iTunes account. For example, try entering 0000, 123456, name123, or 1111.
2. Find the password from Keychain on macOS
You may also attempt to find the password for the iTunes backup using the keychain approach if you are working on a Mac.
The likelihood of success with this approach is relatively low. However, it is still worthwhile to try it, particularly if you have also synchronized your iTunes account with your Mac.
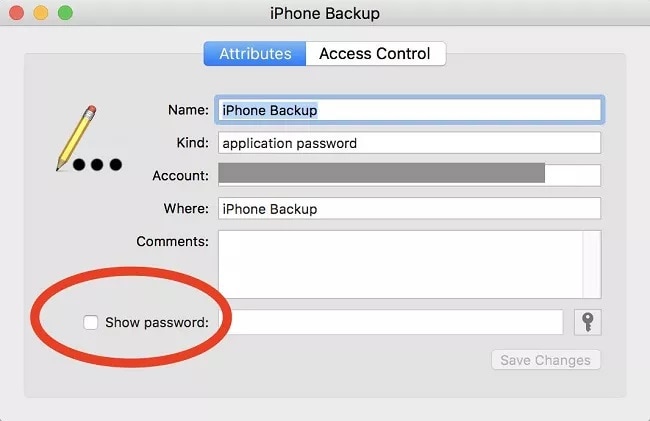
- On your macOS, go to Utilities by clicking the Applications menu item. At this point, launch the Keychain Access app and look for your Apple iPhone 14 backup.
- To open a new dialogue box, double-click the most recent backup file, and you will see one appear before you.
- On this page, choose Show Password to get the password for the Apple iPhone 14 backup. However, you will first be prompted to provide the administrator password associated with your iCloud account to recover the password.
3. “Reset All Settings”
Resetting the password is another option at your disposal if you encounter the Apple iPhone 14 backup password never set problem. How you do this will be different depending on the version of iOS that you have installed.
Here are what you can do with your iOS smartphone if it has iOS 11 or a later version:
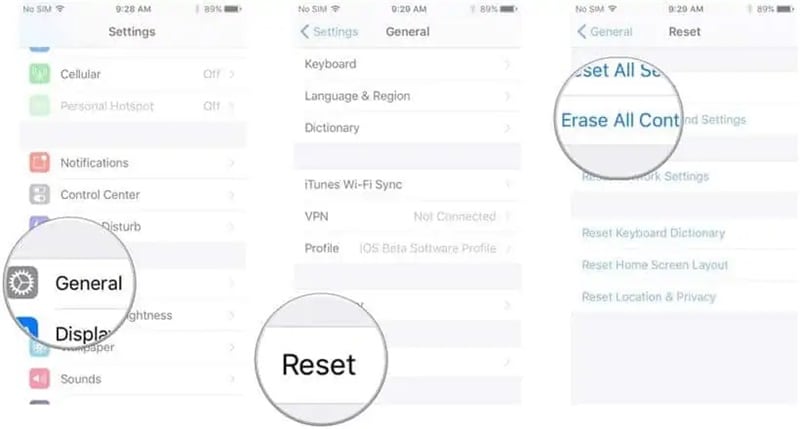
Step 1: Unlock your Apple iPhone 14, and then open the Settings app on your device.
Step 2: After locating the General menu, go to the Reset menu and then hit the Reset All Settings button. Please confirm your action by providing the password for your Apple iPhone 14.
Step 3: Once the reset has been completed, your previous password will be deleted.
Step 4: The next thing you should do is take a fresh backup of your Apple iPhone 14 using iTunes, and then establish a new password for the backup that iTunes creates.
You will need to use an alternative strategy, which includes a factory reset if you use an older version of the iOS firmware than iOS 11.
Step 1: Before continuing, it is highly recommended that you create a backup of the data on your Apple iPhone 14 using iCloud.
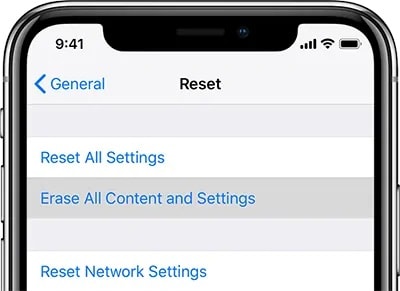
Step 2: After you have opened the Settings app, go to the General menu, then to the Reset menu, and finally to the Erase All Content and Settings option.
Step 3: Confirm that you want to reset your Apple iPhone 14 to factory settings, and wait until it is done.
Step 4: Once the factory data reset is finished, you must restore your iCloud backup. To do this, follow the steps for setting up iOS until you reach the Apps & Data option.
Step 5: Create a new backup in iTunes and change the password for the existing backup in iTunes.
You should be aware that resetting the Apple iPhone 14 device to factory settings will not make your encrypted backups accessible again.
On the other hand, it does make it possible for you to generate a fresh backup in iTunes that is not encrypted.
4. Dr.Fone-Screen Unlock
First step: After installing Dr.Fone on your device, please run the program and look for the red button labeled “Screen Unlock.”
Step 2: While in the interface for Screen Unlock, navigate to the bottom right of the screen and tap on the feature labeled “Remove iTunes BackUp Encryption.” This will allow you to proceed.

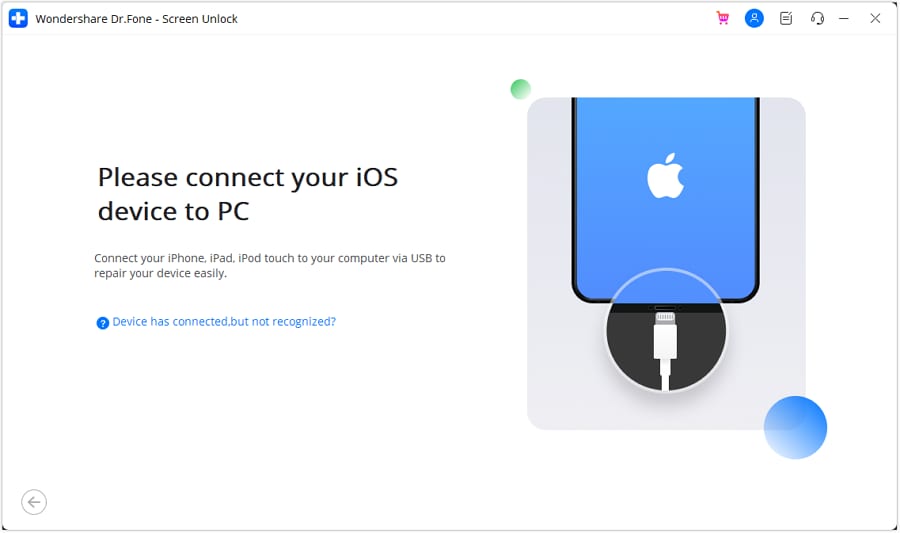
Step 3: When brought to this screen, please use a USB cord to connect your iOS device to your personal computer. If Dr.Fone can identify this relationship, the following picture will appear for you to see.
Please read the following three notes carefully before clicking the “Remove Now” button:
- Check to ensure that “Find My iPhone” is not turned on.
- During this procedure, you should not launch “iTunes.”
- During the process, your Apple iPhone 14 will restart.

Step 4: If you have an iTunes backup, Dr.Fone may automatically verify it and delete it. This encryption will be removed once the percentage on the progress meter reaches the end. This procedure won’t take a lot of time at all.

Step 5: The encryption of the iTunes backup has been successfully erased! Your backed-up data may be quickly restored, transferred, wiped clean, and backed up again. Hence, you can enter the password to unlock your Apple iPhone 14 backup never set in the first place!

The Bottom Line
There are four ways to fix the problem if iTunes keeps asking for your Apple iPhone 14 backup password. The first method is to try all the passwords you use on your Apple iPhone 14. You can try finding the password from Keychain on macOS if this does not work. Another option is to “Reset All Settings” on your Apple iPhone 14.
Lastly, Dr.Fone-Screen Unlock is a program that can help you bypass the passcode and get into your backups. So, what are you waiting for? It’s time to avoid the problem of iTunes backup password never set.
Also read:
- [New] Cinematic Images Post-Production of VT Videos with FCPX for 2024
- 2024 Approved Mastering Instagram Rising Video View Counts
- 7 Solutions to Fix Error Code 963 on Google Play Of Honor Play 40C | Dr.fone
- Deleting YouTube Content A Step-by-Step Guide for 2024
- Detailed Review of doctorSIM Unlock Service For Apple iPhone 14 Pro Max | Dr.fone
- How to Downgrade Apple iPhone 14 without Losing Any Content? | Dr.fone
- In 2024, Complete Fixes To Solve iPhone XS Max Randomly Asking for Apple ID Password | Dr.fone
- In 2024, How To Change Your Apple ID Password On your iPhone SE (2022) | Dr.fone
- In 2024, How to Fix Apple iPhone 13 mini Passcode not Working? | Dr.fone
- In 2024, How to Remove and Reset Face ID on iPhone SE (2022) | Dr.fone
- In 2024, PassFab Apple iPhone 13 mini Backup Unlocker Top 4 Alternatives | Dr.fone
- Tailored Training Regimens Prioritizing Your Well-Being
- The Great Tech Tussle: Selecting Your Digital Companion
- Things You Should Know When Unlocking Total Wireless Of Apple iPhone 12 | Dr.fone
- Troubleshooting Guide for Call of Duty's Black Ops Cold War - Fixing Error 887A0005
- Unlock Apple iPhone 13 mini With Forgotten Passcode Different Methods You Can Try | Dr.fone
- Updated The Ultimate List of Video Editing Software for Newcomers
- Title: How To Change Country on App Store for iPhone 14 With 7 Methods | Dr.fone
- Author: Amelia
- Created at : 2024-11-04 18:49:07
- Updated at : 2024-11-07 00:14:14
- Link: https://iphone-unlock.techidaily.com/how-to-change-country-on-app-store-for-iphone-14-with-7-methods-drfone-by-drfone-ios/
- License: This work is licensed under CC BY-NC-SA 4.0.