
How To Change Your Apple ID on iPhone XS With or Without Password | Dr.fone
How To Change Your Apple ID on Apple iPhone XS With or Without Password
The Apple ID is a unique identifier used to log in to all Apple services, including iCloud, the App Store, Apple Music, and more. You can track purchases and manage your account settings through your Apple ID. But what if you need a new one for security or moving to a new location?
Whatever the reason, learning how to change your Apple ID on your iPad is straightforward. And this guide will show the steps and provide some tips at the end.

Part 1: Reasons Why You Might Need To Change Your Apple ID
Your iOS devices contain most of your digital data. That includes your contact list, email, financial information, and social media passwords. All this data is valuable - others can use it to do identity theft, fraud, and other crimes.
If you feel the existing Apple ID isn’t secure enough, it’s a good idea to change your Apple ID on your iPad or other devices. Aside from this, there are a few scenarios where you might find yourself needing to change your details:
You No Longer Use the Email Address or Phone Number Associated With Your Apple ID
Life moves fast, and sometimes contact info changes. If the email or phone number linked to your Apple ID becomes outdated, it’s a good idea to update it. That way, you won’t miss out on vital notifications or have trouble recovering your account if needed.
You Want To Simplify Your Online Life
If you have multiple email addresses, you may want to consolidate them into one email address. It can make it easier to manage and remember your online accounts, including your Apple ID.
You Are Relocating to a Different Region or Country
Moving abroad? Your Apple ID may need an update to match your new location. It ensures access to region-specific apps and services. You need to have a few things in place before you can do that: add a payment method for your new location, cancel your subscriptions, and spend your store credit. Aside from that, you will also need to change your Apple ID country or region.
Changing your Apple ID can be smart, ensuring your digital life stays up-to-date, secure, and tailored to your needs. It’s not complicated, and it’s all about making your Apple experience better suited to you. So, go ahead and learn how to change your Apple ID on your iPad in the following sections.
Part 2: How To Change Apple ID on iPad Without Losing Data?
If you receive a notification from Apple about suspicious account activity, it’s time to act. Before you learn how to change the Apple ID on an iPad – for yourself or others, here are some common signs of a compromised Apple ID:
- A login attempt from a device or location that you don’t recognize
- A password change that you didn’t know about
- Unauthorized messages or purchases
- A password that no longer works
- Unfamiliar account details
If you suspect unauthorized access to your Apple ID, below is what you can do.
Steps To Change Your Apple ID to a Different Email Address
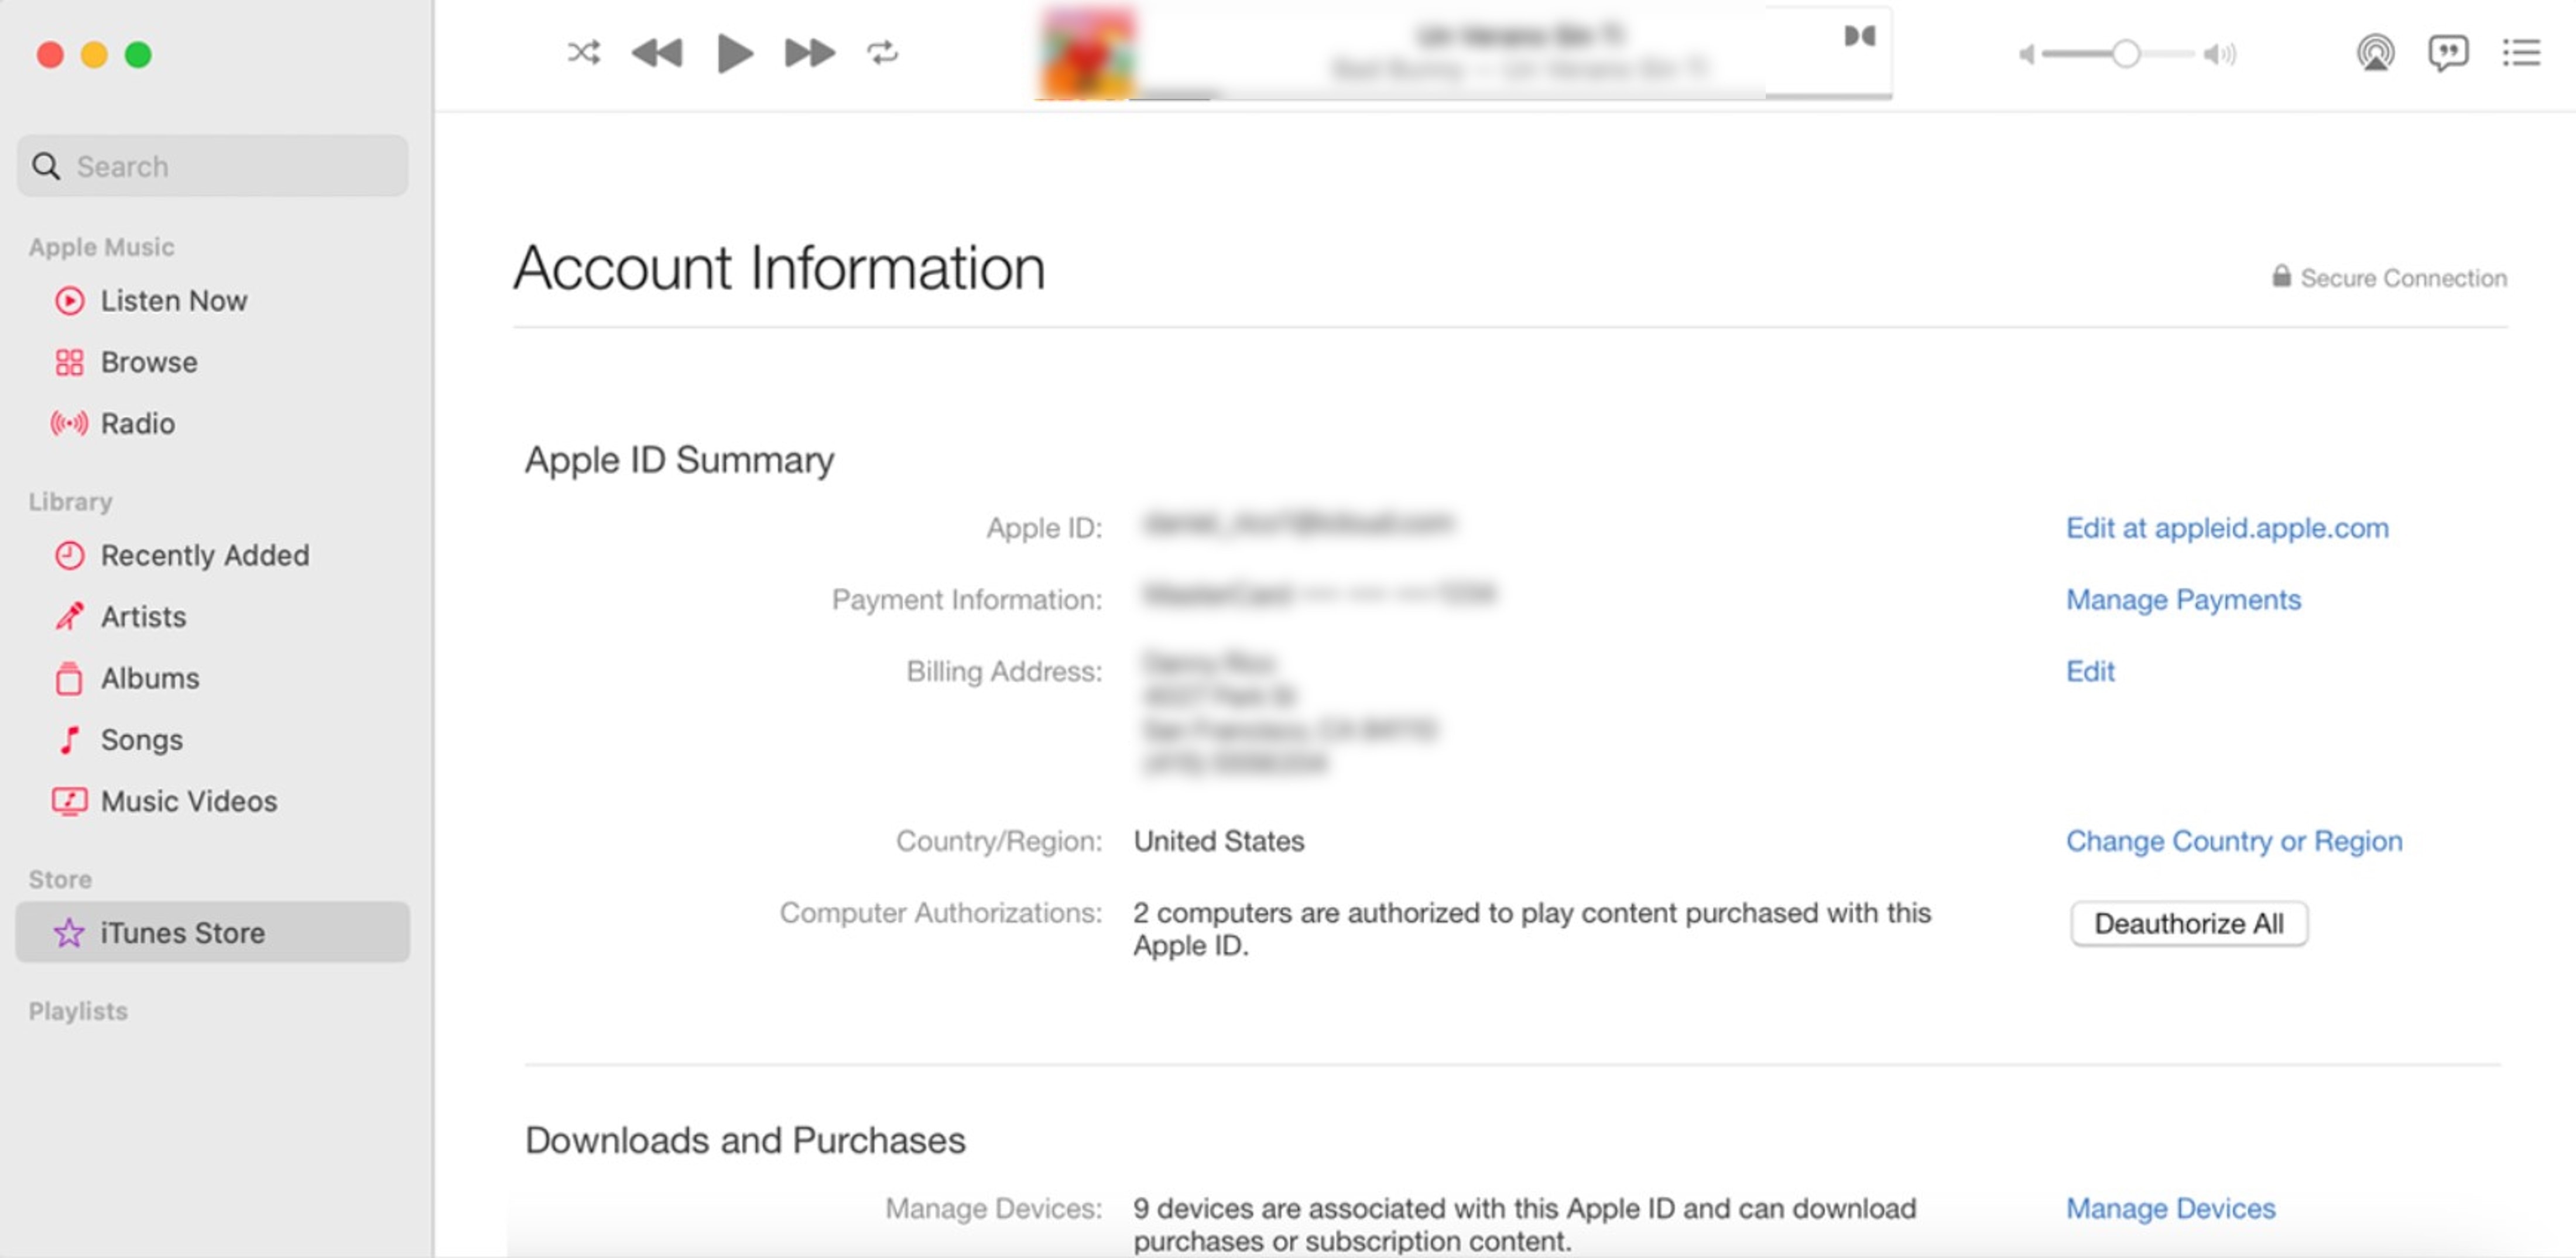
If you are worried about losing data such as purchases and contacts, don’t worry. You can update your Apple ID account anytime without disrupting your data. Here’s a step-by-step guide on how to change your Apple ID email address. Just sign out of all Apple services and devices that use your account first.
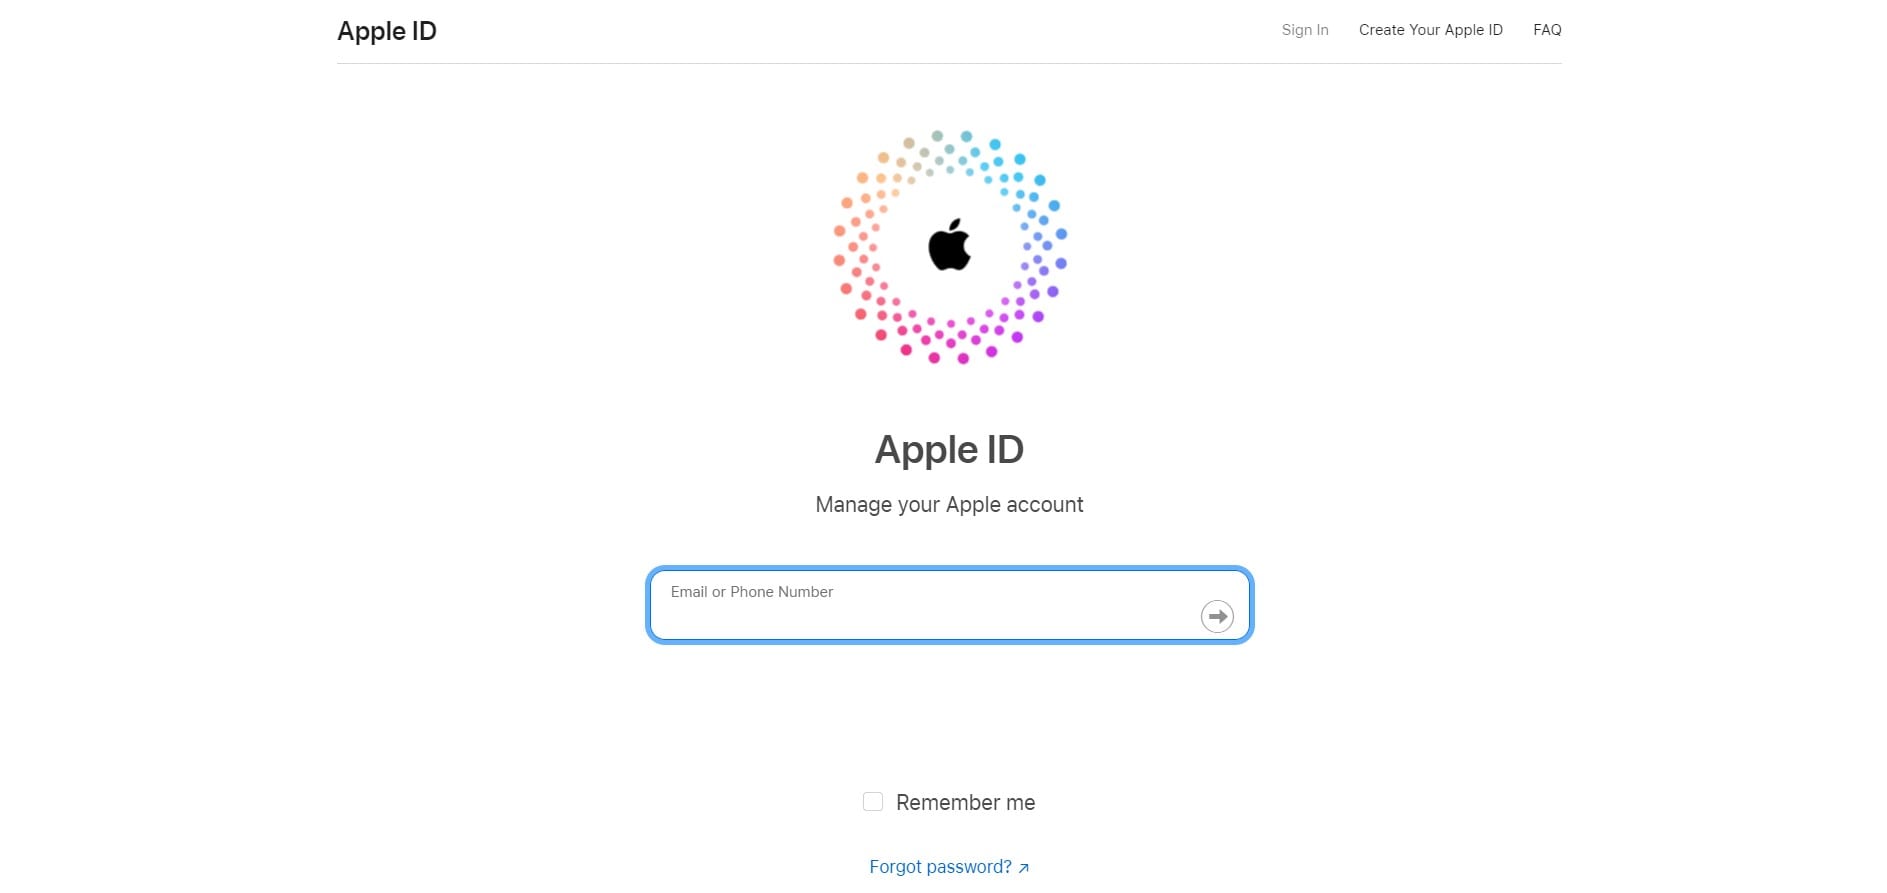
- Step 1: Visit the Apple ID official website and log in to your account credentials.
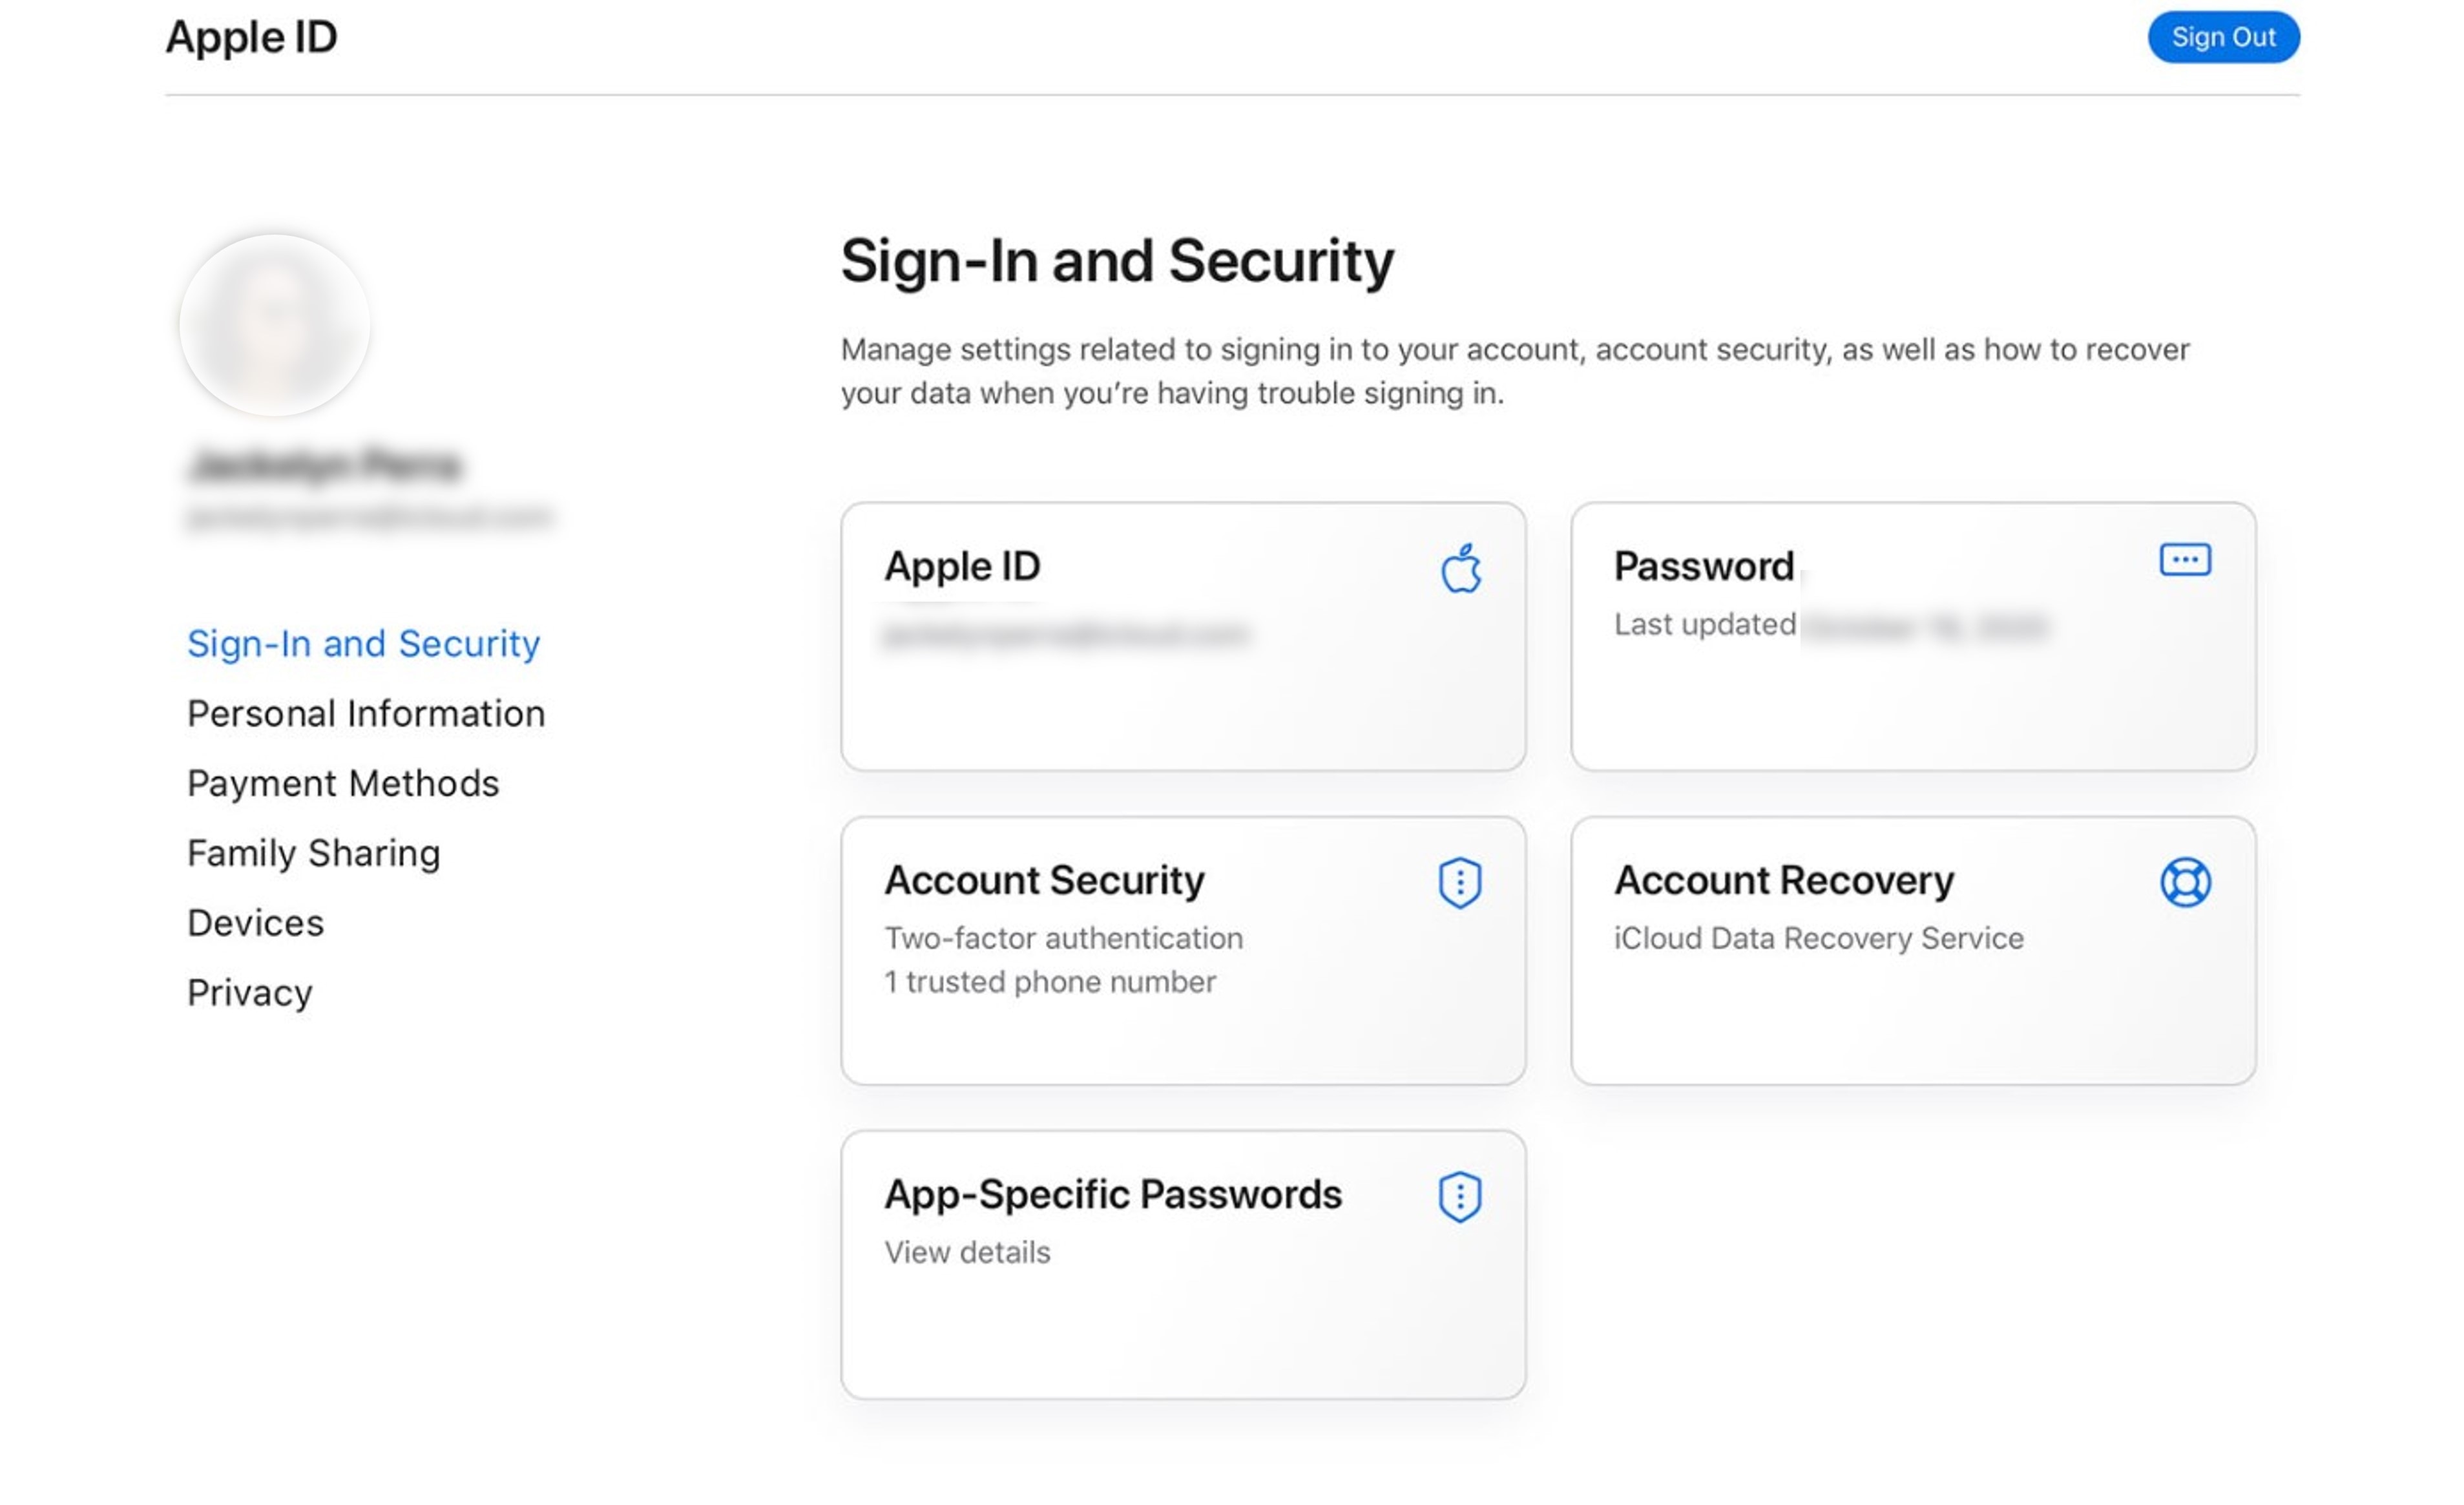
- Step 2: Once logged in, select Apple ID in the Sign-In and Security section.
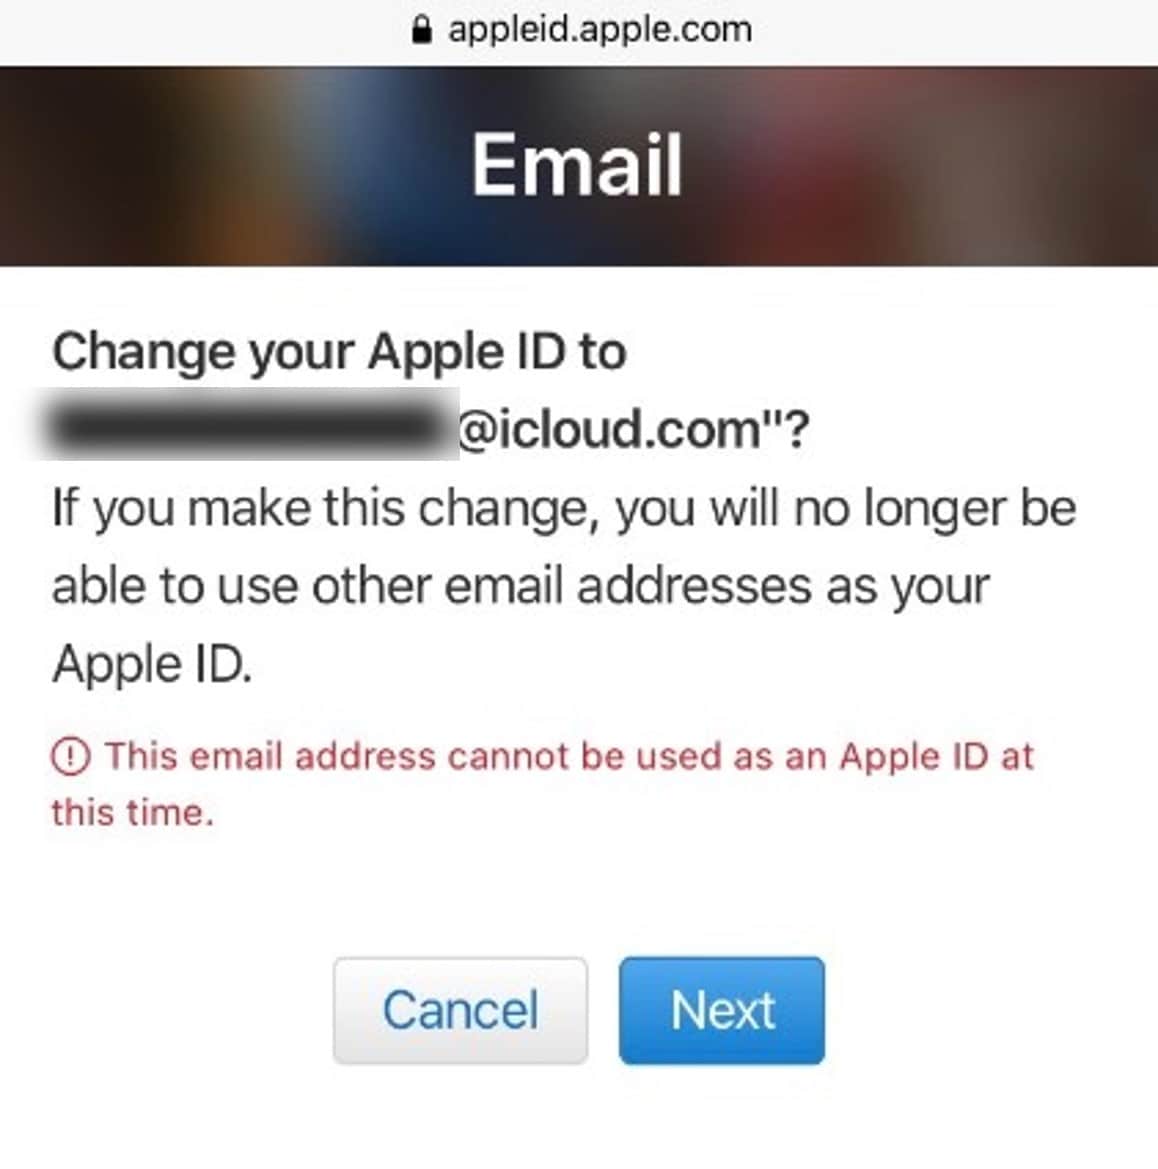
- Step 3: From the Apple ID pop-up window, enter your new Apple ID in the Change your Apple ID text field.
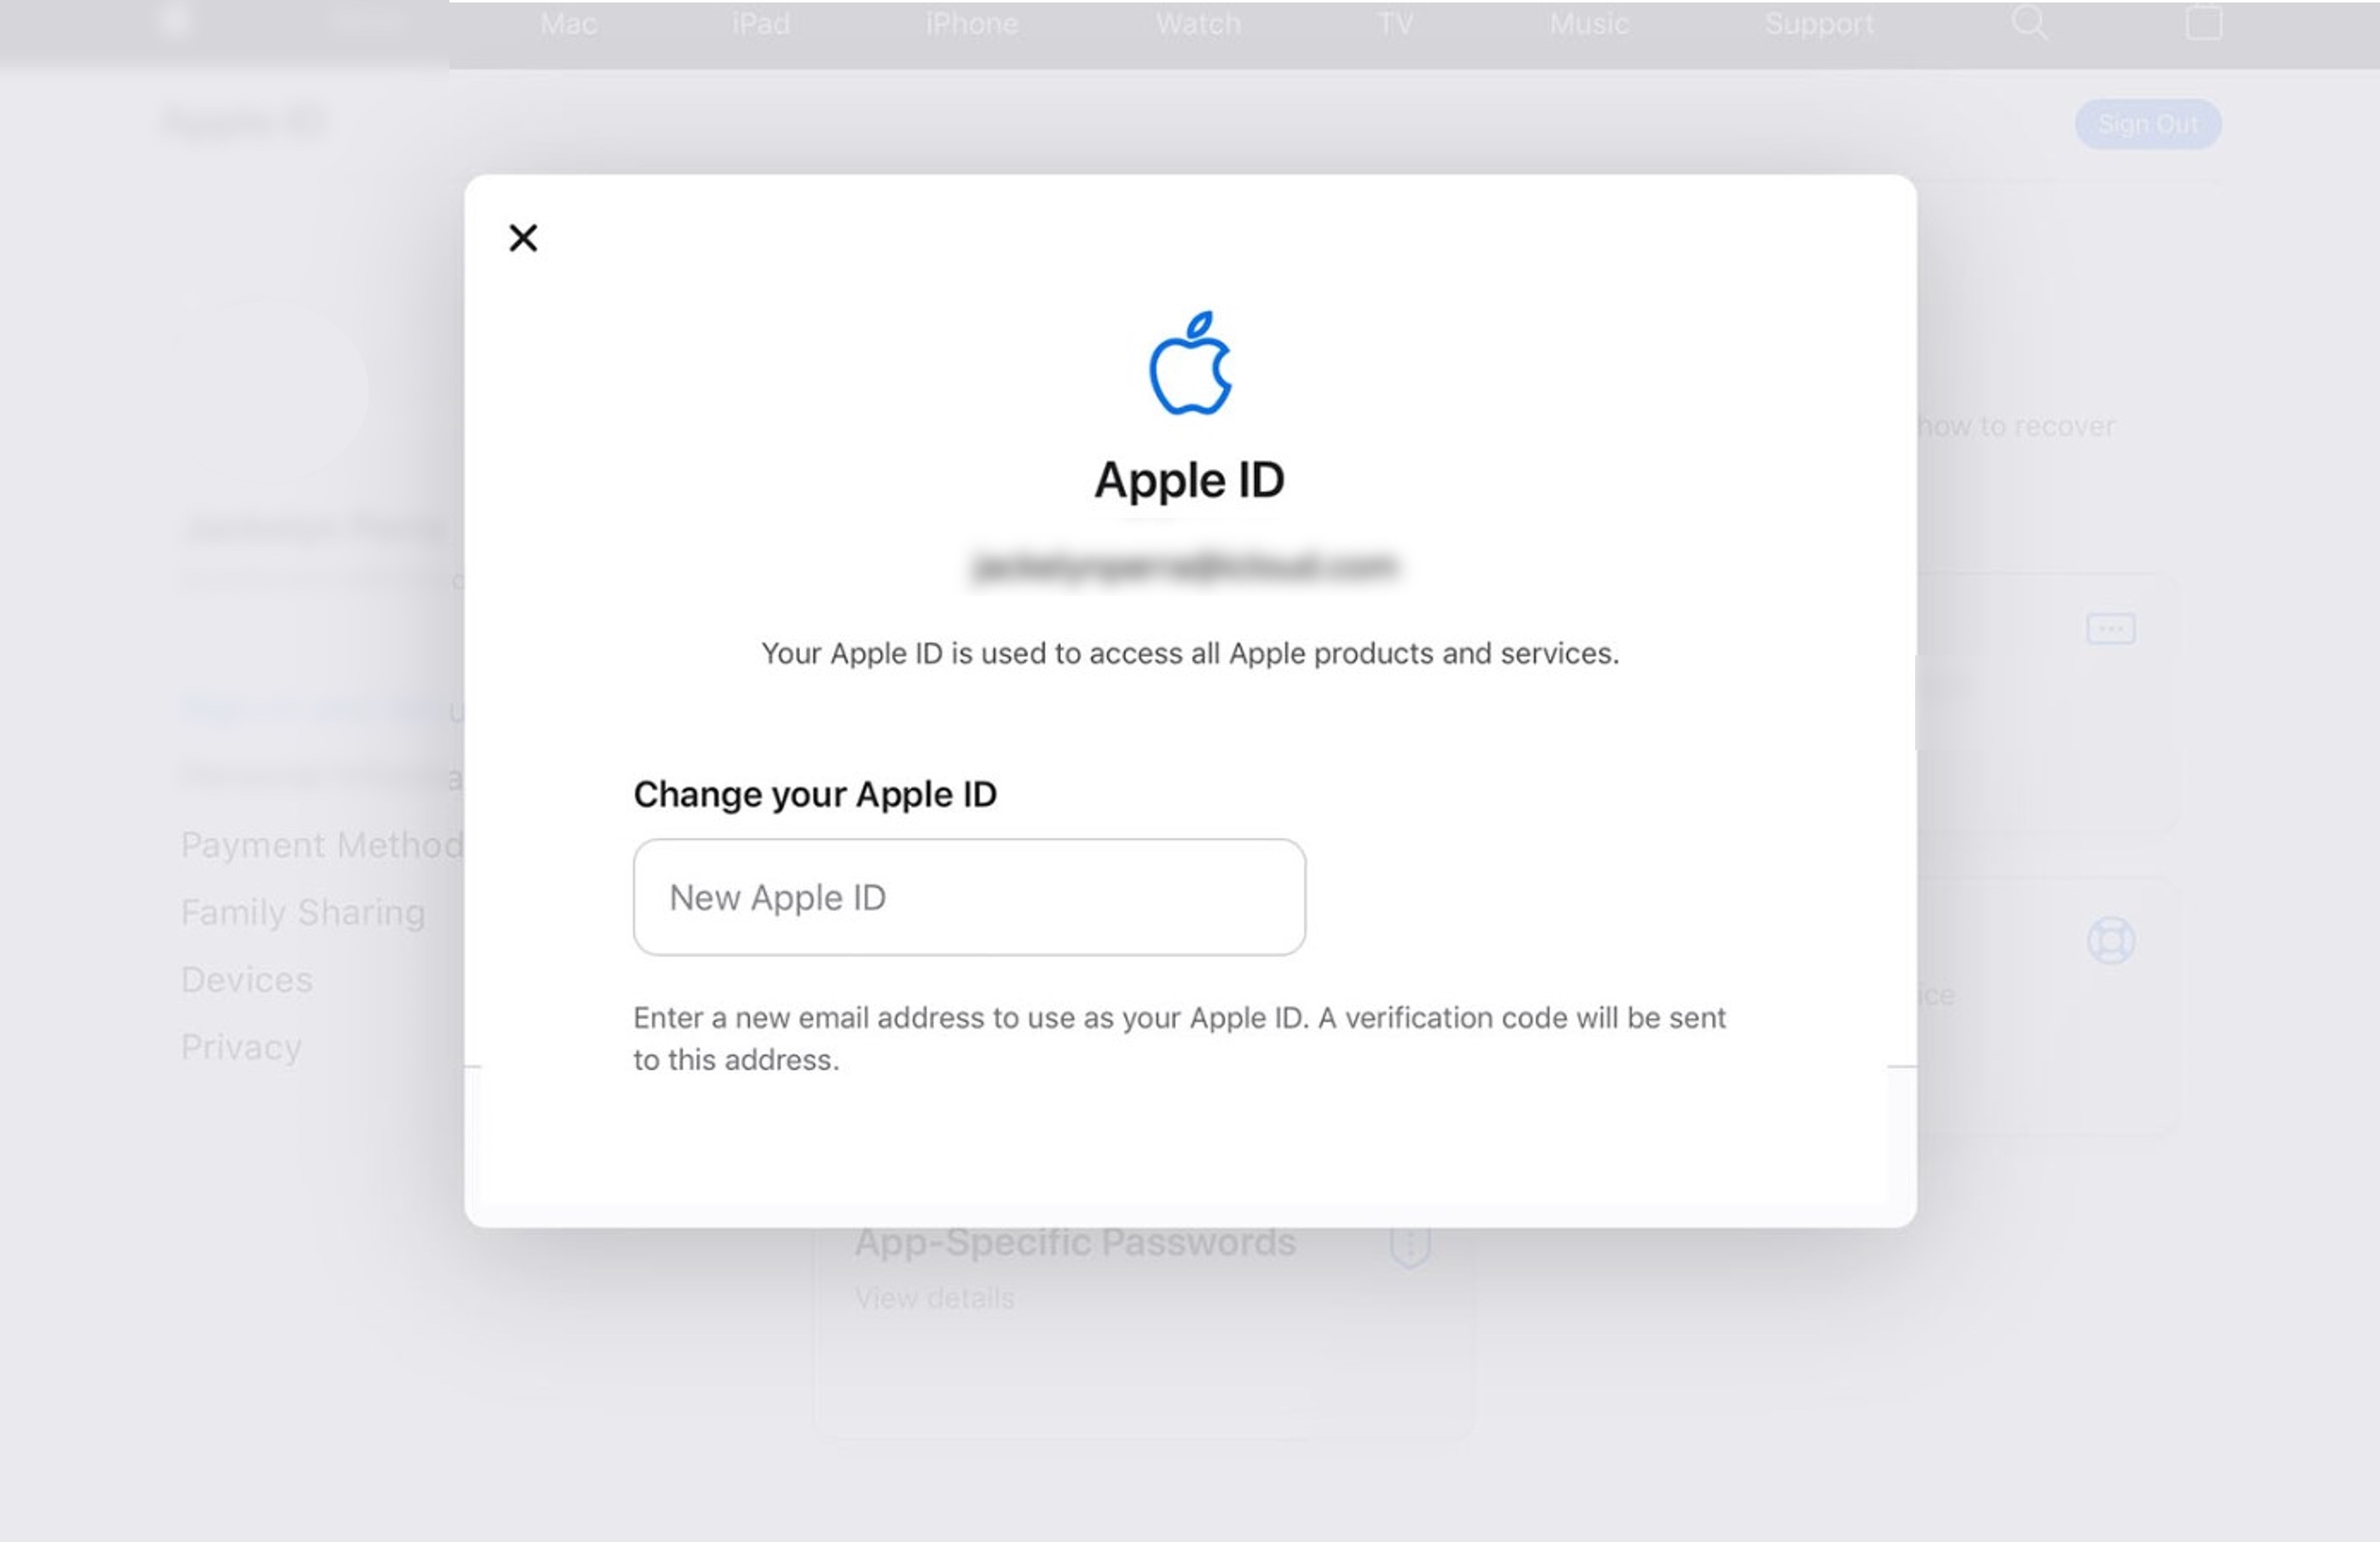
- Step 4: Select Change Apple ID to proceed.
- Step 5: Check your email to get a verification code sent by Apple to ensure that only you can change it to a third-party email address. Enter the code to complete the update.
Step 6: Sign in to Apple services such as iCloud and Messages, using your new Apple ID to continue sharing with others.
Steps To Change Your Apple ID to a Different Mobile Number
Do you want to use Your Apple iPhone XS number as your Apple ID username? It’s possible, but it depends on your location, how you created your account, and what version of iOS you’re using.
If you’re in China mainland or India, and you’re using iOS 11 or later, you can create a new Apple ID with Your Apple iPhone XS number as the username. However, Your Apple iPhone XS number must be (+86) or (+91). So, if you’re thinking of, “How can I change my Apple ID on my iPad if it’s a mobile phone number?” then this guide is for you:
- Step 1: Log out of all Apple services and devices currently signed in with your Apple ID, except the one you’re using to change your Apple ID.
- Step 2: On your iPad, go to Settings > [your account name] > Sign-in & Security.
- Step 3: Tap Edit next to Email & Phone Numbers.
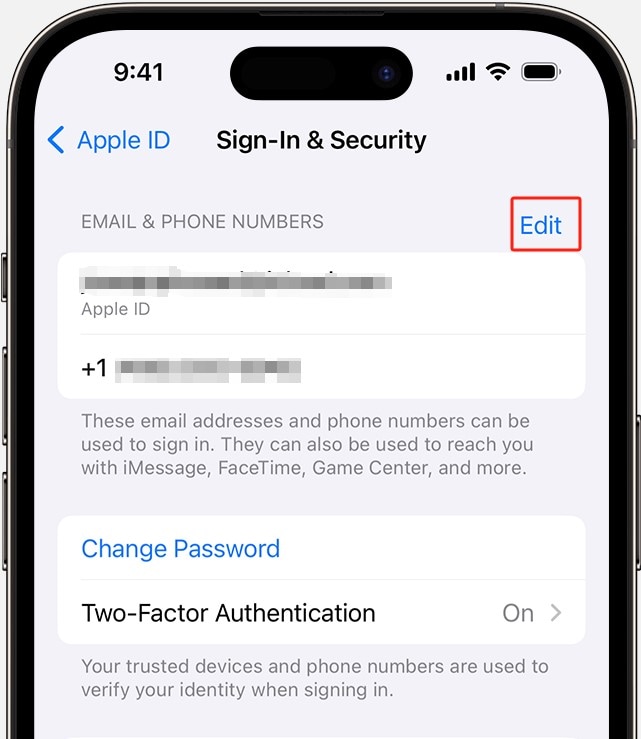
- Step 4: Go to the Delete icon next to your mobile number and follow the directions given.
- Step 5: Enter the code sent to the mobile number you added as your new Apple ID to verify it.
- Step 6: Log into all Apple services using your new Apple ID.
Even if you can’t change your Apple ID on your iPad to a mobile phone number, you can still associate it with a phone number on your account page. It means you can use a different email address or mobile phone number to log in to your Apple ID. See the next sections for more information on the workarounds you can try.
Part 3: What To Do if You Cannot Change Your Apple ID on iPad?
Changing your Apple ID on an iPad is usually easy. However, there can be setbacks during the process. Now, here’s what to do if you find yourself unable to do it and why it might be happening:
Try Again Later
If you encounter errors during the process, give it a little time and try again. Mayne it is because you changed your Apple ID on your iPad to an iCloud email address within 30 days.
Check if Apple ID Is Already in Use
Apple IDs are unique, and you can’t have two identical ones. If you’re trying to change your Apple ID to one that’s already in use, you’ll hit a roadblock. Ensure that the new Apple ID you want isn’t already taken. Remove it from the family member’s account if they are using it.
Your Apple ID Is an Email Address
If your current Apple ID is an email address, you won’t be able to change it to a mobile phone number directly. Instead, you can add an email or phone number to your account for contact purposes.
If you’ve addressed these issues and still can’t change your Apple ID, don’t worry. Apple customer support is available to assist you with account-related challenges. Contact them for guidance and solutions tailored to your situation.
However, if you can’t change your Apple ID on your iPad because you forgot or don’t have access to the password, you can use a third-party tool such as Dr.Fone. This tool is easy to use and can help you unlock your iPad and remove the Apple ID in a few clicks.
Part 4: Using Wondershare Dr.Fone
Dr.Fone Screen Unlock (iOS) tool is your go-to solution for unlocking iOS devices without a passcode. The best part? It is easy to use for users of all technical backgrounds. With Dr.Fone, you can unlock iOS screens protected by 4 to 6-digit passcodes, Face ID, Touch ID, and more.
But it doesn’t stop there; Dr.Fone can also help remove the iCloud activation lock, unlock Apple ID without a password, and much more. This powerful tool is a lifesaver for iOS users, supporting the latest iPadOS 17, iOS 17, and iPhone 14.
Step-by-Step Guide to Removing Apple ID on iPad Using Dr.Fone
Dr.Fone can bypass the Find My/Find My iPhone feature to remove your Apple ID from your iPad, iPhone, or iPod Touch. Follow the steps below to learn how to use this feature on your iOS device.
Step 1: Get Wondershare Dr.Fone from their website and install it on your computer.
Step 2: From the app’s Toolbox homepage, click Screen Unlock, and select iOS.

- Step 3: Select Remove AppleID from the available Screen Unlock tools.

- Step 4: Connect your iPad or other iOS device to your computer, then click Unlock Now to continue.


- Step 5: Click Yes to confirm your device has a screen lock. Otherwise, it won’t work.

- Step 6: Enable the Two-Factor Authentication on your iPad so you can unlock your Apple ID. Then, click Yes to proceed.

- Step 7: Follow the on-screen instructions to put your iPad in Recovery Mode.

- Step 8: The next screen will demonstrate the Device Model information. Select an option from the System Version dropdown list and click Start.

- Step 9: The iOS firmware will start downloading, and you can see the progress on the next screen. If you’re experiencing slow download speeds, click Copy to get the link and download it.

- Step 10: Review the Device Model and System Version, then click Unlock Now to proceed.

- Step 11: From the Warning dialogue box, enter the code shown in the text field, then click Unlock.

- Step 12: Wait and refrain from using your device while it’s connected to avoid a bricked device.

- Step 13: Once finished, click Done, then check your iPad. If your Apple ID is not unlocked, you may need to click Try again to restart.

Best Practices To Secure Your iOS Data
Changing your Apple ID on your iPad can be a great way to protect your privacy and security. However, it’s important to take steps to ensure that your iOS data remains safe during the process. Here are some tips to help you do just that:
- Backup Your Files
Before you change your Apple ID on your iPad, create a backup of your data so you don’t lose important files. You can create a backup using iCloud or Dr.Fone.
Dr.Fone also allows you to view the contents of your backup before you restore it, so you can ensure that you’re getting back exactly what you want. This way, you can restore your data to your new Apple ID if needed.
- Password Check
Review your current passwords. Change any weak or compromised ones, including your Apple ID password, and never share it with anyone.
- Avoid Sharing an Apple ID
It’s best practice for each family member to have their own Apple ID. Sharing one can lead to problems with app purchases, data syncing, and privacy.
- Enable Two-Factor Authentication (2FA)
If not already enabled, turn on 2FA for an extra layer of security. It’s simple and highly effective.
## ConclusionChanging your Apple ID on your iPad or other iOS devices is a simple process that can help you protect your privacy and information. With the tips above, you can ensure your iOS data is safe and secure during the switch.
And if you need to remove your Apple ID without a password, Dr.Fone is a good option. Dr.Fone is a powerful iOS toolkit that can help you with various phone solutions. It’s easy to use and can help you solve mobile problems in just a few minutes.
8 Safe and Effective Methods to Unlock Your Apple iPhone XS Without a Passcode
You may get stuck with any emergency if you do not know how to unlock your Apple iPhone XS/iPad without a passcode. It can happen under various circumstances; let’s say, if you change the passcode too often, you may forget the Apple iPhone XS passcode later; your spouse may change your passcode without telling you; your naughty child accidentally locks your Apple iPhone XS. So, what to do then?
Normally, you don’t believe what you see and start to try entering the passcode to unlock your Apple iPhone XS. However, if you entered an incorrect passcode 10 times, you will receive a messag “iPhone is disabled, connect to iTunes “. In this case, the only way to unlock your disabled iPhone is to restore it. And that is a situation none of us would like to be in right? Hence, in this article, today, we will elaborate ways on how to unlock iPhone without passcode or restore it.
Part 1: Unlocking Your Apple iPhone XS: What Are the 4 Main Causes of Failure?
Unlocking your Apple iPhone XS can be a frustrating experience, especially when you just want to access the Apple iPhone XS device. Unfortunately, there are several common reasons why an iPhone may not unlock.
Before you go ahead and take it to a technician for repair, let’s look at the main causes of why you cannot unlock your Apple iPhone XS:
- If you input the wrong passcode too many times, your Apple iPhone XS will be disabled and locked. To unlock iPhone, you will need to enter the correct passcode. If you don’t remember your passcode, you can try using recovery mode to reset your device.
- When someone else has your Apple iPhone XS passcode, they can easily reset your Apple iPhone XS passcode. And you have no idea why you cannot access your Apple iPhone XS. This is a relatively common problem.
- If your Apple iPhone XS screen is broken, it may be difficult or impossible to unlock the Apple iPhone XS device. In this case, you may need to take it to an Apple store or authorized service provider to have the screen repaired.
- If your Apple iPhone XS is in Lost Mode, it will be locked by others, and you will input enter the passcode associated with the Apple ID that was used to set up the Apple iPhone XS device. If you don’t remember the passcode, then Dr.Fone - Screen Unlock (iOS) will be your ideal choice.
Learn about all the solutions to unlock iPhone quickly through the video below:
 safe & secure
For more tutorial videos about how to unlock your Apple iPhone XS, you can explore more from Wondershare Video Community .
Keep reading to learn more feasible ways to unlock iPhone without passcode in detail!
Part 2: How to Unlock iPhone/iPad Without a Passcode? (iOS 7.0 or later)
Dr.Fone - iPhone Unlocker is a powerful software that can help you open your iDevice without a passcode. It supports all iPhone models from iPhone 6 to iPhone 15, and all iPad models. Dr.Fone-Screen Unlock is easy to use and can be used to bypass the lock screen in just a few simple steps. It can also be used to reset the Apple iPhone XS device to its factory settings, allowing you to start fresh. In this section, we will learn about this important tool for iPhone lock screen removal. Thus, instead of thinking hard about how to unlock iPhone without a passcode, you can use Dr.Fone - Screen Unlock (iOS) to do the needful.
Dr.Fone - Screen Unlock (iOS)
Remove iPhone Lock Screen without Hassle.
- Unlock an iPhone whenever the passcode is forgotten.
- Save your Apple iPhone XS quickly from the disabled state.
- Free your sim out of any carrier worldwide.
- Works for all models of iPhone, iPad, and iPod touch.
- Fully compatible with the latest iOS.

3981454 people have downloaded it
To use Dr.Fone - Screen Unlock to unlock your Apple iPhone XS or iPad without a passcode, follow these steps:
- Step 1. Download and install Dr.Fone - Screen Unlock (Windows version ) or (Mac Version ) on your computer.
- Step 2. Go to “Toolbox” > “Screen Unlock” > “iOS” > “Unlock iOS Screen”, then connect your Apple iPhone XS to your PC.

- Step 3. Follow the instructions to put your Apple iPhone XS into Recovery mode. When your Apple iPhone XS is in Recovery mode, the software will begin downloading firmware.

- Step 4. When the process is complete, click “Unlock Now”, and Dr.Fone will start unlocking. After a while, your device will be unlocked, and you can access your device without a passcode.

Unlock your Apple iPhone XS/iPad without a passcode now!
Part 3: The TikTok Method to iPhone Unlocking Without Using a Passcode or Face ID
There has been a viral trend on TikTok about how to unlock your Apple iPhone XS without using a passcode or your face ID, no matter which iPhone model you use. These themes of videos quickly racked up almost 9 million views.
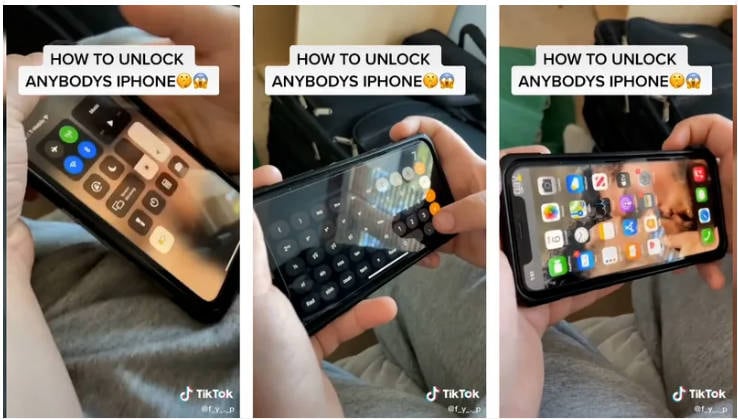
This method states that it can enter your phone camera or calculator from the control panel, then without face ID unlocks, your phone can be used as normal.
The concrete steps of this TikTok viral method are below if you want to have a try. Maybe that’s a practical way for your emergency:
- Step 1: Swipe down on your control center (if you just want to test this way whether it works or not, cover your camera). If you are on an older iPhone 5, iPhone 6, iPhone 7, or iPhone 8, then swipe up.
- Step 2: Turn off your Wi-Fi, Data and Bluetooth, and Cellular data. Then turn on Aeroplane mode.
- Step 3: Next, you can open up the calculator app, which is also accessible from the Control Center and doesn’t require any password or fingerprint ID.
- Step 4: Please flip the phone horizontally to access the scientific calculator and type in a decimal place: 7 + 4 + EE = 280,000.
- Step 5: Turn your phone sideways to enter scientific mode, press “IN,” then Press “Rand.”
- Step 6: Swipe up on your device, and it’s unlocked.
Now you should unlock iPhone without passcode without computer or iTunes!
You May Also Like:
What To Do If You Bought A Locked iPhone?
Bypass iPhone Lock Screen Using Emergency Call
Unlock iPhone If It Doesn’t Happen With Correct Password
Part 4: Click “Erase iPhone” on the Lock Screen
This method may be a better choice for unlocking your Apple iPhone XS than using the TikTok method. It is more secure and reliable, but it works on iOS 15.2 or devices with the latest version. This method can unlock iPhone without computer.

- Step 1: Type a wrong passcode on the Lock Screen.
- Step 2: When the message appears, click “Erase iPhone” and click on it.
- Step 3: Enter your Apple ID credentials.
- Step 4: Click “Erase” to confirm that you want to erase your Apple iPhone XS.
- Step 5: Wait for the process to complete, and your Apple iPhone XS will be unlocked.
Part 5: Use the Voice Control to Unlock iPhone (iOS 13 or later)
The use of Voice Control to unlock iPhone without passcode is a feature available in iOS 13 or later. Voice Control is a feature that lets you navigate your Apple iPhone XS using just your voice. It allows you to unlock your Apple iPhone XS without having to enter a passcode or use Touch ID.
Instead, you can simply say “Hey Siri” followed by a command. Voice Control also allows you to take other actions, such as launching apps and setting reminders.
To use the Voice Control feature to unlock iPhone (iOS 13 or later), you will need to set it up first. To do this, follow these steps:

- Step 1. To set up Voice Control on your Apple iPhone XS, open the Settings app and tap Accessibility.
- Step 2. Tap Voice Control and then tap Set Up Voice Control.
- Step 3. Follow the on-screen instructions to create a voice profile.
When you’re finished, you can use your voice to unlock your Apple iPhone XS. To unlock your Apple iPhone XS:
- Step 1. Say “Hey Siri” followed by “Unlock my iPhone”.
- Step 2. You will then see authenticate using Face ID, Touch ID, or your passcode.
- Step 3. Once you’ve authenticated, your Apple iPhone XS will be unlocked.
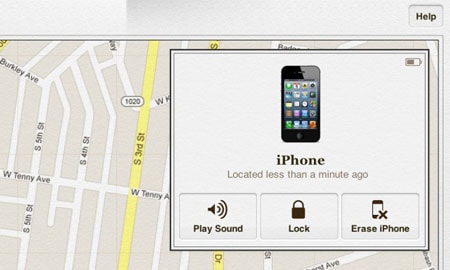
Part 6: How to Unlock iPhone Without a Passcord Using Find My iPhone?
How to unlock iPhone without Siri and passcode using “Find My iPhone” is another method. It just takes several minutes to clean up your device. It securely removes your Apple iPhone XS lock screen without tapping the passcode. If you want to restore your Apple iPhone XS data, this is another great method to enable the features in all terms specifically.
You can perform the steps from your Apple iPhone XS directly to turn on “Find My iPhone.” Follow the below methods for the best result:
- Step 1: Use your computer or someone else’s iOS device, visit icloud.com/find, and sign in with your Apple credentials.
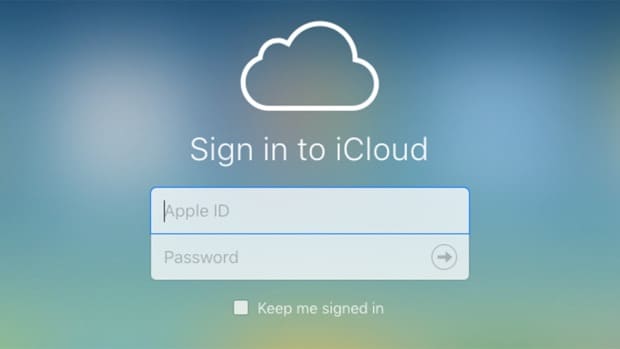
- Step 2: Then, you need to choose the option “All Devices”. If my iPhone is already enabled on your device, you will see your Apple iPhone XS listed. Simply click on it and choose the option “Erase iPhone.” Then all the data, including the passcode, will be removed from your Apple iPhone XS. Thus, this process unlocks the Apple iPhone XS without Siri.
Note: Now, your device will reboot without a passcode. It has a strategy to restore your data and reboot into a new iPhone, thus going for a secret passcode to unlock any iPhone.
Part 7: How to Unlock iPhone Without a Passcode With the Finder or iTunes?
After looking at the maybe-trick way of the TikTok viral method and other unlock ways, an official solution from Apple, we also let you know how to fix the disabled iPhone. This method puts your phone into recovery mode with the help of iTunes or Finder on the computer. However, a small lousy side of this method is that it will erase your data along with the passcode.
Before you start, please ensure you have a computer (Mac or PC). If you’re using a PC, ensure it has Windows 8 or later and that iTunes is installed. Then, just follow the steps below to unlock your Apple iPhone XS without a password with iTunes.
- Step 1: Turn off your Apple iPhone XS through the following methods according to your Apple iPhone XS model.

Notice: If your phone is connected to the computer, please unplug your Apple iPhone XS.
- Step 2: Get ready by finding the button on your Apple iPhone XS, as shown in the pictures below. You’ll need to hold in the following step.

- Step 3: Connect your Apple iPhone XS to the computer where the Finder or iTunes is enabled > Click on iTunes and restore your Apple iPhone XS.

- Step 4: Choose the Restore option when you see a pop-up. Your computer downloads software for your Apple iPhone XS and begins the restore process. If the download takes more than 15 minutes and your device exits the recovery mode screen, let the download finish, turn off your Apple iPhone XS, and start again.
Notice: Before the Finder or iTunes restores your Apple iPhone XS, it will back up the Apple iPhone XS data in iCloud. Thus, you can download the restored files after the Apple iPhone XS device restarts.
Now, you have learned how to unlock a disabled iPhone with iTunes.
Part 8: Try DFU Mode to Bypass iPhone Passcode
DFU mode (Device Firmware Update) is a special mode on an iPhone that allows you to install firmware or software updates. It can also be utilized to bypass the passcode on an iPhone. To use DFU mode to bypass the passcode on an iPhone, follow these steps:
- Step 1. Connect your iDevice to your PC and launch the iTunes app.
- Step 2. Switch off your Apple iPhone XS and press and hold the Home and the Side/Power button for 10 seconds.
- Step 3. Release the Side/Power button, but continue to hold the Home button until iTunes recognizes your Apple iPhone XS in recovery mode.
- Step 4. When your iDevice is in recovery mode, you can use iTunes to restore your Apple iPhone XS and bypass the passcode.
Remember that using DFU mode to bypass your Apple iPhone XS passcode will erase all data from your device.
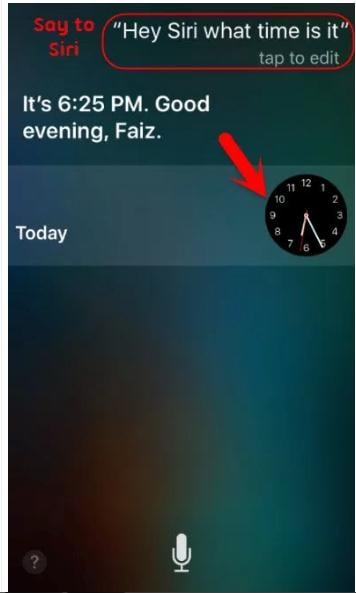
Part 9: How to Unlock iPhone Without Passcode by Tricking Siri?
In this part, we give you the solution to unlock your Apple iPhone XS without a password using Siri. You can consider it a trick or a tip as you wouldn’t be losing your Apple iPhone XS data. It works to give 100% results in even the most tricky situations.
We had a survey for the iOS 10.3.2 and 10.3.3 versions, and Siri certainly ensured one of the best ways to unlock the Apple iPhone XS without a passcode. It’s a simple way, and with it, you will have the possibility to be capable of posting and reading messages on Facebook using this Siri concept.
Let us go through the steps below to learn about how to unlock iPhone without passcode by Siri:
- Step 1: To enable the Siri feature on your Apple iPhone XS device, press and hold the home button. It will immediately activate Siri on your Apple iPhone XS device. Once it gets activated, it is ready to respond to your voice. Now, ask Siri to open the clock to rectify how to unlock a disabled iPhone. Once it displays the clock on your iOS screen, just touch it to proceed.
- Step 2: The World clock appears with the list of tunes you have to select for the alarm clock.
- Step 3: From that option, you will see the tab “buy more tunes” which straight away informs you to reach the iTunes store.
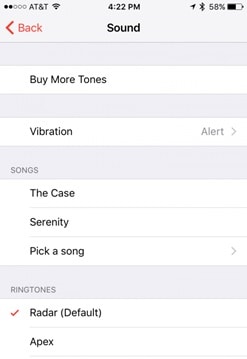
- Step 4: Just click on the home button to go to the phone’s main screen.
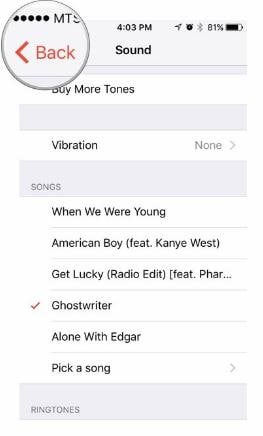
You will see that you can now access your Apple iPhone XS without the passcode as Siri helped unlock iPhone.
Tips: This is only used for iOS 10.3.2 and 10.3.3. If you have updated your iOS system, we recommend you try the previous methods. To make it easier, just use Dr.Fone - Screen Unlock .
FAQs about iPhone Unlock Issues
1. How to unlock iPhone without the Home button?
You can unlock your device without the Home button if you have an iPhone with a Face ID or Touch ID. To unlock iPhone without Home button:
- Step 1: Simply press and hold the Side/Top button along with either the Volume (+ or -) button until the power off slider appears on the screen.
- Step 2: Drag this slider to turn off your Apple iPhone XS completely.
- Step 3: Once it is off, press and hold the Side/Top button until you see the Apple logo.
- Step 4: This will then unlock your device.
2. How to unlock the Apple iPhone XS passcode without data loss?
You can’t unlock an iPhone passcode without losing your data, as doing so would require restoring your device to its factory settings. This will erase all of your personal data, including photos, contacts, and any installed apps. You can use iTunes or iCloud to back up your phone before restoring it.
Once you have backed up your device, you can then restore it using the backup information. That’s how to unlock iPhone without passcode.
3. How to unlock iPhone using the camera?
If you have an older version of iOS (version 9 or earlier), then there is a bug that allows you to unlock your device using the camera. To do this, simply open the Camera app and make sure it’s in selfie mode. Then, hold the Home button until you hear a clicking sound. This will unlock your device without requiring a passcode.
The Bottom Line
Dr.Fone - Screen Unlock (iOS) is a well-known featured software to unlock iPhone without passcode and works instantly after download. We have proven results, and all the methods listed above are user-friendly to the extent that no knowledge of technology is required to unlock the Apple iPhone XS without Siri. We advise you to use Dr.Fone as it will work on your Apple iPhone XS without any damage and give the desired result. However, you may choose any of the above iOS unlocking methods as you see fit.
Forgot Apple iPhone XS Backup Password? Here’s What to Do
Forgetting your Apple iPhone XS backup password can be a real pain. Not only does it mean you can’t access your data, but it also means you can’t restore your phone if something goes wrong.
There are still chances that you could forget your Apple iPhone XS backup password. Fortunately, you have a chance to recover your password. So, if you’re having trouble remembering your Apple iPhone XS backup password, don’t despair. There are still ways to get it back!
Part 1: Overview of iPhone Backup Password
The Apple iPhone XS is secured using a combination that is the backup password. Passwords, Wi-Fi settings, browser history, and health records are sensitive information that an encrypted device may back up.
Remember that this is not the same as your Apple ID or passcode (the sequence you input to unlock the iPhone).
Note:
The encryption of backups is not turned on by default. You will only need to activate the Encrypt Backup option the first time you use either iTunes or Finder. After that, each of your backups will encrypt on its own automatically.
So, if you choose to store your backups in iCloud, it will automatically encrypt all of your data each and every time.
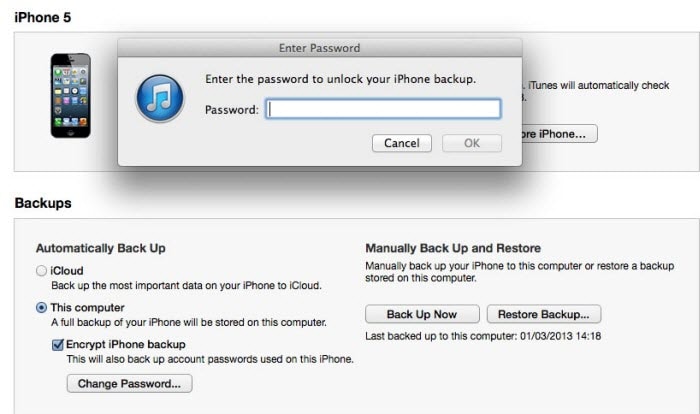
To get the password for the encrypted backup of iTunes:
Step 1: Open iTunes
Launching iTunes is the first thing to do if you have a Mac computer running Mojave 10.14 or an older operating system version. On the other hand, if you use the Mac operating system known as Catalina 10.15, you need to run the Finder application.
Step 2: Link your Apple iPhone XS to your PC
At this point, a USB cable should be used to connect the Apple iPhone XS device to a computer. The next step is to find the widget on your desktop computer or portable device.
Step 3: Begin the Encryption Process
Select the Encrypt Local Backup option in the Backups section directly from either the Summary or General tab of the Backups section.
Step 4: Create a Password
When prompted in the window, create a password for the account. Make it powerful yet that is simple for you to remember. You might also save it somewhere secure to help you recall it later.
After establishing the password, all your previous backups will immediately undergo an automated overwrite and encryption. Make it a priority to ensure that the encryption procedure is finished effectively.
Part 2: 5 Fixes When We Forgot iPhone Backup Password
1. Try all passwords you used on your Apple iPhone XS
The typical method that each individual attempts for the first time is to input all of the available passcodes. Even if it is the most straightforward technique, there is still a possibility that you miss one of them. Therefore, think about all of the passwords you may input, which are listed below.
- The password to log in to the computer
- The password to access Apple ID
- The password to access the encrypted data on the hard disk
- The password to access various websites
- The password to log in to the computer
- Password for the wireless network
- Password for the email account
- Passcode for the administrator
- Passcode for the iPhone
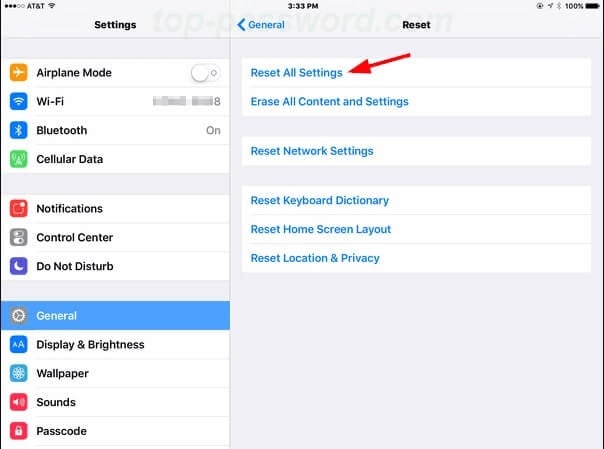
2. “Reset All Settings” via “Settings”
To begin, go to the Settings app on your iOS device, then choose General, followed by Reset.
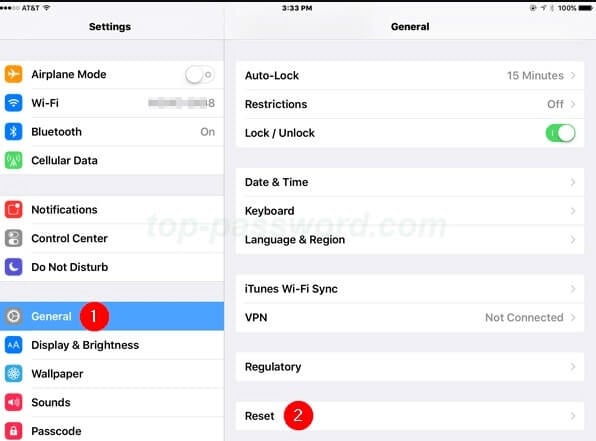
You may now go to Reset All Settings and confirm by entering the security passcode when prompted. Then, your phone will automatically go through the process of resetting and returning to its default settings.
You can also get rid of the password for the last backup without deleting any other apps or data.
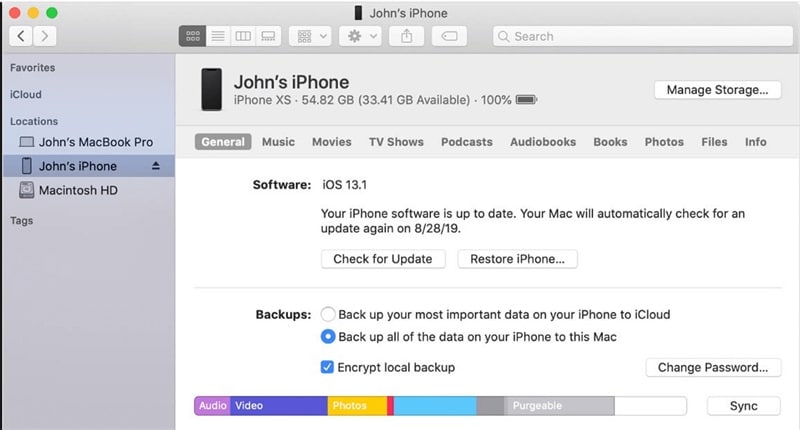
Use a USB cable to link your Apple iPhone XS to your PC. Look at the small iOS icon in the figure below. Just click on it.
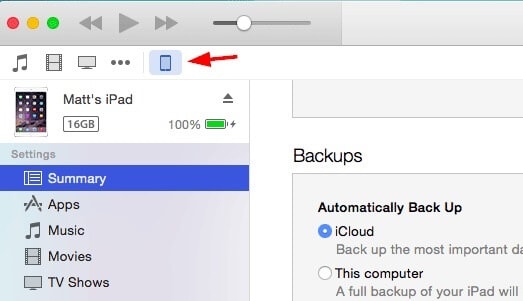
Proceed to the Summary Page and make your selection there for The Computer. After selecting Encrypt Local Backup, you must create a new password. After you have pressed the Backup Now option, wait for iTunes to create a new password for you.
3. Find your password in the macOS keychain
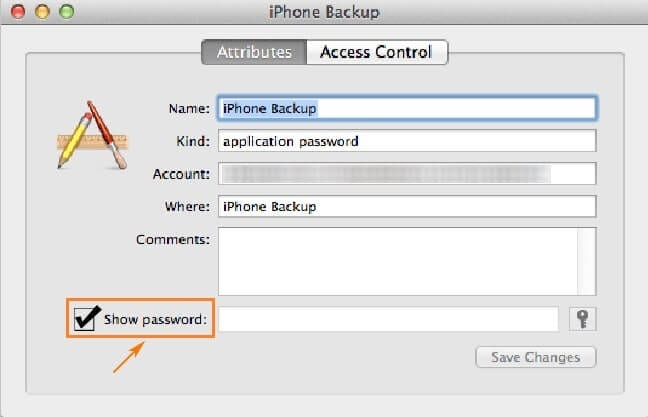
Step 1: Launch Keychain Access by going to Application > Utilities > Keychain Access once your Mac has booted up.
Step 2: Check for a backup of your Apple iPhone XS by entering it into the search box and looking for it there.
Step 3: Double-click the Show Password option, and then choose it from the drop-down menu. After that, type in the password for the keychain. At long last, the password for your Apple iPhone XS backup will be shown.
4. Select “Back Up Now” via iCloud to remove password
If you already have a backup stored in iCloud, you may use iCloud for recovery.
First, power up the gadget and look for the “Hello” screen. If you have previously set up your Apple iPhone XS, you must delete or remove all of the material before continuing.
Navigate to the Apps & Data menu and choose the Restore from iCloud Backup option.
After successfully signing in with your Apple ID, choose Backup.

During the time that the system is being restored, it is essential that the Wi-Fi connection remains active.
5. Dr.Fone-Screen Unlock
With Dr.Fone - Screen Unlock, it’s easy to follow all the steps to get rid of the iTunes backup password.
Step 1: After installing Dr.Fone, open it and look for the red Screen Unlock button.
Step 2: In the Screen Unlock interface, tap Remove iTunes BackUp Encryption in the bottom right corner to move forward.

Step 3: When you get to this page, use a USB cable to connect your iOS device to the PC. If Dr.Fone can find this connection, you will see the picture below.
Before you click Remove Now, please carefully read the following three notes:
- Make sure to turn off Find My iPhone.
- Don’t open iTunes while doing this.
- Your device will reboot

Step 4: Dr.Fone can check your iTunes backup and delete it by itself. This encryption will be erased when the progress bar reaches 100%. This will take a short time to do.

Step 5: The encryption on the iTunes backup has been removed successfully! Now you can easily back up, restore, move, or wipe your device.

Part 3: 3 Tricks to Help You Remember the Passwords
If you have an iPhone, you know it can be tricky to keep track of all your passwords. From your email password to your banking login, there are a lot of different codes to remember.
Here are three tricks to help you keep track of your passwords so you don’t have to stress the next time you can’t log in to your account.
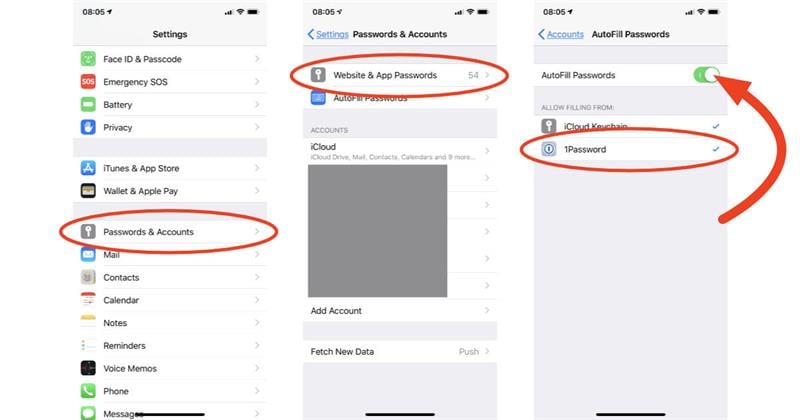
- Turn on “AutoFill” in “Settings”
You can turn on AutoFill in the Settings app. This will allow your Apple iPhone XS to fill in passwords when you visit websites and apps automatically. All you need to do is ensure you’ve entered the correct username and password once, and your Apple iPhone XS will save the information, so you don’t have to enter it again.
- Try iCloud Keychain to keep your passwords
iCloud Keychain is a great way to keep all your passwords in one place. Once you’ve turned on the iCloud Keychain, all your passwords will be synced across your devices. That means if you create a new password on your laptop, it will automatically appear on your Apple iPhone XS.
- Use Notes for passwords
If you’re finding a simple way to keep all your passwords, try using the Notes app. Create a new note and title it “Passwords.” Then, add it to the note whenever you create a new password.
You can even add a description of the password, so you remember which account it’s for.
The Bottom Line
As a last piece of advice, please safely save your newly created passwords. Rather than writing them down in the iPhone’s notepad, you should save the passwords in a secure location.
However, no matter how secure your gadget is, password leakage may happen, sending you to unpleasant situations that you can’t even conceive. It’s best to use Dr.Fone - Screen Unlock as soon as you encounter any problem!
- Title: How To Change Your Apple ID on iPhone XS With or Without Password | Dr.fone
- Author: Amelia
- Created at : 2024-07-15 05:45:01
- Updated at : 2024-07-16 05:45:01
- Link: https://iphone-unlock.techidaily.com/how-to-change-your-apple-id-on-iphone-xs-with-or-without-password-drfone-by-drfone-ios/
- License: This work is licensed under CC BY-NC-SA 4.0.