
How To Fix Auto Lock Greyed Out on iPhone 11 Pro | Dr.fone
How To Fix Auto Lock Greyed Out on Apple iPhone 11 Pro
Auto-lock on iOS devices serves multiple purposes - it conserves battery life, secures your data, and more. But have you encountered the Auto-Lock greyed-out dilemma, fixed at 30 seconds? When this setting becomes inaccessible, it limits your control over screen timeout.
Read on if you’ve encountered a similar problem on your iOS device. In this guide, we’ll explore the possible reasons and offer steps to fix Auto-Lock greyed out on iPhone and iPad devices. If force restarts or settings resets haven’t worked for you, we’ve got alternative solutions. Let’s get started.

Part 1: Why Is Auto-Lock Greyed Out on iOS Device?
There are a few reasons why the Auto-Lock might be greyed out on your Apple iPhone 11 Pro or iPad device, preventing you from adjusting the duration. Here are the most common culprits:
Low Power Mode
When you activate Low Power Mode on your iOS device, you might notice the screen automatically locking after 30 seconds of inactivity. This quick sleep setting, implemented to minimize power usage, explains why the Auto-Lock option appears greyed out and inaccessible.
Screen Time Restrictions
Screen Time restrictions can impact Auto-Lock. For instance, if your downtime schedule blocks all apps, the screen locks itself, even if the Auto-Lock timer hasn’t run out.

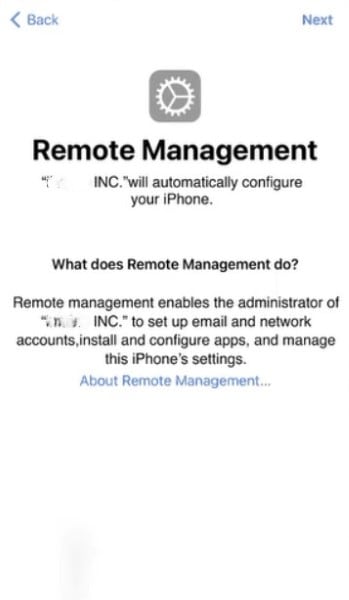
MDM Profile Restrictions
If the Auto-Lock is greyed out on your iPad or iPhone and you use it for work or school, a Mobile Device Management (MDM) profile might be the reason. This profile restricts settings, including Auto-Lock. To fix this, contact your IT administrator and ask if they can adjust the MDM profile settings.
Alright, you know the possible reasons why the Auto-Lock option is not working on your iOS device. Still, you might be wondering how to fix the Auto-Lock greyed-out issue. Below are several ways to get your iPad or iPhone Auto-Lock working normally again.
Fix No.1: Disable Low Power Mode
Your iPhone Auto-Lock greyed out because Low Power Mode limits background activities, including the Auto-Lock option. In this mode, you cannot change the Auto-Lock settings. Turn off Low Power Mode to fix this issue and choose your preferred timeout. Here’s how:
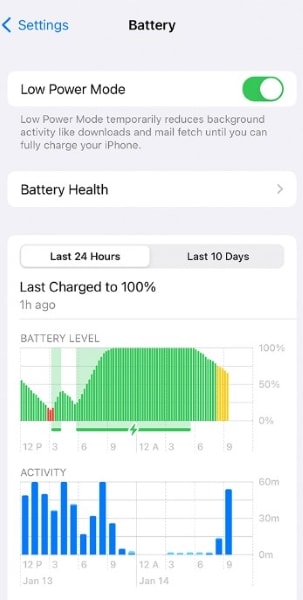
- Step 1: Go to your Apple iPhone 11 Pro or iPad’s Settings app.
- Step 2: Scroll down and tap Battery. It will show you your device’s battery usage and available settings.
- Step 3: Turn off the Low Power Mode. Now, the greyed-out Auto-Lock option in Settings should be available again.

Low Battery Mode can stretch your battery life further. But if you need your screen to stay on longer, like while reading an article or watching a video, you can turn it off. It lets you adjust the screen timeout in Settings so it stays awake for as long as you like.
Fix No.2: Check Screen Time Restrictions
You’ve ruled out the Low Power Mode, but the Auto-Lock greyed out on iPad or iPhone remains. If Low Power Mode isn’t causing the problem, your screen time settings might be the issue. Some app restrictions can limit your screen use to specific times, causing it to lock automatically. Resolve this by removing limits, such as downtime and app restrictions, or turning it off.
- Step 1: Open the Settings app on your iOS device.
- Step 2: Go to Screen Time, then scroll down.
- Step 3: Tap Turn Off Screen Time.

Fix No.3: Remove MDM Configuration Profile
A configuration profile is a file that contains settings and restrictions that can be applied to an iOS device. Organizations, schools, or IT administrators often use it to manage devices remotely and enforce specific configurations. Once installed, the settings within a profile override the Apple iPhone 11 Pro device’s default settings. It can include restrictions related to security, network access, app usage, and more.
Since an MDM configuration profile causes limitations, like the greyed-out Auto-Lock on iPad, removing it can be the solution. Doing so frees your iOS device from external settings imposed by the profile. Then, it could allow you to adjust the Auto-Lock time setting as you normally would.
Step 1: See the configuration profiles you installed on your iOS device.
Go to Settings> General > VPN & Device Management on your Apple iPhone 11 Pro.
Go to Settings> General > Profiles & Device Management on your iPad.
Step 2: Select the configuration profile you need to delete.
Step 3: Tap Remove Profile, enter your device passcode, then tap Remove.

Fix No.4: Remove Network Settings Installed by MDM
Businesses often use Mobile Device Management (MDM) to remotely manage their employees’ iPhones and iPads. MDM lets IT admins push software updates, restrict apps, and remotely wipe a lost device. This keeps corporate data safe and devices under control, whether the company or the employee owns them.
If you’re having trouble with a greyed-out Auto-Lock timeout setting, disassociating your device from MDM might be an option. But remember, this is a big step. Make sure you follow your company’s authorized procedures to avoid unintended consequences.
If your IT team gives the green light, you might also be able to remove the network settings installed by MDM. Just proceed with caution, as messing with these settings could lead to instability or data loss. Here’s how:
- Step 1: Open the Settings app on your iOS device.
- Step 2: Navigate to General > Profile or VPN & Device Management (or a similar section).
- Step 3: Select the management and tap Remove Management.

If the option is unavailable, only the person who used Apple Configurator 2 or handles your company’s mobile device management platform can remove it.
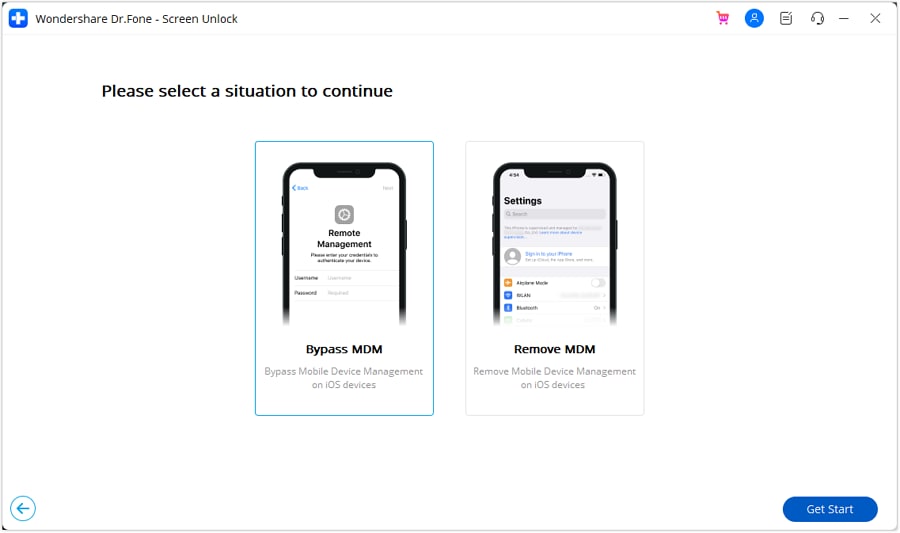
Fix No.5: Use Dr.Fone To Bypass MDM Lock Without Data Loss
Unfortunately, manually removing profiles can be tricky, especially if they’re associated with MDM, Apple School Manager, or supervised configurations. These often require the removal of passwords, admin privileges, or complete data wipes. But there’s good news. Wondershare Dr.Fone - Screen Unlock (iOS) provides a simpler and safer solution.
Here’s why you should try it:
- **Speedy and Efficient:**No more endless troubleshooting. Dr.Fone bypasses the MDM lock in minutes, saving you precious time.
- **Data Stays Safe:**Unlike factory resets, Dr.Fone keeps all your precious photos, messages, and apps right where they belong.
- **No Jailbreaking:**Say goodbye to complex hacks and warranty voiding. Dr.Fone works without jailbreaking your Apple iPhone 11 Pro, keeping it healthy and secure.
- **Universal Compatibility:**Whether you own the latest iPhone with iOS 17 or an older version, Dr.Fone has your back. It supports all iOS devices and versions starting from iOS 7.0.
Have you ever bought a used iPad or Apple iPhone 11 Pro to find the Auto-Lock option greyed out and isn’t working? Mobile Device Management (MDM) profiles, often deployed by companies or schools, can restrict functionality. If you lack the credentials to bypass or remove it, Dr.Fone can help remove all MDM restrictions on your iOS device. Here’s how:
- Step 1: Download and open Dr.Fone on your computer. Next, connect your Apple iPhone 11 Pro or iPad to the computer using a USB cable and navigate to Toolbox > Screen Unlock > iOS.

Tips: Are you searching for a powerful Screen Unlock tool? No worries as Dr.Fone is here to help you. Download it and start a seamless unlock experience!
- Step 2: Within the Screen Unlock tool window, select Unlock MDM iPhone.

- Step 3: Select Bypass MDM, then click Get Start to proceed.
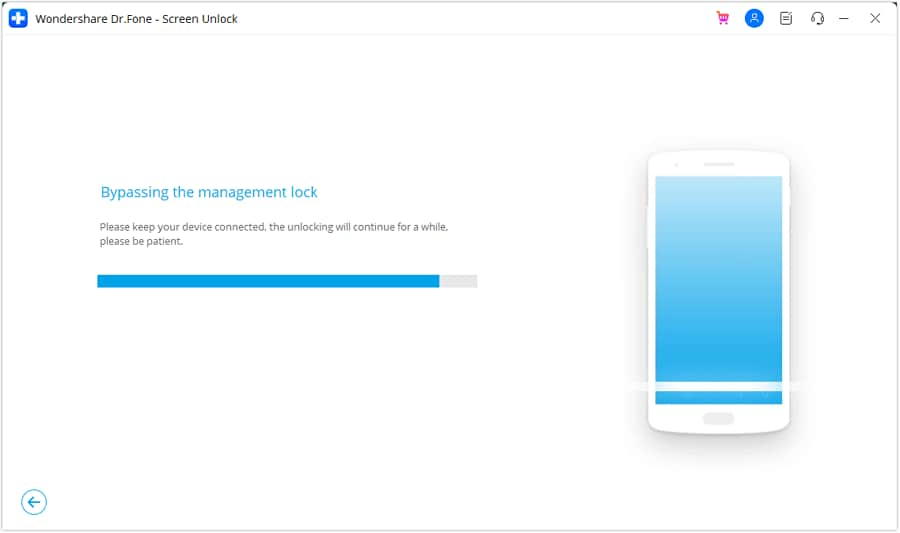
- Step 4: Please review the message carefully before initiating the MDM bypass process. Once you’ve read it, click Start to Bypass to proceed.

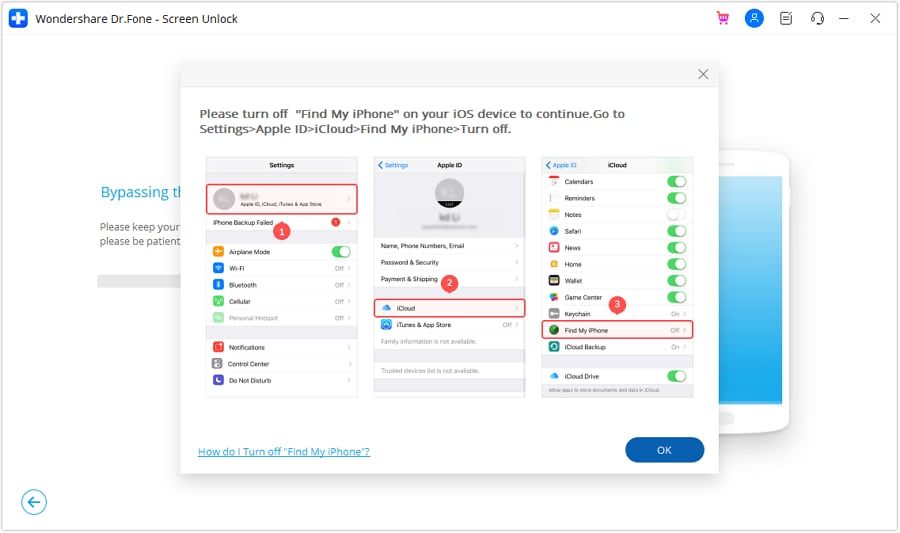
- Step 5: If prompted, go to your device’s Settings > Apple ID > iCloud and turn off the Find My feature. Next, click OK to initiate the MDM bypass.
- Step 6: The software will display the progress of the bypass. Wait for it to complete.
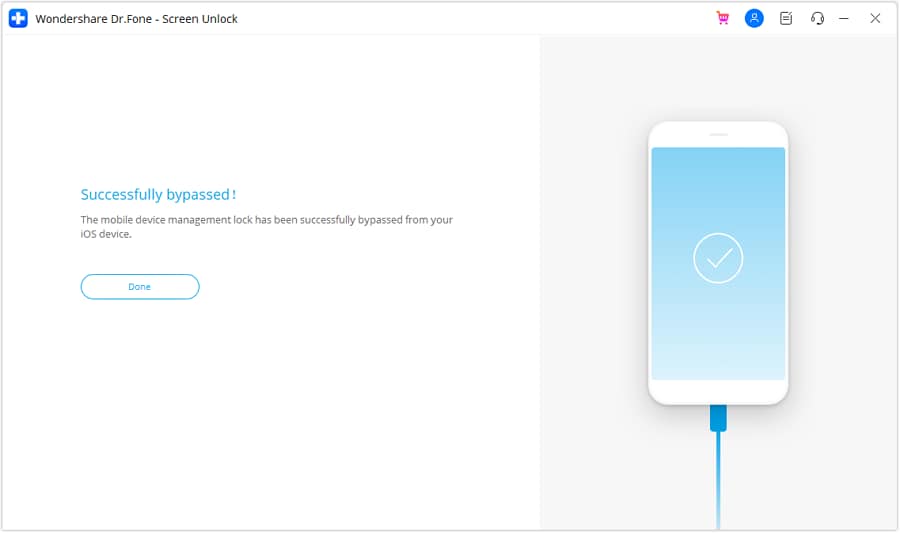
- Step 7: You’ll see a confirmation message once the bypass is successful. Click Done to exit. Your device should now be free from MDM restrictions.
Fix No.6: Check and Adjust Auto-Lock Settings
Once you’ve tried all the fixes above, you might need to set up the Auto-Lock timeout again.
- Setup Auto-Lock on iPad
Here are the steps on how to change Auto-Lock on iPad devices:
- Step 1: Within the Settings app, scroll down the list on the left-hand side and tap Display & Brightness.
- Step 2: On the right-hand side of the Display & Brightness screen, tap the Auto-Lock option.

- Step 3: A list of time options will appear, ranging from 2 minutes to 15 minutes, as well as Never. Select the time you want your iPad to wait before automatically locking the screen after inactivity. If you want the screen to stay on indefinitely, choose Never.

Step 4: Once you’ve selected your preferred auto-lock duration, you can exit the Settings app. The change will be applied automatically.
- Setup Auto-Lock on iPhone
Here’s how to change Auto-Lock on iPhone devices:
- Step 1: Open the Settings app.
- Step 2: Tap on Display & Brightness, scroll down, and tap Auto-Lock.
- Step 3: Choose the desired time interval for your Apple iPhone 11 Pro to automatically lock. The available options typically range from 30 seconds to 5 minutes. You may also have the option to select Never if you prefer to have the screen stay on indefinitely until you manually lock it.

Conclusion
There you have it. This guide has equipped you with the knowledge and solutions to fix the Auto-Lock greyed out on your Apple iPhone 11 Pro or iPad devices. From identifying the reasons like Low Power Mode and MDM configurations to implementing actionable fixes, you can now change your screen timeout. So, turn off those restrictions, remove MDM profiles, and head back to Settings.
For an easy solution, use Dr.Fone Screen Unlock to bypass MDM restrictions, giving you control over your device. Whether it’s a work phone or a personal device under MDM, Dr.Fone can offer an efficient solution. With a few clicks, you’ll have the Auto-Lock back on track, ensuring your iOS device works again just how you want it.
Tips: Are you searching for a powerful Screen Unlock tool? No worries as Dr.Fone is here to help you. Download it and start a seamless unlock experience!
Easy Steps on How To Create a New Apple ID Account On Apple iPhone 11 Pro
Your Apple ID is your gateway to a world of apps and services, making it an essential part of your Apple experience. Whether you’re a new Apple user or simply looking to start fresh, creating a new Apple ID can open the doors to endless possibilities.
This guide will walk you through creating a new account for Apple devices in an easy-to-understand manner. From setting up your email address to securing your account, this article covered you every step of the way. Embark on this journey and learn how to create a new Apple ID account effortlessly.
Part 1: Why Create a New Apple ID?
You might need to create a new Apple ID to enhance your Apple experience. Let’s dive into why it’s a good idea:
A. Reasons for Creating a New Apple ID Account
Here’s a breakdown of the reasons why you should create a new Apple ID for your Apple iPhone 11 Pro:
- Your Apple ID is like your digital identity. Creating a new one lets you choose a unique email address that suits you, adding a personal touch to your Apple journey.
- Maybe you’ve been using an email for your Apple ID that you don’t want to use anymore. Creating a new one helps keep your personal and Apple-related emails separate.
- **Switching Devices.**When you switch to a new Apple device, like getting a new iPhone or iPad, creating a unique Apple ID ensures a fresh start tailored to your new gadget.
- **Separation of Accounts.**Sometimes, you may want to keep your work-related apps and data separate from your ones. Creating a new Apple ID helps you achieve this separation.
- If you’re using Apple services for different purposes, such as work and personal use, having separate Apple IDs can help keep everything organized and distinct.
B. Scenarios Where a New ID Is Needed
Below are the common scenarios where a new Apple ID might be needed:
- **New Apple Device.**When you purchase a new Apple device, like an iPhone or iPad, you’ll need a new Apple ID to set it up and make it truly yours.
- **Shared Device.**If multiple people use the same device, creating a new Apple ID for each user ensures that everyone has their own personalized experience.
- **Change of Email.**If your current email address associated with your Apple ID is changed or you prefer a new one, creating a unique Apple ID with the updated email is the solution.
- **Work and Personal.**To keep your work-related apps and data separate from your personal ones, having separate Apple IDs for each purpose is practical and organized.
- **Starting Fresh.**Sometimes, you might want a fresh start with your Apple experience, and creating a new Apple ID provides a clean slate.
Creating a new Apple ID isn’t just about getting a new email; it’s about tailoring your Apple experience to your needs, whether for personalization, privacy, or organization. Now that you know why it’s essential, let’s explore how to create it in the next section.
Part 2: Step-by-Step Guide: How To Create a New Apple ID Account
Creating a new Apple ID for free is a straightforward process. Let’s break it down into simple steps:
A. Registering a New Apple ID
These are the steps for registering a new Apple ID:
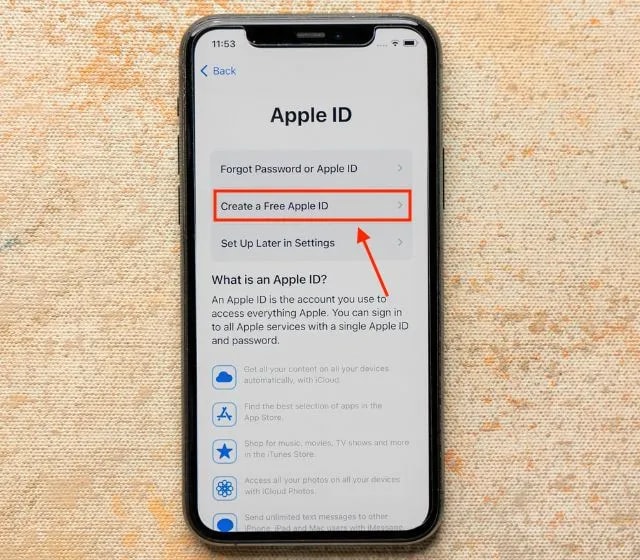
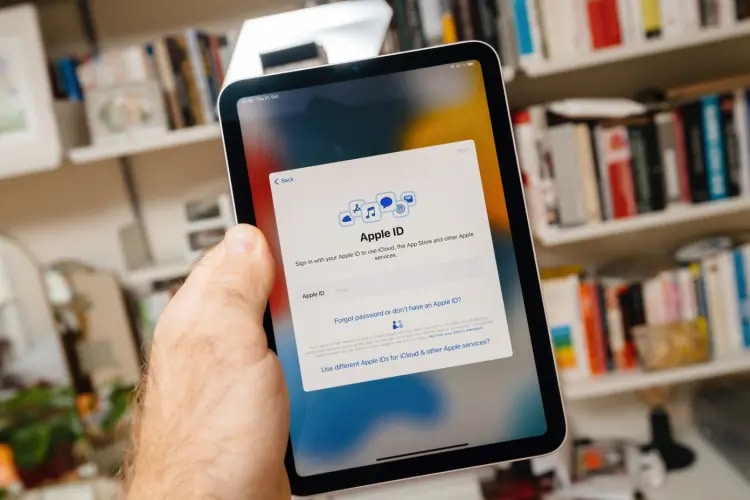
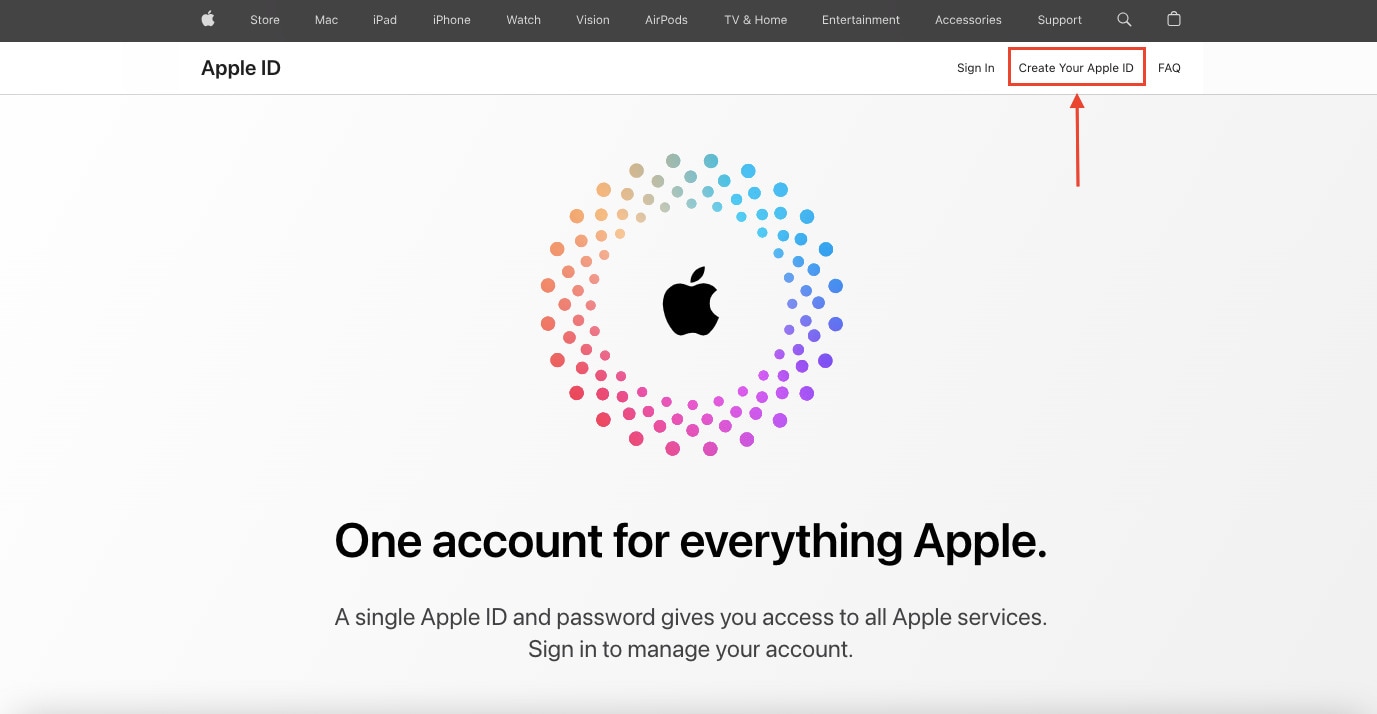
- Step 1: Open your web browser and visit the Apple ID account management page. Click the Create Your Apple ID button to begin.
- Step 2: On the registration page, you’ll be asked to provide your First name and Last name. Make sure to use the name associated with your new Apple ID. Next, you’ll need to enter your preferred email address. This one will be your new Apple ID.
Tip: Choose an email that’s easy to remember and access.
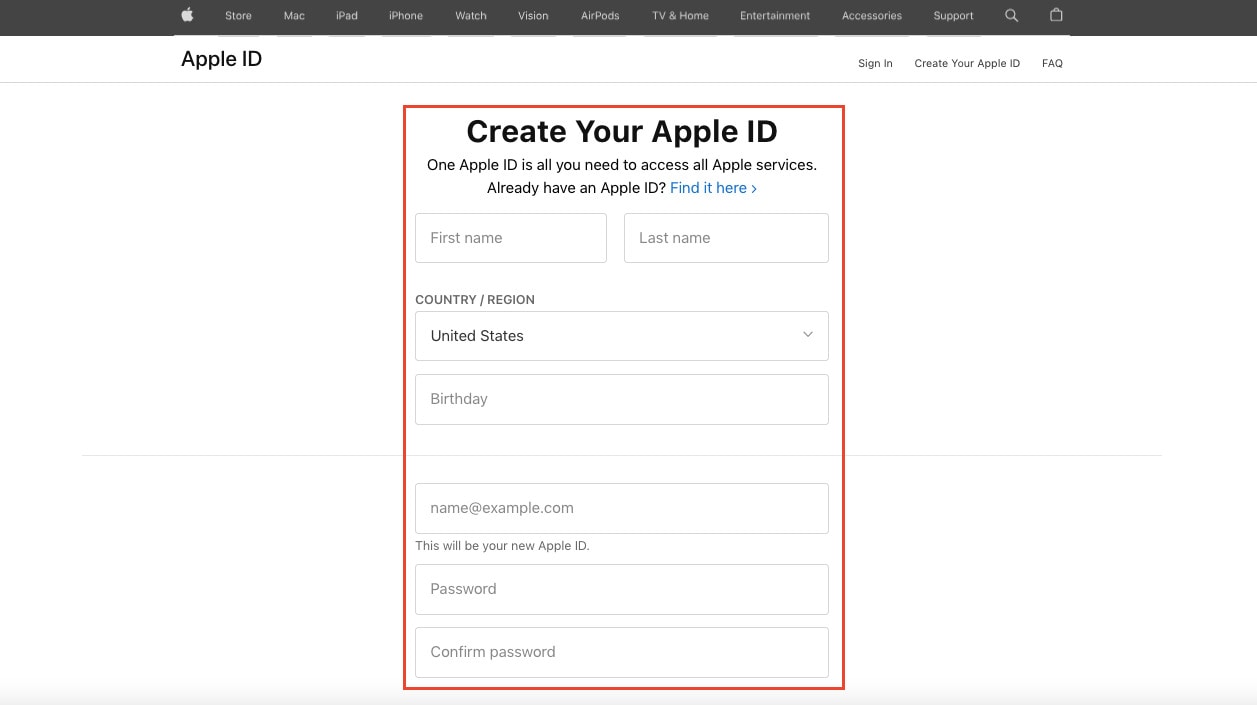
- Step 3: Create a strong password that combines letters, numbers, and symbols. This password is essential for the security of your account, so make it unique and hard to guess. Confirm your password by entering it again in the designated field.
B. Verifying Your Identity
The next step is verifying your identity. Check out the steps below:
- Step 4: Apple takes your security seriously. You may be asked to provide a phone number to verify your identity. This number can be used for account recovery or two-factor authentication. The phone number you provided will receive a verification code. Enter this code in the space provided to confirm your identity.
Note: It’s crucial to ensure that your phone number is accurate and accessible. This number will help you recover your account in case you forget your password or encounter any issues. Apple may use this phone number for two-factor authentication, adding an extra layer of security to your account.
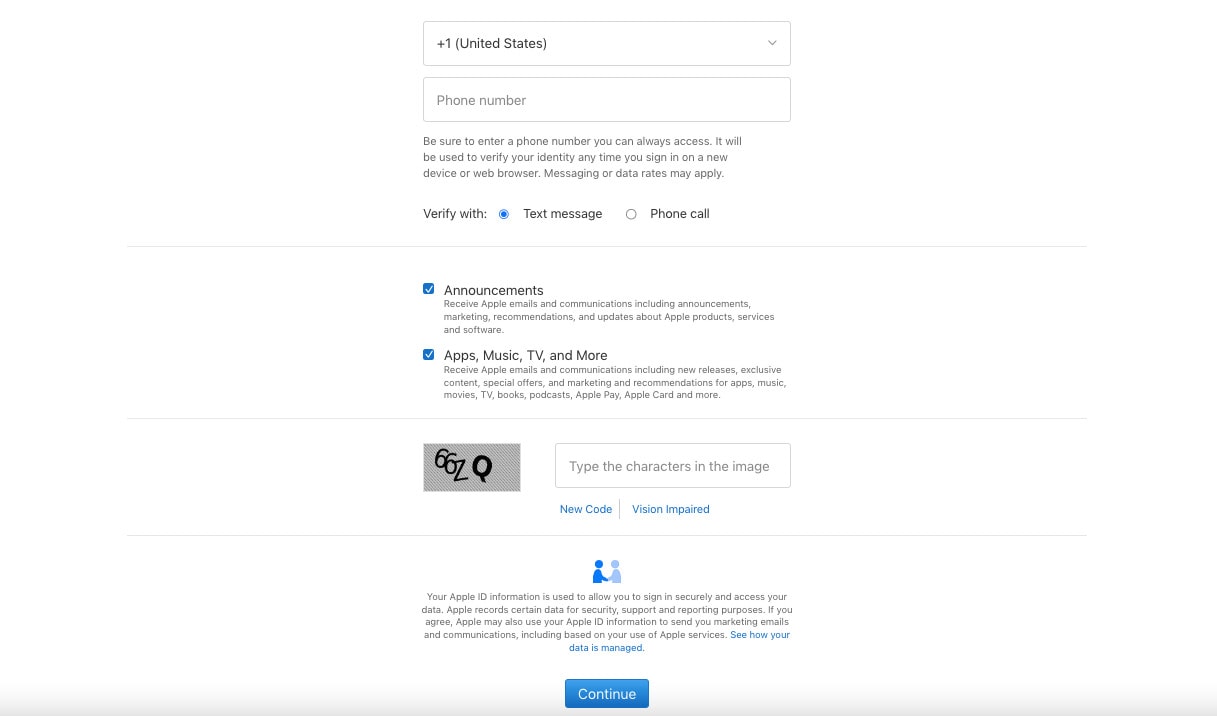
- Step 5: Apple may sometimes ask you to complete a CAPTCHA or verify your identity to prevent automated account creation.
C. Setting Up Security Questions
The next process will be setting up security questions for your account:
- Step 6: Apple asks you to choose and answer security questions. These questions provide an additional layer of protection for your account. Select questions that you can easily remember and that others can’t guess.
D. Finalizing the Process
To finalize the creation process, refer to the steps given below:
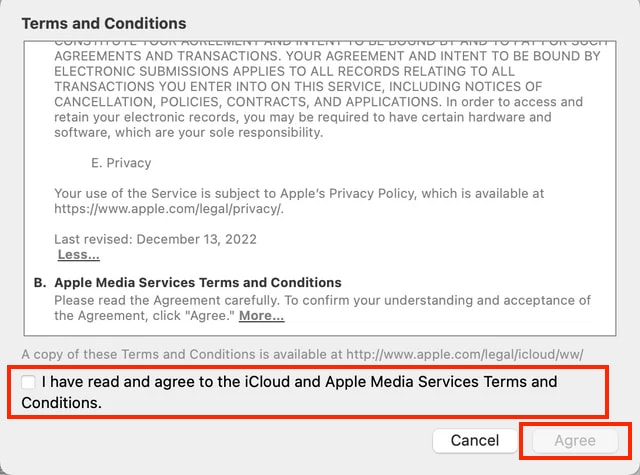
- Step 7: Read through Apple’s Terms and Conditions and Privacy Policy. Once you’ve understood them, tick the box to confirm that you’ve read and agree to the iCloud and Apple Media Services Terms and Conditions. Then click Agree to proceed. Remember that it’s essential to be familiar with Apple’s policies to ensure a secure and smooth experience.
- Step 8: After completing these steps, Apple will send a confirmation email to the address you provided. Go to your email and open the verification link to confirm your new Apple ID.
Congratulations! You’ve successfully created a new Apple ID. With this account, you can now access Apple’s services, including the App Store, iCloud, and more. Remember to keep your login credentials secure and use them to personalize your Apple experience fully.
Part 3: Effortlessly Remove Your Apple ID Using Wondershare Dr.Fone - Screen Unlock (iOS)
You can embark on an enhanced Apple experience after successfully creating your new Apple ID. Removing the previous one is essential when you create it, especially if you’ve acquired a second-hand device or no longer want the previous user’s associated credentials.
This step ensures that your new Apple ID takes center stage, granting you full control over your device and its associated services. But if you encounter difficulties when removing the previous Apple ID from your device, Dr.Fone - Screen Unlock (iOS) is a reliable and user-friendly solution.

Key Features of Dr.Fone - Screen Unlock (iOS)
This versatile tool offers the following key features in the context of Apple ID issues:
- **User-Friendly Interface.**Fone - Screen Unlock (iOS) is designed to be straightforward, making it accessible to users of all levels of technical expertise.
- It is usable with a wide range of iOS devices, ensuring you can remove the previous Apple ID from your device, regardless of the model.
- **Multiple Unlock Modes.**Fone offers various unlock modes to cater to different scenarios, including removing the previous Apple ID. This flexibility ensures that you have the right solution for your specific situation.
- **Data Security.**Fone - Screen Unlock (iOS) prioritizes data security, ensuring that your personal information and content remain intact during the Apple ID removal process.
Step-by-Step Guide on Using Dr.Fone Screen Unlock (iOS)
Check out the steps on how to remove an Apple ID account using Dr.Fone below:
- Step 1: Launch Wondershare Dr.Fone on your PC to use the Screen Unlock function and then navigate to Toolbox. Click the Screen Unlock section, then choose iOS.
- Step 2: If you want to proceed with deleting your Apple ID, you’ll need to go to the next window and select the Remove AppleID option from the menu.
- Step 3: When you hook up your iOS device to a computer, the next screen will report on its connectivity. Select the Unlock Now button to proceed.

- Step 4: Before the Apple ID can be unlocked, the next step is for the platform to ask a series of questions. Verify that a screen lock is active on your iOS device. However, please lock your iOS device before proceeding with the Yes option.

- Step 5: Check if Two-Factor Authentication is set up on all your iOS devices. If not, switch it on before confirming your decision to unlock your Apple ID.

- Step 6: After you have confirmed these settings, you will be taken to a screen with on-screen instructions for entering Recovery Mode on your iDevice. If the steps for your specific iOS device don’t work, try tapping Try DFU Mode in the app’s bottom left corner. To continue with the unlocking process, this will launch the DFU Mode instructions.

- Step 7: Once Recovery Mode has been activated, the Apple iPhone 11 Pro device’s information will be shown on the subsequent screen. Once the Device Model has been identified, all that remains is to choose the appropriate System Version and click Start. However, if there are disagreements in recognition, pick the details by hand and move forward.

- Step 8: The appropriate iOS firmware begins downloading, showing its status on the following screen. Click the Copy button to copy the direct URL to download iOS firmware for systems with sluggish firmware download speeds.
- Step 9: The platform checks the downloaded firmware and displays its details on the following screen. To proceed with unlocking your Apple ID, click the Unlock Now button. To proceed, you will be prompted to input a code into a confirmation window. Enter the code and then click the Unlock button.

- Step 10: The following screen shows the unlocking status of your Apple ID. Don’t let the Apple iPhone 11 Pro device lose its connection under any circumstances. The screen prompts the process of completing the Apple ID once the ID has been unlocked. If the Apple ID has been unlocked, click Done to proceed. If that fails, click the Try Again button and give it another shot.

Conclusion
This guide has simplified the process of creating a new Apple ID, ensuring you can effortlessly personalize, secure, and organize your digital experience. Creating a new Apple ID is easy, and it allows you to tailor your Apple journey to your preferences. Remember, it’s all about you, your privacy, and your convenience.
Should you encounter any challenges while managing your Apple ID, such as removing a previous one, consider Dr.Fone - iOS Screen Unlock tool. This user-friendly resource stands ready to assist, ensuring a seamless and secure Apple experience. Explore the possibilities and make the most of your Apple adventure!
How Do You Unlock your Apple iPhone 11 Pro? Learn All 4 Methods
The Apple Watch symbolizes a world of convenience right on your wrist. Its array of features smoothly integrates into various aspects of our lives. It boosts each aspect, from fitness tracking and connectivity to style and personalization. Whether tracking your heart rate or responding to texts while on the go, the Apple Watch proves helpful.
Yet, there come moments when users might accidentally lock their Apple Watch. It could be due to forgetting a passcode or getting a second-hand locked device. Encountering a locked Apple Watch can be perplexing regardless of the root cause. This article will guide you on how to unlock an Apple Watch.

Part 1. Is It Possible To Unlock the Apple Watch Without a Passcode or Paired Phone?
When it comes to a locked Apple Watch, how to unlock it becomes essential. Unlocking the Apple Watch might seem complicated, especially without a passcode or paired phone. However, rest assured, there are multiple methods available to regain access. These solutions offer diverse perspectives on resolving the issue. It ensures you’re not reliant solely on the passcode or a connected phone to unlock your device.
Part 2. How To Unlock Apple Watch With Passcode or Paired Phone?
Do you have the passcode and your Apple Watch paired with an iPhone? It makes the how do I unlock my Apple Watch process swift and effortless.
- Step 1. Once your Apple Watch and iPhone are nearby, open the Apple Watch app on your Apple iPhone 11 Pro. Here, select the “My Watch” tab, navigate to it, and tap “General.”

- Step 2. Within the “General” tab, press “Reset” and choose “Erase Apple Watch Content and Setting” to start the reset process.

- Step 3. Following this, confirm your action by tapping “Erase All Content and Settings.” Continue to select the same option again as it appears on your Apple iPhone 11 Pro. If Find My is enabled for your Apple Watch, you will be prompted to enter your Apple ID and password. On adding the required details, select “Erase” to conclude the process.

Pro Tip. Make Apple Watch Unlocking Easy With Paired Phone
If you frequently forget the passcode to your Apple Watch, Apple has presented a dedicated option for maintaining control of this problem. It now provides a specific option of automatically unlocking the Apple Watch as soon as it comes near the paired iPhone. To enable this option, follow the simple steps provided as follows:
Instructions. Open the “My Watch” app on your Apple iPhone 11 Pro and scroll down to discover the “Passcode” option. Continue next and look for the “Unlock iPhone” option you need to enable.

Part 3. Working Methods To Unlock Apple Watch Without Passcode Perfectly
Apple Watch security features can manifest in various forms. Understanding these diverse forms of locks on your Apple Watch is essential. It allows you to employ specific operational methods to bypass these locks. Discussed below are three ways how to unlock the Apple Watch without passcode:
Way 1. Unlock Apple Watch Activation Lock Using Third-Party Service
When faced with an Activation Lock on your Apple Watch, accessing the watch might seem challenging. Activation Lock is commonly triggered when the Apple iPhone 11 Pro device is connected to an Apple ID and iCloud account.
Nevertheless, external services claim to provide solutions for bypassing the Activation Lock, specifically on Apple Watches. One such service is provided by Apple iPhone Unlock. These are the steps to bypass the Activation Lock on the Apple Watch:
- Step 1. Access the Apple iPhone Unlock website using a browser on another device. On the website, place the cursor on “Unlock iPhone” and choose “Apple Watch” from the drop-down menu.

- Step 2. Choose your “Country,” along with the network service provider. Next, enter the IMEI number of your Apple Watch and click “Unlock for any SIM Card.” Afterward, follow the prompts on the screen to complete the process.

Way 2. Unlock the Apple Watch Lock by Resetting
If you forget your Apple Watch passcode without a paired device, a method to unlock the watch remains available. In this scenario, performing a reset becomes the answer to the question of how to unlock Apple Watch without paired phone. Place your watch onto its charger and keep charging until this process is complete. Follow these steps to reset your Apple Watch and bypass the lock:
- Step 1. Press and hold the “Side” button until the Power menu appears. As it appears, press and hold the “Digital Crown” button of your Apple Watch.

- Step 2. Stop holding when the reset menu appears on the screen of the Apple Watch. Tap the “Reset” button on the bottom of the screen to execute the entire process.

Way 3. Unlocking Apple Watch Activation Lock by Contacting Previous Owner
Losing access to your Apple Watch goes beyond just forgetting the passcode; purchasing a used Apple Watch can also lead to being locked out. In this scenario, you can encounter an Activation Lock. Reaching out to the previous owner is a direct and often effective solution.
By contacting the previous owner, you can request them to remove the Apple iPhone 11 Pro device from their iCloud account. Here’s the procedure they can follow to unlock your Apple Watch, resulting in the Activation Lock bypass:
- Step 1. Access the iCloud website via a web browser and sign in using the Apple ID. Click on the grid icon near the top right corner and select “Find My.”

- Step 2. Once there, choose your Apple Watch from the “All Devices” list. Opt for “Erase This Device” from the Apple iPhone 11 Pro device’s pop-up menu. Finally, adhere to the on-screen instructions to finalize the process.

Bonus Tip. Unlock Your Locked iPhone With Wondershare Dr.Fone - Screen Unlock (iOS)
Like the Apple Watch, other Apple devices, such as iPhones, may also encounter locking issues. One such reliable and trusted tool to unlock various types of locks on iOS devices is Wondershare Dr.Fone . This tool is highly proficient and is designed to assist users worldwide in unlocking various iOS devices.
Dr.Fone offers a user-friendly interface coupled with powerful features. This makes it a go-to solution for resolving iPhone lock issues. That ensures versatility in resolving locking issues across a wide range of devices.
Prominent Features of Wondershare Dr.Fone
- Fone eliminates the iCloud activation lock , requiring no password.
- Should your Apple ID password slip your mind, Dr. Fone enables the removal of the ID from your device.
- Additionally, it bypasses the encryption lock on iTunes backups while keeping the data inside intact.
Steps To Unlock Your Locked iPhone With Wondershare Dr.Fone
Dr.Fone, preferred by iOS users for its user-friendly interface and straightforward processes, has risen to the top. Unlocking your locked iPhone using Wondershare Dr.Fone involves the following steps:
- Step 1. Launching Dr.Fone and Initiating Device Unlock
Upon installing Wondershare Dr.Fone on your computer, launch the program. Access the “Toolbox” and navigate to “Screen Unlock”. Select “iOS” as the Apple iPhone 11 Pro device type and then choose “Unlock iOS Screen.” Click “Start” to commence the unlocking process for your iOS device.

- Step 2. Entering Recovery Mode and Firmware Preparation
Follow the on-screen instructions to put your iDevice into Recovery Mode. The platform will automatically detect and display the Apple iPhone 11 Pro device Model. Adjust the model or System Version if necessary, and once done, click “Start.” Track the iOS firmware download progress on the next screen.
- Step 3. Firmware Validation and Device Unlocking
Ensure the downloaded iOS firmware is validated. Click “Unlock Now” to initiate the unlocking process, enter the required code, and tap “Unlock” to proceed. Upon unlocking, click the “Done” button to complete the process.

Conclusion
In summary, this comprehensive guide navigated how do you unlock an Apple Watch. It addressed diverse scenarios, such as Activation Locks and forgotten passcodes . These strategies offer solutions for varied situations, from leveraging third-party services to collaborating with previous owners. Additionally, it recognizes the need for unlocking tools like Wondershare Dr.Fone.
Tips: Are you searching for a powerful iPhone Unlock tool? No worries as Dr.Fone is here to help you. Download it and start a seamless unlock experience!
Also read:
- [Updated] From Backdrops to Blending Understanding Green Screen Technology
- 2024 Approved Keep Your Snaps Alive – Strategies for Longevity
- 2024 Approved Step-by-Step Guide IPhone Picture Perfection
- Creating Cinematic Experiences on a Dime: A Look at Budget HTS Starter Packs
- Expert Tips for LUT Integration in Premiere Projects
- Forgot Locked Apple iPhone 14 Pro Max Password? Learn the Best Methods To Unlock | Dr.fone
- How To Unlock Stolen Apple iPhone 12 Pro Max In Different Conditionsin | Dr.fone
- In 2024, How To Bypass the Required Apple Store Verification For Apple iPhone XS | Dr.fone
- In 2024, How To Change Country on App Store for Apple iPhone 15 Pro With 7 Methods | Dr.fone
- In 2024, How to Turn Off Find My iPhone XS when Phone is Broken? | Dr.fone
- Ricoh Theta SC2 Review
- Title: How To Fix Auto Lock Greyed Out on iPhone 11 Pro | Dr.fone
- Author: Amelia
- Created at : 2025-01-23 18:27:56
- Updated at : 2025-01-24 16:11:48
- Link: https://iphone-unlock.techidaily.com/how-to-fix-auto-lock-greyed-out-on-iphone-11-pro-drfone-by-drfone-ios/
- License: This work is licensed under CC BY-NC-SA 4.0.