
How To Fix Auto Lock Greyed Out on iPhone 13 | Dr.fone
How To Fix Auto Lock Greyed Out on Apple iPhone 13
Auto-lock on iOS devices serves multiple purposes - it conserves battery life, secures your data, and more. But have you encountered the Auto-Lock greyed-out dilemma, fixed at 30 seconds? When this setting becomes inaccessible, it limits your control over screen timeout.
Read on if you’ve encountered a similar problem on your iOS device. In this guide, we’ll explore the possible reasons and offer steps to fix Auto-Lock greyed out on iPhone and iPad devices. If force restarts or settings resets haven’t worked for you, we’ve got alternative solutions. Let’s get started.

Part 1: Why Is Auto-Lock Greyed Out on iOS Device?
There are a few reasons why the Auto-Lock might be greyed out on your Apple iPhone 13 or iPad device, preventing you from adjusting the duration. Here are the most common culprits:
Low Power Mode
When you activate Low Power Mode on your iOS device, you might notice the screen automatically locking after 30 seconds of inactivity. This quick sleep setting, implemented to minimize power usage, explains why the Auto-Lock option appears greyed out and inaccessible.
Screen Time Restrictions
Screen Time restrictions can impact Auto-Lock. For instance, if your downtime schedule blocks all apps, the screen locks itself, even if the Auto-Lock timer hasn’t run out.

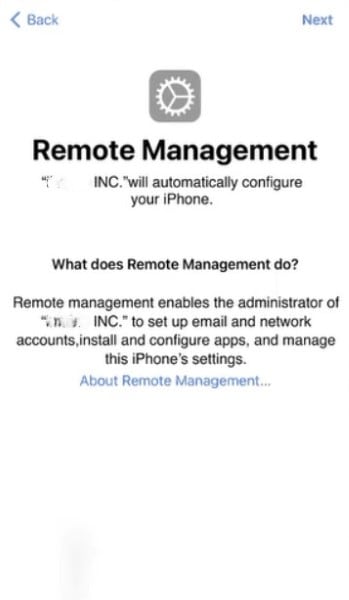
MDM Profile Restrictions
If the Auto-Lock is greyed out on your iPad or iPhone and you use it for work or school, a Mobile Device Management (MDM) profile might be the reason. This profile restricts settings, including Auto-Lock. To fix this, contact your IT administrator and ask if they can adjust the MDM profile settings.
Alright, you know the possible reasons why the Auto-Lock option is not working on your iOS device. Still, you might be wondering how to fix the Auto-Lock greyed-out issue. Below are several ways to get your iPad or iPhone Auto-Lock working normally again.
Fix No.1: Disable Low Power Mode
Your iPhone Auto-Lock greyed out because Low Power Mode limits background activities, including the Auto-Lock option. In this mode, you cannot change the Auto-Lock settings. Turn off Low Power Mode to fix this issue and choose your preferred timeout. Here’s how:
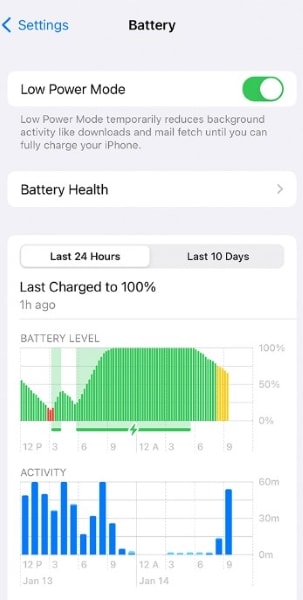
- Step 1: Go to your Apple iPhone 13 or iPad’s Settings app.
- Step 2: Scroll down and tap Battery. It will show you your device’s battery usage and available settings.
- Step 3: Turn off the Low Power Mode. Now, the greyed-out Auto-Lock option in Settings should be available again.

Low Battery Mode can stretch your battery life further. But if you need your screen to stay on longer, like while reading an article or watching a video, you can turn it off. It lets you adjust the screen timeout in Settings so it stays awake for as long as you like.
Fix No.2: Check Screen Time Restrictions
You’ve ruled out the Low Power Mode, but the Auto-Lock greyed out on iPad or iPhone remains. If Low Power Mode isn’t causing the problem, your screen time settings might be the issue. Some app restrictions can limit your screen use to specific times, causing it to lock automatically. Resolve this by removing limits, such as downtime and app restrictions, or turning it off.
- Step 1: Open the Settings app on your iOS device.
- Step 2: Go to Screen Time, then scroll down.
- Step 3: Tap Turn Off Screen Time.

Fix No.3: Remove MDM Configuration Profile
A configuration profile is a file that contains settings and restrictions that can be applied to an iOS device. Organizations, schools, or IT administrators often use it to manage devices remotely and enforce specific configurations. Once installed, the settings within a profile override the Apple iPhone 13 device’s default settings. It can include restrictions related to security, network access, app usage, and more.
Since an MDM configuration profile causes limitations, like the greyed-out Auto-Lock on iPad, removing it can be the solution. Doing so frees your iOS device from external settings imposed by the profile. Then, it could allow you to adjust the Auto-Lock time setting as you normally would.
Step 1: See the configuration profiles you installed on your iOS device.
Go to Settings> General > VPN & Device Management on your Apple iPhone 13.
Go to Settings> General > Profiles & Device Management on your iPad.
Step 2: Select the configuration profile you need to delete.
Step 3: Tap Remove Profile, enter your device passcode, then tap Remove.

Fix No.4: Remove Network Settings Installed by MDM
Businesses often use Mobile Device Management (MDM) to remotely manage their employees’ iPhones and iPads. MDM lets IT admins push software updates, restrict apps, and remotely wipe a lost device. This keeps corporate data safe and devices under control, whether the company or the employee owns them.
If you’re having trouble with a greyed-out Auto-Lock timeout setting, disassociating your device from MDM might be an option. But remember, this is a big step. Make sure you follow your company’s authorized procedures to avoid unintended consequences.
If your IT team gives the green light, you might also be able to remove the network settings installed by MDM. Just proceed with caution, as messing with these settings could lead to instability or data loss. Here’s how:
- Step 1: Open the Settings app on your iOS device.
- Step 2: Navigate to General > Profile or VPN & Device Management (or a similar section).
- Step 3: Select the management and tap Remove Management.

If the option is unavailable, only the person who used Apple Configurator 2 or handles your company’s mobile device management platform can remove it.
Fix No.5: Use Dr.Fone To Bypass MDM Lock Without Data Loss
Unfortunately, manually removing profiles can be tricky, especially if they’re associated with MDM, Apple School Manager, or supervised configurations. These often require the removal of passwords, admin privileges, or complete data wipes. But there’s good news. Wondershare Dr.Fone - Screen Unlock (iOS) provides a simpler and safer solution.
Here’s why you should try it:
- **Speedy and Efficient:**No more endless troubleshooting. Dr.Fone bypasses the MDM lock in minutes, saving you precious time.
- **Data Stays Safe:**Unlike factory resets, Dr.Fone keeps all your precious photos, messages, and apps right where they belong.
- **No Jailbreaking:**Say goodbye to complex hacks and warranty voiding. Dr.Fone works without jailbreaking your Apple iPhone 13, keeping it healthy and secure.
- **Universal Compatibility:**Whether you own the latest iPhone with iOS 17 or an older version, Dr.Fone has your back. It supports all iOS devices and versions starting from iOS 7.0.
Have you ever bought a used iPad or Apple iPhone 13 to find the Auto-Lock option greyed out and isn’t working? Mobile Device Management (MDM) profiles, often deployed by companies or schools, can restrict functionality. If you lack the credentials to bypass or remove it, Dr.Fone can help remove all MDM restrictions on your iOS device. Here’s how:
- Step 1: Download and open Dr.Fone on your computer. Next, connect your Apple iPhone 13 or iPad to the computer using a USB cable and navigate to Toolbox > Screen Unlock > iOS.

Tips: Are you searching for a powerful Screen Unlock tool? No worries as Dr.Fone is here to help you. Download it and start a seamless unlock experience!
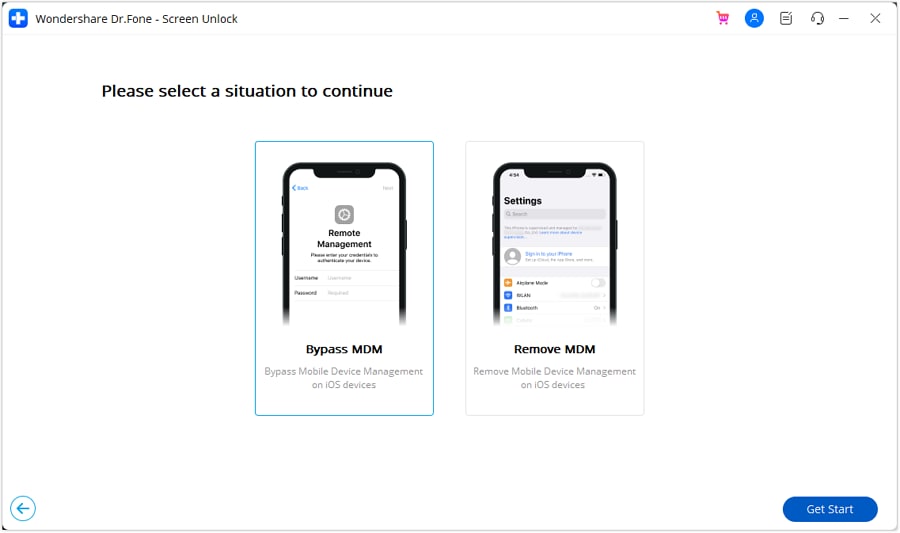
- Step 2: Within the Screen Unlock tool window, select Unlock MDM iPhone.

- Step 3: Select Bypass MDM, then click Get Start to proceed.
- Step 4: Please review the message carefully before initiating the MDM bypass process. Once you’ve read it, click Start to Bypass to proceed.

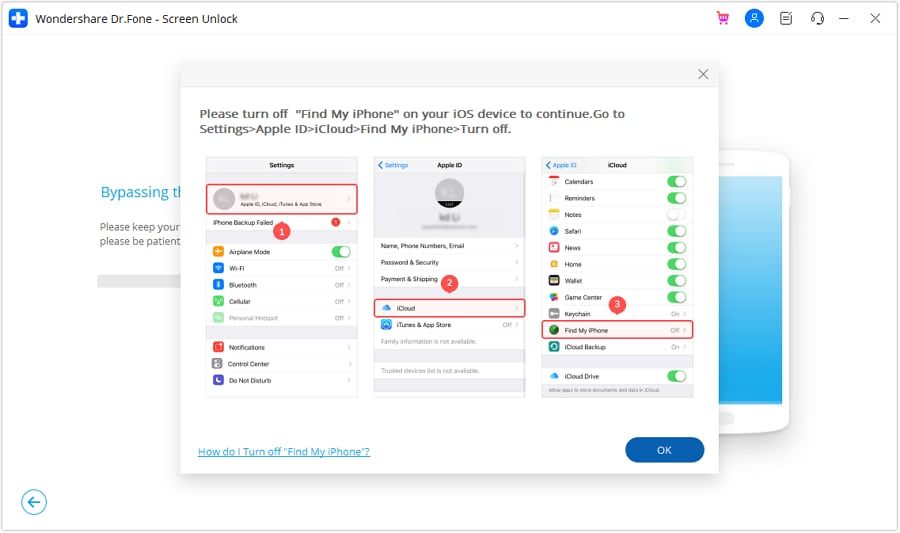
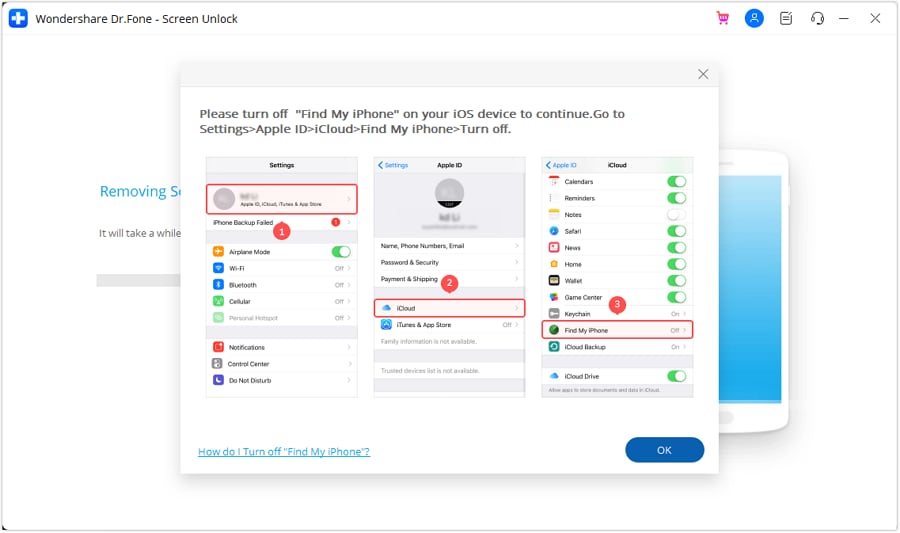
- Step 5: If prompted, go to your device’s Settings > Apple ID > iCloud and turn off the Find My feature. Next, click OK to initiate the MDM bypass.
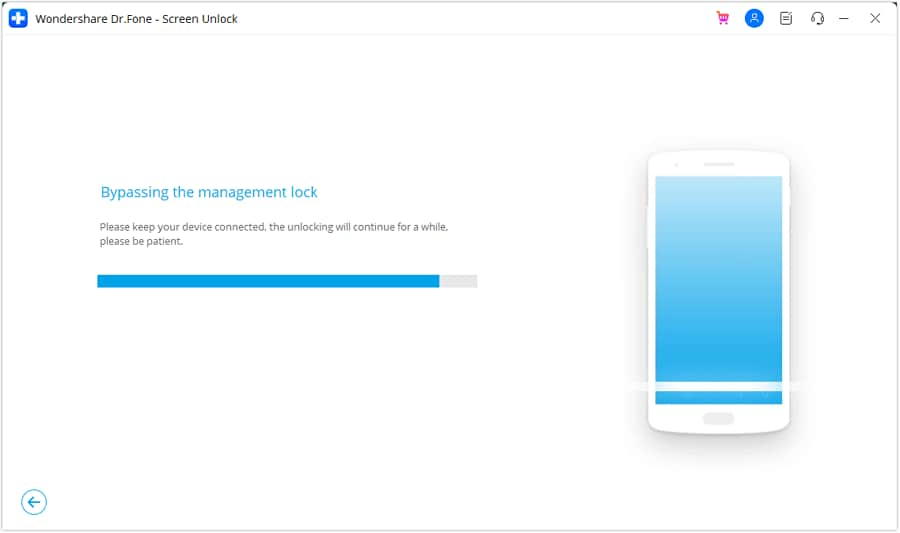
- Step 6: The software will display the progress of the bypass. Wait for it to complete.
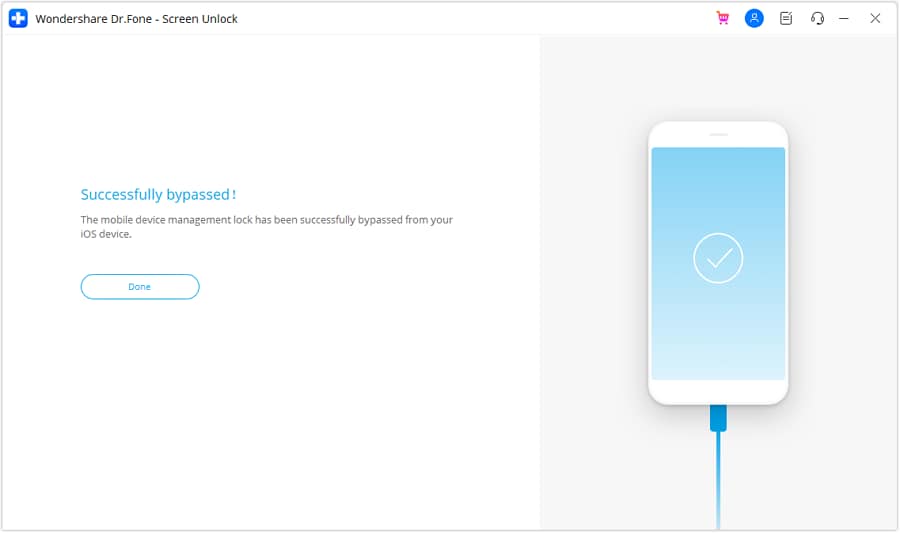
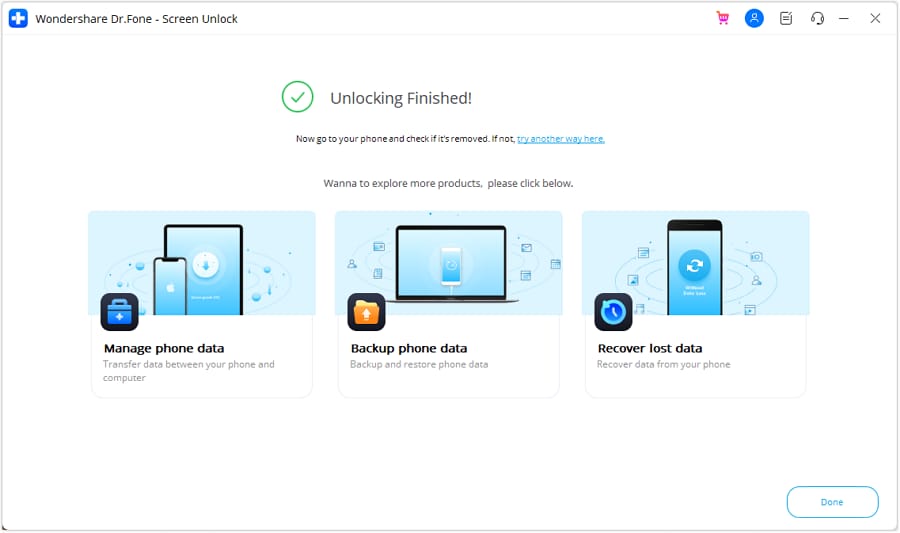
- Step 7: You’ll see a confirmation message once the bypass is successful. Click Done to exit. Your device should now be free from MDM restrictions.
Fix No.6: Check and Adjust Auto-Lock Settings
Once you’ve tried all the fixes above, you might need to set up the Auto-Lock timeout again.
- Setup Auto-Lock on iPad
Here are the steps on how to change Auto-Lock on iPad devices:
- Step 1: Within the Settings app, scroll down the list on the left-hand side and tap Display & Brightness.
- Step 2: On the right-hand side of the Display & Brightness screen, tap the Auto-Lock option.

- Step 3: A list of time options will appear, ranging from 2 minutes to 15 minutes, as well as Never. Select the time you want your iPad to wait before automatically locking the screen after inactivity. If you want the screen to stay on indefinitely, choose Never.

Step 4: Once you’ve selected your preferred auto-lock duration, you can exit the Settings app. The change will be applied automatically.
- Setup Auto-Lock on iPhone
Here’s how to change Auto-Lock on iPhone devices:
- Step 1: Open the Settings app.
- Step 2: Tap on Display & Brightness, scroll down, and tap Auto-Lock.
- Step 3: Choose the desired time interval for your Apple iPhone 13 to automatically lock. The available options typically range from 30 seconds to 5 minutes. You may also have the option to select Never if you prefer to have the screen stay on indefinitely until you manually lock it.

Conclusion
There you have it. This guide has equipped you with the knowledge and solutions to fix the Auto-Lock greyed out on your Apple iPhone 13 or iPad devices. From identifying the reasons like Low Power Mode and MDM configurations to implementing actionable fixes, you can now change your screen timeout. So, turn off those restrictions, remove MDM profiles, and head back to Settings.
For an easy solution, use Dr.Fone Screen Unlock to bypass MDM restrictions, giving you control over your device. Whether it’s a work phone or a personal device under MDM, Dr.Fone can offer an efficient solution. With a few clicks, you’ll have the Auto-Lock back on track, ensuring your iOS device works again just how you want it.
Tips: Are you searching for a powerful Screen Unlock tool? No worries as Dr.Fone is here to help you. Download it and start a seamless unlock experience!
How To Open Your Apple iPhone 13 Without a Home Button
Accidents happen, and sometimes they take a toll on your Apple iPhone 13’s essential components, like the Home button. Whether it’s a drop, spill, or wear and tear, a damaged Home button can be a problem over time. The frustration peaks when you find yourself locked out, and at a loss.
But fear not, for there are ways to unlock an iPhone without a Home button. This guide explores ways how to open an iPhone without a Home button. In case of a Home button malfunction, explore these quick and easy fixes for a reliable workaround. Read on to learn more.

Part 1. 7 Ways To Unlock iPhone Without Home Button
If your Apple iPhone 13’s Home button is out of commission, don’t worry. There are several ways to regain access to your device. Let’s explore seven methods on how to unlock an iPhone without a Home button.
Method 1: Unlock the Apple iPhone 13 Without the Home Button via Touch ID
If your device supports Touch ID, you can use your fingerprint to unlock it. Follow the steps:
- Step 1: Head to Settings > Touch ID & Passcode. Next, tap Add a Fingerprint.

- Step 2: Follow the on-screen instructions to set up Touch ID.
_Note__:_ Please be aware that this approach is effective only when you can still navigate through your Apple iPhone 13’s settings. If that’s not the case, proceed to the following method.
Method 2: Unlock the Apple iPhone 13 Without the Home Button via the Rest Finger to Open
Building upon the initial method, this resolution is effective only if you have previously configured Touch ID. To unlock an iPhone without using the Home button, you can activate the Rest Finger to Open feature. Ensure that Touch ID is permitted for unlocking your Apple iPhone 13, and then follow the steps below:
- Step 1: Go to Settings > General > Accessibility > Home Button.

Step 2: Toggle the switch next to Rest Finger to Open to enable this feature.
Method 3: Unlock the Apple iPhone 13 Without the Home Button via AssistiveTouch
The alternative solution for how to open an iPhone without the Home button but with AssistiveTouch. The feature is designed to simplify iPhone usage. It allows various actions without pressing the Home button or other physical buttons. Here’s how.
- Step 1: Go to Settings > General > Touch > Accessibility, and activate AssistiveTouch. The action will display the AssistiveTouch menu button on your screen.

- Step 2: A floating grayscale button will emerge on your screen after verification. Tap on it. A contextual menu will display, offering options to emulate the functions of your Home button.

- Step 3: Tap Customize Top Level Menu under Assistive Touch and choose Home. The action will guide you to the Apple iPhone 13 passcode screen. From here, you can input your passcode to unlock the Apple iPhone 13 without using the Home button.
Method 4: Unlock iPhone Without Home Button via Dedicated Tool
Unlocking your Apple iPhone 13 without a functional home button becomes effortless with Wondershare Dr.Fone - Screen Unlock (iOS). It’s a specialized tool designed to handle various lock screen issues. Here’s a comprehensive list of key features to get you started:
- **Remove all types of Lock Screens.**Fone Screen Unlock (iOS) can bypass various lock screen types, including passcodes, Touch ID, and Face ID.
- **Bypass Apple ID without a password.**If your Home button is compromised, and you can’t enter the Apple ID password, Dr.Fone can bypass it.
- The tool is compatible with all iPhones equipped with a Home button, ensuring versatility across multiple iPhone models.
- **High success rate.**The platform boasts a high success rate in unlocking devices and follows a straightforward 3-step process.
How To Unlock iPhone Without Home Button With Dr.Fone
Dr.Fone - Screen Unlock (iOS) simplifies the process of unlocking your Apple iPhone 13 without a functional Home button. Follow the steps below:
- Step 1: Visit the official Dr.Fone website and download software. Install the software on your computer and launch it. Next, click Toolbox > Screen Unlock > iOS. Connect your Apple iPhone 13 using a USB cable and choose Unlock iOS Screen. Ensure the software recognizes your device.

- Step 2: Click Start and follow the on-screen instructions. Dr.Fone will automatically detect your device and provide the appropriate firmware package for download. Confirm and proceed.

- Step 3: Once the firmware is downloaded, Dr.Fone will verify it. Confirm the details and click Unlock Now to begin the unlocking process. Follow the on-screen instructions once more.

- Step 4: The software will remove the lock screen from your Apple iPhone 13. Click Try again if your Apple iPhone 13 is still locked. Otherwise, click the Done button. After successful unlocking, set up your Apple iPhone 13 as new. You can now unlock your Apple iPhone 13 without the Home button.

Method 5: Unlock iPhone via Erase iPhone Features (iOS 15.2)
With iOS 15.2, Apple introduced the Erase iPhone feature, aiding users in resetting devices with forgotten passcodes. The functionality applies to iPhones connected to the network with a broken Home button. Compatible devices include iPhone 6 series, iPhone SE series, and newer models. However, it comes at the cost of erasing all content and data on the Apple iPhone 13 device. Follow the steps:
- Step 1: Power on your Apple iPhone 13 by tapping the Power button, then enter the wrong passcode multiple times until the Erase iPhone button appears at the bottom right corner of the screen.

- Step 2: Tap the Erase iPhone button and input your Apple ID passcode to initiate the process. Once the Apple logo displays on your Apple iPhone 13 screen, you can now access your device without the need for a passcode.
_Note__:**_**Keep in mind that all previous content and data on the phone will be erased during this operation.
Method 6: Unlock iPhone via iTunes/Finder
For Mac or Windows users, both Finder and iTunes can unlock your Apple iPhone 13 without the Home button. Windows or Mac Mojave users are recommended to use iTunes. Mac Catalina and newer users should use Finder. Before using iTunes or Finder, it’s advisable to back up your Apple iPhone 13 on iCloud. Here’s how to proceed:
- Step 1: Put your Apple iPhone 13 in the recovery mode and connect it to the computer. Launch Finder or iTunes for Windows or Mac Mojave users.

- Step 2: A window in Finder will prompt you to choose between restoring or updating; click Restore. Confirm your action by tapping Restore again. Upon completion, your Apple iPhone 13 will be unlocked without the Home button.
Method 7: Unlock iPhone via iCloud
If none of the methods work or Dr.Fone is unavailable to you for some reason, then you can use iCloud. To unlock your Apple iPhone 13 without the Home button, visit iCloud.com and sign in with your Apple ID. Next, go to Find My iPhone, select your device, and choose Erase iPhone to unlock it remotely.

Part 2. What To Do if Your Home Button Is Broken
When faced with a broken iPhone Home button, several quick fixes and solutions can sometimes help. Here are some effective measures before considering professional assistance:

Recalibrate the Home Button
Go to Settings > General > Accessibility and toggle the Bold Text switch. Restart your Apple iPhone 13, and this may recalibrate the Home button.
Restore iPhone Firmware
In extreme cases, restoring the iPhone firmware can resolve Home button issues. Tools like Dr.Fone offer a comprehensive solution to restore firmware and address various lock screen challenges.
Clean the Home Button
Dust and debris can affect the Home button’s functionality. Gently clean the area around the button using a small, soft brush or compressed air.
Use the Charger to Press Against the Home Button
This unconventional method involves using the charging cable to apply gentle pressure on the Home button. Be cautious to avoid excessive force.
Visit the Apple Store if Covered by a Warranty
If your Apple iPhone 13 is still under warranty, visiting an Apple Store is advisable. Apple’s warranty covers hardware issues, including malfunctioning Home buttons.
Conclusion
A broken iPhone Home button need not spell disaster. Embrace the solutions discussed and try the best solution available. Enable AssistiveTouch, recalibrate the Home button, clean the area, or even visit an Apple Store if under warranty.
For a comprehensive fix, consider Dr.Fone Screen - Unlock iOS if data loss is a concern. The tool can easily handle unlocking an iPhone without a functioning Home button. It ensures a hassle-free experience. Pick the method that meets your needs best, and regain full access to your device. The power to unlock an iPhone without a Home button is within your grasp.
Tips: Are you searching for a powerful Screen Unlock tool? No worries as Dr.Fone is here to help you. Download it and start a seamless unlock experience!
Disabling Apple iPhone 13 Parental Restrictions With/Without Password
Among smartphones, the Apple iPhone 13 is well known for its quality and reliability. It is celebrated for its elegant design, robust capabilities, and exceptional security attributes. This device holds innovation within the smartphone industry. Among its array of security features lies the parental controls. These are a specialized set of features and settings crafted to aid parents.
It allows them to manage their children’s access to certain content and functionalities. This article aims to go through the details of how to disable parental controls on iPhones. It will offer a range of methods catering to both scenarios: disabling parental controls with and without a password. Moreover, it will feature an in-depth exploration of the most effective method to disable parental control.

Part 1. Defining Parental Controls on iPhone and Why People Want To Disable/Remove It?
Parental controls on an iPhone refer to features designed to allow parents to track various aspects of the Apple iPhone 13 device’s usage. These controls aim to provide younger users with a safer, more regulated digital experience. They include a range of functions, such as screen time limits and app restrictions. Moreover, content filtering and purchase controls also fall under parental control.
Primarily, parental controls serve as a protective measure. They enable parents to safeguard their children from potential online dangers. These include inappropriate content and excessive screen time. It turns out valuable for managing a child’s interaction with digital devices.
Why Do People Want To Disable/Remove Parental Control?
Parental controls can be a great way to manage children’s digital lives. However, there are equally good reasons why users seek how to remove restrictions on iPhone without passcode:
1. Age Appropriateness
As children grow older, they may desire increased independence and responsibility. Parental controls might become restrictive or unnecessary. This leads to the desire for removal to grant them more freedom.
2. Technical Glitches or Restrictions
Sometimes, parental control settings might malfunction or impose unintended restrictions. This can hamper the Apple iPhone 13 device’s regular functionality. Users seek removal to rectify these technical issues.
3. Privacy Concerns
Older users may find parental controls intrusive or overly restrictive. These can affect their privacy and autonomy. Disabling these controls allows for a personalized and private user experience.
4. Change in Circumstances
Situations change, and what was once appropriate may no longer apply. Families might undergo changes in dynamics or rules. This can prompt the need to adjust or remove parental controls accordingly.
Part 2. [With Password] How To Disable Parental Controls on iPhone?
Do you have the password to access parental control settings on your Apple iPhone 13? The process of disabling these controls becomes straightforward. Here, we present 2 distinct methods for how to remove parental controls on iPhone:
Way 1. By Turning Off Screen Time Settings
Accessing Screen Time settings allows you to manage and disable parental controls. This method is recommended if you have the passcode. Follow these steps to know how to turn off restrictions on your Apple iPhone 13 with the password:
- Step 1. To disable Screen Time settings, navigate to “Settings” and select “Screen Time.” On the following screen, choose “Content & Privacy Restrictions” under the “Restrictions” section.

- Step 2. Now, switch the slider next to “Content & Privacy Restrictions” to turn it off. It will disable all parental control on the targeted device. However, before it disables, the Apple iPhone 13 will prompt for the Screen Time passcode, which needs to be added.

Way 2. By Resetting the Entire iPhone
Resetting the entire settings of your Apple iPhone 13 is a drastic but effective method. It can disable parental controls by removing all settings, including restrictions and passcodes. Note that this process will erase personalized settings on your device. However, it does not delete data like photos, videos, or apps. Below are the steps on how to remove parental controls iPhone by resetting:
- Step 1. You will need to access the “General” tab within Settings of your Apple iPhone 13. Here, scroll down and tap “Transfer or Reset iPhone.” On the following screen, tap the “Reset” option.

- Step 2. From the available options, after tapping “Reset,” choose “Reset All Settings.” You will be asked to provide the passcode to successfully reset your Apple iPhone 13 and disable parental control settings.

Part 3. [Without Password] How Do You Disable Parental Controls on iPhone?
Disabling parental controls on an iPhone is still possible, even without the password. Below, we explore two methods that can be used to bypass parental controls without requiring a password.
Way 1. Wondershare Dr.Fone - Screen Unlock (iOS)
Removing a Screen Time passcode without the associated passcode can be challenging. Utilizing Wondershare Dr.Fone presents a potential solution. It is a robust tool that tackles a range of iOS-related problems. You will discover it as a convenient method to surpass the limitations imposed by Screen Time.
Among its functions, Wondershare Dr.Fone - Screen Unlock (iOS) caters to resolving passcode-related concerns. This also includes the removal of Screen Time passcodes. The best thing about using Dr.Fone to remove the Screen Time passcode is that it bypasses the lock without data loss. Along with Screen Time passcodes, Dr.Fone is also an expert in unlocking various screen locks.
Notable Features of Wondershare Dr.Fone
- It lets users bypass MDM on their iOS devices without losing their data.
- If your iOS device is stuck at the iCloud Activation Lock, Dr.Fone bypasses this lock without requiring a passcode.
- For those facing issues with forgotten Apple ID passwords, Dr.Fone facilitates the removal of Apple ID from devices.
Steps To Disable Parental Controls on iPhone via Wondershare Dr.Fone
Forgetting passwords, be it Screen Time lock or device screen lock, can be a stress-inducing experience. Following are the steps for how to turn off parental controls without a password:
- Step 1. Access Unlock Screen Time Passcode
To initiate the procedure, open Wondershare Dr.Fone on your computer. Navigate to “Toolbox,” tap “Screen Unlock,” and choose “iOS” as the Apple iPhone 13 device type. On the following screen, choose “Unlock Screen Time Passcode.” Establish a USB connection between your iOS device and the computer before commencing.

- Step 2. Start Unlocking by Disabling Find My Feature
Upon connecting the Apple iPhone 13 device, the platform will detect the iDevice and showcase its status on the screen. Afterward, you are required to proceed by clicking on the “Unlock Now” button. However, it is necessary to deactivate the Find My service as indicated in the prompt. Navigate to your Apple iPhone 13’s Settings and select the Apple ID at the top of the settings menu. Access the “Find My” settings and toggle off the “Find My iPhone” feature.
- Step 3: Complete Screen Time Passcode Removal Process
Upon completion, confirm by clicking “OK” on the computer screen. The progress bar on the screen indicates the progress of unlocking the screen time passcode process. When the Apple iPhone 13 device is unlocked, the platform will present a confirmation message. To conclude the entire process, click on the “Done” button.
Way 2. Restore iPhone From iTunes
Restoring an iPhone using iTunes is an alternative method for removing parental controls. iTunes is a multimedia management software that is developed by Apple. It provides various functions, including media playback and data synchronization. The most important function is the Apple iPhone 13 device backup and restoration. Restoring your Apple iPhone 13 via iTunes results in the complete erasure of all data and settings. Here is how to disable restrictions on iPhones without password:
- Step 1. Ensure that iTunes has been updated to the most recent version before opening the application. Connect your Apple iPhone 13 to the computer and grant iTunes permission to recognize the Apple iPhone 13 device. After detecting the Apple iPhone 13 device, access the “Summary” tab by tapping the Apple iPhone 13 device icon in iTunes. You can access the “Backups” section to create any backup before restoring.

- Step 2. Afterward, initiate the Apple iPhone 13 restoration by selecting “Restore iPhone.” A menu box will appear, asking you to create a “Back Up” or not. Choose the preferred option, and another dialog box will appear, alerting you about the deletion of all content and settings on your Apple iPhone 13. You should proceed by clicking “Restore” to confirm. Then, follow the on-screen instructions to finalize the process.

Conclusion
In summary, this article explored how to disable restrictions on iPhones without a password and with a password. Accessing settings with a passcode simplifies the process. Wondershare Dr.Fone stands out as the optimal solution for those seeking how to delete parental controls without password. When passcode access is limited, Dr.Fone – Screen Unlock (iOS) offers the most efficient solution.
Tips: Are you searching for a powerful iPhone Unlock tool? No worries as Dr.Fone is here to help you. Download it and start a seamless unlock experience!
Also read:
- [New] 2024 Approved Cracked The Full Screen Hurdle in OBS
- [New] In 2024, TikTok Audio Integrity Overcoming Silent Intervals in Videos
- [New] Rewind and Repeat Mastering YouTube Inversion
- [Updated] 2024 Approved Prime Safe Video Meeting Software Rankings for SMEs
- [Updated] Effortless Solutions for Instagram Video Archiving for 2024
- [Updated] Expert Tips for Capturing and Storing Facebook Messages for 2024
- [Updated] Identifying Excellent Video Production Experts for 2024
- [Updated] Premium Sound to Text Converters
- 5 Most Effective Methods to Unlock iPhone 13 Pro Max in Lost Mode | Dr.fone
- Disabling iPhone 13 Parental Restrictions With/Without Password | Dr.fone
- How to Unlock Apple iPhone 15 Pro? | Dr.fone
- In 2024, Complete Guide on Unlocking Apple iPhone 6s Plus with a Broken Screen? | Dr.fone
- In 2024, How to Bypass iPhone 15 Pro Max Passcode Easily Video Inside | Dr.fone
- iPhone Is Disabled? Here Is The Way To Unlock Disabled iPhone XS Max | Dr.fone
- The Ultimate Guide to Converting Videos for VR Headsets
- Title: How To Fix Auto Lock Greyed Out on iPhone 13 | Dr.fone
- Author: Amelia
- Created at : 2024-12-17 19:37:53
- Updated at : 2024-12-22 00:18:52
- Link: https://iphone-unlock.techidaily.com/how-to-fix-auto-lock-greyed-out-on-iphone-13-drfone-by-drfone-ios/
- License: This work is licensed under CC BY-NC-SA 4.0.