
How to Make the Most of Your iPhone X Lock Screen with Notifications? | Dr.fone
How to Make the Most of Your Apple iPhone X Lock Screen with Notifications?
The Apple iPhone X lock screen has certainly changed a lot over the last few updates of iOS. Not only it provides an added security to the Apple iPhone X device, but with iPhone lock screen notifications, we can also save our time and efforts. With the introduction of iOS 18, we can also see a change in iPhone lock screen with notifications as well. To help you make the most out of lock screen notifications iPhone, we have come up with this ultimate guide. Read on and know all sorts of things you can do with iPhone notification lock screen.
Part 1: How to use iPhone lock screen notifications?
When it comes to iPhone lock screen with notifications, there are so many things that you can do. For instance, here are a handful of things you can do with iPhone lock screen notifications.
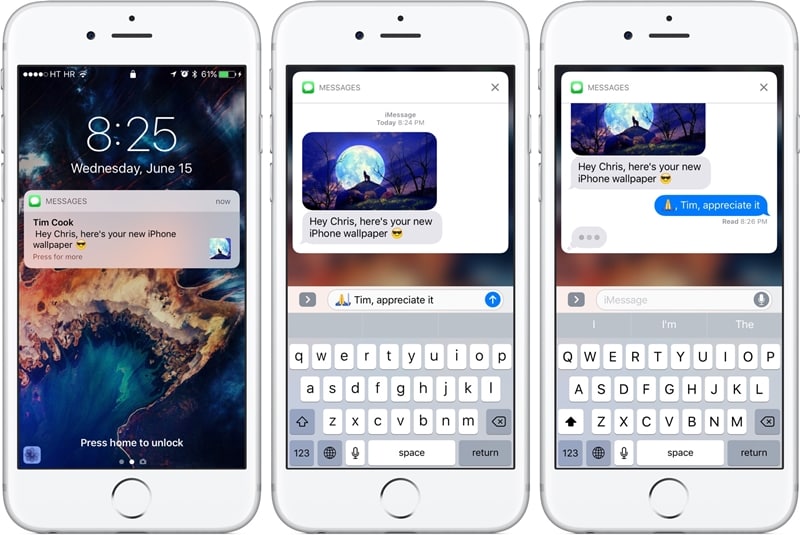
Reply to messages quickly
If you aren’t using this iPhone notification lock screen feature, then you are certainly missing out on something. You might already know that you can get a preview of messages on your home screen. Simply long press it (or 3D Touch) to interact with it. From here, you can reply to your messages without unlocking your device.
Interact with apps without unlocking your phone
Not just your messages, you can interact with other apps as well right from the lock screen notifications iPhone. After getting a list of notifications, you can simply tap on the “x” button to close them.
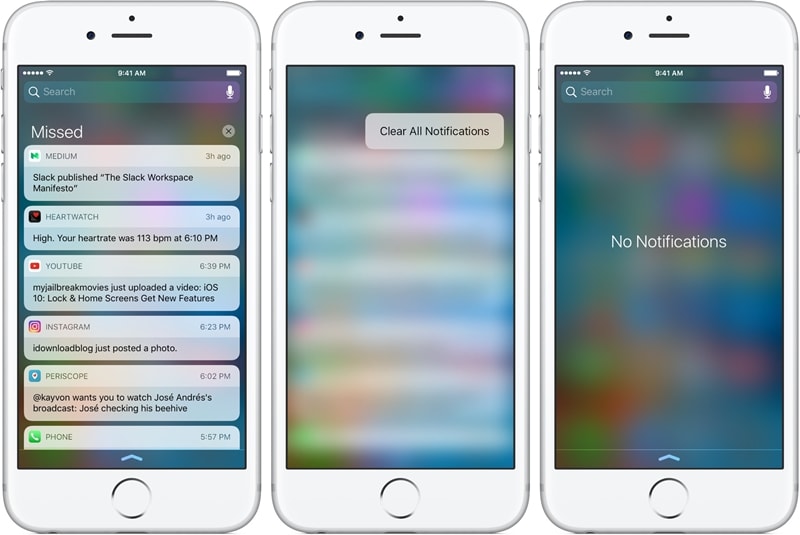
Though, if you want to know more, then just long press the notification. For instance, if you have got a notification for an email, then you can get various options just by long pressing it.

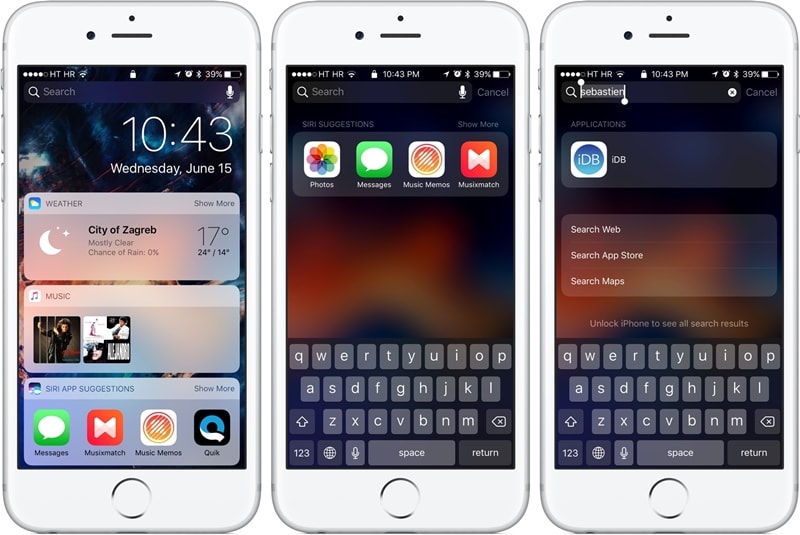
Search for anything
Besides interacting with widgets and apps, you can also search for something on your device and that too without unlocking it. Simply tap on the search bar to make it work.
Part 2: How to turn off notifications on iPhone lock screen?
Sometimes, people can access our private information just by looking at our notifications. In this way, they can get read your crucial information and that too without unlocking your device. By simply visiting your device’s settings, you can customize iPhone lock screen with notifications. In this way, you can turn on or off iPhone lock screen notifications for the apps of your choice.
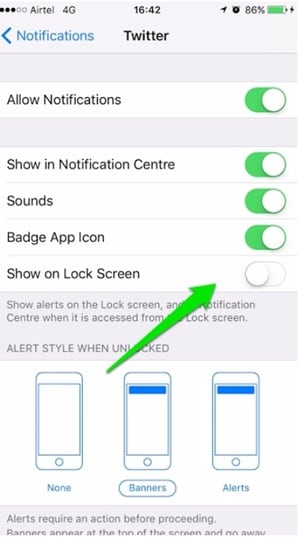
1. Unlock your device and go to its Settings > Notifications to access all the features related to its notifications.
2. From here, you can view a list of all the apps that can access notifications.
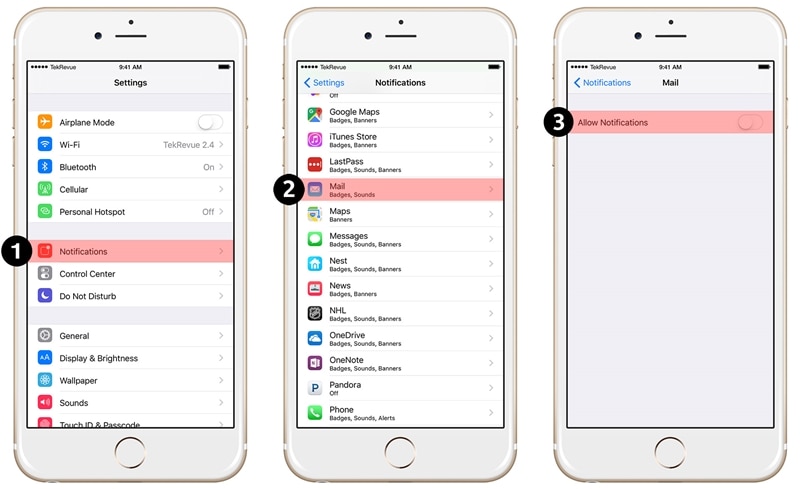
3. Simply tap on the app of your choice (Mail, Message, Photos, iTunes, etc).
4. From here, turn off the option of “Allow Notification” to completely turn off the notifications for the app.
5. If you simply want to turn off notifications on lock screen, then switch off the option of “Show on Lock Screen”.
Besides that, there are a few other options as well that you can either enable or disable to customize your lock screen notifications iPhone.
Part 3: How to turn off notification view on iPhone lock screen?
The notification view can be used to see previous notifications on the Apple iPhone X device without unlocking it. Needless to say, most of the users don’t like to include this iPhone notification lock screen feature. To turn off the notification view of iPhone lock screen notifications, follow these steps:
1. Firstly, unlock your device and got to its Settings > Touch ID & Passcode option.
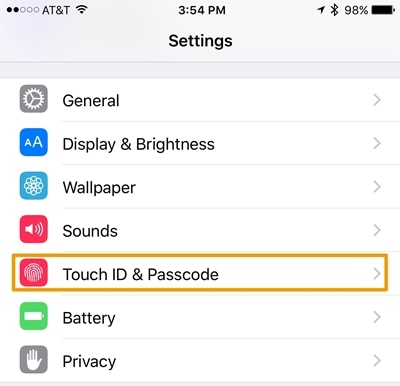
2. You would be needed to provide the passcode or your fingerprint in order to access these settings.
3. This will provide a list of features related to your passcode. Go to the section of “Allow Access When Locked”.
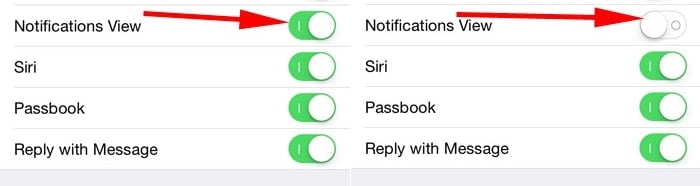
4. From here, make sure that the option of “Notification View” is turned off.
After turning the option off, you can exit from the Settings interface. In this way, your device won’t display the notification view.
Part 4: Changes on iPhone lock screen notifications on iOS 18
With the new update of iOS 18, we can see a drastic change in the Apple iPhone X lock screen notifications as well. Since the Apple iPhone X lock screen with notifications have been integrated into one, it becomes quite easier for users to access it.
Access iPhone notification lock screen on iOS 18
Some people find it a little tricky to access the lock screen notifications iPhone after the iOS 18 update. Instead of sliding the screen from the top, you need to swipe it from the middle. By swiping it from the bottom, you might get its control center.
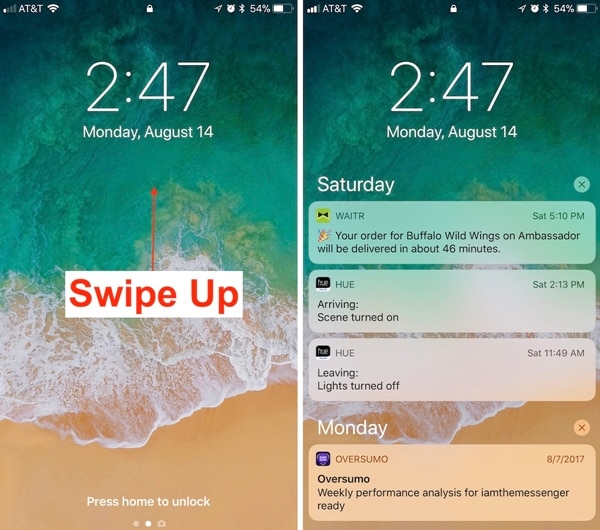

Simply swipe up from the middle of the screen to get a list of all the notifications. Now, you can slide them to access the old notifications.
Nevertheless, you can swipe from the top to access the cover sheet.
Swipe left or right
This is undoubtedly one of the most evident new features of the Apple iPhone X notification lock screen of iOS 18. Now, you can swipe left or right to access various features. By swiping left, you can access the Camera on your device and by swiping right, you can access your Today View.
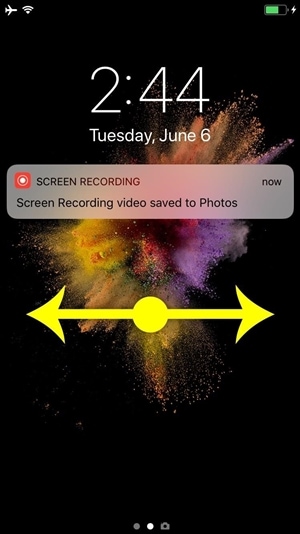
If you want to click pictures instantly, then simply swipe left the lock screen. This will launch the Camera on your device, letting you click pictures on the go. Similarly, by swiping right, you can access your Today View. This includes vital data from apps and widgets that your smartphone assumes is important for you regarding the day.
We hope that after following this guide, you would be able to gain in-depth information regarding iPhone lock screen with notifications. Apart from all the basic things you can do on the lock screen, we have also provided easy ways to customize it. Furthermore, there are so many things that you can do with the iOS 18 iPhone lock screen notifications. While most of the users loved the feature, some are quite hesitant about its application. What is your take on this? Let us know about it in the comments.
Forgot Apple iPhone X Backup Password? Here’s What to Do
Forgetting your Apple iPhone X backup password can be a real pain. Not only does it mean you can’t access your data, but it also means you can’t restore your phone if something goes wrong.
There are still chances that you could forget your Apple iPhone X backup password. Fortunately, you have a chance to recover your password. So, if you’re having trouble remembering your Apple iPhone X backup password, don’t despair. There are still ways to get it back!
Part 1: Overview of iPhone Backup Password
The Apple iPhone X is secured using a combination that is the backup password. Passwords, Wi-Fi settings, browser history, and health records are sensitive information that an encrypted device may back up.
Remember that this is not the same as your Apple ID or passcode (the sequence you input to unlock the iPhone).
Note:
The encryption of backups is not turned on by default. You will only need to activate the Encrypt Backup option the first time you use either iTunes or Finder. After that, each of your backups will encrypt on its own automatically.
So, if you choose to store your backups in iCloud, it will automatically encrypt all of your data each and every time.
To get the password for the encrypted backup of iTunes:
Step 1: Open iTunes
Launching iTunes is the first thing to do if you have a Mac computer running Mojave 10.14 or an older operating system version. On the other hand, if you use the Mac operating system known as Catalina 10.15, you need to run the Finder application.
Step 2: Link your Apple iPhone X to your PC
At this point, a USB cable should be used to connect the Apple iPhone X device to a computer. The next step is to find the widget on your desktop computer or portable device.
Step 3: Begin the Encryption Process
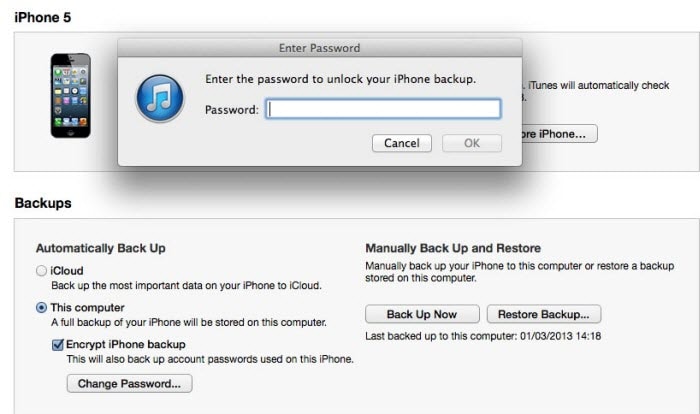
Select the Encrypt Local Backup option in the Backups section directly from either the Summary or General tab of the Backups section.
Step 4: Create a Password
When prompted in the window, create a password for the account. Make it powerful yet that is simple for you to remember. You might also save it somewhere secure to help you recall it later.
After establishing the password, all your previous backups will immediately undergo an automated overwrite and encryption. Make it a priority to ensure that the encryption procedure is finished effectively.
Part 2: 5 Fixes When We Forgot iPhone Backup Password
1. Try all passwords you used on your Apple iPhone X
The typical method that each individual attempts for the first time is to input all of the available passcodes. Even if it is the most straightforward technique, there is still a possibility that you miss one of them. Therefore, think about all of the passwords you may input, which are listed below.
- The password to log in to the computer
- The password to access Apple ID
- The password to access the encrypted data on the hard disk
- The password to access various websites
- The password to log in to the computer
- Password for the wireless network
- Password for the email account
- Passcode for the administrator
- Passcode for the iPhone
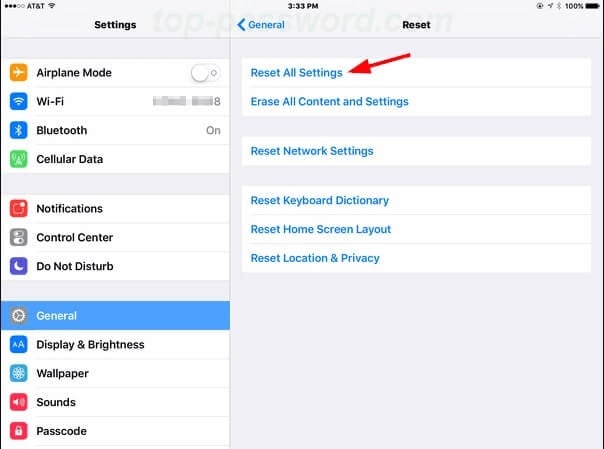
2. “Reset All Settings” via “Settings”
To begin, go to the Settings app on your iOS device, then choose General, followed by Reset.
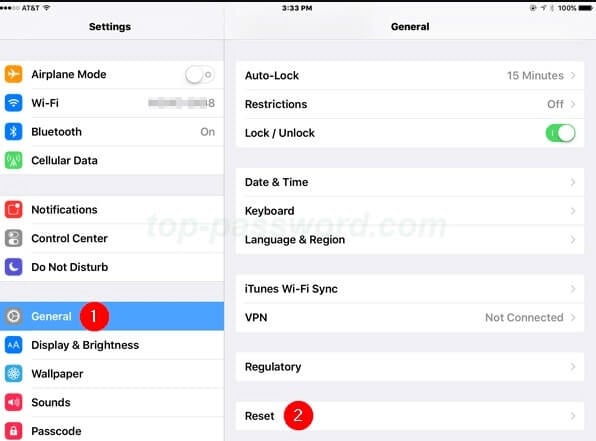
You may now go to Reset All Settings and confirm by entering the security passcode when prompted. Then, your phone will automatically go through the process of resetting and returning to its default settings.
You can also get rid of the password for the last backup without deleting any other apps or data.
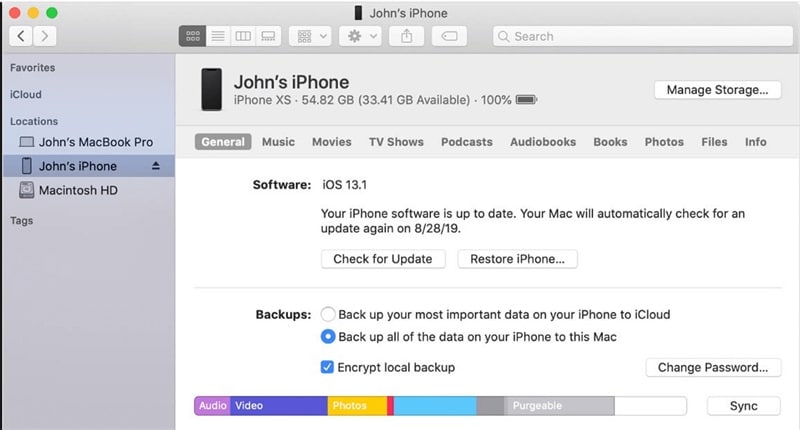
Use a USB cable to link your Apple iPhone X to your PC. Look at the small iOS icon in the figure below. Just click on it.
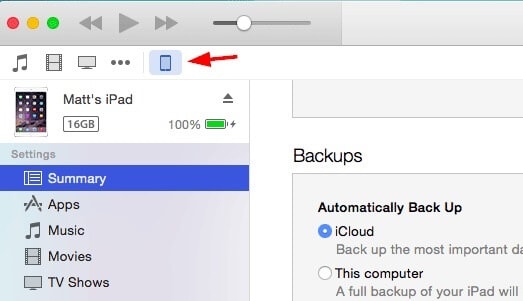
Proceed to the Summary Page and make your selection there for The Computer. After selecting Encrypt Local Backup, you must create a new password. After you have pressed the Backup Now option, wait for iTunes to create a new password for you.
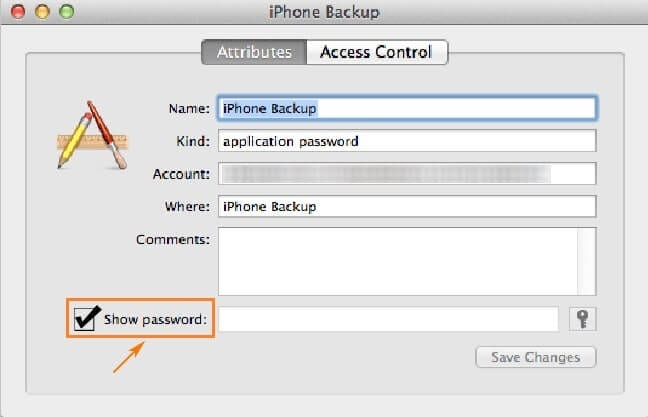
3. Find your password in the macOS keychain
Step 1: Launch Keychain Access by going to Application > Utilities > Keychain Access once your Mac has booted up.
Step 2: Check for a backup of your Apple iPhone X by entering it into the search box and looking for it there.
Step 3: Double-click the Show Password option, and then choose it from the drop-down menu. After that, type in the password for the keychain. At long last, the password for your Apple iPhone X backup will be shown.
4. Select “Back Up Now” via iCloud to remove password
If you already have a backup stored in iCloud, you may use iCloud for recovery.
First, power up the gadget and look for the “Hello” screen. If you have previously set up your Apple iPhone X, you must delete or remove all of the material before continuing.
Navigate to the Apps & Data menu and choose the Restore from iCloud Backup option.
After successfully signing in with your Apple ID, choose Backup.

During the time that the system is being restored, it is essential that the Wi-Fi connection remains active.
5. Dr.Fone-Screen Unlock
With Dr.Fone - Screen Unlock, it’s easy to follow all the steps to get rid of the iTunes backup password.
Step 1: After installing Dr.Fone, open it and look for the red Screen Unlock button.

Step 2: In the Screen Unlock interface, tap Remove iTunes BackUp Encryption in the bottom right corner to move forward.

Step 3: When you get to this page, use a USB cable to connect your iOS device to the PC. If Dr.Fone can find this connection, you will see the picture below.
Before you click Remove Now, please carefully read the following three notes:
- Make sure to turn off Find My iPhone.
- Don’t open iTunes while doing this.
- Your device will reboot

Step 4: Dr.Fone can check your iTunes backup and delete it by itself. This encryption will be erased when the progress bar reaches 100%. This will take a short time to do.

Step 5: The encryption on the iTunes backup has been removed successfully! Now you can easily back up, restore, move, or wipe your device.

Part 3: 3 Tricks to Help You Remember the Passwords
If you have an iPhone, you know it can be tricky to keep track of all your passwords. From your email password to your banking login, there are a lot of different codes to remember.
Here are three tricks to help you keep track of your passwords so you don’t have to stress the next time you can’t log in to your account.
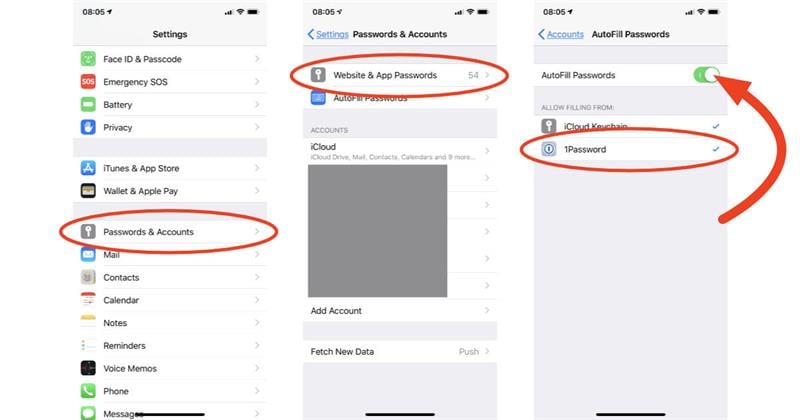
- Turn on “AutoFill” in “Settings”
You can turn on AutoFill in the Settings app. This will allow your Apple iPhone X to fill in passwords when you visit websites and apps automatically. All you need to do is ensure you’ve entered the correct username and password once, and your Apple iPhone X will save the information, so you don’t have to enter it again.
- Try iCloud Keychain to keep your passwords
iCloud Keychain is a great way to keep all your passwords in one place. Once you’ve turned on the iCloud Keychain, all your passwords will be synced across your devices. That means if you create a new password on your laptop, it will automatically appear on your Apple iPhone X.
- Use Notes for passwords
If you’re finding a simple way to keep all your passwords, try using the Notes app. Create a new note and title it “Passwords.” Then, add it to the note whenever you create a new password.
You can even add a description of the password, so you remember which account it’s for.
The Bottom Line
As a last piece of advice, please safely save your newly created passwords. Rather than writing them down in the iPhone’s notepad, you should save the passwords in a secure location.
However, no matter how secure your gadget is, password leakage may happen, sending you to unpleasant situations that you can’t even conceive. It’s best to use Dr.Fone - Screen Unlock as soon as you encounter any problem!
How to Turn Off Find My Apple iPhone X when Phone is Broken?
In today’s world, your phone is your most important asset. Especially when you own an iPhone, you’re much more careful because it is pretty expensive than normal phones. You’re always making sure to keep it safe and secure, but Apple has ways to keep you away from this hassle.
Apple ensures the privacy and security of its customers. For that, it has introduced this excellent feature of Find My iPhone, which keeps track of the location of your device no matter in which part of the world you are. So, if you’ve lost your Apple iPhone X or it is stolen, this app is your savior.
Downloading and enabling Find My iPhone can be really easy and cinch but turning it off can be an arduous task. But we have you covered through this article that shall tell you about this app in detail and guide you on how to turn off Find My iPhone even when your Apple iPhone X is broken.
Part 1: What is Find My iPhone?
Find My iPhone is an application forged by Apple that keeps track of your Apple iPhone X’s location protects your data. Once you enable this application, it requires your iCloud password to unlock your phone to keep your Apple iPhone X safe from the wrong hands. This application comes in handy when you accidentally lose or misplace your phone.
The best part about this application is that it is free of cost. It usually comes built-in your Apple iPhone X already, but if not, you can easily download it from the app store. Sign in with your Apple ID, and it will automatically locate your Apple iPhone X no matter where you go.
Part 2: Efficient Way of Turning Off Find My iPhone Within Second- Dr. Fone
Dr.Fone - Screen Unlock is an excellent data recovery and management software created by Wondershare. However, limiting it to just recovery and management of data will not be just as it offers much more than just that. Transferring files, repairing the operating system, changing the GPS location, and fixing the activation lock are its amazing services.
Dr.Fone - Screen Unlock (iOS)
Turning Off Find My iPhone Within Second.
- Maintains the security of your data and keeps it in its original form.
- Recovers your data from damaged or broken devices.
- Erase’s data in such a way that no other software can recover it.
- Has great integration with iOS and macOS.
3981454 people have downloaded it
Dr.Fone can also be a great solution for how to turn off Find My iPhone when your Apple iPhone X is broken.
Step 1: Install Dr. Fone
Launch Wondershare Dr.Fone on your computer and connect your Apple iPhone X with it via cable.
Step 2: Unlock Apple ID
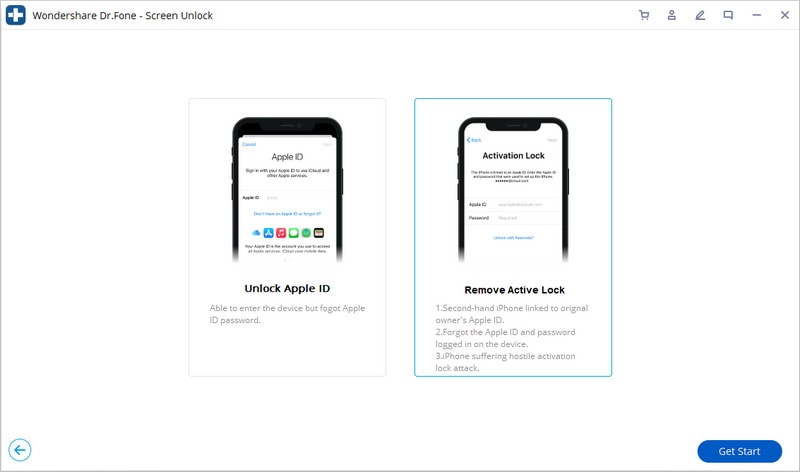
Open Wondershare Dr.Fone and select “Screen Unlock” among the other options on the home interface. Now another interface will appear displaying four options. Click on “Unlock Apple ID.”
Step 3: Remove Active Lock
After choosing the “Unlock Apple ID” option, an interface will be displayed that will show another two options, out of which you have to select “Remove Active Lock” to proceed further.
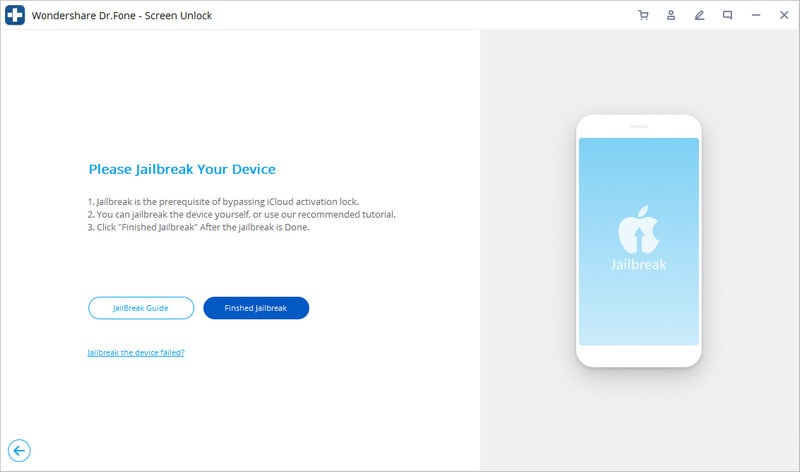
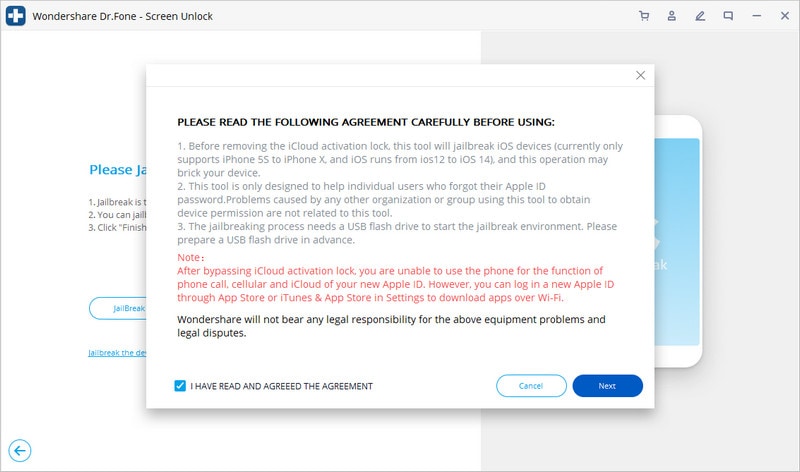
Step 4: Jailbreak your Apple iPhone X
Jailbreak your Apple iPhone X by following the instructions given by the system. Once you complete them, click on “Finish Jailbreak.”
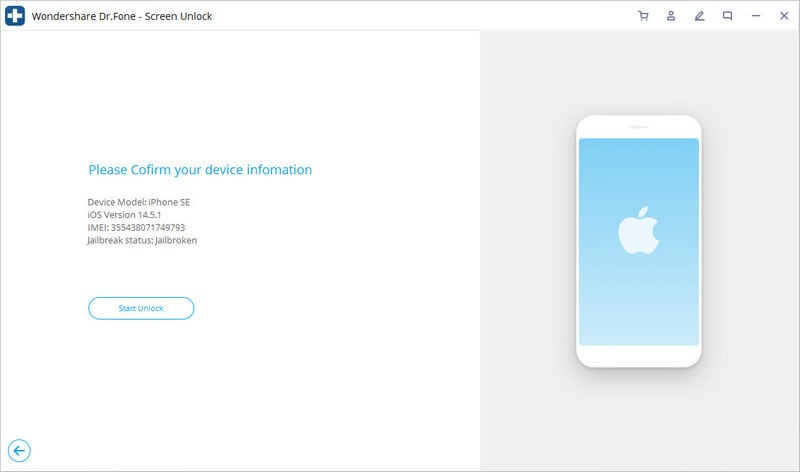
Step 5: Confirmation Window
A warning will be displayed on the screen asking for confirmation to remove the active lock. Then again, another confirmation message will pop up confirming the model of your device.
Step 6: Unlock your Apple iPhone X
Click on “Start Unlock” to proceed. Once the process is started, you have to wait for a moment until the activation lock is successfully removed.
Step 7: Turn off Find My iPhone
As your activation lock is removed, go to the settings and remove your Apple ID. Consequently, Find My iPhone will be disabled.

Part 3: How to Turn Off Find My iPhone on Broken iPhone Using iCloud?
iCloud is the most secure storage drive introduced by Apple. It keeps your gallery, your reminders, contacts, and your messages up to date. Moreover, it also organizes and stores your files while keeping them private and secure. iCloud strongly integrates your Apple iPhone X with other iOS devices so you can share your data, documents, and location with other iCloud users.
As mentioned earlier, turning off Find My iPhone can be very complex. But if your Apple iPhone X is damaged in some way, turning it off can be much more stressful. Here, iCloud can come to the rescue as it’s the most effective solution for how to turn off Find My iPhone when your phone is broken.
Here we have explained to you step by step how to turn off Find My iPhone on broken iPhone using iCloud:
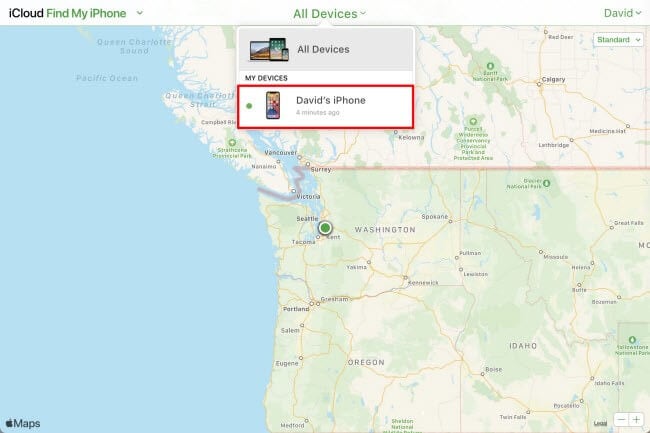
Step 1: Go to the official website of iCloud.com and enter your credentials to sign in with your Apple ID.
Step 2: Click on the “Find My iPhone” icon at the end of the page. The app will start locating your device, but as your Apple iPhone X is damaged, it might not find anything.

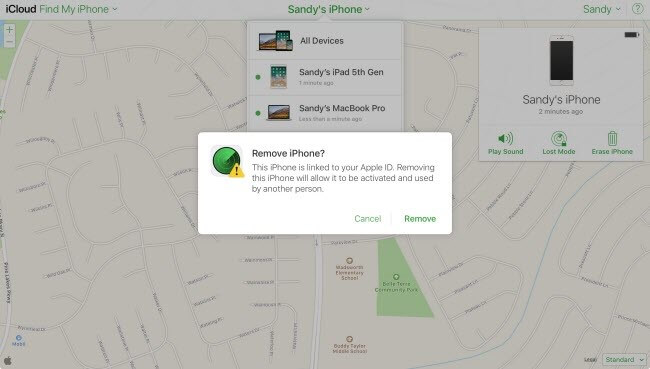
Step 3: Click on the “All Devices” option from the top. Select your Apple iPhone X, which you want to remove by clicking on “Remove from account.”
Step 4: Once your device is removed from the account, a window will pop up asking you to delete the option of that device from your iCloud account. Now you may log in Find My iPhone with your iCloud account on another device.
Part 4: Turn off Find My iPhone using Recovery Mode
The recovery model of the Apple iPhone X allows you to reset or restore your data. It also offers data cleaning and backing up of apps to keep your Apple iPhone X updated and free of glitches. When your phone is lagging or not working properly, then you need to put it into Recovery Mode.
However, Recovery Mode can also be useful to turn off Find My iPhone on your device. Here are the steps that will guide you on how to turn off Find My iPhone on a broken phone using Recovery Mode.
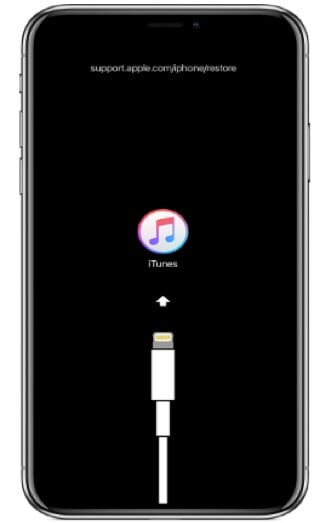
Step 1: Connect your Apple iPhone X to your computer via cable and wait for your computer to detect your device.
Step 2: As soon as your Apple iPhone X is detected, open iTunes and force restart your phone to activate the Recovery Mode. Activating this mode is different for different models of iPhone.
- For iPhone 8 and the later: Press the Volume Down button and release is immediately. Then press the Volume Up button and release it immediately again. After that, press and hold the Power Button until you see the Apple logo.
- For iPhone 7 and 7+: Press the Power Button and Volume Down button at the same time and hold them until the Apple logo appears on your screen.
- For iPhone 6s, and Previous Models: Press and hold the Home Button and Power button concurrently until your Apple iPhone X shows the Apple logo.
Once your Apple iPhone X shows the Apple logo, it means the Recovery Mode is activated.
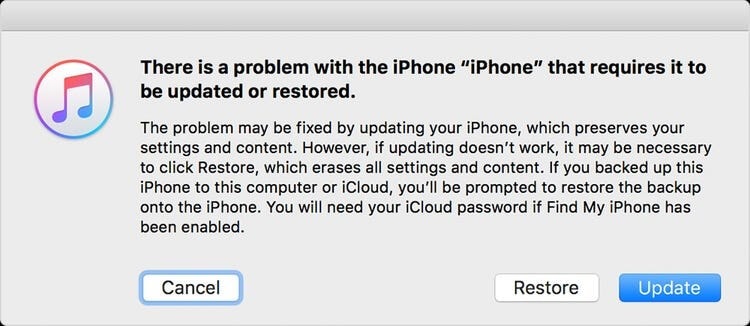
Step 3: Now click on “Restore” so iTunes can download software on your Apple iPhone X. Once the process is completed, you can set up your Apple iPhone X as new. This means your previous data will be erased, and Find My iPhone will be disabled automatically.
Conclusion
Now we’re done as we’ve provided you the best possible solutions to turn off Find My iPhone when your Apple iPhone X is broken. It is obvious that it is a quite complicated process, but you have to be patient and follow the steps correctly to disable Find My Apple iPhone X to avoid any inconvenience in the future. We hope this article answers all your queries regarding it.
Also read:
- [New] Seamless Video Tweaks Integrating Story Remix Into Windows 10 Photos for 2024
- [Updated] The Ultimate 5 PC Snipers for Efficient Image Capture
- Forgot your Realme lock screen pattern, PIN or password? Here’s what to do
- In 2024, Detailed Verification GoPro HERO4 Silver Edition
- In 2024, Easy Steps on How To Create a New Apple ID Account On Apple iPhone 14 | Dr.fone
- In 2024, How To Unlock Stolen iPhone 14 Pro In Different Conditionsin | Dr.fone
- In 2024, Locked Out of iPhone SE (2022)? 5 Ways to get into a Locked iPhone SE (2022) | Dr.fone
- In 2024, Resolve Your iPhone 15 Keeps Asking for Outlook Password | Dr.fone
- New Best Free MPEG Video Joiner Software Top 5 List for 2024
- Overcoming Windows 10 Brightness Dysfunction: A Step-by-Step Guide
- Vivo S17t support - Turn Off Screen Lock.
- Ways to trade pokemon go from far away On Apple iPhone 15 Pro Max? | Dr.fone
- Title: How to Make the Most of Your iPhone X Lock Screen with Notifications? | Dr.fone
- Author: Amelia
- Created at : 2024-09-29 17:15:25
- Updated at : 2024-10-03 16:03:58
- Link: https://iphone-unlock.techidaily.com/how-to-make-the-most-of-your-iphone-x-lock-screen-with-notifications-drfone-by-drfone-ios/
- License: This work is licensed under CC BY-NC-SA 4.0.