
How To Remove Flashlight From Apple iPhone 6s Plus Lock Screen | Dr.fone
How To Remove Flashlight From Apple iPhone 6s Plus Lock Screen
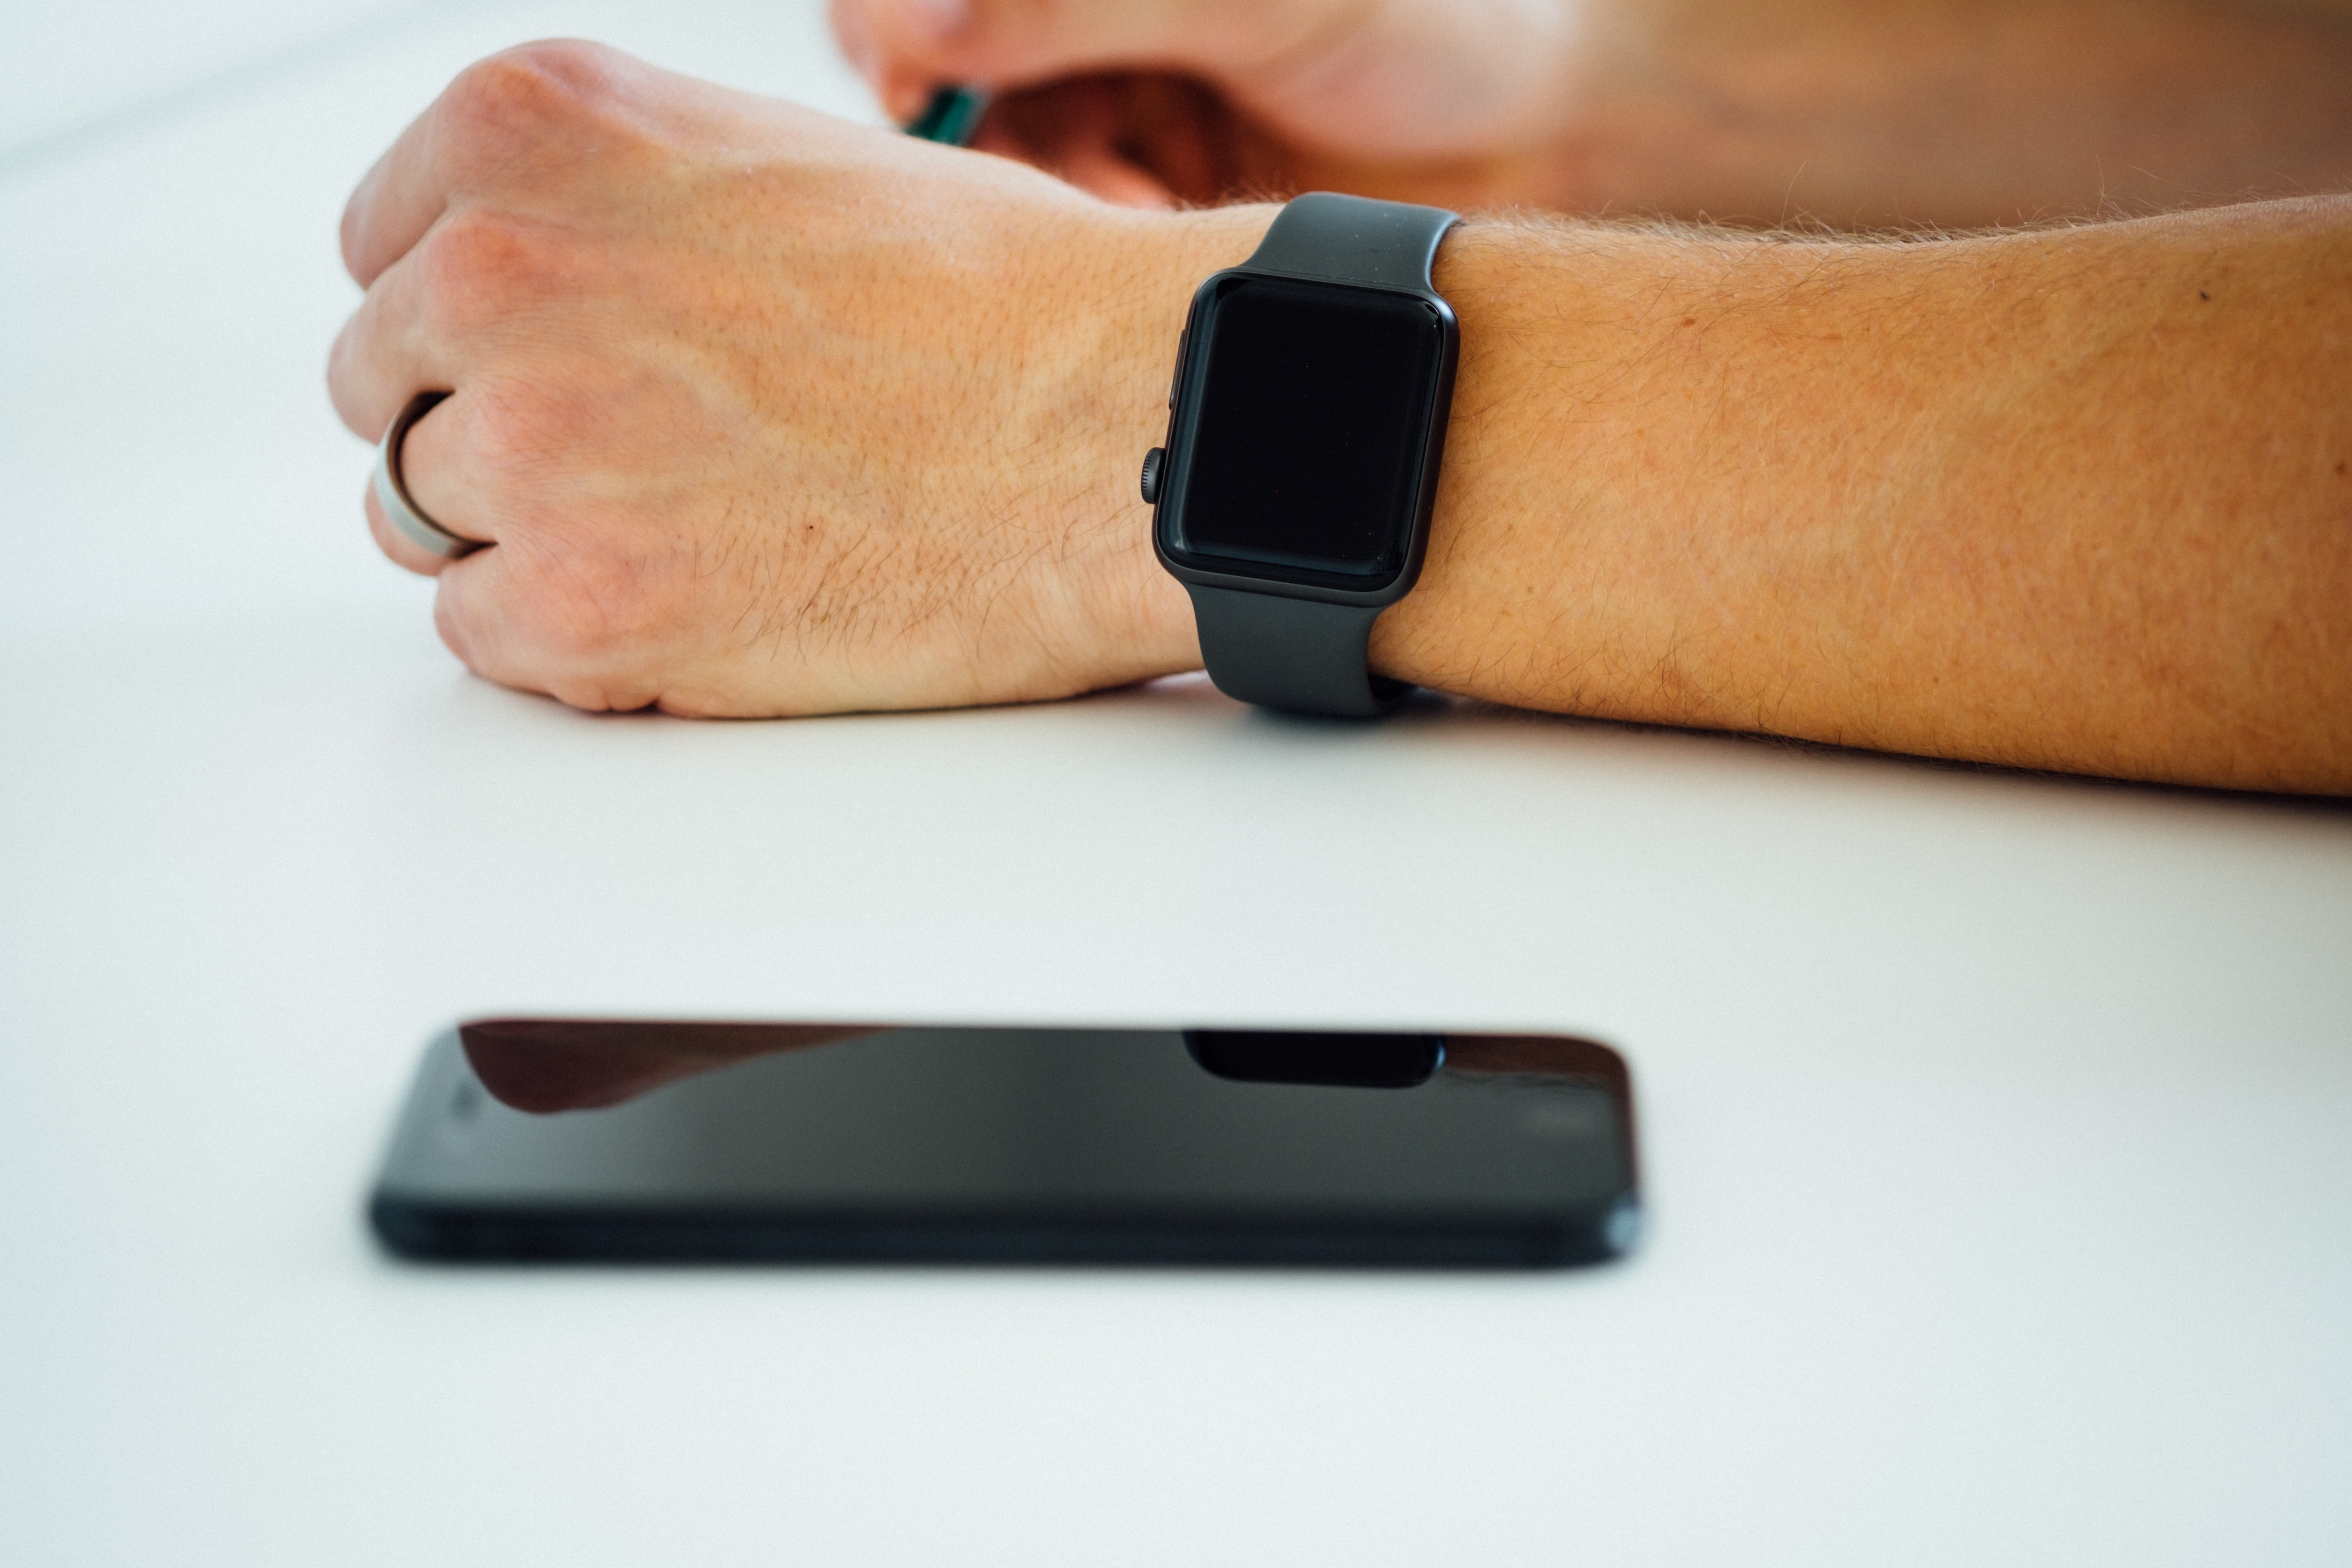
Ever wonder why the flashlight shows up on your Apple iPhone 6s Plus lock screen? Especially when it happens in your pocket or while you’re holding it. If you, like many, accidentally turn it on and drain your battery, no need to worry.
While you can’t remove it, figuring out how to remove flashlight from iPhone lock screens is a common question. This guide shares several ways to prevent accidental activations and save your device’s battery. Keep reading for easy solutions to take charge of your Apple iPhone 6s Plus’s lock screen and make it work better for you.

Part 1: How To Remove Flashlight From iPhone Lock Screens?
You can’t remove the shortcuts like the flashlight icon from an iPhone lock screen. These are built-in features, and Apple doesn’t currently offer an option to disable them. However, there are some workarounds to make the flashlights less accessible and avoid turning them on accidentally. You can turn off Tap to Wake, Raise to Wake, remove the flashlight icon from the control center, and turn off the Back Tap shortcut.
Find out the steps below.
Quick Fix No. 1: Turn Off Tap To Wake
Tap to Wake lets you light up your Apple iPhone 6s Plus screen with a simple tap. It’s handy, but there’s a catch – tapping near the bottom right corner might accidentally turn on the flashlight icon. The Tap to Wake feature can be troublesome, especially in the dark, when you don’t want any unexpected brightness.
Turning off the Tap to Wake feature is not directly related to the issue of iPhone users wanting to remove the flashlight from lock screens. However, adjusting settings like Tap to Wake can be part of customizing the overall user experience on an iPhone. When turned off, the screen won’t light up with a tap, reducing the likelihood of accidentally triggering the flashlight.
Here is how to turn off the Tap to Wake feature:
- Step 1: Go to Settings or General > Accessibility on your Apple iPhone 6s Plus device.
- Step 2: Toggle off Tap to Wake.

Quick Fix No. 2: Turn Off Raise To Wake
With “Raise to Wake” enabled, simply picking up your phone can activate the lock screen. Consequently, the flashlight icon becomes more susceptible to accidental touches. To address this, turning off this feature stops the screen from waking when you lift your Apple iPhone 6s Plus. By doing so, it becomes less likely that you’ll accidentally turn on the flashlight when you pick up your iOS device.
Here is how to remove flashlights from iPhone lock screens when not needed:
- Step 1: Head to Settings > Display & Brightness on your iOS device.
- Step 2: Toggle off the Raise to Wake option.

Quick Fix No. 3: Remove the Flashlight From the Control Center
The Control Center on iPhones is a quick-access panel. You can access it by swiping down from the top right corner of your screen. There, you can control various settings, like the flashlight. If you remove it, the flashlight becomes less accessible from the lock screen. Follow these steps to remove the flashlight from the control center:
- Step 1: Open the Settings app and navigate to Control Center.
- Step 2: Tap on Customize Controls, then find the Flashlight icon.
- Step 3: Tap the red minus (-) sign next to the Flashlight icon.
- Step 4: Tap Remove to confirm deleting the Flashlight icon from the Control Center.

Quick Fix No. 4: Turn Off Back Tap Shortcut
Back Tap on the Apple iPhone 6s Plus lets you set actions for double or triple taps on the back. One of these actions is turning on the flashlight. If you often tap your phone’s back, you might accidentally activate the flashlight. Turning off the Back Tap for the flashlight prevents these accidental activations.
Although the flashlight icon remains on the lock screen, you won’t accidentally turn it on by hitting the back of your phone. Here’s how to disable the Back Tap for the flashlight shortcut:
- Step 1: Go to Settings > Accessibility > Touch > Back Tap.
- Step 2: Select the Double Tap or Triple Tap option you’re using for the flashlight shortcut.
- Step 3: Choose None instead of the currently assigned action, which might be Flashlight.

Part 2: How To Turn Off the Flashlight on iPhone?
Now, let’s address turning off the flashlight on your Apple iPhone 6s Plus. Even if you’ve applied Part 1’s solutions, knowing how to switch off the flashlight is crucial. In this section, you’ll learn how to turn the light off on iPhone devices.
Method No. 1: Turn Off the Flashlight in the Control Center
You can’t remove the flashlight icon from the lock screen, but you can still turn it off easily. Just swipe down from the upper-right corner or swipe up from the bottom (for iPhones with a Home button). Then, follow these steps to discover how to turn off the flashlight on your Apple iPhone 6s Plus: Here’s how to do it.
- Step 1: Find the flashlight icon in the Control Center. It’s usually located in the bottom left corner.
- Step 2: Tap on the flashlight icon once to turn it off. The icon will turn gray, indicating the flashlight is deactivated.

This method is fast and convenient, especially if you’ve kept the flashlight icon in the Control Center. Plus, it works regardless of how the flashlight was activated, even if it was an accidental tap on the lock screen.
Method No. 2: Use Siri To Turn Off Flashlight
To go hands-free and avoid accidental taps, you can use Siri to turn off the flashlight. For those who favor a hands-free approach, it offers an alternative method, particularly if you haven’t customized the Control Center. Here’s how to turn off the flashlight with Siri on your Apple iPhone 6s Plus:
- Step 1: Say “Hey Siri” or press and hold the power button (or Home button on older iPhones) to activate Siri.
- Step 2: Give the commands saying, “Turn off the flashlight.”
- Step 3: Siri will confirm your request and turn off the flashlight. You’ll hear a voice cue and see the flashlight icon on your screen dim.

Remember, even with Siri, ensure your Apple iPhone 6s Plus’s microphone isn’t covered or blocked for successful voice recognition.
Bonus Part: Easily Unlock Your Apple iPhone 6s Plus Without a Password
Removing the flashlight shortcut avoids accidentally activating the Apple iPhone 6s Plus flashlight. But what if you forget your lock screen passcode and need to access your Apple iPhone 6s Plus? That’s where Wondershare Dr.Fone Screen Unlock (iOS) comes in, offering a powerful toolkit for regaining access to your locked iOS device.
This software effortlessly bypasses any lock screen, so you can access your data in a few steps. Dr.Fone works seamlessly with the latest iOS versions and devices, providing a dependable safety net for iPhone users.
Key Features:
- If you’ve forgotten your phone’s password or bought a second-hand device, here’s how Dr.Fone can help you:
- Bypasses various lock screen types like pattern, 4 or 6-digit passcode, Touch ID, and Face ID without the original passcode.
- Removes iCloud Activation Lock on a used or lost iPhone/iPad, allowing it to be set up with a new Apple ID.
- Offers a simple, intuitive interface with clear instructions.
Forgotten passcodes and iCloud Activation Lock can leave you feeling shut out. To address this issue, here’s a step-by-step guide using Dr.Fone Screen Unlock (iOS):
- Step 1: Download and install Dr. Fone’s desktop app on your computer. Make sure you get the latest version for optimal compatibility. Launch the app and select the Screen Unlock option from the Toolbox homepage.


- Step 2: Select iOS as the Apple iPhone 6s Plus device type. Then, within the Screen Unlock window, select Unlock iOS Screen to begin the process.

- Step 3: Click Start to remove the iOS screen lock.

- Step 4: Get your Apple iPhone 6s Plus and a USB cable. Connect the phone to your computer and wait for Dr.Fone to recognize it. Next, put your Apple iPhone 6s Plus into Recovery Mode using specific button combinations for your model.

- Step 5: Check your Device Model, select the System Version you need from the dropdown list, then click Start.

- Step 6: Dr.Fone will download and install the latest iOS firmware on your device. Then, click Unlock Now once the firmware is ready. Follow the on-screen instructions to continue unlocking your device.

- Step 7: Once the process is complete, Dr.Fone will notify you. Your Apple iPhone 6s Plus should be unlocked and ready for you to set it up again with your preferred settings and Apple ID.

Conclusion
Resolving the issue of how to remove flashlight from iPhone lock screens is attainable with these workarounds. Turning off Tap to Wake and Raise to Wake reduces accidental activations. Customizing the Control Center and Back Tap allows precise accessibility adjustments.
Additionally, learn how to turn off the flashlight using straightforward methods: either through the Control Center or by instructing Siri to do so. These solutions ensure a personalized lock screen experience, minimizing unwanted light disruptions.
And if ever locked out with the flashlight on, consider Dr.Fone Screen Unlock. This powerful tool bypasses various screen locks, including passcodes, Face IDs, and Touch IDs. Dr.Fone remains a valuable safety net for unexpected moments while fixing your iOS device. Customize your Apple iPhone 6s Plus lock screen settings with these tips for a seamless experience.
Tips: Are you searching for a powerful Screen Unlock tool? No worries as Dr.Fone is here to help you. Download it and start a seamless unlock experience!
How to Unlock Apple iPhone 6s Plus With an Apple Watch & What to Do if It Doesn’t Work
There are plenty of reasons why Apple devices are in such high demand. The quality of the products is unquestionable – few can argue the superior quality of the Apple iPhone 6s Plus’s camera, for instance. Almost all devices are long-lasting. They have a great resale value. They offer cutting-edge features.
However, perhaps the greatest advantage of Apple products is just how well they integrate with one another and work together.
With a quick little tap, you can have your Apple iPhone 6s Plus’s camera working as your Mac’s webcam. You can use your iPad as a second Mac display. Take calls using any device.
Moreover, you might be able to use the Apple Watch to unlock your Apple iPhone 6s Plus.
Now, you cannot just unlock any Apple iPhone 6s Plus with your Watch. The devices must be paired, and you’ll need to follow a few steps to enable this option. Here’s how to unlock your phone using your Apple Watch like a pro.
Part 1. Can I Use an Apple Watch To Unlock My Apple iPhone 6s Plus?
The Apple iPhone 6s Plus face ID is one of the simplest, most practical ways to unlock your phone. While you’ll need a passcode just as another security layer, you won’t have to worry about someone else breaking in if they know it, going through your messages, or collecting your private information.
With face ID, only you can unlock your phone, sign in to your favorite apps, and even authenticate purchases.
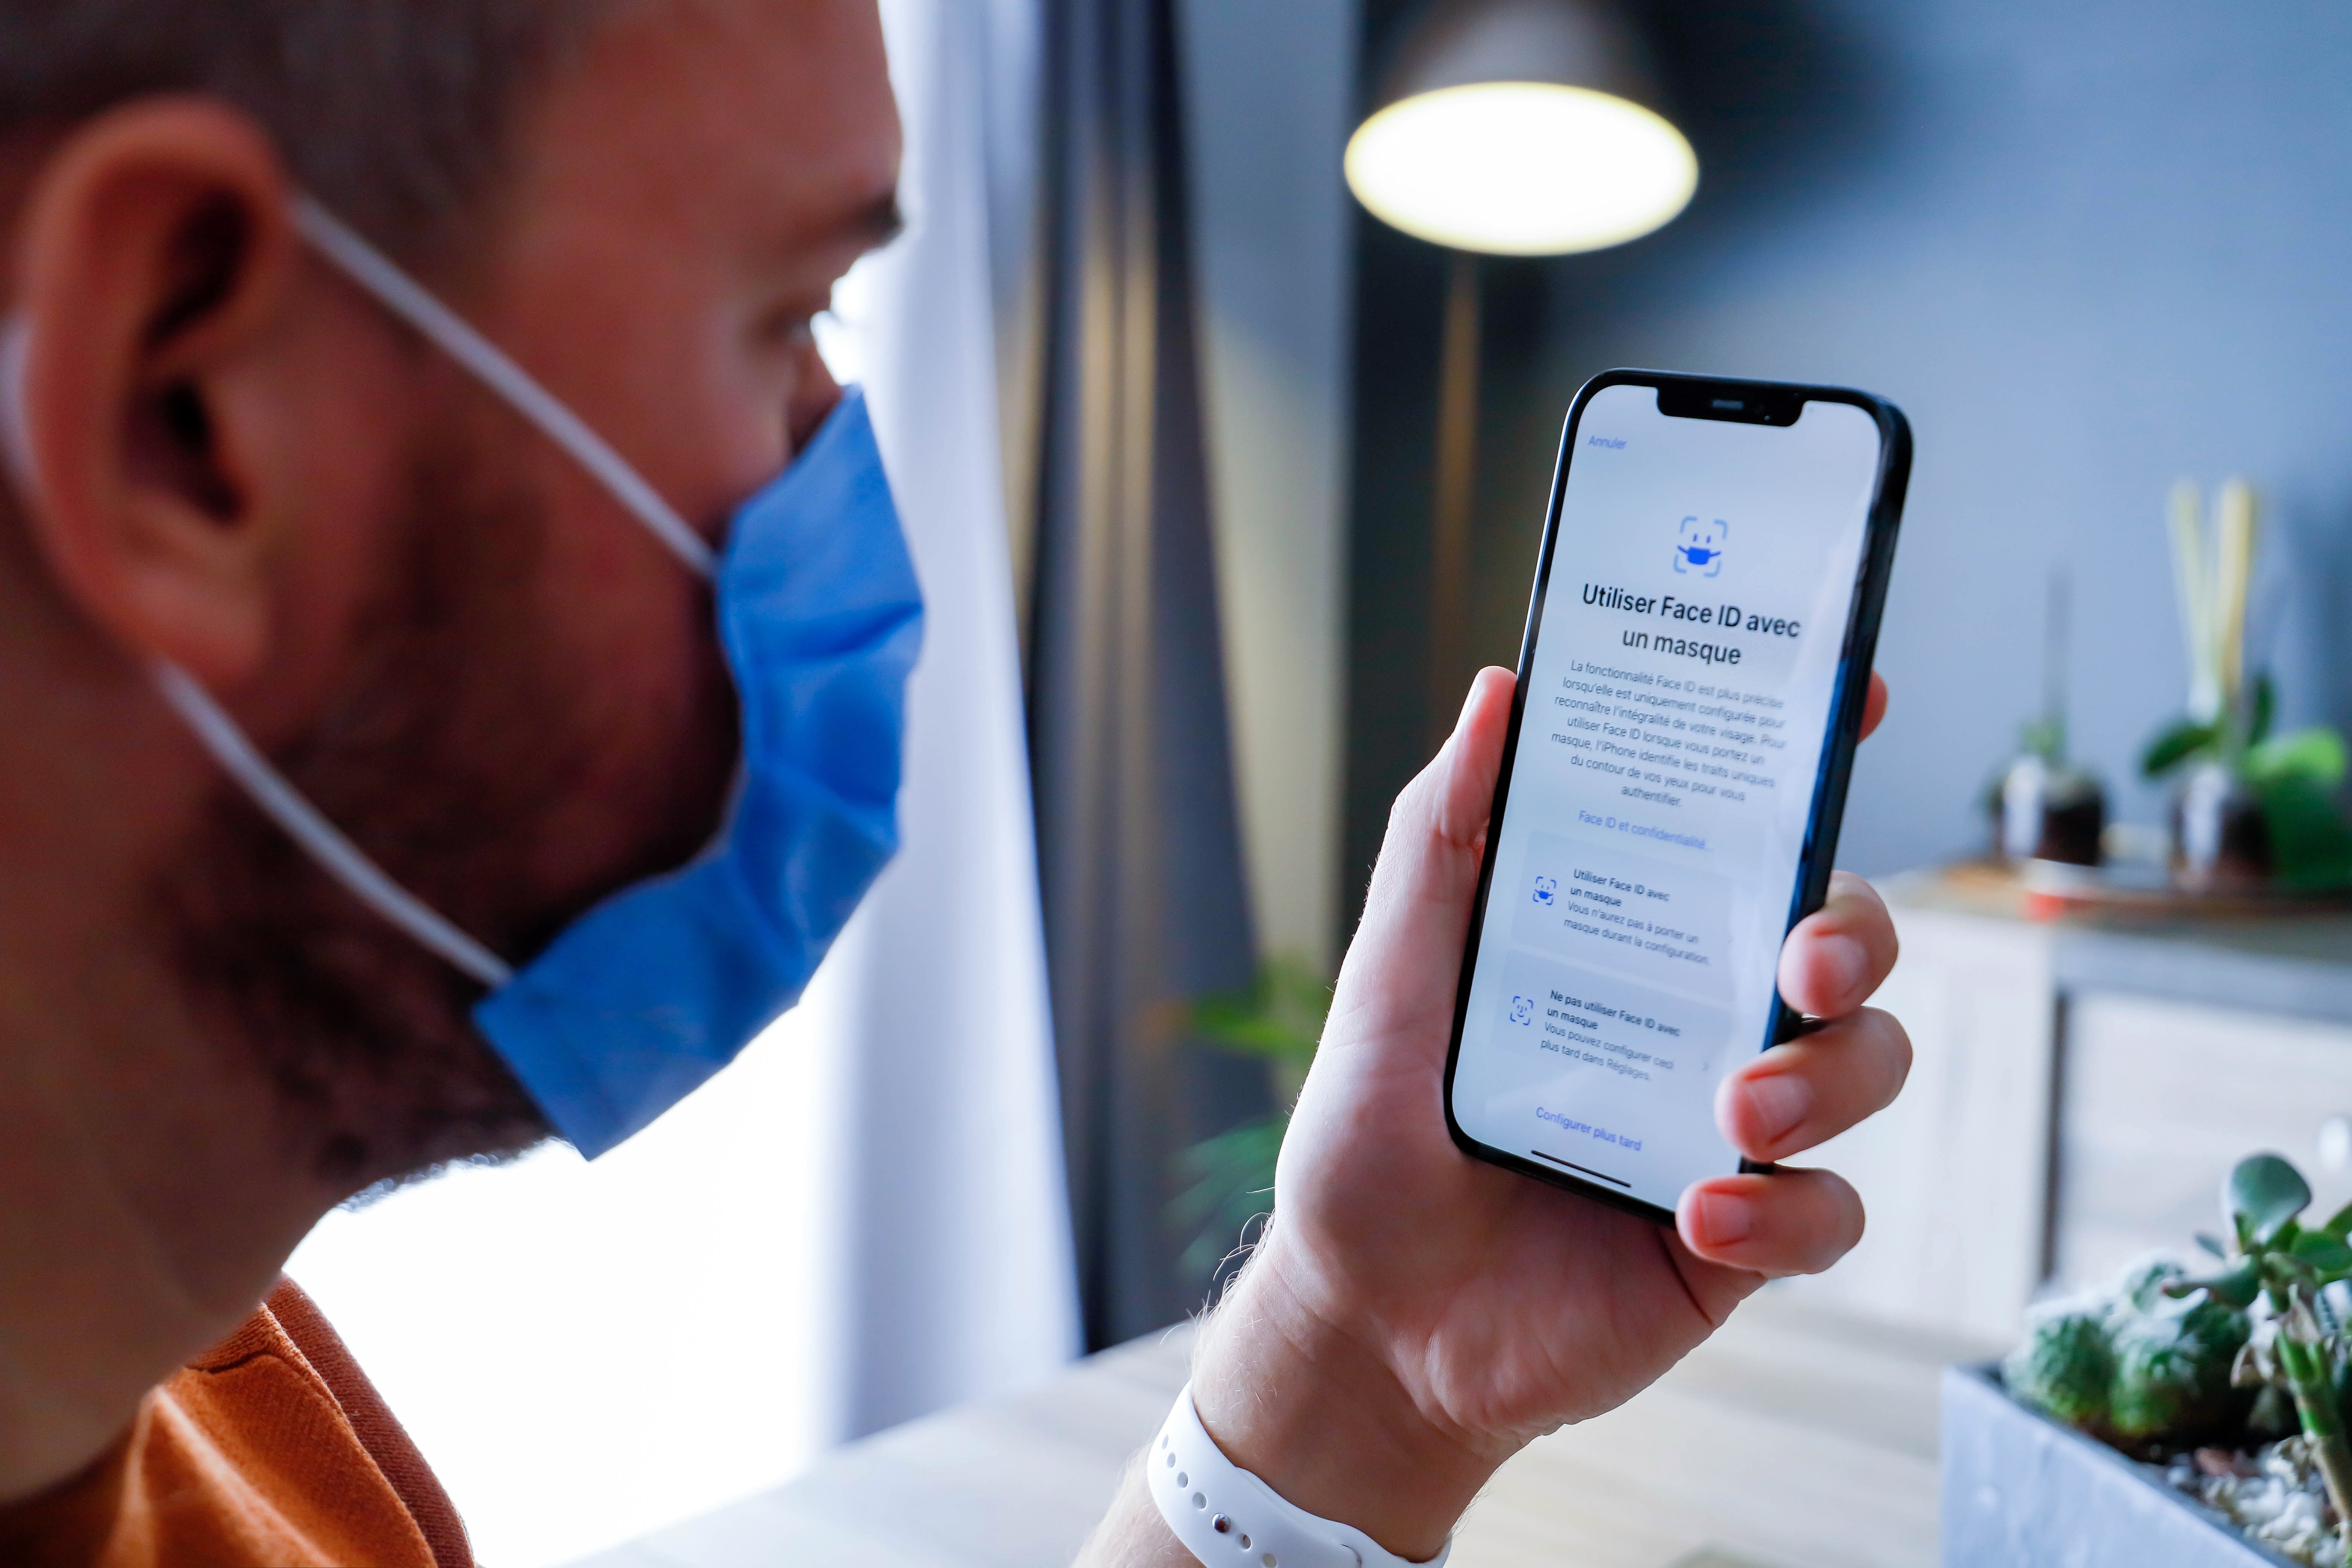
The problem is that neither face ID nor traditional passcodes aren’t always the most convenient option. If you wear sunglasses, safety goggles, a face mask, or other face coverings and can’t take them off for some reason, face ID won’t work. If you have gloves on and can’t type in your passcode, your passcodes won’t work.
What could work is your Apple Watch.
Depending on the Apple Watch version you own and your Apple iPhone 6s Plus model, you could use your watch to unlock your phone in any circumstances. It’s easy, secure, and convenient, above all else.
Part 2. Requirements for Unlocking Apple iPhone 6s Plus With Apple Watch

Unfortunately, not every Apple iPhone 6s Plus can be unlocked with your Apple Watch, and not every Apple Watch can unlock your Apple iPhone 6s Plus. Both devices must meet some requirements before you can adjust your settings to enable this option.
To be able to use your Apple Watch to unlock your phone with the utmost ease, you’ll need:
- An Apple iPhone 6s Plus with Face ID – Apple iPhone 6s Plus X and newer models;
- iOS 14.5 and newer versions;
- An Apple Watch series 3 and newer models;
- watchOS 7.4 and newer versions.
Additional requirements you’ll need to meet include:
- Your Apple iPhone 6s Plus and Apple Watch need to be paired;
- Both devices need to have WiFi and Bluetooth turned on (but a connection to a WiFi network isn’t necessary);
- You need to have a passcode on your Apple Watch;
- Wrist detection on your watch needs to be turned on;
- The watch needs to be on your wrist and unlocked.
You’ll also need to wear items such as sunglasses, face coverings, ski masks, or others that prevent you from using your Apple iPhone 6s Plus Face ID.
Part 3. How To Unlock Apple iPhone 6s Plus With an Apple Watch

If you meet all the aforementioned criteria, setting up the feature to unlock your Apple iPhone 6s Plus using an Apple Watch is easy. You’ll just have to follow a few steps:
- Step 1: Go to Settings > Face ID & Passcodeon your Apple iPhone 6s Plus;
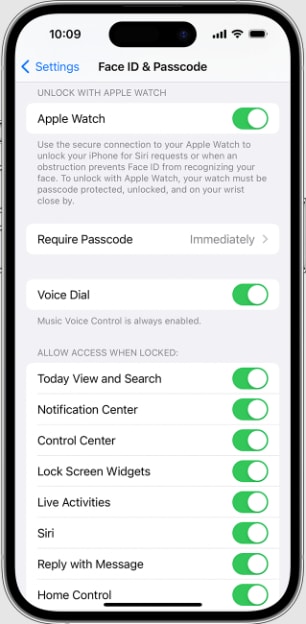
- Step 2: Type in your passcode;
- Step 3: Find and enable Unlock with Apple Watch.
Remember that your Apple Watch’s wrist detection must be turned on for this option to work. When you tap to enable Unlock with Apple Watch, if your wrist detection isn’t turned on, you’ll get a prompt on your phone asking you to turn it on.
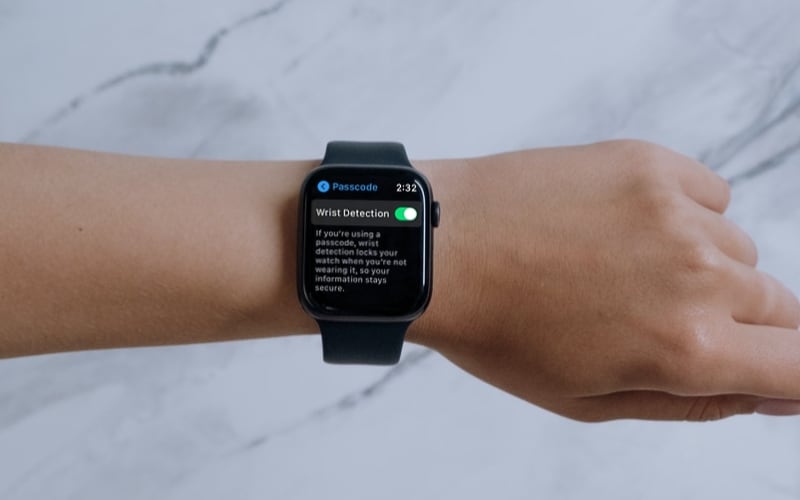
You can turn on wrist detection on your watch by following these steps:
- Step 4: Go to Settingson your Apple Watch;
- Step 5: Tap on the Passcode;
- Step 6: Toggle Wrist Detection
Now that you’ve enabled the option to unlock your Apple iPhone 6s Plus using your Apple Watch, it’s time to simply start using the feature. To unlock your phone, you’ll need to:
- Have your Apple Watch on your wrist, unlocked;
- Tap on your Apple iPhone 6s Plus or raise it to your face to activate it;
- Glance at your phone while wearing a face mask, sunglasses, or another item that’s preventing you from using Face ID;
- Swipe up on your phone’s screen.
Your Apple Watch will send an alert when you’ve used it to unlock your Apple iPhone 6s Plus. If you accidentally unlock your phone, simply tap on the Lock Apple iPhone 6s Plus on the screen of your watch to lock it.
However, remember that the next time you want to use your Apple Watch to unlock your Apple iPhone 6s Plus, you’ll first need to type in your passcode.
Part 4. What To Do if You Can’t Unlock Your Apple iPhone 6s Plus With a Watch
Generally speaking, unlocking your Apple iPhone 6s Plus with an Apple Watch should be a simple, seamless task. Unfortunately, though, that’s not always the case. A glitch or a bug could be preventing you from enjoying this feature, so take a look at a few things you could try to fix it.
1. Check All Settings & Reconfigure
As mentioned earlier, there are a few requirements that your devices need to meet to unlock your Apple iPhone 6s Plus with your Apple Watch.
If you’re using the correct versions of Apple iPhone 6s Plus (iPhone X, iOS 14.5 and newer) and Apple Watch (series 3, watchOS 7.4 and newer), try to reconfigure your settings.
Make sure that you have:
- A passcode on your watch;
- Wrist detection turned on;
- Feature Unlock with Apple Watchturned on on your Apple iPhone 6s Plus.
If all the settings are correct, try one of the following options.
2. Restart Your WiFi/Bluetooth Connection
Your Apple iPhone 6s Plus and your Apple Watch need to have both WiFi and Bluetooth turned on. If they’re turned on on both devices, try turning them off and back on again to restart the connection.
Remember, you only need WiFi and Bluetooth on but don’t need to be connected to a WiFi network.
If the problem persists, you could also restart your devices and try again.

3. Reset Your Face ID
In some instances, it’s the Face ID feature that’s causing trouble, so you might want to try and reset it. It’s much easier than it may sound, you just need to follow the next few steps:
- Step 1: Go to your Apple iPhone 6s Plus’s Settings;
- Step 2: Select Face ID & Passcode;
- Step 3: Tap Reset Face ID.
When you tap on this, you’ll need to go through the process of setting your Face ID as usual. You’ll need to type in your passcode, hold your Apple iPhone 6s Plus in front of you (in portrait orientation), tap to get started, and put your face in the provided frame.
Move your face to complete the circle, then tap on Continue. Repeat the face scan process the second time and select Done.
4. Do a System Repair on Your Apple iPhone 6s Plus
If your Apple Watch unlock is still misbehaving, you might need to do a full system repair. As a general rule of thumb, it’s best to use verified apps like Dr.Fone to prevent the problem from getting worse.
Dr.Fone Apple iPhone 6s Plus system repair is designed to be fast, efficient, and safe. It can repair virtually any system glitch in less than five minutes, ensuring your phone operates seamlessly.
To perform a standard system repair with Dr.Fone, follow the next few steps:
- Step 1: Download and launch Dr.Fone on your computer;
- Step 2: From the Toolboxon your left-hand side, select System Repair;
- Step 3: Connect your Apple iPhone 6s Plus to your PC using a cable connection;
- Step 4: Select your device type in the new window that opens;
- Step 5: Select iOS repair;

- Step 6: Select Standard Repair Mode;
- Step 7: Follow the on-screen instructions and select Enter Recovery Mode;
- (Alternatively, select Guideif your phone is unresponsive);
- Step 8: Select the iOS firmware you want to download and install on your device;
- Step 9: Wait for the download to finish, then select Repair Now;
- Step 10: Wait until the process is complete, then select Done.

If it was a system mistake preventing you from unlocking your Apple iPhone 6s Plus with your Apple Watch, the option should be functioning well after the Dr.Fone iOS repair.
5. Reset Network Settings
If the problem wasn’t due to a system glitch, you should try resetting your Apple iPhone 6s Plus’s network settings. The process is simple, just:
- Step 1: Go to Settings > General > Reset > Reset Network;
- Step 2: Type in your passcode.
Resetting your network settings will clear out data from your internet, local network, and devices, including WiFi passwords, some Bluetooth connections, and more. However, your paired devices, such as the Apple Watch, shouldn’t be removed.
6. Reset Your Watch and Pair It Again
Finally, if you’re still experiencing issues, you might need to reset your Apple Watch and pair it with your Apple iPhone 6s Plus again.
It’s all quite simple:
- Step 1: Press and hold the power button;
- Step 2: Drag the slider under Power offto the right;
- Step 3: Press and hold the power button to turn the Apple iPhone 6s Plus device back on.
To perform a hard reset, simultaneously press and hold the power button and digital crown.
Conclusion
Using your Apple Watch to unlock your Apple iPhone 6s Plus is convenient when you cannot use the Face ID feature. It allows you to seamlessly unlock your phone when wearing sunglasses, goggles, face masks, or other face coverings that prevent the Face ID from working.
Enabling this option is a straightforward process, and if there’s ever a glitch, there are several options you could try to repair it.
Guide on How To Change Your Apple ID Email Address On Apple iPhone 6s Plus
Your Apple ID email is the key to your digital world with Apple devices. It’s the address Apple recognizes you by, allowing you to access your apps, music, and more. But sometimes, life brings changes, and your Apple ID email may need an update.
This guide will take you through the simple process of changing your Apple ID email address, ensuring it’s easy to understand every step. Explore why you might want to make this change, shedding light on common scenarios where this adjustment can enhance your Apple experience. So dive in and explore!

Part I: Why Change Your Apple ID Email?
Your Apple ID email helps you access your apps, music, and more. But sometimes, you might need to change it for simple reasons. Let’s look at why you might want to change your Apple ID email in easy-to-understand terms.
- Your email address is part of your identity. Changing it to something that better suits you can make your Apple experience more personal.
- If you think someone else knows your old email password, changing it can keep your Apple account safer. A fresh email means a new layer of security.
- Maybe you used an old email you don’t want to use anymore. Changing it lets you keep your personal life separate from your Apple stuff.
- **Email Problems.**If your old email is full of spam or not working well, switching to a new one is a good idea. You’ll get a cleaner and more reliable inbox.
- **Sharing Devices.**If you share Apple devices with someone and want to keep your stuff separate, changing your Apple ID email can help you do that easily.
- Using a more professional email address for your Apple ID can make a better impression when using Apple services for work or business.
These are the simple reasons why you might want to change your Apple ID email. It’s all about making your Apple experience better, safer, and more suited to your needs.
Part II: Step-by-Step Guide: How to Change Apple ID Email
Before you jump into changing your Apple ID email address, there’s an essential step to take. Just like you’d secure your valuables before embarking on a journey, backing up your device before going through the email change process is vital. This step ensures that none of your precious data is lost during the transition.
A. How To Change Your Apple Email Address on Various Devices
Now, let’s explore three different methods of how to change your Apple ID email address, tailored to various user preferences.
Method 1: For Mac Users
If you’re a Mac enthusiast, changing your Apple ID email is straightforward:
- Step 1: Click the Apple logo at the top left corner of your screen.
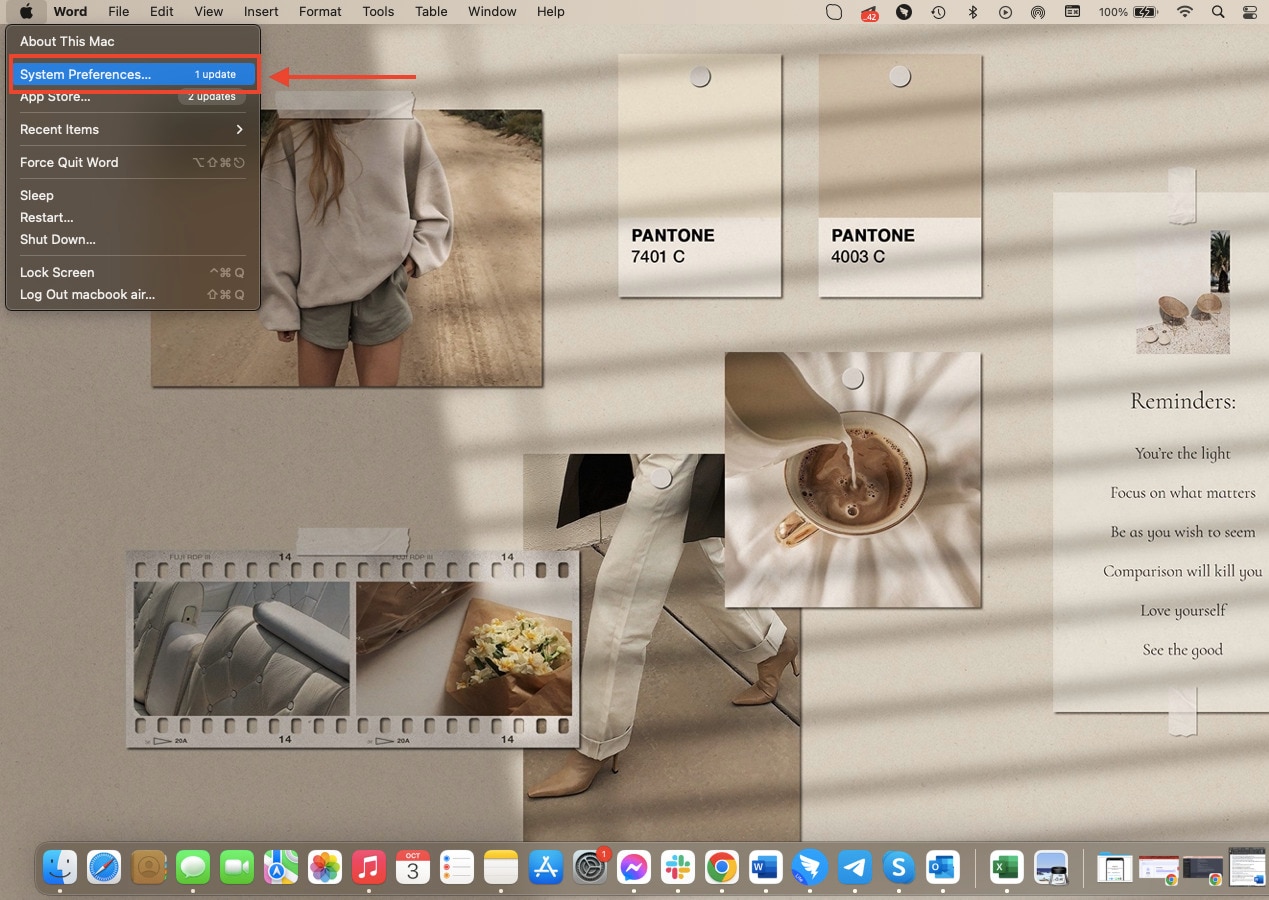
- Step 2: Click System Preferences, and then select Apple ID.
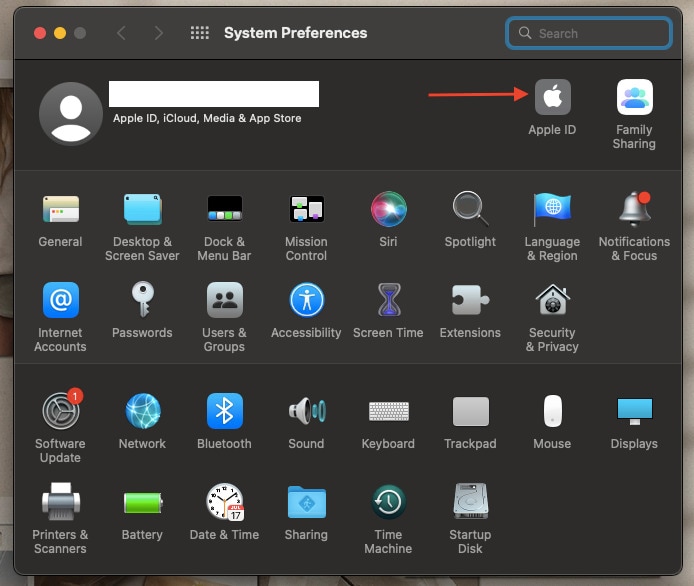
- Step 3: Navigate to the Name, Phone, Email section, then click Edit next to your email address.
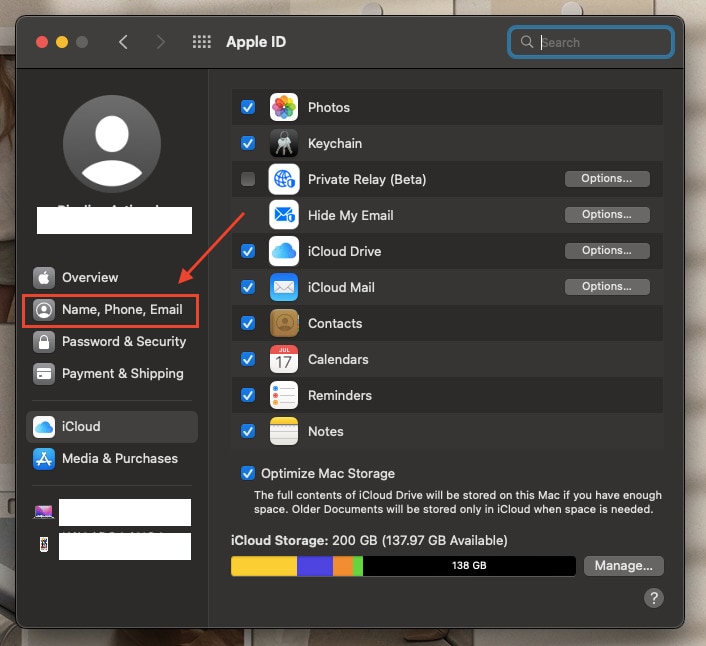
- Step 4: Input your new email address, and Apple will send a verification code to it.
- Step 5: Check your new email for the verification code, enter it, and voilà! Your Apple ID email is updated on your Mac.
Method 2: For Mobile Device Users
For those who prefer the convenience of mobile devices:
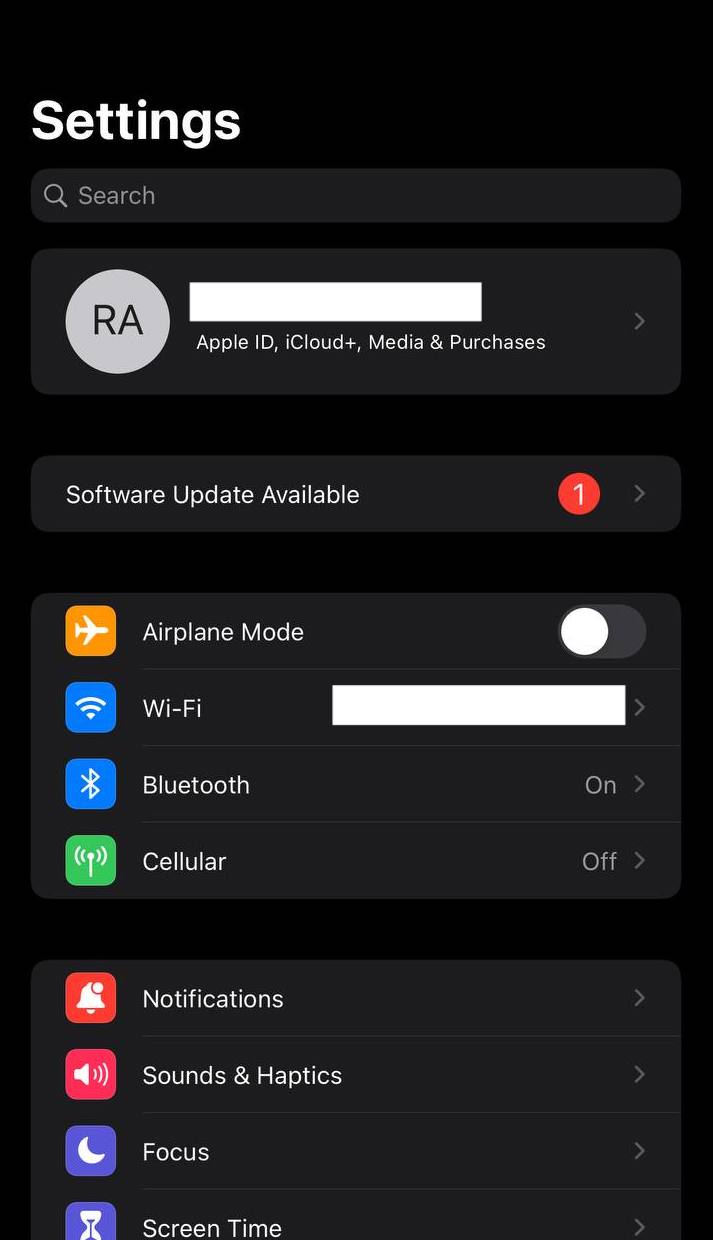
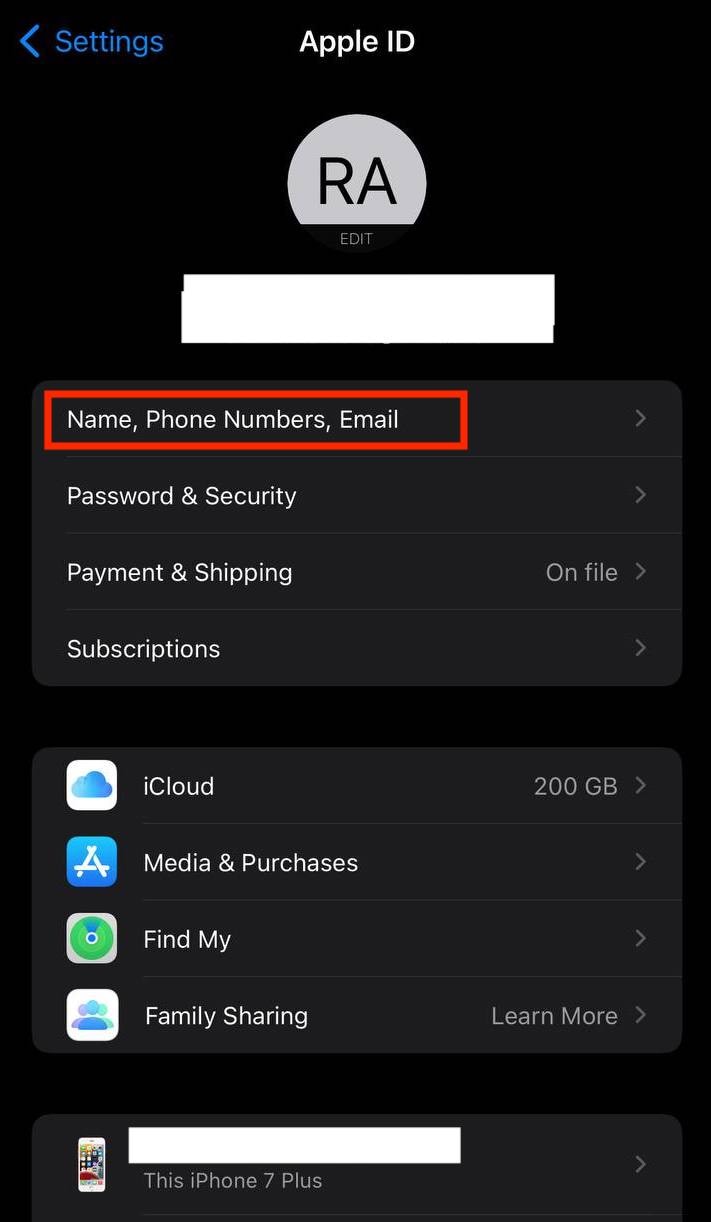
- Step 1: Open the Settings app on your Apple iPhone 6s Plus or iPad, then tap your Apple ID at the top of the screen.
- Step 2: Tap Name, Phone Numbers, Email.
- Step 3: Tap Edit next to your email address, enter your new one, then tap Next.
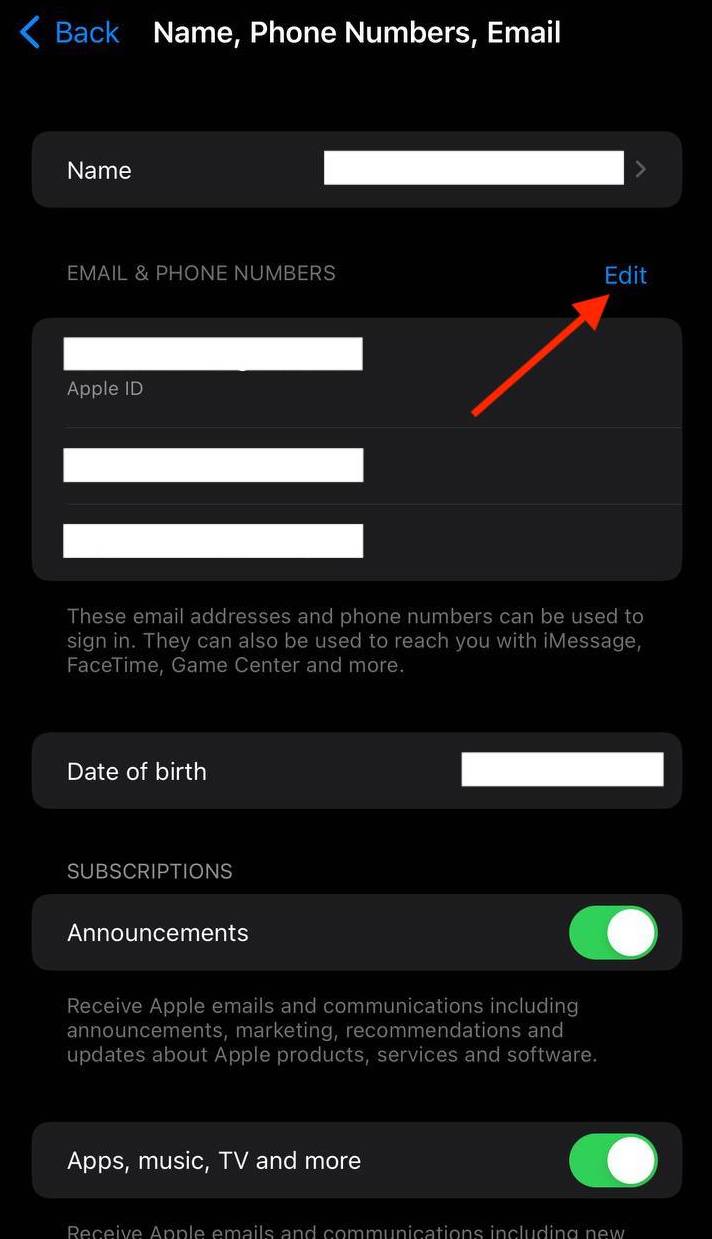
- Step 4: Apple will send a verification code to the new email. Enter it, and your Apple ID email on your mobile device is updated.
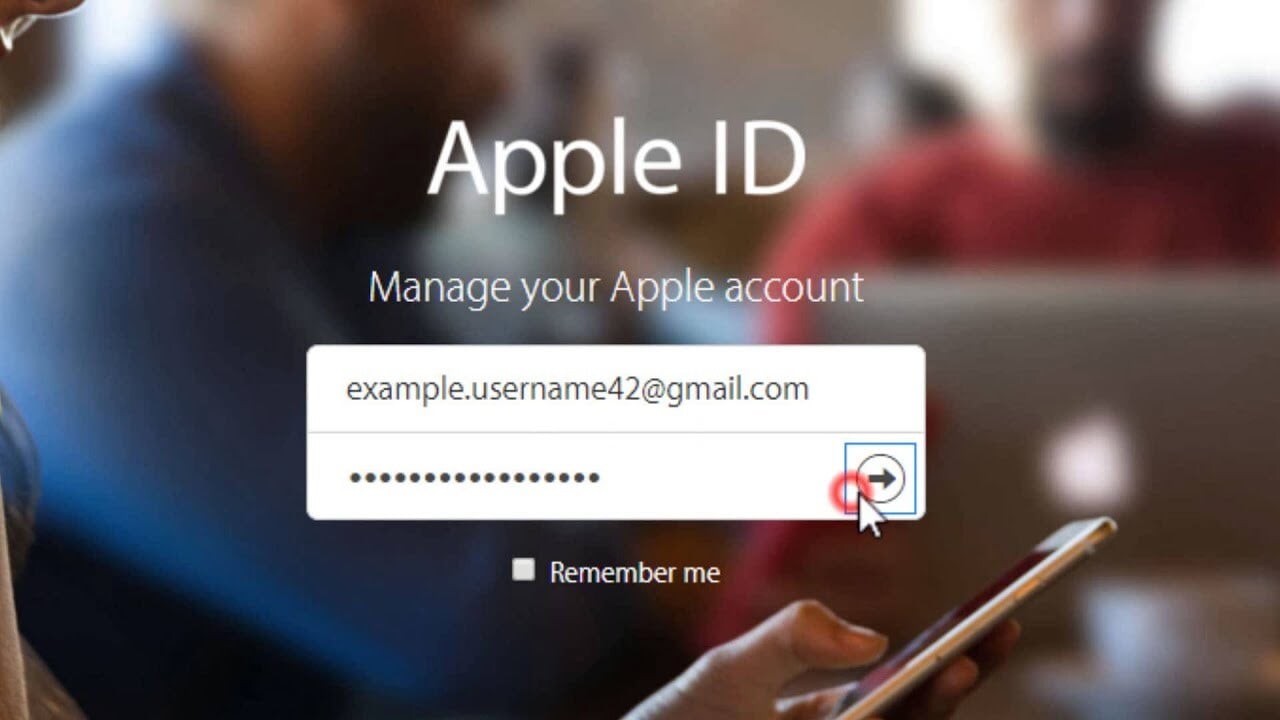
Method 3: For Browser Users
If you prefer the simplicity of a web browser:
- Step 1: Open the web browser your prefer and go to the Apple ID account management page.
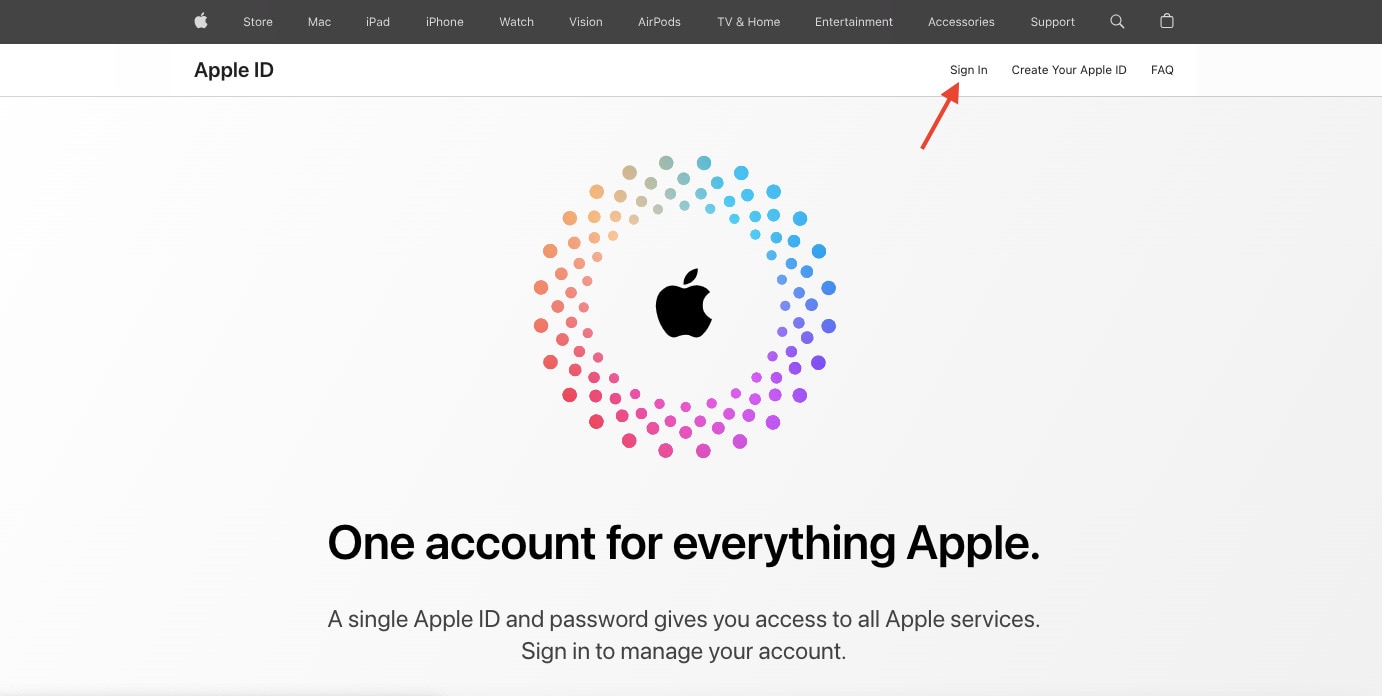
- Step 2: Click Sign In and tap your Email or Phone Number and Password.
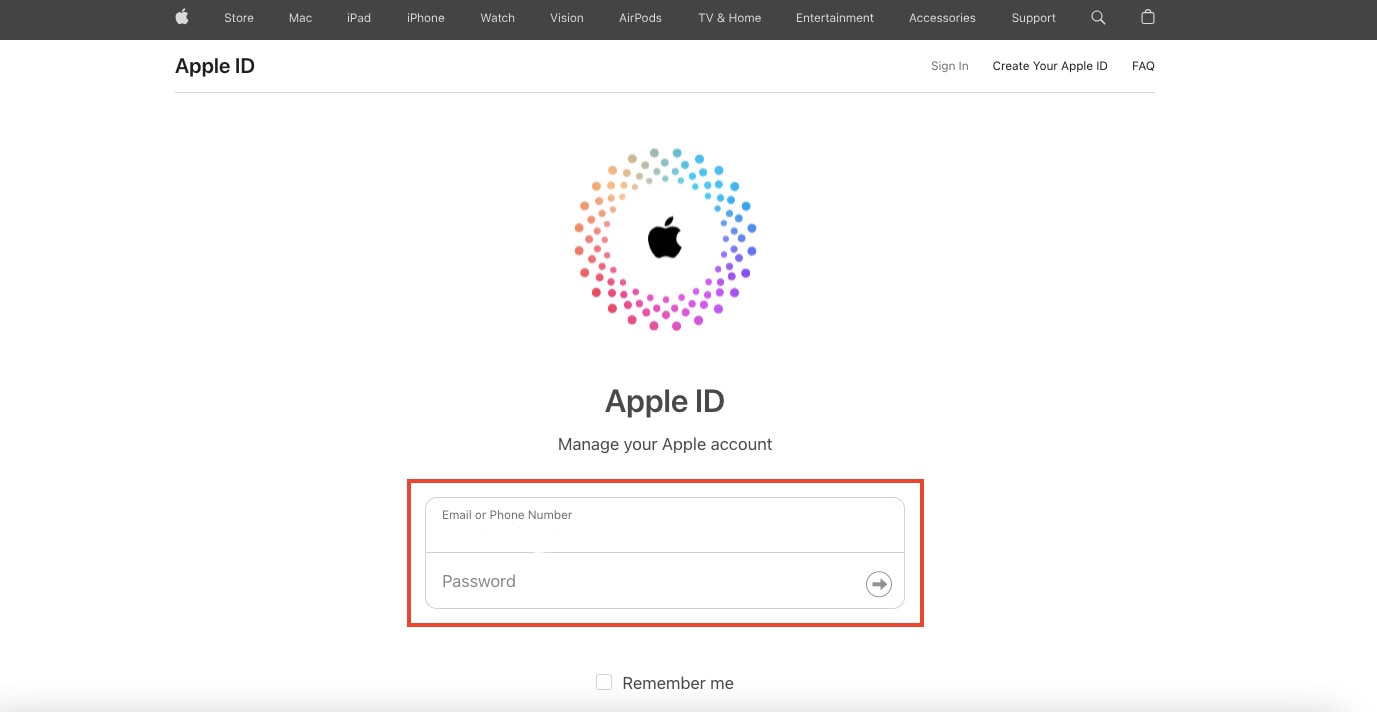
- Step 3: Click Edit next to your email address in the Account section.
- Step 4: Input your new email address and click Continue.
- Step 5: A verification code will be sent to your new email. Enter it to confirm your email change.
B. Updating Your Apple ID
Now that you’ve successfully changed your Apple ID email, it’s crucial to ensure that all your Apple devices are on the same page:
- Step 1: Tap the Settings application on your Apple iPhone 6s Plus or iPad.
- Step 2: Go to Update Apple ID Settings below your Apple ID settings.
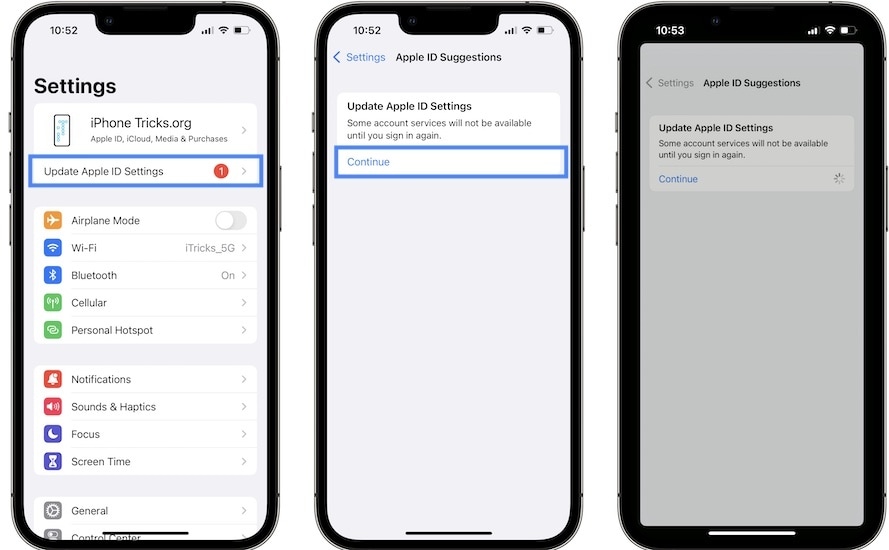
- Step 3: Tap Continue, then wait for a few moments. Your Apple ID will then get updated.
By following these steps, you’ll ensure that all your Apple devices are synced with your updated email address, providing a seamless and consistent Apple experience across all your gadgets. Now, with your new Apple ID email, you’re ready to explore the Apple ecosystem with renewed convenience and security.
Part III: Unlock iOS Screen With Wondershare Dr.Fone - Screen Unlock (iOS)
What if you find yourself in a situation where you want to change your Apple ID email address on your iOS device, but you’re locked out? Don’t worry; Dr.Fone - Screen Unlock (iOS) can rescue you. This handy tool is designed to help you unlock your iOS device, allowing you to change your Apple ID email address smoothly.
Key Features of Dr.Fone - Screen Unlock (iOS)
Check out the key features that Dr.Fone has to offer:
- **User-Friendly Interface.**Fone - Screen Unlock (iOS) is designed to be easy to use, making it accessible for users of all levels of technical expertise.
- It fits a wide range of iOS devices, including iPhones and iPads, ensuring that you can unlock your device no matter which one you have.
- **Multiple Unlock Modes.**Fone offers different unlock modes to cater to various scenarios. Whether you’ve forgotten your passcode, have a disabled device, or are dealing with a locked Apple ID, Dr.Fone has a solution.
- **No Data Loss.**One of the most significant advantages of Dr.Fone is that it unlocks your device without causing any data loss. Your photos, apps, and important information remain intact.
Step-by-Step Guide on Using Dr.Fone - Screen Unlock (iOS)
Outlined below is the step-by-step guide on how to use Dr.Fone – Screen Unlock for iOS devices:
- Step 1: When you’ve finished downloading and installing Wondershare Dr.Fone on your computer, go to Toolbox, then Screen Unlock, and choose iOS to open the tool in a new window.
- Step 2: Begin to pick the Unlock iOS Screen button in the new window to begin unlocking the screen of your iOS device. On the following screen, click the Start button to begin unlocking the iOS device.
Note: Ensure your device’s battery levels are enough before proceeding.
- Step 3: Following that, place your iDevice in Recovery Mode. Follow the on-screen instructions to set your iDevice into mode based on your phone model.
Note: If Recovery Mode does not work, try hitting the Try DFU Mode button at the bottom to access the instructions for putting the iDevice in DFU mode.
- Step 4: After successfully entering your device into Recovery Mode, the platform automatically recognizes the Device Model and shows it in the appropriate section. Modify the model and select the System Version to meet your needs if necessary. After that, select Start to begin unlocking your device’s screen.
- Step 5: The next screen shows the progress of your iOS firmware download. If at any point you decide you’d rather call it quits, hit the Stop button. If the iOS firmware takes a long time to download on your platform, you can copy the download link by clicking the Copy option.
- Step 6: After a successful download, the iOS firmware is checked and shown on the next screen. Select the Unlock Now option again to proceed with the unlocking procedure. A confirmation popup displays, requesting you to confirm the action. Enter the unlock code and press the Unlock button to continue.

- Step 7: You’ll see the unlocking status of your iOS device on the following screen. Don’t forget that keeping the gadget plugged in is necessary to avoid bricking it.
- Step 8: Click the Done button once the iDevice has been unlocked. If you’re still stuck with a locked iPhone, iPad, or iPod, select Try Again to retry the process.
By using Dr.Fone - Screen Unlock (iOS), you can regain access to your iOS device and continue with the process of changing your Apple ID email address hassle-free. It’s a reliable and user-friendly solution that ensures you can enjoy the benefits of the new email address without losing any of your precious data.
You May Also Like:
How to Show Email Password on iPhone and Find It Back
A Detailed Guide to Fix All iPad Email Problems [2023]
How to Fix Email Disappeared from iPhone?
Conclusion
This guide easily explored the process of changing your Apple ID email address. It started by understanding why this change might be necessary and provided straightforward methods for Mac, mobile, and browser users to accomplish it seamlessly.
But what if you’re locked out of your iOS device? Don’t fret; Dr.Fone - Screen Unlock (iOS) is a user-friendly tool that can help you regain access to your device. It ensures a smooth transition to your new email. Unlock new possibilities with Dr.Fone, a reliable companion in managing your iOS device. Explore its features and simplify your Apple journey today!
- Title: How To Remove Flashlight From Apple iPhone 6s Plus Lock Screen | Dr.fone
- Author: Amelia
- Created at : 2024-07-15 05:06:17
- Updated at : 2024-07-16 05:06:17
- Link: https://iphone-unlock.techidaily.com/how-to-remove-flashlight-from-apple-iphone-6s-plus-lock-screen-drfone-by-drfone-ios/
- License: This work is licensed under CC BY-NC-SA 4.0.