
How to Turn Off Find My iPhone SE when Phone is Broken? | Dr.fone
How to Turn Off Find My Apple iPhone SE when Phone is Broken?
In today’s world, your phone is your most important asset. Especially when you own an iPhone, you’re much more careful because it is pretty expensive than normal phones. You’re always making sure to keep it safe and secure, but Apple has ways to keep you away from this hassle.
Apple ensures the privacy and security of its customers. For that, it has introduced this excellent feature of Find My iPhone, which keeps track of the location of your device no matter in which part of the world you are. So, if you’ve lost your Apple iPhone SE or it is stolen, this app is your savior.
Downloading and enabling Find My iPhone can be really easy and cinch but turning it off can be an arduous task. But we have you covered through this article that shall tell you about this app in detail and guide you on how to turn off Find My iPhone even when your Apple iPhone SE is broken.
Part 1: What is Find My iPhone?
Find My iPhone is an application forged by Apple that keeps track of your Apple iPhone SE’s location protects your data. Once you enable this application, it requires your iCloud password to unlock your phone to keep your Apple iPhone SE safe from the wrong hands. This application comes in handy when you accidentally lose or misplace your phone.
The best part about this application is that it is free of cost. It usually comes built-in your Apple iPhone SE already, but if not, you can easily download it from the app store. Sign in with your Apple ID, and it will automatically locate your Apple iPhone SE no matter where you go.

Part 2: Efficient Way of Turning Off Find My iPhone Within Second- Dr. Fone
Dr.Fone - Screen Unlock is an excellent data recovery and management software created by Wondershare. However, limiting it to just recovery and management of data will not be just as it offers much more than just that. Transferring files, repairing the operating system, changing the GPS location, and fixing the activation lock are its amazing services.
Dr.Fone - Screen Unlock (iOS)
Turning Off Find My iPhone Within Second.
- Maintains the security of your data and keeps it in its original form.
- Recovers your data from damaged or broken devices.
- Erase’s data in such a way that no other software can recover it.
- Has great integration with iOS and macOS.
3981454 people have downloaded it
Dr.Fone can also be a great solution for how to turn off Find My iPhone when your Apple iPhone SE is broken.
Step 1: Install Dr. Fone
Launch Wondershare Dr.Fone on your computer and connect your Apple iPhone SE with it via cable.
Step 2: Unlock Apple ID
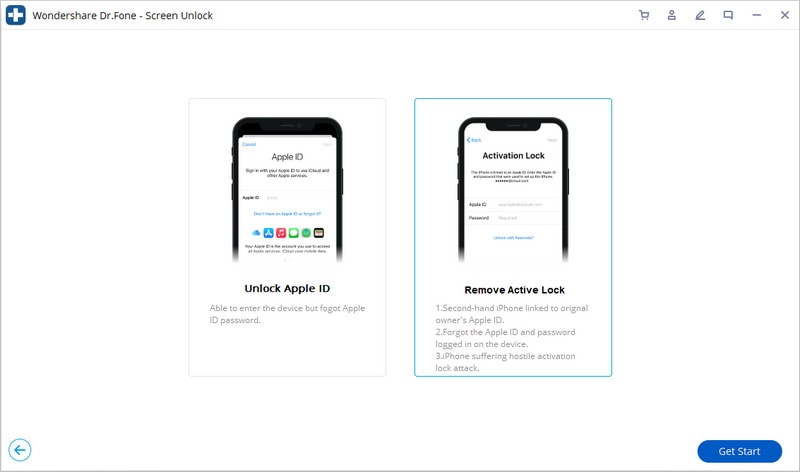
Open Wondershare Dr.Fone and select “Screen Unlock” among the other options on the home interface. Now another interface will appear displaying four options. Click on “Unlock Apple ID.”

Step 3: Remove Active Lock
After choosing the “Unlock Apple ID” option, an interface will be displayed that will show another two options, out of which you have to select “Remove Active Lock” to proceed further.
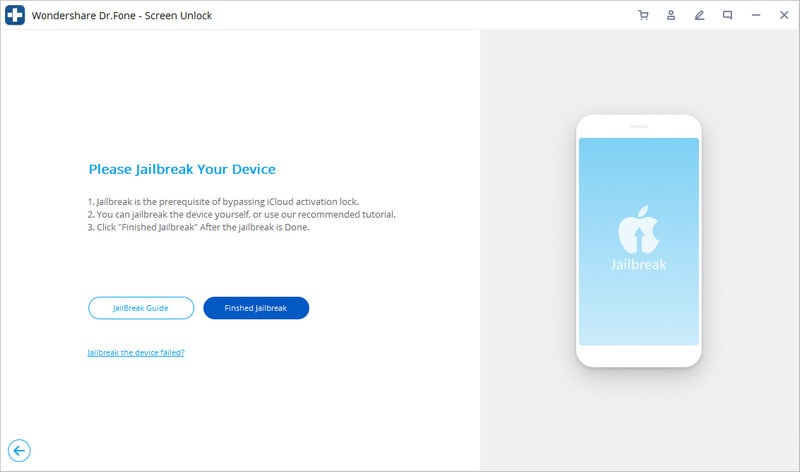
Step 4: Jailbreak your Apple iPhone SE
Jailbreak your Apple iPhone SE by following the instructions given by the system. Once you complete them, click on “Finish Jailbreak.”
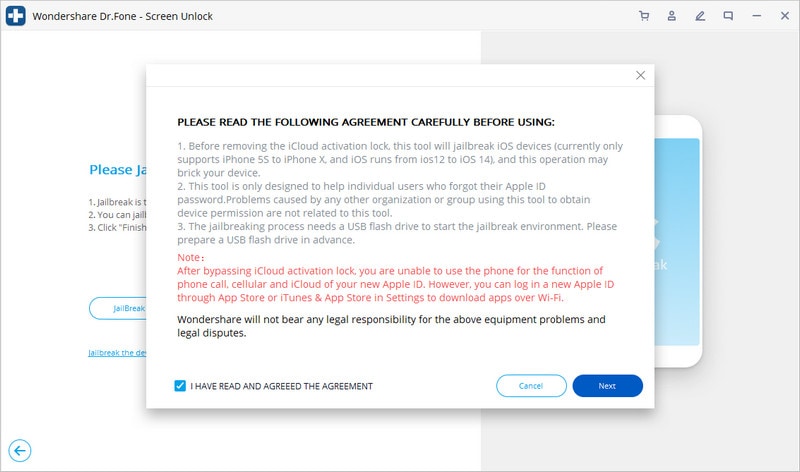
Step 5: Confirmation Window
A warning will be displayed on the screen asking for confirmation to remove the active lock. Then again, another confirmation message will pop up confirming the model of your device.
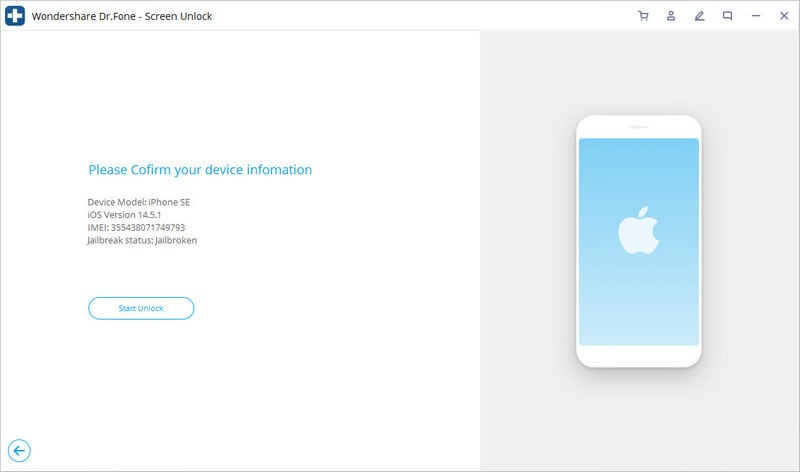
Step 6: Unlock your Apple iPhone SE
Click on “Start Unlock” to proceed. Once the process is started, you have to wait for a moment until the activation lock is successfully removed.
Step 7: Turn off Find My iPhone
As your activation lock is removed, go to the settings and remove your Apple ID. Consequently, Find My iPhone will be disabled.

Part 3: How to Turn Off Find My iPhone on Broken iPhone Using iCloud?
iCloud is the most secure storage drive introduced by Apple. It keeps your gallery, your reminders, contacts, and your messages up to date. Moreover, it also organizes and stores your files while keeping them private and secure. iCloud strongly integrates your Apple iPhone SE with other iOS devices so you can share your data, documents, and location with other iCloud users.
As mentioned earlier, turning off Find My iPhone can be very complex. But if your Apple iPhone SE is damaged in some way, turning it off can be much more stressful. Here, iCloud can come to the rescue as it’s the most effective solution for how to turn off Find My iPhone when your phone is broken.
Here we have explained to you step by step how to turn off Find My iPhone on broken iPhone using iCloud:
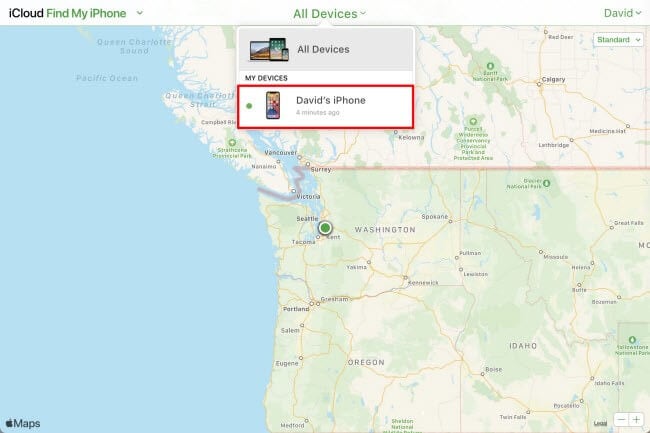
Step 1: Go to the official website of iCloud.com and enter your credentials to sign in with your Apple ID.
Step 2: Click on the “Find My iPhone” icon at the end of the page. The app will start locating your device, but as your Apple iPhone SE is damaged, it might not find anything.

Step 3: Click on the “All Devices” option from the top. Select your Apple iPhone SE, which you want to remove by clicking on “Remove from account.”
Step 4: Once your device is removed from the account, a window will pop up asking you to delete the option of that device from your iCloud account. Now you may log in Find My iPhone with your iCloud account on another device.
Part 4: Turn off Find My iPhone using Recovery Mode
The recovery model of the Apple iPhone SE allows you to reset or restore your data. It also offers data cleaning and backing up of apps to keep your Apple iPhone SE updated and free of glitches. When your phone is lagging or not working properly, then you need to put it into Recovery Mode.
However, Recovery Mode can also be useful to turn off Find My iPhone on your device. Here are the steps that will guide you on how to turn off Find My iPhone on a broken phone using Recovery Mode.
Step 1: Connect your Apple iPhone SE to your computer via cable and wait for your computer to detect your device.
Step 2: As soon as your Apple iPhone SE is detected, open iTunes and force restart your phone to activate the Recovery Mode. Activating this mode is different for different models of iPhone.
- For iPhone 8 and the later: Press the Volume Down button and release is immediately. Then press the Volume Up button and release it immediately again. After that, press and hold the Power Button until you see the Apple logo.
- For iPhone 7 and 7+: Press the Power Button and Volume Down button at the same time and hold them until the Apple logo appears on your screen.
- For iPhone 6s, and Previous Models: Press and hold the Home Button and Power button concurrently until your Apple iPhone SE shows the Apple logo.
Once your Apple iPhone SE shows the Apple logo, it means the Recovery Mode is activated.
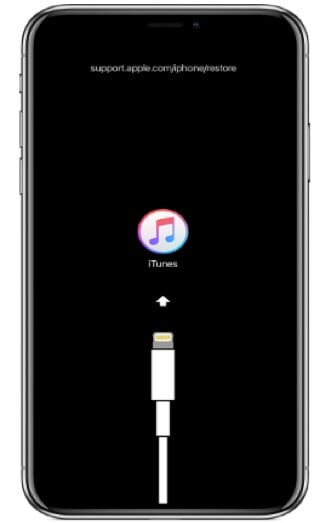
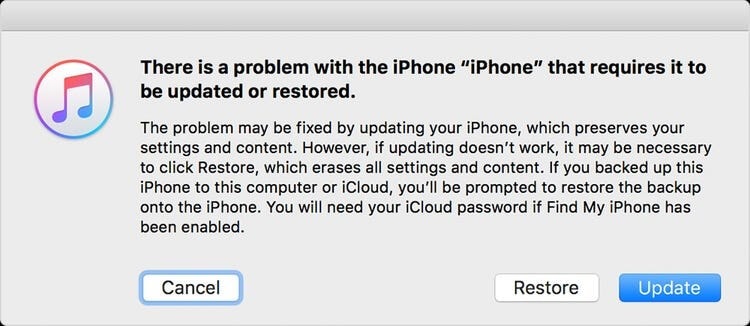
Step 3: Now click on “Restore” so iTunes can download software on your Apple iPhone SE. Once the process is completed, you can set up your Apple iPhone SE as new. This means your previous data will be erased, and Find My iPhone will be disabled automatically.
Conclusion
Now we’re done as we’ve provided you the best possible solutions to turn off Find My iPhone when your Apple iPhone SE is broken. It is obvious that it is a quite complicated process, but you have to be patient and follow the steps correctly to disable Find My Apple iPhone SE to avoid any inconvenience in the future. We hope this article answers all your queries regarding it.
How to Unlock Disabled Apple iPhone SE/iPad Without Computer
Forgetting the Apple iPhone SE or iPad passcode could be the worst nightmare for plenty of iOS users. If you are also locked out of your Apple iPhone SE, then don’t worry. There are several ways to learn how to unlock a disabled Apple iPhone SE without a computer. Surprisingly, you don’t need to take the assistance of a computer to unlock your iOS device. This guide will make you familiar with how to unlock the iPad passcode without a computer. Read on and learn how to unlock the disabled Apple iPhone SE without a computer right away.
Part 1: How to unlock disabled Apple iPhone SE without computer using Siri?
Accessing Siri is the first thing that comes to iOS users’ minds whenever they get locked out of their Apple iPhone SE . It might surprise you, but you can also take the assistance of Siri to unlock your phone. Most users prefer this technique, as it doesn’t require a computer and can unlock an iOS device without erasing its data.
Though, before you proceed, you need to know the limitations of this method. Since it is considered a loophole in iOS, it doesn’t always yield desirable results. It has been observed that the method only works on devices running from iOS 8.0 to iOS 10.1. To learn how to unlock iPad passcode without a computer, follow these stepwise instructions:
Step 1. Activate Siri on your iOS device by holding the Home button. Ask for the present time by giving a command like “Hey Siri, what time is it?” to proceed. Siri will let you know the current time by displaying a clock. Tap on it.

Step 2. Tap on the Add (plus) icon.

Step 3. From here, you can search for a city. Just type anything you want and tap again to get various options. Choose the “Select all” button to get more options.

Step 4. Select the feature of “Share.”

Step 5. Tap on the message icon.

Step 6. It will open another interface to draft a new message. Wait for a while and write something in the “To” field. Once you are done, tap on the return button on the keyboard.

Step 7. This will highlight your text in green. Now, tap on the add icon located nearby.

Step 8. A new interface would be launched to add a new contact. From here, tap on the “Create New Contact” button.

Step 9. Instead of adding information regarding a new contact, tap on the photo icon, and choose the option of “Add Photo.”

Step 10. This will open your device’s gallery. You can browse your photo library from here.

Step 11. After a while, press the Home button. If everything goes right, you will enter the Home screen of your iOS device after unlocking it.

By following this technique, you would also learn how to unlock the disabled Apple iPhone SE 4. Though, you need to ensure that the iOS device you are using would support this feature.
Part 2: How to unlock disabled Apple iPhone SE using Find My Apple iPhone SE?
The chances are that your iOS device might not work with the above-stated solution, or it’s latest iOS version. Therefore, you would be required to take the assistance of another method to unlock your device. With the help of Apple’s official Find My Apple iPhone SE service, you can easily restore your device remotely. It is also used to locate an iOS device, play a sound, and lock it remotely.
After implementing this solution, your iOS device will reset, and your data would be erased. Nevertheless, in the end, it will automatically reset its lock as well. Follow these steps:
Step 1. Open iCloud’s website on any other handheld device of your choice. Not just your system, you can open the website on any other smart device as well. Use your Apple ID and password to log in to your iCloud account.
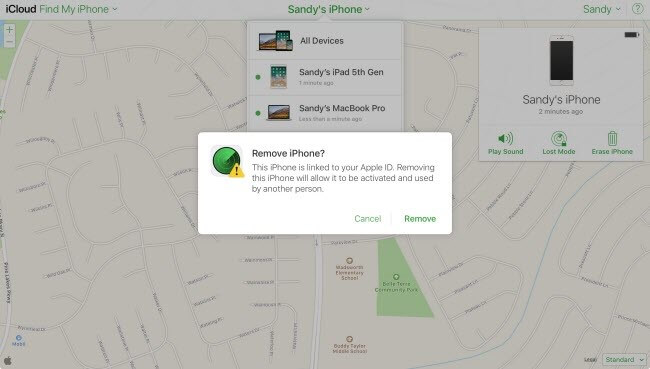
Step 2. Visit the Find My Apple iPhone SE service. Under the “All Devices” category, you can view all the iOS devices linked to your Apple ID. Select the Apple iPhone SE device you want to reset.

Step 3. Select the feature of the Erase device and confirm your choice. Wait for a while as your Apple iPhone SE or iPad would be restored remotely.

By following this method, you can learn how to unlock the iPad passcode without a computer remotely.
Part 3: Unlock disabled Apple iPhone SE/iPad using Dr.Fone - Screen Unlock?
Dr.Fone can help you to remove the screen from the disabled Apple iPhone SE or iPad. It can also unlock the Apple ID after you forgot the Apple ID email or password.
- Easy operations to unlock the Apple iPhone SE without the passcode.
- Removes the Apple iPhone SE lock screen without relying on iTunes.
- Works for all models of Apple iPhone SE, iPad, and iPod touch.
- Fully compatible with the latest iOS 14.

Step 1. Install Dr.Fone on your computer.
Step 2. Open ‘Screen Unlock’. Select ‘Unlock iOS Screen.’
Step 3. Follow the on-screen instruction.
Boot your Apple iPhone SE into DFU mode.

Select device information on Dr.Fone

Step 4. Start to Unlock. The phone will be unlocked after that.

Part 4: Tips to protect your Apple iPhone SE from being unlocked by thieves
As you can see, anyone can learn how to unlock the disabled Apple iPhone SE 4 without a computer and other iOS devices as well. Therefore, if you don’t want your Apple iPhone SE and iPad to be misused by thieves, you should take some added measures. Follow these suggestions to increase security on your iOS device.
1. Disable Siri from the lock screen
If someone can’t access Siri from the lock screen, then they won’t be able to follow the above-mentioned process to unlock an iOS device. Therefore, it is highly recommended to disable Siri from the lock screen. To do this, visit your device’s Settings > Touch ID & Passcode, and under the “Allow access when locked” section, disable the option of “Siri.”

2. Enable Find My Apple iPhone SE service
There are times when users forget to enable the Find My Apple iPhone SE feature on their iOS device. To access this feature, make sure that it is turned on. To do this, go to your device’s Settings > iCloud > Find My Apple iPhone SE and turn on the feature of “Find My Apple iPhone SE.” Additionally, you should turn on the “Send the last location” option as well.

3. Set a strong alphanumeric password
One of the best ways to secure your iOS device is by adding secure passwords. To do this, visit your device’s Settings > Touch ID & Passcode > Change Passcode and select the option of “Custom Alphanumeric Code.” Provide a strong alphanumeric passcode to boost the security of your device.

Conclusion
By implementing the above suggestions, you can easily make your iOS device more secure. Additionally, we have also listed two stepwise solutions that can unlock your iPad or Apple iPhone SE without taking the assistance of a computer. Now when you know how to unlock a disabled Apple iPhone SE without a computer, you can easily make the most out of your iOS device.
How To Fix Auto Lock Greyed Out on Apple iPhone SE
Auto-lock on iOS devices serves multiple purposes - it conserves battery life, secures your data, and more. But have you encountered the Auto-Lock greyed-out dilemma, fixed at 30 seconds? When this setting becomes inaccessible, it limits your control over screen timeout.
Read on if you’ve encountered a similar problem on your iOS device. In this guide, we’ll explore the possible reasons and offer steps to fix Auto-Lock greyed out on iPhone and iPad devices. If force restarts or settings resets haven’t worked for you, we’ve got alternative solutions. Let’s get started.

Part 1: Why Is Auto-Lock Greyed Out on iOS Device?
There are a few reasons why the Auto-Lock might be greyed out on your Apple iPhone SE or iPad device, preventing you from adjusting the duration. Here are the most common culprits:
Low Power Mode
When you activate Low Power Mode on your iOS device, you might notice the screen automatically locking after 30 seconds of inactivity. This quick sleep setting, implemented to minimize power usage, explains why the Auto-Lock option appears greyed out and inaccessible.
Screen Time Restrictions
Screen Time restrictions can impact Auto-Lock. For instance, if your downtime schedule blocks all apps, the screen locks itself, even if the Auto-Lock timer hasn’t run out.

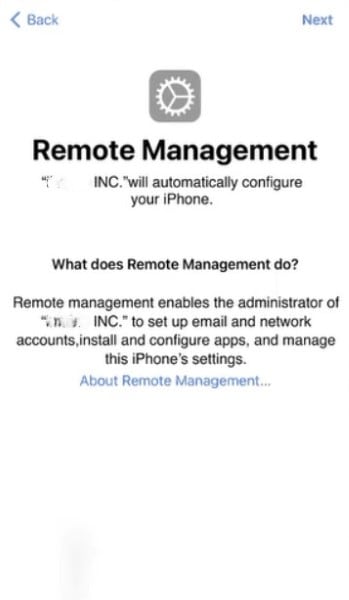
MDM Profile Restrictions
If the Auto-Lock is greyed out on your iPad or iPhone and you use it for work or school, a Mobile Device Management (MDM) profile might be the reason. This profile restricts settings, including Auto-Lock. To fix this, contact your IT administrator and ask if they can adjust the MDM profile settings.
Alright, you know the possible reasons why the Auto-Lock option is not working on your iOS device. Still, you might be wondering how to fix the Auto-Lock greyed-out issue. Below are several ways to get your iPad or iPhone Auto-Lock working normally again.
Fix No.1: Disable Low Power Mode
Your iPhone Auto-Lock greyed out because Low Power Mode limits background activities, including the Auto-Lock option. In this mode, you cannot change the Auto-Lock settings. Turn off Low Power Mode to fix this issue and choose your preferred timeout. Here’s how:
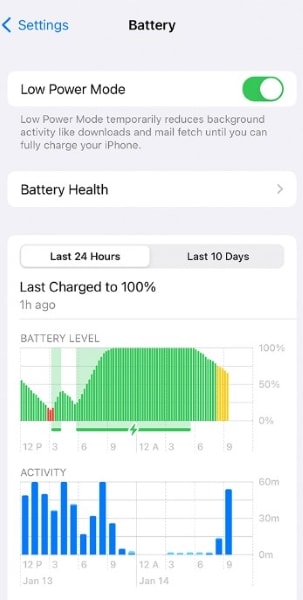
- Step 1: Go to your Apple iPhone SE or iPad’s Settings app.
- Step 2: Scroll down and tap Battery. It will show you your device’s battery usage and available settings.
- Step 3: Turn off the Low Power Mode. Now, the greyed-out Auto-Lock option in Settings should be available again.

Low Battery Mode can stretch your battery life further. But if you need your screen to stay on longer, like while reading an article or watching a video, you can turn it off. It lets you adjust the screen timeout in Settings so it stays awake for as long as you like.
Fix No.2: Check Screen Time Restrictions
You’ve ruled out the Low Power Mode, but the Auto-Lock greyed out on iPad or iPhone remains. If Low Power Mode isn’t causing the problem, your screen time settings might be the issue. Some app restrictions can limit your screen use to specific times, causing it to lock automatically. Resolve this by removing limits, such as downtime and app restrictions, or turning it off.
- Step 1: Open the Settings app on your iOS device.
- Step 2: Go to Screen Time, then scroll down.
- Step 3: Tap Turn Off Screen Time.

Fix No.3: Remove MDM Configuration Profile
A configuration profile is a file that contains settings and restrictions that can be applied to an iOS device. Organizations, schools, or IT administrators often use it to manage devices remotely and enforce specific configurations. Once installed, the settings within a profile override the Apple iPhone SE device’s default settings. It can include restrictions related to security, network access, app usage, and more.
Since an MDM configuration profile causes limitations, like the greyed-out Auto-Lock on iPad, removing it can be the solution. Doing so frees your iOS device from external settings imposed by the profile. Then, it could allow you to adjust the Auto-Lock time setting as you normally would.
Step 1: See the configuration profiles you installed on your iOS device.
Go to Settings> General > VPN & Device Management on your Apple iPhone SE.
Go to Settings> General > Profiles & Device Management on your iPad.
Step 2: Select the configuration profile you need to delete.
Step 3: Tap Remove Profile, enter your device passcode, then tap Remove.

Fix No.4: Remove Network Settings Installed by MDM
Businesses often use Mobile Device Management (MDM) to remotely manage their employees’ iPhones and iPads. MDM lets IT admins push software updates, restrict apps, and remotely wipe a lost device. This keeps corporate data safe and devices under control, whether the company or the employee owns them.
If you’re having trouble with a greyed-out Auto-Lock timeout setting, disassociating your device from MDM might be an option. But remember, this is a big step. Make sure you follow your company’s authorized procedures to avoid unintended consequences.
If your IT team gives the green light, you might also be able to remove the network settings installed by MDM. Just proceed with caution, as messing with these settings could lead to instability or data loss. Here’s how:
- Step 1: Open the Settings app on your iOS device.
- Step 2: Navigate to General > Profile or VPN & Device Management (or a similar section).
- Step 3: Select the management and tap Remove Management.

If the option is unavailable, only the person who used Apple Configurator 2 or handles your company’s mobile device management platform can remove it.
Fix No.5: Use Dr.Fone To Bypass MDM Lock Without Data Loss
Unfortunately, manually removing profiles can be tricky, especially if they’re associated with MDM, Apple School Manager, or supervised configurations. These often require the removal of passwords, admin privileges, or complete data wipes. But there’s good news. Wondershare Dr.Fone - Screen Unlock (iOS) provides a simpler and safer solution.
Here’s why you should try it:
- **Speedy and Efficient:**No more endless troubleshooting. Dr.Fone bypasses the MDM lock in minutes, saving you precious time.
- **Data Stays Safe:**Unlike factory resets, Dr.Fone keeps all your precious photos, messages, and apps right where they belong.
- **No Jailbreaking:**Say goodbye to complex hacks and warranty voiding. Dr.Fone works without jailbreaking your Apple iPhone SE, keeping it healthy and secure.
- **Universal Compatibility:**Whether you own the latest iPhone with iOS 17 or an older version, Dr.Fone has your back. It supports all iOS devices and versions starting from iOS 7.0.
Have you ever bought a used iPad or Apple iPhone SE to find the Auto-Lock option greyed out and isn’t working? Mobile Device Management (MDM) profiles, often deployed by companies or schools, can restrict functionality. If you lack the credentials to bypass or remove it, Dr.Fone can help remove all MDM restrictions on your iOS device. Here’s how:
- Step 1: Download and open Dr.Fone on your computer. Next, connect your Apple iPhone SE or iPad to the computer using a USB cable and navigate to Toolbox > Screen Unlock > iOS.

Tips: Are you searching for a powerful Screen Unlock tool? No worries as Dr.Fone is here to help you. Download it and start a seamless unlock experience!
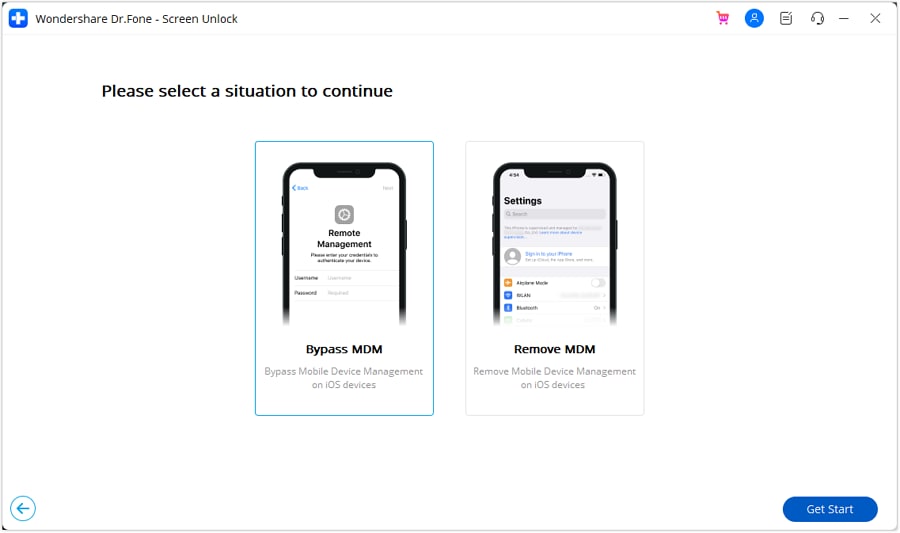
- Step 2: Within the Screen Unlock tool window, select Unlock MDM iPhone.

- Step 3: Select Bypass MDM, then click Get Start to proceed.
- Step 4: Please review the message carefully before initiating the MDM bypass process. Once you’ve read it, click Start to Bypass to proceed.

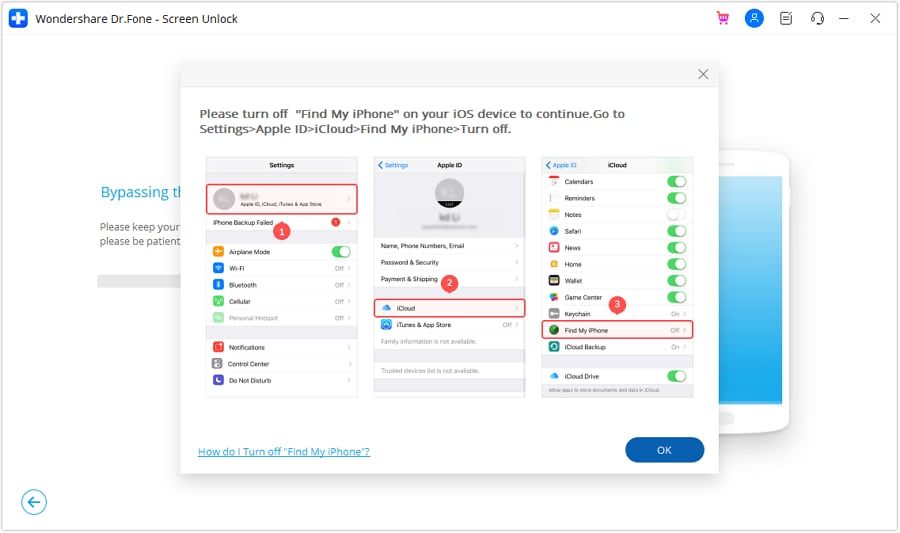
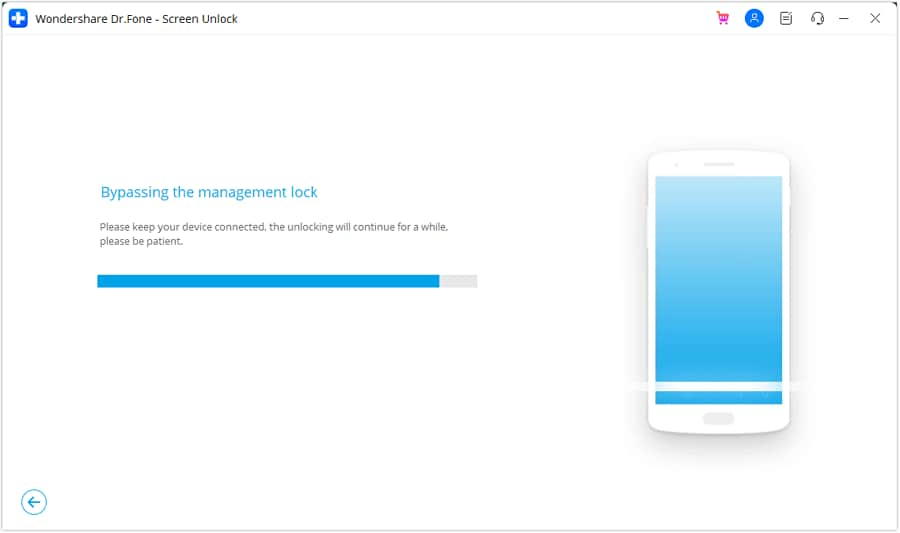
- Step 5: If prompted, go to your device’s Settings > Apple ID > iCloud and turn off the Find My feature. Next, click OK to initiate the MDM bypass.
- Step 6: The software will display the progress of the bypass. Wait for it to complete.
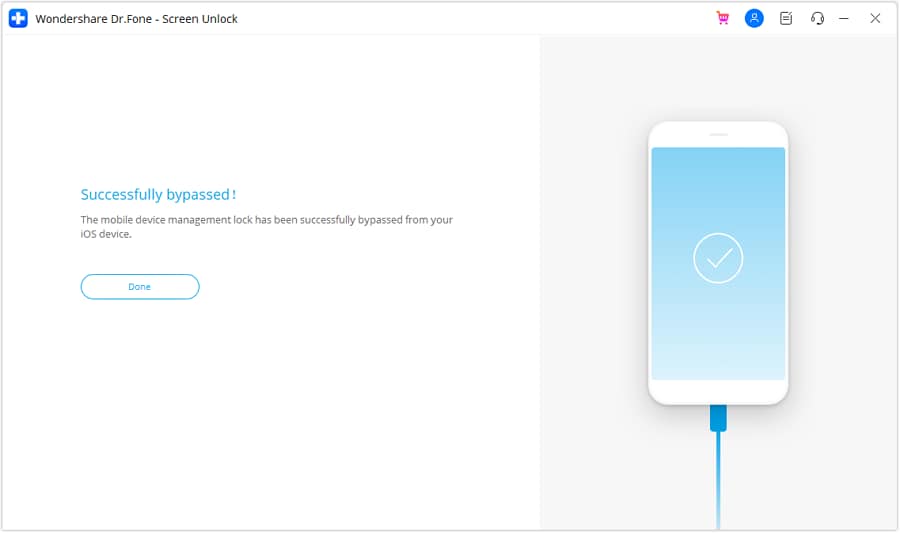
- Step 7: You’ll see a confirmation message once the bypass is successful. Click Done to exit. Your device should now be free from MDM restrictions.
Fix No.6: Check and Adjust Auto-Lock Settings
Once you’ve tried all the fixes above, you might need to set up the Auto-Lock timeout again.
- Setup Auto-Lock on iPad
Here are the steps on how to change Auto-Lock on iPad devices:
- Step 1: Within the Settings app, scroll down the list on the left-hand side and tap Display & Brightness.
- Step 2: On the right-hand side of the Display & Brightness screen, tap the Auto-Lock option.

- Step 3: A list of time options will appear, ranging from 2 minutes to 15 minutes, as well as Never. Select the time you want your iPad to wait before automatically locking the screen after inactivity. If you want the screen to stay on indefinitely, choose Never.

Step 4: Once you’ve selected your preferred auto-lock duration, you can exit the Settings app. The change will be applied automatically.
- Setup Auto-Lock on iPhone
Here’s how to change Auto-Lock on iPhone devices:
- Step 1: Open the Settings app.
- Step 2: Tap on Display & Brightness, scroll down, and tap Auto-Lock.
- Step 3: Choose the desired time interval for your Apple iPhone SE to automatically lock. The available options typically range from 30 seconds to 5 minutes. You may also have the option to select Never if you prefer to have the screen stay on indefinitely until you manually lock it.

Conclusion
There you have it. This guide has equipped you with the knowledge and solutions to fix the Auto-Lock greyed out on your Apple iPhone SE or iPad devices. From identifying the reasons like Low Power Mode and MDM configurations to implementing actionable fixes, you can now change your screen timeout. So, turn off those restrictions, remove MDM profiles, and head back to Settings.
For an easy solution, use Dr.Fone Screen Unlock to bypass MDM restrictions, giving you control over your device. Whether it’s a work phone or a personal device under MDM, Dr.Fone can offer an efficient solution. With a few clicks, you’ll have the Auto-Lock back on track, ensuring your iOS device works again just how you want it.
Tips: Are you searching for a powerful Screen Unlock tool? No worries as Dr.Fone is here to help you. Download it and start a seamless unlock experience!
- Title: How to Turn Off Find My iPhone SE when Phone is Broken? | Dr.fone
- Author: Amelia
- Created at : 2024-07-15 05:13:26
- Updated at : 2024-07-16 05:13:26
- Link: https://iphone-unlock.techidaily.com/how-to-turn-off-find-my-iphone-se-when-phone-is-broken-drfone-by-drfone-ios/
- License: This work is licensed under CC BY-NC-SA 4.0.