
How to Unlock Disabled Apple iPhone XR/iPad Without Computer | Dr.fone
How to Unlock Disabled Apple iPhone XR/iPad Without Computer
Forgetting the Apple iPhone XR or iPad passcode could be the worst nightmare for plenty of iOS users. If you are also locked out of your Apple iPhone XR, then don’t worry. There are several ways to learn how to unlock a disabled Apple iPhone XR without a computer. Surprisingly, you don’t need to take the assistance of a computer to unlock your iOS device. This guide will make you familiar with how to unlock the iPad passcode without a computer. Read on and learn how to unlock the disabled Apple iPhone XR without a computer right away.
Part 1: How to unlock disabled Apple iPhone XR without computer using Siri?
Accessing Siri is the first thing that comes to iOS users’ minds whenever they get locked out of their Apple iPhone XR . It might surprise you, but you can also take the assistance of Siri to unlock your phone. Most users prefer this technique, as it doesn’t require a computer and can unlock an iOS device without erasing its data.
Though, before you proceed, you need to know the limitations of this method. Since it is considered a loophole in iOS, it doesn’t always yield desirable results. It has been observed that the method only works on devices running from iOS 8.0 to iOS 10.1. To learn how to unlock iPad passcode without a computer, follow these stepwise instructions:
Step 1. Activate Siri on your iOS device by holding the Home button. Ask for the present time by giving a command like “Hey Siri, what time is it?” to proceed. Siri will let you know the current time by displaying a clock. Tap on it.

Step 2. Tap on the Add (plus) icon.

Step 3. From here, you can search for a city. Just type anything you want and tap again to get various options. Choose the “Select all” button to get more options.

Step 4. Select the feature of “Share.”

Step 5. Tap on the message icon.

Step 6. It will open another interface to draft a new message. Wait for a while and write something in the “To” field. Once you are done, tap on the return button on the keyboard.

Step 7. This will highlight your text in green. Now, tap on the add icon located nearby.

Step 8. A new interface would be launched to add a new contact. From here, tap on the “Create New Contact” button.

Step 9. Instead of adding information regarding a new contact, tap on the photo icon, and choose the option of “Add Photo.”

Step 10. This will open your device’s gallery. You can browse your photo library from here.

Step 11. After a while, press the Home button. If everything goes right, you will enter the Home screen of your iOS device after unlocking it.

By following this technique, you would also learn how to unlock the disabled Apple iPhone XR 4. Though, you need to ensure that the iOS device you are using would support this feature.
Part 2: How to unlock disabled Apple iPhone XR using Find My Apple iPhone XR?
The chances are that your iOS device might not work with the above-stated solution, or it’s latest iOS version. Therefore, you would be required to take the assistance of another method to unlock your device. With the help of Apple’s official Find My Apple iPhone XR service, you can easily restore your device remotely. It is also used to locate an iOS device, play a sound, and lock it remotely.
After implementing this solution, your iOS device will reset, and your data would be erased. Nevertheless, in the end, it will automatically reset its lock as well. Follow these steps:
Step 1. Open iCloud’s website on any other handheld device of your choice. Not just your system, you can open the website on any other smart device as well. Use your Apple ID and password to log in to your iCloud account.
Step 2. Visit the Find My Apple iPhone XR service. Under the “All Devices” category, you can view all the iOS devices linked to your Apple ID. Select the Apple iPhone XR device you want to reset.

Step 3. Select the feature of the Erase device and confirm your choice. Wait for a while as your Apple iPhone XR or iPad would be restored remotely.

By following this method, you can learn how to unlock the iPad passcode without a computer remotely.
Part 3: Unlock disabled Apple iPhone XR/iPad using Dr.Fone - Screen Unlock?
Dr.Fone can help you to remove the screen from the disabled Apple iPhone XR or iPad. It can also unlock the Apple ID after you forgot the Apple ID email or password.
- Easy operations to unlock the Apple iPhone XR without the passcode.
- Removes the Apple iPhone XR lock screen without relying on iTunes.
- Works for all models of Apple iPhone XR, iPad, and iPod touch.
- Fully compatible with the latest iOS 14.


Step 1. Install Dr.Fone on your computer.
Step 2. Open ‘Screen Unlock’. Select ‘Unlock iOS Screen.’

Step 3. Follow the on-screen instruction.
Boot your Apple iPhone XR into DFU mode.

Select device information on Dr.Fone

Step 4. Start to Unlock. The phone will be unlocked after that.

Part 4: Tips to protect your Apple iPhone XR from being unlocked by thieves
As you can see, anyone can learn how to unlock the disabled Apple iPhone XR 4 without a computer and other iOS devices as well. Therefore, if you don’t want your Apple iPhone XR and iPad to be misused by thieves, you should take some added measures. Follow these suggestions to increase security on your iOS device.
1. Disable Siri from the lock screen
If someone can’t access Siri from the lock screen, then they won’t be able to follow the above-mentioned process to unlock an iOS device. Therefore, it is highly recommended to disable Siri from the lock screen. To do this, visit your device’s Settings > Touch ID & Passcode, and under the “Allow access when locked” section, disable the option of “Siri.”

2. Enable Find My Apple iPhone XR service
There are times when users forget to enable the Find My Apple iPhone XR feature on their iOS device. To access this feature, make sure that it is turned on. To do this, go to your device’s Settings > iCloud > Find My Apple iPhone XR and turn on the feature of “Find My Apple iPhone XR.” Additionally, you should turn on the “Send the last location” option as well.

3. Set a strong alphanumeric password
One of the best ways to secure your iOS device is by adding secure passwords. To do this, visit your device’s Settings > Touch ID & Passcode > Change Passcode and select the option of “Custom Alphanumeric Code.” Provide a strong alphanumeric passcode to boost the security of your device.

Conclusion
By implementing the above suggestions, you can easily make your iOS device more secure. Additionally, we have also listed two stepwise solutions that can unlock your iPad or Apple iPhone XR without taking the assistance of a computer. Now when you know how to unlock a disabled Apple iPhone XR without a computer, you can easily make the most out of your iOS device.
Apple iPhone XR Asking for Passcode after iOS 17/14 Update, What to Do?
If you’ve recently updated your iOS iPhone and iPad to the iOS 17/14 operating system, you may notice a bit of a bug where the Apple iPhone XR displays the passcode lock, even if you haven’t got a security code in place.
This obviously means you won’t be able to access your phone, and in many cases, you’re going to want to get back into your phone as quickly as possible. However, this may be easier said than done. Fortunately, today we’re going to go through multiple solutions to help you get your device working as it should!
Part 1. Don’t try passcodes blindly
One of the worst things you can do when faced with this situation is to enter passcodes blindly. Perhaps you’re trying random numbers and letters, or you’re trying passwords you’ve used in the past. If you get it wrong, you’re going to be locked out of your device for a long time.
The more times you get your code wrong, the longer you’ll be locked out, so avoid doing this at all costs, so make sure you move straight onto these approaches to get your phone working as quickly as possible.
Part 2. 5 ways to unlock iPhone after iOS 17/14 Update
2.1 Try a default passcode in your family
While we said, you shouldn’t type in random numbers to try and guess the password, of course, if you have a standard family passcode that you use across all iOS devices, perhaps an admin password or just something you use for everything, it can be well worth a try.

In reality, you get three attempts to put a passcode in before it locks you out, so try two passcodes that your family uses to see whether this will easily unlock your device. If you brought your device preowned and still have contact with the owner, they may have a passcode you can try.
2.2 Unlock iPhone with an unlock tool
The second approach you can take if you don’t know the passcode and can’t get it unlocked is to use a powerful software solution known as Dr.Fone - Screen Unlock (iOS) . This Wondershare software application completely unlocks your phone, even if you don’t know the passcode.
This software is easy to use and incredibly simple, yet it gets the job done. If you’re looking for a quick way to get your iOS device back up and running with full access after an iOS 17/14 update, it doesn’t get much better than this. Here’s how it works;
Step 1. Download and install the Dr.Fone - Screen Unlock (iOS) software to either your Mac or Windows PC and open it, so you’re on the homepage. Connect your iOS device to your computer using the USB cable and wait for the software to recognize your device.
When it does, close iTunes if it automatically opens and clicks the Screen Unlock option from the main menu.

Step 2. Click the Unlock iOS Screen option.
Step 3. You will now need to put your device in DFU mode, also known as Recovery Mode. Fortunately, this is easy thanks to the on-screen instructions where you will hold down the volume down and power button for a few seconds.
Step 4. Once Dr.Fone - Screen Unlock (iOS) has detected your device in DFU Mode. You’ll be able to select which device you’re using and what firmware you want to be repaired; in this case, iOS 17/14.
Step 5. Once everything has been confirmed and you’re happy to continue, press the Unlock option. The program will do its thing, and when it’s done, the software will say you’re able to disconnect your Apple iPhone XR and use it without a lock screen!
That’s how easy Dr.Fone - Screen Unlock (iOS) makes the entire unlock process!
2.3 Restore an old backup from iTunes
Another key way that some users have found to unlock their device after an update is to restore their device to an older version, aiming to put your device back into a position where it didn’t have a lock screen.
It’s only possible to do this if you’ve backed up your iOS device in the past (which is why you’re encouraged to back up regularly), and it can all be done through the iTunes software on either your Mac or Windows computer. Here’s how it works;
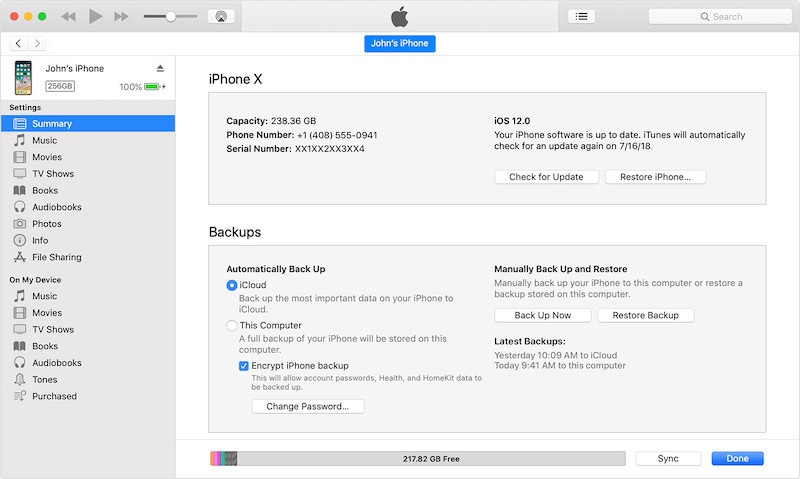
Step 1. Ensure you’re running the latest version of iTunes and then connect your iOS device to your Mac or Windows computer using the official USB cable. This should automatically open the iTunes window.
Step 2. In iTunes, click the symbol representing your device and then click Summary. On this screen, you’ll be able to choose the Restore iPhone option at the top to begin the restoring process.
Step 3. Follow the onscreen instructions where you’ll choose which backup file you want to use before iTunes, then restores your device. When the software has completed the process, you’ll be able to disconnect your Apple iPhone XR and use it without a lock screen!
2.4 Restore in recovery mode
In some cases, restoring your device using just iTunes will not be good enough, and it won’t have the effect you’re looking for; in this case, restoring your device with no lock screen after an iOS 17/14 update.
If the above method of restoring your device via iTunes doesn’t work, or you haven’t got a backup file to load, you’ll need to restore your device using a move known as Recovery Mode, or DFU mode. This will hard reset your device and get it working to its full potential.
Here’s how to do it. (Note, the process will differ slightly depending on which model of iPhone you’re using).
Step 1. Press and hold the volume up button for about one second, and then switch and press the Volume Down button for the same amount of time. You can then hold the side button (on devices without a home button), and the following screen should appear after a few seconds.
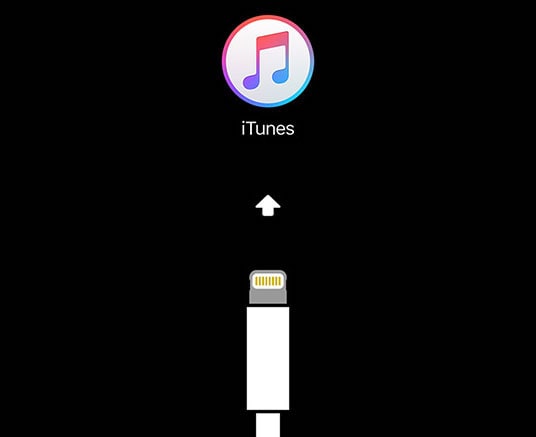
Step 2. Now connect your Apple iPhone XR to your computer with iTunes and wait for iTunes to open. Make sure you’re running the latest version of iTunes before connecting up your device. Also, make sure you’re using the official USB cable for the most stability.
Step 3. iTunes should automatically detect that your device is in Recovery Mode and automatically restore your device to a default state without a lock screen. Wait until this process is completed before disconnecting your device and using it as normal.
2.5 Use Find My iPhone feature in iCloud
The fifth and final approach you can take to removing a lock screen from your recently updated iPhone or iPad when faced with the iOS 17/14 glitch is taking advantage of the integrated Apple technology and features are known as Find My iPhone.
While this feature originally allows you to literally find your Apple iPhone XR in the situation where it’s lost and offers many other security features to help ensure your device and data don’t fall into the wrong hands, you can also use it to remove your device unwanted lock screen.
Of course, this will only work if the Find My iPhone features have been enabled in the past, so make sure you’re using it to get it to work. Here’s how to use the feature to get your phone access back.
Step 1. From your computer, iPad, tablet, or mobile web browser, head over to iCloud.com and log into your iCloud account using the login in button at the top of the screen.

Step 2. Once signed in, scroll down the menu of features and select the Find iPhone feature. Click on the All Devices option at the top.
Step 3. From the list of devices connected to your account, click the Apple iPhone XR device name with the locked screen and then click the Erase option. This will clear everything from your device, much like the process we’ve spoken about in the methods above.
Leave the Apple iPhone XR device to erase, and once completed, you’ll be able to pick up and use your phone as normal without a lock screen. You should also now be able to update to iOS 17/14 without any problems!
Summary
And there you go, the five key ways you need to know when it comes to removing an unwanted lock screen from your iOS device after an iOS 17/14 update. We highly recommend the Dr.Fone - Screen Unlock (iOS) since the software makes the whole process incredibly easy, especially when managing any problems you may have on your iOS device!
How to Unlock Apple iPhone XR with a Mask On
Are you tired of wearing a mask in this pandemic? Apple introduced a new feature through which people can unlock iPhone face ID while wearing a mask. Before this, people either had to use other types of passwords or put off the mask to use Face ID. However, this feature is only available on iOS 15.4, depicting that iPhones containing earlier iOS versions won’t be able to enjoy this feature.
Only iPhone 12 and the latest models can use Face ID with a mask on, which reflects that models like iPhone 11, iPhone X, and the older models cannot utilize this function. Moreover, an additional way to unlock iPhone is to use Apple Watch to unlock iPhone 11, X, or earlier models.
Once you meet these requirements, you can easily unlock your Apple iPhone XR while wearing a mask and get further details by reading this article.
Part 1: How to Unlock iPhone Face ID with a Mask on
Are you excited to unlock your Apple iPhone XR while wearing a face mask? This section will give you detailed steps to unlock your Apple iPhone XR with a mask on, but before proceeding, make sure that you have updated your phone’s model to iPhone 12 or iPhone 13. This iOS 15.4 version feature is only available on:
- iPhone 12
- iPhone 12 Mini
- iPhone 12 Pro
- iPhone 12 Pro Max
- iPhone 13
- iPhone 13 Pro Max
- iPhone 13 Pro
- iPhone 13 Mini
- iPhone 14
- iPhone 14 Pro
- iPhone 14 Pro Max
- iPhone 15
- iPhone 15 Pro
- iPhone 15 Pro Max
Once you have updated to iPhone 12 or iPhone 13 model, you will automatically receive the prompt to set your Face ID while wearing a mask. If you have missed the chance to scan your face during the setup of iOS 15.4, follow the below guidelines to activate this fantastic feature unlock iPhone with a mask:
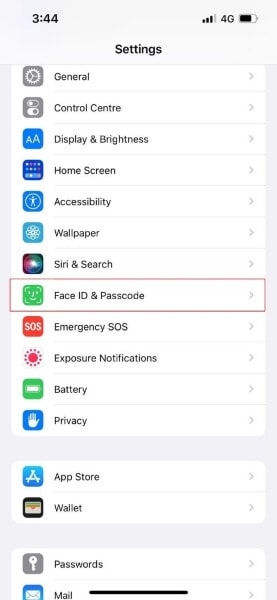
Step 1: Navigate to the app “Settings” from the home screen of your Apple iPhone XR. From the displayed menu, select “Face ID & Passcode.” Enter your passcode to give verification.

Step 2: Tap on the toggle switch of “Use Face ID with a Mask.” Afterward, select “Use Face ID with a Mask” to begin with settings.
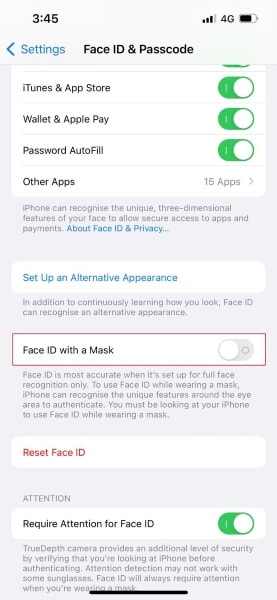
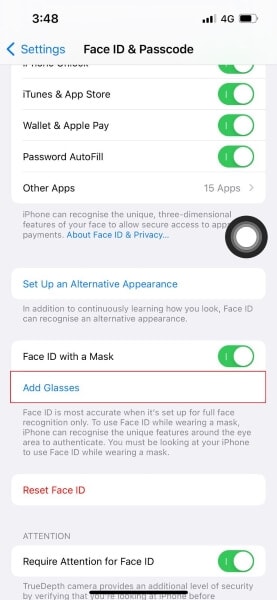
Step 3: Now, it’s time to scan your face with your Apple iPhone XR to initiate the setup. Again, you don’t have to wear a mask at this stage, as the Apple iPhone XR device’s main focus while scanning would be the eyes. Also, if you wear glasses, you can proceed without taking them off.
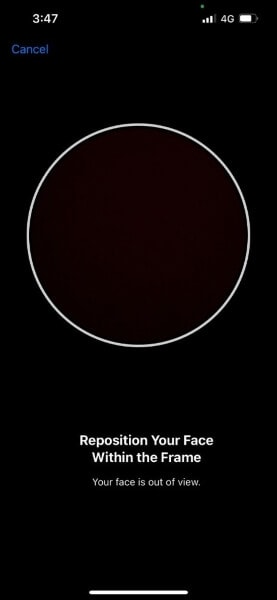
Step 4: After scanning your face twice, select “Add Glasses” by tapping on it. You can use your Face ID while wearing your regular glasses. Make sure that you scan your face with every pair of glasses daily.
After carefully following the steps mentioned above, you are ready to unlock your Face ID with a mask. Remember that Face ID will scan and focus mainly on your eyes and forehead. However, it cannot work in the scenarios if you have completely concealed your look by wearing hats or accessories that can hide your face.
Part 2: How to Unlock iPhone Face ID Using Apple Watch
Before unlocking iPhone through the Apple Watch, some requirements are necessary for security reasons. Read the following requirements to proceed further:
- First, you would need an Apple Watch that must be functioning on WatchOS 7.4 or later.
- The passcode on your Apple iPhone XR must be enabled from the settings. If you have not enabled the passcode on your Apple iPhone XR, you can do it by navigating to the “Settings” and tapping on “Passcode.” From there, enable the passcode by turning it on.
- You should be wearing the Apple Watch on your wrist, and it must be unlocked.
- Your Apple iPhone XR should be upgraded to iOS 14.5 or above.
- The wrist detection on your phone should be activated.
To enable the feature of unlocking the Apple iPhone XR with an Apple Watch, the steps are:
Step 1: Head to the “ Settings “ app and choose “Face ID & Passcode.” Give your passcode for authenticity and proceed further.
Step 2: Now, on the displayed menu, scroll down to the bottom, where you will see the toggle of “Unlock with Apple Watch.” Tap on that toggle to enable this feature.
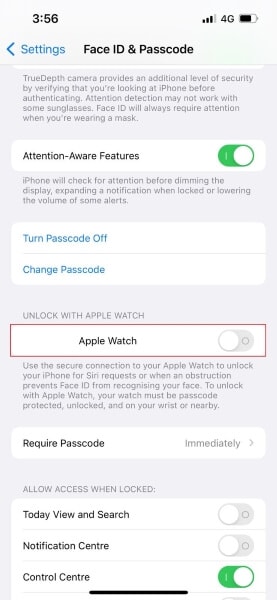
After enabling this feature, you can unlock your Apple iPhone XR with a mask on through your Apple Watch. You need to grab your phone and hold it the same way you would in a normal Face ID scan. The phone will be unlocked, and you will feel a slight vibration on the wrist. Also, a notification will pop up on your watch, indicating that your Apple iPhone XR has been unlocked.
Bonus Tips: Unlock iPhone Without Any Experience
Are you stuck with your locked iPhone? Don’t worry, as Dr.Fone - Screen Unlock can unlock any screen passcode, Face ID, Touch ID, and PINs. You don’t need any technical experience to use this tool, as the user interface is pretty simple and understandable. Moreover, it works perfectly well on all iOS devices at the best possible speed.
Dr.Fone - Screen Unlock (iOS)
Unlock iPhone/iPad Lock Screen Without Hassle.
- Intuitive instructions to unlock iPhone without the passcode.
- Removes the iPhone’s lock screen whenever it is disabled.
- Works for all models of iPhone, iPad and iPod touch.
- Fully compatible with the latest iOS 11,12,13.
3981454 people have downloaded it
You can also unlock Apple ID and iCloud passwords without losing the data. Also, while unlocking iPhone Screen Time Passcode through this platform, all of your data and information will be kept intact, and you can function your phone normally again.
Conclusion
We all can relate that unlocking an iPhone on Face ID while wearing a face mask in a pandemic era is annoying. That’s why Apple introduced a new feature of unlocking the Apple iPhone XR Face ID with a mask on to help individuals who rely entirely on Face ID. Find out about enabling this feature to easily unlock your Apple iPhone XR Face ID while wearing a mask.
Also read:
- [New] In 2024, Interpreting the Significance of Blue Emojis on Messenger
- [New] Top Strategies for Optimizing Zoom Video Quality
- [Updated] In 2024, Expert Techniques for Clearing Picture Edges
- Can You Unlock iPhone 12 Pro Max After Forgetting the Passcode?
- Holistic Editing Experience PanoramaShift Evolution
- How Can I Unlock My iPhone 8 After Forgetting my PIN Code? | Dr.fone
- How to Unlock iPhone 11 Pro without Passcode or Face ID | Dr.fone
- In 2024, Forgot iPhone 11 Pro Backup Password? Heres What to Do | Dr.fone
- In 2024, Forgot iPhone Passcode Again? Unlock Apple iPhone 8 Plus Without Passcode Now | Dr.fone
- In 2024, How Do You Unlock your Apple iPhone XR? Learn All 4 Methods | Dr.fone
- In 2024, Immersive Escapes Android/iOS's Favorite AR Games
- In 2024, PassFab Apple iPhone 13 Pro Backup Unlocker Top 4 Alternatives | Dr.fone
- In 2024, Sim Unlock Xiaomi 13T Phones without Code 2 Ways to Remove Android Sim Lock
- iPhone SE (2022) Backup Password Never Set But Still Asking? Heres the Fix | Dr.fone
- Problemlos Wiederherstellen: Wie Sie Fehlende Systemdateien Nach Dem Update Von Windows 10 Ersetzen Können (Sorgenfrei)
- Unlock Your Disabled iPhone 13 Pro Max Without iTunes in 5 Ways | Dr.fone
- What You Need to Know About DTS Play-Fi Technology
- Title: How to Unlock Disabled Apple iPhone XR/iPad Without Computer | Dr.fone
- Author: Amelia
- Created at : 2025-02-11 00:14:08
- Updated at : 2025-02-14 22:42:28
- Link: https://iphone-unlock.techidaily.com/how-to-unlock-disabled-apple-iphone-xripad-without-computer-drfone-by-drfone-ios/
- License: This work is licensed under CC BY-NC-SA 4.0.