
In 2024, 7 Ways to Lock Apps on iPhone 15 Plus and iPad Securely | Dr.fone
7 Ways to Lock Apps on Apple iPhone 15 Plus and iPad Securely
Are you concerned about your privacy and would like to secure certain apps on your iOS device? Don’t worry! There are plenty of ways to app lock the Apple iPhone 15 Plus and protect your privacy. You can follow the same drill to restrict the usage of certain apps for your kids as well by taking the assistance of the Apple iPhone 15 Plus app lock feature. The app lock for iPhone and iPad options can be used pretty easily. There are plenty of native and third-party solutions out there that you can use. In this post, we will make you familiar with seven different techniques on how to lock apps on iPhones and iPads.
Part 1: How to Lock Apps on iPhone with Screen Time?
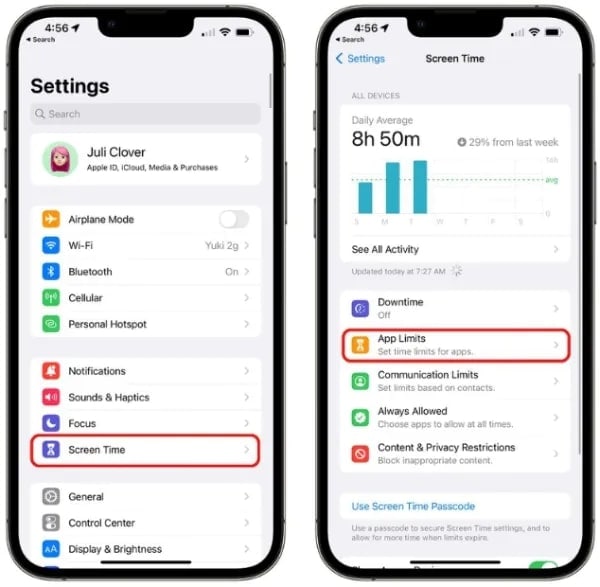
Utilizing Screen Time on your Apple iPhone 15 Plus offers a versatile way to manage app access. It is done through time restrictions and a dedicated passcode. By implementing Screen Time settings, you can exercise control over app usage. It ensures added security and regulated access to your preferred applications. Now, let’s walk through the steps to learn how to lock apps on iPhone Screen Time:
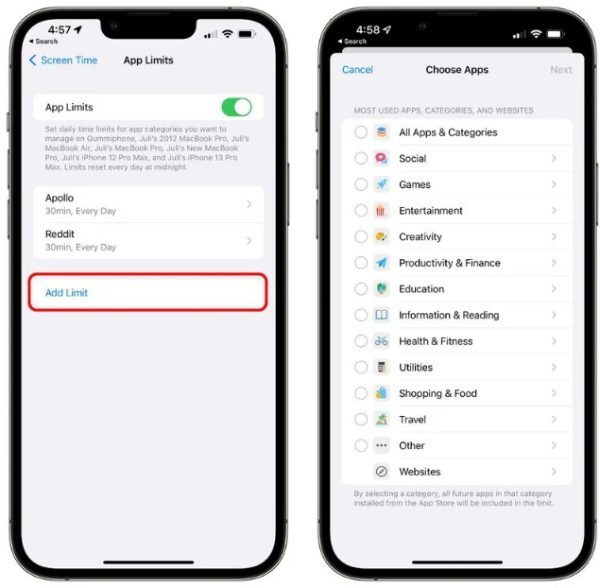
Step 1. Begin by accessing the Settings on your iOS device and tapping on the “Screen Time” option. On the ensuing screen, tap “App Limits,” followed by “Add Limit.”
Step 2. Select the apps or categories of the apps, tap “Next,” and choose the “Time Limit” for the selected apps. After deciding the time limit, press “Add” from the top right corner to add an app limitation.
Part 2: How to Lock Apps on iPhone with Face ID & Passcode?
Leveraging the advanced security capabilities of Face ID or Passcode on your Apple iPhone 15 Plus X or later models effectively fortifies app access. By using facial recognition or passcodes, you can put in place an extra layer of protection. It can be done for specific apps, safeguarding your sensitive data from unauthorized access. Now, let’s proceed with the detailed steps to lock apps using Face ID or Passcode on your iOS device:
Step 1. After opening the Settings app on your Apple iPhone 15 Plus, scroll down to access “Face ID & Passcode.” Here, you will be required to provide the passcode of your device.
Step 2. After providing the passcode, select “Other Apps” and check the apps that have Face ID enabled. Remember, you’re unable to manually include apps in the list. Only those apps that have sought access to the feature will appear here automatically.

Part 3: How to Lock Apps on iPhone Using Shortcuts?
If you are unable to lock the targeted app directly with Face ID, there is no need to worry. There exist workarounds that you can use, and one of them is using the Shortcuts app. It won’t directly lock apps with the Face ID. Instead, it provides a workaround by creating a shortcut that redirects to the lock screen.
When activated, it takes you to the lock screen, prompting Face ID, Touch ID, or Passcode to access the Apple iPhone 15 Plus device again. Use the following steps to lock your apps using the Shortcuts app:
Step 1. On your Apple iPhone 15 Plus, launch the Shortcuts app and select the “Automation” tab from the bottom toolbar. There, tap “New Automation” and use the search bar to look for and select “App.”

Step 2. Now, tap “Choose” in front of the “App” and select the app you want to lock. Now, move down and select “Is Opened,” then move further down to choose “Run Immediately.” Here, leave “Notify when Run” deactivated.

Step 3. Proceed forward by tapping “Next” from the top right corner, and on the following screen, tap “New Blank Automation.” Then, press “Add Action” and enter “Lock Screen” into the Search field, then choose “Lock Screen” from the search results.

Step 4. Finally, tap “Done” to finalize the shortcut. Now, upon accessing the targeted app, the shortcut will activate in the background, causing your Apple iPhone 15 Plus to be locked. You can then use the Face ID, Touch ID, or passcode to unlock it.

Part 4: How to Lock Apps on iPhone Using Restrictions?
By taking the assistance of Apple’s native Restrictions feature, you can app lock the Apple iPhone 15 Plus without any trouble. In this way, you can set up a passcode that needs to be matched before accessing any app. This iPhone app lock is also a great way to restrict your kids from accessing certain apps or making purchases. To learn how to lock apps on iPhone or iPad using Restrictions, follow these steps:
Step 1. Unlock your device and go to its Settings > General > Restrictions.

Step 2. Turn the feature on and set up a passcode for app restrictions. To provide added security, you can set up a passcode that is not similar to your lock screen passcode.
Step 3. Now, you can set up an app lock for iPhone using Restrictions. Simply go to General > Restrictions and turn this feature on for any app of your choice.
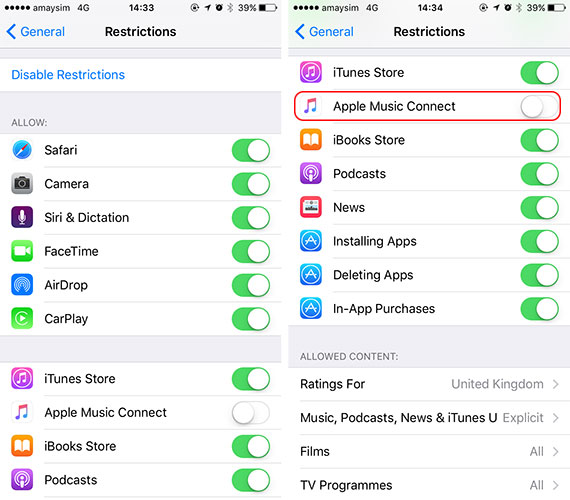
Step 4. If you want, then you can also switch this feature off for any app using the same method.
Bonus Tip: How to Unlock iPhone withoutScreen Locks (PIN/pattern/fingerprints/face)
It can be a trouble if you forget your Apple iPhone 15 Plus passcode since there are many restrictions on using iPhone. Also, if you are still unable to verify your Apple ID by using the above ways you may consider removing your Apple ID on your iOS devices. Here is an easy way to help you bypass Apple ID without a password and 100% working, which is to use Dr.Fone - Screen Unlock (iOS). It’s a professional iOS unlocker tool that can help you remove various locks on iPhones and iPads. With only a few steps, you can easily remove your Apple ID.
Dr.Fone - Screen Unlock (iOS)
Remove iPhone iPhone-locked screen without Hassle.
- Unlock an iPhone whenever the passcode is forgotten.
- Save your Apple iPhone 15 Plus quickly from the disabled state.
- Free your sim out of any carrier worldwide.
- Works for all models of iPhone, iPad, and iPod touch.
- Fully compatible with the latest iOS.


4,008,670 people have downloaded it
Part 5: How to Lock Apps on iPhone Using Guided Access?
Besides the Restrictions feature, you can also take the assistance of Guided Access to lock a certain app on your device. It was originally introduced in iOS 6 and can be used to restrict your device temporarily with the usage of a single app. It is mostly used by parents who would like to restrict their kids from using a single app while lending their devices. Teachers and people with special needs also use Guided Access pretty frequently. To learn how to lock apps on iPhone using Guided Access, follow these steps:
Step 1. To start with, go to your device’s Settings > General > Accessibility and tap on the “Guided Access” option.

Step 2. Turn on the “Guided Access” feature and tap on the “Passcode Settings”.

Step 3. After selecting the “Set Guided Access Passcode” option, you can set up a passcode to use it as an app lock for iPhone.
Step 4. Now, simply launch the app that you want to restrict and tap the Home button three times. This will start the Guided Access mode.

Step 5. Your phone would now be restricted to this app. You can further restrict the usage of certain app features as well.
Step 6. To exit the Guided Access mode, tap the Home screen three times and provide the respective passcode.

Part 6: How to Lock Apps on iPhone with Touch ID?
On the Apple iPhone 15 Plus 8 Series and iPhone SE, Apple offers Touch ID for security. In the process, it is similar to the Face ID available on the later iPhones. If you have an iOS device with Touch ID, here are the steps you can follow for the app lock iPhone process:
Instructions: To start, open the Settings application. Now scroll down to locate and select the “Touch ID & Passcode” option. On the following screen, you can deactivate or activate Touch ID for apps.

Part 7: How to Lock Apps on iPhone Using Third-Party Apps?
1. Lock Apps onApple iPhone 15 Plus & iPad via Famisafe
If the reason you want to lock the apps on your Apple iPhone 15 Plus has to do with managing your kid’s phone usage, we have an excellent alternative for you. FamiSafe is a reliable parental control app that offers features to monitor and manage a child’s device usage. It focuses on parental controls, including features like screen time management, location tracking, web filtering, and activity monitoring.
It offers robust controls to restrict overall device usage, set screen time limits, and monitor app usage. This helps parents guide and regulate their children’s activities on iOS devices. You can use the following steps to lock apps using FamiSafe:
Step 1: Install FamiSafe and FamiSafe Jr on Respective Devices
Get FamiSafe from the App Store and log in using your Wondershare ID or your Apple, Google, or Facebook account. Select the parent mode and link your child’s phone by installing FamiSafe Jr on their devices using either the QR code or the pairing code. Once the pairing is done, input details about your children and allow FamiSafe Jr to oversee their devices.

Step 2: Provide the Necessary Permissions to FamiSafe
Now, activate Accessibility for FamiSafe by accessing “Settings,” tapping “FamiSafe,” and enabling “Location.” Then, grant access to the Apple iPhone 15 Plus device’s photos, microphone, and motion & fitness activity. Now, use a computer and connect your child’s device with a USB cable. Activate content blockers in Safari to prevent kids from accessing inappropriate content.

Step 3: Connect the Kid’s Device to the Computer
To do that, access “Safari” in “Settings” and move to”Content Blockers” to enable FamiSafe. To get started, connect your kids’ iOS devices to your PC. Once connected, navigate to the main interface and select “Features” located at the bottom. This will display available features, and you can proceed by tapping on “App Blocker.”

Step 4: Block Any App Using the App Blocker Feature
Establish the connection between your kids’ iOS devices and your PC by pairing them with your phone. From there, effortlessly choose and block any unwanted apps on your kids’ phones. Additionally, you have the option to block apps based on their App Store ratings for added control and security.

2. Lock apps onApple iPhone 15 Plus & iPad using App Locker
Besides the native iPhone app lock solutions, you can also take the assistance of a third-party tool. However, most of these apps only support jailbroken devices. Therefore, if you wish to use a dedicated app lock for your Apple iPhone 15 Plus, then you need to jailbreak your device. Needless to say, getting your device jailbroken has its perks and demerits. If you don’t want to jailbreak your device, then you can simply take the assistance of the above-mentioned solutions.
However, if you have a jailbroken device and would like to app lock the iPhone, then you can also use AppLocker. It is available at Cydia’s repository and can be purchased for just $0.99. It can be installed on your jailbroken device to get an added level of security. Not just apps, it can also be used to lock certain settings, folders, accessibilities, and more. To learn how to lock apps on iPhone using AppLocker, follow these steps:
Step 1. Firstly, get AppLocker on your device from http://www.cydiasources.net/applocker . As of now, it works on iOS 6 to 10 versions.
Step 2. After installing the tweak, you can go to Settings > Applocker to access it.

Step 3. To access the feature, make sure that you have “Enabled” it (by turning it on).
Step 4. This will let you set up a passcode to lock the apps and settings of your choice.
Step 5. To app lock, the iPhone, visit the “Application Locking” feature on your device.
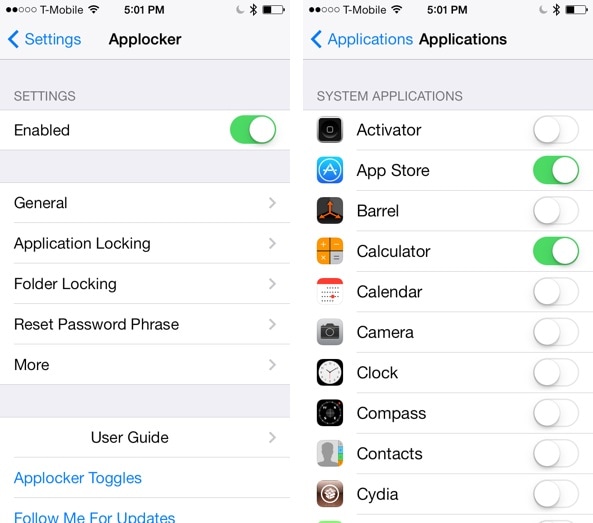
Step 6. From here, you can turn on (or off) the locking feature for apps of your choice.
This will let your app lock the Apple iPhone 15 Plus without any trouble. You can also go to the “Reset Password Phrase” to change the passcode.
3. Lock Apps onApple iPhone 15 Plus & iPad using BioProtect
Just like Applocker, BioProtect is another third-party tool that works only on jailbroken devices. It can also be downloaded from Cydia’s repository. Apart from apps, you can also use BioProtect to lock settings, SIM features, folders, and more. It is linked to the Touch ID of the Apple iPhone 15 Plus device and scans the fingerprint of a user to grant (or deny) access to any app. The app only works on iPhone 5s and later devices, having a Touch ID. However, you can also set a passcode as well if your Touch ID is not working. To use the BioProtect app lock for iPhone, follow these steps:
Step 1. Firstly, get the BioProtect app to lock iPhone on your device from the right http://cydia.saurik.com/package/net.limneos.bioprotect/ .
Step 2. To access the tweak’s panel, you need to provide your fingerprint access.
Step 3. Place your finger on your Touch ID and match its print.

Step 4. This will let you access the BioProtect app settings.
Step 5. Firstly, enable the app by turning the respective feature on.
Step 6. Under the “Protected Applications” section, you can see a list of all the major apps.

Step 7. Simply turn on (or off) the feature of the app that you wish to lock.
Step 8. You can also go to the “Touch ID” feature to further calibrate the app.
Step 9. After setting the lock, you would be asked to authenticate using your fingerprint to access the protected app.

Wrap it up
By following these solutions, you would be able to learn how to lock apps on the Apple iPhone 15 Plus without much trouble. We have provided both, third-party as well as native solutions to app lock the Apple iPhone 15 Plus in a secure manner. You can go with your preferred option and provide an added layer of security on your device to keep it safe.
Did Your Apple iPhone 15 Plus Passcode Change Itself? Unlock It Now
The Apple iPhone 15 Plus changing passcodes itself is not a commonly reported issue, but it surely can happen to anyone. While the reasons are uncertain, the issue can be resolved without putting much strain on your device. If you face this iPhone passcode changed itself issue by any chance, it makes it hard for you to get into your Apple iPhone 15 Plus.
However, you don’t need to worry, as this well-organized guide provides authentic methods to solve this issue. You will also find a bonus tool to fix your iPhone/iPad passcode changed itself issue without any need of knowledge.

Part 1. What Are the Reasons for iPhone Passcode Changing by Itself
Before solving the Apple iPhone 15 Plus or iPad passcode changed itself issue, you should know the actual reason behind it. Here are some points that precisely explain why the Apple iPhone 15 Plus changed its passcode by itself:
- Frequent iOS Updates: One major issue that can cause the problem of iPhone passcodes changing by itself is the ongoing iOS updates. An update can sometimes cause major glitches in the Apple iPhone 15 Plus device, which might automatically change the credentials.
- iOS System Error: Many users are reportedly known for installing and using the Beta version of iOS on their iPhones/iPads. These versions are known to hold major glitches and bugs in the software. Usually, the Apple iPhone 15 Plus changing passcode issue is normally reported by users under such scenarios.
- Malware: Malicious apps can damage your system security and make your iOS device change the passcode automatically. This can either happen due to device hacking or system security breaches.
Part 2. [The Simplest Solution] Remove iPhone Passcodes With Wondershare Dr.Fone
There are multiple ways to resolve the “iPhone changed passcode itself” issue, but they can be consistently difficult. Here, Wondershare Dr.Fone provides the simplest solution to fix your Apple iPhone 15 Plus without putting any effort. When fixing your Apple iPhone 15 Plus’s screen locks, Wondershare Dr.Fone caters to different scenarios. From Touch ID to Face ID and other basic screen locks, this tool unlocks it within minutes.
It clearly shows that you can easily get yourselves out of the miserable iPhone changed passcode itself issue. This is not only what Wondershare Dr.Fone offers its users. You can also find a high success rate for unlocking carrier and MDM locks.
Key Features of Wondershare Dr.Fone
- Wondershare Dr.Fone is compatible with all iOS devices up to iOS 17, which allows everyone to get help using its advanced functionality.
- If you lose access to your Apple ID, it can bypass the iCloud Activation Lock and help you set up your iOS device like a new one.
- Without damaging the data, Wondershare Dr.Fone allows you to remove the iTunes backup encryption . This allows you to back up, restore, transfer, or easily wipe out your device’s data.
Comprehensive Guide To Unlock Screen Using Wondershare Dr.Fone
Wondershare Dr.Fone provides the simplest solution to unlock your Apple iPhone 15 Plus and remove the passcode change issue. Follow this step-by-step guide to complete the screen unlocking process without wasting any time:
- Step 1. Start Tool and Choose Screen Unlock Function
Initially, launch Wondershare Dr.Fone on your computer and connect it to your concerned iPhone. Go into the “Toolbox” and choose the “Screen Unlock” function from the given options. Next, select “iOS” to run the process for the iOS device. Choose the “Unlock iOS Screen” option and hit the “Start” button to initiate the unlocking process.

- Step 2. Put Your Apple iPhone 15 Plus in Recovery Mode and Confirm Status
After that, follow the on-screen instructions to put your Apple iPhone 15 Plus in the Recovery Mode. In the next window, you can see your device model recognized. Then, enter your “System Version” and hit the “Start” button again to continue.

- Step 3. Download iOS Firmware and Confirm
Then, the system starts downloading the required iOS firmware according to your Apple iPhone 15 Plus model. Once the download is complete, click “Unlock Now” to implement the screen unlocking process. Enter the code in the confirmation box in the next window and choose the “Unlock” option.

- Step 4. Install iOS Firmware To Unlock Completely
After that, you can see a progress bar of the unlocking screen process. Then, it takes you to the next window after completion, where you click the “Done” button to accomplish the process.

Part 3. Set Up the Apple iPhone 15 Plus device Again Using the Security Lockout Procedure
Security Lockout or “iPhone Unavailable” happens when you attempt a wrong passcode 10 times. From there, you need to erase all your Apple iPhone 15 Plus data to regain access to the iOS device again.
While there is no direct way to regain access to your device when its passcode changes, you will have to perform a factory reset on your Apple iPhone 15 Plus to make it reusable. For that, look through the comprehensive guide on how to take your device out of this state:
- Step 1. After getting your iOS 17 device into the “iPhone Unavailable” stage, tap the “Forgot Passcode?” option in the bottom right corner.
- Step 2. To start the Apple iPhone 15 Plus reset, you need to tap on the “Start iPhone Reset.” Then, enter your Apple ID password in the given box and sign out your Apple ID. If you have an eSIM, you will be prompted with an option. Select the “Keep eSIM and Erase Data” or the “Delete eSIM and Erase Data” option according to your choice.

In another case, Apple allows you to temporarily sign in to your Apple iPhone 15 Plus using a recently changed passcode within 72 hours. But once you get into your device, set a new passcode immediately to retain your full access.
Part 4. Using iTunes To Set Up iOS Device Again
iTunes service allows you to reset your Apple iPhone 15 Plus to factory settings and unlock the screen lock if the Apple iPhone 15 Plus passcode changes on its own. Using iTunes to set up your Apple iPhone 15 Plus again is a good and safe method, but it removes your device data. If you can compromise losing data, you can follow these instructions to remove the Apple iPhone 15 Plus Passcode Changed Itself issue using iTunes:
Instructions. Firstly, launch iTunes on your desktop and connect your Apple iPhone 15 Plus. Then, you need to progress into putting your Apple iPhone 15 Plus in the Recovery Mode . Continuing this, iTunes detects your device in Recovery Mode and shows two options: “Update” or “Restore.” Click on the “Restore” option and hit the “OK” button to restore your Apple iPhone 15 Plus and regain access.

Part 5. Using iCloud To Set Up iOS Device Again
Using iCloud to unlock iOS devices is a safe and recommended method, but it also leads to complete data loss. If you wish to consider using the iCloud method, it is important for the Find My service to be active on the Apple iPhone 15 Plus device. Also, you need to be aware of your Apple ID and password before proceeding. Follow this comprehensive guide step-by-step to set up your iOS device again using iCloud.
- Step 1. First of all, open iCloud on your desktop web browser. Afterward, enter your “Apple ID” and “Password” to proceed. After trusting the Apple iPhone 15 Plus device, look for the “Grid” icon on the top right to find the “Find My” option in the list.

- Step 2. After that, choose the Apple iPhone 15 Plus device that you want to recover. Then, click the “Erase This Device” option to remove data and regain your device access.

Part 6. Using Find My App To Set Up iOS Device Again
This method needs you to have another iOS device signed into the same Apple ID with the Find My option enabled. After fulfilling these preconditions, you can follow these steps to set up your device whose iPhone passcode changed from 4 to 6 digits by itself:
- Step 1. Launch the Find My App on any other device, select the “Devices” tab from the bottom menu, find your locked iPhone in the list, and tap on that.
- Step 2. You must select the “Erase This Device” button to remove it from the iCloud account. This will instantly factory reset the Apple iPhone 15 Plus device as if it is a new iOS device.

Bonus Tip. How To Change Passcode on iPhone: A Simple Guide
We’ve discussed various reasons why the iPhone passcode changed itself above. However, there are several instances where you want to change the passcode yourself. What to do if you are looking for an effective way to change your Apple iPhone 15 Plus’s passcode? Follow the simple step-by-step guide to change the passcode from the iDevice’s “Settings:”
- Step 1. First, open iPhone “Settings” and go to the “Face ID & Passcode” option to access the Apple iPhone 15 Plus device’s security settings.

- Step 2. After that, tap “Change Passcode” and enter your six-digit passcode to see passcode options. Open “Passcode Options” and set a four-digit passcode easily or vice versa.

Conclusion
In this article, we’ve gone through the scenario of iPhone/iPad passcode changing itself due to system glitches. To fix this problem, we have introduced some effective and reliable methods with simple steps. However, Wondershare Dr.Fone is the recommended tool to bypass this issue because it provides a high success rate with an easy-to-follow system.
Tips: Are you searching for a powerful Screen Unlock tool? No worries as Dr.Fone is here to help you. Download it and start a seamless unlock experience!
Full Guide to Unlock Apple iPhone 15 Plus with iTunes
With such countless passwords, forgetting passwords on occasion isn’t surprising. What are your possibilities for iTunes unlock phone if you run over such circumstances and lose your password? Certainly, when this question springs up, you must not get terrified. We are here to direct you through the process of fixing this issue.
Losing a passcode is entirely normal and can happen to anyone. So, if you are also among the lot, we will elaborate on how to unlock iPhone with iTunes. After thorough research, our experts have laid out some essential unlocking methods for our readers. So, if you need to get things straight, read this detailed guide to go over your issue.
Part 1: Why Was My iPhone Disabled?
Using a lock screen passcode to secure your iDevice is an excellent way. However, it can become troublesome when you forget the key to your phone. Moreover, you may get stuck even if your screen breaks. On the other hand, someone may take your phone and type a few incorrect passcodes.
If your screen displays “iPhone disabled,” the most probable reason is an excess of wrong passcode attempts. However, this can sometimes occur without you understanding if the phone is in your pocket.
It would help if you erased your Apple iPhone 15 Plus to eliminate the lock and passcode, then re-sync it with iTunes. Then, you can restore your phone from an iCloud or an iTunes backup, but if you have never used a backup on your phone, your phone will have nothing. This guide illustrates how to unlock disabled iPhone with iTunes.
Part 2: How to Unlock iPhone with iTunes
At first, iTunes was only a media software used to play, download and see sound and video documents. Later in 2011, it became a valuable tool to support information and adjust it across numerous devices.
It added the ‘Restore’ option that can assist clients with unlocking their iPhones when they forget their passcode.
In any case, one has to know that iTunes is not an expert unlocking tool. Apple seldom updates iTunes, and its last update was long ago. Consequently, it has numerous tech bugs. As a result, the unlocking process using iTunes takes a lot of time. During the process, you may experience different error codes like 3004, 1100, 3194, 4000, and 4013. That makes it a tedious process.
Requirements for Windows PC:
- For iTunes unlock phone, your PC should have installed Windows 8 or later and the most recent iTunes variant.
Requirements for Mac:
- Open the Finder window if you have macOS Catalina or a more recent one.
- Open the most current version of iTunes using macOS Mojave or older.
- You must have a USB connector.
Steps (For Windows)
Step 1. Connect the locked Apple iPhone 15 Plus to the PC
Connect your locked Apple iPhone 15 Plus to your PC through a lightning or USB connector. Open iTunes on Windows PC.
Step 2. Put your Apple iPhone 15 Plus in recovery mode
To enter a Recovery Mode, press a combination of buttons on your Apple iPhone 15 Plus. Doing such, you will see a recovery mode screen on your Apple iPhone 15 Plus. To place the Apple iPhone 15 Plus in Recovery mode, follow these:
- iPhone 8 or above (second and third generation): Press and release the volume (+) button. Press and release the volume (-) button. Hold power/side button until seeing the recovery mode on your screen.
- iPhone 7 and 7 Plus: Press the top (or side) and volume down buttons simultaneously until the recovery screen shows up.
- iPhone SE (first generation) and iPhone 6S: Hold the home button and the power/side button simultaneously until the recovery mode screen shows up.
Note: If you see the passcode screen, switch off your Apple iPhone 15 Plus and do the process again until you see the Recovery mode screen.
Step 3. Restore your Apple iPhone 15 Plus
As the recovery Mode screen shows up on the iPhone, you will find your Apple iPhone 15 Plus on iTunes unlock phone screen. Then, a box shows up with a message saying there is an iPhone issue. It will expect you to update or restore your phone. So, click on Restore.
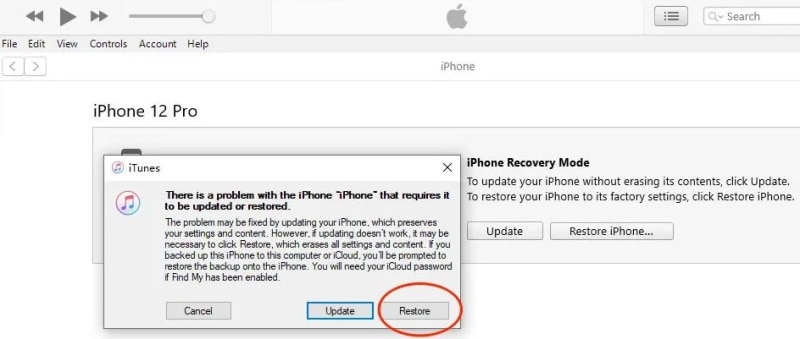
Step 4. It then asks you to confirm whether you are sure you need to restore the Apple iPhone 15 Plus to its default factory state. It does so because your media and data will be all erased. Then, click on Restore and Update.
Step 5. Then, “iPhone Software Update” may spring up. Click Next, and afterwards, click Agree. iTunes will begin downloading the software and restore your Apple iPhone 15 Plus when the download is finished.
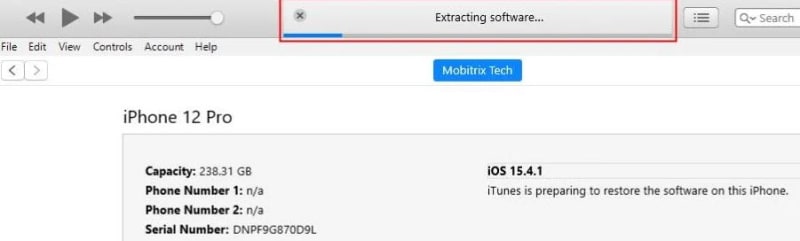
When the “iPhone software update” is downloaded, iTunes will show that it will erase your Apple iPhone 15 Plus and restore it to iOS 15.4.1. Then click on Restore.
The above bar will show “Extracting software… “. It implies iOS 15.4.1 iTunes is planning to restore the software on this iPhone.
Step 6. Your Apple iPhone 15 Plus will show the restore progress bar with the white apple logo. The length of the process relies upon how much data is on your cell phone. Generally, it takes 20 to 120 minutes. When done, your Apple iPhone 15 Plus will restart naturally. Furthermore, after your Apple iPhone 15 Plus restarts, you can reset your Apple iPhone 15 Plus. For example, you can make a new passcode.
Part 3: Unlocking iPhone without iTunes
1. Unlock it with Find My in iCloud
Find My is a famous element in Apple devices that allows you to find your lost phone through Maps. The component has been updated from that point forward, and presently it can be utilized to erase your Apple iPhone 15 Plus. Additionally, you can use it to erase your information without a passcode.
Steps to Unlock:
Step 1. Open iCloud.com on a mobile or internet browser.
Step 2. Enter your Apple ID and password as inquired.
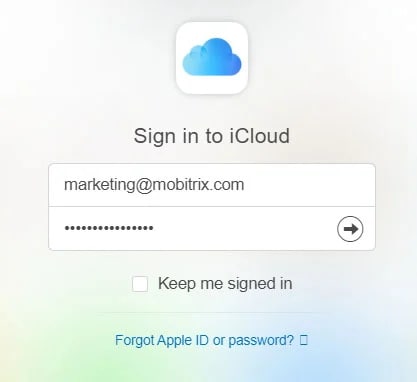
Step 3. After signing in effectively, click on Find My and enter your Apple ID and password. Click on Sign In.
Pick your locked gadget under the “All Devices” area.

Step 4. Click on ‘Erase iPhone’. Click on ‘Erase’ again.
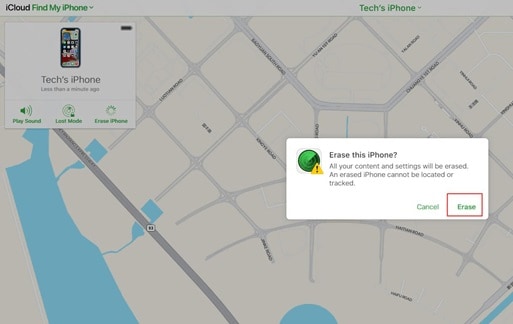
Step 5. Enter the Apple ID password to proceed.
Step 6. A check code will be sent to unlock your locked gadget. Enter the code to proceed.
Step 7. Presently, enter your number. Then, click Next and then Done.
Step 8. The iCloud will effectively begin the erase, and you can see the Apple sign with a white advancement bar noticeable on your locked iPhone. After an effective erase process, your Apple iPhone 15 Plus will restart.
Step 9. Swipe up on the Apple iPhone 15 Plus screen to begin once more.
Step 10. iPhone will show that it is locked to the owner. You have to sign in with your Apple ID again, enter the password, and tap on Next. You will currently be enabled to make your new passcode.
2. Dr.Fone-Screen Unlock
If you are searching for an elective way to unlock your Apple iPhone 15 Plus with iTunes, you can pick Wondershare Dr.Fone-Screen Unlock.
This software is an ideal iTunes elective that doesn’t need a passcode to unlock the iPhone. Whatever the situation, Dr.Fone can determine the issue in no time. It can eliminate Face ID, Touch ID, or a 4 to 6-digit passcode in no time. Moreover, it works with almost any iOS version at the moment. Here’s the alternate way to iTunes unlock phone:
Step 1. Connect your iDevice to the PC
From the Dr.Fone program on your PC, select “Screen Unlock” the tool.

Then use a USB connector to connect your iOS gadget to the PC. Then, click the “Unlock iOS Screen” option on your screen.

Step 2. Boot your iDevice in Recovery/DFU Mode
Before deleting the Apple iPhone 15 Plus screen, it is necessary to boot it in Recovery/DFU. You can follow the steps on your screen to do so. Moreover, the Recovery mode is the suggested way for your situation. However, you can use the DFU mode if this doesn’t work.

Step 3. Confirm Phone Model
After turning the DFU mode on, the program will show your phone information. In addition, it will show its model and software version. You can choose the correct data from the dropdown menu if it isn’t accurate. Then, it is time to download the firmware required for your phone model.
Step 4. Remove the Lock
After downloading the firmware, tap Unlock Now to begin the unlocking process.

Doing so will unlock your Apple iPhone 15 Plus within no time. However, kindly note this unlocking process will likewise wipe your Apple iPhone 15 Plus’s user data. Indeed, each solution removes your data. Therefore, you must be careful enough to back up your files before doing this process.
The Bottom Line
We hope you found out about how to unlock iPhone with iTunes. We likewise discussed what to do when you need an alternate method to iTunes. We know that using iTunes can be somewhat complicated; hence, the other options can help you a ton. However, we strongly suggest Dr.Fone-Screen Unlock for a more refined unlocking process.
Also read:
- [New] Perfect Focus in Teams Meetings Mastering Background Blur
- [Updated] Top Screen Recorders in Chrome OS, Free Version for 2024
- 2024 Approved Masterpiece Tools Filmora's Loved 9 Edits Unraveled
- 3 Ways to Erase Apple iPhone XS When Its Locked Within Seconds | Dr.fone
- 7 Ways to Lock Apps on iPhone 14 Pro and iPad Securely | Dr.fone
- Android Safe Mode - How to Turn off Safe Mode on Motorola Edge 40? | Dr.fone
- Exiting Android's Safe Mode: Essential Tips and Tricks
- Exploring No-Cost Cam Screens Reviews & High Alternatives
- Flair in Friends' Forum: Messaging's Textual Tricks
- In 2024, How to Unlock iPhone 13, Apples New iPhone | Dr.fone
- In 2024, How to Unlock iPhone 15 Pro Max Passcode without Computer? | Dr.fone
- In 2024, How-To Guide for Soundless Video Documentation
- In 2024, Learn How To Lock Stolen Your iPhone 14 Plus Properly | Dr.fone
- In 2024, Resolve Your Apple iPhone 15 Pro Max Keeps Asking for Outlook Password | Dr.fone
- In 2024, Unlock iPhone 14 Pro Max With Forgotten Passcode Different Methods You Can Try | Dr.fone
- New Constructing an Elegant Transition for Decreasing Auditory Intensity
- Title: In 2024, 7 Ways to Lock Apps on iPhone 15 Plus and iPad Securely | Dr.fone
- Author: Amelia
- Created at : 2024-10-16 16:52:22
- Updated at : 2024-10-20 20:51:50
- Link: https://iphone-unlock.techidaily.com/in-2024-7-ways-to-lock-apps-on-iphone-15-plus-and-ipad-securely-drfone-by-drfone-ios/
- License: This work is licensed under CC BY-NC-SA 4.0.