
In 2024, Complete Guide For iPhone 15 Plus Lock Screen | Dr.fone
Complete Guide For Apple iPhone 15 Plus Lock Screen
Like most iPhone users, you rely on your lock screen to keep your data safe and protected. But with the release of iOS 17, there are a few new features and changes that you need to know about. This complete guide will clarify everything you need to know about the iOS 17 lock screen.
We’ll explain to you how to use the new features, protect your data, and more. So don’t waste any time - read on for all the details!
How to Have a Customized iOS 17 Lock Screen?
Before we get started, you should know that there are three ways to have a customized lock screen in iOS 17. Let’s get to know more about them.
1. How to select your favorite wallpaper
The first way is to use a pre-made wallpaper from the Apple Wallpaper Gallery.
To do this, go to Settings > Wallpapers & Brightness > Choose a New Wallpaper. Then, select the Apple Wallpaper Gallery and choose the image you want to use.
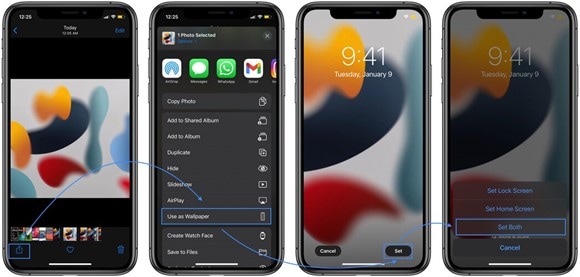
The second way to have a customized lock screen is to use a Live Photo. To do this, go to Settings > Wallpapers & Brightness > Choose a New Wallpaper. Then, select the Live Photo option and choose the image you want to use.
Note: You can only use Live Photos for your lock screen if your Apple iPhone 15 Plus is unlocked.
2. How to manage notifications
If you want to manage notifications on the iOS 17 lock screen, there are two ways to do it.
At first, you can go to Settings > Notifications. Here, you can choose how many notifications you want to see on your lock screen and which apps can send you notifications.
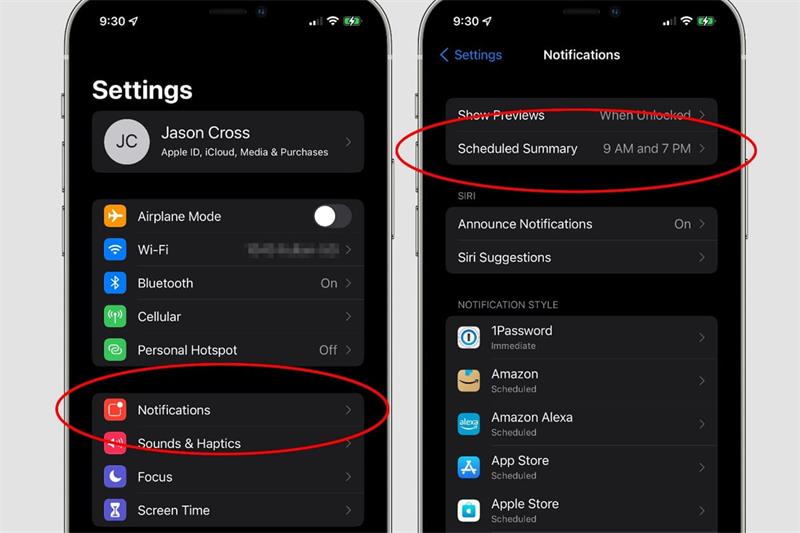
The Do Not Disturb feature is the second way to manage notifications. To do this, go to Settings > Do Not Disturb and enable the feature. You can also schedule when Do Not should turn on and off. This feature work like a charm if you want to silence all notifications at night.
3. How to set Auto-Lock time
If you want to set the Auto-Lock time, go to Settings > Display & Brightness > Auto-Lock. Here, you can choose how long it should take for your Apple iPhone 15 Plus to lock automatically.
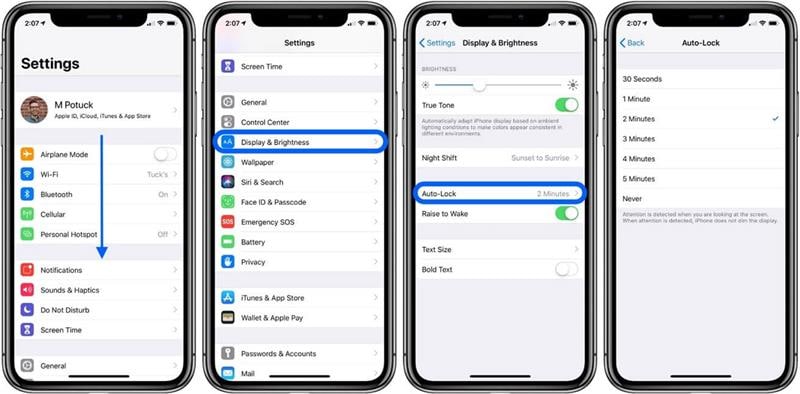
By default, the Auto-Lock time is set to 30 seconds. But you can choose to lock it immediately, after 1 minute, 5 minutes, or never.
How to Turn Off/On Lock Screen in iOS 17?
If you want to turn off the lock screen, go to Settings > Touch ID & Passcode (or Face ID & Passcode). Then, scroll down and disable the Unlock with Passcode (or Unlock with Face ID) option.
Enable the Unlock with Passcode (or Unlock with Face ID) to turn ON the lock screen.

But if you have forgotten your passcode, don’t worry. The next section will show you how to bypass the lock screen.
How to Bypass the iOS 17 Lock Screen Passcode?
Different methods can help you bypass the iOS 17 lock screen passcode. Let’s discuss them in detail.
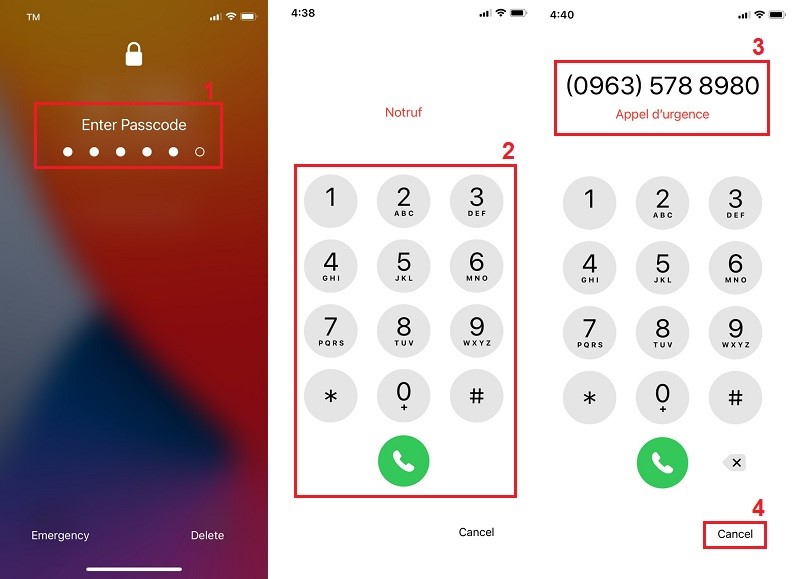
1. Use Emergency call
The first method to bypass the passcode is to use the emergency call feature.
To do this, access your device with five wrong passcodes attempts. This will trigger the emergency call feature. All you need to do is, dial an emergency number and then tap on the cancel button, and you’ll be taken to the home screen.
That’s how you bypass the lock screen without losing any data.

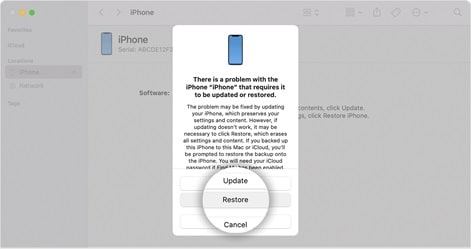
2. Bypass passcode with iTunes restore
If your Apple iPhone 15 Plus needs to be backed up with iTunes sync feature, you can use this method to bypass the passcode.
To do this, connect your Apple iPhone 15 Plus to a computer and open iTunes. Then, click the Restore button and follow the on-screen instructions to restore your Apple iPhone 15 Plus.
It will take some time, but you can use your Apple iPhone 15 Plus without a passcode once it’s done.
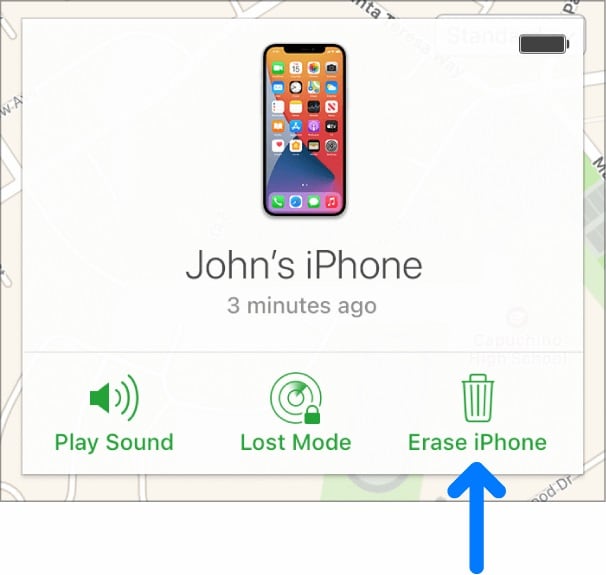
3. Use Find My in iCloud
If you have synced your Apple iPhone 15 Plus with iCloud, you can try the Find My feature to bypass the lock screen.
To do this, go to icloud.com/#find and sign in with your Apple ID. Then, select your device from the list of devices and click on the Erase button.
To do this, go to icloud.com/#find and sign in with your Apple ID. Then, select your device from the list of devices and click on the Erase button.
All the data will disappear on your Apple iPhone 15 Plus, and you’ll be able to access it without a passcode.
This process can also take some time, so be patient.
4. Dr.Fone-Screen Unlock
If all mentioned methods don’t work for you, the ultimate solution is to use Wondershare Dr.Fone-Screen Unlock and bypass the passcode. To finish it, you can follow the steps given below carefully.
Step #1: Download/Install Dr.Fone on your Computer or MacBook
A third-party tool named Dr.Fone-Screen Unlock can help you in this regard. The wonderful part is that you don’t have to learn any technical knowledge.
First, download/install Dr.Fone-Screen Unlock on your computer or MacBook. You can get it from here:
After downloading the tool, install launch it on your PC.
Step #2: Launch the Application and Go for Screen Unlock
Once you have installed the tool, launch it and go to its main window. Here, you will see different features. Select the Screen Unlock feature from the list.

Step #3: Connect your Apple iPhone 15 Plus and Activate DFU Mode
Now, you need to connect your Apple iPhone 15 Plus to the computer using an Apple original cable. Once done, you need to put your Apple iPhone 15 Plus into DFU mode.
To do this, you need to press and hold the Home button and Sleep/Wake button simultaneously for 10 seconds.
After that, release the Sleep/Wake button but keep holding the Home button until Dr.Fone detects your device in DFU mode.

Step #4: Download the Appropriate Firmware
Once Dr.Fone detects your Apple iPhone 15 Plus, it will ask you to continue. So, proceed to the next, and here you will be asked to download the correct firmware package for your device.
So, choose the firmware carefully and hit the download button.
Depending on your internet connection, you may have to wait for a longer time. But once the firmware is downloaded successfully, you can proceed to the next step.

Step #5: Unlock your Apple iPhone 15 Plus
After the firmware is downloaded, you need to press the Unlock Now button, and Dr.Fone will start to unlock your Apple iPhone 15 Plus without a passcode. Once it is done, you can get into your device without any restriction.

FAQs
Why iOS 17 Lock Screen is not working?
There could be many reasons for the malfunction of the Lock Screen in iOS 17. The most common reason is the installation of incompatible jailbreak tweaks. Therefore, it is recommended to remove all the jailbreak tweaks and check whether the problem persists.
You can try resetting your device to factory settings if the problem still exists. But make sure to back up your data before doing so, as it will erase all your data.
How do I fix my iOS 17 lock screen bugs?
There are various ways to fix the lock screen bugs in iOS 17. You can try resetting your device to factory settings, or you can also try restoring your device from a previous backup.
If none of these methods work, you can try using a third-party tool like Dr.Fone-Screen Unlock to bypass the lock screen.
How do you unlock a locked iPhone iOS 17?
There are various ways to unlock a locked iPhone running on iOS 17. You can try the feature of Find My iPhone, or you can also use a third-party tool like Dr.Fone-Screen Unlock.
How do you fix an unresponsive lock screen on iPhone running on iOS 17?
If your lock screen is unresponsive on iPhone running on iOS 17, you can try force restarting your device. To do this, you need to press and hold the Home button and Sleep/Wake button simultaneously for 10 seconds.
After that, release the Sleep/Wake button but keep holding the Home button until you see the Apple logo. Once your device is restarted, check if the problem persists or not.
If the problem still bothers you, you can try using a third-party tool like Dr.Fone-Screen Unlock to reset the phone, eventually fixing the issue.
The Bottom Line
So this is what we want to talk about the iOS 17 Lock Screen with you. We have tried to cover everything in this article, including the new features, lock screen bugs, and how to fix them.
All the fixes mentioned above are tested and proven to be working. So you can try them without any hesitation.
But if you are still facing problems with your lock screen, then the greatest thing you can do is to use a third-party tool like Dr.Fone-Screen Unlock. This tool is very easy to use and will unlock your device within minutes.
So, if you are looking for a hassle-free solution to fix your lock screen issues, then this is the best one you should never miss.
5 Most Effective Methods to Unlock Apple iPhone 15 Plus in Lost Mode
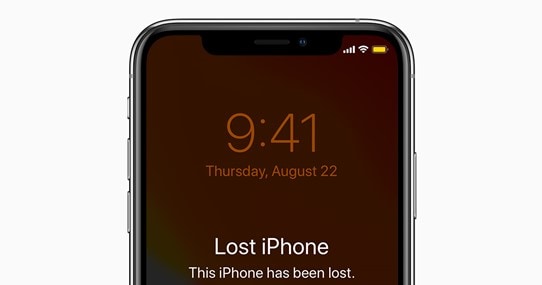
Numerous security features make all Mac devices like iPhones, iPads, and Macs stand apart from the opposition in terms of user data safety. Lost Mode is one feature that locks your lost iPhone or other Apple devices so nobody can get to them.
If your device is gone, you can use the Find My application on your other Apple device connected to a similar account to unlock the lost iPhone.
If your Apple iPhone 15 Plus is in Lost Mode and you don’t have the foggiest idea of how to restore it, relax. This guide will cover every one of the techniques that you can use for iPhone Lost Mode unlock.
Part 1: What Will Happen When iPhone Is in Lost Mode?
The Apple iPhone 15 Plus Lock feature permits remotely locking a lost Apple iPhone 15 Plus to prevent people from using its data. If you set a password for a device before enabling the Lost Mode, you will need this password to unlock the Apple iPhone 15 Plus once it has returned to its proprietor.
The Lost Mode menu will ask you to set one if it has no password. Password is obligatory to stop Lost Mode once a device is returned to the owner, as Contact ID or Face ID won’t work for this reason.
Send a Custom Text Message: When you sort out your lost iPhone and put it in Lost Mode, another supportive feature accessible to you is a custom message shown on the Lock Screen. You can enter any message to let an individual who found it realize this iPhone is lost. This way, you can demonstrate a phone number for the other person. That will expand opportunities to get your device back.
Erase Data Remotely: Lost Mode allows you to delete the Apple iPhone 15 Plus if you believe it’s been some time since it’s gone and you don’t think you can get it back. Doing so will ensure nobody will use your user data.
Track Your Device on Map: An owner can follow their lost iPhone on the map through the Lost Mode menu. The menu additionally gives email warnings to show the last location of your Apple iPhone 15 Plus.
Play Songs: Playing a sound might assist you with finding your lost iPhone if it’s still close by. The Apple iPhone 15 Plus will play a sound at top volume, no matter what volume level was set on the Apple iPhone 15 Plus device when you lost it.
1. Remove lost mode by entering the correct passcode
The most straightforward method for unlocking the Apple iPhone 15 Plus in Lost Mode is entering the password on the actual device. If your device was protected with a password before placing it in Lost Mode, enter it again.
If your device had no password while placing it in Lost Mode and you’ve entered it into iCloud while placing your Apple iPhone 15 Plus into Lost Mode, utilize this password. That will help you unlock lost iPhone, and you can start operating your Apple iPhone 15 Plus again.
2. Remove it from Find My in iCloud
One more method for unlocking the Lost Mode on your Apple iPhone 15 Plus is to utilize the Find My iPhone application on the official iCloud site. Follow the steps underneath to do so:
- Go to <www.icloud.com> and utilize your account details to sign in.
- Click the “Find My iPhone” button and select all iDevices.
- Pick the Apple iPhone 15 Plus device you need to unlock in Lost Mode and tap the “Lost Mode” button.
- Click the “Stop Lost Mode” button to remove the lock from the phone.
- Confirm this activity by clicking the “Stop Lost Mode” button again.
3. Use iCloud DNS Bypass
Domain Name Service is an unsafe technique that utilizes a domain name to an IP address. iCloud stores every iPhone’s information, and when an iPhone is set up, it sends a request through DNS to ensure whether the Apple iPhone 15 Plus device has an activation lock enabled.
The DNS bypass will send a fake “device isn’t locked” message to iCloud through a server. It allows you to go through the setting of your Apple iPhone 15 Plus and access some applications. However, you must remember that this technique works on iOS 11 or older versions. Follow these steps to utilize the iCloud DNS bypassing strategy to unlock lost iPhone:
- Insert SIM in your Apple iPhone 15 Plus, turn it on, and select a preferred language and your location.
- A WiFi screen will spring up. Tap on the “I” icon. If you are now connected with your WiFi, tap “Forget this Network.”
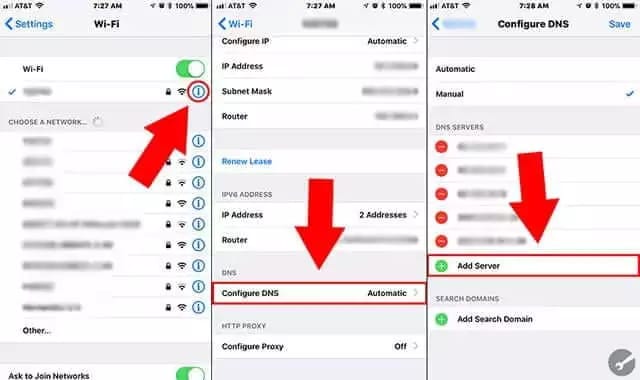
- Tap on “Configure DNS,” and enter a DNS server as per your region from the list underneath:
USA: 104.154.51.7
Asia: 104.155.28.90
Europe: 104.155.28.90
South America: 35.199.88.219
Australia and Oceania: 35.189.47.23
- Clean old DNS server off of ISP modem, select and connect to a WiFi network. Click the Back button when a popup says that the Apple iPhone 15 Plus device is attempting to connect to the Apple servers.
- You will now be on the DNS bypass screen. Pick the applications from the list to keep using your device. However, only a handful of applications are available through this.
4. Use Emergency Call
This technique is the most widely recognized one. You can bypass your iCloud activation by settling on a fake Emergency call. Nonetheless, it is accounted for that this strategy probably won’t work for everyone.
If your Apple iPhone 15 Plus is on lost mode and attempting to unlock it, you can try using this method. Follow these steps for making an Emergency call on your iPhone in Lost Mode unlock:
- Click the “Emergency Call” option on your locked device.
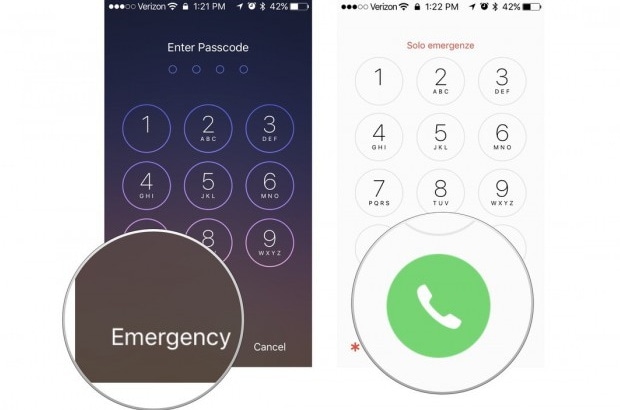
- Dial “*#96274825*0000*1#,” then, at that point, press and hold the dial button for 10 to 15 minutes.
- If it’s not working, try changing the last digit from 1-9. If this doesn’t work, have a go at setting 0 after 9. Remember to hold the dial button.
- Press Home, and it will return you to the beginning screen. Select the language and country, and the activation screen will never appear again. Now create a new password after iPhone Lost Mode unlock.
5. Apple iPhone Unlock
Apple iPhone Unlock is a site that can assist you with iPhone in Lost Mode unlock. You must give them your Apple iPhone 15 Plus’s IMEI and model number to get their services.
The benefit of Apple iPhone Unlock is that they keep themselves updated with the latest technology. They are educated regarding their tool’s advancement by giving updates every time.
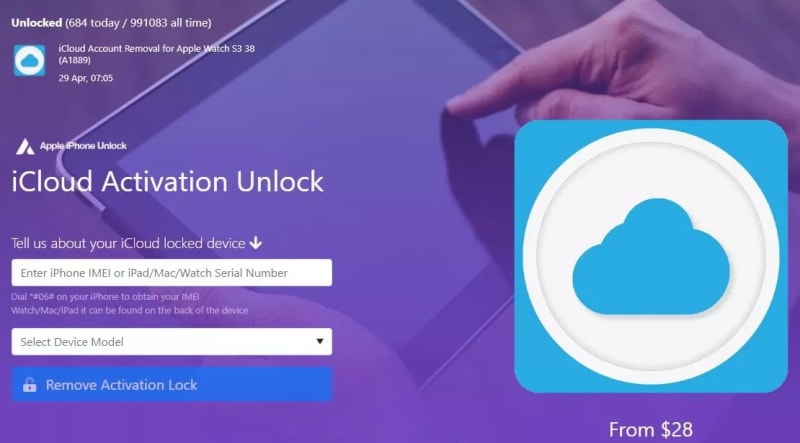
Critical Features of Apple iPhone Unlock:
- As per their site, Apple iPhone Unlock can work with every one of the Apple iPhone 15 Plus devices going from iPhone 4 to iPhone 14 Pro Max.
- Don’t bother downloading anything to your PC or phone like others. Another iPhone lock screen expects you to download their tool or software to work.
Bonus Tips: How to Unlock Our iPhone Screen?
Dr.Fone-Screen Unlock
An expert unlocking tool comes in handy when no other method works. In this case, we strongly suggest you use the Dr.Fone-Screen Unlock tool by Wondershare. Dr.Fone is a reliable tool and has been in the market for a long time. Professional unlock service providers use it because of its ease of use and clean interface.
So, without looking any further, download this tool for a remarkable unlocking experience. The methods below will guide you into unlocking your Apple iPhone 15 Plus within no time:
Step 1. Connect your Apple iPhone 15 Plus/iPad
Open the Dr.Fone software and tap the “Unlock iOS Screen.”
Step 2. Boot iPhone in Recovery/DFU mode
Before bypassing the Apple iPhone 15 Plus lock screen, we want to boot it in Recovery or DFU mode by adhering to the on-screen guidelines. The Recovery mode is suggested for the iOS lock screen. However, if you can’t activate the Recovery mode, you can figure out how to activate the DFU mode from their official site.
Step 3. Affirm Device Information
After getting the phone in DFU mode, Dr.Fone will show the Apple iPhone 15 Plus device information, for example, the Apple iPhone 15 Plus model and other data. You can choose the right information from the dropdown menu if the information isn’t right. Then, at that point, download the firmware for your Apple iPhone 15 Plus.
Step 4. Unlock the Apple iPhone 15 Plus Screen Lock
After downloading the required firmware effectively, click Unlock Now to remove the lock. However, note that this unlocking system will wipe the user data on your Apple iPhone 15 Plus. Truly, there is no answer for iPhone Lost Mode unlock without losing your data.

The Bottom Line
You might forget the password used before placing your Apple iPhone 15 Plus in Lost Mode. It is also likely to purchase a locked device, and then you can’t contact the owner to unlock it and don’t know your Apple ID details. Some might think this is a dead situation, and you can’t use the iPhone.
Luckily, we’re here to provide a series of dependable and secure solutions that will help your iPhone in Lost Mode unlock.
Did Your Apple iPhone 15 Plus Passcode Change Itself? Unlock It Now
The Apple iPhone 15 Plus changing passcodes itself is not a commonly reported issue, but it surely can happen to anyone. While the reasons are uncertain, the issue can be resolved without putting much strain on your device. If you face this iPhone passcode changed itself issue by any chance, it makes it hard for you to get into your Apple iPhone 15 Plus.
However, you don’t need to worry, as this well-organized guide provides authentic methods to solve this issue. You will also find a bonus tool to fix your iPhone/iPad passcode changed itself issue without any need of knowledge.

Part 1. What Are the Reasons for iPhone Passcode Changing by Itself
Before solving the Apple iPhone 15 Plus or iPad passcode changed itself issue, you should know the actual reason behind it. Here are some points that precisely explain why the Apple iPhone 15 Plus changed its passcode by itself:
- Frequent iOS Updates: One major issue that can cause the problem of iPhone passcodes changing by itself is the ongoing iOS updates. An update can sometimes cause major glitches in the Apple iPhone 15 Plus device, which might automatically change the credentials.
- iOS System Error: Many users are reportedly known for installing and using the Beta version of iOS on their iPhones/iPads. These versions are known to hold major glitches and bugs in the software. Usually, the Apple iPhone 15 Plus changing passcode issue is normally reported by users under such scenarios.
- Malware: Malicious apps can damage your system security and make your iOS device change the passcode automatically. This can either happen due to device hacking or system security breaches.
Part 2. [The Simplest Solution] Remove iPhone Passcodes With Wondershare Dr.Fone
There are multiple ways to resolve the “iPhone changed passcode itself” issue, but they can be consistently difficult. Here, Wondershare Dr.Fone provides the simplest solution to fix your Apple iPhone 15 Plus without putting any effort. When fixing your Apple iPhone 15 Plus’s screen locks, Wondershare Dr.Fone caters to different scenarios. From Touch ID to Face ID and other basic screen locks, this tool unlocks it within minutes.
It clearly shows that you can easily get yourselves out of the miserable iPhone changed passcode itself issue. This is not only what Wondershare Dr.Fone offers its users. You can also find a high success rate for unlocking carrier and MDM locks.
Key Features of Wondershare Dr.Fone
- Wondershare Dr.Fone is compatible with all iOS devices up to iOS 17, which allows everyone to get help using its advanced functionality.
- If you lose access to your Apple ID, it can bypass the iCloud Activation Lock and help you set up your iOS device like a new one.
- Without damaging the data, Wondershare Dr.Fone allows you to remove the iTunes backup encryption . This allows you to back up, restore, transfer, or easily wipe out your device’s data.
Comprehensive Guide To Unlock Screen Using Wondershare Dr.Fone
Wondershare Dr.Fone provides the simplest solution to unlock your Apple iPhone 15 Plus and remove the passcode change issue. Follow this step-by-step guide to complete the screen unlocking process without wasting any time:
- Step 1. Start Tool and Choose Screen Unlock Function
Initially, launch Wondershare Dr.Fone on your computer and connect it to your concerned iPhone. Go into the “Toolbox” and choose the “Screen Unlock” function from the given options. Next, select “iOS” to run the process for the iOS device. Choose the “Unlock iOS Screen” option and hit the “Start” button to initiate the unlocking process.

- Step 2. Put Your Apple iPhone 15 Plus in Recovery Mode and Confirm Status
After that, follow the on-screen instructions to put your Apple iPhone 15 Plus in the Recovery Mode. In the next window, you can see your device model recognized. Then, enter your “System Version” and hit the “Start” button again to continue.
- Step 3. Download iOS Firmware and Confirm
Then, the system starts downloading the required iOS firmware according to your Apple iPhone 15 Plus model. Once the download is complete, click “Unlock Now” to implement the screen unlocking process. Enter the code in the confirmation box in the next window and choose the “Unlock” option.

- Step 4. Install iOS Firmware To Unlock Completely
After that, you can see a progress bar of the unlocking screen process. Then, it takes you to the next window after completion, where you click the “Done” button to accomplish the process.
Part 3. Set Up the Apple iPhone 15 Plus device Again Using the Security Lockout Procedure
Security Lockout or “iPhone Unavailable” happens when you attempt a wrong passcode 10 times. From there, you need to erase all your Apple iPhone 15 Plus data to regain access to the iOS device again.
While there is no direct way to regain access to your device when its passcode changes, you will have to perform a factory reset on your Apple iPhone 15 Plus to make it reusable. For that, look through the comprehensive guide on how to take your device out of this state:
- Step 1. After getting your iOS 17 device into the “iPhone Unavailable” stage, tap the “Forgot Passcode?” option in the bottom right corner.
- Step 2. To start the Apple iPhone 15 Plus reset, you need to tap on the “Start iPhone Reset.” Then, enter your Apple ID password in the given box and sign out your Apple ID. If you have an eSIM, you will be prompted with an option. Select the “Keep eSIM and Erase Data” or the “Delete eSIM and Erase Data” option according to your choice.

In another case, Apple allows you to temporarily sign in to your Apple iPhone 15 Plus using a recently changed passcode within 72 hours. But once you get into your device, set a new passcode immediately to retain your full access.
Part 4. Using iTunes To Set Up iOS Device Again
iTunes service allows you to reset your Apple iPhone 15 Plus to factory settings and unlock the screen lock if the Apple iPhone 15 Plus passcode changes on its own. Using iTunes to set up your Apple iPhone 15 Plus again is a good and safe method, but it removes your device data. If you can compromise losing data, you can follow these instructions to remove the Apple iPhone 15 Plus Passcode Changed Itself issue using iTunes:
Instructions. Firstly, launch iTunes on your desktop and connect your Apple iPhone 15 Plus. Then, you need to progress into putting your Apple iPhone 15 Plus in the Recovery Mode . Continuing this, iTunes detects your device in Recovery Mode and shows two options: “Update” or “Restore.” Click on the “Restore” option and hit the “OK” button to restore your Apple iPhone 15 Plus and regain access.

Part 5. Using iCloud To Set Up iOS Device Again
Using iCloud to unlock iOS devices is a safe and recommended method, but it also leads to complete data loss. If you wish to consider using the iCloud method, it is important for the Find My service to be active on the Apple iPhone 15 Plus device. Also, you need to be aware of your Apple ID and password before proceeding. Follow this comprehensive guide step-by-step to set up your iOS device again using iCloud.
- Step 1. First of all, open iCloud on your desktop web browser. Afterward, enter your “Apple ID” and “Password” to proceed. After trusting the Apple iPhone 15 Plus device, look for the “Grid” icon on the top right to find the “Find My” option in the list.

- Step 2. After that, choose the Apple iPhone 15 Plus device that you want to recover. Then, click the “Erase This Device” option to remove data and regain your device access.

Part 6. Using Find My App To Set Up iOS Device Again
This method needs you to have another iOS device signed into the same Apple ID with the Find My option enabled. After fulfilling these preconditions, you can follow these steps to set up your device whose iPhone passcode changed from 4 to 6 digits by itself:
- Step 1. Launch the Find My App on any other device, select the “Devices” tab from the bottom menu, find your locked iPhone in the list, and tap on that.
- Step 2. You must select the “Erase This Device” button to remove it from the iCloud account. This will instantly factory reset the Apple iPhone 15 Plus device as if it is a new iOS device.

Bonus Tip. How To Change Passcode on iPhone: A Simple Guide
We’ve discussed various reasons why the iPhone passcode changed itself above. However, there are several instances where you want to change the passcode yourself. What to do if you are looking for an effective way to change your Apple iPhone 15 Plus’s passcode? Follow the simple step-by-step guide to change the passcode from the iDevice’s “Settings:”
- Step 1. First, open iPhone “Settings” and go to the “Face ID & Passcode” option to access the Apple iPhone 15 Plus device’s security settings.

- Step 2. After that, tap “Change Passcode” and enter your six-digit passcode to see passcode options. Open “Passcode Options” and set a four-digit passcode easily or vice versa.

Conclusion
In this article, we’ve gone through the scenario of iPhone/iPad passcode changing itself due to system glitches. To fix this problem, we have introduced some effective and reliable methods with simple steps. However, Wondershare Dr.Fone is the recommended tool to bypass this issue because it provides a high success rate with an easy-to-follow system.
Tips: Are you searching for a powerful Screen Unlock tool? No worries as Dr.Fone is here to help you. Download it and start a seamless unlock experience!
Also read:
- [New] Innovating Image Vision Mastering HDR in Photoshop
- A Comprehensive Guide to iPhone 12 mini Blacklist Removal Tips and Tools | Dr.fone
- Android Screen Stuck General Vivo V29e Partly Screen Unresponsive | Dr.fone
- Effective Strategies for Resolving 'msvbvm50.dll' Cannot Be Found Error
- Effizientes Übertragen Von Videos Zwischen iPhone Und iPad Mithilfe Der AirDrop-Funktion Des iOS-Systems
- Erfolgreich EXT4/EXT3 Partitionen in Windows Wiederbeleben: Schritt-Für-Schritt Anleitungen Für Benutzer
- How Do You Unlock your iPhone 15 Pro? Learn All 4 Methods | Dr.fone
- How To Fix Apple iPhone 14 Plus Unavailable Issue With Ease | Dr.fone
- How to Unlock Apple iPhone SE (2022) With an Apple Watch & What to Do if It Doesnt Work | Dr.fone
- In 2024, Easy Steps on How To Create a New Apple ID Account On iPhone XS | Dr.fone
- In 2024, How Can I Unlock My iPhone 6 Plus After Forgetting my PIN Code? | Dr.fone
- In 2024, iPhone Is Disabled? Here Is The Way To Unlock Disabled Apple iPhone 6s Plus | Dr.fone
- In 2024, The Lowdown on VN Video Editor for PC A Brief but Informative Review
- Quick Guide to Screen Capture on Laptops and ChromeOS
- Sharing Life's Moments with Your Online Audience
- Unlock the Secret: How to Prevent Recurrebl Crashes in Valheim While Playing on Your PC
- Title: In 2024, Complete Guide For iPhone 15 Plus Lock Screen | Dr.fone
- Author: Amelia
- Created at : 2024-10-16 21:05:08
- Updated at : 2024-10-20 20:36:35
- Link: https://iphone-unlock.techidaily.com/in-2024-complete-guide-for-iphone-15-plus-lock-screen-drfone-by-drfone-ios/
- License: This work is licensed under CC BY-NC-SA 4.0.