
In 2024, Did Your Apple iPhone 8 Plus Passcode Change Itself? Unlock It Now | Dr.fone
Did Your Apple iPhone 8 Plus Passcode Change Itself? Unlock It Now
The Apple iPhone 8 Plus changing passcodes itself is not a commonly reported issue, but it surely can happen to anyone. While the reasons are uncertain, the issue can be resolved without putting much strain on your device. If you face this iPhone passcode changed itself issue by any chance, it makes it hard for you to get into your Apple iPhone 8 Plus.
However, you don’t need to worry, as this well-organized guide provides authentic methods to solve this issue. You will also find a bonus tool to fix your iPhone/iPad passcode changed itself issue without any need of knowledge.


Part 1. What Are the Reasons for iPhone Passcode Changing by Itself
Before solving the Apple iPhone 8 Plus or iPad passcode changed itself issue, you should know the actual reason behind it. Here are some points that precisely explain why the Apple iPhone 8 Plus changed its passcode by itself:
- Frequent iOS Updates: One major issue that can cause the problem of iPhone passcodes changing by itself is the ongoing iOS updates. An update can sometimes cause major glitches in the Apple iPhone 8 Plus device, which might automatically change the credentials.
- iOS System Error: Many users are reportedly known for installing and using the Beta version of iOS on their iPhones/iPads. These versions are known to hold major glitches and bugs in the software. Usually, the Apple iPhone 8 Plus changing passcode issue is normally reported by users under such scenarios.
- Malware: Malicious apps can damage your system security and make your iOS device change the passcode automatically. This can either happen due to device hacking or system security breaches.
Part 2. [The Simplest Solution] Remove iPhone Passcodes With Wondershare Dr.Fone
There are multiple ways to resolve the “iPhone changed passcode itself” issue, but they can be consistently difficult. Here, Wondershare Dr.Fone provides the simplest solution to fix your Apple iPhone 8 Plus without putting any effort. When fixing your Apple iPhone 8 Plus’s screen locks, Wondershare Dr.Fone caters to different scenarios. From Touch ID to Face ID and other basic screen locks, this tool unlocks it within minutes.
It clearly shows that you can easily get yourselves out of the miserable iPhone changed passcode itself issue. This is not only what Wondershare Dr.Fone offers its users. You can also find a high success rate for unlocking carrier and MDM locks.
Key Features of Wondershare Dr.Fone
- Wondershare Dr.Fone is compatible with all iOS devices up to iOS 17, which allows everyone to get help using its advanced functionality.
- If you lose access to your Apple ID, it can bypass the iCloud Activation Lock and help you set up your iOS device like a new one.
- Without damaging the data, Wondershare Dr.Fone allows you to remove the iTunes backup encryption . This allows you to back up, restore, transfer, or easily wipe out your device’s data.
Comprehensive Guide To Unlock Screen Using Wondershare Dr.Fone
Wondershare Dr.Fone provides the simplest solution to unlock your Apple iPhone 8 Plus and remove the passcode change issue. Follow this step-by-step guide to complete the screen unlocking process without wasting any time:
- Step 1. Start Tool and Choose Screen Unlock Function
Initially, launch Wondershare Dr.Fone on your computer and connect it to your concerned iPhone. Go into the “Toolbox” and choose the “Screen Unlock” function from the given options. Next, select “iOS” to run the process for the iOS device. Choose the “Unlock iOS Screen” option and hit the “Start” button to initiate the unlocking process.

- Step 2. Put Your Apple iPhone 8 Plus in Recovery Mode and Confirm Status
After that, follow the on-screen instructions to put your Apple iPhone 8 Plus in the Recovery Mode. In the next window, you can see your device model recognized. Then, enter your “System Version” and hit the “Start” button again to continue.

- Step 3. Download iOS Firmware and Confirm
Then, the system starts downloading the required iOS firmware according to your Apple iPhone 8 Plus model. Once the download is complete, click “Unlock Now” to implement the screen unlocking process. Enter the code in the confirmation box in the next window and choose the “Unlock” option.

- Step 4. Install iOS Firmware To Unlock Completely
After that, you can see a progress bar of the unlocking screen process. Then, it takes you to the next window after completion, where you click the “Done” button to accomplish the process.

Part 3. Set Up the Apple iPhone 8 Plus device Again Using the Security Lockout Procedure
Security Lockout or “iPhone Unavailable” happens when you attempt a wrong passcode 10 times. From there, you need to erase all your Apple iPhone 8 Plus data to regain access to the iOS device again.
While there is no direct way to regain access to your device when its passcode changes, you will have to perform a factory reset on your Apple iPhone 8 Plus to make it reusable. For that, look through the comprehensive guide on how to take your device out of this state:
- Step 1. After getting your iOS 17 device into the “iPhone Unavailable” stage, tap the “Forgot Passcode?” option in the bottom right corner.
- Step 2. To start the Apple iPhone 8 Plus reset, you need to tap on the “Start iPhone Reset.” Then, enter your Apple ID password in the given box and sign out your Apple ID. If you have an eSIM, you will be prompted with an option. Select the “Keep eSIM and Erase Data” or the “Delete eSIM and Erase Data” option according to your choice.

In another case, Apple allows you to temporarily sign in to your Apple iPhone 8 Plus using a recently changed passcode within 72 hours. But once you get into your device, set a new passcode immediately to retain your full access.
Part 4. Using iTunes To Set Up iOS Device Again
iTunes service allows you to reset your Apple iPhone 8 Plus to factory settings and unlock the screen lock if the Apple iPhone 8 Plus passcode changes on its own. Using iTunes to set up your Apple iPhone 8 Plus again is a good and safe method, but it removes your device data. If you can compromise losing data, you can follow these instructions to remove the Apple iPhone 8 Plus Passcode Changed Itself issue using iTunes:
Instructions. Firstly, launch iTunes on your desktop and connect your Apple iPhone 8 Plus. Then, you need to progress into putting your Apple iPhone 8 Plus in the Recovery Mode . Continuing this, iTunes detects your device in Recovery Mode and shows two options: “Update” or “Restore.” Click on the “Restore” option and hit the “OK” button to restore your Apple iPhone 8 Plus and regain access.

Part 5. Using iCloud To Set Up iOS Device Again
Using iCloud to unlock iOS devices is a safe and recommended method, but it also leads to complete data loss. If you wish to consider using the iCloud method, it is important for the Find My service to be active on the Apple iPhone 8 Plus device. Also, you need to be aware of your Apple ID and password before proceeding. Follow this comprehensive guide step-by-step to set up your iOS device again using iCloud.
- Step 1. First of all, open iCloud on your desktop web browser. Afterward, enter your “Apple ID” and “Password” to proceed. After trusting the Apple iPhone 8 Plus device, look for the “Grid” icon on the top right to find the “Find My” option in the list.

- Step 2. After that, choose the Apple iPhone 8 Plus device that you want to recover. Then, click the “Erase This Device” option to remove data and regain your device access.

Part 6. Using Find My App To Set Up iOS Device Again
This method needs you to have another iOS device signed into the same Apple ID with the Find My option enabled. After fulfilling these preconditions, you can follow these steps to set up your device whose iPhone passcode changed from 4 to 6 digits by itself:
- Step 1. Launch the Find My App on any other device, select the “Devices” tab from the bottom menu, find your locked iPhone in the list, and tap on that.
- Step 2. You must select the “Erase This Device” button to remove it from the iCloud account. This will instantly factory reset the Apple iPhone 8 Plus device as if it is a new iOS device.

Bonus Tip. How To Change Passcode on iPhone: A Simple Guide
We’ve discussed various reasons why the iPhone passcode changed itself above. However, there are several instances where you want to change the passcode yourself. What to do if you are looking for an effective way to change your Apple iPhone 8 Plus’s passcode? Follow the simple step-by-step guide to change the passcode from the iDevice’s “Settings:”
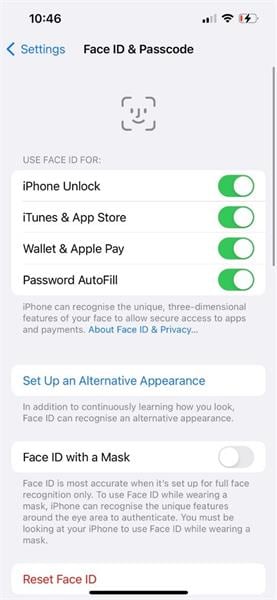
- Step 1. First, open iPhone “Settings” and go to the “Face ID & Passcode” option to access the Apple iPhone 8 Plus device’s security settings.

- Step 2. After that, tap “Change Passcode” and enter your six-digit passcode to see passcode options. Open “Passcode Options” and set a four-digit passcode easily or vice versa.

Conclusion
In this article, we’ve gone through the scenario of iPhone/iPad passcode changing itself due to system glitches. To fix this problem, we have introduced some effective and reliable methods with simple steps. However, Wondershare Dr.Fone is the recommended tool to bypass this issue because it provides a high success rate with an easy-to-follow system.
Tips: Are you searching for a powerful Screen Unlock tool? No worries as Dr.Fone is here to help you. Download it and start a seamless unlock experience!
How to Unlock Apple iPhone 8 Plus without Passcode or Face ID
You can’t access your Apple iPhone 8 Plus because the Face ID isn’t working, and you forgot your passcode? So you are considering how to unlock iPhone without face ID or passcode. If so, this article will walk you through how to do that.
Firstly, one ought to realize that it is impossible to hack an iPhone passcode. Therefore, the primary way that attempts to unlock your device without a PIN or Face ID is to erase it. After reading this guide, you will figure out how to unlock iPhone without passcode or face ID. Keep reading to find out more and learn about the best tools in the business.
Part 1: Best Ways to Unlock iPhone without a Passcode or Face ID
1. Unlock it via Find My
- Go to the iCloud official site, and sign in to your iCloud account. The site will give you two or three choices when you log in. Click on “Find iPhone” to proceed.
- You will be taken to another interface. Click “All devices” and select the Apple iPhone 8 Plus on which you need to erase the passcode.
- Click on “Erase iPhone”, and afterwards affirm the decision. That’s the simplest solution for how to unlock iPhone without passcode or face ID.

2. Via iTunes
Step 1. Go to Recovery Mode
Entering the recovery mode requires various steps, given your Apple iPhone 8 Plus model or settings. Assuming you’re uncertain which one you have, check the rear of your phone or the client manual you got in the first box.
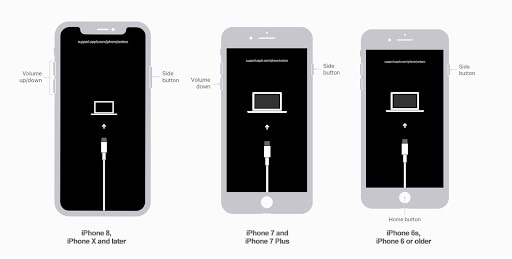
iPhone 8 and Above:
- Hold the Side button used to lock your screen and both Volume buttons. The power-off slider will show up on the screen.
- Drag the slider to one side to switch off your Apple iPhone 8 Plus.
- Use a lightning connector to plug your Apple iPhone 8 Plus into a Macintosh or PC while holding the Side button.
- Keep holding the button until the recovery screen shows up.
iPhone 7/7 Plus:
- Hold the Side button used to lock your screen until the power-off slider shows up.
- Switch off your Apple iPhone 8 Plus.
- Connect your Apple iPhone 8 Plus to a Macintosh or PC through a connector while holding the Volume (-) button.
- Continue to press the button until you get to recovery mode.
iPhone 6 or Below:
- Hold the Side or Top button and trust that the power-off slider will appear.
- Switch off your Apple iPhone 8 Plus.
- Connect your Apple iPhone 8 Plus to a system through a connector while holding the Home button.
- Keep the Home button held until you see the recovery screen.
Step 2. Select your Device on your System
After entering recovery mode, you’ll have to continue on your Macintosh or PC. Then, contingent upon your OS, follow the aide underneath to begin unlocking your Apple iPhone 8 Plus.
macOS Catalina
- Go to the Finder window.
- Your Apple iPhone 8 Plus will appear on the left half of the Finder window under Locations. You can tap on it to choose it.

macOS Mojave or a Windows with iTunes
If your gadget isn’t running macOS Catalina or later, you’ll need to involve iTunes to connect your Apple iPhone 8 Plus. In the first place, download iTunes on your PC. Then, take the appropriate steps depending on which iTunes version you’re running:
- On iTunes 12 and newer, click on the Apple iPhone 8 Plus symbol in the upper-left corner of the iTunes window.
- On iTunes 11, click on the Apple iPhone 8 Plus tab on the right half of the iTunes window.
- On iTunes 10, the Apple iPhone 8 Plus will be in the sidebar on the left.
Step 3. Pick the Choice to Restore
When you’ve effectively connected and chosen your Apple iPhone 8 Plus on a Mac or a PC, tap on the Restore button. And that’s how to unlock iPhone without passcode or face ID.
3. DNS Server
The following steps explain how to unlock iPhone without face ID or passcode using a DNS server:
Step 1. Pick your LANGUAGE and COUNTRY from the lock screen menu after switching on a locked device.
Step 2. Click “Continue” to enter the WiFi settings page. Whenever requested to connect to WiFi, search for the “I” next to the WiFi tab.
Step 3. Disconnect your current network, go to “Network/connection Settings”, and click Forget.
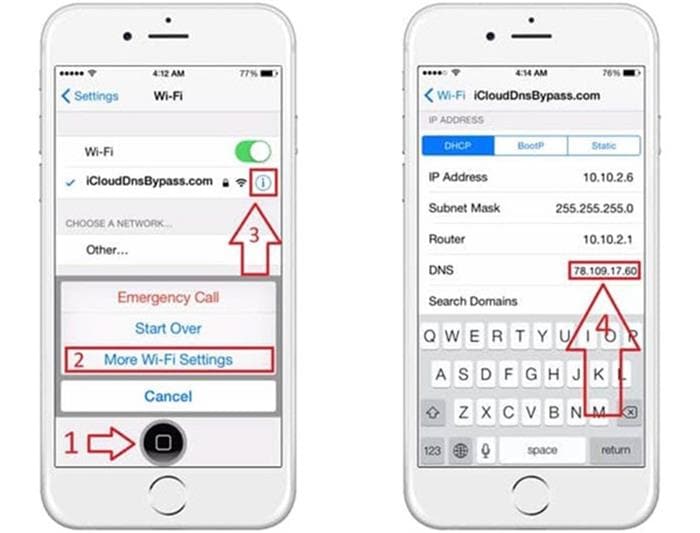
Step 4. Click the “I” and enter a DNS server IP address to bypass the lock. IP addresses of different regions are given below:
- USA: 104.154.51.7
- South America: 35.199.88.219
- Europe: 104.155.28.90
- Asia: 104.155.220.58
- Australia and Oceania: 35.189.47.23
- Others: 78.100.17.60
Step 5. Then, click the “Back” choice at the left half of your screen, turn the WiFi on and select your network. Enter your WiFi passcode.
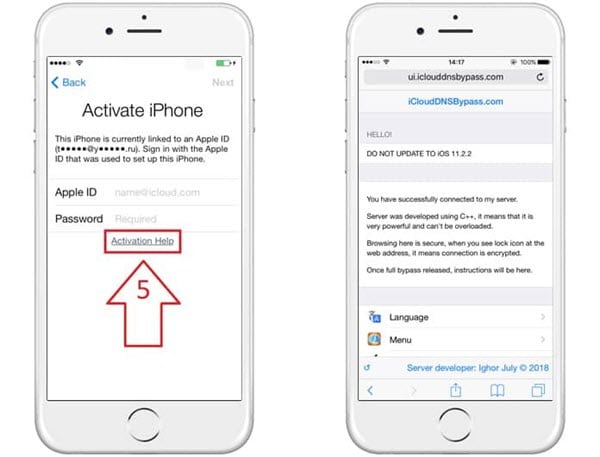
Step 6. Click Next Page > Back to enter the lock bypass screen. These are all the required steps for how to unlock iPhone without passcode or face ID 2022.
4. Dr.Fone-Screen Unlock
This section will introduce you to our most important solution. Yes, you heard it right. If you need a hassle-free method to unlock your iDevice without a passcode or face ID, use Wondershare Dr.Fone Screen Unlock.
Dr.Fone will not only remove the screen lock but also make sure to keep your identity safe. In addition, it is the easiest method and requires no prior knowledge. So if you are someone new to this technology, we suggest you follow the steps below:
Step 1. Launch the Software on your PC
After successfully installing Dr.Fone on your PC, open it and select the “Screen Unlock” tool from the main interface.

Next, connect your locked phone to the system through a wired connection. Then go for the iOS screen unlock feature.


Step 2. Recovery or DFU Mode Boot
It is necessary to first boot your locked device in recovery or DFU mode. Follow the guidelines on your screen to do so. The Recovery mode is the suggested way for iOS screen locks. If you can’t actuate this mode, go for the DFU mode boot.

Step 3. Select your Apple iPhone 8 Plus Model
After the phone is in recovery/DFU mode, the program will show the locked device’s information. Here you can see the model and iOS variant of the Apple iPhone 8 Plus device. If it isn’t correct, you could choose the right one from the dropdown menu next to it. After that, click the Download button to get the required firmware for your locked phone.
Step 4. Remove the Screen Lock
After downloading the firmware effectively, click the “Unlock Now” button to let Dr.Fone unlock your Apple iPhone 8 Plus.

Simply in no time, Dr.Fone will successfully unlock your device.
Note: This unlocking process will erase everything off your Apple iPhone 8 Plus and bring it to the factory default state. Indeed, no other method that doesn’t allow data erasure at the moment.

Part 2: How to Turn Off Passcode or Face ID on My Device?
Face ID can be a helpful method for unlocking your Apple iPhone 8 Plus - by simply looking at your phone. However, a few clients might worry that it’s not as secure as utilizing a PIN to open your phone. If that is the best case for you, you can follow this manual to disable Face ID and depend on a passcode.
Here’s the step-by-step guide to the most effective method to switch off Face ID on the iPhone:
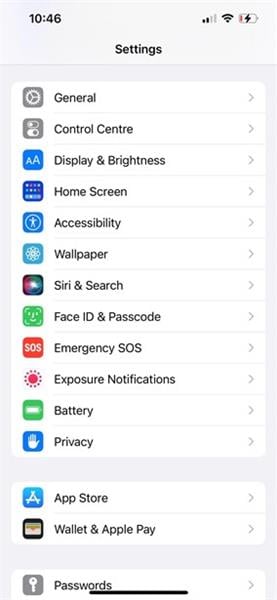
1. Open the Settings application
First, tap on your Settings app to open it. That is the one on the home screen with a symbol like the mechanical gear.
2. Tap on Face ID and Passcode
On the Settings menu, tap on the Face ID and Passcode menu.
3. Enter your passcode
At this stage, you’ll be approached to enter your passcode, so do this to get to the Face ID and Passcode menu.
4. Switch off Face ID
You’ll have the option to turn off the switch for Face ID across different activities, including the phone unlock.
Part 3: Can I bypass my iPhone Face ID with a picture?
As indicated by Apple, the short and obvious answer is no.
FaceID isn’t simply a camera snapping a picture. It utilizes an exceptional chip to filter the face with many spots. It makes a 3D contour of the look that works in low, glorious light around evening time, and your eyes must be opened. The opportunity to randomly unlock an iPhone with FaceID is 1/1 million, compared to 1/50000 with Touch ID.
It doesn’t work by snapping a picture of your face, but by taking a contour of your face if you utilize a camera that can see infrared. However, a photograph is a level and cannot give a dab matrix required for Face ID to work. You may be holding a clear piece of paper before the phone.
The Bottom Line
That’s all about our take on how to unlock iPhone without passcode or face ID 2022. We have worked hard to make sure you get the right solutions in hand. However, we strongly suggest Dr.Fone if you still face issues with our solutions. Even if the above methods fail, Dr.Fone will ensure you unlock your phone.
How to Access Your Apple iPhone 8 Plus When You Forget the Passcode?
We all have secrets in our iPhone or some important financial or business data that we all wish to protect from unwanted access. For this, we set up a passcode. But what if Apple iPhone 8 Plus passcode is forgotten by you? Well, you may now wonder how to perform Apple iPhone 8 Plus passcode bypass, right? Worry no more! We’re right here to help you with the proven solutions for Apple iPhone 8 Plus passcode reset without iTunes or with it too. Let’s explore.
Part 1. Unlock Apple iPhone 8 Plus screen passcode in one click (unlock tool needed)
The first and the ultimate measure for Apple iPhone 8 Plus passcode removal in just a matter of a single click is Dr.Fone - Screen Unlock (iOS) . With the help of this mighty tool, performing Apple iPhone 8 Plus passcode reset is even easier than any other alternative. Not only it can perform Apple iPhone 8 Plus passcode bypass, you can also make use of this tool to bypass lock screen of an Android smartphone too. Isn’t it amazing? Moreover, this powerful tool works effortlessly with the latest iOS 13 version and even with the most recent iPhone models as well. Here is the step by step tutorial on Apple iPhone 8 Plus passcode bypass.
Step 1: Install and launch Dr.Fone - Screen Unlock (iOS)
Get the tool Dr.Fone - Screen Unlock (iOS) downloaded and installed over your computer system. Then establish a connection between your computer and iPhone.
Now, launch the tool and then opt for the “Unlock” tile from the main screen.
Step 2: Boot in Recovery/DFU mode
Next move that you need to perform is to opt for the correct mode, i.e. “Unlock iOS Screen”. Then, you’ll be prompted to boot your device in Recovery/DFU mode. The on-screen instructions will guide you on how to do it.

Step 3: Double-Check iPhone information
On the upcoming screen, you’ll be displayed the “Device Model” and most recent “System Version” which is compatible with your Apple iPhone 8 Plus. Simply, hit the “Start” button here.
Step 4: Perform Apple iPhone 8 Plus passcode removal
Once, the software downloads the firmware automatically, you can then proceed to Apple iPhone 8 Plus passcode reset. Hit the “Unlock Now” button over the next screen and in a short while you’ll be notified that Apple iPhone 8 Plus passcode removal is completed.
 safe & secure
Part 2. Restore an iTunes backup for Apple iPhone 8 Plus
Here we’re going to be familiar with the Apple iPhone 8 Plus passcode reset using the renowned iOS data management tool, iTunes. But be sure that iTunes version installed over your computer is up to date or else unknown errors may crop up in between. Eventually, your all-new Apple iPhone 8 Plus may even get bricked. Think this is it? Well, here’s another problem with iTunes, you need to get your Apple iPhone 8 Plus connected only to a pre-synced or pre-trusted computer. Or else, this tutorial won’t bring any good to you.
Step 1: First, get your Apple iPhone 8 Plus connected to your PC. Then, launch the iTunes most recent version. It will automatically detect your Apple iPhone 8 Plus. Once detected, tap the “Device” icon over the left top corner of iTunes.
Step 2: Then, hit the “Summary” option from the left panel and then you need to hit the “Restore iPhone” button. Confirm your actions by simply pushing the “Restore” button on the pop-up message and you’re done. Now, just wait for the process to complete.

Part 3. Restore Apple iPhone 8 Plus in recovery mode to remove screen passcode
If somehow, the above solution fails and you’re just not able to get Apple iPhone 8 Plus passcode reset. You need to boot your device into recovery mode and then perform the factory reset. This would certainly wipe off everything from your Apple iPhone 8 Plus including the passcode as well. Here are the steps involved in booting your Apple iPhone 8 Plus in recovery mode.
- First things first, power off your Apple iPhone 8 Plus by pushing the “Side” button down along with either of the “Volume” button. Keep them pressed till you get to see “Power-off” slider over your screen. Now, simply drag it to power off your device.
- Next, connect your Apple iPhone 8 Plus and your computer firmly with the help of an authentic cable. Please make sure to press and hold the “Side” button meanwhile.
- Ensure not to let go the Side button till the recovery mode screen appears over your Apple iPhone 8 Plus.


- Once the Apple iPhone 8 Plus device is booted in recovery mode, iTunes will throw a pop up message that “iTunes has detected an iPhone in recovery mode”. Simply, hit the “OK” button over the message and then push the “Restore iPhone” button followed by confirming your actions.

Part 4. Use “Find iPhone” from iCloud
The next pro tutorial for Apple iPhone 8 Plus passcode removal is via iCloud. For this, grad access to any computer available on your side. Or, you can also make use of any other smartphone device but ensure it must be connected to a WiFi network or have an active data pack. Moreover, the locked iPhone on which you’re going to perform Apple iPhone 8 Plus passcode reset should also have an active internet connection to make this tutorial work.
Note: Since we’re going to unlock your Apple iPhone 8 Plus using Find My iPhone service of iCloud. It is important that “Find My iPhone” service was enabled beforehand over your Apple iPhone 8 Plus.
Step 1: Launch the browser over any other smartphone device or computer. Then, visit the official web page iCloud.com.
Step 2: Now, make use of same Apple account configured with your Apple iPhone 8 Plus to sign in to iCloud. Then, opt for the “Find My iPhone” icon over the launch pad.

Step 3: Next, tap on the “All Devices” drop-down menu available over the top midsection and then select the Apple iPhone 8 Plus that you wish to bypass the passcode off.
Step 4: Then, you’ll get to witness a pop-up window over your screen. Tap the “Erase iPhone” button over it and then confirm your actions. All the settings and data will be wiped off remotely from your Apple iPhone 8 Plus now.

Step 5: Lastly, wait for the process to complete and upon completion set up your device as usual.
Part 5. How about Apple iPhone 8 Plus restrictions passcode?
Apple iPhone 8 Plus restrictions is a vital setting that is used to lock down a set of functions of the iPhone. These iPhone restrictions are also known as Parental Controls. That implies one can make use of these settings to block or hide songs that have explicit lyrics/content or barring YouTube from running, etc.
It is vital to set up a 4 digit passcode if you want to use iPhone restriction settings. Now, if you somehow forgot the passcode that was set to make use of iPhone restrictions, you need to restore your Apple iPhone 8 Plus with the help of iTunes to remove the previous passcode. But ensure not to restore an old backup of iPhone or else, the old passcode which you may not know will also get activated. Eventually, making your situation even worse.
Reset/Change Apple iPhone 8 Plus restrictions passcode
Now, in case you know the Apple iPhone 8 Plus restrictions passcode and just wish to reset it. Then follow the streak of steps mentioned below.
- Launch “Settings” of your Apple iPhone 8 Plus and then get into “General” followed by “Restrictions”. Now, you’ll be asked to key in the current passcode.

- Once you’ve entered the current passcode, hit on the “Disable Restrictions” and to confirm your actions, key in your passcode when prompted.

- Lastly, hit on “Enable Restrictions”. You’ll be asked to set up a new passcode now. Do it and you’re done.

- Title: In 2024, Did Your Apple iPhone 8 Plus Passcode Change Itself? Unlock It Now | Dr.fone
- Author: Amelia
- Created at : 2024-07-15 05:36:34
- Updated at : 2024-07-16 05:36:34
- Link: https://iphone-unlock.techidaily.com/in-2024-did-your-apple-iphone-8-plus-passcode-change-itself-unlock-it-now-drfone-by-drfone-ios/
- License: This work is licensed under CC BY-NC-SA 4.0.