
In 2024, Did Your iPhone 14 Passcode Change Itself? Unlock It Now | Dr.fone
Did Your Apple iPhone 14 Passcode Change Itself? Unlock It Now
The Apple iPhone 14 changing passcodes itself is not a commonly reported issue, but it surely can happen to anyone. While the reasons are uncertain, the issue can be resolved without putting much strain on your device. If you face this iPhone passcode changed itself issue by any chance, it makes it hard for you to get into your Apple iPhone 14.
However, you don’t need to worry, as this well-organized guide provides authentic methods to solve this issue. You will also find a bonus tool to fix your iPhone/iPad passcode changed itself issue without any need of knowledge.

Part 1. What Are the Reasons for iPhone Passcode Changing by Itself
Before solving the Apple iPhone 14 or iPad passcode changed itself issue, you should know the actual reason behind it. Here are some points that precisely explain why the Apple iPhone 14 changed its passcode by itself:
- Frequent iOS Updates: One major issue that can cause the problem of iPhone passcodes changing by itself is the ongoing iOS updates. An update can sometimes cause major glitches in the Apple iPhone 14 device, which might automatically change the credentials.
- iOS System Error: Many users are reportedly known for installing and using the Beta version of iOS on their iPhones/iPads. These versions are known to hold major glitches and bugs in the software. Usually, the Apple iPhone 14 changing passcode issue is normally reported by users under such scenarios.
- Malware: Malicious apps can damage your system security and make your iOS device change the passcode automatically. This can either happen due to device hacking or system security breaches.
Part 2. [The Simplest Solution] Remove iPhone Passcodes With Wondershare Dr.Fone
There are multiple ways to resolve the “iPhone changed passcode itself” issue, but they can be consistently difficult. Here, Wondershare Dr.Fone provides the simplest solution to fix your Apple iPhone 14 without putting any effort. When fixing your Apple iPhone 14’s screen locks, Wondershare Dr.Fone caters to different scenarios. From Touch ID to Face ID and other basic screen locks, this tool unlocks it within minutes.
It clearly shows that you can easily get yourselves out of the miserable iPhone changed passcode itself issue. This is not only what Wondershare Dr.Fone offers its users. You can also find a high success rate for unlocking carrier and MDM locks.

Key Features of Wondershare Dr.Fone
- Wondershare Dr.Fone is compatible with all iOS devices up to iOS 17, which allows everyone to get help using its advanced functionality.
- If you lose access to your Apple ID, it can bypass the iCloud Activation Lock and help you set up your iOS device like a new one.
- Without damaging the data, Wondershare Dr.Fone allows you to remove the iTunes backup encryption . This allows you to back up, restore, transfer, or easily wipe out your device’s data.
Comprehensive Guide To Unlock Screen Using Wondershare Dr.Fone
Wondershare Dr.Fone provides the simplest solution to unlock your Apple iPhone 14 and remove the passcode change issue. Follow this step-by-step guide to complete the screen unlocking process without wasting any time:
- Step 1. Start Tool and Choose Screen Unlock Function
Initially, launch Wondershare Dr.Fone on your computer and connect it to your concerned iPhone. Go into the “Toolbox” and choose the “Screen Unlock” function from the given options. Next, select “iOS” to run the process for the iOS device. Choose the “Unlock iOS Screen” option and hit the “Start” button to initiate the unlocking process.

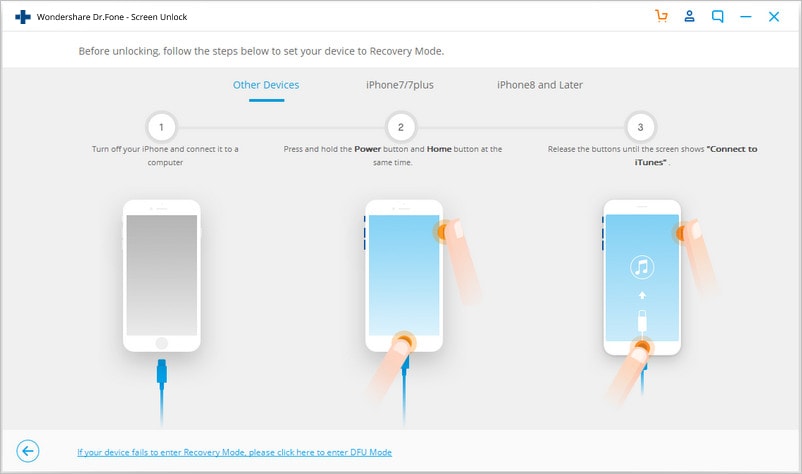
- Step 2. Put Your Apple iPhone 14 in Recovery Mode and Confirm Status
After that, follow the on-screen instructions to put your Apple iPhone 14 in the Recovery Mode. In the next window, you can see your device model recognized. Then, enter your “System Version” and hit the “Start” button again to continue.

- Step 3. Download iOS Firmware and Confirm
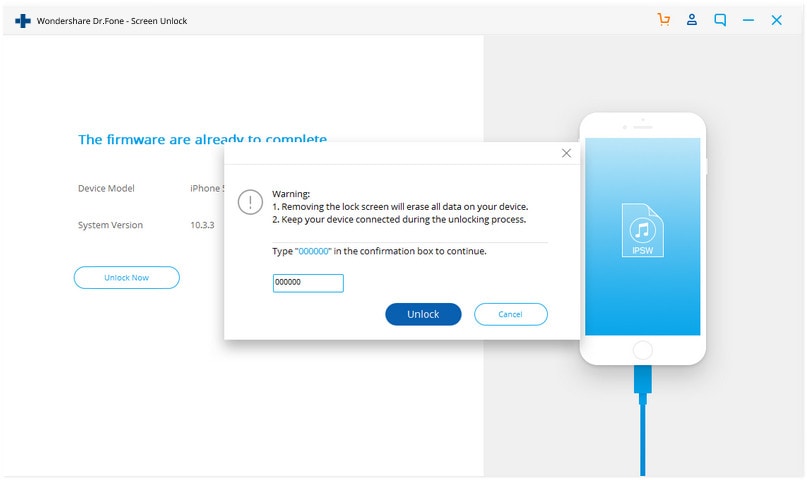
Then, the system starts downloading the required iOS firmware according to your Apple iPhone 14 model. Once the download is complete, click “Unlock Now” to implement the screen unlocking process. Enter the code in the confirmation box in the next window and choose the “Unlock” option.

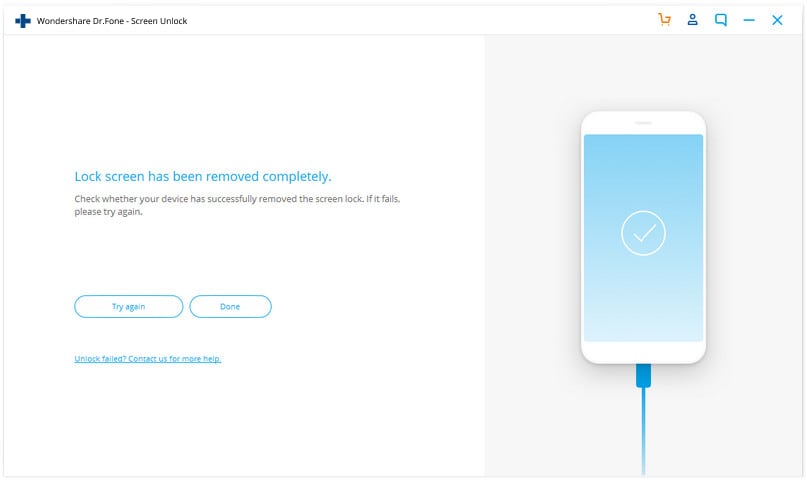
- Step 4. Install iOS Firmware To Unlock Completely
After that, you can see a progress bar of the unlocking screen process. Then, it takes you to the next window after completion, where you click the “Done” button to accomplish the process.

Part 3. Set Up the Apple iPhone 14 device Again Using the Security Lockout Procedure
Security Lockout or “iPhone Unavailable” happens when you attempt a wrong passcode 10 times. From there, you need to erase all your Apple iPhone 14 data to regain access to the iOS device again.
While there is no direct way to regain access to your device when its passcode changes, you will have to perform a factory reset on your Apple iPhone 14 to make it reusable. For that, look through the comprehensive guide on how to take your device out of this state:
- Step 1. After getting your iOS 17 device into the “iPhone Unavailable” stage, tap the “Forgot Passcode?” option in the bottom right corner.
- Step 2. To start the Apple iPhone 14 reset, you need to tap on the “Start iPhone Reset.” Then, enter your Apple ID password in the given box and sign out your Apple ID. If you have an eSIM, you will be prompted with an option. Select the “Keep eSIM and Erase Data” or the “Delete eSIM and Erase Data” option according to your choice.

In another case, Apple allows you to temporarily sign in to your Apple iPhone 14 using a recently changed passcode within 72 hours. But once you get into your device, set a new passcode immediately to retain your full access.
Part 4. Using iTunes To Set Up iOS Device Again
iTunes service allows you to reset your Apple iPhone 14 to factory settings and unlock the screen lock if the Apple iPhone 14 passcode changes on its own. Using iTunes to set up your Apple iPhone 14 again is a good and safe method, but it removes your device data. If you can compromise losing data, you can follow these instructions to remove the Apple iPhone 14 Passcode Changed Itself issue using iTunes:
Instructions. Firstly, launch iTunes on your desktop and connect your Apple iPhone 14. Then, you need to progress into putting your Apple iPhone 14 in the Recovery Mode . Continuing this, iTunes detects your device in Recovery Mode and shows two options: “Update” or “Restore.” Click on the “Restore” option and hit the “OK” button to restore your Apple iPhone 14 and regain access.

Part 5. Using iCloud To Set Up iOS Device Again
Using iCloud to unlock iOS devices is a safe and recommended method, but it also leads to complete data loss. If you wish to consider using the iCloud method, it is important for the Find My service to be active on the Apple iPhone 14 device. Also, you need to be aware of your Apple ID and password before proceeding. Follow this comprehensive guide step-by-step to set up your iOS device again using iCloud.
- Step 1. First of all, open iCloud on your desktop web browser. Afterward, enter your “Apple ID” and “Password” to proceed. After trusting the Apple iPhone 14 device, look for the “Grid” icon on the top right to find the “Find My” option in the list.

- Step 2. After that, choose the Apple iPhone 14 device that you want to recover. Then, click the “Erase This Device” option to remove data and regain your device access.

Part 6. Using Find My App To Set Up iOS Device Again
This method needs you to have another iOS device signed into the same Apple ID with the Find My option enabled. After fulfilling these preconditions, you can follow these steps to set up your device whose iPhone passcode changed from 4 to 6 digits by itself:
- Step 1. Launch the Find My App on any other device, select the “Devices” tab from the bottom menu, find your locked iPhone in the list, and tap on that.
- Step 2. You must select the “Erase This Device” button to remove it from the iCloud account. This will instantly factory reset the Apple iPhone 14 device as if it is a new iOS device.

Bonus Tip. How To Change Passcode on iPhone: A Simple Guide
We’ve discussed various reasons why the iPhone passcode changed itself above. However, there are several instances where you want to change the passcode yourself. What to do if you are looking for an effective way to change your Apple iPhone 14’s passcode? Follow the simple step-by-step guide to change the passcode from the iDevice’s “Settings:”
- Step 1. First, open iPhone “Settings” and go to the “Face ID & Passcode” option to access the Apple iPhone 14 device’s security settings.

- Step 2. After that, tap “Change Passcode” and enter your six-digit passcode to see passcode options. Open “Passcode Options” and set a four-digit passcode easily or vice versa.

Conclusion
In this article, we’ve gone through the scenario of iPhone/iPad passcode changing itself due to system glitches. To fix this problem, we have introduced some effective and reliable methods with simple steps. However, Wondershare Dr.Fone is the recommended tool to bypass this issue because it provides a high success rate with an easy-to-follow system.
Tips: Are you searching for a powerful Screen Unlock tool? No worries as Dr.Fone is here to help you. Download it and start a seamless unlock experience!
How to Make the Most of Your Apple iPhone 14 Lock Screen with Notifications?
The Apple iPhone 14 lock screen has certainly changed a lot over the last few updates of iOS. Not only it provides an added security to the Apple iPhone 14 device, but with iPhone lock screen notifications, we can also save our time and efforts. With the introduction of iOS 18, we can also see a change in iPhone lock screen with notifications as well. To help you make the most out of lock screen notifications iPhone, we have come up with this ultimate guide. Read on and know all sorts of things you can do with iPhone notification lock screen.
Part 1: How to use iPhone lock screen notifications?
When it comes to iPhone lock screen with notifications, there are so many things that you can do. For instance, here are a handful of things you can do with iPhone lock screen notifications.
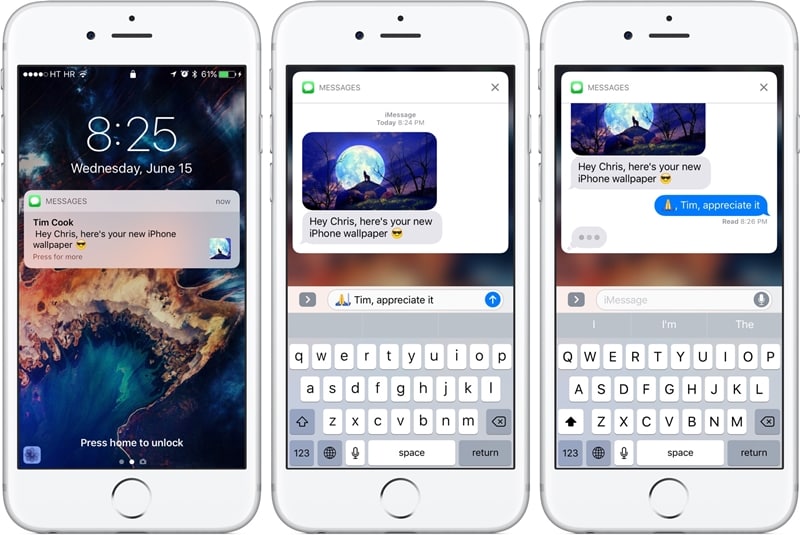
Reply to messages quickly
If you aren’t using this iPhone notification lock screen feature, then you are certainly missing out on something. You might already know that you can get a preview of messages on your home screen. Simply long press it (or 3D Touch) to interact with it. From here, you can reply to your messages without unlocking your device.
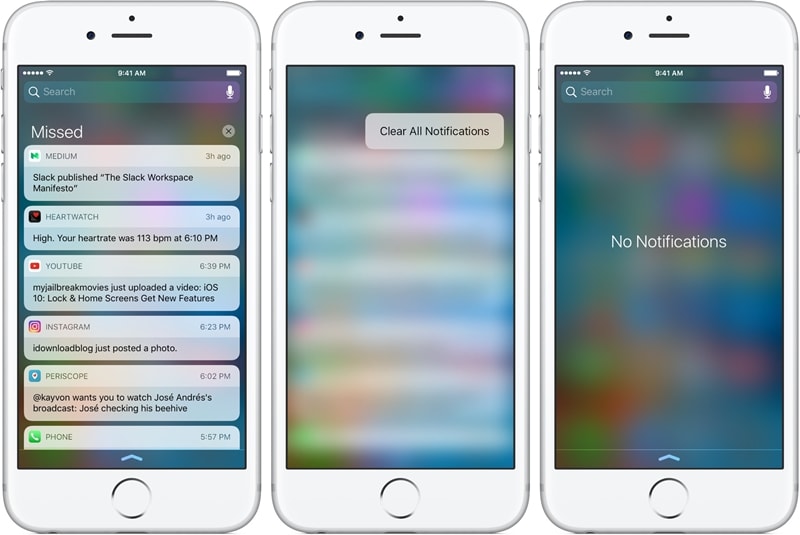
Interact with apps without unlocking your phone
Not just your messages, you can interact with other apps as well right from the lock screen notifications iPhone. After getting a list of notifications, you can simply tap on the “x” button to close them.
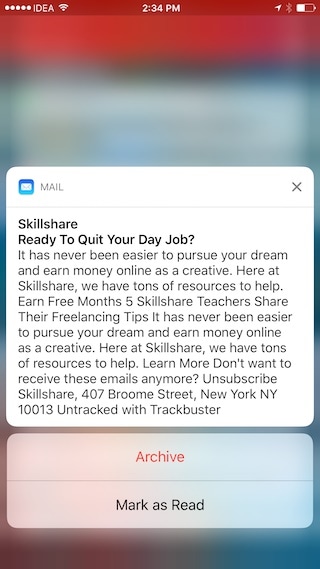
Though, if you want to know more, then just long press the notification. For instance, if you have got a notification for an email, then you can get various options just by long pressing it.
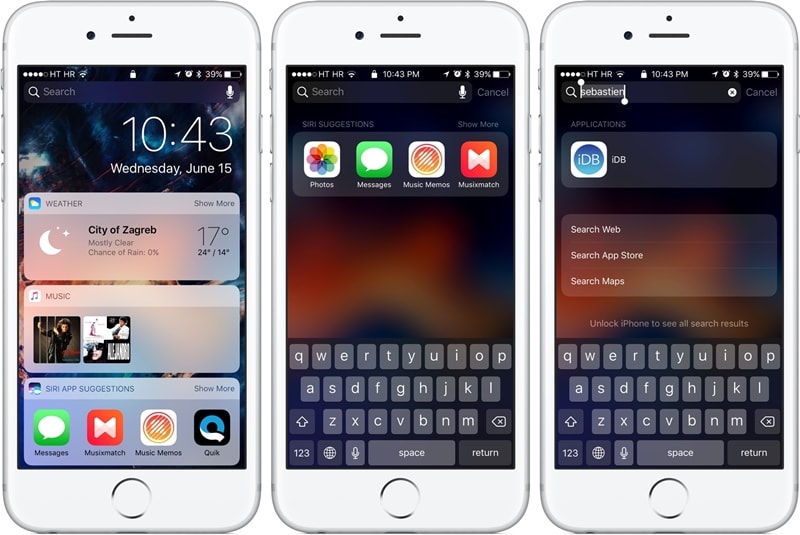
Search for anything
Besides interacting with widgets and apps, you can also search for something on your device and that too without unlocking it. Simply tap on the search bar to make it work.
Part 2: How to turn off notifications on iPhone lock screen?
Sometimes, people can access our private information just by looking at our notifications. In this way, they can get read your crucial information and that too without unlocking your device. By simply visiting your device’s settings, you can customize iPhone lock screen with notifications. In this way, you can turn on or off iPhone lock screen notifications for the apps of your choice.
1. Unlock your device and go to its Settings > Notifications to access all the features related to its notifications.
2. From here, you can view a list of all the apps that can access notifications.
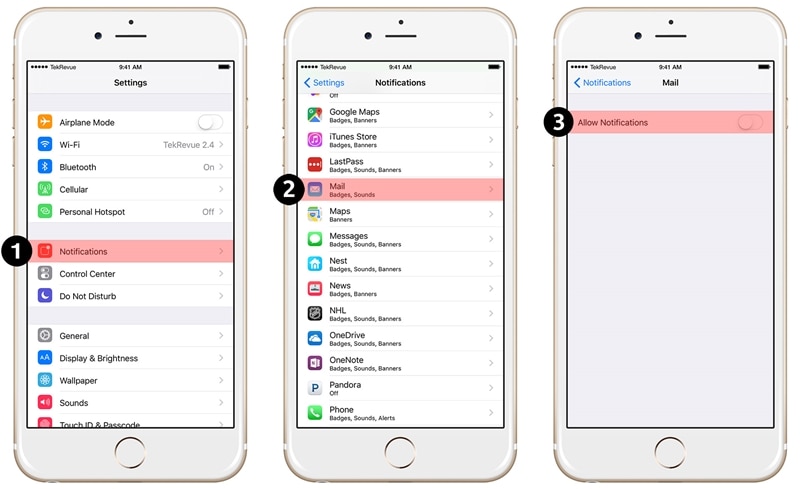
3. Simply tap on the app of your choice (Mail, Message, Photos, iTunes, etc).
4. From here, turn off the option of “Allow Notification” to completely turn off the notifications for the app.
5. If you simply want to turn off notifications on lock screen, then switch off the option of “Show on Lock Screen”.
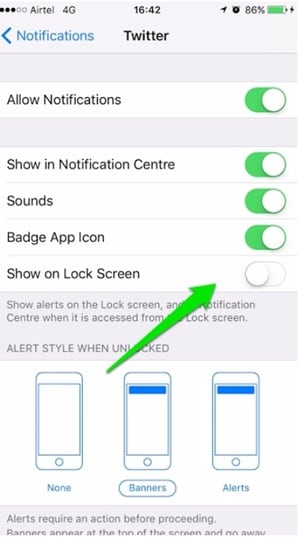
Besides that, there are a few other options as well that you can either enable or disable to customize your lock screen notifications iPhone.
Part 3: How to turn off notification view on iPhone lock screen?
The notification view can be used to see previous notifications on the Apple iPhone 14 device without unlocking it. Needless to say, most of the users don’t like to include this iPhone notification lock screen feature. To turn off the notification view of iPhone lock screen notifications, follow these steps:
1. Firstly, unlock your device and got to its Settings > Touch ID & Passcode option.
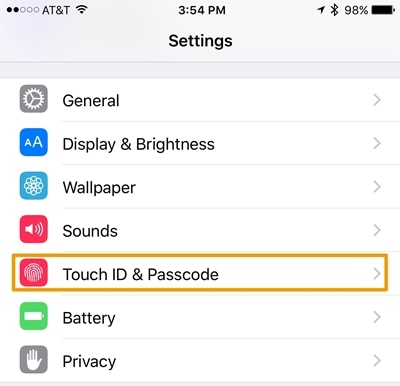
2. You would be needed to provide the passcode or your fingerprint in order to access these settings.
3. This will provide a list of features related to your passcode. Go to the section of “Allow Access When Locked”.
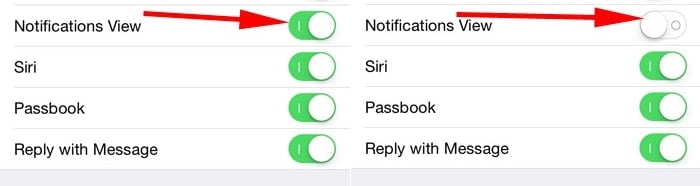
4. From here, make sure that the option of “Notification View” is turned off.
After turning the option off, you can exit from the Settings interface. In this way, your device won’t display the notification view.
Part 4: Changes on iPhone lock screen notifications on iOS 18
With the new update of iOS 18, we can see a drastic change in the Apple iPhone 14 lock screen notifications as well. Since the Apple iPhone 14 lock screen with notifications have been integrated into one, it becomes quite easier for users to access it.
Access iPhone notification lock screen on iOS 18
Some people find it a little tricky to access the lock screen notifications iPhone after the iOS 18 update. Instead of sliding the screen from the top, you need to swipe it from the middle. By swiping it from the bottom, you might get its control center.
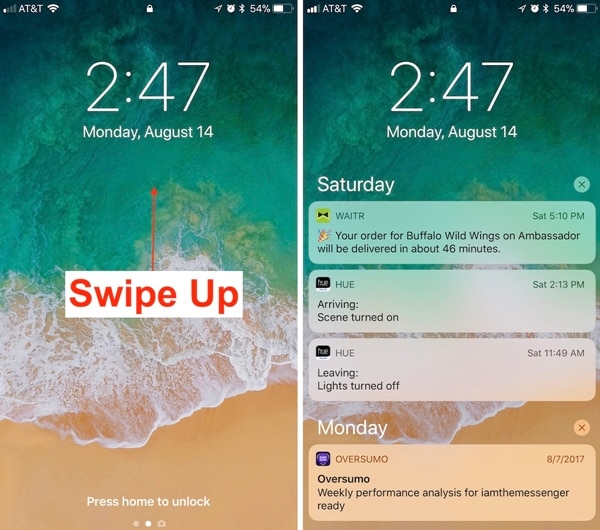
Simply swipe up from the middle of the screen to get a list of all the notifications. Now, you can slide them to access the old notifications.
Nevertheless, you can swipe from the top to access the cover sheet.
Swipe left or right
This is undoubtedly one of the most evident new features of the Apple iPhone 14 notification lock screen of iOS 18. Now, you can swipe left or right to access various features. By swiping left, you can access the Camera on your device and by swiping right, you can access your Today View.
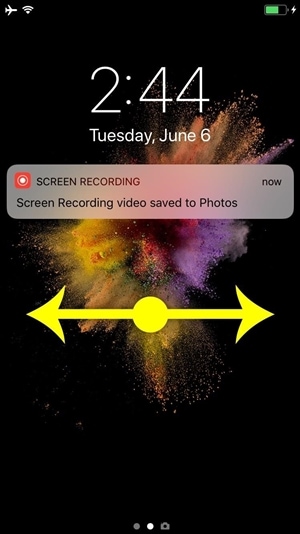
If you want to click pictures instantly, then simply swipe left the lock screen. This will launch the Camera on your device, letting you click pictures on the go. Similarly, by swiping right, you can access your Today View. This includes vital data from apps and widgets that your smartphone assumes is important for you regarding the day.
We hope that after following this guide, you would be able to gain in-depth information regarding iPhone lock screen with notifications. Apart from all the basic things you can do on the lock screen, we have also provided easy ways to customize it. Furthermore, there are so many things that you can do with the iOS 18 iPhone lock screen notifications. While most of the users loved the feature, some are quite hesitant about its application. What is your take on this? Let us know about it in the comments.
How to Bypass Apple iPhone 14 Passcode Easily [Video Inside]
If you have forgotten the passcode of your Apple iPhone 14, then don’t worry! You are not the only one. It happens with plenty of iOS users every now and then. Lately, we have received lots of feedback from our readers asking for a solution to bypass Apple iPhone 14. Therefore, we thought of compiling an informative post to help you bypass the Apple iPhone 14 passcode without much trouble. Go ahead and follow these hassle-free methods to perform an Apple iPhone 14 bypass.
Part 1: How to bypass Apple iPhone 14 passcode with Dr.Fone - Screen Unlock? (iOS 15.4)
Dr.Fone - Screen Unlock is an extremely secure and easy-to-use application that can help you bypass locked screens within minutes. Afterward, you can simply use your phone by resetting its lock. It provides a reliable way to update your phone’s firmware without causing any complications. The application can also be used to resolve plenty of other Apple iPhone 14-related issues. The only disadvantage you should notice is that your data will be wiped out after using this tool. So, you’d better backup it before.
 safe & secure
Compatible with every leading iOS device, it runs on all major iOS versions. Since Dr.Fone has an easy-to-use interface, it can simply resolve your issues without much trouble. You can restore your phone and perform an Apple iPhone 14 bypass with Dr.Fone - Screen Unlock by following these steps.
Dr.Fone - Screen Unlock (iOS)
Bypass Apple iPhone 14 Passcode at Ease
- Remove the 4-digit/6-digit passcode, Touch ID, and Face ID.
- A few clicks and the iOS lock screen are gone.
- The best alternative to factory rest mode.
- Fully compatible with all iDevice models and iOS versions.
4,395,218 people have downloaded it
Step 1. Download Dr.Fone - Screen Unlock on your Mac or Windows system from its official website. After installing it, launch it whenever you need to bypass the Apple iPhone 14 lock. Click on the option of “Screen Unlock“ from the welcome screen.

Step 2. Connect your Apple iPhone 14 to the system and let the application detect it automatically. Click on the “Unlock iOS Screen” button whenever you need to initiate the operation.

Step 3. After your phone is detected, you need to activate the DFU mode as instructed by the on-screen steps.
Step 4. In the next window, you have to provide basic information regarding your iOS device. Here, supply relevant information related to your phone (like device model, firmware, and more). Click on the “Download” button to get the firmware update for your phone.
Step 5. Wait for a while as the application will download the firmware update for your phone. Once it is done, click on the “Unlock Now” button.

Step 6. Simply provide the on-screen confirmation code to initiate the process.
Step 7. As soon as it is completed, you will be notified by the interface. You can also repeat the process by clicking on the “Try Again” button.
safe & secure
Part 2: How to bypass the Apple iPhone 14 passcode with Siri? (iOS 8.0 – iOS 10.1)
If you are an avid user of Apple products, then the chances are that you must have already heard of this Apple iPhone 14 hack. If you are running a device on iOS 8.0 to iOS 10.1, then you can take the assistance of Siri to bypass the Apple iPhone 14 lock. Even though this is not a secure way to surpass your phone’s lock screen, it doesn’t restore or erase your data in the process. You can follow these steps to bypass the Apple iPhone 14 passcode with Siri.
Step 1. Firstly, hold the Home button on our phone to activate Siri. Speak a command like “Siri, what time is it?” to ask the present time. Now, tap on the clock icon.

Step 2. It will open an interface for the world clock feature. From here, add another clock.

Step 3. Simply provide a textual input while searching for the city and tap on the “Select all” button.

Step 4. From all the provided features, select the option of “Share” to continue.

Step 5. Tap on the message icon to draft a new message.

Step 6. A new interface for message draft would be opened. In the “To” field, type something and tap the return button on the keyboard.

Step 7. As your text will turn green, tap on the add icon again.

Step 8. From the next interface, select the option of “Create New Contact”.

Step 9. While adding a new contact, tap on the contact photo icon and choose “Add Photo”.

Step 10. From the photo library, browse your albums.

Step 11. Wait for 3-5 seconds before pressing the home button again. This will lead you to the home screen of your device.

Part 3: How to bypass the Apple iPhone 14 passcode with iTunes?
Another popular way to restore your Apple iPhone 14 is by taking the assistance of iTunes. Needless to say, even though you would be able to bypass the Apple iPhone 14 passcode, the technique will wipe the data on your device. Though, if you have already taken a backup of your data, then you can choose to restore it after performing an Apple iPhone 14 bypass. Do it by following these instructions.
Step 1. Launch iTunes on your system and connect it with a USB/lightning cable.
Step 2. Hold the Home button on your Apple iPhone 14 and while pressing it, connect it to your system. This will display a connect-to-iTunes symbol.

Step 3. After connecting your phone to the system, iTunes will automatically recognize it and display the following message. Simply click on the “Restore” button.

Step 4. Furthermore, you can choose to restore content from a previous backup as well. Go to iTunes Summary section and click on the “Restore Backup” button.

Step 5. Agree with the pop-up message and erase all the previous content on your phone.

Part 4: How to bypass Apple iPhone 14 passcode with Elcomsoft iOS Forensic Toolkit?
This might be new to you, but there are a few forensic toolkits in the market that can help you perform Apple iPhone 14 bypass without much trouble. One of the most reliable options is the Elcomsoft iOS Forensic Toolkit. Though, in order to use it, you need to download its licensed version from its website right.
Later, you can simply connect your phone to the system and run the forensic tool. From the welcome screen, select the option of “Get Passcode”. This will run an encrypted command and provide a passcode to your phone that can be used to unlock it.

Wrap it up
After following these solutions, you would be able to bypass the Apple iPhone 14 lock without any trouble. You can simply choose your preferred option and perform an Apple iPhone 14 bypass. If you are not able to unlock your phone with Siri, then use Dr.Fone - Screen Unlock. It is an extremely safe option to help you bypass the Apple iPhone 14 passcode and overcome various iOS-related problems.
safe & secure
Also read:
- [New] In 2024, Early Bird Winners Youtube's Quick Favorites
- [New] Tailor Your Device's Alerts with Custom Android Sounds
- 2024 Approved Revamping Graphic Design with Non-ACID Pro Options
- Best Practices for Downloading ASUS Mainboard Driver Packages (Windows)
- Everything You Need To Know About Unlocked iPhone 14 Plus | Dr.fone
- How Many Attempts To Unlock Apple iPhone 13 Pro | Dr.fone
- How To Bypass the Required Apple Store Verification For Apple iPhone 13 Pro | Dr.fone
- In 2024, Altering Images A Photographer's Toolkit
- In 2024, How Do You Unlock your iPhone 15? Learn All 4 Methods | Dr.fone
- In 2024, The Ultimate Technique for Capturing & Broadcasting PS4 Games
- Unlocking iPhone 6 Plus Passcode without a Computer | Dr.fone
- Title: In 2024, Did Your iPhone 14 Passcode Change Itself? Unlock It Now | Dr.fone
- Author: Amelia
- Created at : 2024-10-27 17:47:24
- Updated at : 2024-10-31 22:53:26
- Link: https://iphone-unlock.techidaily.com/in-2024-did-your-iphone-14-passcode-change-itself-unlock-it-now-drfone-by-drfone-ios/
- License: This work is licensed under CC BY-NC-SA 4.0.