
In 2024, Disabled iPhone 14 Plus How to Unlock a Disabled iPhone 14 Plus? | Dr.fone
Disabled Apple iPhone 14 Plus: How to Unlock a Disabled Apple iPhone 14 Plus?

Apple iPhone 14 Plus Disabled?
Because of using face masks, Face ID on iPhone does not always work correctly, and we are entering our passcodes more than before. If we enter it incorrectly a few times in succession, the phone will disable itself to prevent unauthorized access. It can seem like the end of the world because in so many ways smartphones have become our world. Here are ways you can unlock your Apple iPhone 14 Plus disabled due to too many incorrect passcode attempts.
Part 1: Unlock Disabled Apple iPhone 14 Plus Without iTunes/ iCloud Using Dr.Fone - Screen Unlock (iOS)
We know and understand that the word troubleshooting can remind you of long telephone calls with support or making appointments and driving down to specialists and spending obscene amounts of money to get solutions. You do not want that. How about a way you could unlock your Apple iPhone 14 Plus in a simple, 1-click way instead?
Dr.Fone - Screen Unlock is a unique tool designed to help you avoid all hassles and get back on track quickly. It comprises modules designed to help you with all the issues that you might encounter during smartphone use. Naturally, there is something to help you when your Apple iPhone 14 Plus is disabled. You don’t need to use anything else, no other software or special cable or support. All you need is this one software you can download on your computer (both macOS and Windows supported) and you’re good to go.
Dr.Fone - Screen Unlock (iOS)
Unlock Disabled Apple iPhone 14 Plus Without iTunes/ iCloud.
- Intuitive instructions to unlock iPhone without the passcode.
- Removes the iPhone’s lock screen whenever it is disabled.
- Easy to use with detailed guides.
- Compatible with the latest iOS/iPadOS version.
3981454 people have downloaded it
Do note that all methods that unlock your Apple iPhone 14 Plus will necessarily wipe your Apple iPhone 14 Plus and remove all data from the Apple iPhone 14 Plus device, essentially booting it up as new.
Step 1: Launch Dr.Fone and click the module titled “Screen Unlock”.
Step 2: Choose the “iOS” option, then select “Unlock iOS Screen” on the subsequent screen to continue unlocking your Apple iPhone 14 Plus.

Step 3: Follow the provided instructions to start the disabled Apple iPhone 14 Plus in Recovery Mode to unlock it. If for any reason the phone does not boot in Recovery Mode, there are instructions provided at the bottom to enter what is called DFU mode.

Step 4: Dr.Fone will read and display your phone model and the software installed on it. If the model displayed is incorrect, use the dropdown to pick the correct detail. Click “Start” to download the specific firmware file for your particular Apple iPhone 14 Plus model.

Step 5: After the download completes, please click Unlock Now to start unlocking the disabled Apple iPhone 14 Plus.

Your Apple iPhone 14 Plus will be unlocked in a short span of time. Please note that all data would have been wiped out from the Apple iPhone 14 Plus device. When you set the Apple iPhone 14 Plus device up again, if you set it to use iCloud, data such as Contacts, iCloud Photos, iCloud Drive data, etc. will be downloaded onto your device again. The apps you had on your Apple iPhone 14 Plus prior to it getting disabled can be downloaded again from the App Store. If you did not use iCloud but backed up the data manually, you will have to manually restore that data onto the Apple iPhone 14 Plus device again.
 safe & secure
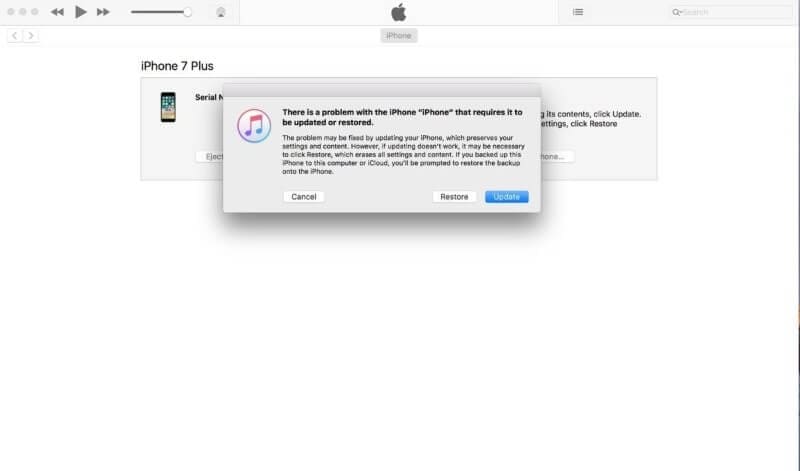
Part 2: Unlock Disabled Apple iPhone 14 Plus Using iTunes or macOS Finder
Of course, there is an official way that Apple provides for users to restore device firmware using iTunes or macOS Finder. For this, iPhone is put under Recovery Mode manually and Finder or iTunes is used to reinstall software on it directly from Apple. This process is fine for people who are conversant in tech, since this process can throw up a lot of errors that are just numbers, and people can get confused as to what they mean, resulting in frustration.
Step 1: Connect your Apple iPhone 14 Plus to a Windows/ macOS device and launch iTunes. If you are on a Mac that runs macOS Catalina or higher, open Finder since you would not have access to iTunes anymore.
Step 2: Pick your Apple iPhone 14 Plus and do the following:
(2.1) Press the volume up button and let it go.
(2.2) Press the volume down button and let it go.
(2.3) Press the Side Button (power button, on the right side of your Apple iPhone 14 Plus) and keep it pressed till Finder or iTunes detects the phone in Recovery Mode.
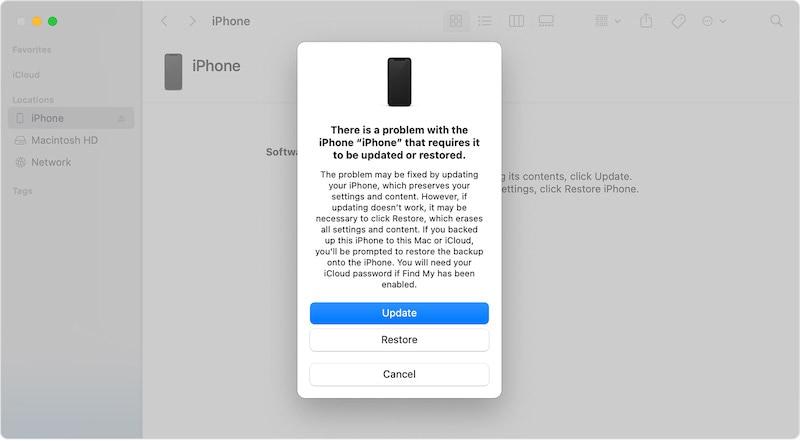
Step 3: Choose Restore to download and reinstall the latest iOS on your Apple iPhone 14 Plus and unlock your Apple iPhone 14 Plus.
When the Apple iPhone 14 Plus reboots, it will be reset to factory settings, and you can set it up again as you did when brand new.
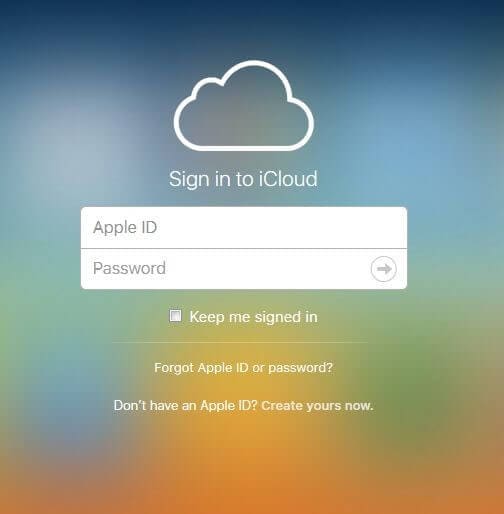
Part 3: Unlock Disabled Apple iPhone 14 Plus Using iCloud Website (Find iPhone method)
Another method you may go with to unlock your disabled Apple iPhone 14 Plus is using the iCloud website to gain access back. This is a fairly easy way and doesn’t require going through complex hoops.
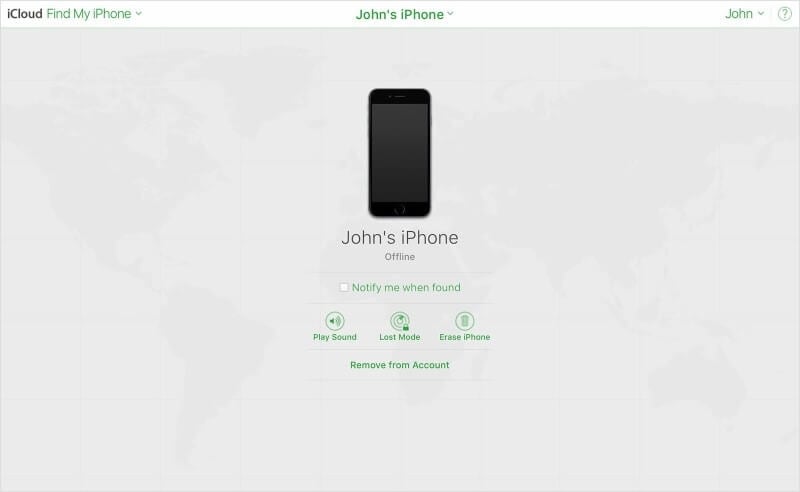
Find My is available both online via the iCloud website and on iOS devices and on Macs. In case the only Apple product you own is the currently disabled Apple iPhone 14 Plus, you can use Find My on the iCloud website from any other computer you may have to unlock your disabled Apple iPhone 14 Plus.
Step 1: Visit https://icloud.com and log in into the same iCloud account/ Apple ID as the disabled Apple iPhone 14 Plus.
Step 2: Go to Find My, select your Apple iPhone 14 Plus.
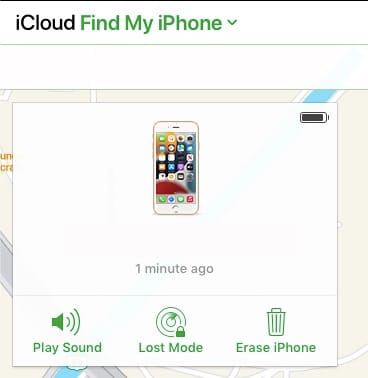
Step 3: Click Erase iPhone and confirm.
This will start the wipe process on your Apple iPhone 14 Plus remotely and your Apple iPhone 14 Plus will be reset to factory settings. You can now proceed to setup your Apple iPhone 14 Plus once again.
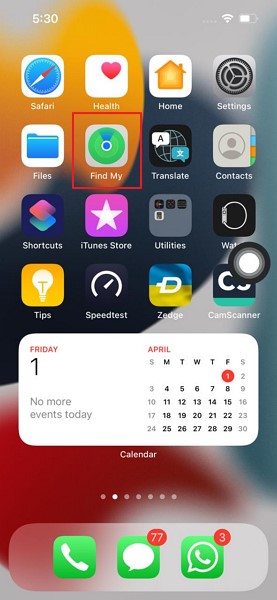
Part 4: Unlock Disabled Apple iPhone 14 Plus Using Find My iPhone App
There are times you have another iOS device in the family or just lying around, you can use that device to unlock your disabled Apple iPhone 14 Plus. This method is particularly useful if you’re traveling with family or alone, and only have family members with their own iOS devices or, say, your iPad with you. As always, note that all these methods will wipe your data from your Apple iPhone 14 Plus.
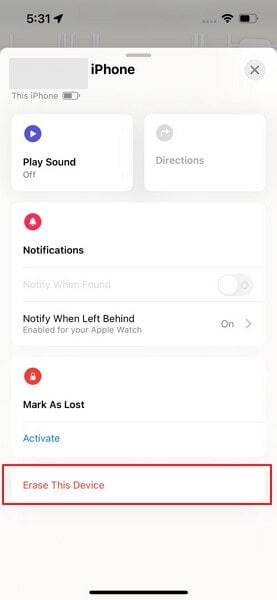
Step 1: Open the Find My app on your other iOS device or Mac
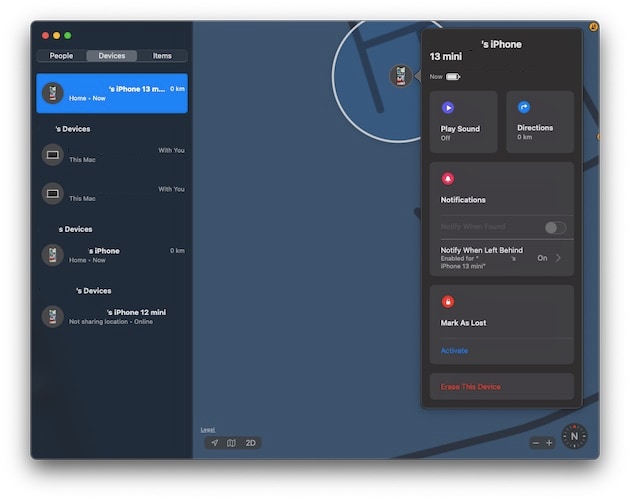
Step 2: Select your disabled Apple iPhone 14 Plus from the Apple iPhone 14 Plus devices from the left pane, click/ tap your disabled Apple iPhone 14 Plus and click/ tap Erase This Device
The disabled iPhone will be wiped and reset to factory settings. You can then set it up again.
Part 5: Unlock Disabled Apple iPhone 14 Plus Without A Computer
There are millions in the world who do not use the traditional computer so to speak. They have entered the post-PC era as they say, and their needs are met without a regular desktop or a laptop. They live wirelessly. They travel the world. Are you one of them? How would you unlock disabled Apple iPhone 14 Plus with no desktop/ laptop computer around? You have a few options.
You can use your other iOS device with Find My iPhone app to unlock your disabled Apple iPhone 14 Plus or you can use the iCloud website from your other device and Find iPhone app to unlock your disabled Apple iPhone 14 Plus.
The second option is to get a loaner device from someone you know. A loaner device is a device you borrow from someone to use for a purpose and return it when you are done with it. In this case, you can ask for a computer from someone you know and use it to unlock your disabled Apple iPhone 14 Plus and return the Apple iPhone 14 Plus device back. That way, you can use iTunes or macOS Finder if you’re more favorable to using that method.
When using a computer, the simplest, easiest, most flexible, and robust method to unlock disabled Apple iPhone 14 Plus is using third-party tools such as Dr.Fone – Screen Unlock (iOS). However, Dr.Fone is not just for troubleshooting and unlocking your disabled devices. Dr.Fone is like that multi-utility knife that can do a variety of things.
Using Dr.Fone you can not only unlock your Apple iPhone 14 Plus with ease, you can also use it periodically as a backup and restore tool that gives power in your hands. How does it do that? When you launched Dr.Fone, you had several modules to choose from and you chose Screen Unlock to unlock your disabled device. Instead of that, you can choose the Phone Backup module to backup and restore data from and to your device. Why would you use a third-party tool to backup and restore?
As you may be aware, using iTunes or macOS Finder allows you to backup and restore data onto your Apple iPhone 14 Plus easily, but, the one glaring omission here is that it does not allow you to choose what you want to backup and what you want to restore. This is a much-coveted feature that is glaringly absent from the Apple world so far, and with Dr.Fone’s iOS Phone Backup feature you can have that choice in your hands, just like you do with Android. Dr.Fone allows you to choose what you want to backup, so, you can back up just your photos, just your text messages, just your files, or any combination thereof, for the matter. And, when it comes to restore, you can restore selectively as well. So, suppose you backed up your entire data using Dr.Fone, now you can restore just the text messages if you so want.
safe & secure
Part 6: Prevent iPhone From Getting Disabled Again
After all this to get access back, you might think let’s go passcode-less and prevent the hassle. Don’t do that - that’s worse and unsafe. Instead, here are tips you can use to make sure you don’t accidentally disable your Apple iPhone 14 Plus again.
Tip 1: About Passcodes
- 1.1 Set a passcode that is easier to remember for you but difficult to think of for thieves and others.
- 1.2 Never use birthdates, years, vehicle numbers or any such numbers that may be easily tried by others.
- 1.3 Never use repeating numbers.
- 1.4 Do not use your ATM PIN as your phone passcode either. Think of some digits or combination that makes sense to you and only you. And then use it.
Tip 2: Use Face ID
Along with Passcode comes the option of Face ID on your Apple iPhone 14 Plus, so use that. That will minimize instances for you to enter your passcode, and may make you forget it again, though. So, make sure that the passcode you set does make sense to you and you can remember it always without effort.
Conclusion
Not all of us have the memory of elephants. With Touch ID and Face ID on our iPhones minimizing the use of passcodes, we may forget them. Another factor in forgetting passcodes is being too smart for our own good and trying to set up such a secure passcode that even we are not able to remember it. If we enter incorrect passcode too many times, the Apple iPhone 14 Plus disables itself and we need to restore it to factory settings to unlock it again. There are several ways to do that, depending on the time you are willing to spend on the job and your proficiency level, along with the resources that you have with you right now. For example, if a method requires use of another iOS device and you do not have it, that method is not useful to you right now, pick another. Lastly, when the Apple iPhone 14 Plus device is reset, instead of going passcode-less to make sure that you do not forget the passcode again, it is best to set up a passcode that you can somehow remember.
safe & secure
7 Ways to Lock Apps on Apple iPhone 14 Plus and iPad Securely
Are you concerned about your privacy and would like to secure certain apps on your iOS device? Don’t worry! There are plenty of ways to app lock the Apple iPhone 14 Plus and protect your privacy. You can follow the same drill to restrict the usage of certain apps for your kids as well by taking the assistance of the Apple iPhone 14 Plus app lock feature. The app lock for iPhone and iPad options can be used pretty easily. There are plenty of native and third-party solutions out there that you can use. In this post, we will make you familiar with seven different techniques on how to lock apps on iPhones and iPads.
Part 1: How to Lock Apps on iPhone with Screen Time?
Utilizing Screen Time on your Apple iPhone 14 Plus offers a versatile way to manage app access. It is done through time restrictions and a dedicated passcode. By implementing Screen Time settings, you can exercise control over app usage. It ensures added security and regulated access to your preferred applications. Now, let’s walk through the steps to learn how to lock apps on iPhone Screen Time:
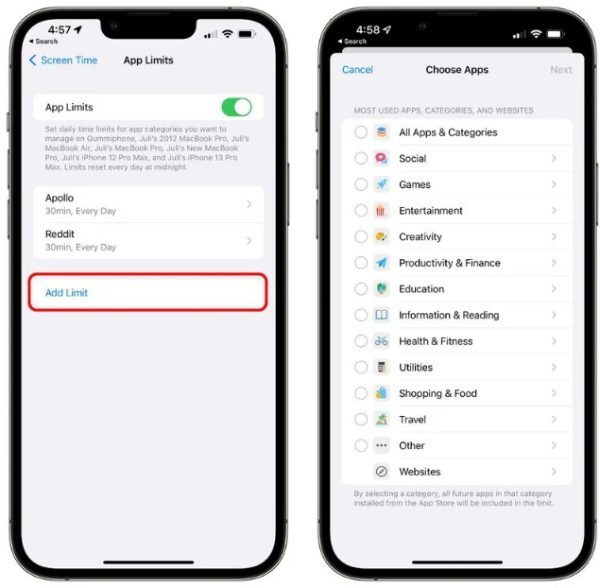
Step 1. Begin by accessing the Settings on your iOS device and tapping on the “Screen Time” option. On the ensuing screen, tap “App Limits,” followed by “Add Limit.”
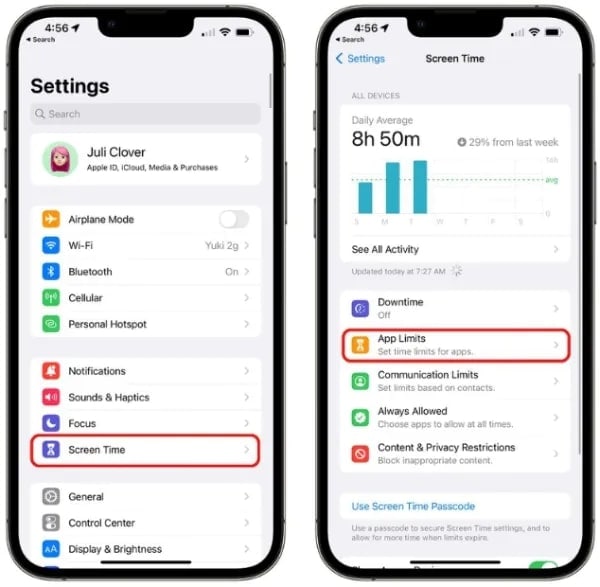
Step 2. Select the apps or categories of the apps, tap “Next,” and choose the “Time Limit” for the selected apps. After deciding the time limit, press “Add” from the top right corner to add an app limitation.
Part 2: How to Lock Apps on iPhone with Face ID & Passcode?
Leveraging the advanced security capabilities of Face ID or Passcode on your Apple iPhone 14 Plus X or later models effectively fortifies app access. By using facial recognition or passcodes, you can put in place an extra layer of protection. It can be done for specific apps, safeguarding your sensitive data from unauthorized access. Now, let’s proceed with the detailed steps to lock apps using Face ID or Passcode on your iOS device:
Step 1. After opening the Settings app on your Apple iPhone 14 Plus, scroll down to access “Face ID & Passcode.” Here, you will be required to provide the passcode of your device.
Step 2. After providing the passcode, select “Other Apps” and check the apps that have Face ID enabled. Remember, you’re unable to manually include apps in the list. Only those apps that have sought access to the feature will appear here automatically.

Part 3: How to Lock Apps on iPhone Using Shortcuts?
If you are unable to lock the targeted app directly with Face ID, there is no need to worry. There exist workarounds that you can use, and one of them is using the Shortcuts app. It won’t directly lock apps with the Face ID. Instead, it provides a workaround by creating a shortcut that redirects to the lock screen.
When activated, it takes you to the lock screen, prompting Face ID, Touch ID, or Passcode to access the Apple iPhone 14 Plus device again. Use the following steps to lock your apps using the Shortcuts app:
Step 1. On your Apple iPhone 14 Plus, launch the Shortcuts app and select the “Automation” tab from the bottom toolbar. There, tap “New Automation” and use the search bar to look for and select “App.”

Step 2. Now, tap “Choose” in front of the “App” and select the app you want to lock. Now, move down and select “Is Opened,” then move further down to choose “Run Immediately.” Here, leave “Notify when Run” deactivated.

Step 3. Proceed forward by tapping “Next” from the top right corner, and on the following screen, tap “New Blank Automation.” Then, press “Add Action” and enter “Lock Screen” into the Search field, then choose “Lock Screen” from the search results.

Step 4. Finally, tap “Done” to finalize the shortcut. Now, upon accessing the targeted app, the shortcut will activate in the background, causing your Apple iPhone 14 Plus to be locked. You can then use the Face ID, Touch ID, or passcode to unlock it.

Part 4: How to Lock Apps on iPhone Using Restrictions?
By taking the assistance of Apple’s native Restrictions feature, you can app lock the Apple iPhone 14 Plus without any trouble. In this way, you can set up a passcode that needs to be matched before accessing any app. This iPhone app lock is also a great way to restrict your kids from accessing certain apps or making purchases. To learn how to lock apps on iPhone or iPad using Restrictions, follow these steps:
Step 1. Unlock your device and go to its Settings > General > Restrictions.

Step 2. Turn the feature on and set up a passcode for app restrictions. To provide added security, you can set up a passcode that is not similar to your lock screen passcode.
Step 3. Now, you can set up an app lock for iPhone using Restrictions. Simply go to General > Restrictions and turn this feature on for any app of your choice.
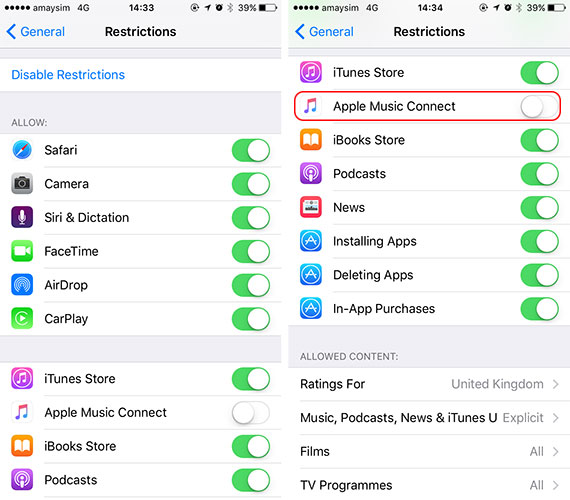
Step 4. If you want, then you can also switch this feature off for any app using the same method.
Bonus Tip: How to Unlock iPhone withoutScreen Locks (PIN/pattern/fingerprints/face)
It can be a trouble if you forget your Apple iPhone 14 Plus passcode since there are many restrictions on using iPhone. Also, if you are still unable to verify your Apple ID by using the above ways you may consider removing your Apple ID on your iOS devices. Here is an easy way to help you bypass Apple ID without a password and 100% working, which is to use Dr.Fone - Screen Unlock (iOS). It’s a professional iOS unlocker tool that can help you remove various locks on iPhones and iPads. With only a few steps, you can easily remove your Apple ID.
Dr.Fone - Screen Unlock (iOS)
Remove iPhone iPhone-locked screen without Hassle.
- Unlock an iPhone whenever the passcode is forgotten.
- Save your Apple iPhone 14 Plus quickly from the disabled state.
- Free your sim out of any carrier worldwide.
- Works for all models of iPhone, iPad, and iPod touch.
- Fully compatible with the latest iOS.


4,008,670 people have downloaded it
Part 5: How to Lock Apps on iPhone Using Guided Access?
Besides the Restrictions feature, you can also take the assistance of Guided Access to lock a certain app on your device. It was originally introduced in iOS 6 and can be used to restrict your device temporarily with the usage of a single app. It is mostly used by parents who would like to restrict their kids from using a single app while lending their devices. Teachers and people with special needs also use Guided Access pretty frequently. To learn how to lock apps on iPhone using Guided Access, follow these steps:
Step 1. To start with, go to your device’s Settings > General > Accessibility and tap on the “Guided Access” option.

Step 2. Turn on the “Guided Access” feature and tap on the “Passcode Settings”.

Step 3. After selecting the “Set Guided Access Passcode” option, you can set up a passcode to use it as an app lock for iPhone.
Step 4. Now, simply launch the app that you want to restrict and tap the Home button three times. This will start the Guided Access mode.

Step 5. Your phone would now be restricted to this app. You can further restrict the usage of certain app features as well.
Step 6. To exit the Guided Access mode, tap the Home screen three times and provide the respective passcode.

Part 6: How to Lock Apps on iPhone with Touch ID?
On the Apple iPhone 14 Plus 8 Series and iPhone SE, Apple offers Touch ID for security. In the process, it is similar to the Face ID available on the later iPhones. If you have an iOS device with Touch ID, here are the steps you can follow for the app lock iPhone process:
Instructions: To start, open the Settings application. Now scroll down to locate and select the “Touch ID & Passcode” option. On the following screen, you can deactivate or activate Touch ID for apps.

Part 7: How to Lock Apps on iPhone Using Third-Party Apps?
1. Lock Apps onApple iPhone 14 Plus & iPad via Famisafe
If the reason you want to lock the apps on your Apple iPhone 14 Plus has to do with managing your kid’s phone usage, we have an excellent alternative for you. FamiSafe is a reliable parental control app that offers features to monitor and manage a child’s device usage. It focuses on parental controls, including features like screen time management, location tracking, web filtering, and activity monitoring.
It offers robust controls to restrict overall device usage, set screen time limits, and monitor app usage. This helps parents guide and regulate their children’s activities on iOS devices. You can use the following steps to lock apps using FamiSafe:
Step 1: Install FamiSafe and FamiSafe Jr on Respective Devices
Get FamiSafe from the App Store and log in using your Wondershare ID or your Apple, Google, or Facebook account. Select the parent mode and link your child’s phone by installing FamiSafe Jr on their devices using either the QR code or the pairing code. Once the pairing is done, input details about your children and allow FamiSafe Jr to oversee their devices.

Step 2: Provide the Necessary Permissions to FamiSafe
Now, activate Accessibility for FamiSafe by accessing “Settings,” tapping “FamiSafe,” and enabling “Location.” Then, grant access to the Apple iPhone 14 Plus device’s photos, microphone, and motion & fitness activity. Now, use a computer and connect your child’s device with a USB cable. Activate content blockers in Safari to prevent kids from accessing inappropriate content.

Step 3: Connect the Kid’s Device to the Computer
To do that, access “Safari” in “Settings” and move to”Content Blockers” to enable FamiSafe. To get started, connect your kids’ iOS devices to your PC. Once connected, navigate to the main interface and select “Features” located at the bottom. This will display available features, and you can proceed by tapping on “App Blocker.”

Step 4: Block Any App Using the App Blocker Feature
Establish the connection between your kids’ iOS devices and your PC by pairing them with your phone. From there, effortlessly choose and block any unwanted apps on your kids’ phones. Additionally, you have the option to block apps based on their App Store ratings for added control and security.

2. Lock apps onApple iPhone 14 Plus & iPad using App Locker
Besides the native iPhone app lock solutions, you can also take the assistance of a third-party tool. However, most of these apps only support jailbroken devices. Therefore, if you wish to use a dedicated app lock for your Apple iPhone 14 Plus, then you need to jailbreak your device. Needless to say, getting your device jailbroken has its perks and demerits. If you don’t want to jailbreak your device, then you can simply take the assistance of the above-mentioned solutions.
However, if you have a jailbroken device and would like to app lock the iPhone, then you can also use AppLocker. It is available at Cydia’s repository and can be purchased for just $0.99. It can be installed on your jailbroken device to get an added level of security. Not just apps, it can also be used to lock certain settings, folders, accessibilities, and more. To learn how to lock apps on iPhone using AppLocker, follow these steps:
Step 1. Firstly, get AppLocker on your device from http://www.cydiasources.net/applocker . As of now, it works on iOS 6 to 10 versions.
Step 2. After installing the tweak, you can go to Settings > Applocker to access it.

Step 3. To access the feature, make sure that you have “Enabled” it (by turning it on).
Step 4. This will let you set up a passcode to lock the apps and settings of your choice.
Step 5. To app lock, the iPhone, visit the “Application Locking” feature on your device.
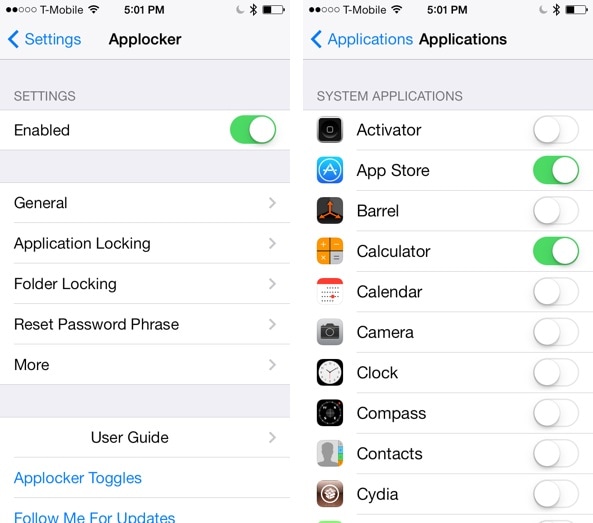
Step 6. From here, you can turn on (or off) the locking feature for apps of your choice.
This will let your app lock the Apple iPhone 14 Plus without any trouble. You can also go to the “Reset Password Phrase” to change the passcode.
3. Lock Apps onApple iPhone 14 Plus & iPad using BioProtect
Just like Applocker, BioProtect is another third-party tool that works only on jailbroken devices. It can also be downloaded from Cydia’s repository. Apart from apps, you can also use BioProtect to lock settings, SIM features, folders, and more. It is linked to the Touch ID of the Apple iPhone 14 Plus device and scans the fingerprint of a user to grant (or deny) access to any app. The app only works on iPhone 5s and later devices, having a Touch ID. However, you can also set a passcode as well if your Touch ID is not working. To use the BioProtect app lock for iPhone, follow these steps:
Step 1. Firstly, get the BioProtect app to lock iPhone on your device from the right http://cydia.saurik.com/package/net.limneos.bioprotect/ .
Step 2. To access the tweak’s panel, you need to provide your fingerprint access.
Step 3. Place your finger on your Touch ID and match its print.

Step 4. This will let you access the BioProtect app settings.
Step 5. Firstly, enable the app by turning the respective feature on.
Step 6. Under the “Protected Applications” section, you can see a list of all the major apps.

Step 7. Simply turn on (or off) the feature of the app that you wish to lock.
Step 8. You can also go to the “Touch ID” feature to further calibrate the app.
Step 9. After setting the lock, you would be asked to authenticate using your fingerprint to access the protected app.

Wrap it up
By following these solutions, you would be able to learn how to lock apps on the Apple iPhone 14 Plus without much trouble. We have provided both, third-party as well as native solutions to app lock the Apple iPhone 14 Plus in a secure manner. You can go with your preferred option and provide an added layer of security on your device to keep it safe.
How to Unlock Apple iPhone 14 Plus Passcode Screen?
Apple offers numerous ways to protect users’ iPhone data from other people, such as Face ID, Touch ID, and screen passcode. Screen passcode has its own significance. Usually, it comes to adoption if your Face ID and Touch ID may not work. In other cases, if you restart your device, and didn’t unlock it for 48 hours, or reset it, you may require to unlock your device through a screen passcode.
What would happen if you accidentally forgot your Apple iPhone 14 Plus screen passcode? After entering it about 5 times, your Apple iPhone 14 Plus will get locked for a few minutes with a message on top. It usually gets frustrating when you cannot unlock it with your screen passcode.
This article comes up with different resolutions and techniques for unlocking your Apple iPhone 14 Plus. Go through the methods to figure out how you can bypass iPhone screen passcode with ease.
Part 1: Unlock iPhone Passcode Screen by Screen Unlock
You might be anxious if you have locked your Apple iPhone 14 Plus and forgotten the passcode. However, there is no need to worry, Dr.Fone - Screen Unlock is here at your service. The tool handles the Apple iPhone 14 Plus passcode screen problem and removes it effortlessly. The user doesn’t need any technical knowledge beforehand to use the tool.
Dr.Fone - Screen Unlock (iOS)
Unlock iPhone Passcode Screen.
- Completely compatible with different lock screens to get you out of the problem.
- It helps the iOS user bypass iPhone passcode and iCloud activation locks
- If you have forgotten your Apple ID password, Dr.Fone Screen Unlock enables you to unlock your phone and log into a new account in seconds.
- Dr.Fone also helps the user bypass the MDM to access the Apple iPhone 14 Plus device effectively.
3981454 people have downloaded it
Step-by-Step Guide to Bypass iPhone Lock Screen
If you are unfamiliar with using the Screen Unlock feature to get rid of the problem, allow us to walk you through the procedure.
Step 1: Launch Wondershare Dr.Fone
First, download and launch Dr.Fone – Screen Unlock on the computer. Then, click on “Screen Unlock” from the interface. After that, connect your iOS device to the system via lightning cable.

Step 2: Booting the Apple iPhone 14 Plus device
Tap on “Unlock iOS Screen” afterward. Now, Follow the on-screen instructions to boot your phone in Recovery or DFU mode. If you cannot activate the recovery mode, click the button line to work on the DFU mode.
Step 3: Unlocking the iPhone/iPad
After the DFU mode is activated, confirm the Apple iPhone 14 Plus device information, and click on “Download.” After it is downloaded, tap on “Unlock Now.”
Step 4: Device Unlocked Successfully
After the DFU mode is activated, confirm the Apple iPhone 14 Plus device information, and click on “Download.” After it is downloaded, tap on “Unlock Now.”
Part 2: How to Remove iPhone Screen Lock Using the Recovery Mode
There are other ways to unlock screen passcode. For starters, you can consider resolving this issue using the Recovery mode. It is a troubleshooting operation that lets iTunes fix the issue and erase the old passcode. Follow the procedure below vividly:
Step 1: Connecting Process
The first step is to connect the Apple iPhone 14 Plus to computer and then launch iTunes. Force restart the phone after the phone is connected.
Step 2: Activating the Recovery Mode
There are different ways to activate the Recovery mode based on your Apple iPhone 14 Plus models.
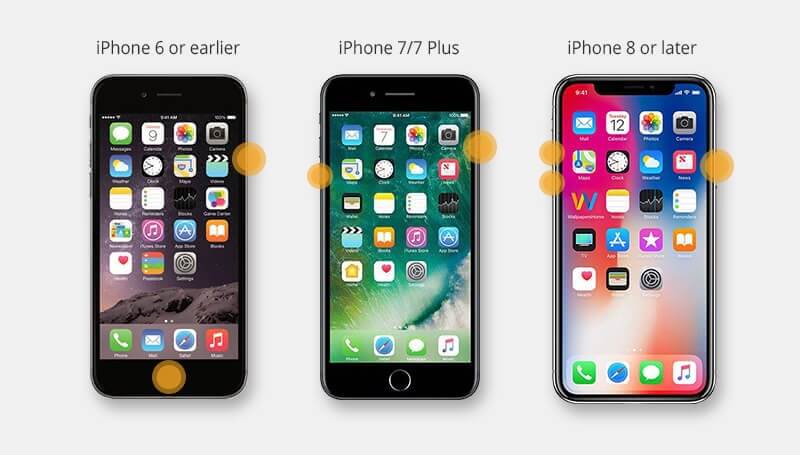
- Press and release the Volume Up button if you are on iPhone 13/12/11/XS/XR/X/8 or iPhone 8 Plus. Again, press and release the Volume Down button. Now, press and hold the Side button to activate the Recovery Mode.
- Similarly, if you are an iPhone 7 or iPhone 7 Plus user, press and hold the Volume Down and Side button simultaneously until the Recovery Mode screen doesn’t show.
- Suppose you own an iPhone 6S or earlier, an iPad, or iPod Touch. Press and hold the Home button and the Side buttons. Until the Recovery Mode enables, you need to hold these buttons off.
Step 3: Restoring Process
Click on Restore, and iTunes will download the software for the Apple iPhone 14 Plus device after the process is concluded, set up your Apple iPhone 14 Plus.
Pros
- The Apple iPhone 14 Plus is restored to the previous settings, and all messages and emails will be retrieved.
- There is no damage attached with using the Recovery mode to bypass iPhone lock screen.
Cons
- All the data will be lost and erased.
- The non-iTunes app such as music will be lost.
Part 3: How to Unlock iPhone without Screen Passcode Via iCloud
Another viable method to solve the problem is to erase your Apple iPhone 14 Plus with iCloud and remove the passcode. Following are the detailed steps:
Step 1: Signing In
Open iCloud.com on your computer and sign with your Apple ID. All the Apple iPhone 14 Plus devices that are linked with your Apple account will appear.
Step 2: Erasing iPhone
Click on the Apple iPhone 14 Plus device that needs to be removed. Then click on “Erase iPhone”. Now, you can restore the Apple iPhone 14 Plus from the backup or set up a new one.
Pros
- The user is free to access all the Apple iPhone 14 Plus devices through iCloud, whether iPad, iPhone, or iPod.
- The location of the lost device can also be tracked effortlessly.
Cons
- One cannot access iCloud without an Apple ID.
- If your iCloud is hacked, your data becomes a liability for them and can be erased at any time.
Part 4: How to Unlock iPhone without Passcode Via Find My iPhone
You can also consider unlocking your Apple iPhone 14 Plus through Find My iPhone. This platform is suitable for many cases where you can find the distance of your device from yourself with its last recorded location. You can also use it to access and control all the data across your Apple iPhone 14 Plus. To unlock your device with this method, you need to:
Step 1: Launch the Find My application on your secondary iPhone and log in with your Apple ID credentials. Click on “Sign In” and proceed.
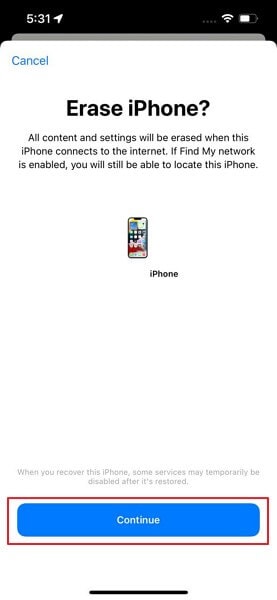
Step 2: You need to select the “Devices” tab and locate your device in the list. After finding the Apple iPhone 14 Plus device, scroll down and click on the “Erase This Device” button.
Step 3: A confirmation message will be provided where you need to tap “Continue” to proceed. When that particular device connects to the internet, the data across it will start to delete automatically.
Pros
- On activating Lost Mode, you will be notified of the availability of the Apple iPhone 14 Plus device’s location. Your Apple iPhone 14 Plus and data will be protected and will not be accessed until provided with the Activation Lock and screen passcode.
- Using this platform, you can manage all your devices, such as Apple Watch and MacBook.
Cons
- Your device needs to be connected to the internet to be erased.
- If you do not remember your Apple ID and password, it would be impossible for you to reactivate the Apple iPhone 14 Plus device.
Part 5: How to Bypass iPhone Lock Screen Using Siri
If you do not have any potential source for unlocking your Apple iPhone 14 Plus, you can consider using Siri for this purpose. Here are the steps to bypass the Apple iPhone 14 Plus lock screen using Siri.
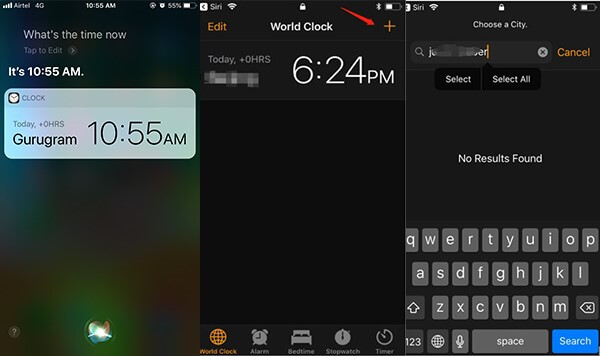
Step 1: You need to activate Siri on your Apple iPhone 14 Plus. Keep holding the Home button or Side button according to your Apple iPhone 14 Plus model for activating it. When activated, speak “What time is it” to it.
Step 2: Siri will display the time with a clock icon on the front. Click on the icon to open the associated interface. Click on the “+” icon and proceed to the next screen. You will find a search box on the next screen. Type random characters and hold the tab until it shows the option of “Select All.”
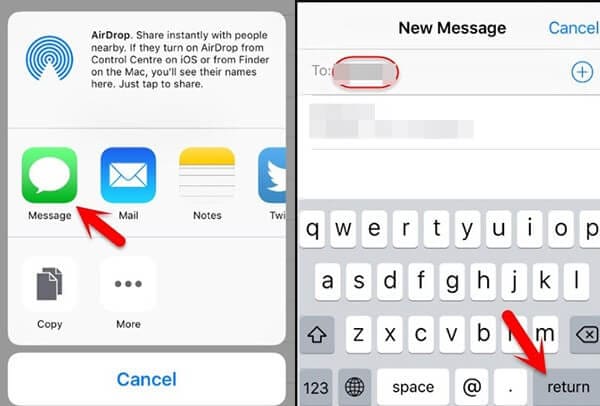
Step 3: You will find the option of the “Share” button soon. A pop-up opens after tapping on the button, which shows different options that can be accessed. Click on “Messages” to move to the next screen.
Step 4: Fill out the “To” box with some characters and click on “Return” on your keyboard. You need to press the Home button or swipe up according to your Apple iPhone 14 Plus model. The home page of your Apple iPhone 14 Plus will be accessed successfully.
Pros
- The data across your Apple iPhone 14 Plus will not get erased with this process.
- You do not need to access any other third-party tool for unlocking your Apple iPhone 14 Plus.
Cons
- If you have a version of iOS except 3.2 and 10.3.3, you cannot use this method.
- This method is not applicable if Siri is not activated across your Apple iPhone 14 Plus.
Part 6: FAQs about iPhone Screen Lock
- How many counts do I have to unlock my iPhone?
You have around ten entries to unlock your Apple iPhone 14 Plus, after which the Apple iPhone 14 Plus device will be completely locked. After the 5th wrong entry, you are expected to wait for a minute until you try again. After the 10th wrong entry, the Apple iPhone 14 Plus device gets locked out and allows you to connect to iTunes.
- Is it possible to reset the Apple iPhone 14 Plus passcode with an Apple ID?
No, you cannot reset the Apple iPhone 14 Plus passcode using Apple ID. Both are different security measures and cannot reset one using another.
- What should I know about the screen time passcode?
Parental controls on iPhones use a different passcode to restrict content. It includes restricting things like privacy, game center, web content, explicit content, iTunes app and purchases. It is also known as a restriction passcode.
- Can Apple reset a forgotten iPhone passcode?
No, Apple cannot reset the forgotten iPhone passcode. However, they will help you with the steps to erase, reset, and recover the phone. You must prove yourself to be the Apple iPhone 14 Plus device owner, so keep the purchase receipt with you.
Conclusion
Human beings are clumsy, and they often forget passcodes to their devices. However, there is no need to panic as technology has progressed enough to offer loopholes in the situations. The article presented multiple methods to bypass iPhone passcode and steer clear of this mess. Some frequently asked questions were also answered regarding the Apple iPhone 14 Plus screen lock.
Also read:
- [New] The Year of Gaming Earnings Revolutions
- 3 Ways to Unlock Apple iPhone 11 Pro Max without Passcode or Face ID | Dr.fone
- 夏を思い出すために作成!覚えやすい 3ステップガイド WinX DVD Author デジタル写真集
- Boosting or Slowing Down The Netflix Playback Rate Guide
- Can I use iTools gpx file to catch the rare Pokemon On Realme GT 5 Pro | Dr.fone
- Easy Steps on How To Create a New Apple ID Account On Apple iPhone SE (2022) | Dr.fone
- Expert Tips for Solving Game Crashes in XCOM 2 on Windows Machines
- Exploring the Distinctions of Level 1, Level 2 and Level 3 EV Chargers
- How To Fix Auto Lock Greyed Out on iPhone 14 Pro Max | Dr.fone
- How to Remove and Reset Face ID on Apple iPhone 11 Pro | Dr.fone
- How To Remove Flashlight From Apple iPhone 15 Pro Lock Screen | Dr.fone
- How to Unlock Apple iPhone SE without Passcode or Face ID | Dr.fone
- In 2024, Capturing the Joy of Nintendo Switch Gaming
- In 2024, Disabled Apple iPhone 13 mini How to Unlock a Disabled Apple iPhone 13 mini? | Dr.fone
- New The Ultimate Premiere Pro Setup Hardware and Software Essentials
- Title: In 2024, Disabled iPhone 14 Plus How to Unlock a Disabled iPhone 14 Plus? | Dr.fone
- Author: Amelia
- Created at : 2024-11-04 22:33:07
- Updated at : 2024-11-07 05:02:26
- Link: https://iphone-unlock.techidaily.com/in-2024-disabled-iphone-14-plus-how-to-unlock-a-disabled-iphone-14-plus-drfone-by-drfone-ios/
- License: This work is licensed under CC BY-NC-SA 4.0.