
In 2024, Forgot Apple iPhone 14 Plus Backup Password? Heres What to Do | Dr.fone
Forgot Apple iPhone 14 Plus Backup Password? Here’s What to Do
Forgetting your Apple iPhone 14 Plus backup password can be a real pain. Not only does it mean you can’t access your data, but it also means you can’t restore your phone if something goes wrong.
There are still chances that you could forget your Apple iPhone 14 Plus backup password. Fortunately, you have a chance to recover your password. So, if you’re having trouble remembering your Apple iPhone 14 Plus backup password, don’t despair. There are still ways to get it back!
Part 1: Overview of iPhone Backup Password
The Apple iPhone 14 Plus is secured using a combination that is the backup password. Passwords, Wi-Fi settings, browser history, and health records are sensitive information that an encrypted device may back up.
Remember that this is not the same as your Apple ID or passcode (the sequence you input to unlock the iPhone).
Note:
The encryption of backups is not turned on by default. You will only need to activate the Encrypt Backup option the first time you use either iTunes or Finder. After that, each of your backups will encrypt on its own automatically.
So, if you choose to store your backups in iCloud, it will automatically encrypt all of your data each and every time.
To get the password for the encrypted backup of iTunes:
Step 1: Open iTunes
Launching iTunes is the first thing to do if you have a Mac computer running Mojave 10.14 or an older operating system version. On the other hand, if you use the Mac operating system known as Catalina 10.15, you need to run the Finder application.
Step 2: Link your Apple iPhone 14 Plus to your PC
At this point, a USB cable should be used to connect the Apple iPhone 14 Plus device to a computer. The next step is to find the widget on your desktop computer or portable device.
Step 3: Begin the Encryption Process
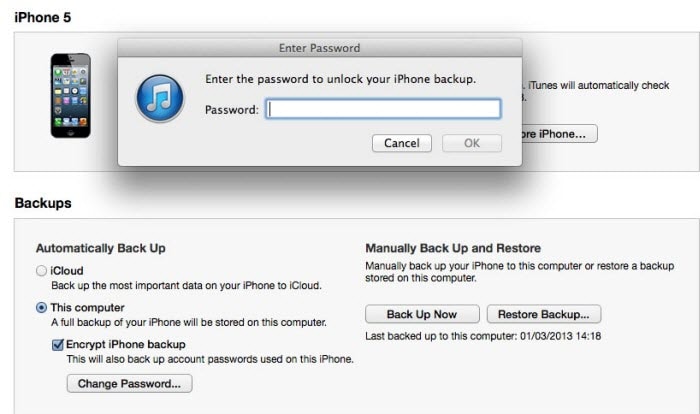
Select the Encrypt Local Backup option in the Backups section directly from either the Summary or General tab of the Backups section.
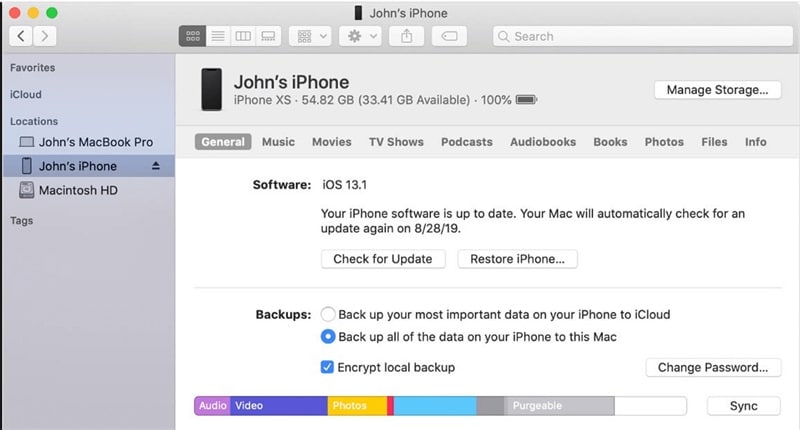
Step 4: Create a Password
When prompted in the window, create a password for the account. Make it powerful yet that is simple for you to remember. You might also save it somewhere secure to help you recall it later.
After establishing the password, all your previous backups will immediately undergo an automated overwrite and encryption. Make it a priority to ensure that the encryption procedure is finished effectively.
Part 2: 5 Fixes When We Forgot iPhone Backup Password
1. Try all passwords you used on your Apple iPhone 14 Plus
The typical method that each individual attempts for the first time is to input all of the available passcodes. Even if it is the most straightforward technique, there is still a possibility that you miss one of them. Therefore, think about all of the passwords you may input, which are listed below.
- The password to log in to the computer
- The password to access Apple ID
- The password to access the encrypted data on the hard disk
- The password to access various websites
- The password to log in to the computer
- Password for the wireless network
- Password for the email account
- Passcode for the administrator
- Passcode for the iPhone
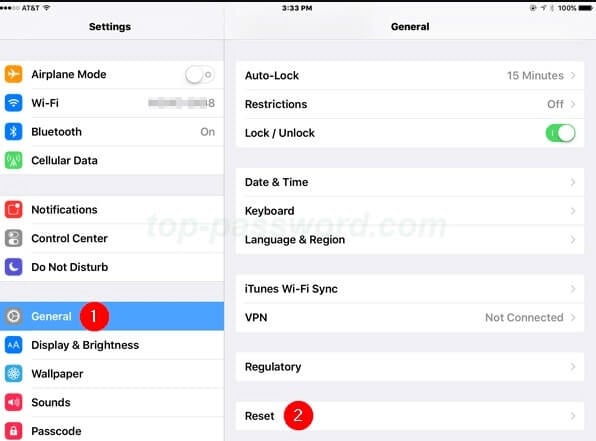
2. “Reset All Settings” via “Settings”
To begin, go to the Settings app on your iOS device, then choose General, followed by Reset.
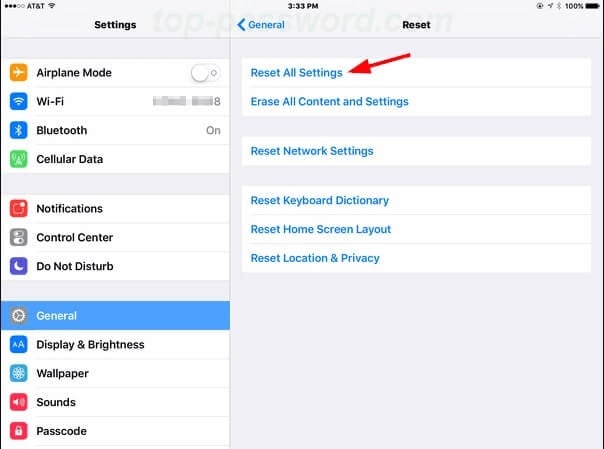
You may now go to Reset All Settings and confirm by entering the security passcode when prompted. Then, your phone will automatically go through the process of resetting and returning to its default settings.
You can also get rid of the password for the last backup without deleting any other apps or data.
Use a USB cable to link your Apple iPhone 14 Plus to your PC. Look at the small iOS icon in the figure below. Just click on it.
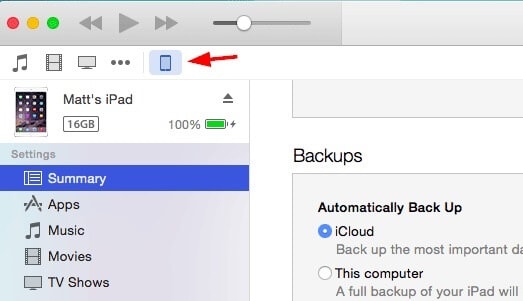

Proceed to the Summary Page and make your selection there for The Computer. After selecting Encrypt Local Backup, you must create a new password. After you have pressed the Backup Now option, wait for iTunes to create a new password for you.
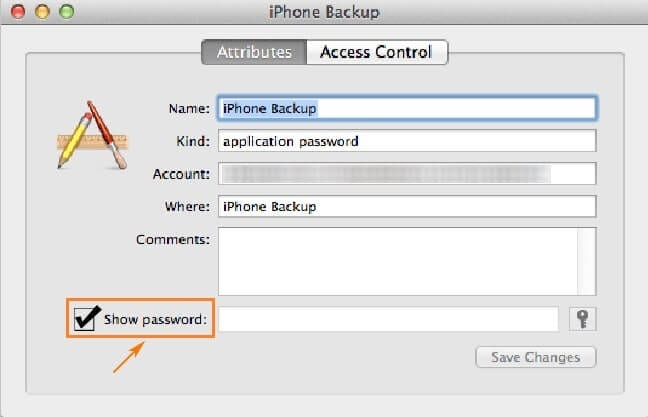
3. Find your password in the macOS keychain
Step 1: Launch Keychain Access by going to Application > Utilities > Keychain Access once your Mac has booted up.
Step 2: Check for a backup of your Apple iPhone 14 Plus by entering it into the search box and looking for it there.
Step 3: Double-click the Show Password option, and then choose it from the drop-down menu. After that, type in the password for the keychain. At long last, the password for your Apple iPhone 14 Plus backup will be shown.
4. Select “Back Up Now” via iCloud to remove password
If you already have a backup stored in iCloud, you may use iCloud for recovery.
First, power up the gadget and look for the “Hello” screen. If you have previously set up your Apple iPhone 14 Plus, you must delete or remove all of the material before continuing.
Navigate to the Apps & Data menu and choose the Restore from iCloud Backup option.
After successfully signing in with your Apple ID, choose Backup.

During the time that the system is being restored, it is essential that the Wi-Fi connection remains active.
5. Dr.Fone-Screen Unlock
With Dr.Fone - Screen Unlock, it’s easy to follow all the steps to get rid of the iTunes backup password.
Step 1: After installing Dr.Fone, open it and look for the red Screen Unlock button.

Step 2: In the Screen Unlock interface, tap Remove iTunes BackUp Encryption in the bottom right corner to move forward.

Step 3: When you get to this page, use a USB cable to connect your iOS device to the PC. If Dr.Fone can find this connection, you will see the picture below.
Before you click Remove Now, please carefully read the following three notes:
- Make sure to turn off Find My iPhone.
- Don’t open iTunes while doing this.
- Your device will reboot

Step 4: Dr.Fone can check your iTunes backup and delete it by itself. This encryption will be erased when the progress bar reaches 100%. This will take a short time to do.

Step 5: The encryption on the iTunes backup has been removed successfully! Now you can easily back up, restore, move, or wipe your device.

Part 3: 3 Tricks to Help You Remember the Passwords
If you have an iPhone, you know it can be tricky to keep track of all your passwords. From your email password to your banking login, there are a lot of different codes to remember.
Here are three tricks to help you keep track of your passwords so you don’t have to stress the next time you can’t log in to your account.
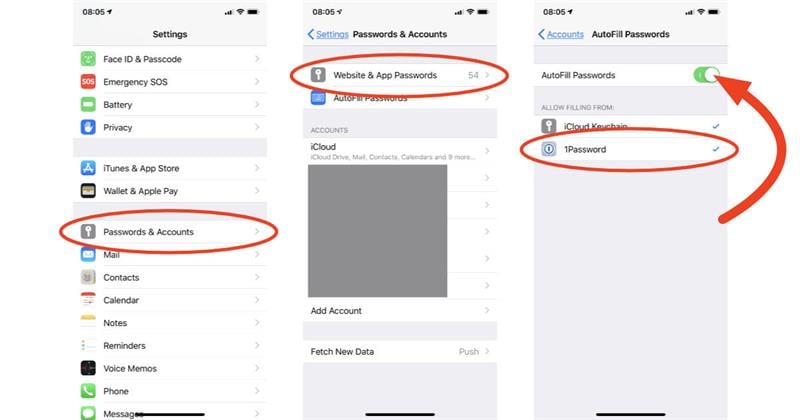
- Turn on “AutoFill” in “Settings”
You can turn on AutoFill in the Settings app. This will allow your Apple iPhone 14 Plus to fill in passwords when you visit websites and apps automatically. All you need to do is ensure you’ve entered the correct username and password once, and your Apple iPhone 14 Plus will save the information, so you don’t have to enter it again.
- Try iCloud Keychain to keep your passwords
iCloud Keychain is a great way to keep all your passwords in one place. Once you’ve turned on the iCloud Keychain, all your passwords will be synced across your devices. That means if you create a new password on your laptop, it will automatically appear on your Apple iPhone 14 Plus.
- Use Notes for passwords
If you’re finding a simple way to keep all your passwords, try using the Notes app. Create a new note and title it “Passwords.” Then, add it to the note whenever you create a new password.
You can even add a description of the password, so you remember which account it’s for.
The Bottom Line
As a last piece of advice, please safely save your newly created passwords. Rather than writing them down in the iPhone’s notepad, you should save the passwords in a secure location.
However, no matter how secure your gadget is, password leakage may happen, sending you to unpleasant situations that you can’t even conceive. It’s best to use Dr.Fone - Screen Unlock as soon as you encounter any problem!
Full Guide to Unlock Apple iPhone 14 Plus with iTunes
With such countless passwords, forgetting passwords on occasion isn’t surprising. What are your possibilities for iTunes unlock phone if you run over such circumstances and lose your password? Certainly, when this question springs up, you must not get terrified. We are here to direct you through the process of fixing this issue.
Losing a passcode is entirely normal and can happen to anyone. So, if you are also among the lot, we will elaborate on how to unlock iPhone with iTunes. After thorough research, our experts have laid out some essential unlocking methods for our readers. So, if you need to get things straight, read this detailed guide to go over your issue.
Part 1: Why Was My iPhone Disabled?
Using a lock screen passcode to secure your iDevice is an excellent way. However, it can become troublesome when you forget the key to your phone. Moreover, you may get stuck even if your screen breaks. On the other hand, someone may take your phone and type a few incorrect passcodes.
If your screen displays “iPhone disabled,” the most probable reason is an excess of wrong passcode attempts. However, this can sometimes occur without you understanding if the phone is in your pocket.
It would help if you erased your Apple iPhone 14 Plus to eliminate the lock and passcode, then re-sync it with iTunes. Then, you can restore your phone from an iCloud or an iTunes backup, but if you have never used a backup on your phone, your phone will have nothing. This guide illustrates how to unlock disabled iPhone with iTunes.
Part 2: How to Unlock iPhone with iTunes
At first, iTunes was only a media software used to play, download and see sound and video documents. Later in 2011, it became a valuable tool to support information and adjust it across numerous devices.
It added the ‘Restore’ option that can assist clients with unlocking their iPhones when they forget their passcode.
In any case, one has to know that iTunes is not an expert unlocking tool. Apple seldom updates iTunes, and its last update was long ago. Consequently, it has numerous tech bugs. As a result, the unlocking process using iTunes takes a lot of time. During the process, you may experience different error codes like 3004, 1100, 3194, 4000, and 4013. That makes it a tedious process.
Requirements for Windows PC:
- For iTunes unlock phone, your PC should have installed Windows 8 or later and the most recent iTunes variant.
Requirements for Mac:
- Open the Finder window if you have macOS Catalina or a more recent one.
- Open the most current version of iTunes using macOS Mojave or older.
- You must have a USB connector.
Steps (For Windows)
Step 1. Connect the locked Apple iPhone 14 Plus to the PC
Connect your locked Apple iPhone 14 Plus to your PC through a lightning or USB connector. Open iTunes on Windows PC.
Step 2. Put your Apple iPhone 14 Plus in recovery mode
To enter a Recovery Mode, press a combination of buttons on your Apple iPhone 14 Plus. Doing such, you will see a recovery mode screen on your Apple iPhone 14 Plus. To place the Apple iPhone 14 Plus in Recovery mode, follow these:
- iPhone 8 or above (second and third generation): Press and release the volume (+) button. Press and release the volume (-) button. Hold power/side button until seeing the recovery mode on your screen.
- iPhone 7 and 7 Plus: Press the top (or side) and volume down buttons simultaneously until the recovery screen shows up.
- iPhone SE (first generation) and iPhone 6S: Hold the home button and the power/side button simultaneously until the recovery mode screen shows up.
Note: If you see the passcode screen, switch off your Apple iPhone 14 Plus and do the process again until you see the Recovery mode screen.
Step 3. Restore your Apple iPhone 14 Plus
As the recovery Mode screen shows up on the iPhone, you will find your Apple iPhone 14 Plus on iTunes unlock phone screen. Then, a box shows up with a message saying there is an iPhone issue. It will expect you to update or restore your phone. So, click on Restore.
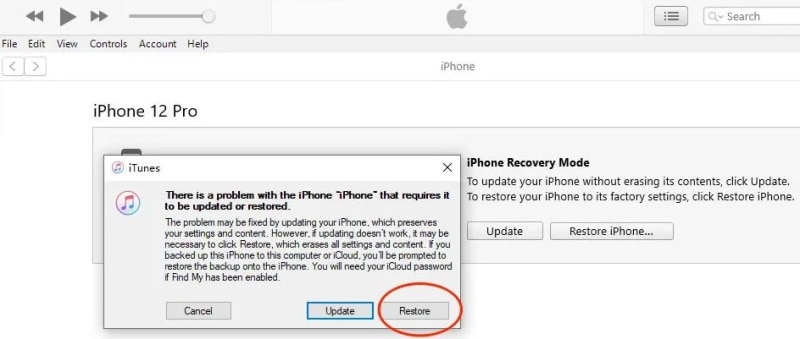
Step 4. It then asks you to confirm whether you are sure you need to restore the Apple iPhone 14 Plus to its default factory state. It does so because your media and data will be all erased. Then, click on Restore and Update.
Step 5. Then, “iPhone Software Update” may spring up. Click Next, and afterwards, click Agree. iTunes will begin downloading the software and restore your Apple iPhone 14 Plus when the download is finished.
When the “iPhone software update” is downloaded, iTunes will show that it will erase your Apple iPhone 14 Plus and restore it to iOS 15.4.1. Then click on Restore.
The above bar will show “Extracting software… “. It implies iOS 15.4.1 iTunes is planning to restore the software on this iPhone.
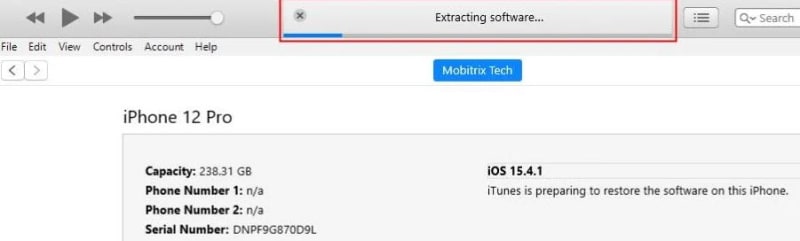
Step 6. Your Apple iPhone 14 Plus will show the restore progress bar with the white apple logo. The length of the process relies upon how much data is on your cell phone. Generally, it takes 20 to 120 minutes. When done, your Apple iPhone 14 Plus will restart naturally. Furthermore, after your Apple iPhone 14 Plus restarts, you can reset your Apple iPhone 14 Plus. For example, you can make a new passcode.
Part 3: Unlocking iPhone without iTunes
1. Unlock it with Find My in iCloud
Find My is a famous element in Apple devices that allows you to find your lost phone through Maps. The component has been updated from that point forward, and presently it can be utilized to erase your Apple iPhone 14 Plus. Additionally, you can use it to erase your information without a passcode.
Steps to Unlock:
Step 1. Open iCloud.com on a mobile or internet browser.
Step 2. Enter your Apple ID and password as inquired.
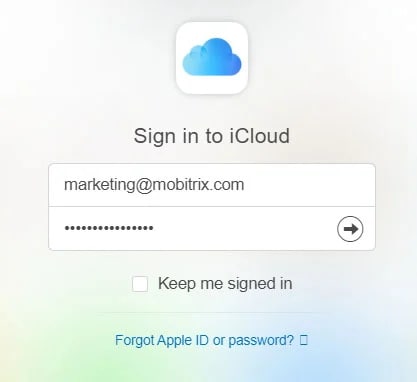
Step 3. After signing in effectively, click on Find My and enter your Apple ID and password. Click on Sign In.
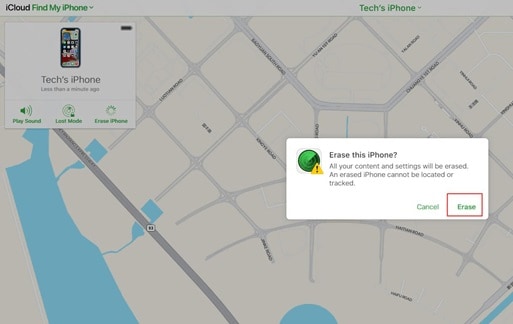
Pick your locked gadget under the “All Devices” area.

Step 4. Click on ‘Erase iPhone’. Click on ‘Erase’ again.
Step 5. Enter the Apple ID password to proceed.
Step 6. A check code will be sent to unlock your locked gadget. Enter the code to proceed.
Step 7. Presently, enter your number. Then, click Next and then Done.
Step 8. The iCloud will effectively begin the erase, and you can see the Apple sign with a white advancement bar noticeable on your locked iPhone. After an effective erase process, your Apple iPhone 14 Plus will restart.
Step 9. Swipe up on the Apple iPhone 14 Plus screen to begin once more.
Step 10. iPhone will show that it is locked to the owner. You have to sign in with your Apple ID again, enter the password, and tap on Next. You will currently be enabled to make your new passcode.
2. Dr.Fone-Screen Unlock
If you are searching for an elective way to unlock your Apple iPhone 14 Plus with iTunes, you can pick Wondershare Dr.Fone-Screen Unlock.
This software is an ideal iTunes elective that doesn’t need a passcode to unlock the iPhone. Whatever the situation, Dr.Fone can determine the issue in no time. It can eliminate Face ID, Touch ID, or a 4 to 6-digit passcode in no time. Moreover, it works with almost any iOS version at the moment. Here’s the alternate way to iTunes unlock phone:
Step 1. Connect your iDevice to the PC
From the Dr.Fone program on your PC, select “Screen Unlock” the tool.
Then use a USB connector to connect your iOS gadget to the PC. Then, click the “Unlock iOS Screen” option on your screen.
Step 2. Boot your iDevice in Recovery/DFU Mode
Before deleting the Apple iPhone 14 Plus screen, it is necessary to boot it in Recovery/DFU. You can follow the steps on your screen to do so. Moreover, the Recovery mode is the suggested way for your situation. However, you can use the DFU mode if this doesn’t work.

Step 3. Confirm Phone Model
After turning the DFU mode on, the program will show your phone information. In addition, it will show its model and software version. You can choose the correct data from the dropdown menu if it isn’t accurate. Then, it is time to download the firmware required for your phone model.

Step 4. Remove the Lock
After downloading the firmware, tap Unlock Now to begin the unlocking process.

Doing so will unlock your Apple iPhone 14 Plus within no time. However, kindly note this unlocking process will likewise wipe your Apple iPhone 14 Plus’s user data. Indeed, each solution removes your data. Therefore, you must be careful enough to back up your files before doing this process.
The Bottom Line
We hope you found out about how to unlock iPhone with iTunes. We likewise discussed what to do when you need an alternate method to iTunes. We know that using iTunes can be somewhat complicated; hence, the other options can help you a ton. However, we strongly suggest Dr.Fone-Screen Unlock for a more refined unlocking process.
Is Your Apple iPhone 14 Plus in Security Lockout? Proper Ways To Unlock
Apple has strict mechanisms to prevent unauthorized access and safeguard valid users’ data. If you are facing a security lockout issue on your Apple device, it means you have entered the wrong passcode multiple times.
To bring back your Apple iPhone 14 Plus in a working state, this guide provides some authentic methods to fix security lockout iPhone errors. Moreover, you will also find an advanced tool here that helps to resolve the security lockout at a high success rate.

Part 1. Understanding Security Lockout in iPhone: What It Is?
Security lockout error appears when you try entering a wrong passcode several times. That is when you have no chance left to enter the passcode, so you should be aware of the number of attempts.
Events to Security Lockout
The security lockout issue does not appear immediately on your Apple iPhone 14 Plus. The points below give insights about the streak of events that take your Apple iPhone 14 Plus/iPad to security lockout error:
- Your Apple iPhone 14 Plus only vibrates and shows no error till 5 wrong password attempts.
- When you enter an incorrect password 6 times consecutively, your Apple iPhone 14 Plus will get disabled for at least 1 minute to try the next passcode.
- If you input the wrong password 7 times on your Apple iPhone 14 Plus, it shows an “iPhone is disabled” error for 5 minutes.
- After the 8th attempt, you will have to wait for 15 minutes to try again.
- iPhone gets disabled for at least 60 minutes after 9 consecutive wrong passcode attempts.
- After the 10th incorrect password attempt, your Apple iPhone 14 Plus will get into a “Security Lockup” error that doesn’t allow you to enter the password again.
If you have encountered this issue, unfortunately, we will offer easy solutions to fix iPhone or iPad security lockout errors.
Part 2. [Easiest Way] Remove Security Lockout From iPhone Using Wondershare Dr.Fone
As you’ve gone through the entire issue of Security Lockout in iOS devices, you will need to find an appropriate solution. Wondershare Dr.Fone provides a dedicated screen unlock tool to solve all relevant iOS unlocking issues. When discovering how to unlock the Apple iPhone 14 Plus security lockout, Wondershare Dr.Fone helps you resolve it in no time.
You can find the latest support of iDevice and iOS versions across the tool, which makes it a versatile option. Consequently, you can bypass all types of screen locks from your Apple iPhone 14 Plus or iPad without any inconvenience. This includes support in removing the carrier and iCloud activation locks.
Key Highlights of Dr.Fone
- You can remove Touch ID, Face ID, alphanumeric passcode, and Screen Time passcode at a high success rate within a few minutes.
- When unlocking your iDevice’s lock screen, it is unnecessary to deactivate Find My services to make Wondershare Dr.Fone operate.
- It also helps to remove MDM profiles and bypass MDM lock without data loss.
Steps To Unlock iPhone Screen Using Wondershare Dr.Fone
Do you have a query about how to get out of security lockout on your Apple iPhone 14 Plus with no effort? Wondershare Dr.Fone offers a legitimate and easy method to unlock your Apple iPhone 14 Plus screen within no time:
- Step 1. Initiate and Select the Screen Unlock Feature
First, run Wondershare Dr.Fone on your computer and connect to your Apple iPhone 14 Plus via cable. Open the “Toolbox” and select the “Screen Unlock” option.
- Step 2. Advance to Unlocking iOS Screen
After that, choose “iOS” to run the required process. On the next window, select the “Unlock iOS Screen” option. The tool will take you to the next screen, and there, click the “Start” button to proceed with unlocking the iOS device. Continue to put your iDevice into Recovery Mode as per the provided instructions on-screen.
- Step 3. Set Device Details and Continue To Unlock
Your “Device Model” will be recognized automatically in Wondershare Dr.Fone. Select the “System Version” and hit the “Start” button to download the related iOS firmware. After downloading, click the “Unlock Now” button to execute the screen unlocking process.
- Step 4. Verify iOS Firmware To Complete the Process
Type the code in the confirmation box in the next prompt window and hit the “Unlock” option. After confirmation, a bar shows the Apple iPhone 14 Plus device unlocking progress on the next screen. Once the Apple iPhone 14 Plus is unlocked successfully, click the “Done” button to terminate the process.

Part 3. How To Get iPhone out of Security Lockout From iPhone Directly?
Getting your Apple iPhone 14 Plus out of Security Lockout from the Apple iPhone 14 Plus directly is a simple and quick technique, but it can cause potential data loss. Users owning an eSIM might get one option of keeping the SIM and its data while executing the process. While you have your latest iPhone locked out, we have provided a simple step-by-step guide explaining how to get your Apple iPhone 14 Plus out of security lockout:
- Step 1. On your “iPhone Unavailable” screen, tap the “Forgot Passcode?” option in the bottom right corner. To proceed with the next step, you need to remember your Apple ID password.
- Step 2. On the next screen, enter your Apple ID password in the box to sign out your Apple ID from your Apple iPhone 14 Plus. This will automatically start processing iDevice reset, removing all contents and passcodes in the Apple iPhone 14 Plus device.

What if I Have Recently Changed My iPhone’s Passcode?
If you have recently changed the iDevice password, you can use your old passcode within 72 hours to sign in temporarily. After getting into your Apple iPhone 14 Plus, set a new passcode immediately to complete the “Passcode Reset” process.
Part 4: How To Get iPhone out of Security Lockout Using iTunes?
iTunes can reset your Apple iPhone 14 Plus to its factory settings, allowing you to bypass the screen lock. While you know this platform for music management, it has brought about many features. The following guide presents instructions about how to unlock iPhone security lockout using iTunes:
Step 1. First, launch iTunes on your computer and connect it to your Apple iPhone 14 Plus. After that, put your Apple iPhone 14 Plus in the Recovery Mode by following the instructions:
iPhone 6 and Earlier Models: You need to press and hold the “Home” or “Power” button simultaneously until the Recovery Mode screen appears.
iPhone 7 and 7 Plus: Proceed to press and hold the “Power” and “Volume Down” buttons simultaneously until the Recovery Mode screen appears.
iPhone 8 and Later Models: Start by pressing the “Volume Up” button, release it, and continue to press the “Volume Down” button. After releasing it, continue by holding the “Side” button until the Recovery Mode screen displays.

- Step 2. Subsequently, iTunes will detect your Apple iPhone 14 Plus in Recovery Mode. A prompt will appear stating that you want to “Update” or “Restore” your Apple iPhone 14 Plus. From there, choose “Restore” and hit the “OK” button to restore your Apple iPhone 14 Plus.

Part 5: How To Get iPhone out of Security Lockout Using iCloud?
iCloud service is another handy method for people having queries about how to get an iPhone out of the security lockout. You should know this method removes your device data to access the phone screen again. Also, it requires the Find My option enabled on your Apple iPhone 14 Plus, and you need to know your Apple ID and password to proceed. After having these details, follow the given steps below:
- Step 1. At the start, go to the official iCloud website on any device and enter your “Apple ID” and “Password” in the related boxes. After that, enter a two-factor authentication code to lead into a new window. As you select the “Grid” icon, click “Find My” to view the connected devices with that Apple ID.

- Step 2. On the next screen, choose the Apple iPhone 14 Plus you want to get out of the security lockout. Then, confirm the process by clicking the “Erase This Device” option.

Conclusion
Security Lockout or “iPhone Unavailable” is a common issue that appears when you enter an incorrect passcode up to 10 times. Our detailed guide provided authentic ways to fix the security lockout iPhone using simple steps. Here, Wondershare Dr.Fone is the most recommended method because it helps recover your Apple iPhone 14 Plus easily within a few steps.
Tips: Are you searching for a powerful Screen Unlock tool? No worries as Dr.Fone is here to help you. Download it and start a seamless unlock experience!
Also read:
- [New] 2024 Approved ZippyZoom TortoisePic TimeStretch
- 5 Most Effective Methods to Unlock Apple iPhone 11 Pro Max in Lost Mode | Dr.fone
- Affordable Luxury at Your Fingertps - Why the Microsoft Sculpt Is Worth Every Penny
- Complete Guide For iPhone 14 Lock Screen | Dr.fone
- Easy Steps on How To Create a New Apple ID Account On Apple iPhone 12 Pro Max | Dr.fone
- Easy Steps on How To Create a New Apple ID Account On iPhone 15 Pro | Dr.fone
- Effortless Ways to Update Your Dell Webcam's Software Correctly
- Fast X265 to X264 Transformation Tutorial Using Handbrake - Effortless Techniques for Speedy Results
- Forgot iPhone 14 Plus Backup Password? Heres What to Do | Dr.fone
- Gameplay Enhancement: The Art of Scripting with ChatGPT
- In 2024, How to Turn Off Find My Apple iPhone 6s when Phone is Broken? | Dr.fone
- In 2024, How to Unlock Apple iPhone 15 Pro Max With an Apple Watch & What to Do if It Doesnt Work | Dr.fone
- In 2024, Master the Art of Eye-Catching Short Videos
- Recovering a Mistakenly Erased Windows Partition: Simple Steps for Success!
- Rift as a Password: Facebook Users Spending Big on Rewriting History
- Title: In 2024, Forgot Apple iPhone 14 Plus Backup Password? Heres What to Do | Dr.fone
- Author: Amelia
- Created at : 2024-10-30 16:40:48
- Updated at : 2024-11-06 17:58:22
- Link: https://iphone-unlock.techidaily.com/in-2024-forgot-apple-iphone-14-plus-backup-password-heres-what-to-do-drfone-by-drfone-ios/
- License: This work is licensed under CC BY-NC-SA 4.0.