
In 2024, Full Guide to Unlock Apple iPhone 13 Pro with iTunes | Dr.fone
Full Guide to Unlock Apple iPhone 13 Pro with iTunes
With such countless passwords, forgetting passwords on occasion isn’t surprising. What are your possibilities for iTunes unlock phone if you run over such circumstances and lose your password? Certainly, when this question springs up, you must not get terrified. We are here to direct you through the process of fixing this issue.
Losing a passcode is entirely normal and can happen to anyone. So, if you are also among the lot, we will elaborate on how to unlock iPhone with iTunes. After thorough research, our experts have laid out some essential unlocking methods for our readers. So, if you need to get things straight, read this detailed guide to go over your issue.
Part 1: Why Was My iPhone Disabled?
Using a lock screen passcode to secure your iDevice is an excellent way. However, it can become troublesome when you forget the key to your phone. Moreover, you may get stuck even if your screen breaks. On the other hand, someone may take your phone and type a few incorrect passcodes.
If your screen displays “iPhone disabled,” the most probable reason is an excess of wrong passcode attempts. However, this can sometimes occur without you understanding if the phone is in your pocket.
It would help if you erased your Apple iPhone 13 Pro to eliminate the lock and passcode, then re-sync it with iTunes. Then, you can restore your phone from an iCloud or an iTunes backup, but if you have never used a backup on your phone, your phone will have nothing. This guide illustrates how to unlock disabled iPhone with iTunes.
Part 2: How to Unlock iPhone with iTunes
At first, iTunes was only a media software used to play, download and see sound and video documents. Later in 2011, it became a valuable tool to support information and adjust it across numerous devices.
It added the ‘Restore’ option that can assist clients with unlocking their iPhones when they forget their passcode.
In any case, one has to know that iTunes is not an expert unlocking tool. Apple seldom updates iTunes, and its last update was long ago. Consequently, it has numerous tech bugs. As a result, the unlocking process using iTunes takes a lot of time. During the process, you may experience different error codes like 3004, 1100, 3194, 4000, and 4013. That makes it a tedious process.
Requirements for Windows PC:
- For iTunes unlock phone, your PC should have installed Windows 8 or later and the most recent iTunes variant.
Requirements for Mac:
- Open the Finder window if you have macOS Catalina or a more recent one.
- Open the most current version of iTunes using macOS Mojave or older.
- You must have a USB connector.
Steps (For Windows)
Step 1. Connect the locked Apple iPhone 13 Pro to the PC
Connect your locked Apple iPhone 13 Pro to your PC through a lightning or USB connector. Open iTunes on Windows PC.
Step 2. Put your Apple iPhone 13 Pro in recovery mode
To enter a Recovery Mode, press a combination of buttons on your Apple iPhone 13 Pro. Doing such, you will see a recovery mode screen on your Apple iPhone 13 Pro. To place the Apple iPhone 13 Pro in Recovery mode, follow these:
- iPhone 8 or above (second and third generation): Press and release the volume (+) button. Press and release the volume (-) button. Hold power/side button until seeing the recovery mode on your screen.
- iPhone 7 and 7 Plus: Press the top (or side) and volume down buttons simultaneously until the recovery screen shows up.
- iPhone SE (first generation) and iPhone 6S: Hold the home button and the power/side button simultaneously until the recovery mode screen shows up.
Note: If you see the passcode screen, switch off your Apple iPhone 13 Pro and do the process again until you see the Recovery mode screen.
Step 3. Restore your Apple iPhone 13 Pro
As the recovery Mode screen shows up on the iPhone, you will find your Apple iPhone 13 Pro on iTunes unlock phone screen. Then, a box shows up with a message saying there is an iPhone issue. It will expect you to update or restore your phone. So, click on Restore.
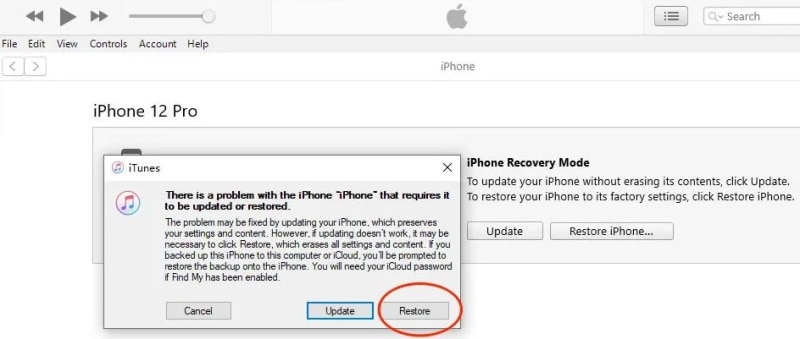
Step 4. It then asks you to confirm whether you are sure you need to restore the Apple iPhone 13 Pro to its default factory state. It does so because your media and data will be all erased. Then, click on Restore and Update.
Step 5. Then, “iPhone Software Update” may spring up. Click Next, and afterwards, click Agree. iTunes will begin downloading the software and restore your Apple iPhone 13 Pro when the download is finished.
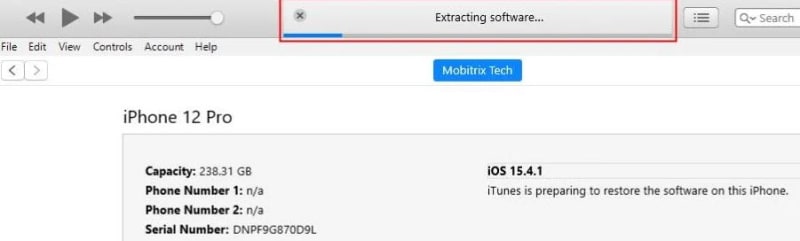
When the “iPhone software update” is downloaded, iTunes will show that it will erase your Apple iPhone 13 Pro and restore it to iOS 15.4.1. Then click on Restore.
The above bar will show “Extracting software… “. It implies iOS 15.4.1 iTunes is planning to restore the software on this iPhone.
Step 6. Your Apple iPhone 13 Pro will show the restore progress bar with the white apple logo. The length of the process relies upon how much data is on your cell phone. Generally, it takes 20 to 120 minutes. When done, your Apple iPhone 13 Pro will restart naturally. Furthermore, after your Apple iPhone 13 Pro restarts, you can reset your Apple iPhone 13 Pro. For example, you can make a new passcode.
Part 3: Unlocking iPhone without iTunes
1. Unlock it with Find My in iCloud
Find My is a famous element in Apple devices that allows you to find your lost phone through Maps. The component has been updated from that point forward, and presently it can be utilized to erase your Apple iPhone 13 Pro. Additionally, you can use it to erase your information without a passcode.
Steps to Unlock:
Step 1. Open iCloud.com on a mobile or internet browser.
Step 2. Enter your Apple ID and password as inquired.
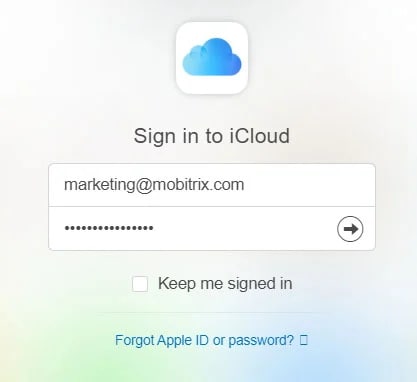
Step 3. After signing in effectively, click on Find My and enter your Apple ID and password. Click on Sign In.
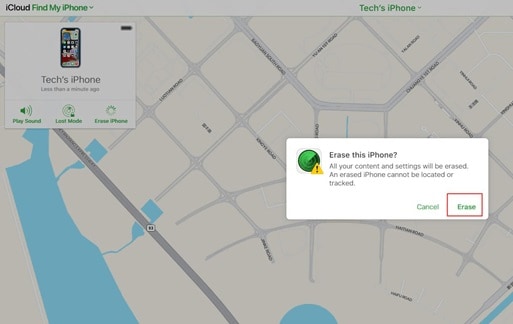
Pick your locked gadget under the “All Devices” area.

Step 4. Click on ‘Erase iPhone’. Click on ‘Erase’ again.
Step 5. Enter the Apple ID password to proceed.
Step 6. A check code will be sent to unlock your locked gadget. Enter the code to proceed.
Step 7. Presently, enter your number. Then, click Next and then Done.
Step 8. The iCloud will effectively begin the erase, and you can see the Apple sign with a white advancement bar noticeable on your locked iPhone. After an effective erase process, your Apple iPhone 13 Pro will restart.
Step 9. Swipe up on the Apple iPhone 13 Pro screen to begin once more.
Step 10. iPhone will show that it is locked to the owner. You have to sign in with your Apple ID again, enter the password, and tap on Next. You will currently be enabled to make your new passcode.
2. Dr.Fone-Screen Unlock
If you are searching for an elective way to unlock your Apple iPhone 13 Pro with iTunes, you can pick Wondershare Dr.Fone-Screen Unlock.
This software is an ideal iTunes elective that doesn’t need a passcode to unlock the iPhone. Whatever the situation, Dr.Fone can determine the issue in no time. It can eliminate Face ID, Touch ID, or a 4 to 6-digit passcode in no time. Moreover, it works with almost any iOS version at the moment. Here’s the alternate way to iTunes unlock phone:
Step 1. Connect your iDevice to the PC
From the Dr.Fone program on your PC, select “Screen Unlock” the tool.

Then use a USB connector to connect your iOS gadget to the PC. Then, click the “Unlock iOS Screen” option on your screen.

Step 2. Boot your iDevice in Recovery/DFU Mode
Before deleting the Apple iPhone 13 Pro screen, it is necessary to boot it in Recovery/DFU. You can follow the steps on your screen to do so. Moreover, the Recovery mode is the suggested way for your situation. However, you can use the DFU mode if this doesn’t work.

Step 3. Confirm Phone Model
After turning the DFU mode on, the program will show your phone information. In addition, it will show its model and software version. You can choose the correct data from the dropdown menu if it isn’t accurate. Then, it is time to download the firmware required for your phone model.

Step 4. Remove the Lock
After downloading the firmware, tap Unlock Now to begin the unlocking process.

Doing so will unlock your Apple iPhone 13 Pro within no time. However, kindly note this unlocking process will likewise wipe your Apple iPhone 13 Pro’s user data. Indeed, each solution removes your data. Therefore, you must be careful enough to back up your files before doing this process.
The Bottom Line
We hope you found out about how to unlock iPhone with iTunes. We likewise discussed what to do when you need an alternate method to iTunes. We know that using iTunes can be somewhat complicated; hence, the other options can help you a ton. However, we strongly suggest Dr.Fone-Screen Unlock for a more refined unlocking process.
How To Fix Auto Lock Greyed Out on Apple iPhone 13 Pro
Auto-lock on iOS devices serves multiple purposes - it conserves battery life, secures your data, and more. But have you encountered the Auto-Lock greyed-out dilemma, fixed at 30 seconds? When this setting becomes inaccessible, it limits your control over screen timeout.
Read on if you’ve encountered a similar problem on your iOS device. In this guide, we’ll explore the possible reasons and offer steps to fix Auto-Lock greyed out on iPhone and iPad devices. If force restarts or settings resets haven’t worked for you, we’ve got alternative solutions. Let’s get started.

Part 1: Why Is Auto-Lock Greyed Out on iOS Device?
There are a few reasons why the Auto-Lock might be greyed out on your Apple iPhone 13 Pro or iPad device, preventing you from adjusting the duration. Here are the most common culprits:
Low Power Mode
When you activate Low Power Mode on your iOS device, you might notice the screen automatically locking after 30 seconds of inactivity. This quick sleep setting, implemented to minimize power usage, explains why the Auto-Lock option appears greyed out and inaccessible.
Screen Time Restrictions
Screen Time restrictions can impact Auto-Lock. For instance, if your downtime schedule blocks all apps, the screen locks itself, even if the Auto-Lock timer hasn’t run out.

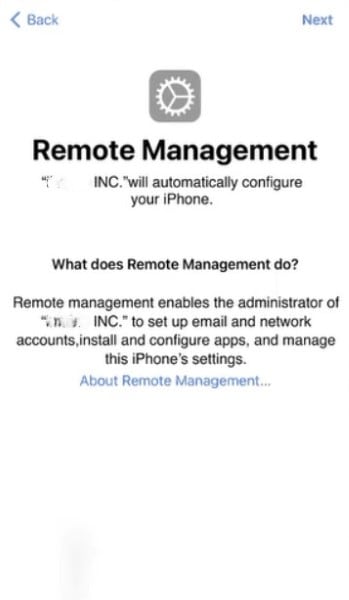
MDM Profile Restrictions
If the Auto-Lock is greyed out on your iPad or iPhone and you use it for work or school, a Mobile Device Management (MDM) profile might be the reason. This profile restricts settings, including Auto-Lock. To fix this, contact your IT administrator and ask if they can adjust the MDM profile settings.
Alright, you know the possible reasons why the Auto-Lock option is not working on your iOS device. Still, you might be wondering how to fix the Auto-Lock greyed-out issue. Below are several ways to get your iPad or iPhone Auto-Lock working normally again.
Fix No.1: Disable Low Power Mode
Your iPhone Auto-Lock greyed out because Low Power Mode limits background activities, including the Auto-Lock option. In this mode, you cannot change the Auto-Lock settings. Turn off Low Power Mode to fix this issue and choose your preferred timeout. Here’s how:
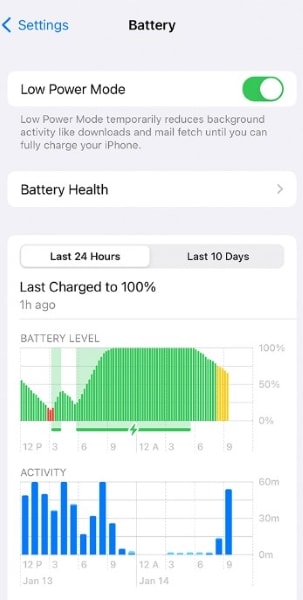
- Step 1: Go to your Apple iPhone 13 Pro or iPad’s Settings app.
- Step 2: Scroll down and tap Battery. It will show you your device’s battery usage and available settings.
- Step 3: Turn off the Low Power Mode. Now, the greyed-out Auto-Lock option in Settings should be available again.

Low Battery Mode can stretch your battery life further. But if you need your screen to stay on longer, like while reading an article or watching a video, you can turn it off. It lets you adjust the screen timeout in Settings so it stays awake for as long as you like.
Fix No.2: Check Screen Time Restrictions
You’ve ruled out the Low Power Mode, but the Auto-Lock greyed out on iPad or iPhone remains. If Low Power Mode isn’t causing the problem, your screen time settings might be the issue. Some app restrictions can limit your screen use to specific times, causing it to lock automatically. Resolve this by removing limits, such as downtime and app restrictions, or turning it off.
- Step 1: Open the Settings app on your iOS device.
- Step 2: Go to Screen Time, then scroll down.
- Step 3: Tap Turn Off Screen Time.

Fix No.3: Remove MDM Configuration Profile
A configuration profile is a file that contains settings and restrictions that can be applied to an iOS device. Organizations, schools, or IT administrators often use it to manage devices remotely and enforce specific configurations. Once installed, the settings within a profile override the Apple iPhone 13 Pro device’s default settings. It can include restrictions related to security, network access, app usage, and more.
Since an MDM configuration profile causes limitations, like the greyed-out Auto-Lock on iPad, removing it can be the solution. Doing so frees your iOS device from external settings imposed by the profile. Then, it could allow you to adjust the Auto-Lock time setting as you normally would.
Step 1: See the configuration profiles you installed on your iOS device.
Go to Settings> General > VPN & Device Management on your Apple iPhone 13 Pro.
Go to Settings> General > Profiles & Device Management on your iPad.
Step 2: Select the configuration profile you need to delete.
Step 3: Tap Remove Profile, enter your device passcode, then tap Remove.

Fix No.4: Remove Network Settings Installed by MDM
Businesses often use Mobile Device Management (MDM) to remotely manage their employees’ iPhones and iPads. MDM lets IT admins push software updates, restrict apps, and remotely wipe a lost device. This keeps corporate data safe and devices under control, whether the company or the employee owns them.
If you’re having trouble with a greyed-out Auto-Lock timeout setting, disassociating your device from MDM might be an option. But remember, this is a big step. Make sure you follow your company’s authorized procedures to avoid unintended consequences.
If your IT team gives the green light, you might also be able to remove the network settings installed by MDM. Just proceed with caution, as messing with these settings could lead to instability or data loss. Here’s how:
- Step 1: Open the Settings app on your iOS device.
- Step 2: Navigate to General > Profile or VPN & Device Management (or a similar section).
- Step 3: Select the management and tap Remove Management.

If the option is unavailable, only the person who used Apple Configurator 2 or handles your company’s mobile device management platform can remove it.
Fix No.5: Use Dr.Fone To Bypass MDM Lock Without Data Loss
Unfortunately, manually removing profiles can be tricky, especially if they’re associated with MDM, Apple School Manager, or supervised configurations. These often require the removal of passwords, admin privileges, or complete data wipes. But there’s good news. Wondershare Dr.Fone - Screen Unlock (iOS) provides a simpler and safer solution.
Here’s why you should try it:
- **Speedy and Efficient:**No more endless troubleshooting. Dr.Fone bypasses the MDM lock in minutes, saving you precious time.
- **Data Stays Safe:**Unlike factory resets, Dr.Fone keeps all your precious photos, messages, and apps right where they belong.
- **No Jailbreaking:**Say goodbye to complex hacks and warranty voiding. Dr.Fone works without jailbreaking your Apple iPhone 13 Pro, keeping it healthy and secure.
- **Universal Compatibility:**Whether you own the latest iPhone with iOS 17 or an older version, Dr.Fone has your back. It supports all iOS devices and versions starting from iOS 7.0.
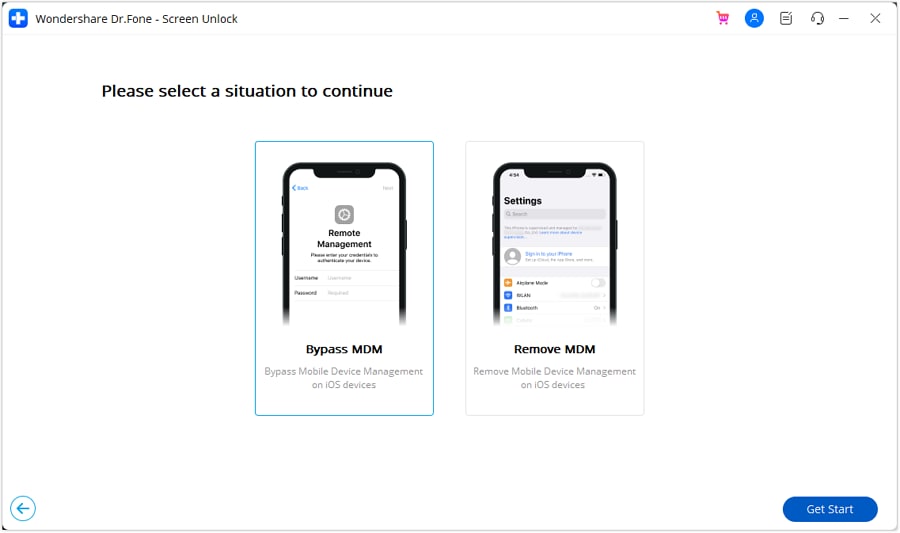
Have you ever bought a used iPad or Apple iPhone 13 Pro to find the Auto-Lock option greyed out and isn’t working? Mobile Device Management (MDM) profiles, often deployed by companies or schools, can restrict functionality. If you lack the credentials to bypass or remove it, Dr.Fone can help remove all MDM restrictions on your iOS device. Here’s how:
- Step 1: Download and open Dr.Fone on your computer. Next, connect your Apple iPhone 13 Pro or iPad to the computer using a USB cable and navigate to Toolbox > Screen Unlock > iOS.
Tips: Are you searching for a powerful Screen Unlock tool? No worries as Dr.Fone is here to help you. Download it and start a seamless unlock experience!
- Step 2: Within the Screen Unlock tool window, select Unlock MDM iPhone.

- Step 3: Select Bypass MDM, then click Get Start to proceed.
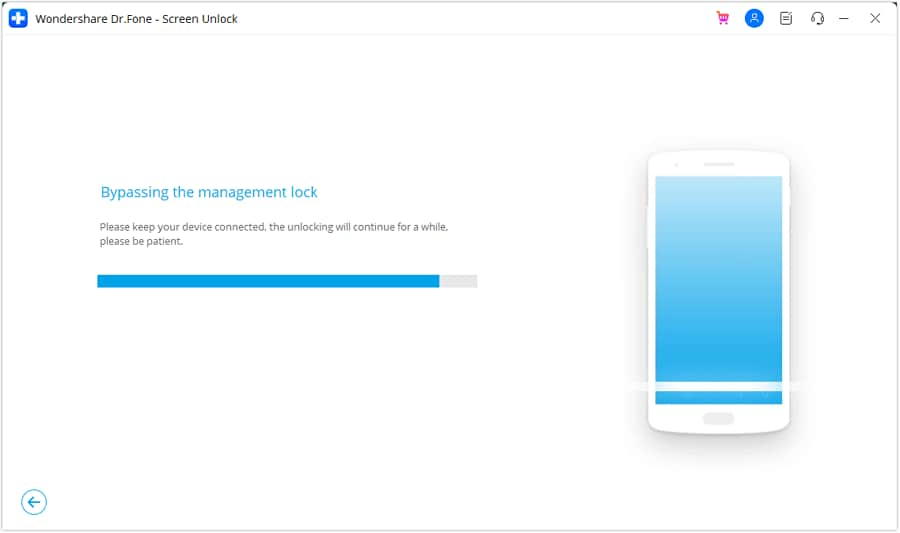
- Step 4: Please review the message carefully before initiating the MDM bypass process. Once you’ve read it, click Start to Bypass to proceed.

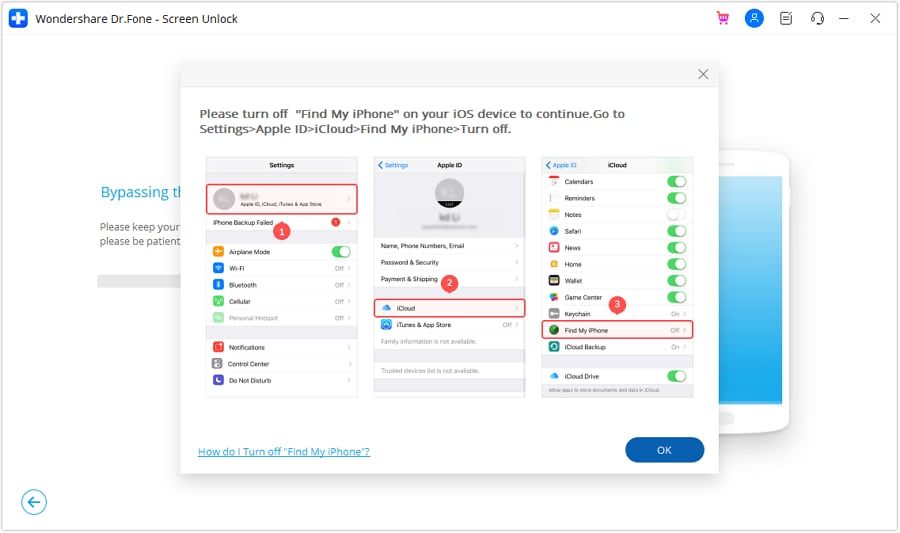
- Step 5: If prompted, go to your device’s Settings > Apple ID > iCloud and turn off the Find My feature. Next, click OK to initiate the MDM bypass.
- Step 6: The software will display the progress of the bypass. Wait for it to complete.
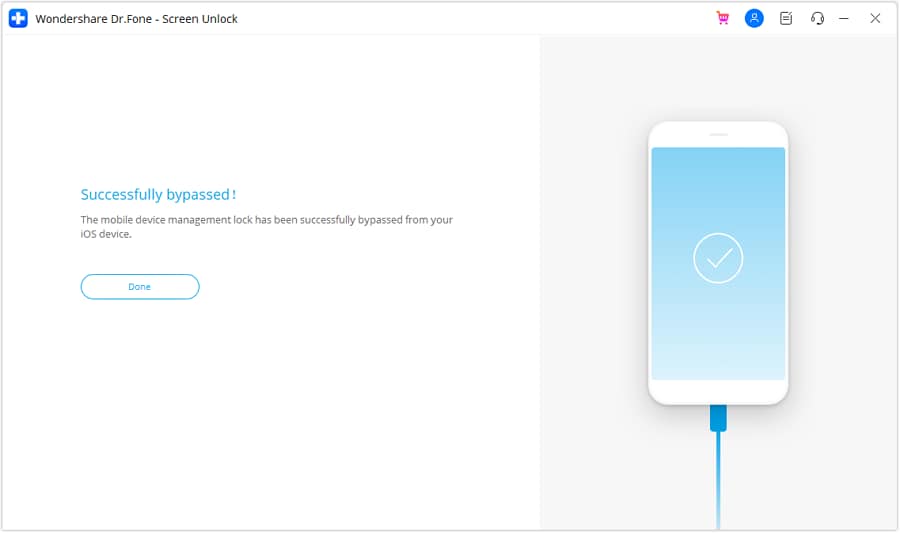
- Step 7: You’ll see a confirmation message once the bypass is successful. Click Done to exit. Your device should now be free from MDM restrictions.
Fix No.6: Check and Adjust Auto-Lock Settings
Once you’ve tried all the fixes above, you might need to set up the Auto-Lock timeout again.
- Setup Auto-Lock on iPad
Here are the steps on how to change Auto-Lock on iPad devices:
- Step 1: Within the Settings app, scroll down the list on the left-hand side and tap Display & Brightness.
- Step 2: On the right-hand side of the Display & Brightness screen, tap the Auto-Lock option.

- Step 3: A list of time options will appear, ranging from 2 minutes to 15 minutes, as well as Never. Select the time you want your iPad to wait before automatically locking the screen after inactivity. If you want the screen to stay on indefinitely, choose Never.

Step 4: Once you’ve selected your preferred auto-lock duration, you can exit the Settings app. The change will be applied automatically.
- Setup Auto-Lock on iPhone
Here’s how to change Auto-Lock on iPhone devices:
- Step 1: Open the Settings app.
- Step 2: Tap on Display & Brightness, scroll down, and tap Auto-Lock.
- Step 3: Choose the desired time interval for your Apple iPhone 13 Pro to automatically lock. The available options typically range from 30 seconds to 5 minutes. You may also have the option to select Never if you prefer to have the screen stay on indefinitely until you manually lock it.

Conclusion
There you have it. This guide has equipped you with the knowledge and solutions to fix the Auto-Lock greyed out on your Apple iPhone 13 Pro or iPad devices. From identifying the reasons like Low Power Mode and MDM configurations to implementing actionable fixes, you can now change your screen timeout. So, turn off those restrictions, remove MDM profiles, and head back to Settings.
For an easy solution, use Dr.Fone Screen Unlock to bypass MDM restrictions, giving you control over your device. Whether it’s a work phone or a personal device under MDM, Dr.Fone can offer an efficient solution. With a few clicks, you’ll have the Auto-Lock back on track, ensuring your iOS device works again just how you want it.
Tips: Are you searching for a powerful Screen Unlock tool? No worries as Dr.Fone is here to help you. Download it and start a seamless unlock experience!
What Does Jailbreaking Apple iPhone 13 Pro i Do? Get Answers here
Jailbreaking grants you root access to your smartphone, opening a range of features and functionalities. But what does jailbreaking an iPhone do? Jailbreaking your Apple iPhone 13 Pro removes the restrictions imposed by Apple on its operating system, iOS. It offers more customization options and access to extra apps.
However, is jailbreaking an iPhone safe and legal? It’s a complex answer and not a decision to take lightly. While the process is legal in most countries, its applications can cross legal lines, like installing pirated apps.
To learn more, read on and explore the capabilities of a jailbroken iPhone in the following sections. This article will also touch on its impact on iCloud Activation Lock. Let’s start with the benefits and risks of jailbreaking your Apple iPhone 13 Pro.

Part 1: What Does Jailbreaking an iPhone Do?
Before trying to jailbreak your Apple iPhone 13 Pro, it’s crucial to understand, “What can you do with a jailbroken iPhone?” While it opens up exciting possibilities, it also introduces potential drawbacks. In this section, you’ll learn both aspects.
Benefits of Jailbreaking
Apple’s App Store and iOS offer a curated selection of features and functionalities. But for some users, this can feel restrictive. Here are some advantages of jailbreaking your Apple iPhone 13 Pro:
- Install Unapproved Apps
Apple’s App Store has strict guidelines limiting the type of apps available. Jailbreaking offers various third-party apps and tweaks not available on the App Store. These could include emulators, screen recorders, or apps that bypass certain limitations.
- Increased Customization Options
Users can customize their iPhones beyond the limitations imposed by Apple after Jailbreaking. It includes changing themes, icons, and even the look and feel of the user interface. This level of personalization can enhance your experience while using your iOS device.

- Unlocking System-wide Features
Jailbreaking unlocks extra iPhone features. It lets you access advanced settings and functions. These aren’t in the regular, non-jailbroken mode. More control means more customization. You can optimize your Apple iPhone 13 Pro based on your preferences.
- Unlocking Network Restrictions
Jailbreaking frees the Apple iPhone 13 Pro from carrier restrictions. You can then use it with different network providers. This is handy for travelers or those wanting better service options.
However, these benefits come with caveats you should consider.
Risks of Jailbreaking
While jailbreaking itself isn’t illegal, it does involve bypassing Apple’s security measures. This increased freedom comes with its own set of potential pitfalls. Here are some potential downsides of jailbreaking your Apple iPhone 13 Pro:
- Security Vulnerabilities
Bypassing Apple’s security measures can expose your device to vulnerabilities. Malicious apps or tweaks can exploit these vulnerabilities, risking your data and privacy. It could lead to the theft of your data, including passwords, financial information, and photos.
- Voided Warranty
Jailbreaking is seen by Apple as a device modification. Doing so can void your device warranty. So, if jailbreaking causes any issues, Apple won’t cover them under their support services—both hardware and software.
- Instability and Performance Issues
Jailbreaking may make your system unstable and cause performance problems. When you add unauthorized tweaks or apps, they can clash with iOS. This clash might result in crashes, freezes, or a general drop in your Apple iPhone 13 Pro’s performance.

- Difficulty in Updating
Jailbreaking may cause problems with new iOS updates. When Apple releases updates, jailbreak developers might take time to catch up. This delay can leave you without access to the latest features and security patches.
- Bricking Risk
Incorrect jailbreaking can “brick“ your Apple iPhone 13 Pro, making it unusable. This risk goes up if you try it without enough knowledge or with unreliable tools.
Part 2: What Can Jailbreak iPhone Do to iCloud Activation Lock?
Jailbreaking an iPhone won’t remove the iCloud Activation Lock, contrary to a common misconception. While jailbreaking provides extensive control over your device’s system, it is not synonymous with bypassing iCloud Activation Lock. These are distinct concepts. Here’s how they differ:
- Jailbreak
If you jailbreak your Apple iPhone 13 Pro, what happens is you have root access to the iOS system. It opens customization and functionality beyond what is available.
- iCloud Activation Lock
iCloud Activation Lock is a security feature that ties an Apple iPhone 13 Pro to the Apple ID used to set it up. If lost or stolen, it prevents unauthorized use even after a factory reset.

While jailbreaking grants you deeper access to the system, it can’t override or bypass the iCloud Activation Lock directly. However, third-party tools that can bypass iCloud activation lock use this access. These software, such as Wondershare Dr.Fone, leverage the jailbreak to access crucial system files and implement their bypass methods.
Part 3: Easily Bypass iCloud Activation Lock Without Password
Security risks? Warranty void? These are valid concerns when considering “What does it mean to jailbreak an iPhone?”
Not only that, but if you jailbreak your Apple iPhone 13 Pro and face issues, you may need the Apple ID and password for access. Retrieving them is easy with known iCloud credentials. But reactivation becomes challenging if you’ve forgotten or bought a used iOS device without the previous owner’s details.
To solve this, you can use software to bypass the Activation Lock on your Apple iPhone 13 Pro. Several tools in the market can do it, and Wondershare Dr.Fone is a standout option. It’s user-friendly, compatible with the latest iOS devices, and boasts an intuitive interface.
Here are some things Dr.Fone - Screen Unlock tool can offer:
- Can remove all types of locked screen
- Remove SIM lock/ unlock iPhone carrier without losing data
- Unlock Apple ID without a password
- Bypass MDM without data loss
- Remove iTunes backup encryption
Dr.Fone uses the responsible path of jailbreaking your iOS device, giving you back control. Now, let’s walk through a step-by-step guide on how to bypass the iCloud Activation Lock using Dr.Fone - Screen Unlock (iOS):
Step 1: Download Dr.Fone and set up the software on your computer.
Step 2: Open the program and select Screen Unlock from the available options on the Toolbox page.
- Step 3: Choose iOS as your device type, then select iCloud Activation Lock Removal on the next window.

- Step 4: Click Start to initiate the bypass process.

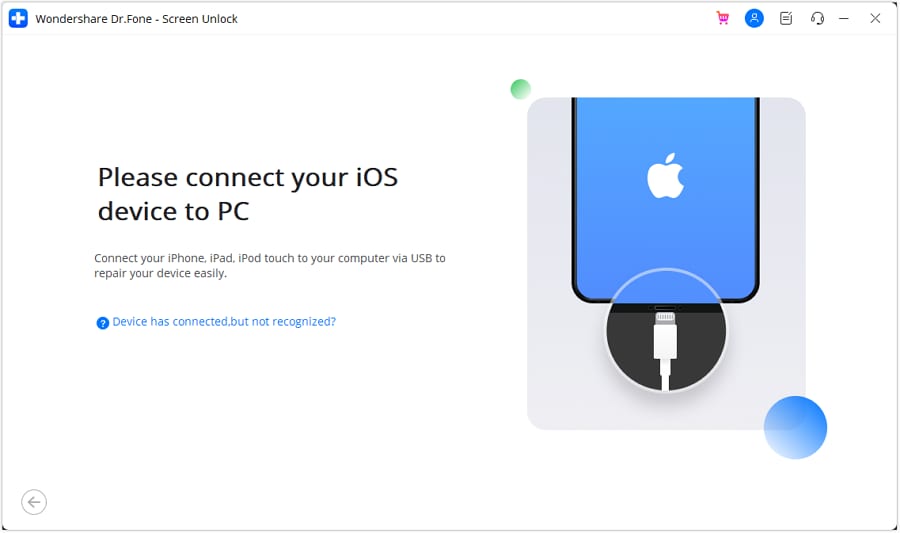
- Step 5: Use a USB cable to connect your Apple iPhone 13 Pro to the computer. Ensure the software detects your device.
- Step 6: Check your Apple iPhone 13 Pro settings for a displayed MEID or ESN number to identify CDMA network support. If an IMEI number is present, the Apple iPhone 13 Pro device supports GSM networks. The findings indicate support for both GSM and CDMA networks. Click Unlock Now to proceed.
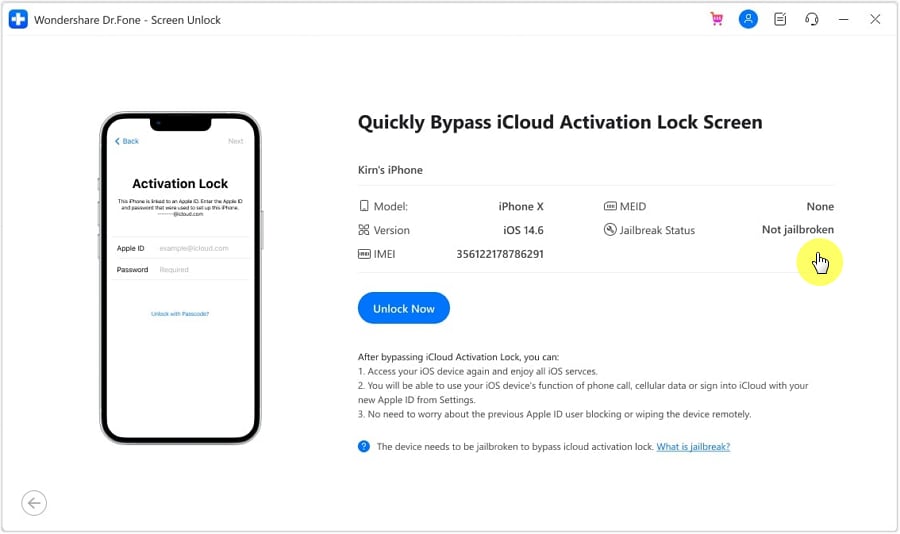
****Note:****For GSM devices, removing the iCloud Activation Lock doesn’t disrupt normal functioning. Conversely, for CDMA devices, calling features may be disabled. However, the Apple ID remains usable for essential functions like App Store access.
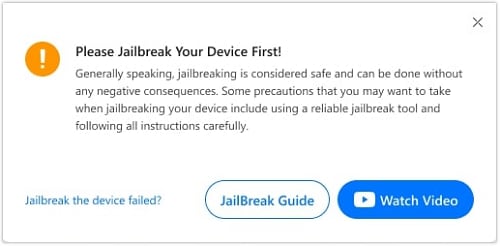
- Step 7: Dr.Fone will check if your device needs to be jailbroken. If it does, follow the on-screen instructions to jailbreak it.
- Step 8: Allow the software to complete the bypass process. Once done, your Apple iPhone 13 Pro will be successfully unlocked from the iCloud Activation Lock without a password.

Part 4: Other Way To Remove iCloud Activation Lock Without Jailbreak
If you’re the rightful owner of the iPhone, the safest and most legitimate way to bypass the Activation Lock is to remove the associated Apple ID from the Apple iPhone 13 Pro device. Here’s how to remove iCloud Activation lock on the web without jailbreaking your Apple iPhone 13 Pro:
- Step 1: Go to appleid.apple.com, then sign in with your Apple ID and password.
- Step 2: Select the Apple iPhone 13 Pro device you want to remove the Activation Lock from, then click Remove from account.

- Step 3: Confirm that you want to remove the Apple iPhone 13 Pro device.
****Note:****If you’re still having trouble removing Activation Lock, you can contact Apple Support for help.
Conclusion
With the question “What does jailbreaking an iPhone do?” answered, it’s time to weigh the pros and cons. Jailbreaking an iPhone means bypassing restrictions for more functions and unauthorized apps. Although it provides customization and extra features, it poses risks.
Jailbreaking your Apple iPhone 13 Pro weakens its iOS security, possibly exposing your device to malware. If you plan to remove iCloud Activation Lock, use trustworthy tools like Dr.Fone. Weighing the benefits of jailbreaking against the potential downsides is crucial. Remember, customizing your Apple iPhone 13 Pro comes at the cost of your device’s security and stability.
Tips: Are you searching for a powerful Screen Unlock tool? No worries as Dr.Fone is here to help you. Download it and start a seamless unlock experience!
Also read:
- [New] 2024 Approved Directly Connect YouTube Tunes to iMovie Seamlessly
- Conquering Heat Management: The Ultimate Guide to Thermalright's Phantom Spirit Evo 120 Edition
- Exclusive Insights: Apple's Next Move with a Secure Operating System for AI & Data Center Mastery - Unveiled Details
- Expert Insights: Corporate Usage of the New Microsoft Surface Pro 8 - A Detailed Review by ZDNet
- Forgot Apple iPhone X Backup Password? Heres What to Do | Dr.fone
- Forgot Locked iPhone 12 Pro Password? Learn the Best Methods To Unlock | Dr.fone
- How to Unlock Apple iPhone 6s Passcode Screen? | Dr.fone
- In 2024, 8 Best Apps for Screen Mirroring Infinix Hot 40i PC | Dr.fone
- In 2024, Forgot iPhone 12 Backup Password? Heres What to Do | Dr.fone
- In 2024, How To Unlock iPhone XS Max Without Passcode? 4 Easy Methods | Dr.fone
- The Art of Engaging Crafting Compelling Reddit Content for 2024
- Transformative Video Techniques for Zoom Mastery for 2024
- Troubleshooting Guide: Fixing Ghostwire: Tokyo's Frequent Disruptions on PC
- USB Compatibility Fixes in Antique Windows Versions
- Title: In 2024, Full Guide to Unlock Apple iPhone 13 Pro with iTunes | Dr.fone
- Author: Amelia
- Created at : 2024-12-10 18:14:05
- Updated at : 2024-12-12 16:17:03
- Link: https://iphone-unlock.techidaily.com/in-2024-full-guide-to-unlock-apple-iphone-13-pro-with-itunes-drfone-by-drfone-ios/
- License: This work is licensed under CC BY-NC-SA 4.0.