In 2024, Full Guide to Unlock Apple iPhone 8 Plus with iTunes | Dr.fone
Full Guide to Unlock Apple iPhone 8 Plus with iTunes
With such countless passwords, forgetting passwords on occasion isn’t surprising. What are your possibilities for iTunes unlock phone if you run over such circumstances and lose your password? Certainly, when this question springs up, you must not get terrified. We are here to direct you through the process of fixing this issue.
Losing a passcode is entirely normal and can happen to anyone. So, if you are also among the lot, we will elaborate on how to unlock iPhone with iTunes. After thorough research, our experts have laid out some essential unlocking methods for our readers. So, if you need to get things straight, read this detailed guide to go over your issue.
Part 1: Why Was My iPhone Disabled?
Using a lock screen passcode to secure your iDevice is an excellent way. However, it can become troublesome when you forget the key to your phone. Moreover, you may get stuck even if your screen breaks. On the other hand, someone may take your phone and type a few incorrect passcodes.
If your screen displays “iPhone disabled,” the most probable reason is an excess of wrong passcode attempts. However, this can sometimes occur without you understanding if the phone is in your pocket.
It would help if you erased your Apple iPhone 8 Plus to eliminate the lock and passcode, then re-sync it with iTunes. Then, you can restore your phone from an iCloud or an iTunes backup, but if you have never used a backup on your phone, your phone will have nothing. This guide illustrates how to unlock disabled iPhone with iTunes.
Part 2: How to Unlock iPhone with iTunes
At first, iTunes was only a media software used to play, download and see sound and video documents. Later in 2011, it became a valuable tool to support information and adjust it across numerous devices.
It added the ‘Restore’ option that can assist clients with unlocking their iPhones when they forget their passcode.
In any case, one has to know that iTunes is not an expert unlocking tool. Apple seldom updates iTunes, and its last update was long ago. Consequently, it has numerous tech bugs. As a result, the unlocking process using iTunes takes a lot of time. During the process, you may experience different error codes like 3004, 1100, 3194, 4000, and 4013. That makes it a tedious process.
Requirements for Windows PC:
- For iTunes unlock phone, your PC should have installed Windows 8 or later and the most recent iTunes variant.
Requirements for Mac:
- Open the Finder window if you have macOS Catalina or a more recent one.
- Open the most current version of iTunes using macOS Mojave or older.
- You must have a USB connector.
Steps (For Windows)
Step 1. Connect the locked Apple iPhone 8 Plus to the PC
Connect your locked Apple iPhone 8 Plus to your PC through a lightning or USB connector. Open iTunes on Windows PC.
Step 2. Put your Apple iPhone 8 Plus in recovery mode
To enter a Recovery Mode, press a combination of buttons on your Apple iPhone 8 Plus. Doing such, you will see a recovery mode screen on your Apple iPhone 8 Plus. To place the Apple iPhone 8 Plus in Recovery mode, follow these:
- iPhone 8 or above (second and third generation): Press and release the volume (+) button. Press and release the volume (-) button. Hold power/side button until seeing the recovery mode on your screen.
- iPhone 7 and 7 Plus: Press the top (or side) and volume down buttons simultaneously until the recovery screen shows up.
- iPhone SE (first generation) and iPhone 6S: Hold the home button and the power/side button simultaneously until the recovery mode screen shows up.
Note: If you see the passcode screen, switch off your Apple iPhone 8 Plus and do the process again until you see the Recovery mode screen.
Step 3. Restore your Apple iPhone 8 Plus
As the recovery Mode screen shows up on the iPhone, you will find your Apple iPhone 8 Plus on iTunes unlock phone screen. Then, a box shows up with a message saying there is an iPhone issue. It will expect you to update or restore your phone. So, click on Restore.
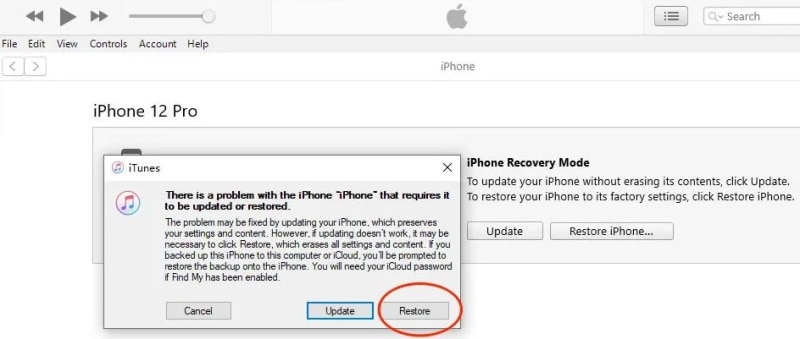
Step 4. It then asks you to confirm whether you are sure you need to restore the Apple iPhone 8 Plus to its default factory state. It does so because your media and data will be all erased. Then, click on Restore and Update.
Step 5. Then, “iPhone Software Update” may spring up. Click Next, and afterwards, click Agree. iTunes will begin downloading the software and restore your Apple iPhone 8 Plus when the download is finished.
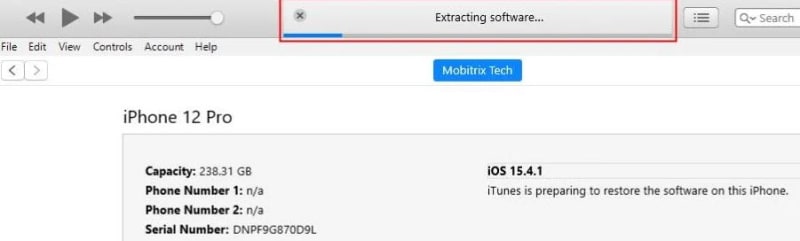
When the “iPhone software update” is downloaded, iTunes will show that it will erase your Apple iPhone 8 Plus and restore it to iOS 15.4.1. Then click on Restore.
The above bar will show “Extracting software… “. It implies iOS 15.4.1 iTunes is planning to restore the software on this iPhone.
Step 6. Your Apple iPhone 8 Plus will show the restore progress bar with the white apple logo. The length of the process relies upon how much data is on your cell phone. Generally, it takes 20 to 120 minutes. When done, your Apple iPhone 8 Plus will restart naturally. Furthermore, after your Apple iPhone 8 Plus restarts, you can reset your Apple iPhone 8 Plus. For example, you can make a new passcode.
Part 3: Unlocking iPhone without iTunes
1. Unlock it with Find My in iCloud
Find My is a famous element in Apple devices that allows you to find your lost phone through Maps. The component has been updated from that point forward, and presently it can be utilized to erase your Apple iPhone 8 Plus. Additionally, you can use it to erase your information without a passcode.
Steps to Unlock:
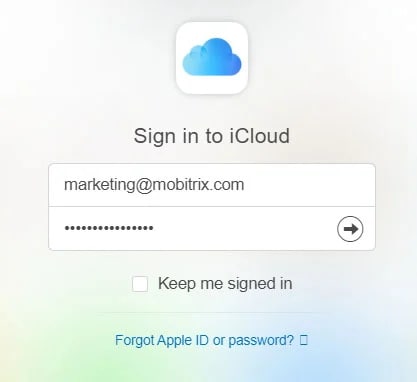
Step 1. Open iCloud.com on a mobile or internet browser.
Step 2. Enter your Apple ID and password as inquired.
Step 3. After signing in effectively, click on Find My and enter your Apple ID and password. Click on Sign In.
Pick your locked gadget under the “All Devices” area.

Step 4. Click on ‘Erase iPhone’. Click on ‘Erase’ again.
Step 5. Enter the Apple ID password to proceed.
Step 6. A check code will be sent to unlock your locked gadget. Enter the code to proceed.
Step 7. Presently, enter your number. Then, click Next and then Done.
Step 8. The iCloud will effectively begin the erase, and you can see the Apple sign with a white advancement bar noticeable on your locked iPhone. After an effective erase process, your Apple iPhone 8 Plus will restart.
Step 9. Swipe up on the Apple iPhone 8 Plus screen to begin once more.
Step 10. iPhone will show that it is locked to the owner. You have to sign in with your Apple ID again, enter the password, and tap on Next. You will currently be enabled to make your new passcode.
2. Dr.Fone-Screen Unlock
If you are searching for an elective way to unlock your Apple iPhone 8 Plus with iTunes, you can pick Wondershare Dr.Fone-Screen Unlock.
This software is an ideal iTunes elective that doesn’t need a passcode to unlock the iPhone. Whatever the situation, Dr.Fone can determine the issue in no time. It can eliminate Face ID, Touch ID, or a 4 to 6-digit passcode in no time. Moreover, it works with almost any iOS version at the moment. Here’s the alternate way to iTunes unlock phone:
Step 1. Connect your iDevice to the PC
From the Dr.Fone program on your PC, select “Screen Unlock” the tool.

Then use a USB connector to connect your iOS gadget to the PC. Then, click the “Unlock iOS Screen” option on your screen.

Step 2. Boot your iDevice in Recovery/DFU Mode
Before deleting the Apple iPhone 8 Plus screen, it is necessary to boot it in Recovery/DFU. You can follow the steps on your screen to do so. Moreover, the Recovery mode is the suggested way for your situation. However, you can use the DFU mode if this doesn’t work.

Step 3. Confirm Phone Model
After turning the DFU mode on, the program will show your phone information. In addition, it will show its model and software version. You can choose the correct data from the dropdown menu if it isn’t accurate. Then, it is time to download the firmware required for your phone model.

Step 4. Remove the Lock
After downloading the firmware, tap Unlock Now to begin the unlocking process.

Doing so will unlock your Apple iPhone 8 Plus within no time. However, kindly note this unlocking process will likewise wipe your Apple iPhone 8 Plus’s user data. Indeed, each solution removes your data. Therefore, you must be careful enough to back up your files before doing this process.
The Bottom Line
We hope you found out about how to unlock iPhone with iTunes. We likewise discussed what to do when you need an alternate method to iTunes. We know that using iTunes can be somewhat complicated; hence, the other options can help you a ton. However, we strongly suggest Dr.Fone-Screen Unlock for a more refined unlocking process.
How To Unlock Apple iPhone 8 Plus Without Swiping Up? 6 Ways
Part 1: What’s Swipe Up To Unlock on iPhone?
The Swipe Up Unlock function has been a fundamental aspect of iPhone functionality for a long time. It enables swift access to your phone by swiping upward from the screen’s bottom. This gesture grants entry to all your applications and data on your Apple iPhone 8 Plus. It was initially introduced to replace the physical Home button. However, it significantly simplified the user experience with iPhones.
It streamlined various tasks without the need for excessive button pressing. Moreover, its simplicity and speed became vital in how individuals utilized their iPhones. Yet, as preferences evolve, not everyone finds the exclusive Swipe Up Unlock feature appealing. Hence, exploring alternative methods to unlock your Apple iPhone 8 Plus is advisable.
Part 2: Why Do You Need To Swipe Up to Unlock on iPhone?
Swipe up to unlock the iPhone holds significant importance in its user interface and accessibility. This intuitive gesture serves as the primary means of gaining access to the Apple iPhone 8 Plus device. Here are several reasons why the Swipe Up to Unlock iPhone feature has been a cornerstone:
1. Simplicity and Ease of Use
The swipe gesture replaced the physical Home button, simplifying the unlocking process. Users could effortlessly swipe up from the bottom of the screen. It eliminates the need for pressing multiple buttons to access their devices.
2. Streamlined Navigation
Beyond unlocking the iPhone, the swipe gesture also allowed for quick navigation to the home screen. This streamlined access enabled users to jump straight into their apps, messages, or other functions.
3. Visual Aesthetics and User Experience
Apple’s design philosophy often revolves around clean, intuitive interfaces. The swipe up to unlock gesture aligns smoothly with this philosophy. It contributes to a visually appealing and user-friendly experience.
4. Security and Privacy
The gesture served as a security measure, preventing accidental or unauthorized access to the iPhone. Moreover, users can confidently rely on this unlocking method to safeguard their personal data.
Part 3: 6 Common Ways To Unlock iPhone Without Swiping Up
For an extended period, the primary method to unlock an iPhone involved swiping up. Nonetheless, if you wish to explore alternative methods, it’s entirely feasible. Various methods have emerged over time to open the Apple iPhone 8 Plus without swiping up.
Method 1: Unlock iPhone without Swiping Up with Enable Back Tap
With the debut of iOS 14, Apple unveiled an innovative feature called Back Tap. It provides users with a method to engage with their iPhones by tapping the Apple iPhone 8 Plus device’s rear surface. This innovative functionality can be configured to perform various actions. It includes unlocking the phone without a swiping-up gesture. Follow these steps to set up and use the Back Tap feature for unlocking your Apple iPhone 8 Plus:
Step 1. To start, access the “Settings” on your iOS device. Once there, scroll down until you locate the “Accessibility” option and tap on it. On the following screen, select “Touch” to access Touch settings under the “Physical and Motor” section.

Step 2. On the following screen, scroll down to the bottom and press “Back Tap.” Now, either choose “Double Tap” or “Triple Tap” and select “Lock Screen” from the options under the “System” section.

Method 2: Unlock iPhone Without Swiping Up Using iPhone Screen Unlocker: Dr.Fone - Screen Unlock
If you’ve forgotten the passcode for your Apple iPhone 8 Plus and are unable to access it anymore, there is no need to panic. We have the perfect tool for you that can unlock any lock on your screen in a few moments. The tool we are talking about is Wondershare Dr.Fone - Screen Unlock (iOS) , an industry leader in smartphones. Dr.Fone, a pioneering tool for iOS lock screen removal, assists in unlocking various iPhone/iPad/iPod touch lock screens.
Dr.Fone - Screen Unlock (iOS)
Unlock iPhone Without Swiping Up!
- Simple, click-through, process.
- Unlock screen passwords from all iPhones and iPads.
- No tech knowledge is required, everybody can handle it.
- Supports iPhone 15 /iPhone 14 /iPhone 13, iPhone 12, … and the latest iOS version fully!


4,395,218 people have downloaded it
It can handle 4-digit / 6-digit passcodes, custom numeric codes, alphanumeric passcodes, Face ID, Touch ID, Screen Time Passcodes, and more within minutes. Wondershare Dr.Fone also offers a swift and simple iCloud activation lock removal feature within its iPhone unlocking capabilities.
Key Features of Wondershare Dr.Fone
- Capable of bypassing Mobile Device Management (MDM) and Screen Time restrictions without causing any data loss.
- Compatible with iOS 17/iPadOS 17 and iPhone 15, ensuring its functionality with the latest Apple OS.
- Offers a simple 3-step procedure, making it accessible even for users without technical expertise.
Steps To Unlock iPhone Without Swiping Up Using Wondershare Dr.Fone
Here is how to open your Apple iPhone 8 Plus without swiping up with the help of Wondershare Dr.Fone:
Step 1: Navigate to Unlock iOS Screen
Download and install Wondershare Dr.Fone on your computer. Go to “Toolbox,” tap “Screen Unlock,” and finally choose “iOS” to access the screen unlock tools. Once the window appears, choose the “Unlock iOS Screen” button to proceed with unlocking your iOS device’s screen. In the following screen, click “Start” to begin the process of unlocking your iOS device.
Step 2: Initiate the iDevice into Recovery Mode
After this step, enter Recovery Mode on your iDevice by following the specific on-screen instructions. Once your iDevice is in Recovery Mode, the system automatically identifies and displays the “Device Model.” You can make adjustments to the model if necessary and choose the “System Version” as per your needs. When finished, click on “Start” to initiate the unlocking process for your device’s screen.
Step 3: Successfully Unlock Your Locked iPhone
The screen will showcase the download progress of the iOS firmware on the platform. Once the iOS firmware download is completed, it undergoes verification. Proceed by selecting the “Unlock Now” button to initiate the unlocking process. A prompt window will appear, requesting confirmation for the process. Enter the necessary code and tap on “Unlock” to proceed. Upon successful unlocking of the iDevice, click “Done” to complete the process.

Method 3: Unlock the Apple iPhone 8 Plus Without Swiping Up via Touch ID/Face ID
Apple’s advanced biometric authentication systems, Touch ID and Face ID, are also reliable options. These offer smooth and secure methods to unlock the Apple iPhone 8 Plus 11 without swiping up. The following are the models that support Touch ID and Face ID:
Models with Touch ID
- iPhone SE (2022)
- iPhone SE (2020)
- iPhone SE (2016)
- iPhone 8 Plus
- iPhone 8
- iPhone 7 Plus
- iPhone 7
- iPhone 6s Plus
- iPhone 6s
- iPhone 6 Plus
- iPhone 6
- iPhone 5s
Models with Face ID
- iPhone 15 Pro Max
- iPhone 15 Pro
- iPhone 15 Plus
- iPhone 15
- iPhone 14 Pro Max
- iPhone 14 Pro
- iPhone 14 Plus
- iPhone 14
- iPhone 13 Pro Max
- iPhone 13 Pro
- iPhone 13 mini
- iPhone 13
- iPhone 12 Pro Max
- iPhone 12 Pro
- iPhone 12 mini
- iPhone 12
- iPhone 11 Pro Max
- iPhone 11 Pro
- iPhone 11
- iPhone XS Max
- iPhone XS
- iPhone XR
- iPhone X
Method 4: Unlock Your Apple iPhone 8 Plus Without Swiping Up via AutoUnlockX
AutoUnlockX is a tweak designed for jailbroken iPhones. It enhances the Apple iPhone 8 Plus device’s unlocking experience by automatically bypassing the lock screen. That is when certain conditions are met. Jailbreaking involves bypassing the software restrictions imposed by Apple. Here are the steps to iPhone 11 unlock screen without swiping:
Step 1. Begin by adding an external repository like Sileo or Cydia, which will serve as an emulator. Remember, it won’t be automatically added to your applications; you’ll need to do this manually. So, download the repository from the SparkDev website (it’s not available on the App Store). Head to the “Tweaks” tab, find “AutoUnlockX,” and download it to your device.
Step 2. Following this, go to “Sources” in your Apple iPhone 8 Plus’s Settings, select “Edit,” and manually add the external repo to Cydia or Sileo. Open Sileo or Cydia and navigate to the “Search” page. In the search bar, type “AutoUnlockX.” Once the tweak appears, select it, and then tap “Get (Sileo)” or “Install (Cydia).”
Step 3. Confirm the selected repo by tapping the “Confirm” option and allow the tweak to install. Once installed, tap “Restart SpringBoard” to complete the download. After your Apple iPhone 8 Plus resprings, proceed to enable AutoUnlockX.
Step 4. Open Settings, tap on “App,” and then select “AutoUnlockX.” Toggle on “Enable Auto Unlock.” Customize other settings as desired by tapping on them to turn them on or off.
Step 5. When finished, tap the “Respring” option at the bottom to apply your changes. At last, unlock your Apple iPhone 8 Plus using your Face ID effortlessly.
Method 5: Unlock iPhone Without Swiping Up via Voice Control
Utilizing Voice Control to unlock your Apple iPhone 8 Plus offers a hands-free approach to accessing your device. It is especially helpful for individuals with accessibility needs. There are situations where manual interaction might be challenging. Here’s a guide on how to set up and use “Voice Control” to unlock your Apple iPhone 8 Plus:
Step 1. Open the Settings app on your Apple iPhone 8 Plus and scroll down to tap “Accessibility.” On the following screen, press “Voice Control” to proceed further.

Step 2. To set up voice control, you need to ensure that the “Voice Control” option is toggled on. After activating Voice Control, use a voice command to unlock your device.

Method 6: Unlock iPhone Without Swiping Up with Switch Control
Utilizing Switch Control is an excellent accessibility feature on iOS devices. It allows users to interact with their iPhones using adaptive switches or the Apple iPhone 8 Plus device’s screen itself. Moreover, it can provide an alternative way to navigate the Apple iPhone 8 Plus and access the Home screen. You no longer have to rely solely on the conventional swipe gesture. Here is how you can set up switch control to iPhone swipe to unlock:
Step 1. Access your Apple iPhone 8 Plus’s Settings, then tap on “Accessibility.” Now find and select “Switch Control,” and within it, navigate to “Switches.” Now, tap “Add New Switch” and choose “Camera.”

Step 2. Set Left Head Movement and Right Head Movement separately to “Home.” This action will lock the screen when tilting your head left or right. Now go back to “Recipes” in Switch Control, select “Edit,” and delete all existing recipes.

Step 3. Set “Scanning Style” to “Single Switch Step Scanning” and adjust “Dwell Time” to the shortest duration. Then, turn off the remaining settings under Switch Control.

Step 4. Save your switch, return to Accessibility Settings, and locate “Accessibility Shortcut.” Now, set triple-clicking the side button to activate “Switch Control.” On the home screen, triple-click the Side button, as previously set, to activate the switch on your Apple iPhone 8 Plus. Now, lock the Apple iPhone 8 Plus screen and then wake the Apple iPhone 8 Plus device without looking at it.

Conclusion
To conclude, we have explored different ways to unlock iPhones without swiping up beyond just using the usual swipe-up method. We’ve talked about using your fingerprint or face to unlock, using voice commands or special controls. The swipe-up gesture on iPhones is great, but these other methods give you more options.
While these methods are helpful, there’s a software called Wondershare Dr.Fone that’s particularly useful for iPhone issues. It does things like recovering data, fixing problems with your phone, and unlocking it when you can’t get in. Dr.Fone has a feature called “Screen Unlock” that was specifically made to help with different ways of unlocking iPhones.
Learn How To Lock Stolen Your Apple iPhone 8 Plus Properly
When it comes to security in smartphones, Apple stands at the forefront. The Activation Lock is a robust barrier to preventing unauthorized access and device theft. Losing your Apple iPhone 8 Plus can be a disturbing event, as accidents are inevitable. Taking prompt action to stop unauthorized data access becomes important. This guide offers a step-by-step approach to how to lock a stolen iPhone.

Part 1. Major Threats To Consider When iPhone Is Stolen
A lost iPhone can become susceptible to a myriad of threats. It could compromise your privacy, security, and personal data. Here are the reasons why learning how to lock your Apple iPhone 8 Plus when lost is essential:
- Unauthorized Access to Personal Data: Thieves can exploit an unsecured Apple iPhone 8 Plus to gain unauthorized access to personal information. These include contacts, messages, emails, and photos.
- **Financial Exploitation:**With access to your Apple iPhone 8 Plus, thieves may attempt to get stored payment methods.
- Identity Theft: Stolen iPhones often contain a wealth of sensitive information. This makes them a prime target for identity theft.
- Compromised Social Media Accounts: Using social media applications on your smartphone carries potential risks in the event of device loss. Unauthorized access to your social media accounts can lead to many problems, including misinformation and compromised privacy.
Part 2. Use Find My To Locate Stolen iPhone
On learning about how do I lock my stolen iPhone, Apple’s robust Find My feature emerges as a beacon of hope. It uses a combination of GPS, Wi-Fi, and Bluetooth signals to locate your Apple iPhone 8 Plus accurately.

Key Scenarios Where Find My Works
Find My can be a source to track stolen iPhones, but certain scenarios are associated with its operations. To know more about these scenarios, this section continues the discussion further below:
- iPhone Turned On:Find My can provide real-time location tracking when your stolen iPhone is still powered on and connected to the internet.
- **iPhone Turned Off or In Airplane Mode:**The last known location before the Apple iPhone 8 Plus device was powered down or put in Airplane Mode is accessible, offering a starting point for recovery efforts.
- **Offline Finding with Bluetooth:**The Find My service leverages Bluetooth technology to create a vast network of Apple devices. With these, it can securely help locate your Apple iPhone 8 Plus, even offline.
- **Activation Lock Integration:**This service is also integrated with Activation Lock, adding an extra layer of security. The Activation Lock remains active if a thief attempts to erase your device.
How To Use Find My To Locate Your Stolen iPhone
- Step 1. Access the Find My app on a trusted device and open it. If you can’t access one, use the iCloud website to access Find My service.

- Step 2. After logging in, select the lost device, and you can see its last recorded location on the map.

Part 3. Using Lost Mode To Lock Stolen iPhone
Lost Mode locks the Apple iPhone 8 Plus device and allows users to showcase a personalized message on the screen. This can help greatly in the safe return of the smartphone. The following are the simple steps you need to follow to learn how to block stolen iPhone with Lost Mode:
Activating Lost Mode Using Your Smartphone
- Step 1. Within the Find My app, tap “Devices” from the bottom toolbar and select your lost device. Now, scroll down to “Mark As Lost” and tap “Activate.”

- Step 2. You will now be given a summary of the Lost Mode; tap “Continue” to proceed. On the following screen, add a phone number, tap “Next,” and add a message that will be displayed on the lost device.

- Step 3. After adding a message, tap “Next” on the following screen and press “Activate” from the top right corner.

Activating Lost Mode Using iCloud Website
- Step 1. Access the iCloud website via your computer’s web browser. Sign in using your Apple ID, continue to click the “Grid” icon in the top right corner, and select “Find My.”

- Step 2. In Find My, add your Apple ID password again to access “All Devices.” Now, choose the lost device from the list of all devices in the top left corner. Then, click “Mark As Lost,” and the following pop-up Lost Mode prompt, tap “Next.”

- Step 3. Now go on to add your phone number and tap “Next.” Follow it by providing the message you want to display and click “Activate” to enable Lost Mode.

Part 4. Can’t Find Stolen Phone? Erase iPhone Completely
When efforts to locate a stolen iPhone fail, the need to protect sensitive data intensifies. As a result, the option to erase the Apple iPhone 8 Plus device becomes a crucial step instead of how to lock the Apple iPhone 8 Plus when lost. Here’s how to protect against the potential misuse of your information by erasing your device via Find My:
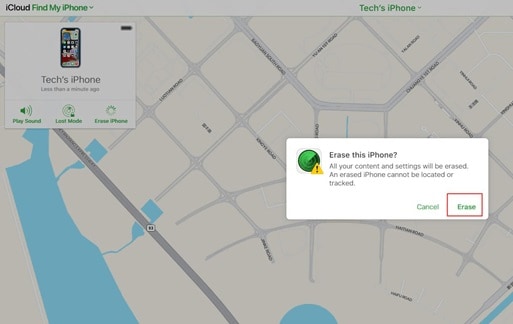
- Step 1. After accessing Find My service, choose the lost device from the list and click “Erase This Device.”

- Step 2. Select “Continue” on the erased iPhone screen for the Find My app. Once you’ve added the number, press “Erase” in the top right corner and follow the on-screen instructions to finish the procedure.

- Step 3. If using the iCloud website, tap “Erase This Device” and click “Next” on the upcoming prompt. You will be asked to enter the Apple ID password, after which you can use the on-screen guidelines to finish the process.

Part 5. Other Things To Do iPhone Is Stolen
There are additional measures you can take to enhance your overall security apart from understanding how do I lock my stolen iPhone. The following are some options you should utilize in case of device loss:
To Do List #1. Report to Police
If your Apple iPhone 8 Plus is stolen, it is crucial to immediately inform your local law enforcement agency. It facilitates the recovery process and assists in combatting criminal activities. Provide essential details about your Apple iPhone 8 Plus, such as the Model, color, and IMEI number. Share information about your efforts to locate the stolen iPhone using Find My.

To Do List #2. Make an Insurance Claim With AppleCare
You can claim insurance if you have AppleCare+ coverage for your Apple iPhone 8 Plus. AppleCare+ with Theft and Loss for iPhone includes protection against theft and loss incidents. It offers up to two incidents of such coverage every 12 months.
To qualify for theft or loss coverage, it is necessary for Find My to be enabled on your device at the time it goes missing. Moreover, it should remain enabled alongside Lost Mode throughout the claims process.

To Do List #3. Remove iPhone From Trusted Devices (2FA)
After your Apple iPhone 8 Plus is stolen, it becomes essential to bolster the security of your online accounts. It is particularly essential for those safeguarded by Two-Factor Authentication (2FA), which needs to be removed:
From iOS Device Settings
- Step 1. Access Settings on an iOS device logged in with the same Apple ID as the lost one. Here, tap on your name on the following screen and scroll down.

- Step 2. Simply select the misplaced device, and in the subsequent interface, press “Remove from Account” to eliminate it from the list of trusted devices.

From the Apple ID Website
- Step 1. If you cannot reach a secure device, visit the http://appleid.apple.com website and sign in with the identical Apple ID.

- Step 2. Once logged in, click “Devices” from the left side and select the lost device. To remove this device as a trusted device, click “Remove from Account.”

Part 6. Precautions To Take for Avoiding Losing iPhone
Users can proactively adopt specific measures to reduce the likelihood of such an occurrence. The following essential precautions are recommended while learning how to block your Apple iPhone 8 Plus when stolen:
Precaution #1. Enable Find My on Device
Activating Find My increases the likelihood of recovering your device. Take the following steps to enable the Find My feature on your Apple iPhone 8 Plus:
- Step 1. On your iOS device, navigate to “Settings” and tap the Apple ID on the top. Now, scroll down and press “Find My” on the following screen.

- Step 2. Next, tap “Find My iPhone,” on the ensuing window, toggle “Find My iPhone.” This will enable the Find My service on your device.

Precaution #2. Enable Separation Alerts on iPhone
Enabling “Separation Alerts” assists in preventing the loss of your Apple iPhone 8 Plus by alerting you when you distance yourself from it. Follow these steps to enable Separation Alerts on your Apple iPhone 8 Plus:
- Step 1. Navigate to and launch the Find My app on your Apple iPhone 8 Plus. Select the Apple iPhone 8 Plus device from the “Devices” tab for which you want to enable separation alerts.

- Step 2. From the available options, tap “Notify When Left Behind,” and on the following screen, toggle “Notify When Left Behind.” You can also add locations on this screen by tapping “New Location,” for which you don’t want to receive a left-behind notice.

Precaution #3. Enable 2FA on iPhone
Activating Two-Factor Authentication (2FA) enhances the security of your Apple iPhone 8 Plus. The mandatory secondary verification step makes 2FA crucial in securing your accounts. Follow these steps to enable 2FA on your Apple iPhone 8 Plus:
- Step 1. Access the Settings app on your iOS device and tap your name/Apple ID. Find and tap “Sign-In & Security” to proceed further.

- Step 2. On the following screen, tap “Turn On Two-Factor Authentication.” Follow it by tapping “Continue” afterward, and use the on-screen instructions to complete the process.

Bonus Tip. Find Stolen iPhone Back but Locked? Unlock With Wondershare Dr.Fone
Recovering your stolen iPhone successfully can be a joyous event. Yet, the frustration of discovering your device locked due to a forgotten password can be disheartening. Wondershare Dr.Fone - Screen Unlock (iOS) offers a solution to regain access to your device. This robust tool is crafted to help users unlock various iOS screen lock scenarios.
It provides a hassle-free solution for those locked out of their devices. This powerful tool effortlessly removes various lock screens on iPhones and iPads. It can bypass the iCloud activation lock without the need for a password.
Key Features of Wondershare Dr.Fone
- If you are using iTunes for backup but have forgotten the iTunes backup encryption passcode, Dr.Fone can remove it without data loss.
- This tool can remove Apple ID from your Apple iPhone 8 Plus or iPad if you have forgotten its password.
- You can free up your device by removing MDM and carrier locks using Dr.Fone.
Steps To Unlock Your Locked iOS Device Using Wondershare Dr.Fone
Wondershare Dr.Fone is a comprehensive toolkit that addresses many iOS-related issues. It offers a user-friendly solution to unlock your Apple iPhone 8 Plus with the help of the following steps:
- Step 1. Launching Wondershare Dr.Fone and Accessing Toolbox
Once you have installed and launched Wondershare Dr.Fone, access the “Toolbox” tab. Click “Screen Unlock,” and on the following screen, choose “iOS.” Click “Unlock iOS Screen” on the following screen and link your iOS device to the computer.

- Step 2. Entering Recovery Mode and Choosing System Version
The next step requires you to put your device in Recovery Mode, for which you can follow the instructions given on-screen. After your device is in Recovery Mode, Dr.Fone will display its “Model.” Now choose the appropriate “System Version” and click “Start.” Here, Dr.Fone will start downloading the required firmware. Once it is downloaded and verified, tap “Unlock Now.”
- Step 3. Acknowledging Data Loss Warning and Initiating Unlock Process
To show your acknowledgment of the warning, enter the asked code, which is “000000.” Afterward, click “Unlock” to initiate the screen unlocking process. Once the process is complete, tap “Done” to conclude the procedure.
Conclusion
Knowing how to lock stolen iPhones is essential for safeguarding personal and sensitive data. Apple’s Find My empowers users to remotely locate, lock, and erase their lost devices. If you have recovered your stolen device but it is locked, Wondershare Dr.Fone emerges as the top choice to unlock it within minutes.
Tips: Are you searching for a powerful Screen Unlock tool? No worries as Dr.Fone is here to help you. Download it and start a seamless unlock experience!
Also read:
- [New] Android Time-Lapse Perfection Secrets Revealed
- [New] Unveiling the Secret Sauce for Massive TikTok Content Grabs
- 3 Easy Ways to Factory Reset a Locked iPhone 6 Plus Without iTunes | Dr.fone
- Complete Solution for Steam's Blocked Game Files Problem
- Detailed Review of doctorSIM Unlock Service For Apple iPhone 12 Pro | Dr.fone
- Easy Ways to Manage Your Lava Yuva 2 Location Settings | Dr.fone
- How To Remove Flashlight From iPhone 13 Lock Screen | Dr.fone
- How To Remove Passcode From iPhone 15? Complete Guide | Dr.fone
- In 2024, 23 Key Metaverse Implementations Unveiling Future Prospects
- In 2024, How to Delete iCloud Account On iPhone 15 without Password?
- In 2024, How to Remove and Reset Face ID on Apple iPhone 15 Pro | Dr.fone
- In 2024, Is Your iPhone 13 Pro in Security Lockout? Proper Ways To Unlock | Dr.fone
- iPhone Is Disabled? Here Is The Way To Unlock Disabled iPhone SE | Dr.fone
- Murahi Resepsi Windows 11: Langkah-Langkah Kembalinya File Yang Hilap Dan Terhilang Tanpa Biaya Lain Lain
- Step-by-Step Tutorial for Copying DVD Movies Onto Computer with Windows Operating System
- Updated 2024 Approved Vlog Like a Pro 10 Essential Editing Apps for iOS and Android
- Title: In 2024, Full Guide to Unlock Apple iPhone 8 Plus with iTunes | Dr.fone
- Author: Amelia
- Created at : 2025-01-30 16:04:12
- Updated at : 2025-02-01 03:51:20
- Link: https://iphone-unlock.techidaily.com/in-2024-full-guide-to-unlock-apple-iphone-8-plus-with-itunes-drfone-by-drfone-ios/
- License: This work is licensed under CC BY-NC-SA 4.0.