
In 2024, Guide on How To Change Your Apple ID Email Address On iPhone 13 Pro Max | Dr.fone
Guide on How To Change Your Apple ID Email Address On Apple iPhone 13 Pro Max
Your Apple ID email is the key to your digital world with Apple devices. It’s the address Apple recognizes you by, allowing you to access your apps, music, and more. But sometimes, life brings changes, and your Apple ID email may need an update.
This guide will take you through the simple process of changing your Apple ID email address, ensuring it’s easy to understand every step. Explore why you might want to make this change, shedding light on common scenarios where this adjustment can enhance your Apple experience. So dive in and explore!

Part I: Why Change Your Apple ID Email?
Your Apple ID email helps you access your apps, music, and more. But sometimes, you might need to change it for simple reasons. Let’s look at why you might want to change your Apple ID email in easy-to-understand terms.
- Your email address is part of your identity. Changing it to something that better suits you can make your Apple experience more personal.
- If you think someone else knows your old email password, changing it can keep your Apple account safer. A fresh email means a new layer of security.
- Maybe you used an old email you don’t want to use anymore. Changing it lets you keep your personal life separate from your Apple stuff.
- **Email Problems.**If your old email is full of spam or not working well, switching to a new one is a good idea. You’ll get a cleaner and more reliable inbox.
- **Sharing Devices.**If you share Apple devices with someone and want to keep your stuff separate, changing your Apple ID email can help you do that easily.
- Using a more professional email address for your Apple ID can make a better impression when using Apple services for work or business.
These are the simple reasons why you might want to change your Apple ID email. It’s all about making your Apple experience better, safer, and more suited to your needs.
Part II: Step-by-Step Guide: How to Change Apple ID Email
Before you jump into changing your Apple ID email address, there’s an essential step to take. Just like you’d secure your valuables before embarking on a journey, backing up your device before going through the email change process is vital. This step ensures that none of your precious data is lost during the transition.
A. How To Change Your Apple Email Address on Various Devices
Now, let’s explore three different methods of how to change your Apple ID email address, tailored to various user preferences.
Method 1: For Mac Users
If you’re a Mac enthusiast, changing your Apple ID email is straightforward:
- Step 1: Click the Apple logo at the top left corner of your screen.
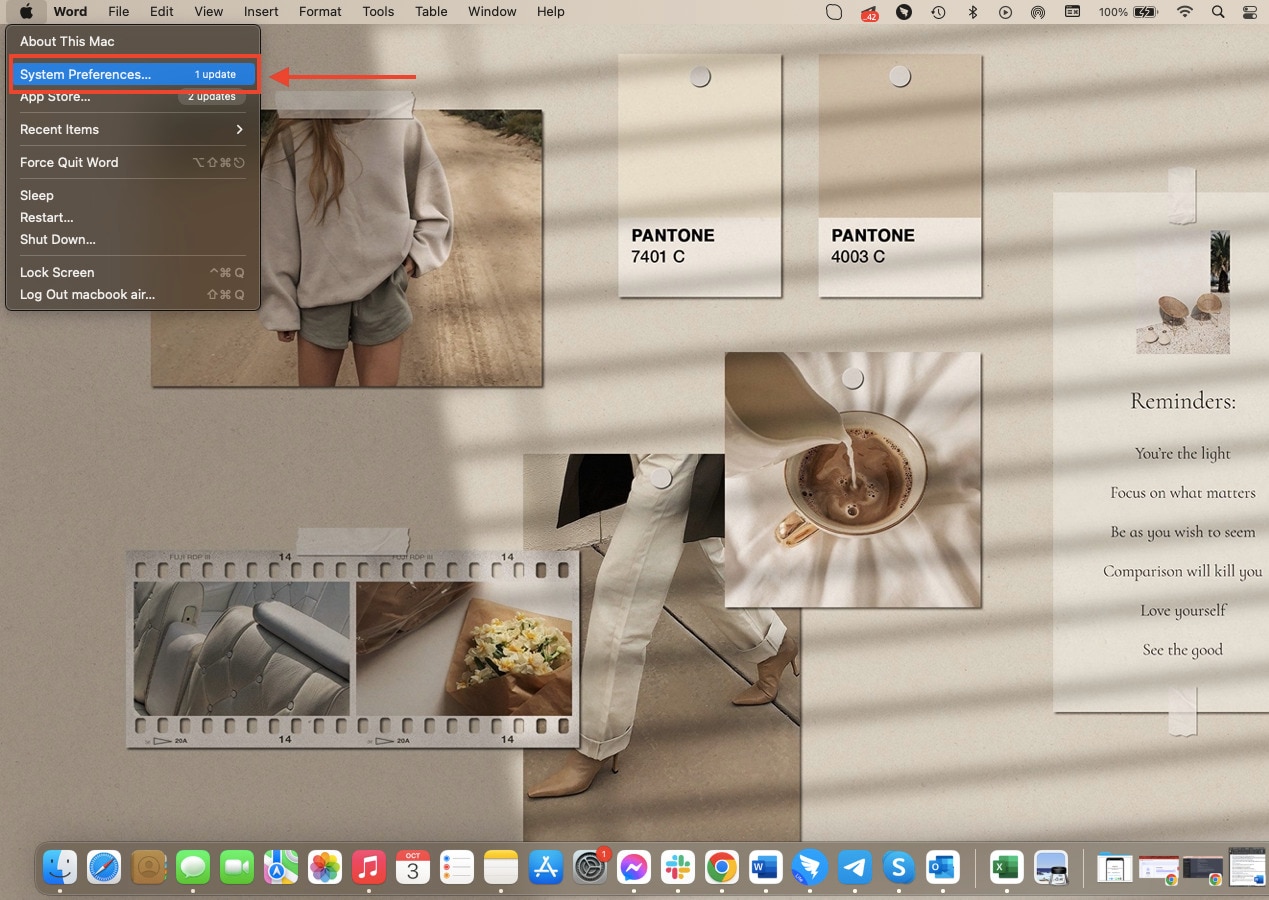
- Step 2: Click System Preferences, and then select Apple ID.
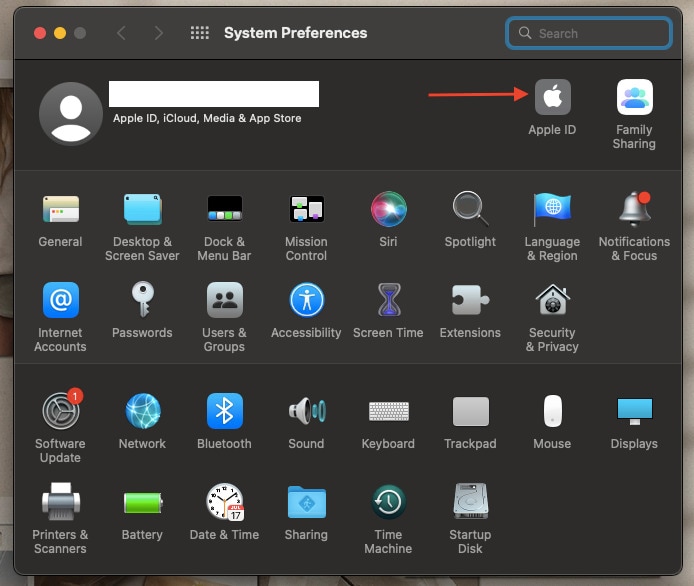
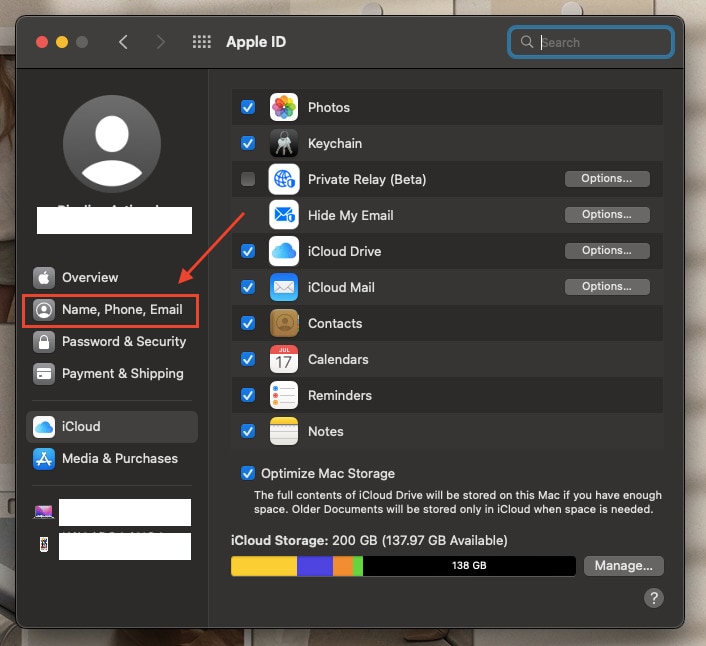
- Step 3: Navigate to the Name, Phone, Email section, then click Edit next to your email address.
- Step 4: Input your new email address, and Apple will send a verification code to it.
- Step 5: Check your new email for the verification code, enter it, and voilà! Your Apple ID email is updated on your Mac.
Method 2: For Mobile Device Users
For those who prefer the convenience of mobile devices:
- Step 1: Open the Settings app on your Apple iPhone 13 Pro Max or iPad, then tap your Apple ID at the top of the screen.
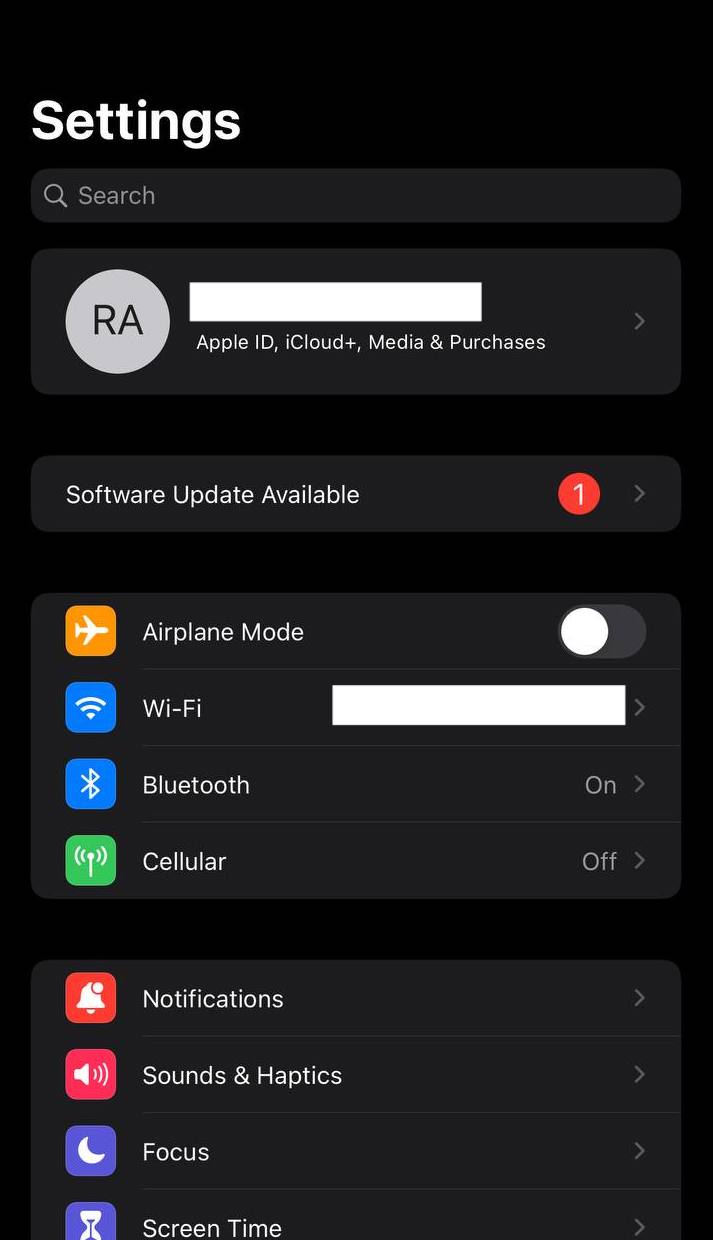
- Step 2: Tap Name, Phone Numbers, Email.
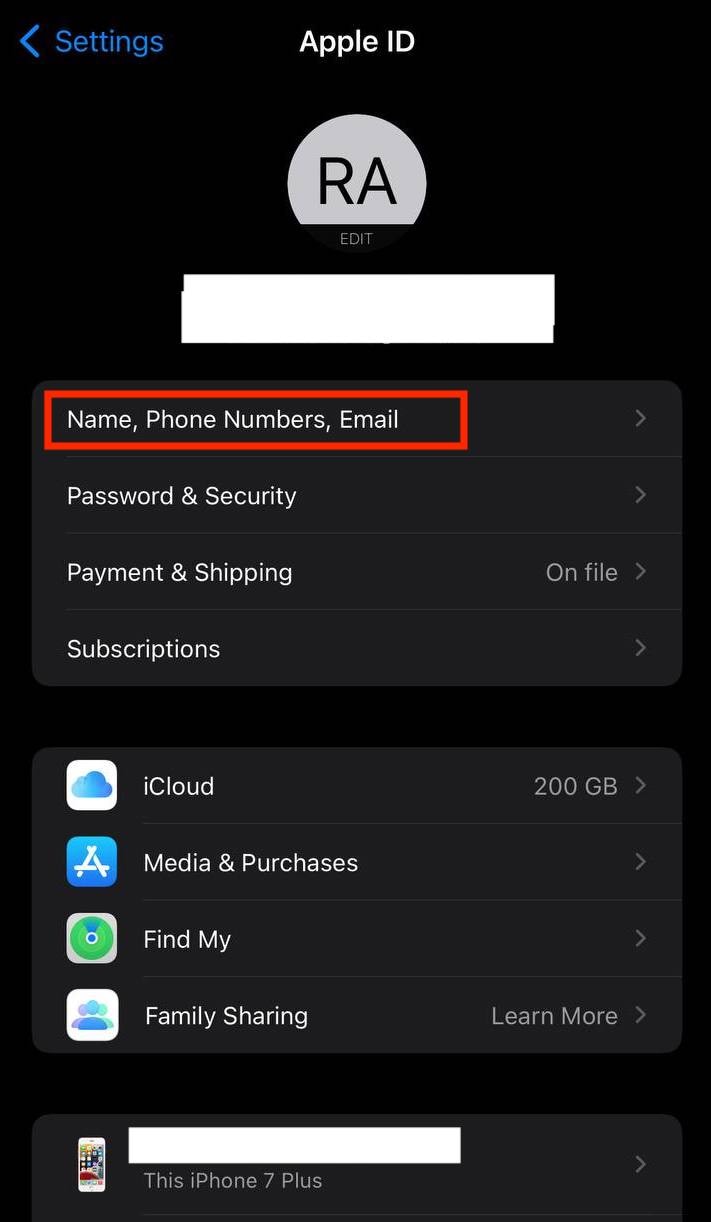
- Step 3: Tap Edit next to your email address, enter your new one, then tap Next.
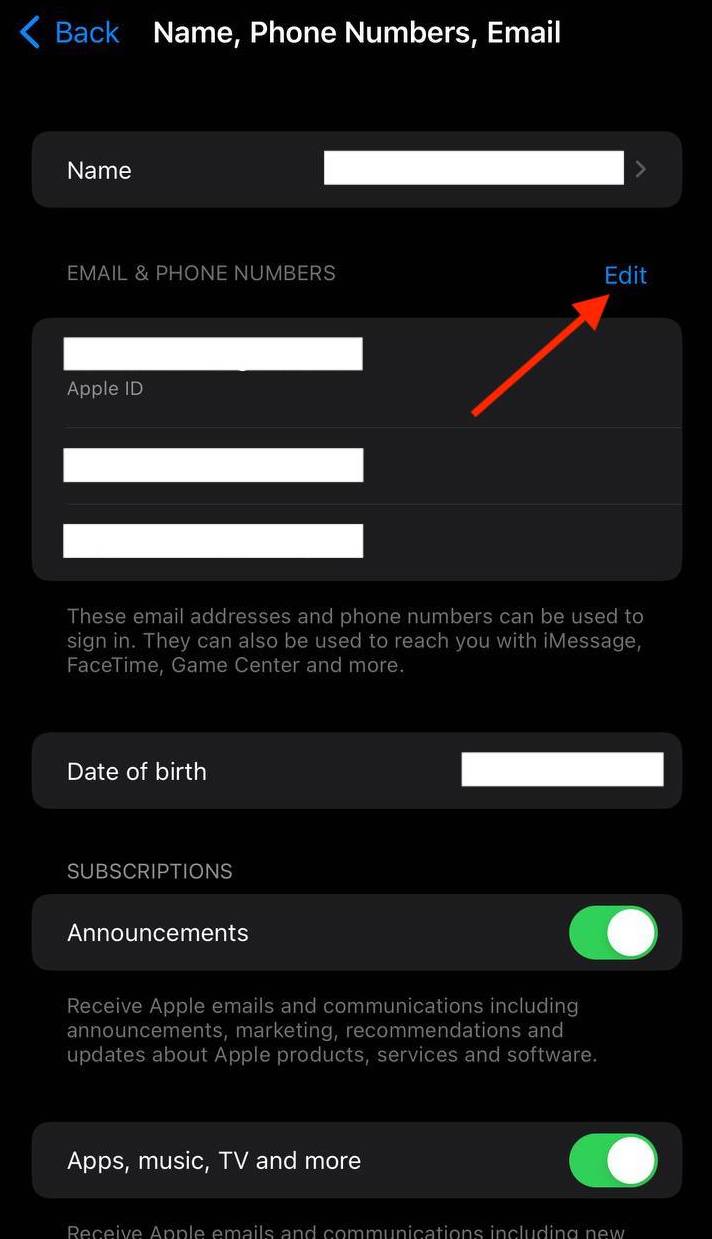
- Step 4: Apple will send a verification code to the new email. Enter it, and your Apple ID email on your mobile device is updated.
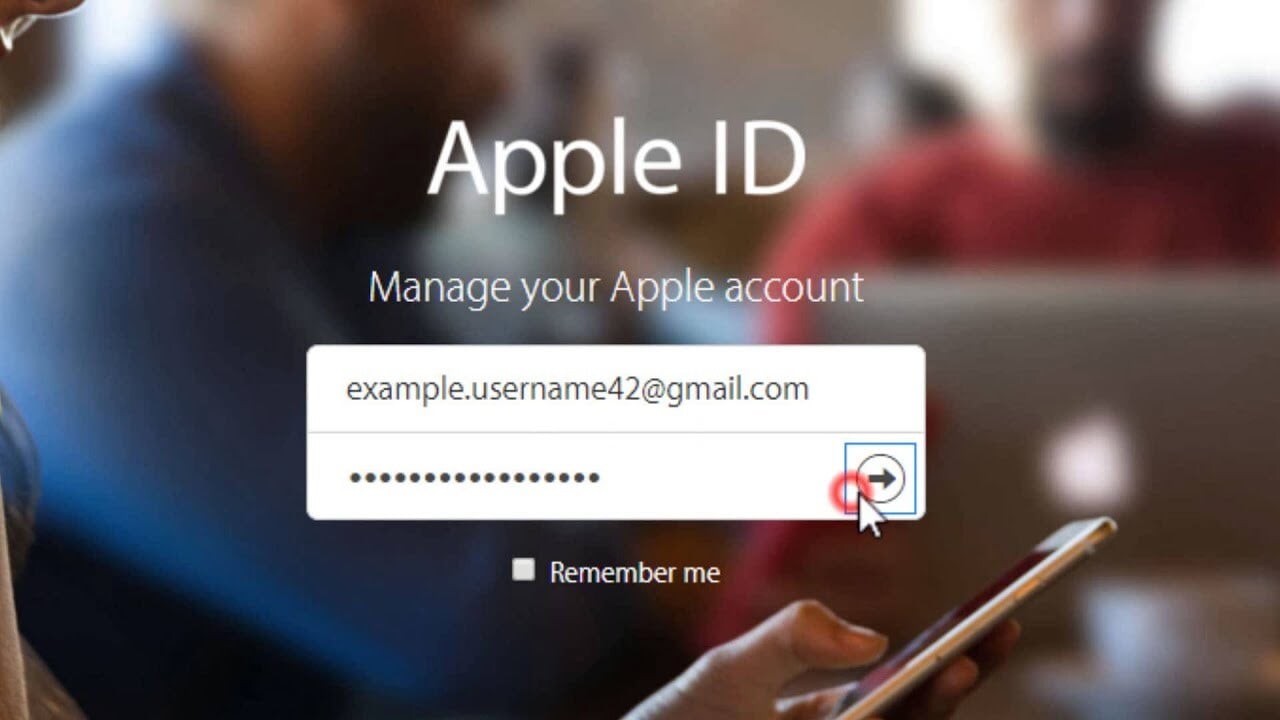
Method 3: For Browser Users
If you prefer the simplicity of a web browser:
- Step 1: Open the web browser your prefer and go to the Apple ID account management page.
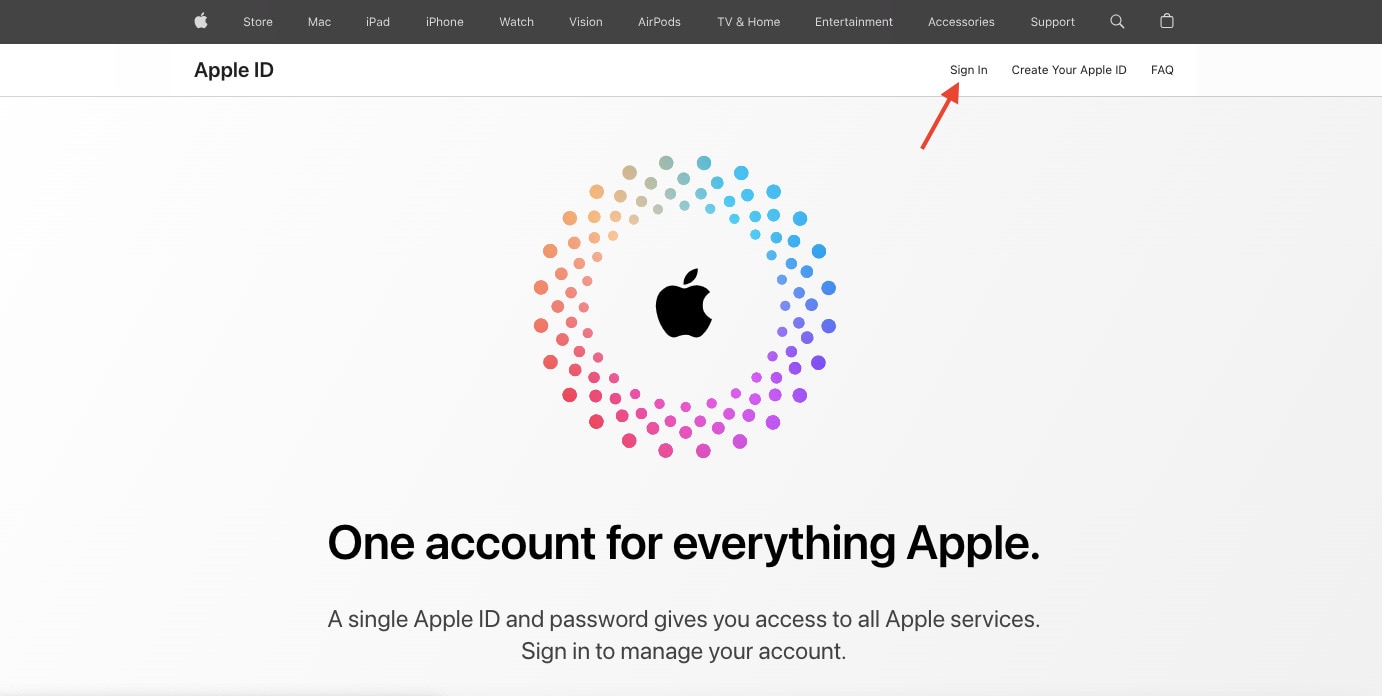
- Step 2: Click Sign In and tap your Email or Phone Number and Password.
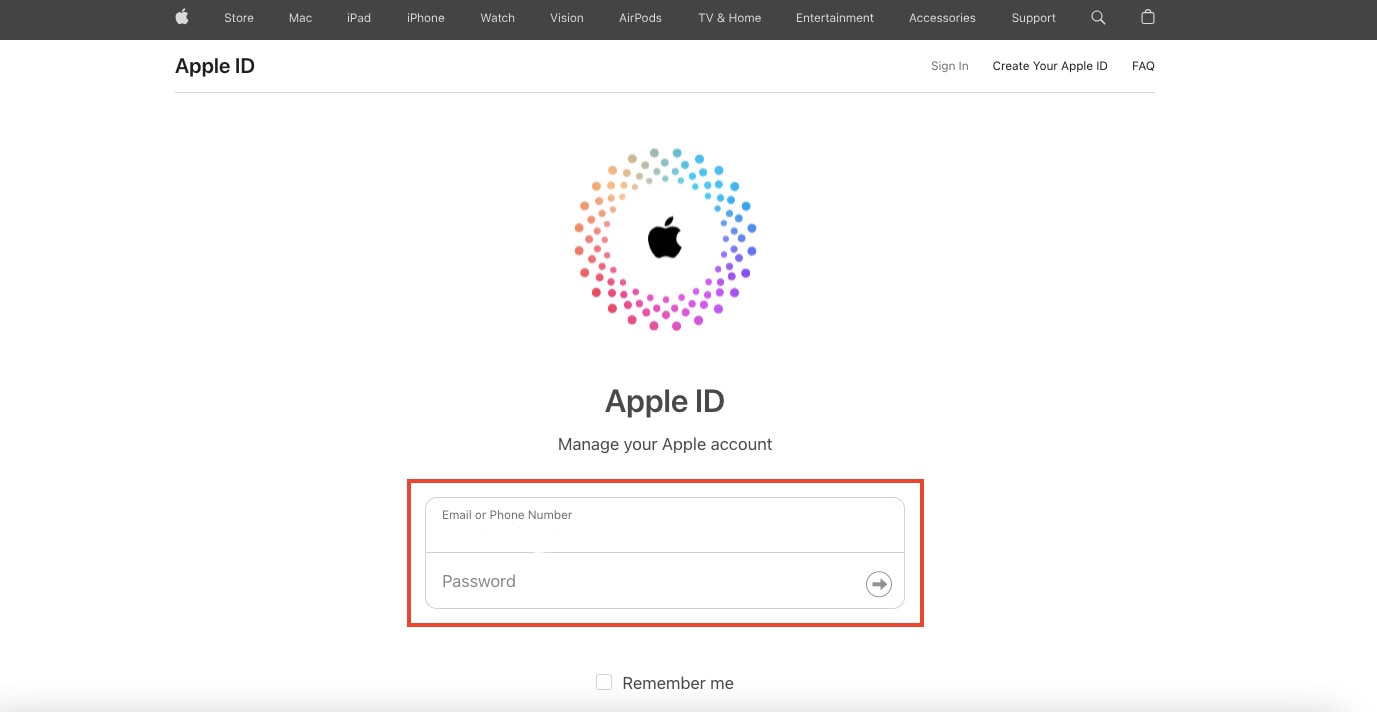
- Step 3: Click Edit next to your email address in the Account section.
- Step 4: Input your new email address and click Continue.
- Step 5: A verification code will be sent to your new email. Enter it to confirm your email change.
B. Updating Your Apple ID
Now that you’ve successfully changed your Apple ID email, it’s crucial to ensure that all your Apple devices are on the same page:
- Step 1: Tap the Settings application on your Apple iPhone 13 Pro Max or iPad.
- Step 2: Go to Update Apple ID Settings below your Apple ID settings.
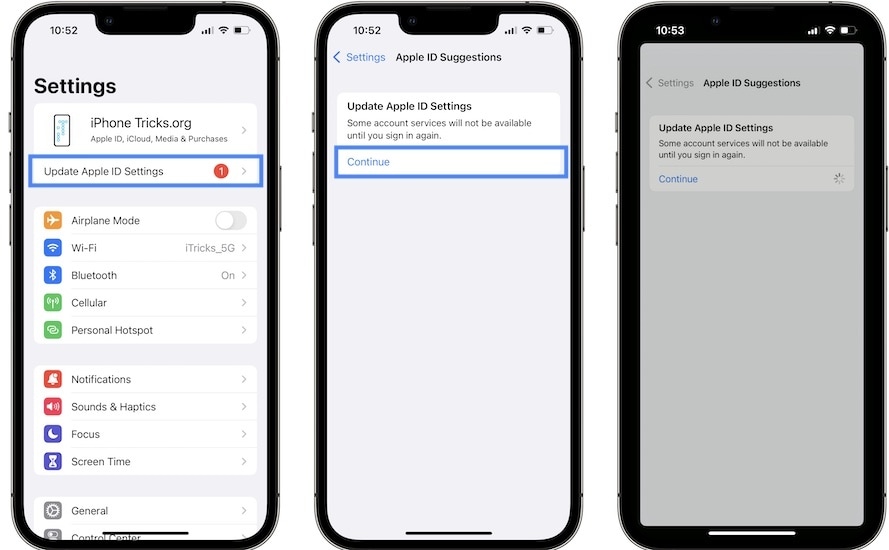
- Step 3: Tap Continue, then wait for a few moments. Your Apple ID will then get updated.
By following these steps, you’ll ensure that all your Apple devices are synced with your updated email address, providing a seamless and consistent Apple experience across all your gadgets. Now, with your new Apple ID email, you’re ready to explore the Apple ecosystem with renewed convenience and security.
Part III: Unlock iOS Screen With Wondershare Dr.Fone - Screen Unlock (iOS)
What if you find yourself in a situation where you want to change your Apple ID email address on your iOS device, but you’re locked out? Don’t worry; Dr.Fone - Screen Unlock (iOS) can rescue you. This handy tool is designed to help you unlock your iOS device, allowing you to change your Apple ID email address smoothly.

Key Features of Dr.Fone - Screen Unlock (iOS)
Check out the key features that Dr.Fone has to offer:
- **User-Friendly Interface.**Fone - Screen Unlock (iOS) is designed to be easy to use, making it accessible for users of all levels of technical expertise.
- It fits a wide range of iOS devices, including iPhones and iPads, ensuring that you can unlock your device no matter which one you have.
- **Multiple Unlock Modes.**Fone offers different unlock modes to cater to various scenarios. Whether you’ve forgotten your passcode, have a disabled device, or are dealing with a locked Apple ID, Dr.Fone has a solution.
- **No Data Loss.**One of the most significant advantages of Dr.Fone is that it unlocks your device without causing any data loss. Your photos, apps, and important information remain intact.
Step-by-Step Guide on Using Dr.Fone - Screen Unlock (iOS)
Outlined below is the step-by-step guide on how to use Dr.Fone – Screen Unlock for iOS devices:
- Step 1: When you’ve finished downloading and installing Wondershare Dr.Fone on your computer, go to Toolbox, then Screen Unlock, and choose iOS to open the tool in a new window.
- Step 2: Begin to pick the Unlock iOS Screen button in the new window to begin unlocking the screen of your iOS device. On the following screen, click the Start button to begin unlocking the iOS device.
Note: Ensure your device’s battery levels are enough before proceeding.

- Step 3: Following that, place your iDevice in Recovery Mode. Follow the on-screen instructions to set your iDevice into mode based on your phone model.
Note: If Recovery Mode does not work, try hitting the Try DFU Mode button at the bottom to access the instructions for putting the iDevice in DFU mode.

- Step 4: After successfully entering your device into Recovery Mode, the platform automatically recognizes the Device Model and shows it in the appropriate section. Modify the model and select the System Version to meet your needs if necessary. After that, select Start to begin unlocking your device’s screen.

- Step 5: The next screen shows the progress of your iOS firmware download. If at any point you decide you’d rather call it quits, hit the Stop button. If the iOS firmware takes a long time to download on your platform, you can copy the download link by clicking the Copy option.

- Step 6: After a successful download, the iOS firmware is checked and shown on the next screen. Select the Unlock Now option again to proceed with the unlocking procedure. A confirmation popup displays, requesting you to confirm the action. Enter the unlock code and press the Unlock button to continue.

- Step 7: You’ll see the unlocking status of your iOS device on the following screen. Don’t forget that keeping the gadget plugged in is necessary to avoid bricking it.
- Step 8: Click the Done button once the iDevice has been unlocked. If you’re still stuck with a locked iPhone, iPad, or iPod, select Try Again to retry the process.

By using Dr.Fone - Screen Unlock (iOS), you can regain access to your iOS device and continue with the process of changing your Apple ID email address hassle-free. It’s a reliable and user-friendly solution that ensures you can enjoy the benefits of the new email address without losing any of your precious data.
You May Also Like:
How to Show Email Password on iPhone and Find It Back
A Detailed Guide to Fix All iPad Email Problems [2023]
How to Fix Email Disappeared from iPhone?
Conclusion
This guide easily explored the process of changing your Apple ID email address. It started by understanding why this change might be necessary and provided straightforward methods for Mac, mobile, and browser users to accomplish it seamlessly.
But what if you’re locked out of your iOS device? Don’t fret; Dr.Fone - Screen Unlock (iOS) is a user-friendly tool that can help you regain access to your device. It ensures a smooth transition to your new email. Unlock new possibilities with Dr.Fone, a reliable companion in managing your iOS device. Explore its features and simplify your Apple journey today!
Things You Should Know When Unlocking Total Wireless Of Apple iPhone 13 Pro Max
Total Wireless is a prominent name when it comes to affordable network carriers. It offers users a wide range of call and data packages. The company also offers smartphones; however, they are carrier-locked. This can become a problem for users who want to switch networks. Users need to learn unlocking methods that seek greater flexibility and control over their phones.
In this article, we go through the essence of unlocking a Total Wireless phone. Our focus is to present a comprehensive overview of the methods and essential details required to unlock your device. It will enable users to make informed decisions and achieve the best possible results.

Part 1. Defining The Total Wireless Phone Terminology
A Total Wireless phone refers to a mobile device that operates on the Total Wireless network. It is a prepaid mobile virtual network operator (MVNO) that uses Verizon’s network infrastructure. These phones are often sold with Total Wireless plans. Moreover, they are optimized to function within its network coverage area. Unlocking a Total Wireless phone can pose challenges due to the Apple iPhone 13 Pro Max device’s association with a specific carrier.
The difficulty level largely depends on factors such as the phone model, contract status, and carrier policies. Unlock Total Wireless iPhone is indeed feasible under specific conditions. Even so, the procedure might not follow a direct path and is subject to variation on various factors. Like its counterparts, Total Wireless presents distinct guidelines and eligibility criteria for phone unlocking.

Part 2. Looking out the Reasons for Unlocking a Total Wireless Phone
Understanding the details of unlocking a Total Wireless phone opens up many compelling reasons to pursue this task. It enables users to bypass limitations and enjoy the benefits of a more liberated mobile experience. Given below are some of the many reasons why you should go for unlocking a Total Wireless phone:
- Switching Carriers: Total Wireless phones are often locked to their network, which limits users to their services. Unlocking allows users to switch to other carriers for better plans, coverage, or services that suit their needs.
- International Travel: On Total Wireless, international roaming options might be limited or expensive. Unlocking the phone enables the use of local SIM cards abroad. This offers more cost-effective communication options during travel.
- Network Compatibility: Total Wireless phones don’t work with other carriers due to specific network configurations. Unlocking enables these devices to work with a broader range of networks, enhancing usability.
Advantages of Unlocking a Total Wireless Device
Unlocking a Total Wireless phone opens up a lot of advantages. Here are a few of the benefits associated with unlocking Total Wireless iPhone:
- Flexibility: The freedom to select among different carriers, plans, and services is offered by unlocked phones. It grants users increased flexibility in handling their communication requirements.
- Cost Savings: Switching to more affordable or better-suited plans from different carriers can result in cost savings. This is especially true for users with specific usage patterns or travel requirements.
- Improved Resale Value: Unlocked phones generally have higher demand in the resale market. It appeals to a wider range of buyers and potentially fetching better prices.

Part 3. How To Check if Your Apple iPhone 13 Pro Max Is Already Unlocked?
No need to worry if you’re unsure whether your Total Wireless device is unlocked. You can easily verify its status through a simple SIM test. Here’s a straightforward set of steps to check if your iPhone Total Wireless unlock is already unlocked:
- Step 1. Turn off your device and remove the SIM tray to start. Swap the current SIM card for one from a different carrier and position it in the tray. Reinsert the tray into your device and power it on again.

- Step 2. First, check to see if the SIM card is getting network service. Attempting a call or sending an SMS are alternative methods to test whether your phone is unlocked. If it fails, it suggests that your phone might still be locked to Total Wireless.
Part 4. A Small Checklist to Ensure Before Unlocking Your Total Wireless Phone
Prior to Total Wireless unlock, it’s essential to verify that it meets the specified criteria. Ensure your phone aligns with the requirements by following the provided checklist:
- Check Contract Status: Ensure your device is not bound by an ongoing contract with Total Wireless. If under contract, complete the contractual obligations, which include payment of fees or early termination charges.
- Verify Eligibility: Confirm your device’s eligibility for unlocking. Total Wireless requires your device to be at least completed 12 months of service period. Moreover, you need to ensure the Apple iPhone 13 Pro Max device isn’t reported lost or stolen.
- Clear Outstanding Payments: Make sure no outstanding payments or dues are associated with your Total Wireless account. These cover any installment plans or unpaid bills involving the Apple iPhone 13 Pro Max device.
- IMEI Compatibility: Check if your device’s IMEI is compatible with unlocking services. Moreover, you need to ensure that it is not blacklisted.
- Backup Your Data: Before initiating the unlocking process, back up all your important data . This includes contacts, photos, and files to prevent any potential loss during the process.
- Understand Terms and Conditions: Familiarize yourself with the unlocking policies and terms Total Wireless provides. Ensure compliance with their guidelines to avoid complications during the unlocking process.
Part 5. How To Unlock Total Wireless Phone: The Best Methods
You are now armed with an inherent understanding of Total Wireless phones. We discussed the reasons for unlocking a Total Wireless phone free and its prerequisites. Below, the most common methods to unlock a Total Wireless phone are summarized. These will equip you completely to explore the most effective ways to unlock your device.
Way 1. Accessing All Important Carriers
Unlocking a phone to access various carriers involves understanding the unique policies of each carrier. Below are the differing policies of prominent carriers:
AT&T
Instructions. Using a browser, open the att.com/deviceunlock website. Here, choose the “Start an unlock request” option and follow the on-screen prompts to complete the process. AT&T will let you know about the unlock status via the provided email.

T-Mobile
Instructions. Access the T-Mobile website and navigate to the “Contact US” page. Here, choose a way to contact customer service and request device unlocking. If you meet the basic criteria set by T-Mobile, your device will be unlocked.

Verizon
Instructions. Verizon has established a minimum period of 60 days, after which your device will be unlocked. However, it is necessary that you don’t have any outstanding payments. Moreover, your device is not blacklisted is also an essential requirement.

Way 2. Contact the Total Wireless Customer Service
As explained before, Total Wireless requires you to use your device for at least 365 days before you can request device unlocking. Moreover, the Apple iPhone 13 Pro Max device should be white-listed and should not be reported missing or stolen. These are the simple instructions to unlock Total Wireless phone free:
- Step 1. After ensuring you meet all the criteria, you can contact them by dialing 1-888-442-5102. This number is available throughout the week between 8 A.M and 11:45 P.M EST. Once you reach out, the department will request your IMEI number.
- Step 2. Following that, they will advise you to wait a few days as they need this time to verify your request. They will contact you to unlock your device if you meet their requirements. It is an unlock code for Android devices, while iPhones can be unlocked remotely.

Way 3. Make the Urgency Fee Payment
While the official Total Wireless device unlocking policy requires you to use the Apple iPhone 13 Pro Max device for at least a year, there are times when it might not be feasible. In such scenarios, you can pay an urgent fee to unlock the Apple iPhone 13 Pro Max device. Remember that even when paying an urgency fee, you need to have used the Apple iPhone 13 Pro Max device for at least 60 days.
Way 4. Unlock Your Total Wireless Phone Using SafeUnlocks
SafeUnlocks stands as the premier choice for unlocking your phone. It is committed to delivering unparalleled services, including speed, safety, and affordability. The aim of the superior quality is a guaranteed phone unlocking experience. It boasts a 99.9% success rate and can unlock any phone’s brand without a hassle. Additionally, we specialize in unlocking devices from numerous carriers worldwide. Here’s how to unlock Total Wireless phone using SafeUnlocks:
- Step 1. Begin by accessing the official SafeUnlocks website. Click “Services” from the top toolbar and choose the “Carrier Unlock” option. Provide your name, email, device model, and IMEI number on the following screen.

- Step 2. After ensuring you’ve marked the “I accept the $1 fee for signing up and unlocking my device” box, proceed by tapping “Proceed.” Next, on the following screen, select a payment method and then follow the prompts displayed on the screen.

Bonus Tip. What To Do if Your Apple iPhone 13 Pro Max Is Locked? Use Wondershare Dr.Fone
Should your Apple iPhone 13 Pro Max become locked because of forgotten passcodes or any other issues, there’s no need to panic. Wondershare Dr.Fone , a dependable software tool, seeks to rescue the situation. It is a reputable software known for its utility. You can find options to resolve various iOS device-related problems, including unlocking iPhone screens.
Dr.Fone effectively unlocks your iOS devices across various iOS versions, from iOS 7 to iOS 17. It covers various lock types, including touch lock screens, 4-digit/6-digit passcodes, numeric codes, and alphanumeric passcodes. Moreover, it can bypass Face ID, Touch ID, and Screen Time Passcode, among others. With Dr.Fone, you can unlock your iDevices within minutes.
Key Characteristics of Wondershare Dr.Fone
- This tool can effortlessly bypass the iCloud activation lock without needing the Apple ID.
- You can find a dedicated option for Data Recovery in Dr.Fone’s service, allowing you to easily recover all types of lost data.
- It can remove encryption locks from iTunes backups without causing any data loss.
Steps To Unlock Your Locked iPhone Using Wondershare Dr.Fone
This tool ensures a straightforward process without any learning curve. Experience the simplicity of unlocking your Apple iPhone 13 Pro Max in just a few easy steps:
- Step 1. Initialization and Setup of Screen Unlocking
After installing Wondershare Dr.Fone on your computer, begin by launching the program. Access the “Toolbox” section and find “Screen Unlock”. Choose “iOS” as your device type and proceed by selecting “Unlock iOS Screen .” Initiate the unlocking process by clicking “Start.”

Tips: Are you searching for a powerful iPhone Unlock tool? No worries as Dr.Fone is here to help you. Download it and start a seamless unlock experience!
- Step 2. Preparing Devices and Firmware
Follow the prompts on the screen to put your iDevice into Recovery Mode. The platform will automatically detect and showcase the “Device Model.” If necessary, modify the model or System Version accordingly and click “Start.” Monitor the progress of the iOS firmware download on the following screen.
- Step 3. Validation and Completion
Ensure that the downloaded iOS firmware is validated before proceeding. To start the unlocking process, click “Unlock Now”. Enter the required code and tap “Unlock” to continue. Upon successfully unlocking the Apple iPhone 13 Pro Max device, finalize the process by clicking the “Done” button.
Conclusion
In this comprehensive guide, we navigated through how to unlock Total Wireless phone. It covered its definition, reasons for unlocking, and a checklist before initiating the process. We explored multiple unlocking methods, including carrier-specific policies and third-party services. Additionally, we discussed Wondershare Dr.Fone as the ultimate choice when users encounter device unlocking.
How to Access Your Apple iPhone 13 Pro Max When You Forget the Passcode?
We all have secrets in our iPhone or some important financial or business data that we all wish to protect from unwanted access. For this, we set up a passcode. But what if Apple iPhone 13 Pro Max passcode is forgotten by you? Well, you may now wonder how to perform Apple iPhone 13 Pro Max passcode bypass, right? Worry no more! We’re right here to help you with the proven solutions for Apple iPhone 13 Pro Max passcode reset without iTunes or with it too. Let’s explore.
Part 1. Unlock Apple iPhone 13 Pro Max screen passcode in one click (unlock tool needed)
The first and the ultimate measure for Apple iPhone 13 Pro Max passcode removal in just a matter of a single click is Dr.Fone - Screen Unlock (iOS) . With the help of this mighty tool, performing Apple iPhone 13 Pro Max passcode reset is even easier than any other alternative. Not only it can perform Apple iPhone 13 Pro Max passcode bypass, you can also make use of this tool to bypass lock screen of an Android smartphone too. Isn’t it amazing? Moreover, this powerful tool works effortlessly with the latest iOS 13 version and even with the most recent iPhone models as well. Here is the step by step tutorial on Apple iPhone 13 Pro Max passcode bypass.
Step 1: Install and launch Dr.Fone - Screen Unlock (iOS)
Get the tool Dr.Fone - Screen Unlock (iOS) downloaded and installed over your computer system. Then establish a connection between your computer and iPhone.
Now, launch the tool and then opt for the “Unlock” tile from the main screen.
Step 2: Boot in Recovery/DFU mode
Next move that you need to perform is to opt for the correct mode, i.e. “Unlock iOS Screen”. Then, you’ll be prompted to boot your device in Recovery/DFU mode. The on-screen instructions will guide you on how to do it.
Step 3: Double-Check iPhone information
On the upcoming screen, you’ll be displayed the “Device Model” and most recent “System Version” which is compatible with your Apple iPhone 13 Pro Max. Simply, hit the “Start” button here.
Step 4: Perform Apple iPhone 13 Pro Max passcode removal
Once, the software downloads the firmware automatically, you can then proceed to Apple iPhone 13 Pro Max passcode reset. Hit the “Unlock Now” button over the next screen and in a short while you’ll be notified that Apple iPhone 13 Pro Max passcode removal is completed.
 safe & secure
Part 2. Restore an iTunes backup for Apple iPhone 13 Pro Max
Here we’re going to be familiar with the Apple iPhone 13 Pro Max passcode reset using the renowned iOS data management tool, iTunes. But be sure that iTunes version installed over your computer is up to date or else unknown errors may crop up in between. Eventually, your all-new Apple iPhone 13 Pro Max may even get bricked. Think this is it? Well, here’s another problem with iTunes, you need to get your Apple iPhone 13 Pro Max connected only to a pre-synced or pre-trusted computer. Or else, this tutorial won’t bring any good to you.
Step 1: First, get your Apple iPhone 13 Pro Max connected to your PC. Then, launch the iTunes most recent version. It will automatically detect your Apple iPhone 13 Pro Max. Once detected, tap the “Device” icon over the left top corner of iTunes.
Step 2: Then, hit the “Summary” option from the left panel and then you need to hit the “Restore iPhone” button. Confirm your actions by simply pushing the “Restore” button on the pop-up message and you’re done. Now, just wait for the process to complete.

Part 3. Restore Apple iPhone 13 Pro Max in recovery mode to remove screen passcode
If somehow, the above solution fails and you’re just not able to get Apple iPhone 13 Pro Max passcode reset. You need to boot your device into recovery mode and then perform the factory reset. This would certainly wipe off everything from your Apple iPhone 13 Pro Max including the passcode as well. Here are the steps involved in booting your Apple iPhone 13 Pro Max in recovery mode.
- First things first, power off your Apple iPhone 13 Pro Max by pushing the “Side” button down along with either of the “Volume” button. Keep them pressed till you get to see “Power-off” slider over your screen. Now, simply drag it to power off your device.
- Next, connect your Apple iPhone 13 Pro Max and your computer firmly with the help of an authentic cable. Please make sure to press and hold the “Side” button meanwhile.
- Ensure not to let go the Side button till the recovery mode screen appears over your Apple iPhone 13 Pro Max.

- Once the Apple iPhone 13 Pro Max device is booted in recovery mode, iTunes will throw a pop up message that “iTunes has detected an iPhone in recovery mode”. Simply, hit the “OK” button over the message and then push the “Restore iPhone” button followed by confirming your actions.

Part 4. Use “Find iPhone” from iCloud
The next pro tutorial for Apple iPhone 13 Pro Max passcode removal is via iCloud. For this, grad access to any computer available on your side. Or, you can also make use of any other smartphone device but ensure it must be connected to a WiFi network or have an active data pack. Moreover, the locked iPhone on which you’re going to perform Apple iPhone 13 Pro Max passcode reset should also have an active internet connection to make this tutorial work.
Note: Since we’re going to unlock your Apple iPhone 13 Pro Max using Find My iPhone service of iCloud. It is important that “Find My iPhone” service was enabled beforehand over your Apple iPhone 13 Pro Max.
Step 1: Launch the browser over any other smartphone device or computer. Then, visit the official web page iCloud.com.
Step 2: Now, make use of same Apple account configured with your Apple iPhone 13 Pro Max to sign in to iCloud. Then, opt for the “Find My iPhone” icon over the launch pad.

Step 3: Next, tap on the “All Devices” drop-down menu available over the top midsection and then select the Apple iPhone 13 Pro Max that you wish to bypass the passcode off.
Step 4: Then, you’ll get to witness a pop-up window over your screen. Tap the “Erase iPhone” button over it and then confirm your actions. All the settings and data will be wiped off remotely from your Apple iPhone 13 Pro Max now.

Step 5: Lastly, wait for the process to complete and upon completion set up your device as usual.
Part 5. How about Apple iPhone 13 Pro Max restrictions passcode?
Apple iPhone 13 Pro Max restrictions is a vital setting that is used to lock down a set of functions of the iPhone. These iPhone restrictions are also known as Parental Controls. That implies one can make use of these settings to block or hide songs that have explicit lyrics/content or barring YouTube from running, etc.
It is vital to set up a 4 digit passcode if you want to use iPhone restriction settings. Now, if you somehow forgot the passcode that was set to make use of iPhone restrictions, you need to restore your Apple iPhone 13 Pro Max with the help of iTunes to remove the previous passcode. But ensure not to restore an old backup of iPhone or else, the old passcode which you may not know will also get activated. Eventually, making your situation even worse.
Reset/Change Apple iPhone 13 Pro Max restrictions passcode
Now, in case you know the Apple iPhone 13 Pro Max restrictions passcode and just wish to reset it. Then follow the streak of steps mentioned below.
- Launch “Settings” of your Apple iPhone 13 Pro Max and then get into “General” followed by “Restrictions”. Now, you’ll be asked to key in the current passcode.

- Once you’ve entered the current passcode, hit on the “Disable Restrictions” and to confirm your actions, key in your passcode when prompted.

- Lastly, hit on “Enable Restrictions”. You’ll be asked to set up a new passcode now. Do it and you’re done.

Also read:
- [New] Mastering Light & Shadow with iPhone X's New Lens Technology
- [New] Premium Editing Platform Tailored to Vimeo
- [New] The Next Frontier in Technological Application
- [Updated] 2024 Approved Thriving in the YouTube Landscape with Data-Driven Approach
- 3 Ways to Erase Apple iPhone 14 When Its Locked Within Seconds | Dr.fone
- Download & Install KYOCERA Windows-Compatible Printer Drivers
- Exclusive Listing High-Quality, Free Streamers for WebM Files for 2024
- Full Guide to Hard Reset Your Vivo Y78 5G | Dr.fone
- In 2024, 5 Ways To Teach You To Transfer Files from OnePlus Nord N30 5G to Other Android Devices Easily | Dr.fone
- In 2024, Complete Guide on Unlocking Apple iPhone 13 with a Broken Screen? | Dr.fone
- In 2024, Easy Steps on How To Create a New Apple ID Account On iPhone 6s | Dr.fone
- In 2024, How To Unlock A Found Apple iPhone 12 Pro Max? | Dr.fone
- In 2024, How to Unlock iPhone 15 Pro Max? | Dr.fone
- In 2024, iPhone 7 Plus Backup Password Never Set But Still Asking? Heres the Fix | Dr.fone
- iPhone Is Disabled? Here Is The Way To Unlock Disabled Apple iPhone 13 | Dr.fone
- Remove Google FRP Lock on OnePlus 11R
- Title: In 2024, Guide on How To Change Your Apple ID Email Address On iPhone 13 Pro Max | Dr.fone
- Author: Amelia
- Created at : 2024-12-05 16:38:16
- Updated at : 2024-12-12 16:31:55
- Link: https://iphone-unlock.techidaily.com/in-2024-guide-on-how-to-change-your-apple-id-email-address-on-iphone-13-pro-max-drfone-by-drfone-ios/
- License: This work is licensed under CC BY-NC-SA 4.0.