
In 2024, How to Bypass Apple iPhone 15 Passcode Easily Video Inside | Dr.fone
How to Bypass Apple iPhone 15 Passcode Easily [Video Inside]
If you have forgotten the passcode of your Apple iPhone 15, then don’t worry! You are not the only one. It happens with plenty of iOS users every now and then. Lately, we have received lots of feedback from our readers asking for a solution to bypass Apple iPhone 15. Therefore, we thought of compiling an informative post to help you bypass the Apple iPhone 15 passcode without much trouble. Go ahead and follow these hassle-free methods to perform an Apple iPhone 15 bypass.
Part 1: How to bypass Apple iPhone 15 passcode with Dr.Fone - Screen Unlock? (iOS 15.4)
Dr.Fone - Screen Unlock is an extremely secure and easy-to-use application that can help you bypass locked screens within minutes. Afterward, you can simply use your phone by resetting its lock. It provides a reliable way to update your phone’s firmware without causing any complications. The application can also be used to resolve plenty of other Apple iPhone 15-related issues. The only disadvantage you should notice is that your data will be wiped out after using this tool. So, you’d better backup it before.
 safe & secure
Compatible with every leading iOS device, it runs on all major iOS versions. Since Dr.Fone has an easy-to-use interface, it can simply resolve your issues without much trouble. You can restore your phone and perform an Apple iPhone 15 bypass with Dr.Fone - Screen Unlock by following these steps.
Dr.Fone - Screen Unlock (iOS)
Bypass Apple iPhone 15 Passcode at Ease
- Remove the 4-digit/6-digit passcode, Touch ID, and Face ID.
- A few clicks and the iOS lock screen are gone.
- The best alternative to factory rest mode.
- Fully compatible with all iDevice models and iOS versions.
4,395,218 people have downloaded it
Step 1. Download Dr.Fone - Screen Unlock on your Mac or Windows system from its official website. After installing it, launch it whenever you need to bypass the Apple iPhone 15 lock. Click on the option of “Screen Unlock“ from the welcome screen.

Step 2. Connect your Apple iPhone 15 to the system and let the application detect it automatically. Click on the “Unlock iOS Screen” button whenever you need to initiate the operation.

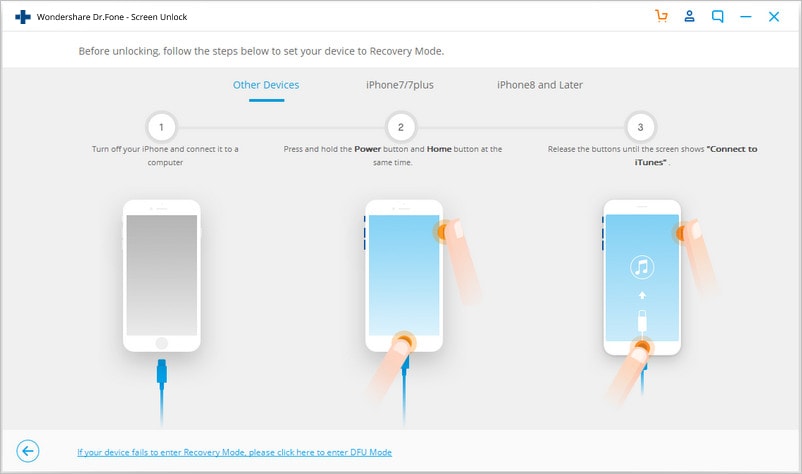
Step 3. After your phone is detected, you need to activate the DFU mode as instructed by the on-screen steps.
Step 4. In the next window, you have to provide basic information regarding your iOS device. Here, supply relevant information related to your phone (like device model, firmware, and more). Click on the “Download” button to get the firmware update for your phone.

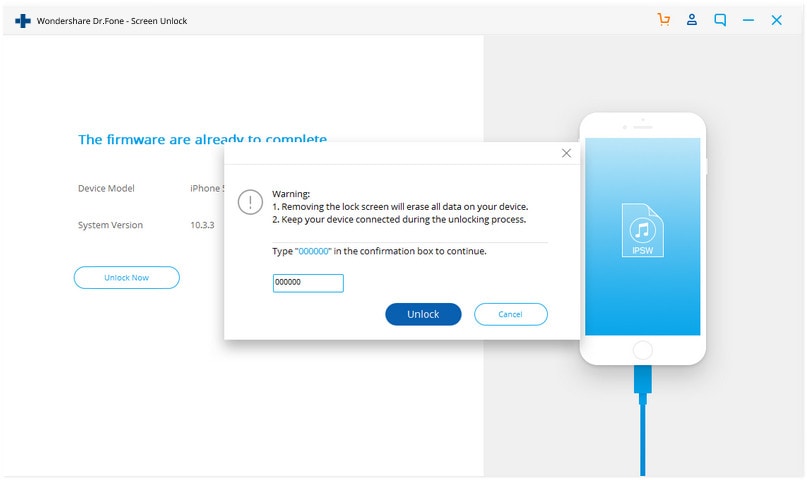
Step 5. Wait for a while as the application will download the firmware update for your phone. Once it is done, click on the “Unlock Now” button.

Step 6. Simply provide the on-screen confirmation code to initiate the process.
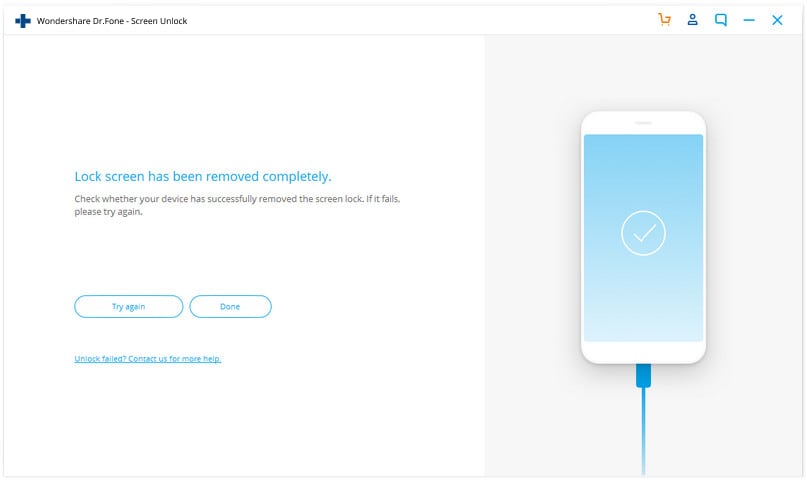
Step 7. As soon as it is completed, you will be notified by the interface. You can also repeat the process by clicking on the “Try Again” button.
safe & secure
Part 2: How to bypass the Apple iPhone 15 passcode with Siri? (iOS 8.0 – iOS 10.1)
If you are an avid user of Apple products, then the chances are that you must have already heard of this Apple iPhone 15 hack. If you are running a device on iOS 8.0 to iOS 10.1, then you can take the assistance of Siri to bypass the Apple iPhone 15 lock. Even though this is not a secure way to surpass your phone’s lock screen, it doesn’t restore or erase your data in the process. You can follow these steps to bypass the Apple iPhone 15 passcode with Siri.
Step 1. Firstly, hold the Home button on our phone to activate Siri. Speak a command like “Siri, what time is it?” to ask the present time. Now, tap on the clock icon.

Step 2. It will open an interface for the world clock feature. From here, add another clock.

Step 3. Simply provide a textual input while searching for the city and tap on the “Select all” button.

Step 4. From all the provided features, select the option of “Share” to continue.

Step 5. Tap on the message icon to draft a new message.

Step 6. A new interface for message draft would be opened. In the “To” field, type something and tap the return button on the keyboard.

Step 7. As your text will turn green, tap on the add icon again.

Step 8. From the next interface, select the option of “Create New Contact”.

Step 9. While adding a new contact, tap on the contact photo icon and choose “Add Photo”.

Step 10. From the photo library, browse your albums.

Step 11. Wait for 3-5 seconds before pressing the home button again. This will lead you to the home screen of your device.

Part 3: How to bypass the Apple iPhone 15 passcode with iTunes?
Another popular way to restore your Apple iPhone 15 is by taking the assistance of iTunes. Needless to say, even though you would be able to bypass the Apple iPhone 15 passcode, the technique will wipe the data on your device. Though, if you have already taken a backup of your data, then you can choose to restore it after performing an Apple iPhone 15 bypass. Do it by following these instructions.
Step 1. Launch iTunes on your system and connect it with a USB/lightning cable.
Step 2. Hold the Home button on your Apple iPhone 15 and while pressing it, connect it to your system. This will display a connect-to-iTunes symbol.

Step 3. After connecting your phone to the system, iTunes will automatically recognize it and display the following message. Simply click on the “Restore” button.

Step 4. Furthermore, you can choose to restore content from a previous backup as well. Go to iTunes Summary section and click on the “Restore Backup” button.

Step 5. Agree with the pop-up message and erase all the previous content on your phone.

Part 4: How to bypass Apple iPhone 15 passcode with Elcomsoft iOS Forensic Toolkit?
This might be new to you, but there are a few forensic toolkits in the market that can help you perform Apple iPhone 15 bypass without much trouble. One of the most reliable options is the Elcomsoft iOS Forensic Toolkit. Though, in order to use it, you need to download its licensed version from its website right.
Later, you can simply connect your phone to the system and run the forensic tool. From the welcome screen, select the option of “Get Passcode”. This will run an encrypted command and provide a passcode to your phone that can be used to unlock it.

Wrap it up
After following these solutions, you would be able to bypass the Apple iPhone 15 lock without any trouble. You can simply choose your preferred option and perform an Apple iPhone 15 bypass. If you are not able to unlock your phone with Siri, then use Dr.Fone - Screen Unlock. It is an extremely safe option to help you bypass the Apple iPhone 15 passcode and overcome various iOS-related problems.
safe & secure
Guide on How To Change Your Apple ID Email Address On Apple iPhone 15
Your Apple ID email is the key to your digital world with Apple devices. It’s the address Apple recognizes you by, allowing you to access your apps, music, and more. But sometimes, life brings changes, and your Apple ID email may need an update.
This guide will take you through the simple process of changing your Apple ID email address, ensuring it’s easy to understand every step. Explore why you might want to make this change, shedding light on common scenarios where this adjustment can enhance your Apple experience. So dive in and explore!

Part I: Why Change Your Apple ID Email?
Your Apple ID email helps you access your apps, music, and more. But sometimes, you might need to change it for simple reasons. Let’s look at why you might want to change your Apple ID email in easy-to-understand terms.
- Your email address is part of your identity. Changing it to something that better suits you can make your Apple experience more personal.
- If you think someone else knows your old email password, changing it can keep your Apple account safer. A fresh email means a new layer of security.
- Maybe you used an old email you don’t want to use anymore. Changing it lets you keep your personal life separate from your Apple stuff.
- **Email Problems.**If your old email is full of spam or not working well, switching to a new one is a good idea. You’ll get a cleaner and more reliable inbox.
- **Sharing Devices.**If you share Apple devices with someone and want to keep your stuff separate, changing your Apple ID email can help you do that easily.
- Using a more professional email address for your Apple ID can make a better impression when using Apple services for work or business.
These are the simple reasons why you might want to change your Apple ID email. It’s all about making your Apple experience better, safer, and more suited to your needs.
Part II: Step-by-Step Guide: How to Change Apple ID Email
Before you jump into changing your Apple ID email address, there’s an essential step to take. Just like you’d secure your valuables before embarking on a journey, backing up your device before going through the email change process is vital. This step ensures that none of your precious data is lost during the transition.
A. How To Change Your Apple Email Address on Various Devices
Now, let’s explore three different methods of how to change your Apple ID email address, tailored to various user preferences.
Method 1: For Mac Users
If you’re a Mac enthusiast, changing your Apple ID email is straightforward:
- Step 1: Click the Apple logo at the top left corner of your screen.
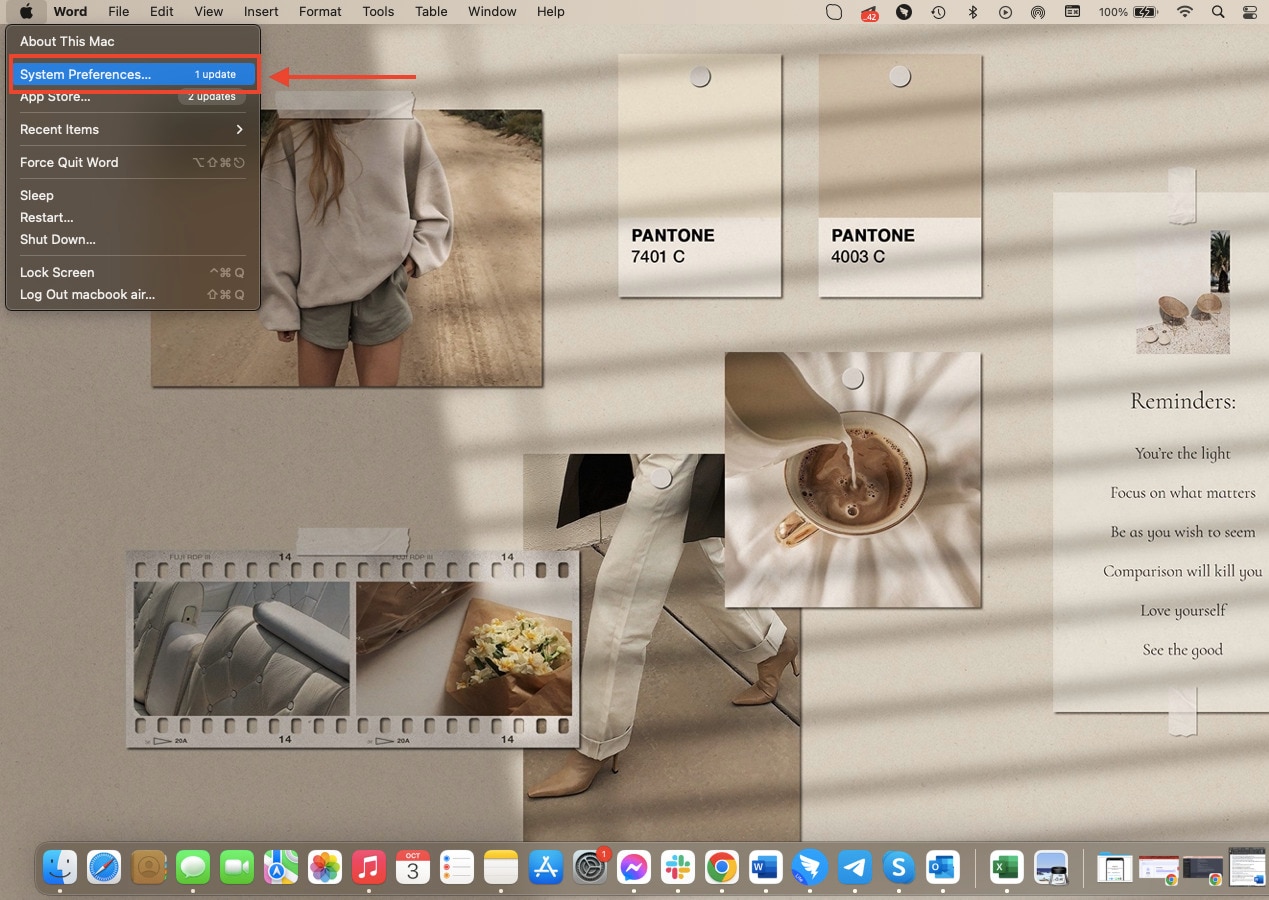
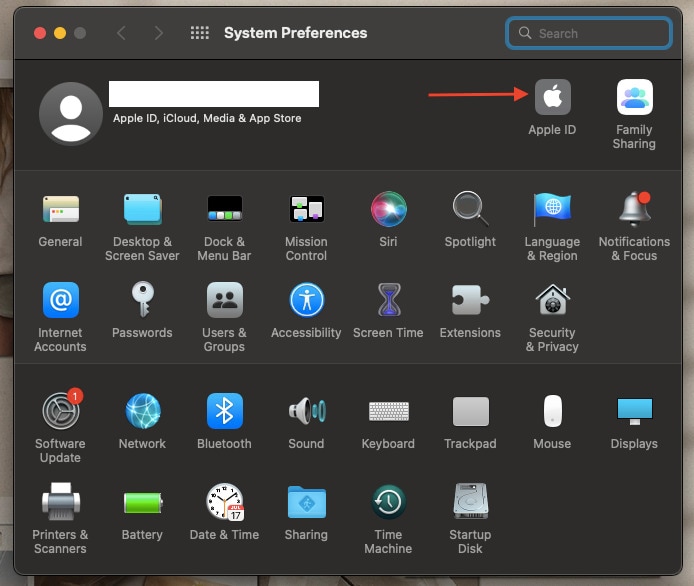
- Step 2: Click System Preferences, and then select Apple ID.
- Step 3: Navigate to the Name, Phone, Email section, then click Edit next to your email address.
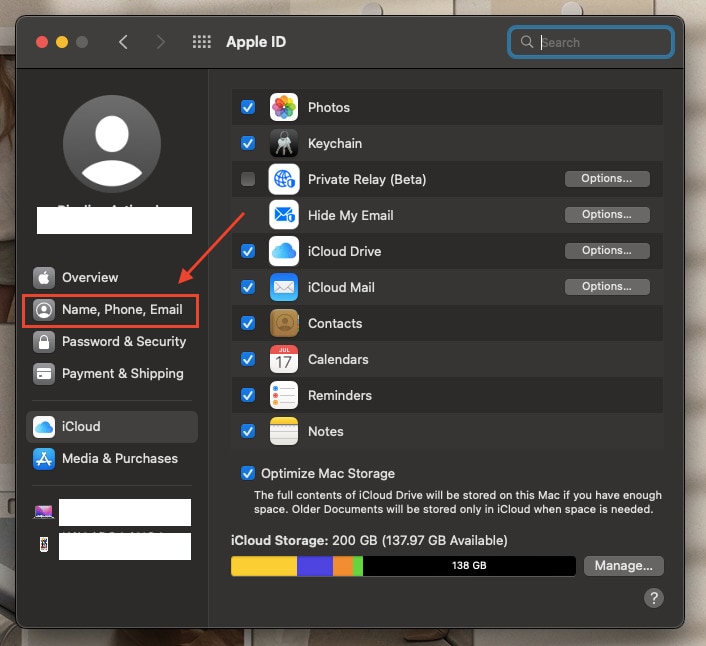
- Step 4: Input your new email address, and Apple will send a verification code to it.
- Step 5: Check your new email for the verification code, enter it, and voilà! Your Apple ID email is updated on your Mac.
Method 2: For Mobile Device Users
For those who prefer the convenience of mobile devices:
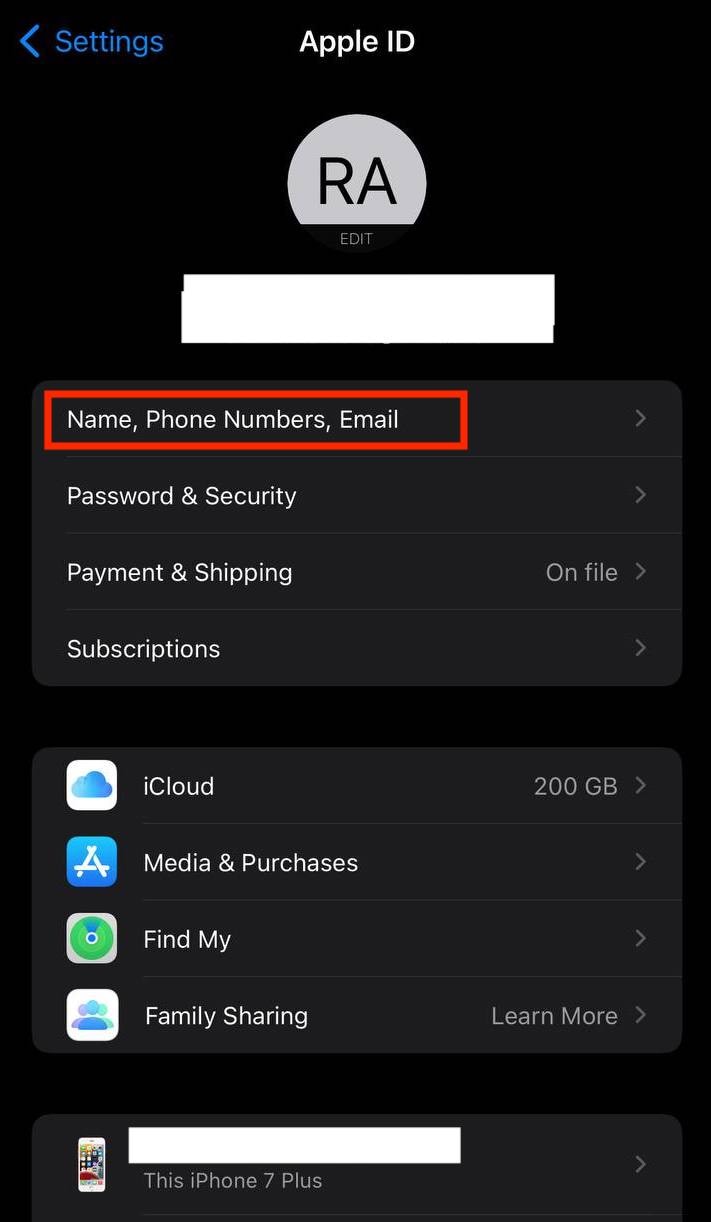
- Step 1: Open the Settings app on your Apple iPhone 15 or iPad, then tap your Apple ID at the top of the screen.
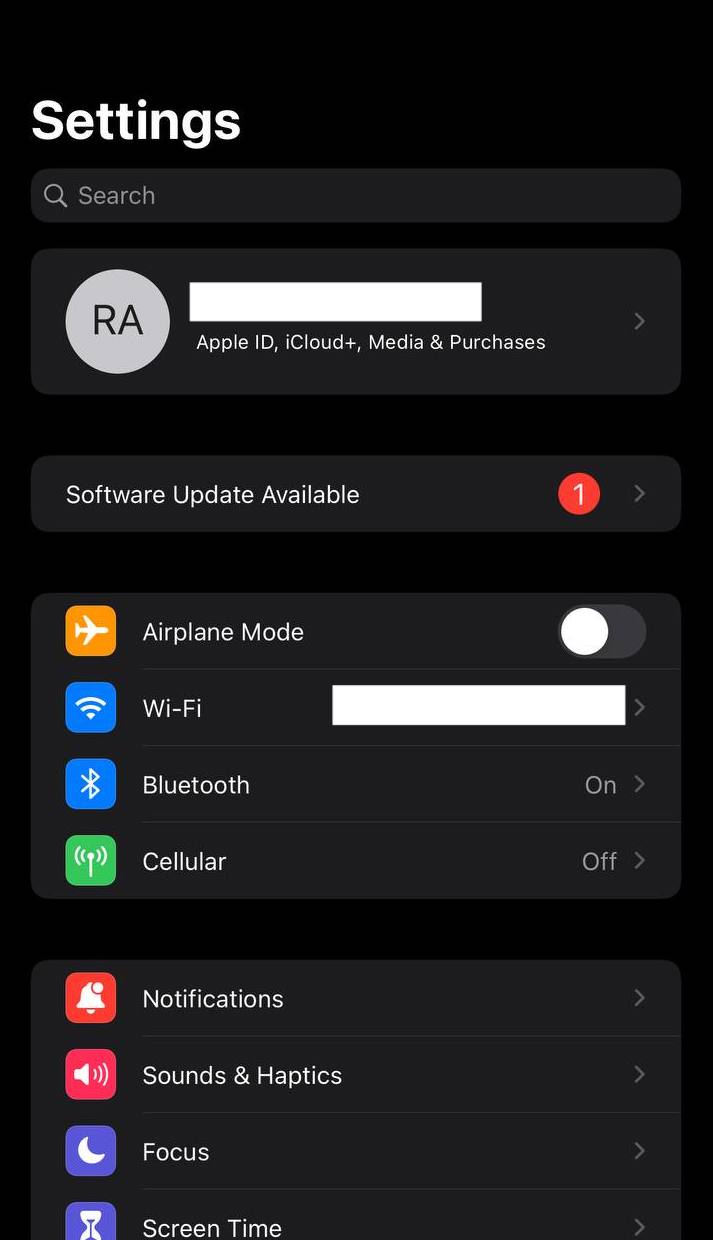
- Step 2: Tap Name, Phone Numbers, Email.
- Step 3: Tap Edit next to your email address, enter your new one, then tap Next.
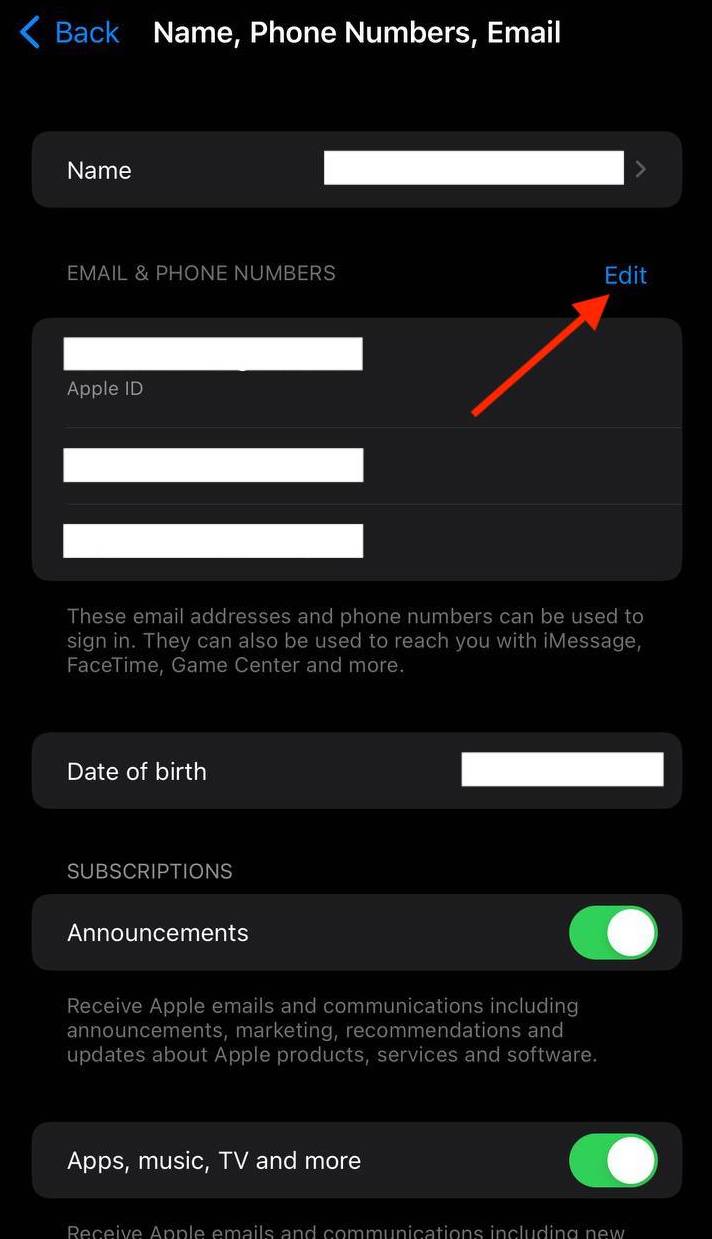
- Step 4: Apple will send a verification code to the new email. Enter it, and your Apple ID email on your mobile device is updated.
Method 3: For Browser Users
If you prefer the simplicity of a web browser:
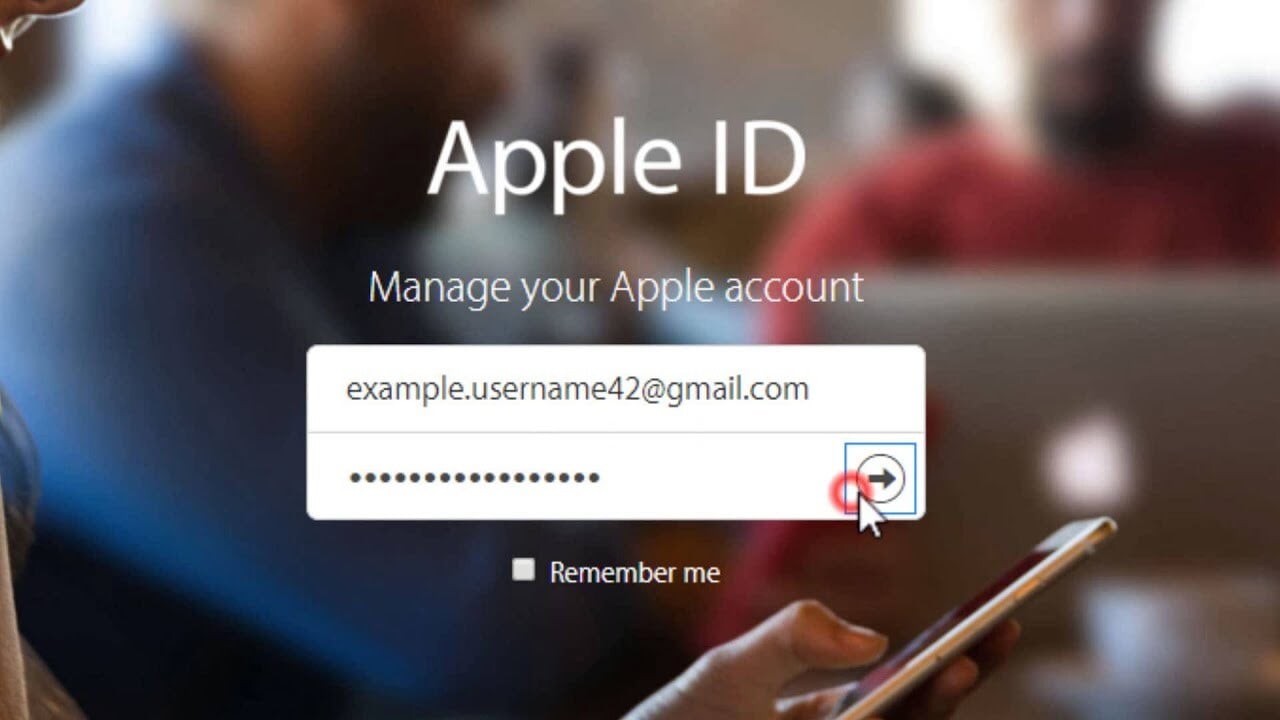
- Step 1: Open the web browser your prefer and go to the Apple ID account management page.
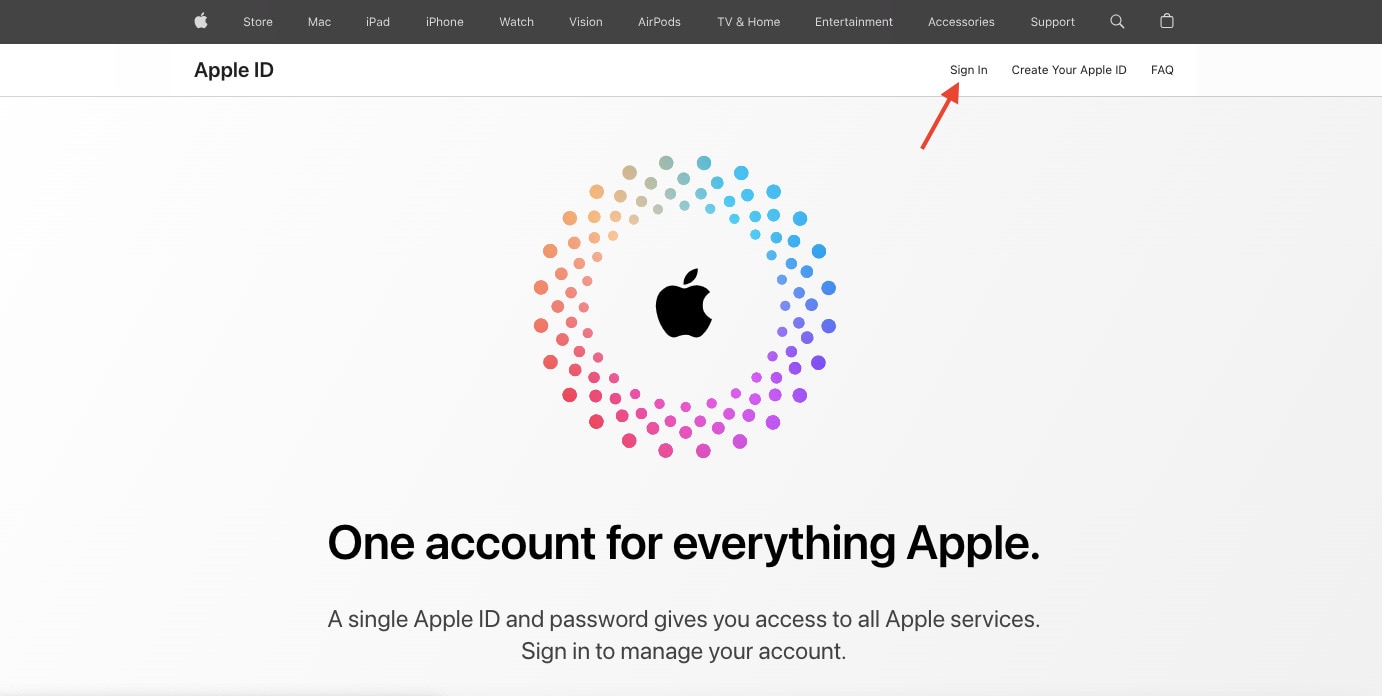
- Step 2: Click Sign In and tap your Email or Phone Number and Password.
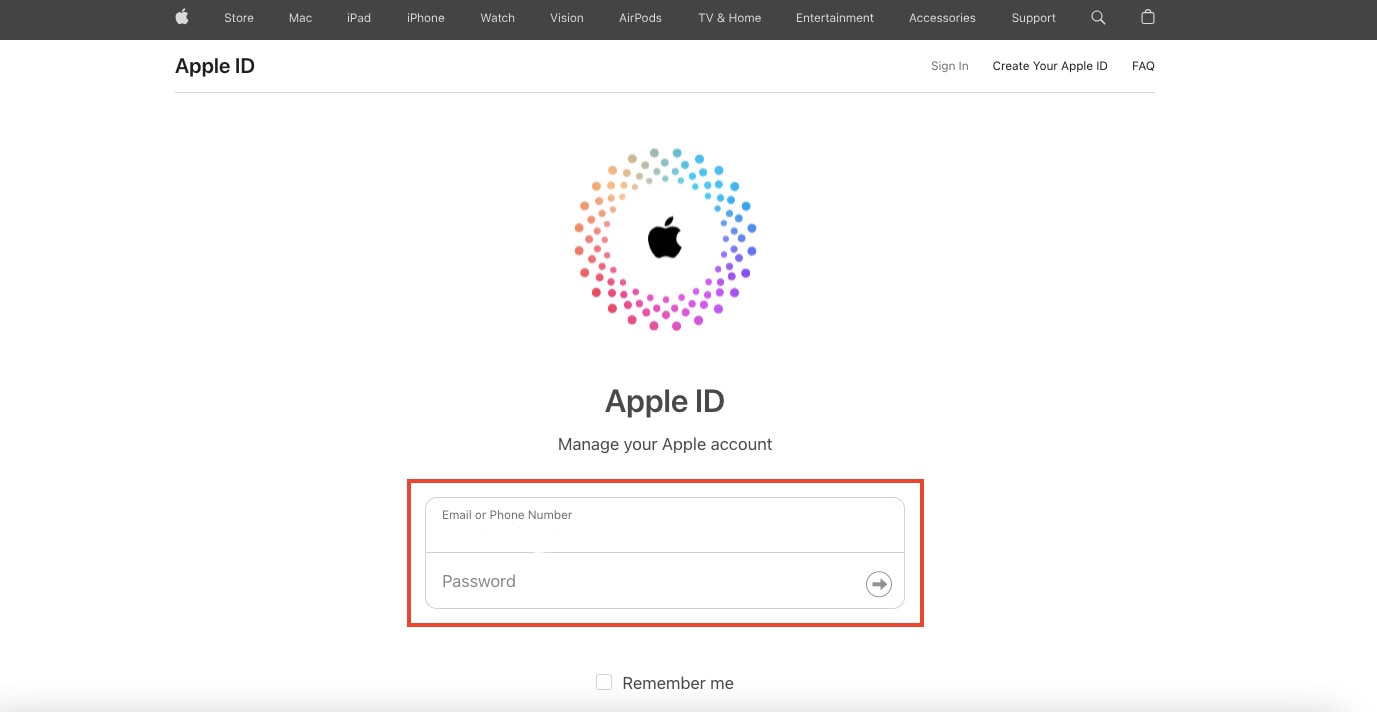
- Step 3: Click Edit next to your email address in the Account section.
- Step 4: Input your new email address and click Continue.
- Step 5: A verification code will be sent to your new email. Enter it to confirm your email change.
B. Updating Your Apple ID
Now that you’ve successfully changed your Apple ID email, it’s crucial to ensure that all your Apple devices are on the same page:
- Step 1: Tap the Settings application on your Apple iPhone 15 or iPad.
- Step 2: Go to Update Apple ID Settings below your Apple ID settings.
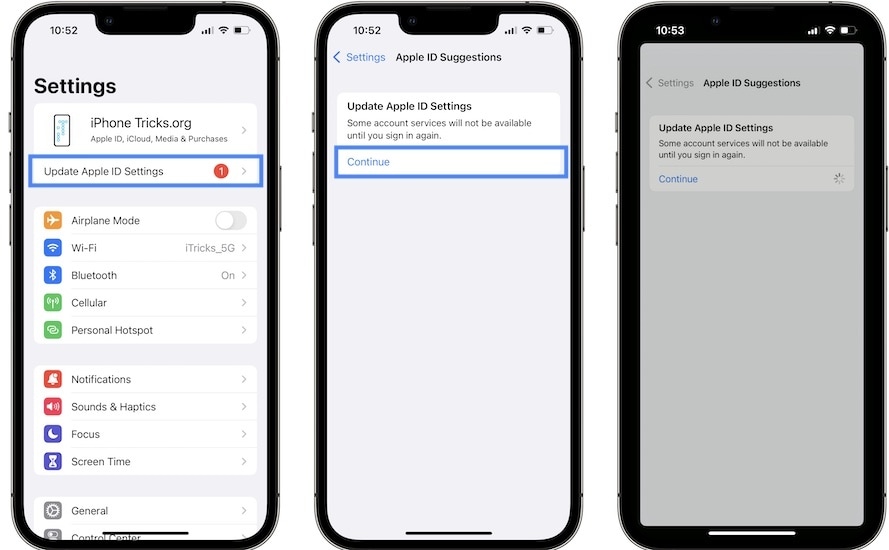
- Step 3: Tap Continue, then wait for a few moments. Your Apple ID will then get updated.
By following these steps, you’ll ensure that all your Apple devices are synced with your updated email address, providing a seamless and consistent Apple experience across all your gadgets. Now, with your new Apple ID email, you’re ready to explore the Apple ecosystem with renewed convenience and security.
Part III: Unlock iOS Screen With Wondershare Dr.Fone - Screen Unlock (iOS)
What if you find yourself in a situation where you want to change your Apple ID email address on your iOS device, but you’re locked out? Don’t worry; Dr.Fone - Screen Unlock (iOS) can rescue you. This handy tool is designed to help you unlock your iOS device, allowing you to change your Apple ID email address smoothly.
Key Features of Dr.Fone - Screen Unlock (iOS)
Check out the key features that Dr.Fone has to offer:
- **User-Friendly Interface.**Fone - Screen Unlock (iOS) is designed to be easy to use, making it accessible for users of all levels of technical expertise.
- It fits a wide range of iOS devices, including iPhones and iPads, ensuring that you can unlock your device no matter which one you have.
- **Multiple Unlock Modes.**Fone offers different unlock modes to cater to various scenarios. Whether you’ve forgotten your passcode, have a disabled device, or are dealing with a locked Apple ID, Dr.Fone has a solution.
- **No Data Loss.**One of the most significant advantages of Dr.Fone is that it unlocks your device without causing any data loss. Your photos, apps, and important information remain intact.
Step-by-Step Guide on Using Dr.Fone - Screen Unlock (iOS)
Outlined below is the step-by-step guide on how to use Dr.Fone – Screen Unlock for iOS devices:
- Step 1: When you’ve finished downloading and installing Wondershare Dr.Fone on your computer, go to Toolbox, then Screen Unlock, and choose iOS to open the tool in a new window.
- Step 2: Begin to pick the Unlock iOS Screen button in the new window to begin unlocking the screen of your iOS device. On the following screen, click the Start button to begin unlocking the iOS device.
Note: Ensure your device’s battery levels are enough before proceeding.

- Step 3: Following that, place your iDevice in Recovery Mode. Follow the on-screen instructions to set your iDevice into mode based on your phone model.
Note: If Recovery Mode does not work, try hitting the Try DFU Mode button at the bottom to access the instructions for putting the iDevice in DFU mode.

- Step 4: After successfully entering your device into Recovery Mode, the platform automatically recognizes the Device Model and shows it in the appropriate section. Modify the model and select the System Version to meet your needs if necessary. After that, select Start to begin unlocking your device’s screen.
- Step 5: The next screen shows the progress of your iOS firmware download. If at any point you decide you’d rather call it quits, hit the Stop button. If the iOS firmware takes a long time to download on your platform, you can copy the download link by clicking the Copy option.

- Step 6: After a successful download, the iOS firmware is checked and shown on the next screen. Select the Unlock Now option again to proceed with the unlocking procedure. A confirmation popup displays, requesting you to confirm the action. Enter the unlock code and press the Unlock button to continue.

- Step 7: You’ll see the unlocking status of your iOS device on the following screen. Don’t forget that keeping the gadget plugged in is necessary to avoid bricking it.
- Step 8: Click the Done button once the iDevice has been unlocked. If you’re still stuck with a locked iPhone, iPad, or iPod, select Try Again to retry the process.

By using Dr.Fone - Screen Unlock (iOS), you can regain access to your iOS device and continue with the process of changing your Apple ID email address hassle-free. It’s a reliable and user-friendly solution that ensures you can enjoy the benefits of the new email address without losing any of your precious data.
You May Also Like:
How to Show Email Password on iPhone and Find It Back
A Detailed Guide to Fix All iPad Email Problems [2023]
How to Fix Email Disappeared from iPhone?
Conclusion
This guide easily explored the process of changing your Apple ID email address. It started by understanding why this change might be necessary and provided straightforward methods for Mac, mobile, and browser users to accomplish it seamlessly.
But what if you’re locked out of your iOS device? Don’t fret; Dr.Fone - Screen Unlock (iOS) is a user-friendly tool that can help you regain access to your device. It ensures a smooth transition to your new email. Unlock new possibilities with Dr.Fone, a reliable companion in managing your iOS device. Explore its features and simplify your Apple journey today!
How To Unlock Apple iPhone 15 Without Swiping Up? 6 Ways
Part 1: What’s Swipe Up To Unlock on iPhone?
The Swipe Up Unlock function has been a fundamental aspect of iPhone functionality for a long time. It enables swift access to your phone by swiping upward from the screen’s bottom. This gesture grants entry to all your applications and data on your Apple iPhone 15. It was initially introduced to replace the physical Home button. However, it significantly simplified the user experience with iPhones.
It streamlined various tasks without the need for excessive button pressing. Moreover, its simplicity and speed became vital in how individuals utilized their iPhones. Yet, as preferences evolve, not everyone finds the exclusive Swipe Up Unlock feature appealing. Hence, exploring alternative methods to unlock your Apple iPhone 15 is advisable.
Part 2: Why Do You Need To Swipe Up to Unlock on iPhone?
Swipe up to unlock the iPhone holds significant importance in its user interface and accessibility. This intuitive gesture serves as the primary means of gaining access to the Apple iPhone 15 device. Here are several reasons why the Swipe Up to Unlock iPhone feature has been a cornerstone:
1. Simplicity and Ease of Use
The swipe gesture replaced the physical Home button, simplifying the unlocking process. Users could effortlessly swipe up from the bottom of the screen. It eliminates the need for pressing multiple buttons to access their devices.
2. Streamlined Navigation
Beyond unlocking the iPhone, the swipe gesture also allowed for quick navigation to the home screen. This streamlined access enabled users to jump straight into their apps, messages, or other functions.
3. Visual Aesthetics and User Experience
Apple’s design philosophy often revolves around clean, intuitive interfaces. The swipe up to unlock gesture aligns smoothly with this philosophy. It contributes to a visually appealing and user-friendly experience.
4. Security and Privacy
The gesture served as a security measure, preventing accidental or unauthorized access to the iPhone. Moreover, users can confidently rely on this unlocking method to safeguard their personal data.
Part 3: 6 Common Ways To Unlock iPhone Without Swiping Up
For an extended period, the primary method to unlock an iPhone involved swiping up. Nonetheless, if you wish to explore alternative methods, it’s entirely feasible. Various methods have emerged over time to open the Apple iPhone 15 without swiping up.
Method 1: Unlock iPhone without Swiping Up with Enable Back Tap
With the debut of iOS 14, Apple unveiled an innovative feature called Back Tap. It provides users with a method to engage with their iPhones by tapping the Apple iPhone 15 device’s rear surface. This innovative functionality can be configured to perform various actions. It includes unlocking the phone without a swiping-up gesture. Follow these steps to set up and use the Back Tap feature for unlocking your Apple iPhone 15:
Step 1. To start, access the “Settings” on your iOS device. Once there, scroll down until you locate the “Accessibility” option and tap on it. On the following screen, select “Touch” to access Touch settings under the “Physical and Motor” section.

Step 2. On the following screen, scroll down to the bottom and press “Back Tap.” Now, either choose “Double Tap” or “Triple Tap” and select “Lock Screen” from the options under the “System” section.

Method 2: Unlock iPhone Without Swiping Up Using iPhone Screen Unlocker: Dr.Fone - Screen Unlock
If you’ve forgotten the passcode for your Apple iPhone 15 and are unable to access it anymore, there is no need to panic. We have the perfect tool for you that can unlock any lock on your screen in a few moments. The tool we are talking about is Wondershare Dr.Fone - Screen Unlock (iOS) , an industry leader in smartphones. Dr.Fone, a pioneering tool for iOS lock screen removal, assists in unlocking various iPhone/iPad/iPod touch lock screens.
Dr.Fone - Screen Unlock (iOS)
Unlock iPhone Without Swiping Up!
- Simple, click-through, process.
- Unlock screen passwords from all iPhones and iPads.
- No tech knowledge is required, everybody can handle it.
- Supports iPhone 15 /iPhone 14 /iPhone 13, iPhone 12, … and the latest iOS version fully!


4,395,218 people have downloaded it
It can handle 4-digit / 6-digit passcodes, custom numeric codes, alphanumeric passcodes, Face ID, Touch ID, Screen Time Passcodes, and more within minutes. Wondershare Dr.Fone also offers a swift and simple iCloud activation lock removal feature within its iPhone unlocking capabilities.
Key Features of Wondershare Dr.Fone
- Capable of bypassing Mobile Device Management (MDM) and Screen Time restrictions without causing any data loss.
- Compatible with iOS 17/iPadOS 17 and iPhone 15, ensuring its functionality with the latest Apple OS.
- Offers a simple 3-step procedure, making it accessible even for users without technical expertise.
Steps To Unlock iPhone Without Swiping Up Using Wondershare Dr.Fone
Here is how to open your Apple iPhone 15 without swiping up with the help of Wondershare Dr.Fone:
Step 1: Navigate to Unlock iOS Screen
Download and install Wondershare Dr.Fone on your computer. Go to “Toolbox,” tap “Screen Unlock,” and finally choose “iOS” to access the screen unlock tools. Once the window appears, choose the “Unlock iOS Screen” button to proceed with unlocking your iOS device’s screen. In the following screen, click “Start” to begin the process of unlocking your iOS device.
Step 2: Initiate the iDevice into Recovery Mode
After this step, enter Recovery Mode on your iDevice by following the specific on-screen instructions. Once your iDevice is in Recovery Mode, the system automatically identifies and displays the “Device Model.” You can make adjustments to the model if necessary and choose the “System Version” as per your needs. When finished, click on “Start” to initiate the unlocking process for your device’s screen.
Step 3: Successfully Unlock Your Locked iPhone
The screen will showcase the download progress of the iOS firmware on the platform. Once the iOS firmware download is completed, it undergoes verification. Proceed by selecting the “Unlock Now” button to initiate the unlocking process. A prompt window will appear, requesting confirmation for the process. Enter the necessary code and tap on “Unlock” to proceed. Upon successful unlocking of the iDevice, click “Done” to complete the process.
Method 3: Unlock the Apple iPhone 15 Without Swiping Up via Touch ID/Face ID
Apple’s advanced biometric authentication systems, Touch ID and Face ID, are also reliable options. These offer smooth and secure methods to unlock the Apple iPhone 15 11 without swiping up. The following are the models that support Touch ID and Face ID:
Models with Touch ID
- iPhone SE (2022)
- iPhone SE (2020)
- iPhone SE (2016)
- iPhone 8 Plus
- iPhone 8
- iPhone 7 Plus
- iPhone 7
- iPhone 6s Plus
- iPhone 6s
- iPhone 6 Plus
- iPhone 6
- iPhone 5s
Models with Face ID
- iPhone 15 Pro Max
- iPhone 15 Pro
- iPhone 15 Plus
- iPhone 15
- iPhone 14 Pro Max
- iPhone 14 Pro
- iPhone 14 Plus
- iPhone 14
- iPhone 13 Pro Max
- iPhone 13 Pro
- iPhone 13 mini
- iPhone 13
- iPhone 12 Pro Max
- iPhone 12 Pro
- iPhone 12 mini
- iPhone 12
- iPhone 11 Pro Max
- iPhone 11 Pro
- iPhone 11
- iPhone XS Max
- iPhone XS
- iPhone XR
- iPhone X
Method 4: Unlock Your Apple iPhone 15 Without Swiping Up via AutoUnlockX
AutoUnlockX is a tweak designed for jailbroken iPhones. It enhances the Apple iPhone 15 device’s unlocking experience by automatically bypassing the lock screen. That is when certain conditions are met. Jailbreaking involves bypassing the software restrictions imposed by Apple. Here are the steps to iPhone 11 unlock screen without swiping:
Step 1. Begin by adding an external repository like Sileo or Cydia, which will serve as an emulator. Remember, it won’t be automatically added to your applications; you’ll need to do this manually. So, download the repository from the SparkDev website (it’s not available on the App Store). Head to the “Tweaks” tab, find “AutoUnlockX,” and download it to your device.
Step 2. Following this, go to “Sources” in your Apple iPhone 15’s Settings, select “Edit,” and manually add the external repo to Cydia or Sileo. Open Sileo or Cydia and navigate to the “Search” page. In the search bar, type “AutoUnlockX.” Once the tweak appears, select it, and then tap “Get (Sileo)” or “Install (Cydia).”
Step 3. Confirm the selected repo by tapping the “Confirm” option and allow the tweak to install. Once installed, tap “Restart SpringBoard” to complete the download. After your Apple iPhone 15 resprings, proceed to enable AutoUnlockX.
Step 4. Open Settings, tap on “App,” and then select “AutoUnlockX.” Toggle on “Enable Auto Unlock.” Customize other settings as desired by tapping on them to turn them on or off.
Step 5. When finished, tap the “Respring” option at the bottom to apply your changes. At last, unlock your Apple iPhone 15 using your Face ID effortlessly.
Method 5: Unlock iPhone Without Swiping Up via Voice Control
Utilizing Voice Control to unlock your Apple iPhone 15 offers a hands-free approach to accessing your device. It is especially helpful for individuals with accessibility needs. There are situations where manual interaction might be challenging. Here’s a guide on how to set up and use “Voice Control” to unlock your Apple iPhone 15:
Step 1. Open the Settings app on your Apple iPhone 15 and scroll down to tap “Accessibility.” On the following screen, press “Voice Control” to proceed further.

Step 2. To set up voice control, you need to ensure that the “Voice Control” option is toggled on. After activating Voice Control, use a voice command to unlock your device.

Method 6: Unlock iPhone Without Swiping Up with Switch Control
Utilizing Switch Control is an excellent accessibility feature on iOS devices. It allows users to interact with their iPhones using adaptive switches or the Apple iPhone 15 device’s screen itself. Moreover, it can provide an alternative way to navigate the Apple iPhone 15 and access the Home screen. You no longer have to rely solely on the conventional swipe gesture. Here is how you can set up switch control to iPhone swipe to unlock:
Step 1. Access your Apple iPhone 15’s Settings, then tap on “Accessibility.” Now find and select “Switch Control,” and within it, navigate to “Switches.” Now, tap “Add New Switch” and choose “Camera.”

Step 2. Set Left Head Movement and Right Head Movement separately to “Home.” This action will lock the screen when tilting your head left or right. Now go back to “Recipes” in Switch Control, select “Edit,” and delete all existing recipes.

Step 3. Set “Scanning Style” to “Single Switch Step Scanning” and adjust “Dwell Time” to the shortest duration. Then, turn off the remaining settings under Switch Control.

Step 4. Save your switch, return to Accessibility Settings, and locate “Accessibility Shortcut.” Now, set triple-clicking the side button to activate “Switch Control.” On the home screen, triple-click the Side button, as previously set, to activate the switch on your Apple iPhone 15. Now, lock the Apple iPhone 15 screen and then wake the Apple iPhone 15 device without looking at it.

Conclusion
To conclude, we have explored different ways to unlock iPhones without swiping up beyond just using the usual swipe-up method. We’ve talked about using your fingerprint or face to unlock, using voice commands or special controls. The swipe-up gesture on iPhones is great, but these other methods give you more options.
While these methods are helpful, there’s a software called Wondershare Dr.Fone that’s particularly useful for iPhone issues. It does things like recovering data, fixing problems with your phone, and unlocking it when you can’t get in. Dr.Fone has a feature called “Screen Unlock” that was specifically made to help with different ways of unlocking iPhones.
Also read:
- [New] In 2024, Mastering Momentum Go From Zero to Viral in FB
- [Updated] 2024 Approved Dish on Titles Crafting Captivating Cookery Channel Names
- [Updated] In 2024, Elevate Your Content with These Top Keyword Discovery Tools
- 2024 Approved Comparative Study of VSDC vs Best Video Recorders
- 2024 Approved GoPro's Deep Sea Capturing Unforgettable Underwater Scenes
- Complete Guide on Unlocking Apple iPhone 14 Pro Max with a Broken Screen? | Dr.fone
- Comprehensive Review of the Latest Apple Watch Series 9 Features
- From Sound to Size - Analyzing the Key Differences Between Echo Pop & Echo Dot
- How to Turn Off Find My iPhone 8 when Phone is Broken? | Dr.fone
- In 2024, How Do You Unlock your iPhone 8? Learn All 4 Methods | Dr.fone
- In 2024, How Many Attempts To Unlock Apple iPhone 11 | Dr.fone
- In 2024, How to Make the Most of Your Apple iPhone 15 Plus Lock Screen with Notifications? | Dr.fone
- In 2024, How to Unlock Disabled Apple iPhone XR/iPad Without Computer | Dr.fone
- In 2024, Unlock Your Disabled iPhone 13 mini Without iTunes in 5 Ways | Dr.fone
- Quick and Easy Update: Downloading AMD ATI Radeon HD 3450 Drivers Now
- Weave Audio Threads Through PowerPoint Slides
- Title: In 2024, How to Bypass Apple iPhone 15 Passcode Easily Video Inside | Dr.fone
- Author: Amelia
- Created at : 2024-10-23 16:49:17
- Updated at : 2024-10-26 16:00:05
- Link: https://iphone-unlock.techidaily.com/in-2024-how-to-bypass-apple-iphone-15-passcode-easily-video-inside-drfone-by-drfone-ios/
- License: This work is licensed under CC BY-NC-SA 4.0.