
In 2024, How To Bypass the Required Apple Store Verification For Apple iPhone SE | Dr.fone
How To Bypass the Required Apple Store Verification For Apple iPhone SE
The Apple App Store is a familiar place for anyone with an iPhone or iPad. It’s where you find all sorts of useful and fun apps. However, one thing that can be a hassle is the store’s strict verification process. Every time you make a purchase, you need to go through this step.
It’s there for a good reason – to stop fraud – but it can get annoying, especially if you forget your Apple ID or have other issues. This article will explore the ways to stop the Apple Store “Verification Required” prompt, making your app downloading experience smoother.

Part 1: Why Does Apple Require Verification in the Apple Store?
When browsing the App Store on your Apple iPhone SE or iPad and looking to download the latest game or productivity tool, you might have noticed that Apple often asks for some form of verification before you can proceed with your purchase. This is not just a random step; there’s a solid reason behind it.
The primary reason Apple requires verification for App Store purchases is to ensure that you are the person authorizing the purchase. This security measure prevents unauthorized transactions and protects your account from fraud.
What does this verification usually involve? It could be entering your Apple ID password or using Face ID or Touch ID if your device supports these features. These methods are designed to confirm your identity quickly and securely.

Reasons Why the Verification Required Message Might Appear
There are several reasons why you might see an Apple Store’ Verification Required’ message when trying to download an app or make a purchase:
- New Apple ID. If you’ve just created a new Apple ID and need to download or pay for apps, Apple must verify your payment information. Thus, you’ll have to prove everything, especially on a new phone.
- **Payment method needs to be corrected.**Suppose there’s an issue with your Apple ID’s payment method, such as outdated or incorrect details. In that case, verification is required to ensure the account is secure and ready for transactions.
- Invalid credit card. Unsupported or invalid credit cards can trigger the verification notice, as Apple can’t process payments with these cards.
- Unpaid balance. If there’s an outstanding balance on your Apple ID, you can download or pay for new apps once this balance is cleared.
- Family Sharing restrictions. For those using Family Sharing, if the family organizer has placed restrictions on your account, this could result in a verification prompt.
Understanding these reasons is the first step in addressing the ‘Verification Required’ message. It’s not just a random or annoying hurdle; it’s there for your security and to ensure a smooth, safe experience when using the App Store.
Part 2: How To Fix Verification Required Prompt Using Apple ID
Having to deal with the ‘Verification Required’ prompt in the App Store can be a bit of a hassle, especially when you’re eager to get your hands on a new app or game. Fortunately, there are several methods you can use to resolve this issue, most of which are pretty straightforward and can be done right from your device. Here’s how to tackle it:
### Update Payment MethodOne of the most common reasons for the verification prompt is a problem with your payment method. To fix this, go to your Apple ID settings on your Apple iPhone SE or iPad. Tap your name at the top of the Settings app, then go to Payment & Shipping. You can update your payment information or add a new payment method here. Make sure the details are correct and up to date.
Check Unpaid Subscriptions
Sometimes, unpaid subscriptions can trigger the verification prompt. Tap the App Store > your profile icon, and select Subscriptions. Here, you can view all your subscriptions, active or expired. Check if there are any unpaid ones and clear any outstanding payments.

Don’t Require Password for Purchases
For less frequent purchases, you should change the settings so you don’t always have to enter your password. Go to Settings, then to Screen Time. Under Content & Privacy Restrictions, select iTunes & App Store Purchases. Here, you can change the settings to Don’t Require for purchases. However, be cautious with this method as it reduces security.

Sign Out of Apple ID and Re-Sign In
Sometimes, simply signing out of your Apple ID and then signing back in can resolve the issue. Go to the Settings app, tap your name at the top, and scroll down to Sign Out. After signing out, restart your device and then sign back in. This can help refresh your account settings and clear up any minor glitches.
Remember, these methods are about bypassing the verification process and ensuring your account is up-to-date and secure. Regularly checking your Apple ID settings and payment information can prevent many common issues with the App Store, including the frustrating ‘Verification Required’ prompt.
Part 3: How To Bypass Verification Required Prompt Without Apple ID
If you need to learn how to bypass the ‘Verification Required’ prompt in the App Store but don’t have access to the Apple ID or password, there’s an alternative approach using third-party software. One such tool that can assist in this situation is Wondershare Dr.Fone - Screen Unlock (iOS), which offers a feature specifically designed for this purpose.
Introducing Dr. Fone’s Screen Unlock (iOS) Feature
Dr.Fone - Screen Unlock (iOS) function includes an Apple ID remover tool. This feature is handy when you cannot remember your Apple ID or password but need to download apps from the App Store. Here’s a step-by-step guide on how to use this feature.
Step-by-Step Guide To Bypass Verification Without Apple ID With Dr.Fone
Here’s a complete guide on bypassing the verification required on the App Store.
Step 1: Install and open Wondershare Dr.Fone on your computer.
Step 2: Navigate to Toolbox and select Screen Unlock followed by iOS.

- Step 3: In the next window, choose Remove Apple ID to proceed.

- Step 4: A connectivity status will appear on the screen with your iOS device connected to the computer. Click Unlock Now to start the process.

- Step 5: Confirm if your iOS device has a screen lock and two-factor authentication enabled. This is crucial for the process to continue smoothly.

- Step 6: Follow the on-screen instructions to put your iOS device in Recovery Mode. If necessary, you can also opt for DFU Mode by following the provided instructions. Once in Recovery Mode, the tool will recognize your device model. You’ll need to select the correct system version to proceed.

- Step 7: The tool will download the appropriate iOS firmware for your device. After the download, it will verify the firmware.


- Step 8: After firmware verification, click Unlock Now. You’ll be prompted to enter a code for confirmation. Once entered, the unlocking process will begin.

- Step 9: You’ll receive a notification once the process is complete. You may try again if the process fails to succeed the first time.

Note: After Apple ID removal, you must re-enter a new Apple ID to access the App Store. Take note of the password now if you forgot your previous one.
Conclusion
In this article, you’ve learned how to remove ‘Verification Required’ in the App Store. The primary takeaway is to try solving the issue using your Apple ID, as this approach typically prevents data loss. However, if you’re in a tight spot without access to your Apple ID, Dr.Fone - Screen Unlock (iOS) offers a reliable alternative to bypass this hurdle.
While it’s an effective solution, always consider it a secondary option to safeguard your data. Additionally, Dr.Fone can be a handy tool for various other phone-related challenges, making it a useful resource for tackling different tech problems.
Tips: Are you searching for a powerful Screen Unlock tool? No worries as Dr.Fone is here to help you. Download it and start a seamless unlock experience!
Can You Unlock Apple iPhone SE After Forgetting the Passcode?
If you forget the passcode on your Apple iPhone SE, you won’t have the option to access its information and use it flawlessly. What’s more disturbing is that if you keep entering the wrong ones, your Apple iPhone SE will be locked. It would help if you opened it, be it a 4-digit passcode, 6-digit passcode, Fingerprint, or Face ID.
If you forgot passcode on iPhone, the main thing you can do with your iDevice is to make an Emergency call. You should erase your Apple iPhone SE if you don’t remember your screen unlock code. But don’t worry; we have many solutions available here. Keep reading to learn about the best tool, i.e., Dr.Fone, for screen unlock.
Part 1: Can I Unlock My iPhone When I Forgot Passcode?
Yes, you can unlock your locked iPhone without a passcode. If you forgot passcode on iPhone, Apple’s proper prescribed way is to reset your Apple iPhone SE. In other words, do a factory reset to erase the passcode. However, many individuals can’t do this strategy since it’s irksome and may lead to a few unforeseen issues. Such issues can worsen the condition.
Therefore, we have introduced some alternate ways to unlock your iDevice. You can even use an expert tool to remove this issue. Keep following us to find out more about our recommended methods.
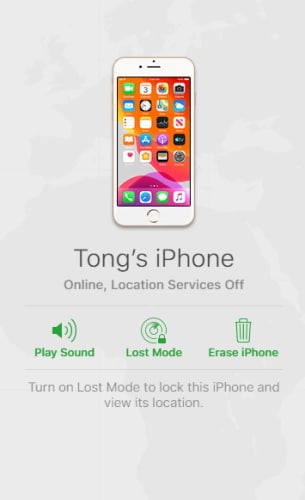
1. Use Find My
Utilizing iCloud if the Find My feature is enabled before you forgot iPhone passcode. By visiting iCloud.com, you can erase your Apple iPhone SE from a distance. Moreover, you can eliminate the Apple iPhone SE device’s screen lock to unlock it.
To erase the passcode using the Find My feature on iCloud:
Step 1. Go to iCloud.com and enter your Apple account credentials and log in to your account.
Step 2. Pick “Find iPhone” and go to “All Devices” > “Erase iPhone”.
2. Use Recovery Mode with iTunes
How to bypass the Apple iPhone SE passcode or eliminate the passcode? The method is to utilize iTunes. However, using iTunes to restore the Apple iPhone SE in recovery mode will erase all data from the Apple iPhone SE device.
It will wipe out the iDevice. Therefore, you must back up your data to restore it later. Without any backup accessible, you will permanently lose everything on the iDevice.
Additionally, ensure you remember the Mac ID credentials on the iDevice, or you won’t be able to use it. Finally, utilizing iTunes will eliminate the lock screen’s passcode but not the firmware. Considering all these, bypassing a passcode isn’t so hard. Here’s how to bypass the Apple iPhone SE passcode with iTunes:
Step 1. Enter the recovery mode on your Apple iPhone SE, iPad, or iPod Contact.
- On iPhone 8/8 Or later: Hold the Power/Side button on your phone and one of the volume buttons. Keep holding until the power off slider shows up. Flip the slider to switch off the iPhone. Next, press and hold the power button and connect your Apple iPhone SE to the PC. Hold the button until the Apple iPhone SE transforms into the recovery mode screen.
- On iPhone 7/7 Or Below: Press and hold the power button until you see the slider. Flip the slider to switch off the iPhone. Press the Volume Down button and connect the Apple iPhone SE to the PC. Continue to hold the button until you see the recovery mode screen.
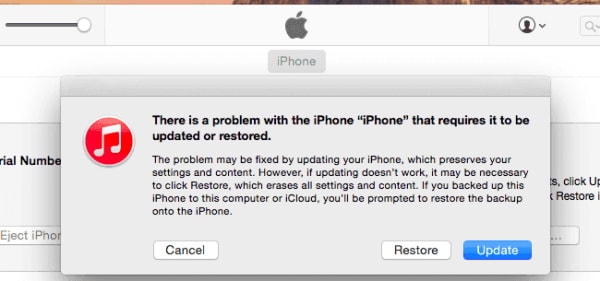
Step 2. Restore your Apple iPhone SE.
After connecting your Apple iPhone SE to the PC, you will see a popup window in iTunes saying, “There is an issue with the ‘iPhone name’ that needs it to be restored.” In that window, select “Restore” to erase the iPhone. (If iTunes doesn’t run, open iTunes by double tapping it.)
Step 3. Set up iPhone.
Hang tight for the process to wrap up. Then, a short time later, go to your Apple iPhone SE and follow the on-screen directions to set up and utilize your phone again.
3. “Erase iPhone” Option
However long the locked iPhone has a functioning WiFi connection, you can now delete the Apple iPhone SE device from the lock screen. This method only works if it is running iOS 15.2 or above.
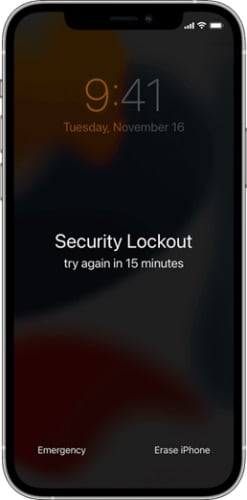
After several wrong attempts, an “Erase iPhone” choice will appear on the screen’s lower part. Just tap on that, confirm you need to erase the Apple iPhone SE and enter your Apple ID details afterward. The device will then reset itself, completely deleting all data and beginning as a new one.
If the Apple iPhone SE device can’t connect to WiFi or data, the Apple ID approval step will fail. Then the Apple iPhone SE cannot be erased, and you will need to turn to the conventional DFU strategy.
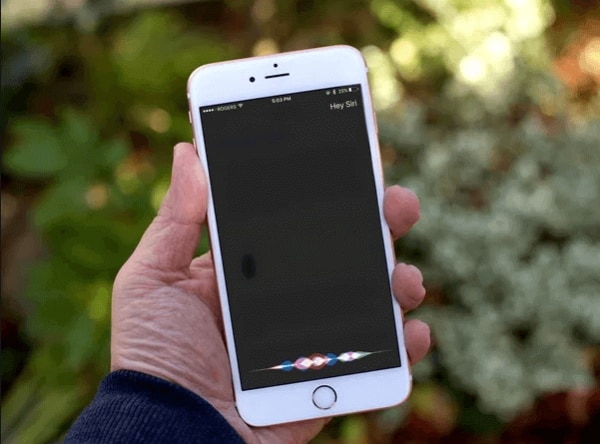
4. Use Siri
You can also use Siri to bypass the Apple iPhone SE passcode. Using Siri to erase the lock is an iPhone hack existing on iOS devices running iOS 8.0 to iOS 10.1. You can utilize Siri to bypass your Apple iPhone SE passcode by switching off cellular data. You also need to read a new message and set a reminder, and that’s just the beginning.
That is an indirect method for bypassing a forgotten passcode on iPhone. In any case, it is just available on a few iOS variants.
To erase the lock screen passcode with Siri on iOS 8 to iOS 10.1:
Step 1. Press and hold the “Home” button to actuate Siri on your Apple iPhone SE.
Step 2. Advise Siri to set a reminder.
Step 3. Tap the recently added reminder to open the “Reminders” application.
Step 4. Click the “Home” button and go to the Home screen. Presently you have effectively bypassed the lock screen.
As you might be aware, this way is helpful because of iOS bugs. This method is also viewed as a method for hacking the iPhone. In later iOS versions, Apple fixed these bugs. In this manner, it works on iPhones running iOS 8.0 to 10.1.
5. Dr.Fone-Screen Unlock
The Apple iPhone SE unlock software Dr.Fone-Screen Unlock will help to open the password without iTunes. It is well-versed in unlocking screen locks from various iOS devices, including the iPhone, iPad, and iPod contact. With it introduced on your PC, you can eliminate your Apple iPhone SE lock screen effectively. It can remove the 4-digit password, 6-digit password, Fingerprint, or Face ID.
Therefore, Dr.Fone is a decent option if you like to sidestep the passcode on your Apple iPhone SE without Siri or iTunes. To fix more issues, such as bypassing the enactment lock without the past proprietor, Dr.Fone-Screen Unlock will be a decent option for you. The following steps illustrate how you can unlock your lock screen passcode:
Step 1. Connect your Apple iPhone SE/iPad
Open the Dr.Fone program on your PC and select “Screen Unlock” among all the options from the home page.

Connect your iOS device to the PC through a USB connector. Then, at that point, click the “Unlock iOS Screen” option on the screen.

Step 2. Boot iPhone in Recovery or DFU mode
Before sidestepping the Apple iPhone SE lock screen, we want to boot it in Recovery or DFU mode by adhering to the on-screen directions. Therefore, the Recovery mode is suggested for the iOS lock screen. Yet, if you can’t actuate the Recovery mode, you can also use the DFU mode.

Step 3. Affirm iOS device information
After putting the Apple iPhone SE device in DFU mode, Dr.Fone will show the Apple iPhone SE device information, for example, the Apple iPhone SE device Model and OS Variant. You can choose the correct data from the dropdown menu if the information is incorrect. Then, at that point, click Download to download the firmware for your device.

Step 4. Unlock the Apple iPhone SE screen lock
After the firmware is downloaded effectively, click Unlock Now to begin unlocking your Apple iPhone SE/iPad.

Simply shortly, your Apple iPhone SE will be unlocked effectively. Note that this unlocking process will wipe the user data on your Apple iPhone SE. However, it is practical to erase this issue from your device.
Part 3: How Can I Turn Off/On My Passcode?
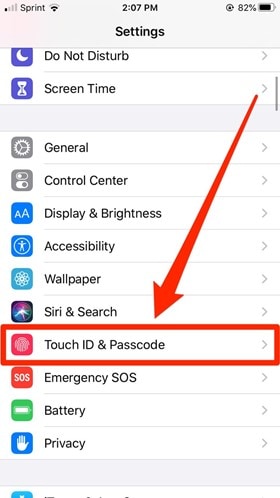
- Open your Settings application and look down until you track down the choice for the password menu. On iPhones with a home button, this will be named “Fingerprint and Password.” On new ones, it is “Face ID and Password.” Click this choice.
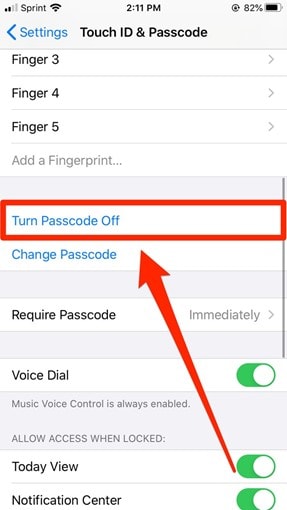
- Enter your current password.
- Look down until you track the “Turn Passcode Off” choice and tap it.
- Click again to agree with your decision to turn off your passcode.

The Bottom Line
Indeed, if you forgot the passcode on the iPhone, there are a few ways to get into your phone again. However, the best way is to use professional software to do the task for you. Therefore, we strongly suggest you install the Wondershare Dr.Fone-Screen Unlock software. It is a security tool and worth trying when you forgot iPhone passcode. So download it today for a quick unlocking experience.
How to Unlock Apple iPhone SE With an Apple Watch & What to Do if It Doesn’t Work
There are plenty of reasons why Apple devices are in such high demand. The quality of the products is unquestionable – few can argue the superior quality of the Apple iPhone SE’s camera, for instance. Almost all devices are long-lasting. They have a great resale value. They offer cutting-edge features.
However, perhaps the greatest advantage of Apple products is just how well they integrate with one another and work together.
With a quick little tap, you can have your Apple iPhone SE’s camera working as your Mac’s webcam. You can use your iPad as a second Mac display. Take calls using any device.
Moreover, you might be able to use the Apple Watch to unlock your Apple iPhone SE.
Now, you cannot just unlock any Apple iPhone SE with your Watch. The devices must be paired, and you’ll need to follow a few steps to enable this option. Here’s how to unlock your phone using your Apple Watch like a pro.
Part 1. Can I Use an Apple Watch To Unlock My Apple iPhone SE?

The Apple iPhone SE face ID is one of the simplest, most practical ways to unlock your phone. While you’ll need a passcode just as another security layer, you won’t have to worry about someone else breaking in if they know it, going through your messages, or collecting your private information.
With face ID, only you can unlock your phone, sign in to your favorite apps, and even authenticate purchases.
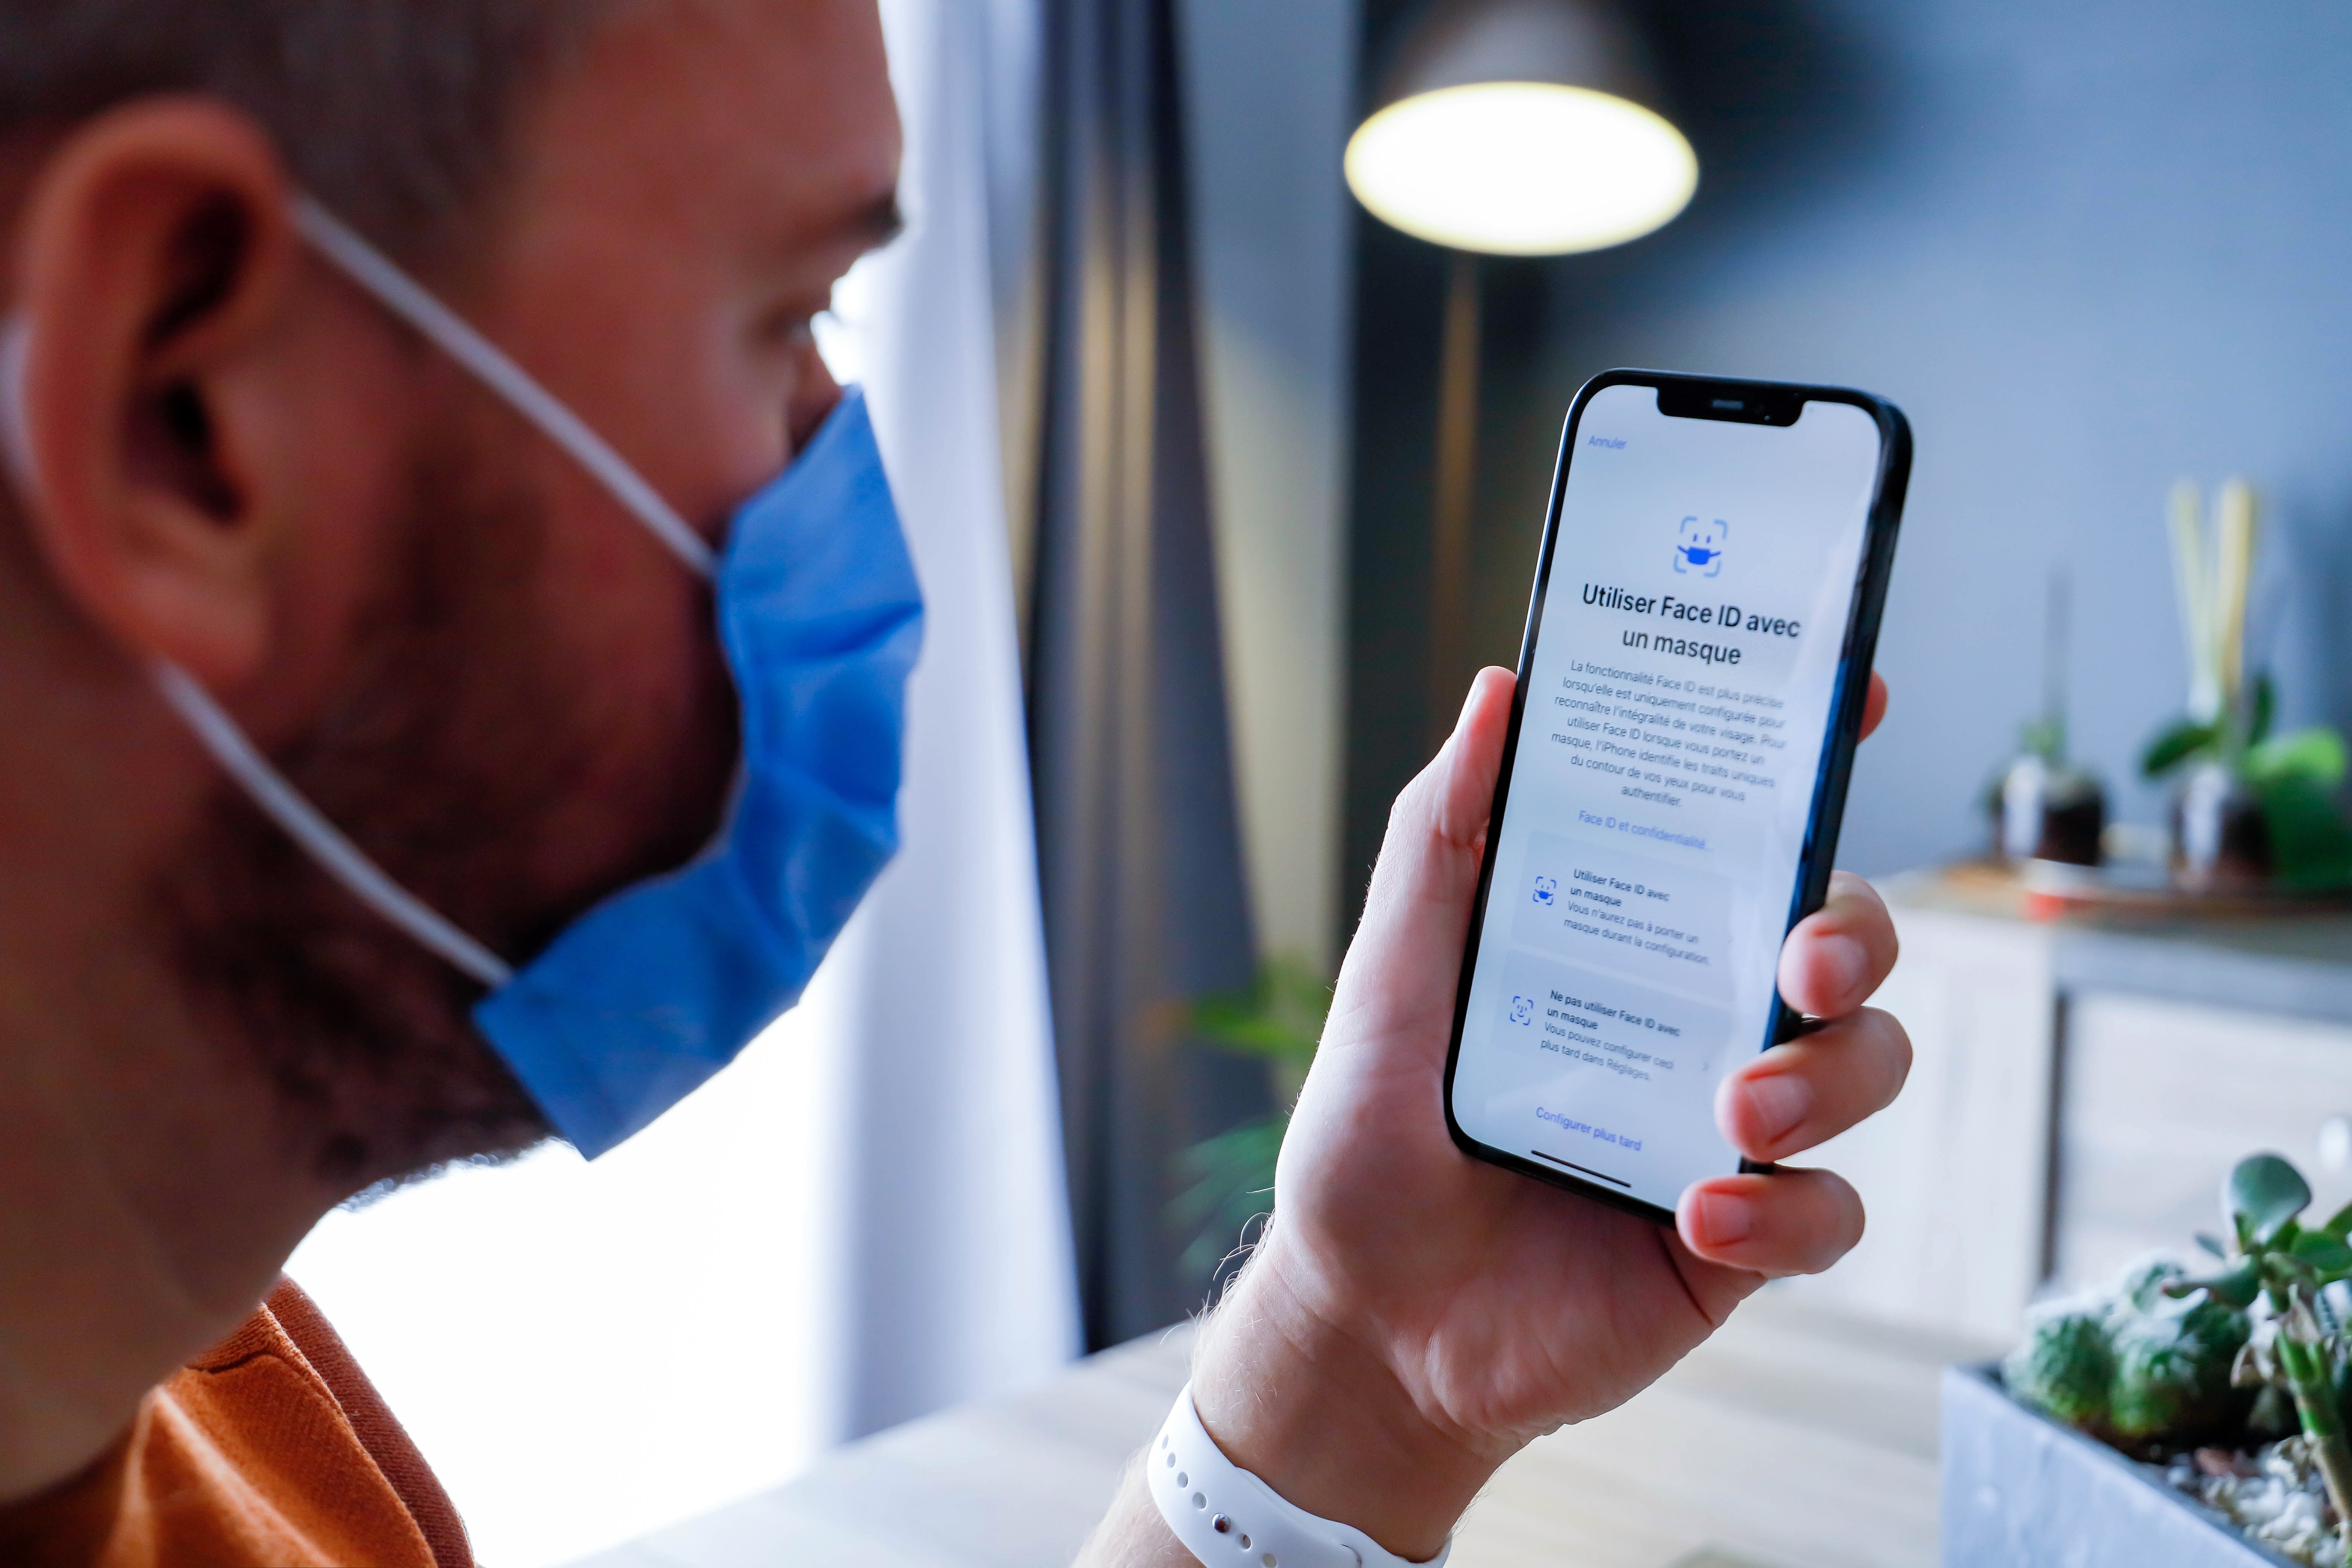
The problem is that neither face ID nor traditional passcodes aren’t always the most convenient option. If you wear sunglasses, safety goggles, a face mask, or other face coverings and can’t take them off for some reason, face ID won’t work. If you have gloves on and can’t type in your passcode, your passcodes won’t work.
What could work is your Apple Watch.
Depending on the Apple Watch version you own and your Apple iPhone SE model, you could use your watch to unlock your phone in any circumstances. It’s easy, secure, and convenient, above all else.
Part 2. Requirements for Unlocking Apple iPhone SE With Apple Watch

Unfortunately, not every Apple iPhone SE can be unlocked with your Apple Watch, and not every Apple Watch can unlock your Apple iPhone SE. Both devices must meet some requirements before you can adjust your settings to enable this option.
To be able to use your Apple Watch to unlock your phone with the utmost ease, you’ll need:
- An Apple iPhone SE with Face ID – Apple iPhone SE X and newer models;
- iOS 14.5 and newer versions;
- An Apple Watch series 3 and newer models;
- watchOS 7.4 and newer versions.
Additional requirements you’ll need to meet include:
- Your Apple iPhone SE and Apple Watch need to be paired;
- Both devices need to have WiFi and Bluetooth turned on (but a connection to a WiFi network isn’t necessary);
- You need to have a passcode on your Apple Watch;
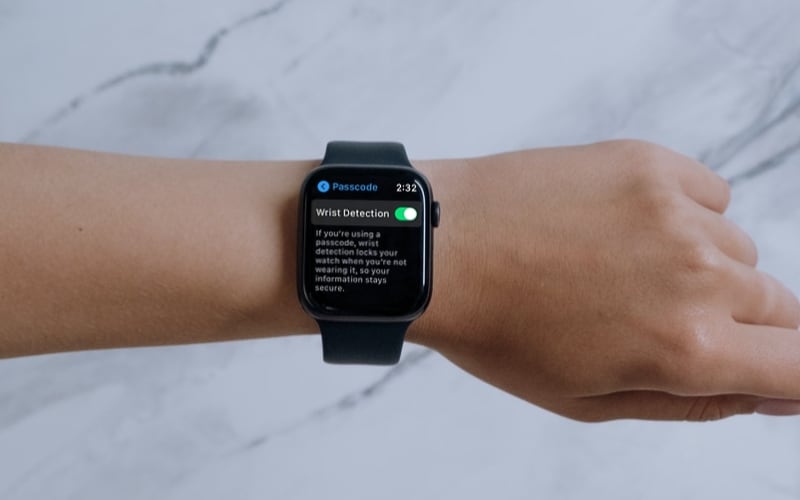
- Wrist detection on your watch needs to be turned on;
- The watch needs to be on your wrist and unlocked.
You’ll also need to wear items such as sunglasses, face coverings, ski masks, or others that prevent you from using your Apple iPhone SE Face ID.
Part 3. How To Unlock Apple iPhone SE With an Apple Watch

If you meet all the aforementioned criteria, setting up the feature to unlock your Apple iPhone SE using an Apple Watch is easy. You’ll just have to follow a few steps:
- Step 1: Go to Settings > Face ID & Passcodeon your Apple iPhone SE;
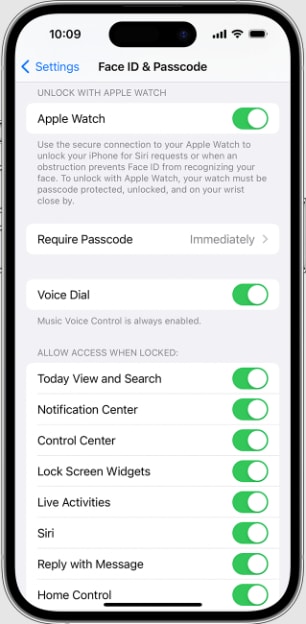
- Step 2: Type in your passcode;
- Step 3: Find and enable Unlock with Apple Watch.
Remember that your Apple Watch’s wrist detection must be turned on for this option to work. When you tap to enable Unlock with Apple Watch, if your wrist detection isn’t turned on, you’ll get a prompt on your phone asking you to turn it on.
You can turn on wrist detection on your watch by following these steps:
- Step 4: Go to Settingson your Apple Watch;
- Step 5: Tap on the Passcode;
- Step 6: Toggle Wrist Detection
Now that you’ve enabled the option to unlock your Apple iPhone SE using your Apple Watch, it’s time to simply start using the feature. To unlock your phone, you’ll need to:
- Have your Apple Watch on your wrist, unlocked;
- Tap on your Apple iPhone SE or raise it to your face to activate it;
- Glance at your phone while wearing a face mask, sunglasses, or another item that’s preventing you from using Face ID;
- Swipe up on your phone’s screen.
Your Apple Watch will send an alert when you’ve used it to unlock your Apple iPhone SE. If you accidentally unlock your phone, simply tap on the Lock Apple iPhone SE on the screen of your watch to lock it.
However, remember that the next time you want to use your Apple Watch to unlock your Apple iPhone SE, you’ll first need to type in your passcode.
Part 4. What To Do if You Can’t Unlock Your Apple iPhone SE With a Watch
Generally speaking, unlocking your Apple iPhone SE with an Apple Watch should be a simple, seamless task. Unfortunately, though, that’s not always the case. A glitch or a bug could be preventing you from enjoying this feature, so take a look at a few things you could try to fix it.
1. Check All Settings & Reconfigure
As mentioned earlier, there are a few requirements that your devices need to meet to unlock your Apple iPhone SE with your Apple Watch.
If you’re using the correct versions of Apple iPhone SE (iPhone X, iOS 14.5 and newer) and Apple Watch (series 3, watchOS 7.4 and newer), try to reconfigure your settings.
Make sure that you have:
- A passcode on your watch;
- Wrist detection turned on;
- Feature Unlock with Apple Watchturned on on your Apple iPhone SE.
If all the settings are correct, try one of the following options.
2. Restart Your WiFi/Bluetooth Connection
Your Apple iPhone SE and your Apple Watch need to have both WiFi and Bluetooth turned on. If they’re turned on on both devices, try turning them off and back on again to restart the connection.
Remember, you only need WiFi and Bluetooth on but don’t need to be connected to a WiFi network.
If the problem persists, you could also restart your devices and try again.
3. Reset Your Face ID
In some instances, it’s the Face ID feature that’s causing trouble, so you might want to try and reset it. It’s much easier than it may sound, you just need to follow the next few steps:
- Step 1: Go to your Apple iPhone SE’s Settings;
- Step 2: Select Face ID & Passcode;
- Step 3: Tap Reset Face ID.
When you tap on this, you’ll need to go through the process of setting your Face ID as usual. You’ll need to type in your passcode, hold your Apple iPhone SE in front of you (in portrait orientation), tap to get started, and put your face in the provided frame.
Move your face to complete the circle, then tap on Continue. Repeat the face scan process the second time and select Done.
4. Do a System Repair on Your Apple iPhone SE
If your Apple Watch unlock is still misbehaving, you might need to do a full system repair. As a general rule of thumb, it’s best to use verified apps like Dr.Fone to prevent the problem from getting worse.
Dr.Fone Apple iPhone SE system repair is designed to be fast, efficient, and safe. It can repair virtually any system glitch in less than five minutes, ensuring your phone operates seamlessly.
To perform a standard system repair with Dr.Fone, follow the next few steps:
- Step 1: Download and launch Dr.Fone on your computer;
- Step 2: From the Toolboxon your left-hand side, select System Repair;
- Step 3: Connect your Apple iPhone SE to your PC using a cable connection;
- Step 4: Select your device type in the new window that opens;
- Step 5: Select iOS repair;

- Step 6: Select Standard Repair Mode;
- Step 7: Follow the on-screen instructions and select Enter Recovery Mode;
- (Alternatively, select Guideif your phone is unresponsive);
- Step 8: Select the iOS firmware you want to download and install on your device;
- Step 9: Wait for the download to finish, then select Repair Now;
- Step 10: Wait until the process is complete, then select Done.

If it was a system mistake preventing you from unlocking your Apple iPhone SE with your Apple Watch, the option should be functioning well after the Dr.Fone iOS repair.
5. Reset Network Settings
If the problem wasn’t due to a system glitch, you should try resetting your Apple iPhone SE’s network settings. The process is simple, just:
- Step 1: Go to Settings > General > Reset > Reset Network;
- Step 2: Type in your passcode.
Resetting your network settings will clear out data from your internet, local network, and devices, including WiFi passwords, some Bluetooth connections, and more. However, your paired devices, such as the Apple Watch, shouldn’t be removed.
6. Reset Your Watch and Pair It Again
Finally, if you’re still experiencing issues, you might need to reset your Apple Watch and pair it with your Apple iPhone SE again.
It’s all quite simple:
- Step 1: Press and hold the power button;
- Step 2: Drag the slider under Power offto the right;
- Step 3: Press and hold the power button to turn the Apple iPhone SE device back on.
To perform a hard reset, simultaneously press and hold the power button and digital crown.
Conclusion
Using your Apple Watch to unlock your Apple iPhone SE is convenient when you cannot use the Face ID feature. It allows you to seamlessly unlock your phone when wearing sunglasses, goggles, face masks, or other face coverings that prevent the Face ID from working.
Enabling this option is a straightforward process, and if there’s ever a glitch, there are several options you could try to repair it.
- Title: In 2024, How To Bypass the Required Apple Store Verification For Apple iPhone SE | Dr.fone
- Author: Amelia
- Created at : 2024-07-15 05:14:31
- Updated at : 2024-07-16 05:14:31
- Link: https://iphone-unlock.techidaily.com/in-2024-how-to-bypass-the-required-apple-store-verification-for-apple-iphone-se-drfone-by-drfone-ios/
- License: This work is licensed under CC BY-NC-SA 4.0.