
In 2024, How To Bypass the Required Apple Store Verification For iPhone 13 Pro Max | Dr.fone
How To Bypass the Required Apple Store Verification For Apple iPhone 13 Pro Max
The Apple App Store is a familiar place for anyone with an iPhone or iPad. It’s where you find all sorts of useful and fun apps. However, one thing that can be a hassle is the store’s strict verification process. Every time you make a purchase, you need to go through this step.
It’s there for a good reason – to stop fraud – but it can get annoying, especially if you forget your Apple ID or have other issues. This article will explore the ways to stop the Apple Store “Verification Required” prompt, making your app downloading experience smoother.

Part 1: Why Does Apple Require Verification in the Apple Store?
When browsing the App Store on your Apple iPhone 13 Pro Max or iPad and looking to download the latest game or productivity tool, you might have noticed that Apple often asks for some form of verification before you can proceed with your purchase. This is not just a random step; there’s a solid reason behind it.
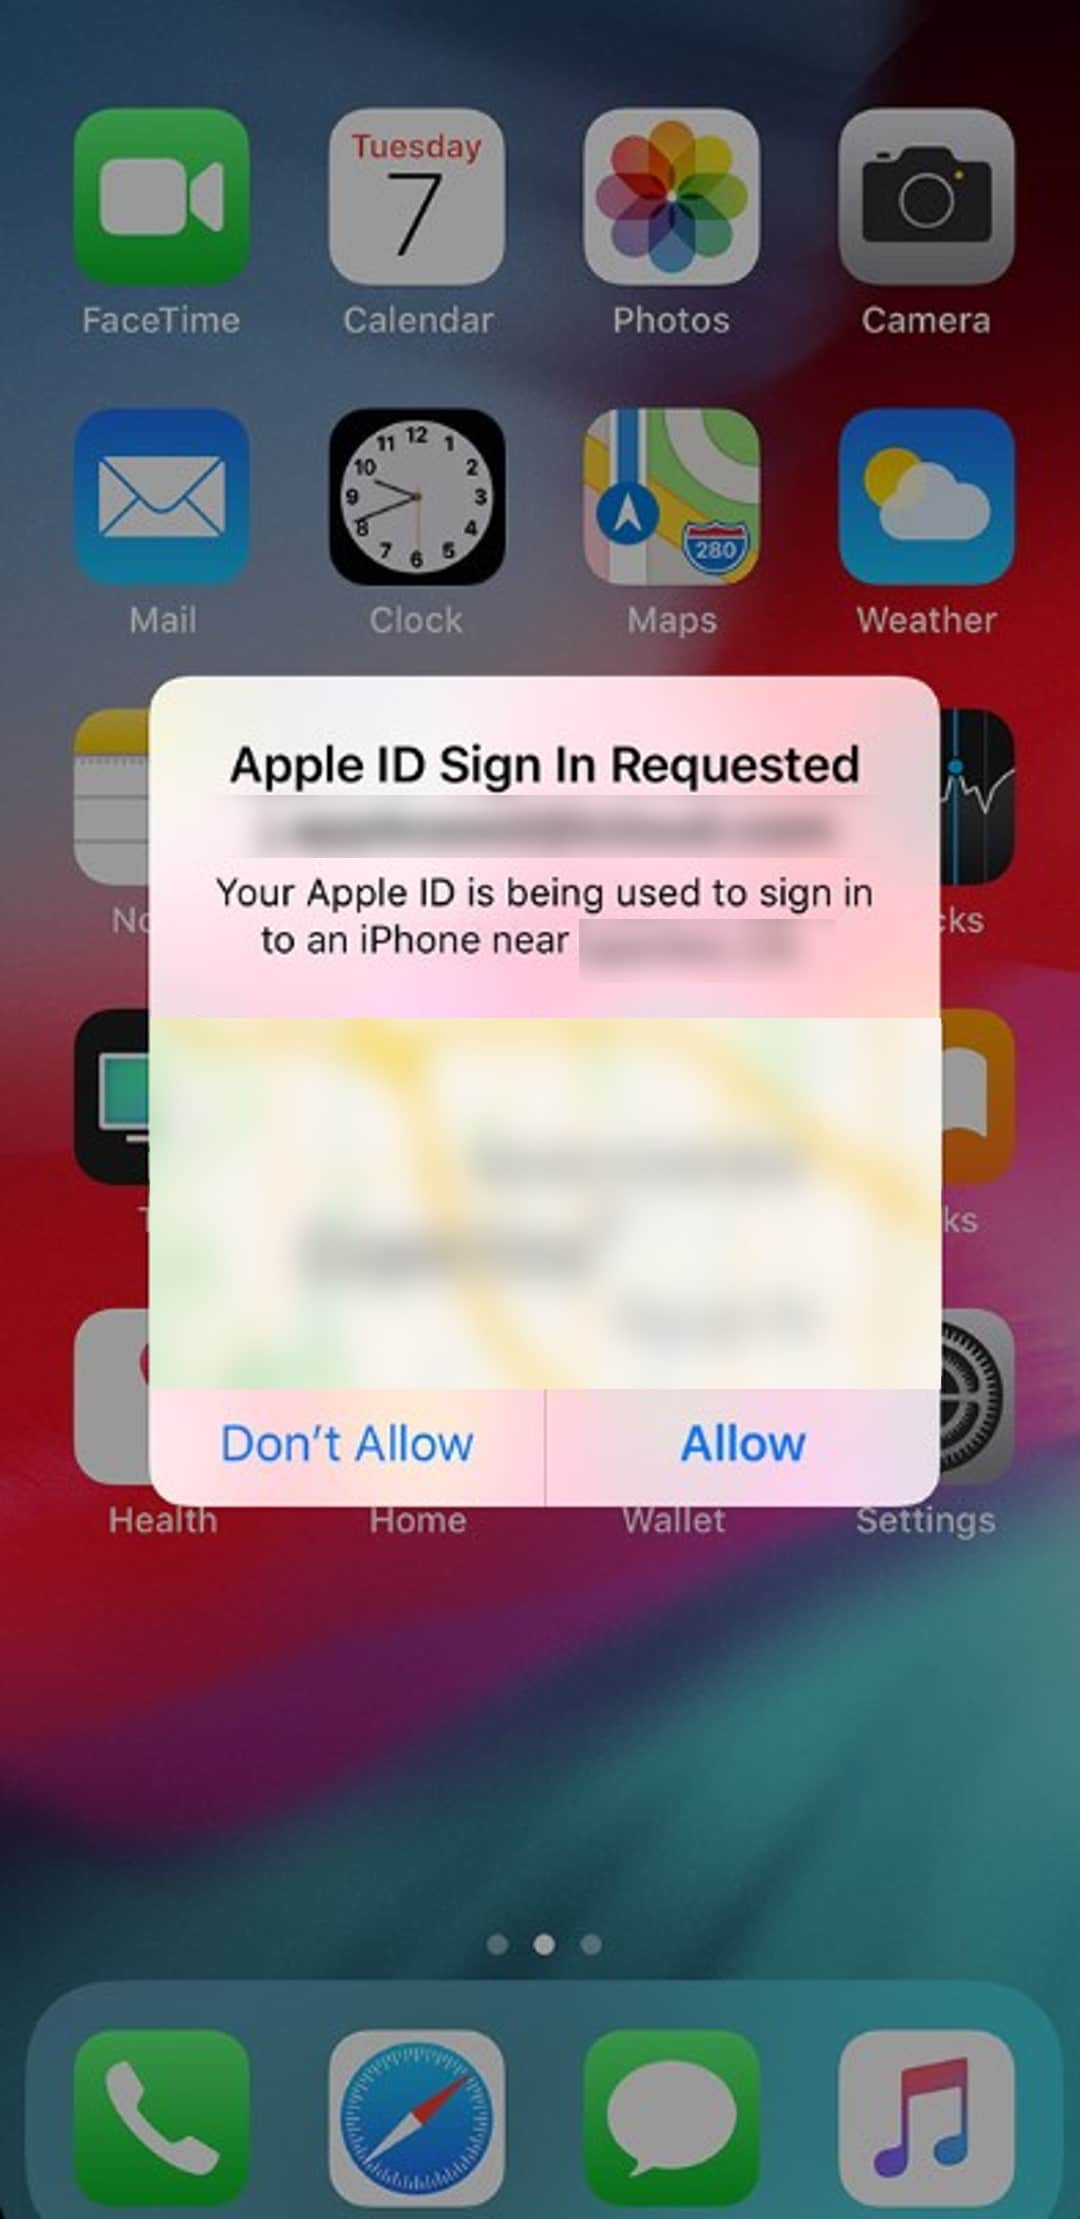
The primary reason Apple requires verification for App Store purchases is to ensure that you are the person authorizing the purchase. This security measure prevents unauthorized transactions and protects your account from fraud.
What does this verification usually involve? It could be entering your Apple ID password or using Face ID or Touch ID if your device supports these features. These methods are designed to confirm your identity quickly and securely.

Reasons Why the Verification Required Message Might Appear
There are several reasons why you might see an Apple Store’ Verification Required’ message when trying to download an app or make a purchase:
- New Apple ID. If you’ve just created a new Apple ID and need to download or pay for apps, Apple must verify your payment information. Thus, you’ll have to prove everything, especially on a new phone.
- **Payment method needs to be corrected.**Suppose there’s an issue with your Apple ID’s payment method, such as outdated or incorrect details. In that case, verification is required to ensure the account is secure and ready for transactions.
- Invalid credit card. Unsupported or invalid credit cards can trigger the verification notice, as Apple can’t process payments with these cards.
- Unpaid balance. If there’s an outstanding balance on your Apple ID, you can download or pay for new apps once this balance is cleared.
- Family Sharing restrictions. For those using Family Sharing, if the family organizer has placed restrictions on your account, this could result in a verification prompt.
Understanding these reasons is the first step in addressing the ‘Verification Required’ message. It’s not just a random or annoying hurdle; it’s there for your security and to ensure a smooth, safe experience when using the App Store.
Part 2: How To Fix Verification Required Prompt Using Apple ID
Having to deal with the ‘Verification Required’ prompt in the App Store can be a bit of a hassle, especially when you’re eager to get your hands on a new app or game. Fortunately, there are several methods you can use to resolve this issue, most of which are pretty straightforward and can be done right from your device. Here’s how to tackle it:
Update Payment Method
One of the most common reasons for the verification prompt is a problem with your payment method. To fix this, go to your Apple ID settings on your Apple iPhone 13 Pro Max or iPad. Tap your name at the top of the Settings app, then go to Payment & Shipping. You can update your payment information or add a new payment method here. Make sure the details are correct and up to date.
Check Unpaid Subscriptions
Sometimes, unpaid subscriptions can trigger the verification prompt. Tap the App Store > your profile icon, and select Subscriptions. Here, you can view all your subscriptions, active or expired. Check if there are any unpaid ones and clear any outstanding payments.

Don’t Require Password for Purchases
For less frequent purchases, you should change the settings so you don’t always have to enter your password. Go to Settings, then to Screen Time. Under Content & Privacy Restrictions, select iTunes & App Store Purchases. Here, you can change the settings to Don’t Require for purchases. However, be cautious with this method as it reduces security.

Sign Out of Apple ID and Re-Sign In
Sometimes, simply signing out of your Apple ID and then signing back in can resolve the issue. Go to the Settings app, tap your name at the top, and scroll down to Sign Out. After signing out, restart your device and then sign back in. This can help refresh your account settings and clear up any minor glitches.
Remember, these methods are about bypassing the verification process and ensuring your account is up-to-date and secure. Regularly checking your Apple ID settings and payment information can prevent many common issues with the App Store, including the frustrating ‘Verification Required’ prompt.
Part 3: How To Bypass Verification Required Prompt Without Apple ID
If you need to learn how to bypass the ‘Verification Required’ prompt in the App Store but don’t have access to the Apple ID or password, there’s an alternative approach using third-party software. One such tool that can assist in this situation is Wondershare Dr.Fone - Screen Unlock (iOS), which offers a feature specifically designed for this purpose.
Introducing Dr. Fone’s Screen Unlock (iOS) Feature
Dr.Fone - Screen Unlock (iOS) function includes an Apple ID remover tool. This feature is handy when you cannot remember your Apple ID or password but need to download apps from the App Store. Here’s a step-by-step guide on how to use this feature.
Step-by-Step Guide To Bypass Verification Without Apple ID With Dr.Fone
Here’s a complete guide on bypassing the verification required on the App Store.
Step 1: Install and open Wondershare Dr.Fone on your computer.
Step 2: Navigate to Toolbox and select Screen Unlock followed by iOS.

- Step 3: In the next window, choose Remove Apple ID to proceed.

- Step 4: A connectivity status will appear on the screen with your iOS device connected to the computer. Click Unlock Now to start the process.

- Step 5: Confirm if your iOS device has a screen lock and two-factor authentication enabled. This is crucial for the process to continue smoothly.

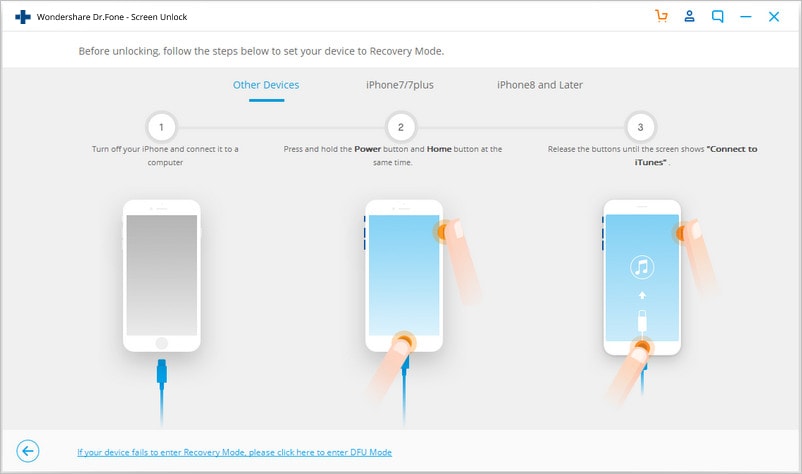
- Step 6: Follow the on-screen instructions to put your iOS device in Recovery Mode. If necessary, you can also opt for DFU Mode by following the provided instructions. Once in Recovery Mode, the tool will recognize your device model. You’ll need to select the correct system version to proceed.

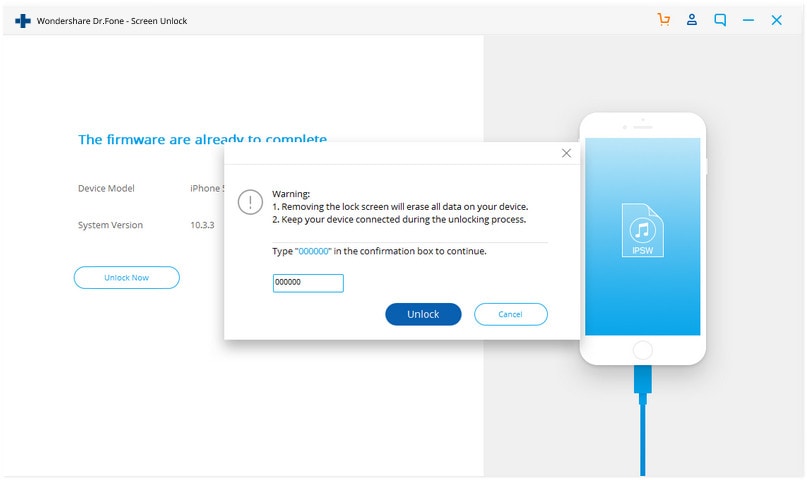
- Step 7: The tool will download the appropriate iOS firmware for your device. After the download, it will verify the firmware.

- Step 8: After firmware verification, click Unlock Now. You’ll be prompted to enter a code for confirmation. Once entered, the unlocking process will begin.

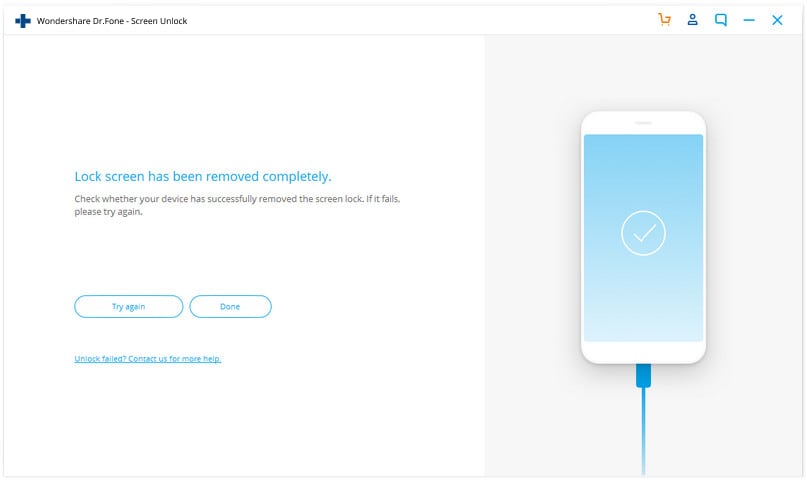
- Step 9: You’ll receive a notification once the process is complete. You may try again if the process fails to succeed the first time.

Note: After Apple ID removal, you must re-enter a new Apple ID to access the App Store. Take note of the password now if you forgot your previous one.
Conclusion
In this article, you’ve learned how to remove ‘Verification Required’ in the App Store. The primary takeaway is to try solving the issue using your Apple ID, as this approach typically prevents data loss. However, if you’re in a tight spot without access to your Apple ID, Dr.Fone - Screen Unlock (iOS) offers a reliable alternative to bypass this hurdle.
While it’s an effective solution, always consider it a secondary option to safeguard your data. Additionally, Dr.Fone can be a handy tool for various other phone-related challenges, making it a useful resource for tackling different tech problems.
Tips: Are you searching for a powerful Screen Unlock tool? No worries as Dr.Fone is here to help you. Download it and start a seamless unlock experience!
Locked Out of Apple iPhone 13 Pro Max? 5 Ways to get into a Locked Apple iPhone 13 Pro Max
Is your Apple iPhone 13 Pro Max locked, and can’t seem to remember its passcode? If your response is “yes,” then you’re in. It might surprise you, but there are a lot of ways to get into a locked Apple iPhone 13 Pro Max. To help our readers, we have come up with this extensive post, covering different techniques for taking the lock off Apple iPhone 13 Pro Max. Follow these expert suggestions and unlock your iOS device when you are locked out of your Apple iPhone 13 Pro Max.
Part 1: How to get into a locked Apple iPhone 13 Pro Max with Dr.Fone?
If you are locked out of Apple iPhone 13 Pro Max, you should only use a reliable and secure way to unlock it. The chances are that the above-mentioned technique might not work on your device. Hence, you can use Dr.Fone - Screen Unlock for help to unlock your phone. Compatible with almost all iOS devices, its desktop application runs on Mac and Windows. One can learn how to get into a locked Apple iPhone 13 Pro Max by following these instructions.
Attention: All your data all be erased after you get into your locked Apple iPhone 13 Pro Max.Please make sure if you have backed up all your data.
Dr.Fone - Screen Unlock
Get Into Locked Apple iPhone 13 Pro Max In 5 Minutes!
- No special skills are required to get into a locked Apple iPhone 13 Pro Max.
- Unlock the iDevice effectively whether it is disabled or nobody knows its passcode.
- Works properly whether if you’re using Apple iPhone 13 Pro Max, iPad, and iPod touch.
- Fully compatible with the latest iOS.


4,395,216 people have downloaded it
You can watch the video below about how to unlock your Apple iPhone 13 Pro Max without Password, and you can explore more from Wondershare Video Community .
Step 1. Download Dr.Fone - Screen Unlock, install it on the computer, and launch it whenever you need to unlock your phone. Choose the option of “Screen Unlock” from the main screen.
Step 2. Connect your device with a computer. Afterward, choose the “Unlock iOS Screen” to get started.

Step 3. Then on the next screen, this tool will prompt you to enter the DFU mode to continue.
Step 4. Provide the essential details about your phone in the next window and Download the firmware update.

Step 5. Wait a moment until the download process is done, and then click on the “Unlock Now” button to activate the process.

Step 6. There will be a warning message showing up. Just confirm it by entering the on-screen code.
Step 7. Let the application resolve the issue on your phone. Once it is done, you will be notified that your lock screen is removed.
Part 2: How to get into a locked Apple iPhone 13 Pro Max with iTunes?
This is another popular way to resolve the locked out of the Apple iPhone 13 Pro Max problem. It can get a little complicated to start with, but in the end, your data would be erased. On Mac with macOS Catalina, you need to open Finder. On Windows PC and Mac with other macOS, you can use iTunes. Implement the following steps to restore your Apple iPhone 13 Pro Max.
Step 1. Connect your Apple iPhone 13 Pro Max to the computer.
Step 2. Enter the Recovery Mode.
- For Apple iPhone 13 Pro Max 8 and 8 Plus and later: Press and quickly release the ‘Volume Up’ button. Press and quickly release the ‘Volume Down’ button. Keep the Side (Top) button until the Recovery-mode screen appears.
- For Apple iPhone 13 Pro Max 7 and 7 Plus, iPod Touch (7th generation): Press and hold the ‘Top’ (‘Side’) and ‘Volume Down’ buttons simultaneously. Keep holding until it enters the Recovery mode.
- For iPad with Hom buttons and Apple iPhone 13 Pro Max 6s and former Apple iPhone 13 Pro Max: Press and hold the ‘Home’ and ‘Side’ (‘Top’) buttons at the same time. Keep holding both buttons until the iTunes symbol would appear on the screen.

Step 3. Click on the “Restore” button. This would reset your device.

Part 3: How to get into a locked Apple iPhone 13 Pro Max via Find My Apple iPhone 13 Pro Max?
Apple’s official Find My Apple iPhone 13 Pro Max is a smart and hassle-free way to locate your lost Apple iPhone 13 Pro Max or reset it remotely. All you need to remmber is your Apple ID and password. To use this method, preconditions are: Find My Apple iPhone 13 Pro Max is enabled and internet network is available. Follow these instructions to reset your Apple iPhone 13 Pro Max:
Step 1. Log in to iCloud’s website using your Apple ID and password. Visit the Find My Apple iPhone 13 Pro Max page and click on the “All Devices” option to view all the iOS devices linked to your Apple ID. Now, select the iOS device that is locked.

Step 2. This will provide various tasks that you can perform on the iOS device. Click on the “Erase Apple iPhone 13 Pro Max” button to reset the Apple iPhone 13 Pro Max device.

Part 4: How to get into a locked Apple iPhone 13 Pro Max with Siri?
If you don’t want to erase your device’s data while resolving this issue, you can use Siri. You should know that this is not an official fix and only works for limited iOS devices (iOS 8.0 to iOS 13). Ideally, it is considered a loophole in iOS, which can be exploited to fix a disabled phone. You can learn how to get in a locked Apple iPhone 13 Pro Max by implementing the following steps:
Step 1. To activate Siri, please long press your home button on the phone. Ask for the present time (by saying “Hey Siri, what time is it?”) and wait for its response. Now, tap on the clock icon.

Step 2. On the world clock interface, add another clock.

Step 3. The interface will ask you to search for a location of your choice. Type anything on the search tab and select it to get various options. Tap on the “Select all” text.

Step 4. A few added options will be displayed. Tap on “Share” to proceed.

Step 5. Out of all the options to share this text, select the Message app.

Step 6. A new interface will be opened from where you can draft a new message. Type anything in the “To” field and tap “return” from a keyboard.

Step 7. Then the text will be highlighted. Tap on the add icon.

Step 8. This will open another interface to add a new contact. From here, tap on the “Create new contact” option.

Step 9. Instead of adding a contact, tap on the photo icon and select the “Choose Photo” option.

Step 10. This will open the photo library on your phone. Visit an album or wait for a while.

Step 11. Now, press the home button. If nothing goes wrong, then you will enter the Home screen on your phone.

Conclusion
We hope that after learning how to get in a locked Apple iPhone 13 Pro Max in different ways, you would be able to resolve the issue on your iOS device. Choose the way you prefer and fix the locked out of the Apple iPhone 13 Pro Max problem. We recommend using Dr.Fone - Screen Unlock to get an easy fix to your issue without much trouble.
How To Change Your Apple ID Password On your Apple iPhone 13 Pro Max
Are you aware of the common mistakes people make when creating their Apple ID passwords, such as using weak passwords and personal information? And how often should you change your Apple ID password? If it’s been a while since your last update, stay in this article to learn how to change your Apple ID password on your account.
Part 1: Is Your Apple ID Safe? Watch Out for These Signs
Despite your best efforts, there’s always a risk of password compromise. If this happens, a hacker could access all your personal information. They could steal your photos, videos, contacts, and financial data.
They could also use your account to make unauthorized purchases or spread malware. That’s why knowing the signs of a hacked Apple ID password is crucial. If you notice any of the following, you should change your account password immediately:
- Frequent Login Requests
If you notice unusual login attempts or receive notifications from Apple about new sign-ins from unknown devices or locations, it’s a red flag. Someone may be trying to open your Apple account.
- Unexpected Purchases
Unexplained app or content purchases on your account may indicate unauthorized access. Review your purchase history regularly.
- Password Reset Emails
Receiving emails notifying you of a password change when you didn’t make one is a major concern. It indicates unauthorized access attempts.
- Unusual Emails Sent from Your Account
Friends and family receiving strange emails from your Apple ID should raise suspicion. Phishing attempts often involve emails or messages that appear to be from Apple, asking for your login credentials. Be cautious and verify the source.
- Difficult Logging In
To protect your account from unauthorized access, Apple may lock or disable your account if your password or other account information is entered incorrectly several times.
Now that you’re aware of these signs, it’s crucial to know how to change your Apple ID password to fortify your account’s security. Don’t worry; the next section will guide you through the process step by step.
Part 2: How To Change Your Password on Apple ID on Different Devices?
But first, are you now wondering if your Apple ID password is strong enough? Or if it is even secure?
If so, you’re not alone. Millions of people use the same password for multiple accounts. That makes it easy for hackers to break into their accounts. And even if you use a different password for each account, it’s still important to change your passwords regularly. So, before you discover how to change your Apple ID password on your Apple account, here are three things you should consider:
- Complexity
Vary the types of characters in your password to make it more complex and difficult to crack – mix the numbers, uppercase and lowercase letters, and special characters.
- Uniqueness
Be creative, and don’t use publicly available information about you, such as your phone number or birthday. Avoid using common words or phrases that are easy to guess, such as “123456” or “password.”
- Length
Use a password at least 12 characters long, or even longer if possible.
Now that you have a solid foundation for creating a secure Apple ID password. Read on to get to the heart of the matter – how to change the password on Apple ID. Doing it is easy; you can do it on your Apple iPhone 13 Pro Max, iPad, Mac, or the web.
Step-by-Step Guide: Change Your Apple ID Password on iOS Devices
If you’re looking for a quick and easy way to update your password on your Apple account, you can do it right from your iOS device. It is convenient if you don’t have computer access or are more comfortable using your Apple iPhone 13 Pro Max, iPad, or Apple Watch. Here’s a guide on how to change your password for your Apple ID account on these devices:
- Step 1: Open the Settings app, then tap [your account name].
- Step 2: Go to Sign-In & Security and tap Change Password.
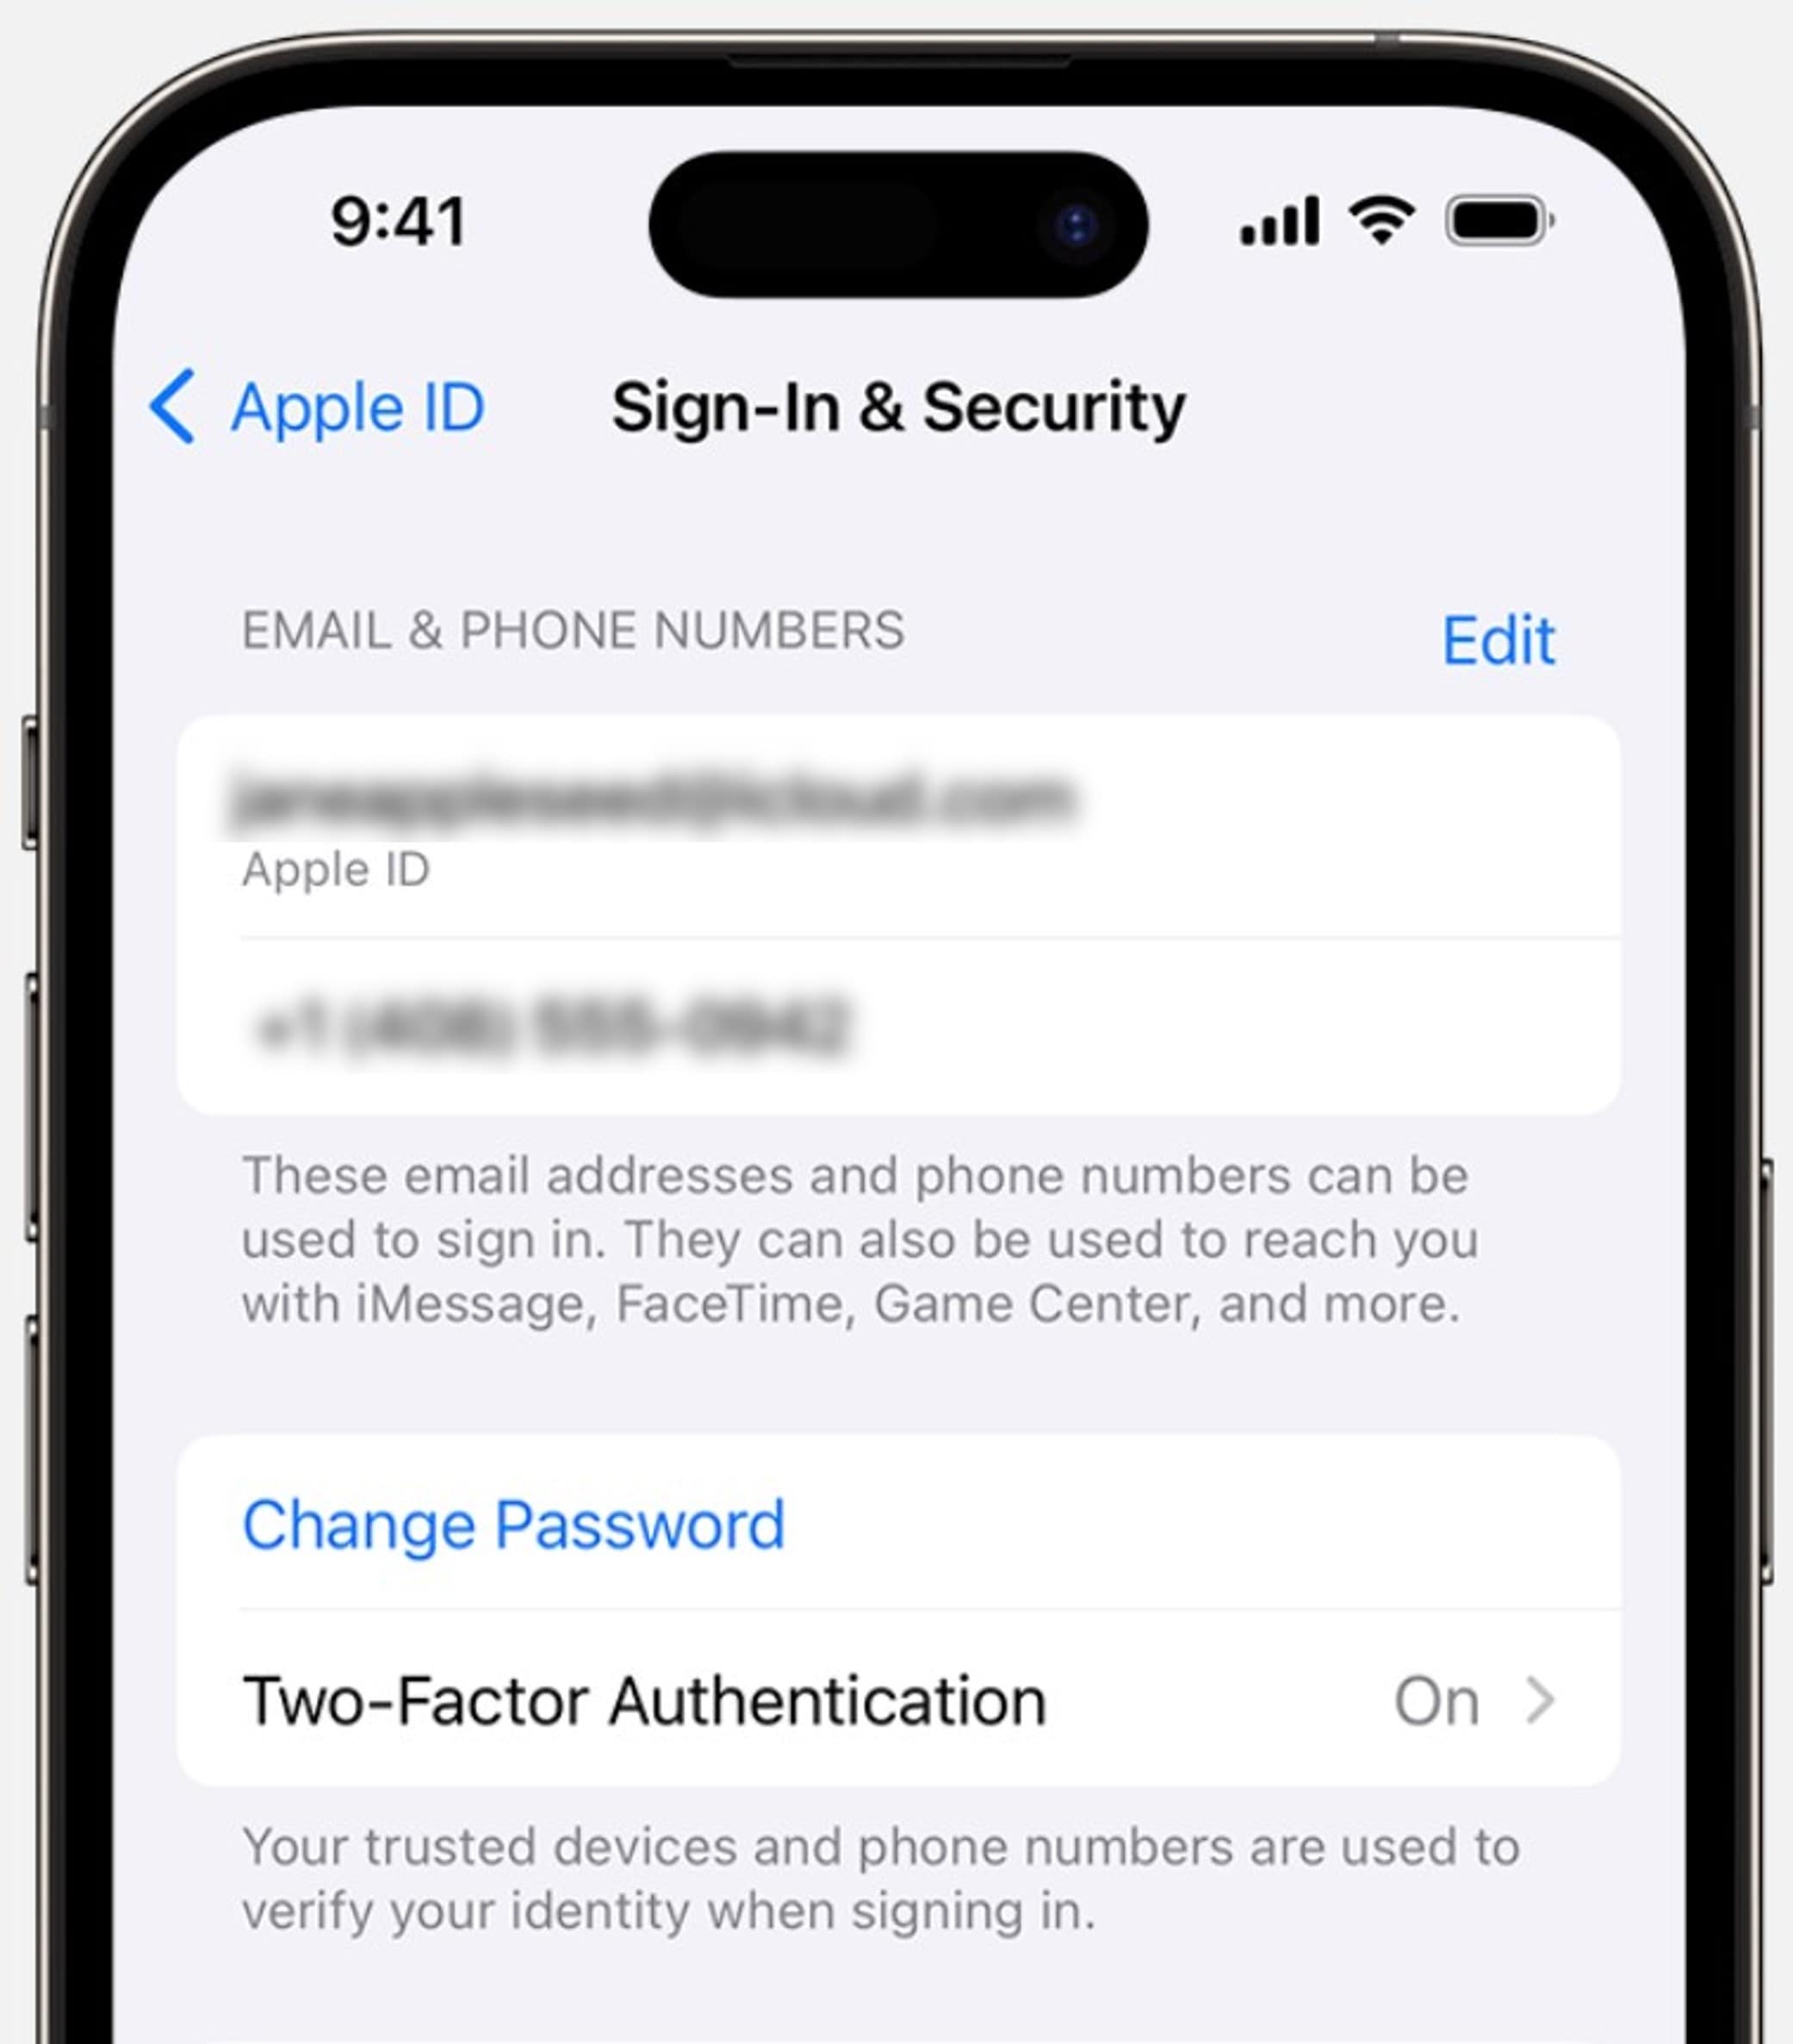
- Step 3: Verify your identity with your current password or device passcode. Then input a new password and re-enter it to confirm.
- Step 4: Tap Change Password or Change.
Step-by-Step Guide: Change Your Apple ID Password on macOS
Mac computers typically have larger screens than other iPhone or iPad devices, so it’s easier to see and enter your password. If you would like to know how to change your Apple ID password on your Mac, follow the steps below:
- Step 1: Go to Apple Menu > System Settings > [your name].
- Step 2: From the Sign-In & Security section, click Change Password.
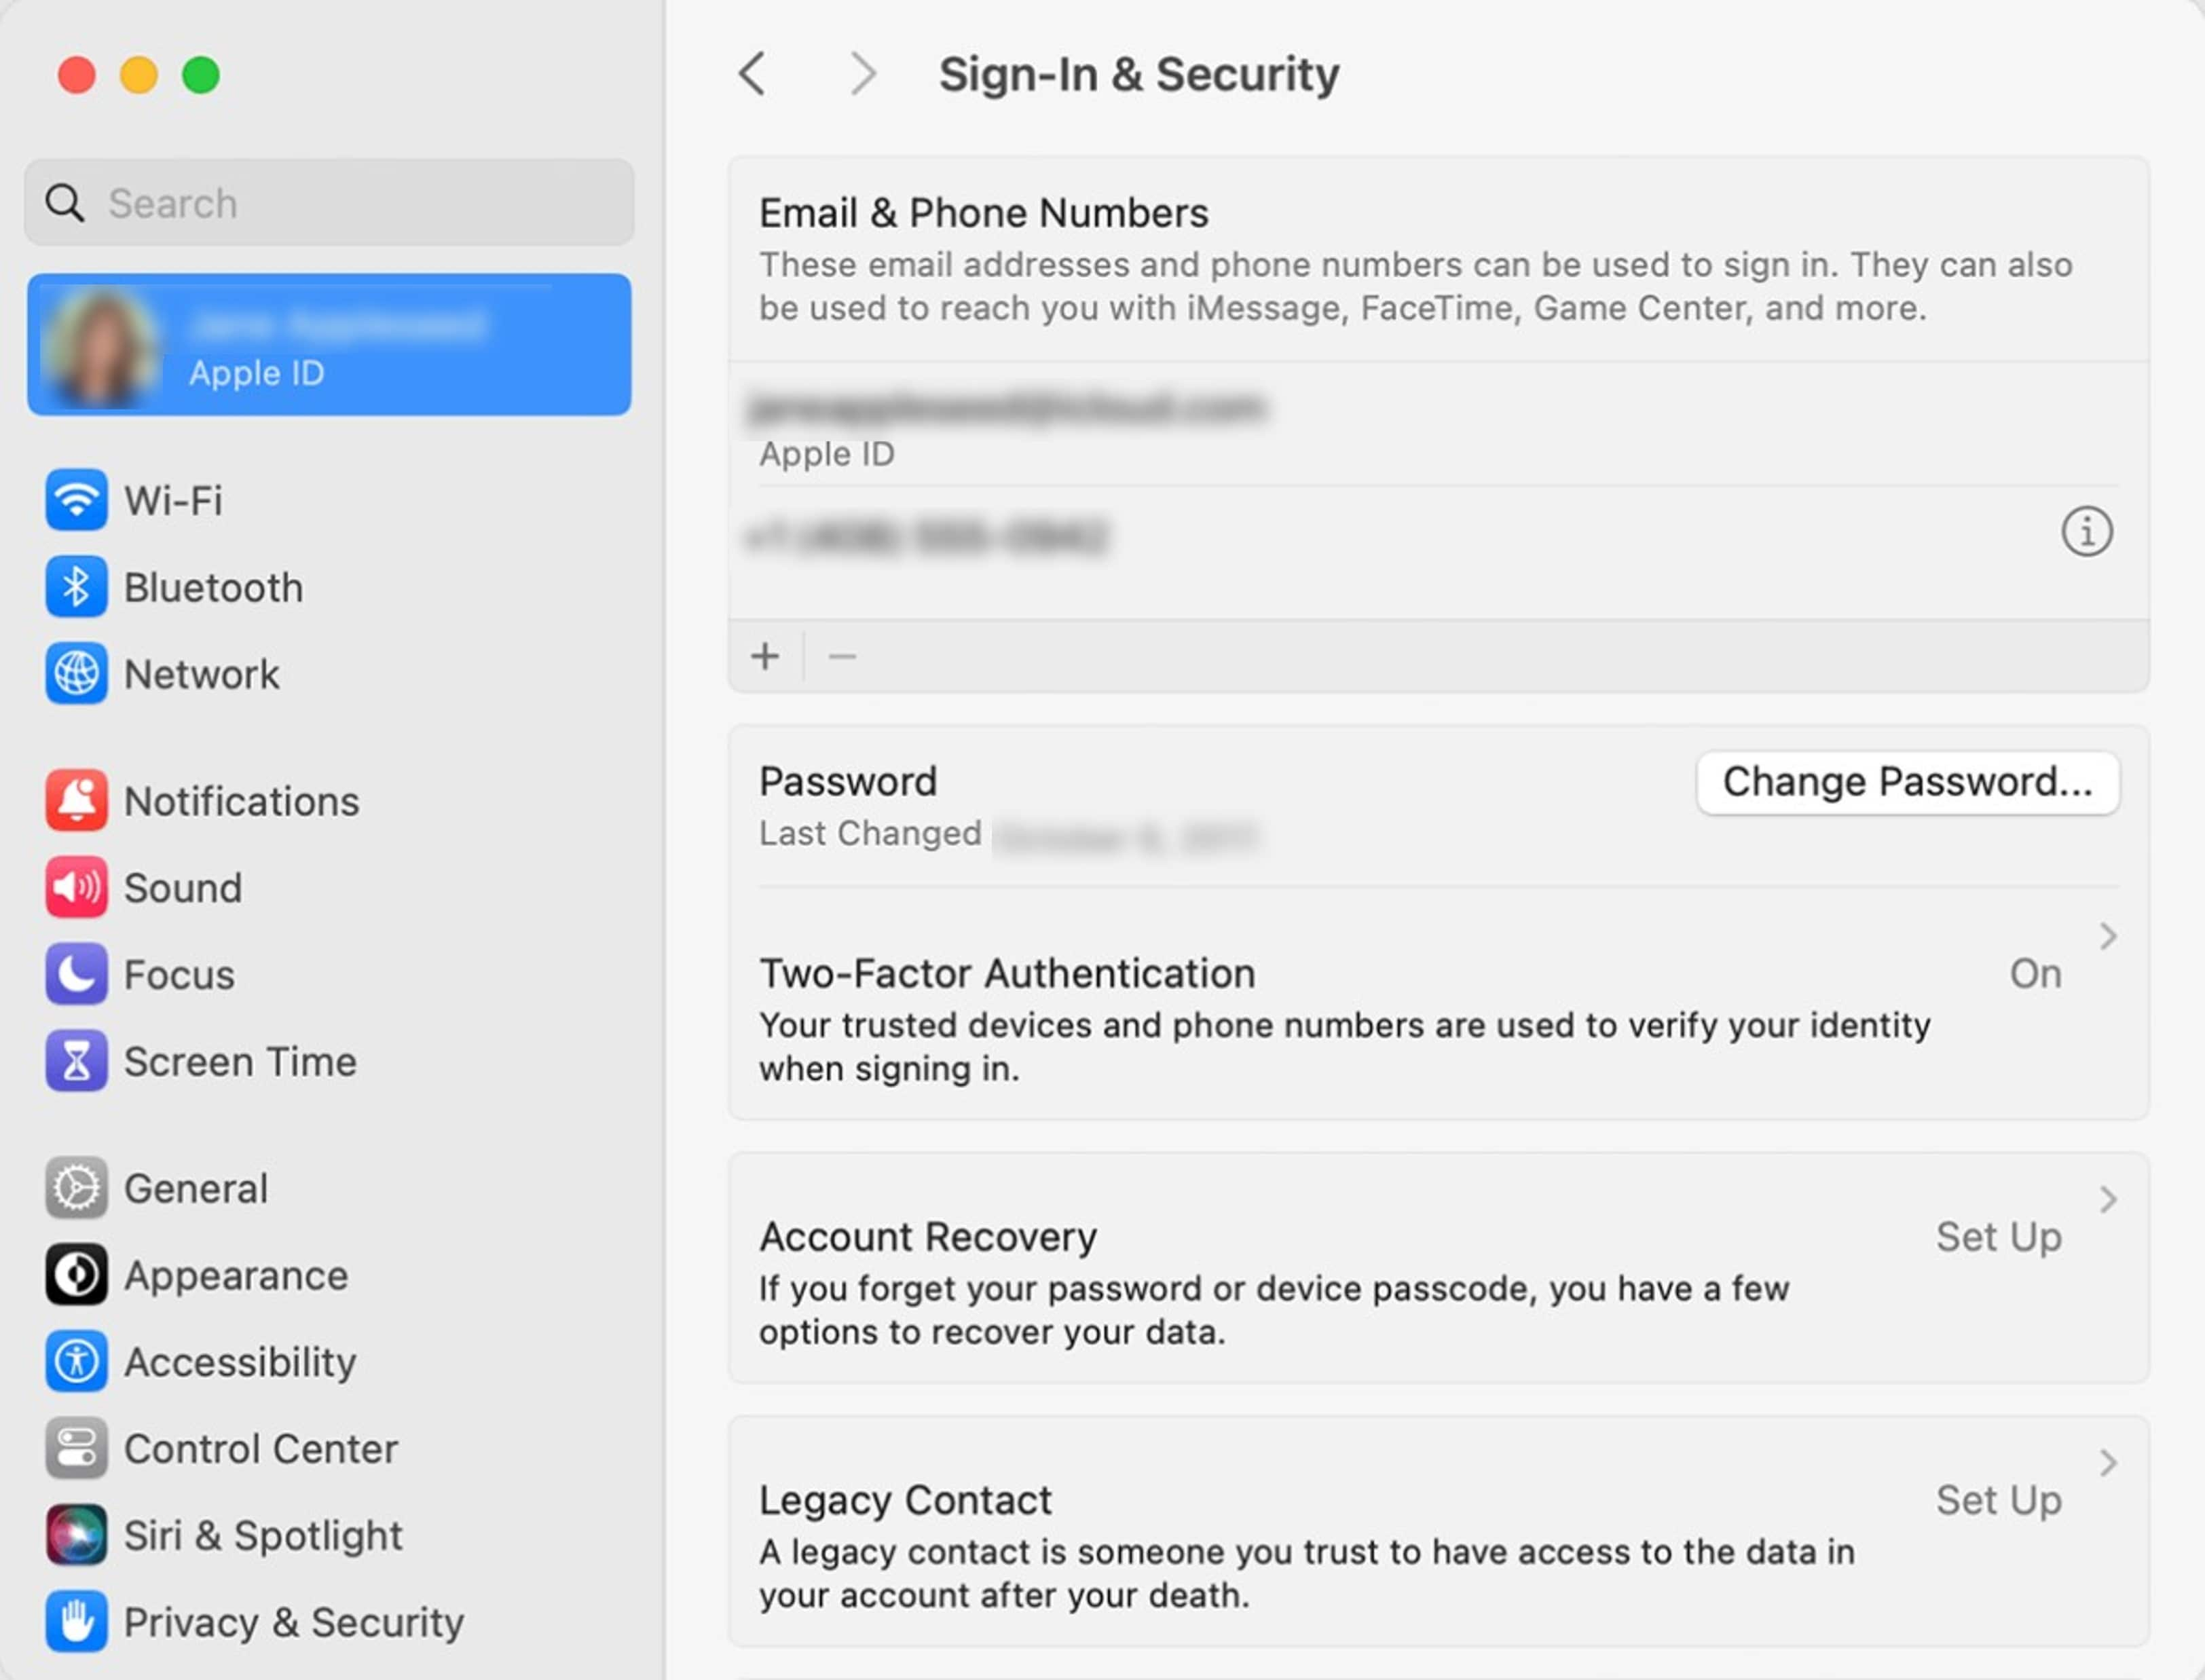
- Step 3: Enter your Mac’s login password to reset your Apple ID password.
Step-by-Step Guide: Change Your Apple ID Password Online
Web browsers are available on a wider range of devices than iOS devices. If you want to learn how to change your Apple ID password on Chrome, Safari, and other browsers, here’s how you do it:
- Step 1: On a web browser, visit the website of Apple ID and sign in to your Apple account.
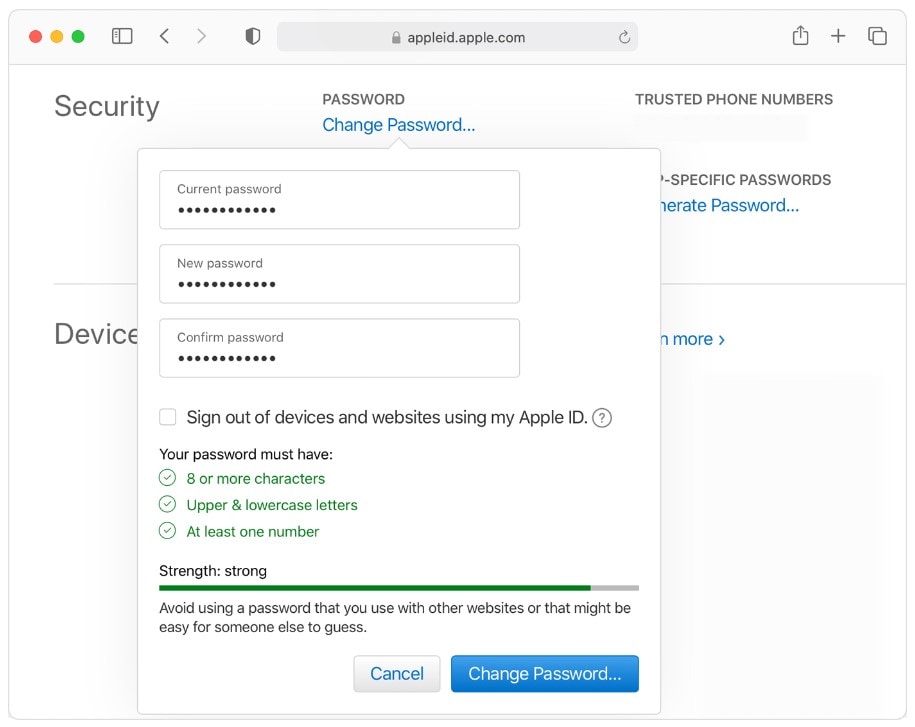
- Step 2: Click Password below the Sign-In and Security section.
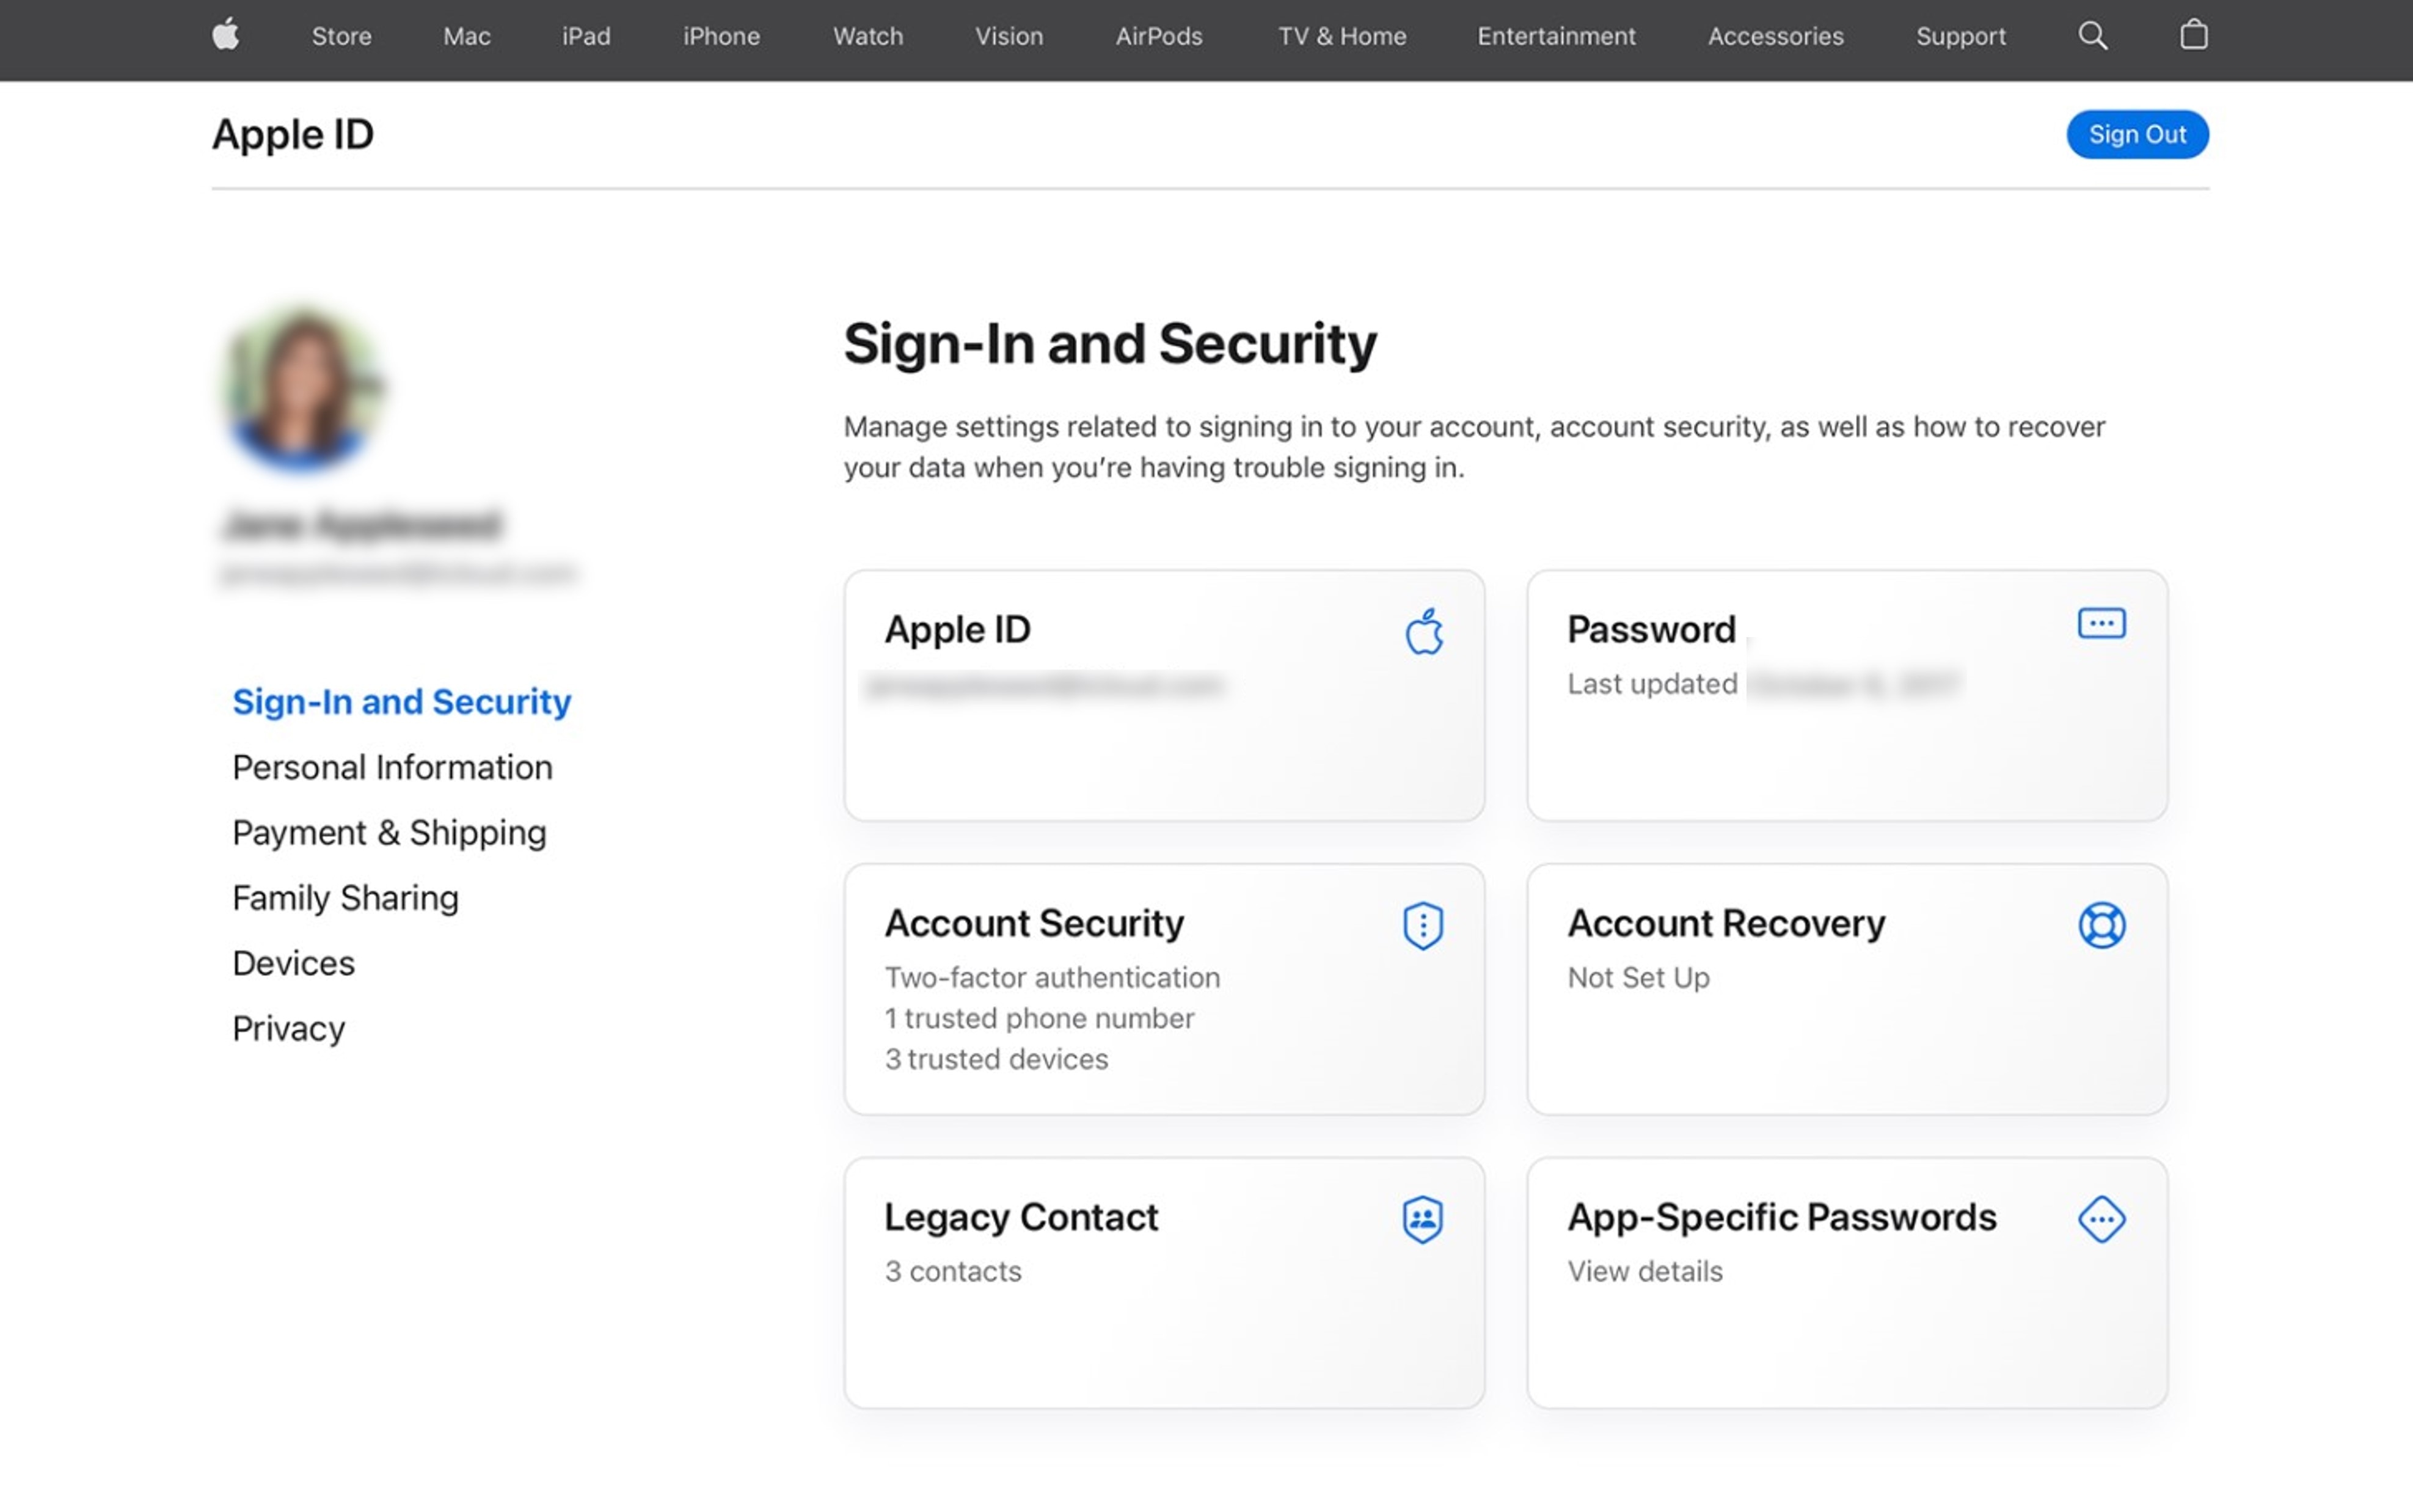
- Step 3: Authenticate with the current Apple ID password, then enter a new password.
- Step 4: Once confirmed, select Change Password.
Password updated! You’re one step closer to keeping your Apple account safe and secure. However, if you’re still having trouble changing your Apple ID password, the next section might help you.
Part 3: Can’t Change Your Apple ID Password? Here’s What You Should Do
It’s happened to everyone: you try to change your Apple ID password, but something goes wrong. Maybe you get an error message or can’t remember your current password. Whatever the reason, there are a few workarounds to change your Apple account password.
Change Your Apple ID Password on a New Device
Did you get a new Apple device or forgot your Apple ID password? No problem! Try these two things before and after setting up your new iOS device.
Before Your Device Setup
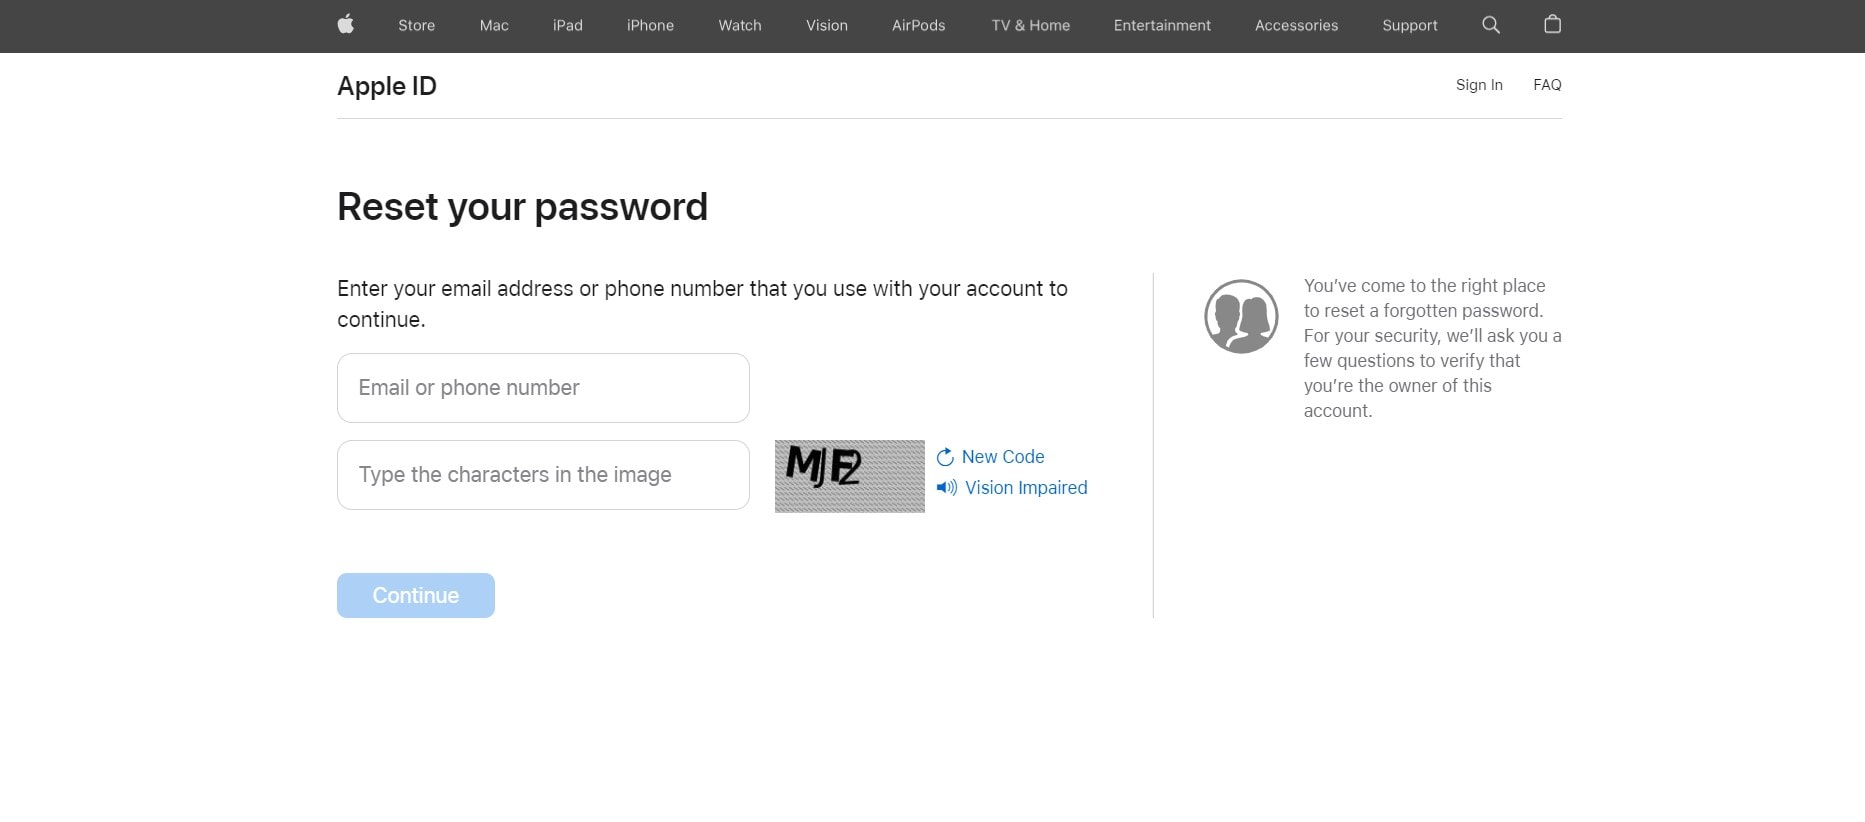
Click Forgot password on the Apple ID sign-in page on the web browser. This option is typically found during the setup process for a new Apple device or when you try to sign in to an Apple service on an unsigned-in device.
After You Setup Your Device
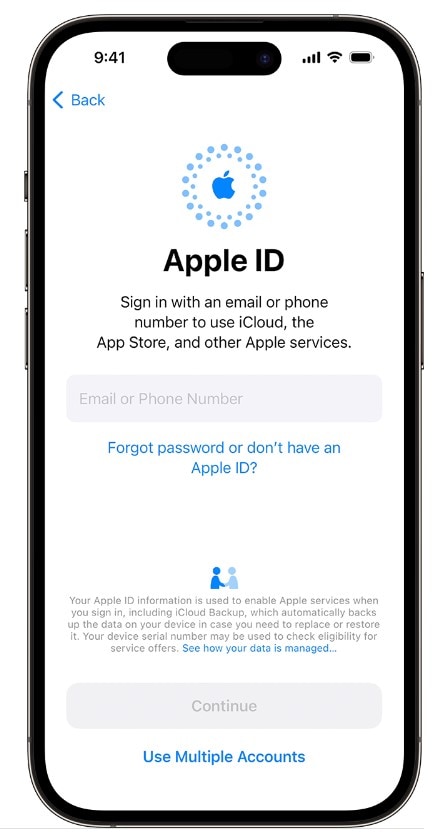
Need to create a new Apple ID or reset your password after setup? You can find the “Forgot password or don’t have an Apple ID?” in your Settings app. Here’s how to find it:
On an iPhone or iPad
For iOS users:
- Step 1: Open the Settings application and tap Sign-In to your Apple iPhone 13 Pro Max or iPad.
- Step 2: Tap Forgot password or don’t have an Apple ID? and follow the in-app guide to proceed.
On a Mac Computer
If you prefer to use your desktop:
- Step 1: From the Apple menu, go to System Settings.
- Step 2: Click Sign in with your Apple ID and click Forgot password.
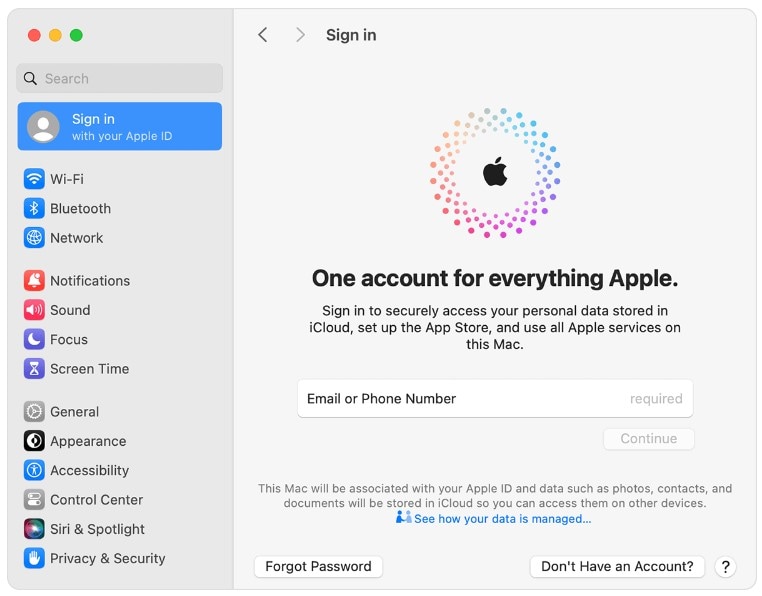
- Step 3: Follow the on-screen instructions to reset your password or recover your account.
Reset Your Apple ID Password Using a Family Device
Losing your phone or being unable to access your iOS device can be a major inconvenience. But it doesn’t have to mean you’re locked out of your Apple ID account. Even if you don’t have your Apple device with you, you can still reset your password and get back to using your family’s Apple devices.
- Step 1: Open the Apple Support app or download it from the App Store if not yet installed.
- Step 2: From the Support Tools section, select Reset Password.
- Step 3: Select A different Apple ID and tap Continue.
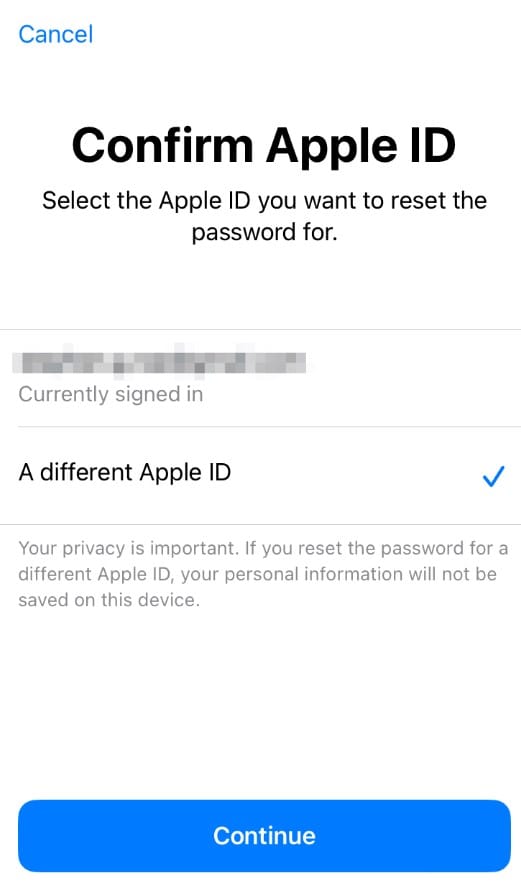
- Step 4: Follow the in-app guide to reset your Apple ID password.
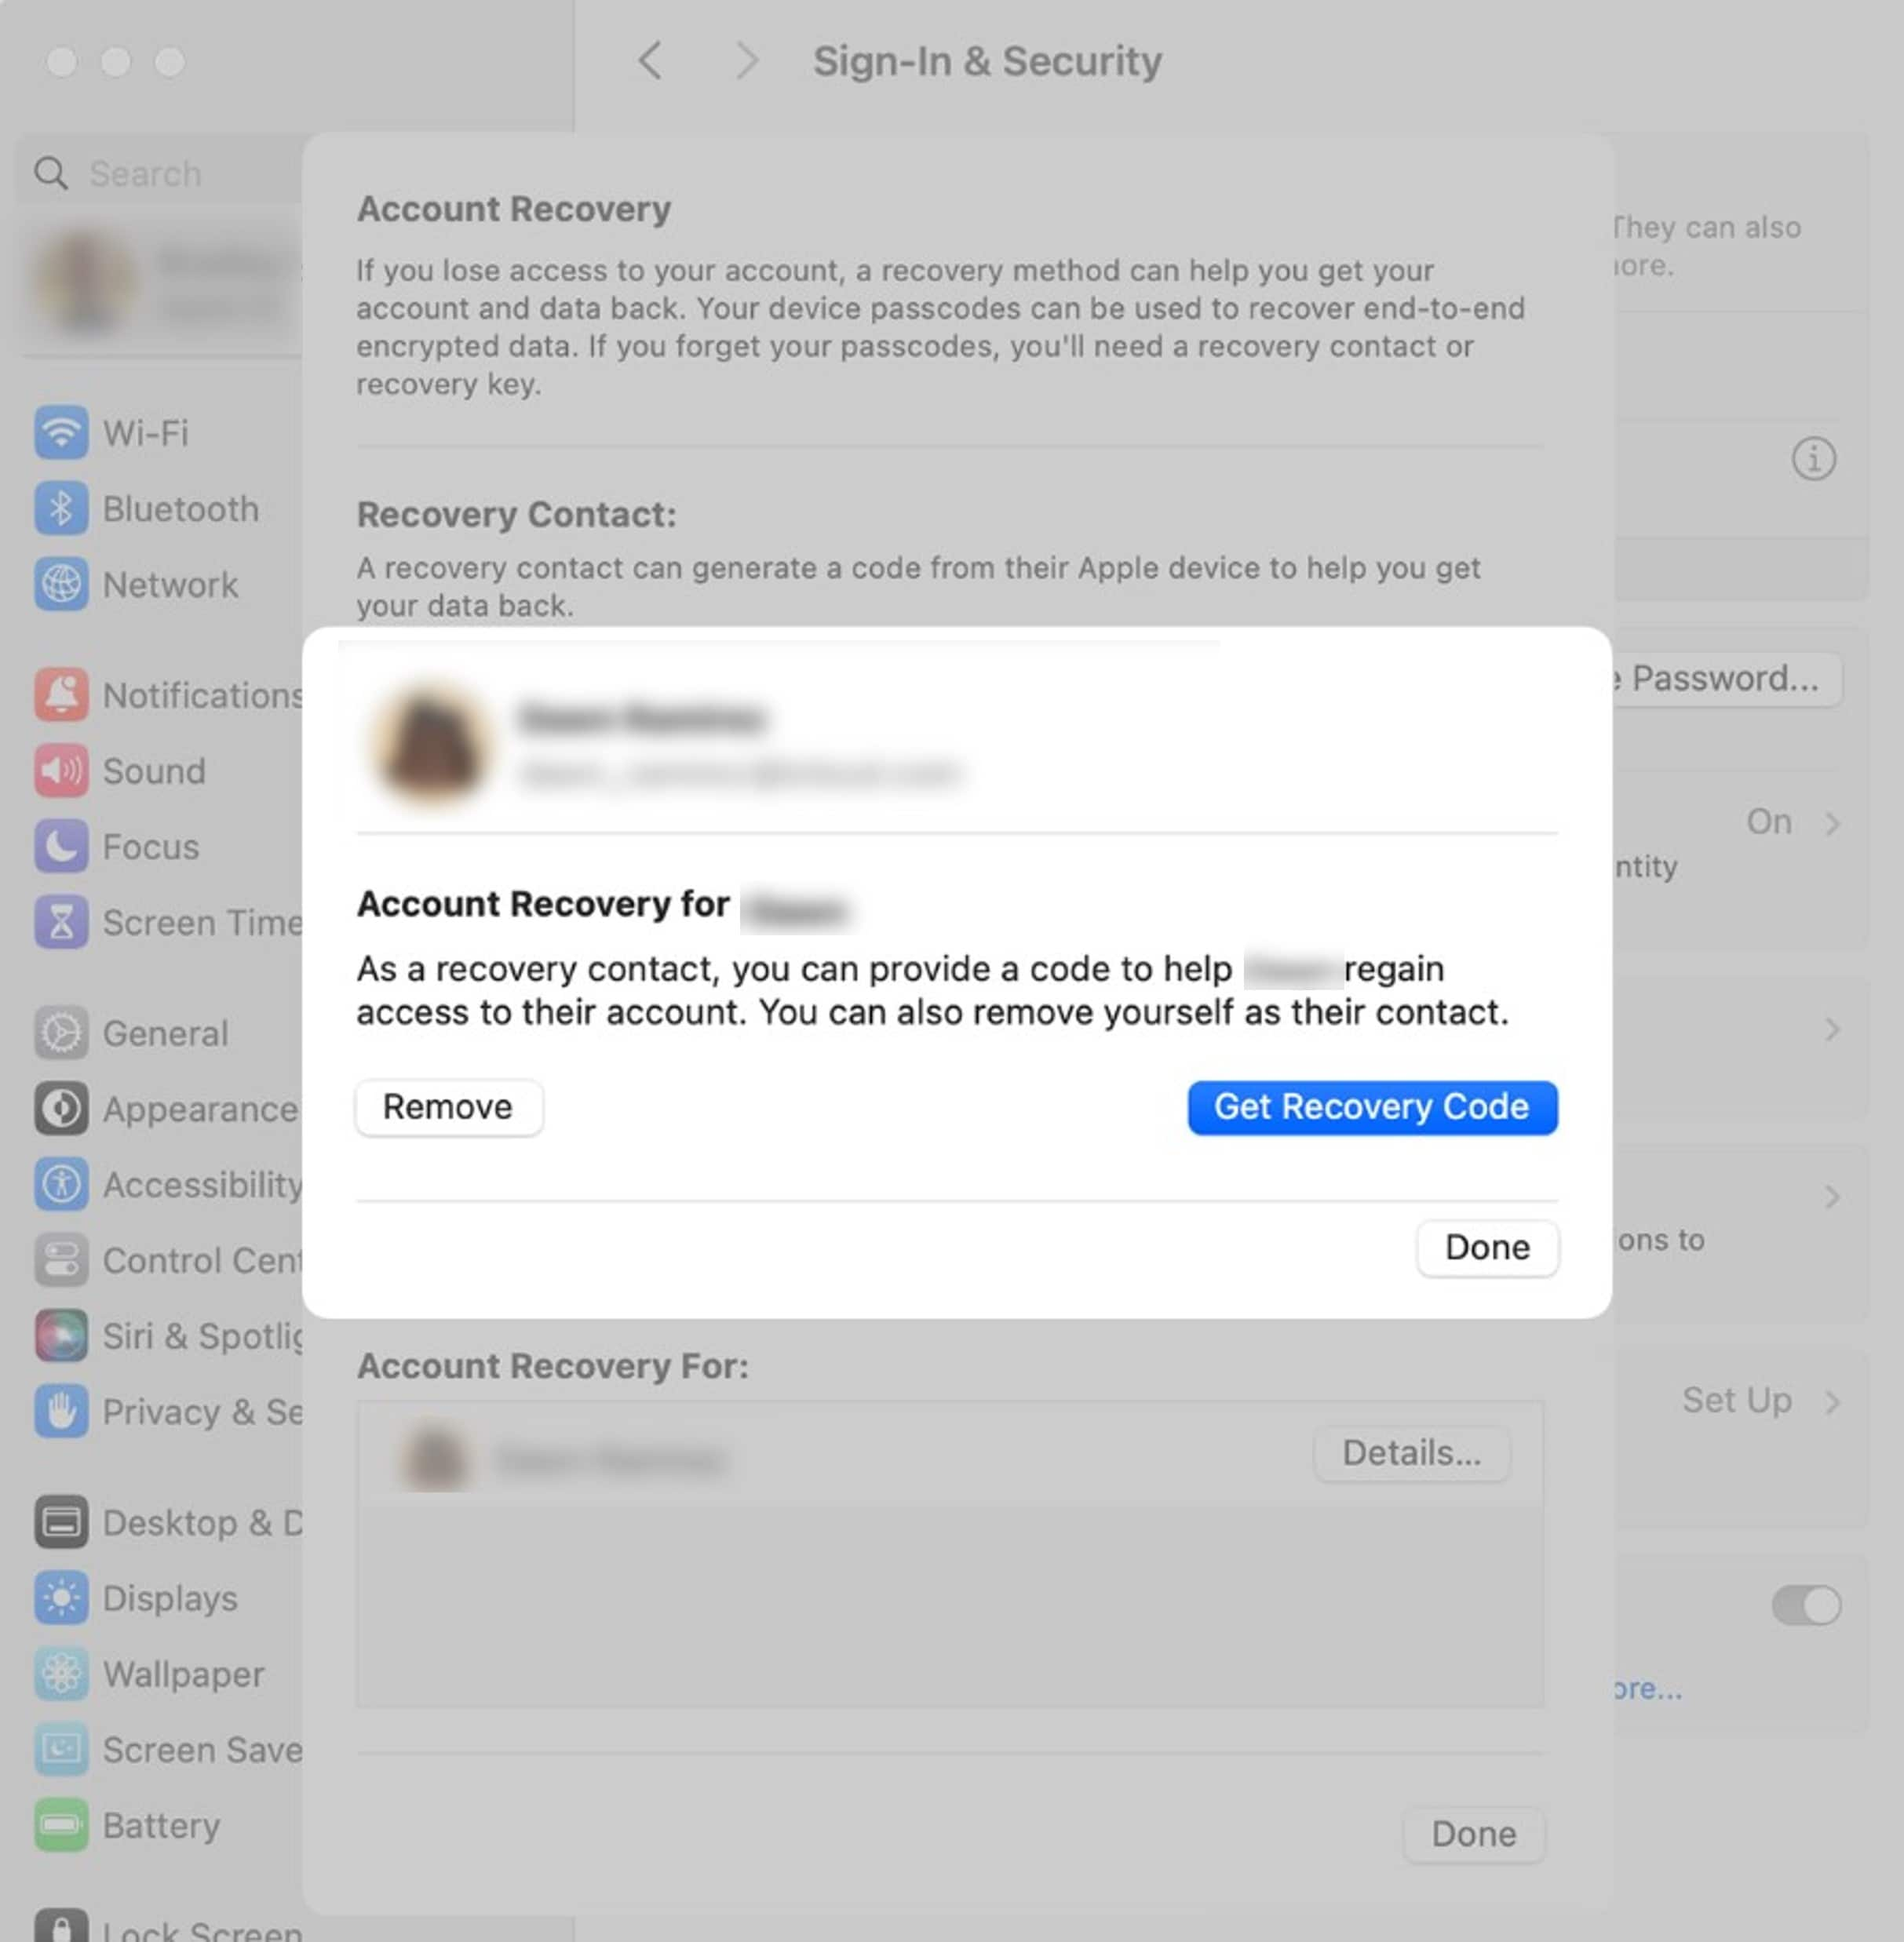
You can also designate a friend or family member you trust as your account recovery contact. They can help you reset your password if you forget it by providing a recovery code upon request.
Still Can’t Change Your Apple ID Password? Try Account Recovery
The previous section showed you how to change your Apple ID password on any device if you cannot reset it. But what if you’ve tried all the steps in that section and you’re still having trouble?
There’s still one more option available: submit an account recovery request to Apple.
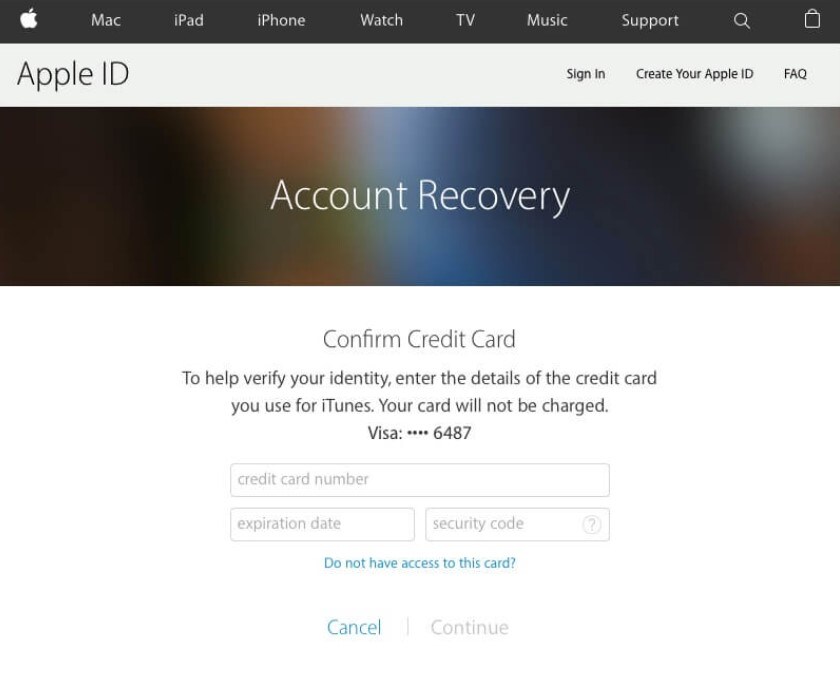
Account recovery is a process that can help you regain access to your Apple ID account if you don’t have enough details to change your password or if you use two-factor authentication. The caveat? Account recovery can be lengthy and might take several days or longer. However, there are a few ways to expedite the recovery process:
- Confirm the six-digit code sent to your primary email address to prove that you’re the account’s rightful owner.
- Provide your credit card details. Apple will send an authorization request to your credit card issuer, which will help verify your identity.
If you need to access iCloud services and Apple ID features faster, a third-party tool like Wondershare Dr.Fone may help.
You May Also Like:
3 Ways to Recover iCloud Password
Complete Guide to Unlock Mi Account Without Password In 2023
[2023 Updated] How to Sign Out of Apple ID without Password?
Part 4: Using Dr.Fone Unlock Tool To Access Your Apple Account Sooner
Dr.Fone Unlock can help you remove your Apple ID from your Apple devices without a password, even with the enabled Find My/Find My iPhone feature. It’s compatible with all iOS devices running iOS 17/iPadOS 17 and iPhone 14.
How To Remove Your Apple ID if You Forgot Your Apple ID Password?
Dr.Fone is easy to use and intuitive, even for users with no technical experience. Here’s a step-by-step guide on how to use Dr. Fone’s iOS Screen Unlock feature and remove your Apple ID:
Step 1: Download Dr.Fone from their official website and install it on your computer.
Step 2: From the Toolbox homepage, select Screen Unlock > iOS.
- Step 3: Select Remove AppleID and click Unlock Now on the next screen.
- Step 4: For the question, “Have you set up a screen lock on your Phone?” click Yes. Then, on the next screen, click Yes again to verify you enabled the two-factor authentication.
- Step 5: Follow the in-app instructions to put your iOS device into Recovery Mode.
- Step 6: Select an option from the System Version dropdown list for the Device Model, then click Start.
- Step 7: Wait while the iOS firmware is downloading, then click Unlock Now once done.
- Step 8: Enter the code given in the Warning dialogue box and click Unlock to continue.
- Step 9: Wait and do not use your device while the Apple ID removal is in progress to avoid being a bricked device.

- Step 10: Click Done once the process is successful or click Try again to repeat.
Conclusion
Creating a strong Apple ID password is simple: mix letters and numbers, make it lengthy, and keep it unique. Regularly changing your Apple ID password using the steps above is key to protecting your digital data. And if you ever find yourself locked out, consider the Dr.Fone Unlock Tool, a reliable mobile solution. Stay private and secure to enjoy your Apple experience with peace of mind.
Also read:
- [Updated] 3 Best Ways to Get Pinterest Video to MP3 Downloaded
- [Updated] In 2024, Filmmaker's Checklist On-the-Go Gear Guide
- 4 Ways to Unlock Apple iPhone 6 to Use USB Accessories Without Passcode | Dr.fone
- 9 Best Free Android Monitoring Apps to Monitor Phone Remotely For your Realme GT 3 | Dr.fone
- Can You Unlock iPhone SE (2022) After Forgetting the Passcode? | Dr.fone
- In 2024, How Can I Unlock My iPhone 8 After Forgetting my PIN Code? | Dr.fone
- In 2024, How to Remove a Previously Synced Google Account from Your Nubia
- In 2024, How to Unlock iPhone 13 Pro Max without Passcode or Face ID | Dr.fone
- In 2024, Things You Should Know When Unlocking Total Wireless Of Apple iPhone 13 mini | Dr.fone
- Journey Through the Unexpected: An Enriching Exploration of Yoku's Island Express
- Proficient Techniques for Finding Steam Users
- Title: In 2024, How To Bypass the Required Apple Store Verification For iPhone 13 Pro Max | Dr.fone
- Author: Amelia
- Created at : 2024-12-09 17:48:28
- Updated at : 2024-12-12 17:29:12
- Link: https://iphone-unlock.techidaily.com/in-2024-how-to-bypass-the-required-apple-store-verification-for-iphone-13-pro-max-drfone-by-drfone-ios/
- License: This work is licensed under CC BY-NC-SA 4.0.