
In 2024, How To Change Country on App Store for iPhone X With 7 Methods | Dr.fone
How To Change Country on App Store for Apple iPhone X With 7 Methods
Changing your App Store country can give you access to apps that are not available in your region. Whether getting region-specific apps, accessing exclusive content, or switching to a country with better app offerings, it’s a valuable capability.
The article below guides you through seven methods on how to change the country of your App Store.Following the guide ensures access to a world of apps and content tailored to your preferences. Keep reading the page below to achieve this.

Part 1. Pros and Cons of Changing Your App Store Country
Changing your App Store country on your Apple iPhone X can offer various benefits, but it also comes with certain drawbacks. It’s necessary to consider the pros and cons before making this decision.
Pros
- **Access to Region-Specific Apps.**Different countries have unique apps tailored to their markets. By changing your App Store country, you can access apps that might not be available in your current region. For example, some popular Chinese and Japanese apps are unavailable in the US App Store. If you want to use these apps, you will need to change your App Store country.
- **Getting App Updates.**Sometimes, apps receive updates and features in certain regions before others. Changing your App Store country can give you early access to these updates, improving your app experience. For example, a gaming app might first release new levels or features in select countries.
- **Access Exclusive Content.**Some apps and content are exclusive to certain countries. By switching your App Store country, you can enjoy movies, music, or TV shows unavailable in your current region. For instance, certain Netflix shows are restricted to specific countries due to licensing agreements.
Cons
- **Loss of Access to Purchases.**If you’ve made purchases in your current App Store country, changing it can result in losing access to those purchases. The loss includes paid apps, in-app purchases, and subscriptions. For example, if you switch from the US to the UK store, you may lose access to US-specific subscriptions.
- **Offload Apps.**When you change your App Store country, your device may prompt you to offload apps that are not available in your new region. This can be inconvenient if you rely on specific apps for daily use. For instance, a banking app may be region-specific and unavailable in your new country.
- **Family Sharing Issues.**If you’re part of a Family Sharing group, changing your App Store country can affect the access and sharing of purchased apps and subscriptions. Family members may lose access to content tied to your previous country. For example, if you switch from the UK to the US store, your family members might no longer have access to UK-specific content.
Part 2. Different Methods to Change Your App Store Country
Changing your App Store country can be done through various methods. Below are different ways to achieve that, along with step-by-step instructions for each technique.
Method 1: Changing Apple ID Region via iPhone
It is the most common and straightforward way to change your App Store country. To do this, follow these steps:
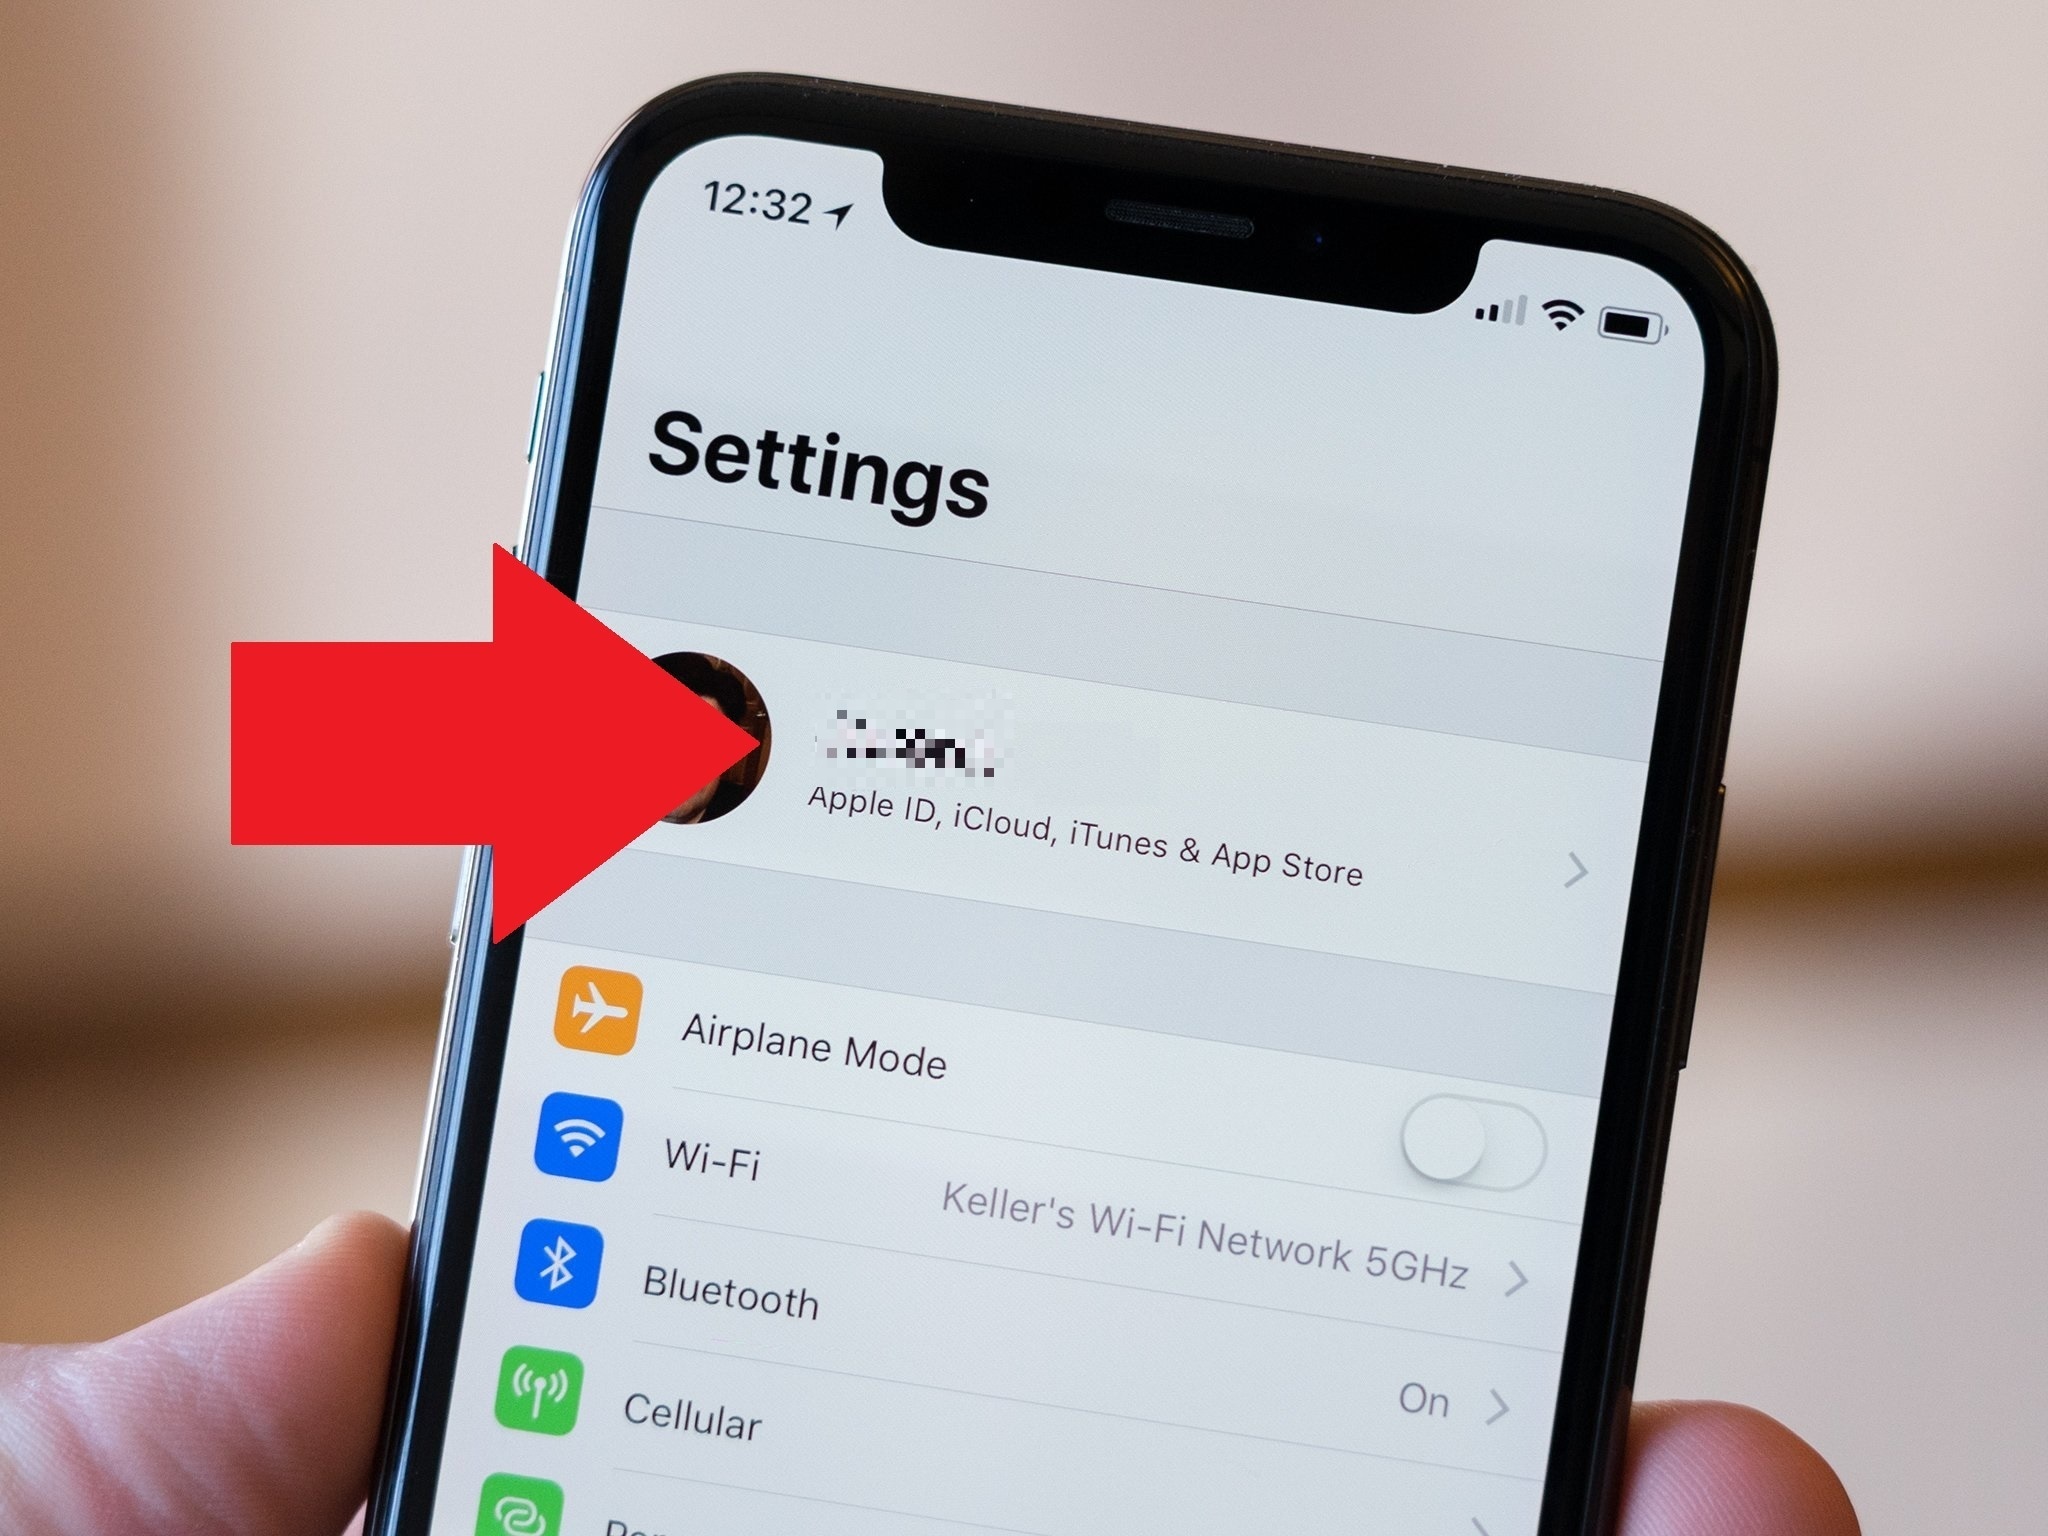
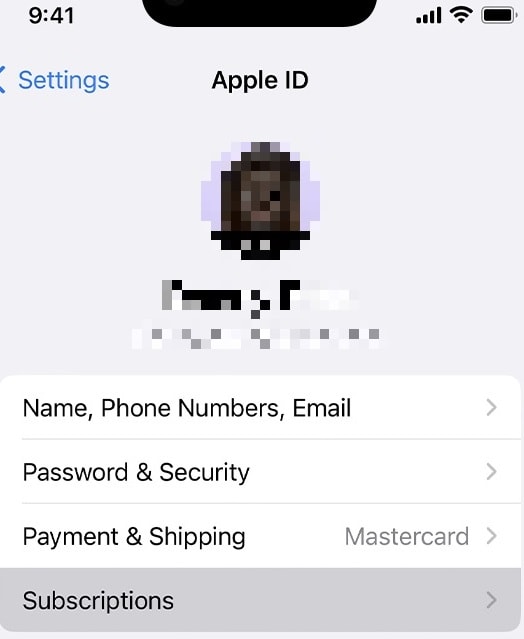
- Step 1: Open Settings on your Apple iPhone X and tap your Apple ID at the top.
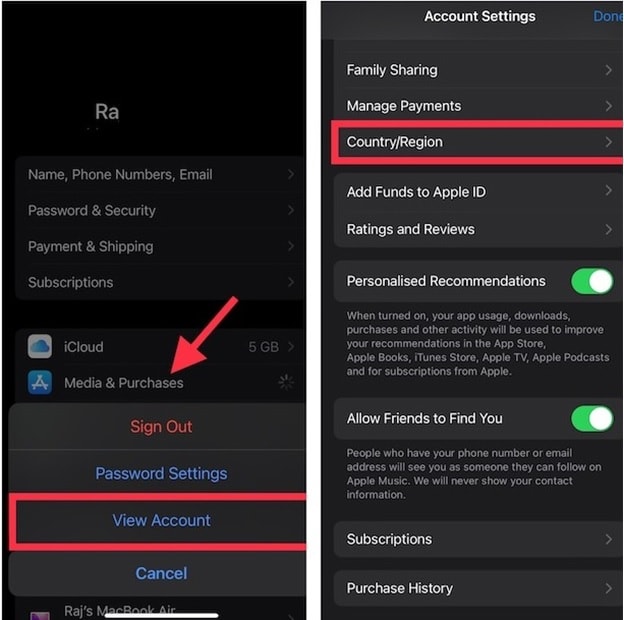
- Step 2: Tap on Media & Purchases > View Account. Sign in with your Apple ID. Next, Tap Country/Region > Change Country or Region and choose your desired country. Follow the on-screen prompts.
Method 2: Changing Apple ID Region via Mac/Windows
To change your Apple ID region via Mac/Windows, follow these steps:
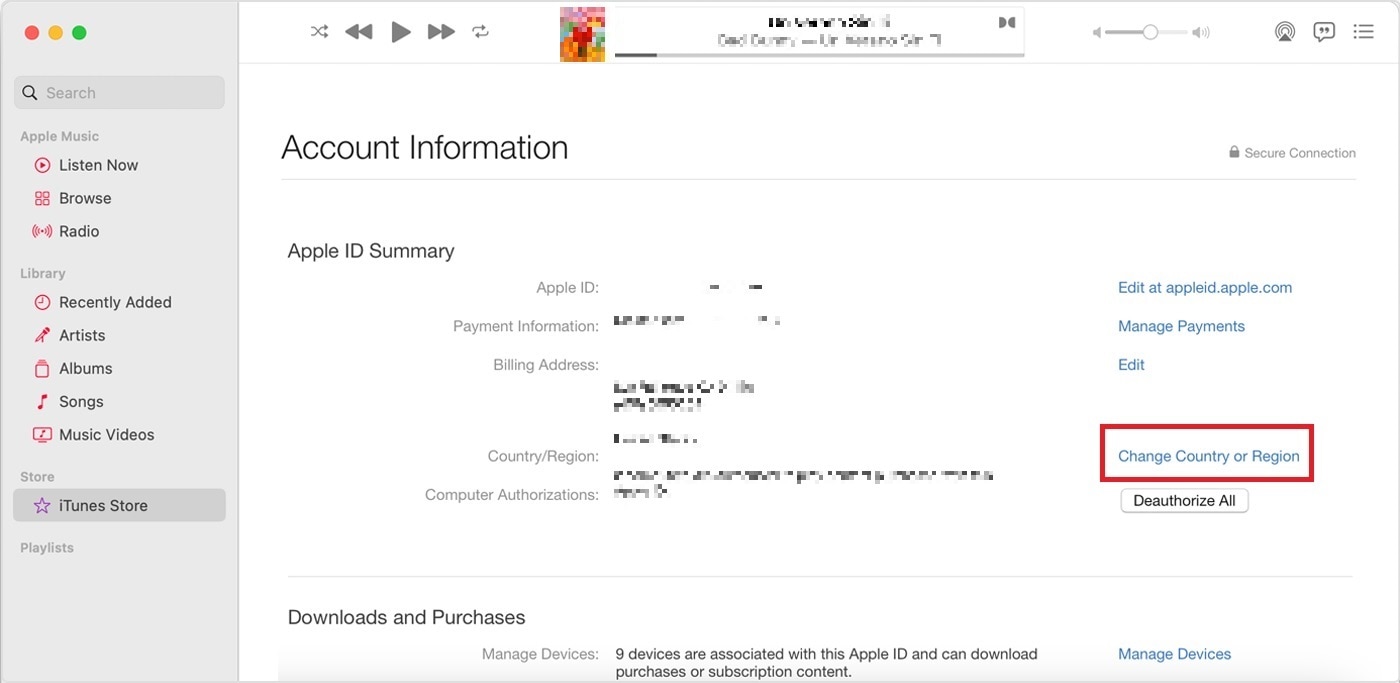
- Step 1: Open iTunes (on Windows) or Music (on Mac). Sign in with your Apple ID.
- Step 2: Go to Account > View My Account. Under Apple ID Summary, click Change Country or Region. Click your desired country and follow the instructions.
Method 3: Changing Apple ID Region via Web
The steps below are to change your Apple ID region via the web.
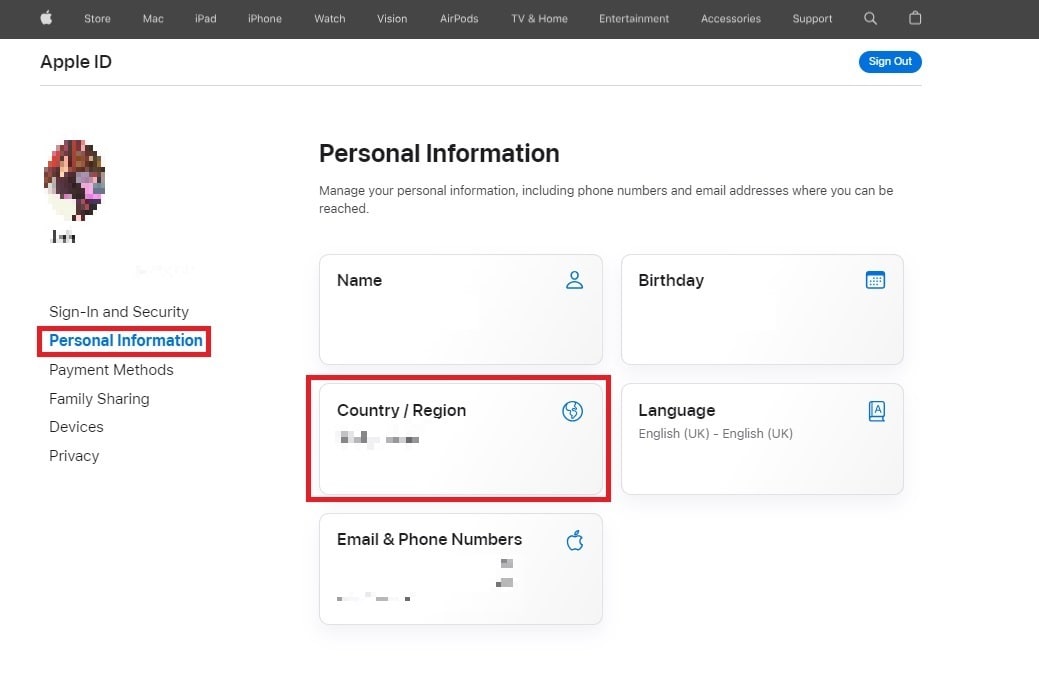
- Step 1: Open a web browser on your desktop or mobile device. Next, go to appleid.apple.com. Sign in with your Apple ID.
- Step 2: Under Personal Information, click the Country/Region button. Next, click the Change country or region and choose your preferred country.
Method 4: Leaving a Family-Sharing Group
If you’re part of a family sharing group, you need to leave the group before you can change your App Store country. To leave a family sharing group and change your app store country, follow the steps below.
- Step 1: Open the Settings app on your Apple iPhone X and tap Family.
- Step 2: Tap your name and tap Stop Using Family Sharing. Once you have left the family sharing group, you can change your App Store country by following the aforementioned manners.

Method 5: Cancel All Subscriptions
If you have any subscriptions, you must cancel them before changing your App Store country. Here are the steps below.
- Step 1: Open Settings on your Apple iPhone X. Next, tap your name at the top of the screen.
- Step 2: Tap Subscriptions > Cancel Subscription. Once you cancel all of your subscriptions, you can change your App Store country.
Method 6: Using a VPN
You can also use a VPN to change your App Store country. However, this method is not recommended, as it can be unreliable and may result in your account being banned. Here are the steps below.
- Step 1: Install a VPN app from the App Store.
- Step 2: Connect to a server in your desired country. Open the App Store and see content from the connected country.
Method 7: Creating a New Apple ID
Finally, you can create a new Apple ID account with the country you want your App Store country to be. Here are the steps below.
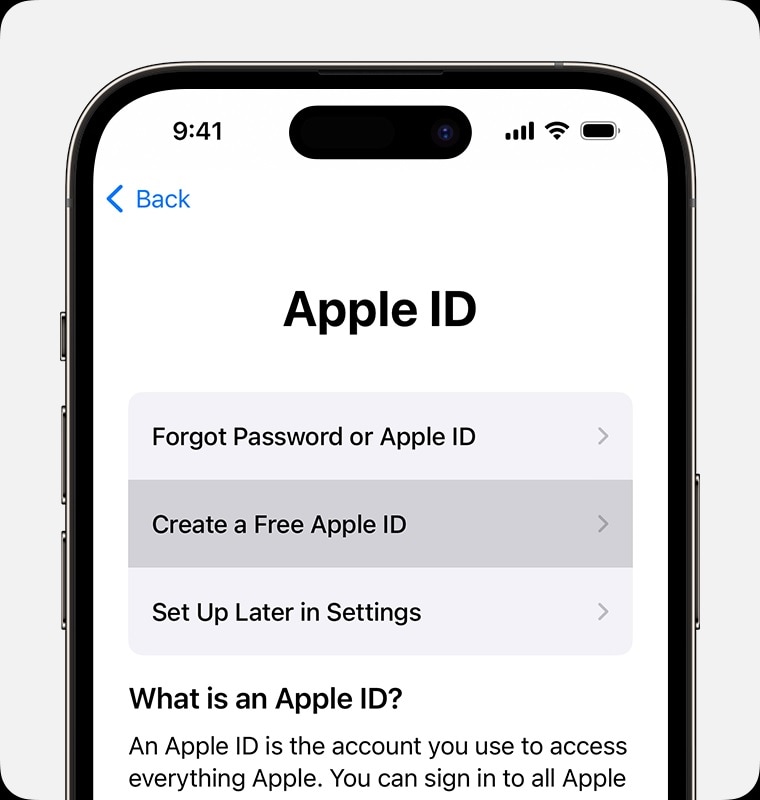
- Step 1: Sign out of your current Apple ID in Settings.
- Step 2: Create a new Apple ID with your desired country as the region.
Sometimes, changing your App Store country can lead to issues. It can lock you out of your Apple ID, or you’re forgetting your password. During these events, it can restrict your App Store access. In such cases, a tool like Dr.Fone - Screen Unlock (iOS) can come to the rescue.
Part 3. Changing Countries Not Going Your Way? Use Wondershare Dr.Fone – Screen Unlock
Dr.Fone - Screen Unlock (iOS) helps you regain access to your Apple ID and fix any login-related problems. It ensures that you can continue enjoying your App Store without any hindrance. It’s a safe and reliable software tool that is used by millions of people to unlock their devices. It is also easy to use, even if you are not tech-savvy.

Key Features
Dr.Fone - Screen Unlock (iOS) is a powerful tool that can help you to:
- **Unlock iOS Device Without Passcode.**Regain access to your locked iPhone or iPad without needing the passcode.
- **Remove All Lock Screen Types.**Versatile unlock support for 4-digit/6-digit passcodes, Touch ID, and Face ID lock screens.
- **Unlock Apple ID Without Password.**Effortlessly unlock your Apple ID without requiring the password, simplifying access.
How To Unlock Your Apple iPhone X in Seconds
Dr.Fone’s Screen Unlock tool offers a streamlined solution to get you back into your device within seconds. Here’s a simple guide on how to do it.
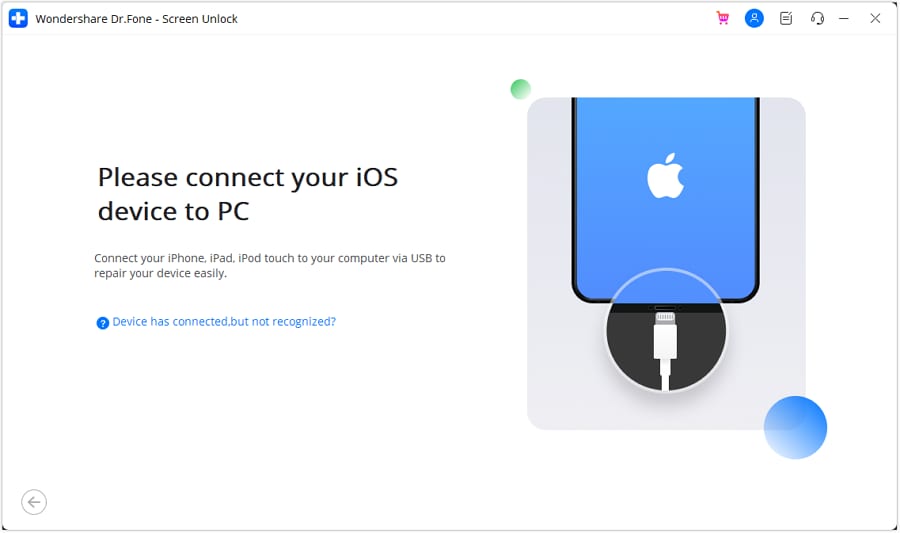
- Step 1: Download Dr.Fone - Screen Unlock (iOS) on your computer and install it. Next, launch the app.
- Step 2: Connect your locked Apple iPhone X to your computer using a compatible USB cable. Afterward, click Start on the program. Follow the on-screen prompts on Dr.Fone. It will tell you to boot differently into DFU mode. Once your device enters DFU mode, Dr.Fone will present device details, including phone generation, iOS version, and more.
- Step 3: Dr.Fone will download the necessary firmware for your device. Follow the on-screen instructions to finish the unlocking process. Once done, Dr.Fone will remove the activation lock from your device.

Conclusion
Changing your App Store country can open doors to region-specific apps, exclusive content, and timely updates. However, it’s important to consider the potential drawbacks, such as losing previous purchases.
When changing the App Store country on your Apple iPhone X, it’s important to consider Apple ID access issues. You never know when you will get locked out or suddenly forget your password. Wondershare Dr.Fone - Screen Unlock (iOS) offers a reliable solution during these instances. The tool ensures uninterrupted access to your App Store and Apple ID account, making it a valuable resource for managing your digital experience seamlessly.
Disabling Apple iPhone X Parental Restrictions With/Without Password
Among smartphones, the Apple iPhone X is well known for its quality and reliability. It is celebrated for its elegant design, robust capabilities, and exceptional security attributes. This device holds innovation within the smartphone industry. Among its array of security features lies the parental controls. These are a specialized set of features and settings crafted to aid parents.
It allows them to manage their children’s access to certain content and functionalities. This article aims to go through the details of how to disable parental controls on iPhones. It will offer a range of methods catering to both scenarios: disabling parental controls with and without a password. Moreover, it will feature an in-depth exploration of the most effective method to disable parental control.

Part 1. Defining Parental Controls on iPhone and Why People Want To Disable/Remove It?
Parental controls on an iPhone refer to features designed to allow parents to track various aspects of the Apple iPhone X device’s usage. These controls aim to provide younger users with a safer, more regulated digital experience. They include a range of functions, such as screen time limits and app restrictions. Moreover, content filtering and purchase controls also fall under parental control.
Primarily, parental controls serve as a protective measure. They enable parents to safeguard their children from potential online dangers. These include inappropriate content and excessive screen time. It turns out valuable for managing a child’s interaction with digital devices.
Why Do People Want To Disable/Remove Parental Control?
Parental controls can be a great way to manage children’s digital lives. However, there are equally good reasons why users seek how to remove restrictions on iPhone without passcode:
1. Age Appropriateness
As children grow older, they may desire increased independence and responsibility. Parental controls might become restrictive or unnecessary. This leads to the desire for removal to grant them more freedom.
2. Technical Glitches or Restrictions
Sometimes, parental control settings might malfunction or impose unintended restrictions. This can hamper the Apple iPhone X device’s regular functionality. Users seek removal to rectify these technical issues.
3. Privacy Concerns
Older users may find parental controls intrusive or overly restrictive. These can affect their privacy and autonomy. Disabling these controls allows for a personalized and private user experience.
4. Change in Circumstances
Situations change, and what was once appropriate may no longer apply. Families might undergo changes in dynamics or rules. This can prompt the need to adjust or remove parental controls accordingly.
Part 2. [With Password] How To Disable Parental Controls on iPhone?
Do you have the password to access parental control settings on your Apple iPhone X? The process of disabling these controls becomes straightforward. Here, we present 2 distinct methods for how to remove parental controls on iPhone:
Way 1. By Turning Off Screen Time Settings
Accessing Screen Time settings allows you to manage and disable parental controls. This method is recommended if you have the passcode. Follow these steps to know how to turn off restrictions on your Apple iPhone X with the password:
- Step 1. To disable Screen Time settings, navigate to “Settings” and select “Screen Time.” On the following screen, choose “Content & Privacy Restrictions” under the “Restrictions” section.

- Step 2. Now, switch the slider next to “Content & Privacy Restrictions” to turn it off. It will disable all parental control on the targeted device. However, before it disables, the Apple iPhone X will prompt for the Screen Time passcode, which needs to be added.

Way 2. By Resetting the Entire iPhone
Resetting the entire settings of your Apple iPhone X is a drastic but effective method. It can disable parental controls by removing all settings, including restrictions and passcodes. Note that this process will erase personalized settings on your device. However, it does not delete data like photos, videos, or apps. Below are the steps on how to remove parental controls iPhone by resetting:
- Step 1. You will need to access the “General” tab within Settings of your Apple iPhone X. Here, scroll down and tap “Transfer or Reset iPhone.” On the following screen, tap the “Reset” option.

- Step 2. From the available options, after tapping “Reset,” choose “Reset All Settings.” You will be asked to provide the passcode to successfully reset your Apple iPhone X and disable parental control settings.

Part 3. [Without Password] How Do You Disable Parental Controls on iPhone?
Disabling parental controls on an iPhone is still possible, even without the password. Below, we explore two methods that can be used to bypass parental controls without requiring a password.
Way 1. Wondershare Dr.Fone - Screen Unlock (iOS)
Removing a Screen Time passcode without the associated passcode can be challenging. Utilizing Wondershare Dr.Fone presents a potential solution. It is a robust tool that tackles a range of iOS-related problems. You will discover it as a convenient method to surpass the limitations imposed by Screen Time.
Among its functions, Wondershare Dr.Fone - Screen Unlock (iOS) caters to resolving passcode-related concerns. This also includes the removal of Screen Time passcodes. The best thing about using Dr.Fone to remove the Screen Time passcode is that it bypasses the lock without data loss. Along with Screen Time passcodes, Dr.Fone is also an expert in unlocking various screen locks.
Notable Features of Wondershare Dr.Fone
- It lets users bypass MDM on their iOS devices without losing their data.
- If your iOS device is stuck at the iCloud Activation Lock, Dr.Fone bypasses this lock without requiring a passcode.
- For those facing issues with forgotten Apple ID passwords, Dr.Fone facilitates the removal of Apple ID from devices.
Steps To Disable Parental Controls on iPhone via Wondershare Dr.Fone
Forgetting passwords, be it Screen Time lock or device screen lock, can be a stress-inducing experience. Following are the steps for how to turn off parental controls without a password:
- Step 1. Access Unlock Screen Time Passcode
To initiate the procedure, open Wondershare Dr.Fone on your computer. Navigate to “Toolbox,” tap “Screen Unlock,” and choose “iOS” as the Apple iPhone X device type. On the following screen, choose “Unlock Screen Time Passcode.” Establish a USB connection between your iOS device and the computer before commencing.

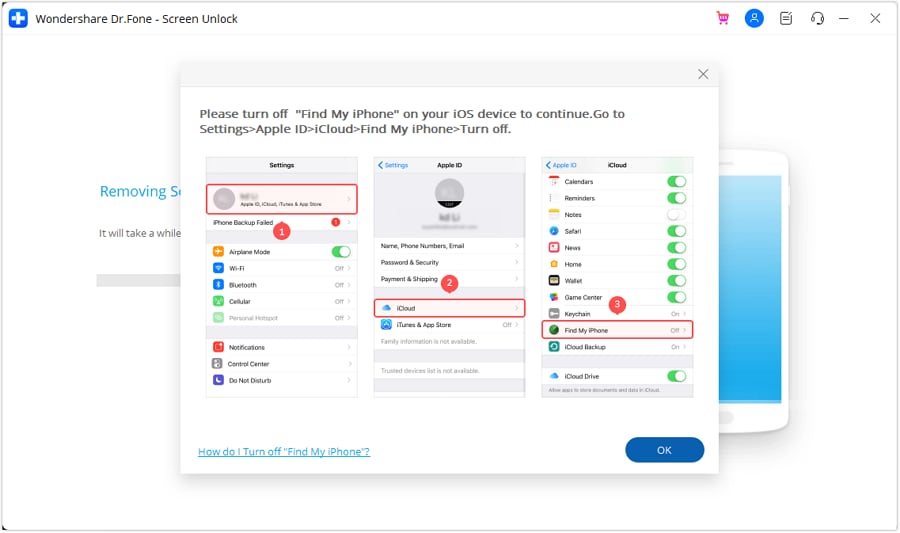
- Step 2. Start Unlocking by Disabling Find My Feature
Upon connecting the Apple iPhone X device, the platform will detect the iDevice and showcase its status on the screen. Afterward, you are required to proceed by clicking on the “Unlock Now” button. However, it is necessary to deactivate the Find My service as indicated in the prompt. Navigate to your Apple iPhone X’s Settings and select the Apple ID at the top of the settings menu. Access the “Find My” settings and toggle off the “Find My iPhone” feature.
- Step 3: Complete Screen Time Passcode Removal Process
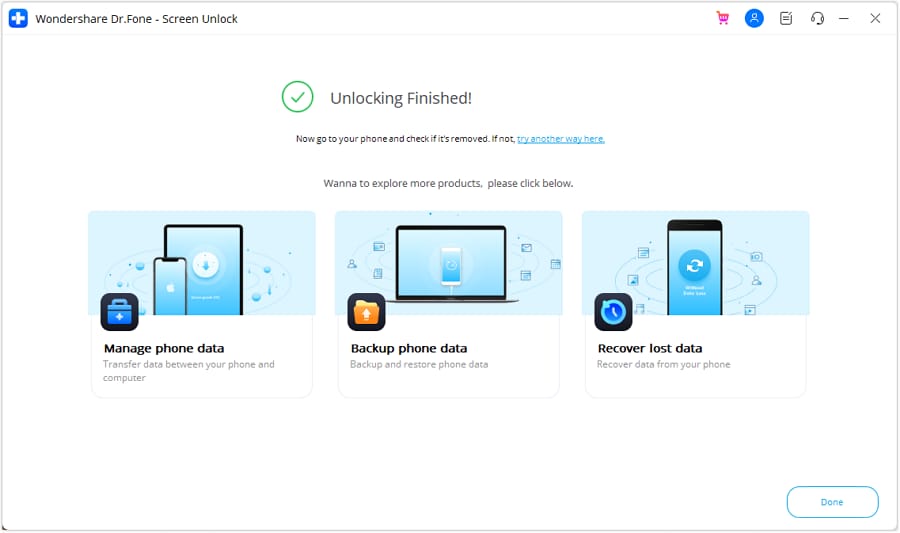
Upon completion, confirm by clicking “OK” on the computer screen. The progress bar on the screen indicates the progress of unlocking the screen time passcode process. When the Apple iPhone X device is unlocked, the platform will present a confirmation message. To conclude the entire process, click on the “Done” button.
Way 2. Restore iPhone From iTunes
Restoring an iPhone using iTunes is an alternative method for removing parental controls. iTunes is a multimedia management software that is developed by Apple. It provides various functions, including media playback and data synchronization. The most important function is the Apple iPhone X device backup and restoration. Restoring your Apple iPhone X via iTunes results in the complete erasure of all data and settings. Here is how to disable restrictions on iPhones without password:
- Step 1. Ensure that iTunes has been updated to the most recent version before opening the application. Connect your Apple iPhone X to the computer and grant iTunes permission to recognize the Apple iPhone X device. After detecting the Apple iPhone X device, access the “Summary” tab by tapping the Apple iPhone X device icon in iTunes. You can access the “Backups” section to create any backup before restoring.

- Step 2. Afterward, initiate the Apple iPhone X restoration by selecting “Restore iPhone.” A menu box will appear, asking you to create a “Back Up” or not. Choose the preferred option, and another dialog box will appear, alerting you about the deletion of all content and settings on your Apple iPhone X. You should proceed by clicking “Restore” to confirm. Then, follow the on-screen instructions to finalize the process.

Conclusion
In summary, this article explored how to disable restrictions on iPhones without a password and with a password. Accessing settings with a passcode simplifies the process. Wondershare Dr.Fone stands out as the optimal solution for those seeking how to delete parental controls without password. When passcode access is limited, Dr.Fone – Screen Unlock (iOS) offers the most efficient solution.
Tips: Are you searching for a powerful iPhone Unlock tool? No worries as Dr.Fone is here to help you. Download it and start a seamless unlock experience!
Learn How To Lock Stolen Your Apple iPhone X Properly
When it comes to security in smartphones, Apple stands at the forefront. The Activation Lock is a robust barrier to preventing unauthorized access and device theft. Losing your Apple iPhone X can be a disturbing event, as accidents are inevitable. Taking prompt action to stop unauthorized data access becomes important. This guide offers a step-by-step approach to how to lock a stolen iPhone.

Part 1. Major Threats To Consider When iPhone Is Stolen
A lost iPhone can become susceptible to a myriad of threats. It could compromise your privacy, security, and personal data. Here are the reasons why learning how to lock your Apple iPhone X when lost is essential:
- Unauthorized Access to Personal Data: Thieves can exploit an unsecured Apple iPhone X to gain unauthorized access to personal information. These include contacts, messages, emails, and photos.
- **Financial Exploitation:**With access to your Apple iPhone X, thieves may attempt to get stored payment methods.
- Identity Theft: Stolen iPhones often contain a wealth of sensitive information. This makes them a prime target for identity theft.
- Compromised Social Media Accounts: Using social media applications on your smartphone carries potential risks in the event of device loss. Unauthorized access to your social media accounts can lead to many problems, including misinformation and compromised privacy.
Part 2. Use Find My To Locate Stolen iPhone
On learning about how do I lock my stolen iPhone, Apple’s robust Find My feature emerges as a beacon of hope. It uses a combination of GPS, Wi-Fi, and Bluetooth signals to locate your Apple iPhone X accurately.

Key Scenarios Where Find My Works
Find My can be a source to track stolen iPhones, but certain scenarios are associated with its operations. To know more about these scenarios, this section continues the discussion further below:
- iPhone Turned On:Find My can provide real-time location tracking when your stolen iPhone is still powered on and connected to the internet.
- **iPhone Turned Off or In Airplane Mode:**The last known location before the Apple iPhone X device was powered down or put in Airplane Mode is accessible, offering a starting point for recovery efforts.
- **Offline Finding with Bluetooth:**The Find My service leverages Bluetooth technology to create a vast network of Apple devices. With these, it can securely help locate your Apple iPhone X, even offline.
- **Activation Lock Integration:**This service is also integrated with Activation Lock, adding an extra layer of security. The Activation Lock remains active if a thief attempts to erase your device.
How To Use Find My To Locate Your Stolen iPhone
- Step 1. Access the Find My app on a trusted device and open it. If you can’t access one, use the iCloud website to access Find My service.

- Step 2. After logging in, select the lost device, and you can see its last recorded location on the map.

Part 3. Using Lost Mode To Lock Stolen iPhone
Lost Mode locks the Apple iPhone X device and allows users to showcase a personalized message on the screen. This can help greatly in the safe return of the smartphone. The following are the simple steps you need to follow to learn how to block stolen iPhone with Lost Mode:
Activating Lost Mode Using Your Smartphone
- Step 1. Within the Find My app, tap “Devices” from the bottom toolbar and select your lost device. Now, scroll down to “Mark As Lost” and tap “Activate.”

- Step 2. You will now be given a summary of the Lost Mode; tap “Continue” to proceed. On the following screen, add a phone number, tap “Next,” and add a message that will be displayed on the lost device.

- Step 3. After adding a message, tap “Next” on the following screen and press “Activate” from the top right corner.

Activating Lost Mode Using iCloud Website
- Step 1. Access the iCloud website via your computer’s web browser. Sign in using your Apple ID, continue to click the “Grid” icon in the top right corner, and select “Find My.”

- Step 2. In Find My, add your Apple ID password again to access “All Devices.” Now, choose the lost device from the list of all devices in the top left corner. Then, click “Mark As Lost,” and the following pop-up Lost Mode prompt, tap “Next.”

- Step 3. Now go on to add your phone number and tap “Next.” Follow it by providing the message you want to display and click “Activate” to enable Lost Mode.

Part 4. Can’t Find Stolen Phone? Erase iPhone Completely
When efforts to locate a stolen iPhone fail, the need to protect sensitive data intensifies. As a result, the option to erase the Apple iPhone X device becomes a crucial step instead of how to lock the Apple iPhone X when lost. Here’s how to protect against the potential misuse of your information by erasing your device via Find My:
- Step 1. After accessing Find My service, choose the lost device from the list and click “Erase This Device.”

- Step 2. Select “Continue” on the erased iPhone screen for the Find My app. Once you’ve added the number, press “Erase” in the top right corner and follow the on-screen instructions to finish the procedure.

- Step 3. If using the iCloud website, tap “Erase This Device” and click “Next” on the upcoming prompt. You will be asked to enter the Apple ID password, after which you can use the on-screen guidelines to finish the process.

Part 5. Other Things To Do iPhone Is Stolen
There are additional measures you can take to enhance your overall security apart from understanding how do I lock my stolen iPhone. The following are some options you should utilize in case of device loss:
To Do List #1. Report to Police
If your Apple iPhone X is stolen, it is crucial to immediately inform your local law enforcement agency. It facilitates the recovery process and assists in combatting criminal activities. Provide essential details about your Apple iPhone X, such as the Model, color, and IMEI number. Share information about your efforts to locate the stolen iPhone using Find My.

To Do List #2. Make an Insurance Claim With AppleCare
You can claim insurance if you have AppleCare+ coverage for your Apple iPhone X. AppleCare+ with Theft and Loss for iPhone includes protection against theft and loss incidents. It offers up to two incidents of such coverage every 12 months.
To qualify for theft or loss coverage, it is necessary for Find My to be enabled on your device at the time it goes missing. Moreover, it should remain enabled alongside Lost Mode throughout the claims process.

To Do List #3. Remove iPhone From Trusted Devices (2FA)
After your Apple iPhone X is stolen, it becomes essential to bolster the security of your online accounts. It is particularly essential for those safeguarded by Two-Factor Authentication (2FA), which needs to be removed:
From iOS Device Settings
- Step 1. Access Settings on an iOS device logged in with the same Apple ID as the lost one. Here, tap on your name on the following screen and scroll down.

- Step 2. Simply select the misplaced device, and in the subsequent interface, press “Remove from Account” to eliminate it from the list of trusted devices.

From the Apple ID Website
- Step 1. If you cannot reach a secure device, visit the http://appleid.apple.com website and sign in with the identical Apple ID.

- Step 2. Once logged in, click “Devices” from the left side and select the lost device. To remove this device as a trusted device, click “Remove from Account.”

Part 6. Precautions To Take for Avoiding Losing iPhone
Users can proactively adopt specific measures to reduce the likelihood of such an occurrence. The following essential precautions are recommended while learning how to block your Apple iPhone X when stolen:
Precaution #1. Enable Find My on Device
Activating Find My increases the likelihood of recovering your device. Take the following steps to enable the Find My feature on your Apple iPhone X:
- Step 1. On your iOS device, navigate to “Settings” and tap the Apple ID on the top. Now, scroll down and press “Find My” on the following screen.

- Step 2. Next, tap “Find My iPhone,” on the ensuing window, toggle “Find My iPhone.” This will enable the Find My service on your device.

Precaution #2. Enable Separation Alerts on iPhone
Enabling “Separation Alerts” assists in preventing the loss of your Apple iPhone X by alerting you when you distance yourself from it. Follow these steps to enable Separation Alerts on your Apple iPhone X:
- Step 1. Navigate to and launch the Find My app on your Apple iPhone X. Select the Apple iPhone X device from the “Devices” tab for which you want to enable separation alerts.

- Step 2. From the available options, tap “Notify When Left Behind,” and on the following screen, toggle “Notify When Left Behind.” You can also add locations on this screen by tapping “New Location,” for which you don’t want to receive a left-behind notice.

Precaution #3. Enable 2FA on iPhone
Activating Two-Factor Authentication (2FA) enhances the security of your Apple iPhone X. The mandatory secondary verification step makes 2FA crucial in securing your accounts. Follow these steps to enable 2FA on your Apple iPhone X:
- Step 1. Access the Settings app on your iOS device and tap your name/Apple ID. Find and tap “Sign-In & Security” to proceed further.

- Step 2. On the following screen, tap “Turn On Two-Factor Authentication.” Follow it by tapping “Continue” afterward, and use the on-screen instructions to complete the process.

Bonus Tip. Find Stolen iPhone Back but Locked? Unlock With Wondershare Dr.Fone
Recovering your stolen iPhone successfully can be a joyous event. Yet, the frustration of discovering your device locked due to a forgotten password can be disheartening. Wondershare Dr.Fone - Screen Unlock (iOS) offers a solution to regain access to your device. This robust tool is crafted to help users unlock various iOS screen lock scenarios.
It provides a hassle-free solution for those locked out of their devices. This powerful tool effortlessly removes various lock screens on iPhones and iPads. It can bypass the iCloud activation lock without the need for a password.
Key Features of Wondershare Dr.Fone
- If you are using iTunes for backup but have forgotten the iTunes backup encryption passcode, Dr.Fone can remove it without data loss.
- This tool can remove Apple ID from your Apple iPhone X or iPad if you have forgotten its password.
- You can free up your device by removing MDM and carrier locks using Dr.Fone.
Steps To Unlock Your Locked iOS Device Using Wondershare Dr.Fone
Wondershare Dr.Fone is a comprehensive toolkit that addresses many iOS-related issues. It offers a user-friendly solution to unlock your Apple iPhone X with the help of the following steps:
- Step 1. Launching Wondershare Dr.Fone and Accessing Toolbox
Once you have installed and launched Wondershare Dr.Fone, access the “Toolbox” tab. Click “Screen Unlock,” and on the following screen, choose “iOS.” Click “Unlock iOS Screen” on the following screen and link your iOS device to the computer.

- Step 2. Entering Recovery Mode and Choosing System Version
The next step requires you to put your device in Recovery Mode, for which you can follow the instructions given on-screen. After your device is in Recovery Mode, Dr.Fone will display its “Model.” Now choose the appropriate “System Version” and click “Start.” Here, Dr.Fone will start downloading the required firmware. Once it is downloaded and verified, tap “Unlock Now.”

- Step 3. Acknowledging Data Loss Warning and Initiating Unlock Process
To show your acknowledgment of the warning, enter the asked code, which is “000000.” Afterward, click “Unlock” to initiate the screen unlocking process. Once the process is complete, tap “Done” to conclude the procedure.

Conclusion
Knowing how to lock stolen iPhones is essential for safeguarding personal and sensitive data. Apple’s Find My empowers users to remotely locate, lock, and erase their lost devices. If you have recovered your stolen device but it is locked, Wondershare Dr.Fone emerges as the top choice to unlock it within minutes.
Tips: Are you searching for a powerful Screen Unlock tool? No worries as Dr.Fone is here to help you. Download it and start a seamless unlock experience!
Also read:
- [New] 2024 Approved Fostering Self-Assurance Against Virtual Hostility
- [New] Accelerated Learning for Chromakey Artistry for 2024
- [New] In 2024, Facebook Video Glitch How to Spot & Fix
- [New] Make Sense of iPhone Video Repetition Tech
- [New] Your Pathway to Successful YouTube Beginnings (Techniques 1 & 2)
- [Updated] Curate Engaging Content with Top IGTV Editor Tools for 2024
- [Updated] The Ultimate Roadmap to Crafting Memorable TikTok Videos
- A Comprehensive Guide to Apple iPhone 15 Blacklist Removal Tips and Tools | Dr.fone
- Corsair Logitech K55 Peripheral Setup Guide – Download & Updates
- Guide on How To Change Your Apple ID Email Address On iPhone XS | Dr.fone
- How To Fix Auto Lock Greyed Out on Apple iPhone XS Max | Dr.fone
- How To Unlock A Found iPhone XS Max? | Dr.fone
- How To Unlock Apple iPhone 7 Without Passcode? 4 Easy Methods | Dr.fone
- In 2024, Full Guide to Unlock iPhone SE (2020) with iTunes | Dr.fone
- In 2024, How to Turn Off Find My iPhone 12 when Phone is Broken? | Dr.fone
- In 2024, Resolve Your Apple iPhone 13 Keeps Asking for Outlook Password | Dr.fone
- Overcoming Connectivity Hurdles: Ensuring All Your Gadgets Pair with Windows 10'S Bluetooth
- Region Unlocking DVDs on Windows 11/8/7: Free Conversion Methods Explored
- Resolve Your iPhone 14 Pro Keeps Asking for Outlook Password | Dr.fone
- Title: In 2024, How To Change Country on App Store for iPhone X With 7 Methods | Dr.fone
- Author: Amelia
- Created at : 2025-01-25 22:01:33
- Updated at : 2025-02-01 02:45:14
- Link: https://iphone-unlock.techidaily.com/in-2024-how-to-change-country-on-app-store-for-iphone-x-with-7-methods-drfone-by-drfone-ios/
- License: This work is licensed under CC BY-NC-SA 4.0.