
In 2024, How to Fix iPhone 12 mini Passcode not Working? | Dr.fone
How to Fix Apple iPhone 12 mini Passcode not Working?
Apple has always been one of the top successful companies. The reason for its success can be clearly seen through its efforts in pioneering top-notch products. It not only puts its efforts into ensuring the perfect working of the Apple iPhone 12 mini device but also provides the user with essential security measures to protect the data of the Apple iPhone 12 mini device from unauthorized access.
This is the sole reason why Apple focuses so much on privacy through passcodes. But sometimes, these passcodes can be a hurdle in the working of the iPhone.
If you’re facing this issue, then you’ve come to the right place. This article shall cover your queries regarding fixing the Apple iPhone 12 mini passcode that is not working and providing full-depth details for your ease.
Part 1: Why iPhone is Saying Passcode is Wrong?
If you enter the wrong password, your Apple iPhone 12 mini will not accept it and won’t open your phone. If you repeatedly enter the wrong password, it will disable your phone mainly because of security reasons. However, sometimes you’re genuinely trying to enter the correct password, but your device won’t accept it. This isn’t common, but there are quite a few reasons why iPhone is saying your passcode is wrong.
Sometimes the problem is trivial, like you may have entered the wrong keys in a hurry, due to which it won’t accept your passcode. In other cases, face recognition may not recognize your face if you’re wearing any mask.
However, occasionally the problem is technical. Sometimes, your Apple iPhone 12 mini may be corrupted. This can cause trouble for your device to detect the security file where your passcode is stored. Other times, the operating system may not be installed properly after updating to the new version of iOS.
Part 2: Remove iPhone Passcode with Dr.Fone Without Losing Data
Everyone in the field of tech is familiar with Wondershare as it is the most innovative and versatile software in the market. Dr.Fone is a toolkit containing data recovery, phone manager software, etc., introduced by Wondershare. One of the many reasons for its success is the intuitive interface that has made it convenient for professionals as well as amateurs.
When it comes to fixing your Apple iPhone 12 mini passcode, which is not working, Wondershare Dr.Fone - Screen Unlock does wonders.
iTunes is another great way to bypass the activation screen without a SIM card. If you’re new to this, here’s a small guide on how to use iTunes to bypass the activation screen.
Dr.Fone - Screen Unlock (iOS)
Remove iPhone Passcode.
- If you don’t have access to iTunes, Dr.Fone is a great alternative.
- Compatible with all models of iPhone and other iOS devices.
- It resets the factory settings without requiring the passcode.
- It recovers data after resetting iPhone’s passcode.
3981454 people have downloaded it
Step 1: Connect Apple iPhone 12 mini to your Computer
The first step is to connect your Apple iPhone 12 mini to your computer via cable and install Wondershare Dr.Fone - Screen Unlock.

Step 2: Screen Unlock Tool
Select the “Screen Unlock” tool from the given tools on the home interface. Another interface will be displayed on the screen in which you’ve to select “Unlock iOS Screen.”

Step 3: DFU Mode
Before directly unlocking the Apple iPhone 12 mini lock screen, you’ve to set it up in either Recovery mode or DFU mode. Mostly ‘Recovery Mode’ is recommended as it removes the passcode by default. However, if your device fails to activate it, you can opt for DFU mode.

Step 4: Download Firmware
Once your Apple iPhone 12 mini is in DFU mode, another window will be displayed on the screen, asking for confirmation regarding the Apple iPhone 12 mini device Model and System Version. Now click on the “Download” button placed at the bottom.

Step 5: Unlock your Apple iPhone 12 mini.
After downloading the firmware, select “Unlock Now” to unlock your Apple iPhone 12 mini.

Part 3: Effective Ways to Fix iPhone Password Not Working
This part shall assert its focus on the effective ways of resolving the issue involving the Apple iPhone 12 mini password not working on your device. It revolves around the methods involving iTunes, iCloud, and iPhone Recovery Mode.
3.1 By using iTunes and iPhone Cables
iTunes is one of the most used and innovational software pioneered by Apple. It has proved to be the best software out there through its versatility and exceptional performance. This software is your savior if you’re looking for something to organize your files in iPhone as it has great integration with iOS.
If you want to fix your Apple iPhone 12 mini passcode, which is not working, then iTunes can be an efficacious solution for your problem. Below we have explained step-by-step how to fix your passcode in iPhone using iTunes:
Step 1: Connect to Computer
The first step is to connect your Apple iPhone 12 mini to the computer with which you’ve synced previously.
Step 2: Recovery Mode and Synchronize
Now open iTunes. If it asks for a passcode, try another computer that you’ve synced your device with. Else, put your phone to Recovery mode. Wait for iTunes to detect and sync your device. It will then create a backup.
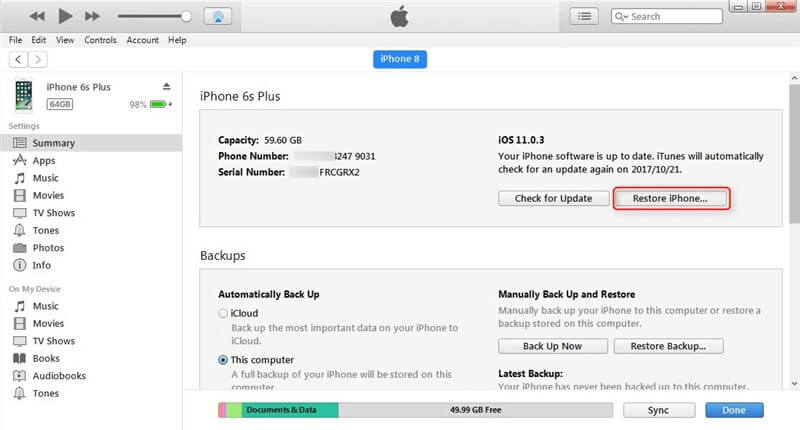
Step 4: Restore
Once your device is synced with iTunes, a “Set Up” window will pop up on the screen displaying two options, “Restore” or “Update.” Select “Restore” to proceed further.
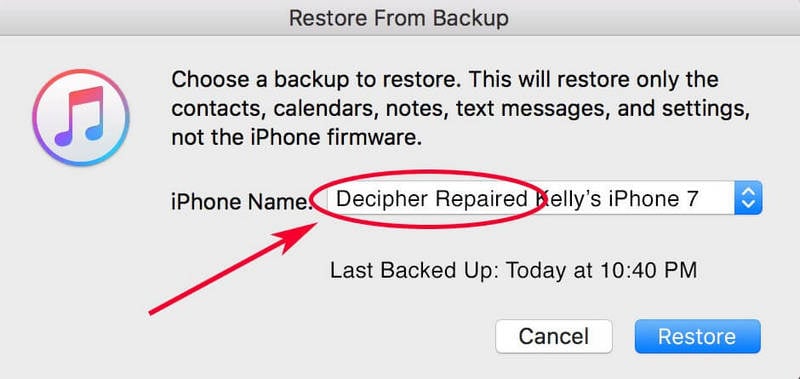
Step 5: Reset Passcode
Select your device and the appropriate backup for your device in iTunes. Once the process is completed, you can reset the passcode of your Apple iPhone 12 mini in the settings.
3.2 Apple iCloud Feature
iCloud is a multifunctional drive compatible with iOS and macOS. It saves your data, your media and organizes your files in folders. Moreover, it allows the user to share media, data, files, and even location with the other iPhone/iOS user. The major feature of Apple iCloud is its ‘Backup’ which stores all your data in case you lose or damage your phone.
To fix the Apple iPhone 12 mini passcode, which is not working, iCloud can come in handy. But this method can only work if you’ve logged in to your iCloud account on your Apple iPhone 12 mini and your “Find My iPhone” application is turned on. All you have to do is erase your data which will automatically erase your passcode through iCloud.
Step 1: Sign in with Apple ID
First, open iCloud.com on another iOS and write your credentials to sign in your Apple ID.
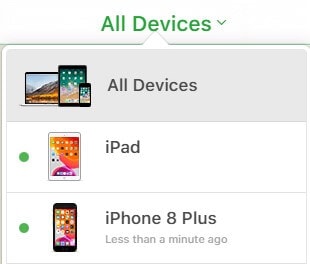
Step 2: Select your Device
Click on “Find My iPhone” and select “All devices,” and a list of devices will come up which are working under the same Apple ID. Select your Apple iPhone 12 mini.
Step 3: Erase Data and Set up your Apple iPhone 12 mini.
Now click on the option of “Erase iPhone” to erase all your data and even your passcode. You have the autonomy to set up your Apple iPhone 12 mini from a previous backup or set it up as a new device.

3.3 Using iPhone Recovery Mode
If you’ve never synced your Apple iPhone 12 mini with iTunes or set up “Find my iPhone” and you’re out of options, then iPhone Recovery Mode can come to the rescue. Recovery Mode allows your Apple iPhone 12 mini to connect with iTunes without restarting the system.
This process is quite time-consuming and different for different versions of the iPhone. Here we will guide you on how to fix the Apple iPhone 12 mini passcode via Recovery Mode.
Step 1: Connect your device to the Computer
Connect your Apple iPhone 12 mini to your computer and open iTunes.
Step 2: Activate Recovery Mode
Once the computer detects your Apple iPhone 12 mini, it force restarts it. Activating Recovery Mode is different for different models of iPhone.
- For iPhone 6s and earlier versions: Press and hold the Home Button and the Power Button simultaneously.
- For iPhone 7 and 7 Plus: Press and hold the Power Button and Volume Down Button simultaneously.
- For iPhone 8 and latest versions: Press and release the Volume Down button instantly. Then again, press and release the Volume up button. Now press the Power Button till you see the option of “Recovery Mode.”
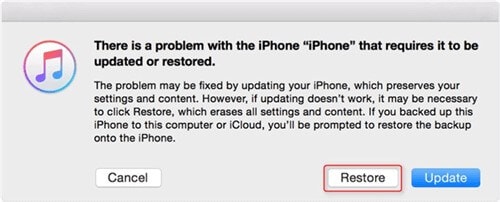
Step 3: Restore your Apple iPhone 12 mini.
When you’re given the option of Restore or Update, choose ‘Restore.’ iTunes will automatically download the appropriate software.
Step 4: Set Up your Apple iPhone 12 mini
Once the process has reached completion, set up your Apple iPhone 12 mini, if this process takes more than 15 minutes, it will leave the Recovery Mode automatically and repeat the steps again.
Conclusion
This article has provided you the reasons and best possible ways to fix the issue of the Apple iPhone 12 mini passcode not working in detail. You must follow these steps immediately if you’ve locked your Apple iPhone 12 mini to avoid further trouble and anxiety.
We hope we have covered every bit of this article perfectly and you have successfully unlocked your Apple iPhone 12 mini without any hassle.
How Do You Remove Restricted Mode on Apple iPhone 12 mini
Restricted Mode on iPhone is useful for controlling access to certain content. If you need to remove these restrictions, learn how to disable Restricted Mode on your Apple iPhone 12 mini by reading the article. The feature provides a layer of security and content filtering. However, it can limit functionality in some apps.
Follow the steps outlined in the page’s latter part to learn how to turn off Restricted Mode on your Apple iPhone 12 mini. This will grant you unrestricted access to all apps and content, ensuring a smoother and more flexible user experience. To know more, let’s get started.

Part 1. What Is the iPhone’s Restricted Mode?
iPhone’s Restricted Mode is a comprehensive set of features to enhance user control in family-oriented contexts. It acts as a comprehensive filter, safeguarding users from unwanted content. Restricted Mode employs several key functionalities, such as:
- **Content filtering.**Content filtering filters out inappropriate content from various sources, including apps, websites, and search results.
- Functionality restrictions. Restricted Mode can also turn off specific functionalities like in-app purchases and the Apple iPhone 12 mini device camera. It ensures a more controlled and secure user experience.
- **4-digit passcode.**The inclusion of a 4-digit passcode adds an extra layer of security. It prevents unauthorized changes to the Apple iPhone 12 mini settings or Apple ID.
- **Parental controls.**Targeting family use, Restricted Mode incorporates robust parental controls. Parents can manage and monitor screen time for a balanced, age-appropriate digital experience for their children.

Part 2. Why Can’t I Remove Restricted Mode?
If you want to know how to remove Restricted Mode on your Apple iPhone 12 mini, it’s not as simple as you may have desired. Here are several reasons:
- Forgotten Passcode
If you’ve forgotten the passcode set for Restricted Mode, unlocking it becomes challenging. Security measures are in place to prevent unauthorized changes, and bypassing it can be complex.
- Parental Controls
For users under parental guidance, restrictions are often set by parents or guardians. It’s to ensure a safe and controlled digital environment. Removing Restricted Mode might require parental consent or a passcode.
- Software Updates
Occasionally, issues arise during iOS updates, causing bugs or glitches that may affect the removal of Restricted Mode. These technical issues can hinder the smooth operation of device features.
- Factory Restrictions
In cases of secondhand or refurbished iPhones, the Apple iPhone 12 mini device may have restrictions that limit the removal of Restricted Mode. These restrictions are set to maintain the Apple iPhone 12 mini device’s integrity and compliance with certain standards.
These factors are crucial for users attempting to remove Restricted Mode. Each scenario may necessitate a different approach or solution.
Enabling Restricted Mode on your Apple iPhone 12 mini is prudent, especially for parents. It ensures a secure and controlled digital environment for their children. Follow these simple steps to turn on Restricted Mode:
- Step 1: Go to Settings > Screen Time > Content & Privacy Restrictions on your Apple iPhone 12 mini. Next, Toggle the switch next to Content & Privacy Restrictions to turn it on.

- Step 2: The device will prompt you to set a passcode. Choose a secure 4-digit code required to make changes or deactivate the Restricted Mode. You can customize various settings, such as app usage, web content, and privacy settings. Tailor these restrictions according to your preferences and the intended user.
Part 4. 3 Ways to Turning Off Restricted Mode on iPhone
If you want to know how to turn off Restricted Mode on your Apple iPhone 12 mini, here are three efficient methods to do so. Whether on a specific iOS version or facing a forgotten passcode, these provide solutions for every scenario.
Method 1: Turn Off Restricted Mode on iOS 12 and Above
For users on iOS 12 and above, turning off Restricted Mode is straightforward:
- Step 1: Open the Settings app on your Apple iPhone 12 mini and scroll down to find Screen Time > Content & Privacy Restrictions. Enter your passcode when prompted.

- Step 2: Toggle off the switch next to Content & Privacy Restrictions. This action turns off Restricted Mode on your Apple iPhone 12 mini.
Method 2: Turn Off Restricted Mode on iOS 11 and Below
For those using iOS 11 and below, the steps are a bit different:
- Step 1: Go to Settings > General. Scroll down to find the Restrictions option.

- Step 2: Toggle off the switch next to Restrictions. The action turns off Restricted Mode on iOS 11 and below.
Method 3: Turn Off Restricted Mode Using Dr.Fone - Screen Unlock (iOS)
There may be situations where removing Restricted Mode on your Apple iPhone 12 mini becomes challenging. If you can’t unlock your Apple iPhone 12 mini screen time, then you need a specialized tool like Wondershare Dr.Fone. The platform’s Unlock Screen Time Passcode feature can assist in its removal in quick and easy steps.
Key features
Packed with essential features, Dr.Fone ensures a seamless experience in removing Restricted Mode your device:
- Removes all types of lock screens. Dr.Fone - Screen Unlock (iOS) is equipped to handle various lock screens. It provides a versatile solution for users dealing with Restricted Mode passcode issues.
- **No need for an Apple ID password.**Unlike many other tools, Dr.Fone allows you to unlock without Apple ID password. It streamlines the unlocking process, making it more accessible for users.
- **Unlocks Without Data Loss.**You regain access to your Apple iPhone 12 mini without compromising your valuable information.
- High Success Rate: Dr.Fone - Screen Unlock (iOS) boasts a high success rate, assuring users of a reliable and effective solution.
How To Turn Off Restricted Mode Using Dr.Fone
Here’s how to disable Restricted Mode on iPhone without a password using Dr.Fone. Follow the steps:
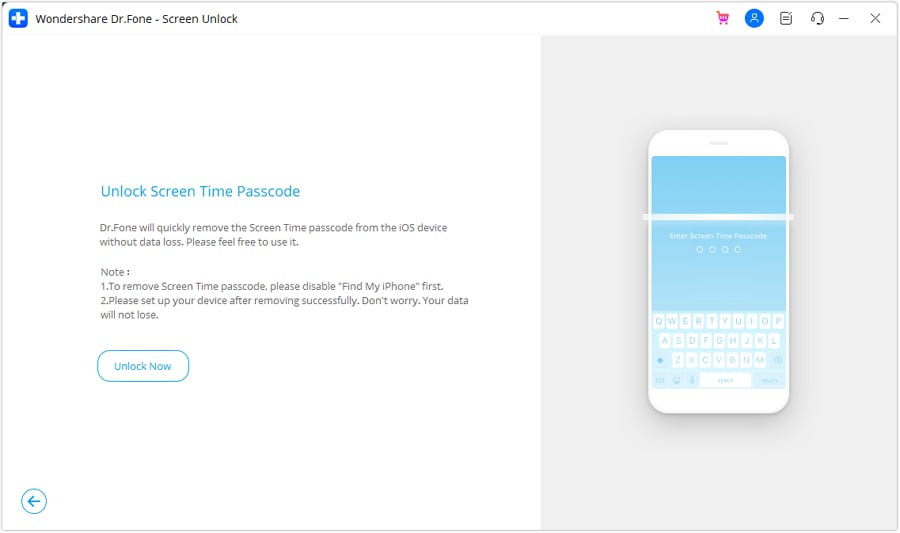
- Step 1: Begin by downloading and installing Dr.Fone on your computer. Next, click Toolbox > Screen Unlock > iOS. Choose Unlock Screen Time Passcode from the next window to start the process.

- Step 2: Ensure your Apple iPhone 12 mini is connected to the computer using a USB cable. Wait for Dr.Fone to detect your Apple iPhone 12 mini automatically. Next, click the Unlock Now button.
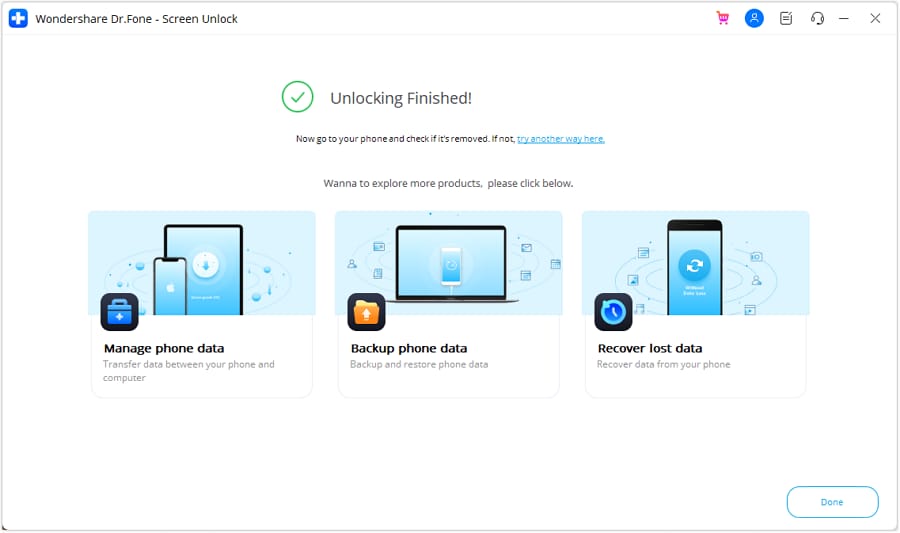
- Step 3: Follow the on-screen instructions. Afterward, Dr.Fone will initiate the unlocking process to remove the Restricted Mode passcode. Once removed, click the Done button to finish.
Tips: Are you searching for a powerful Screen Unlock tool? No worries as Dr.Fone is here to help you. Download it and start a seamless unlock experience!
Bonus. How To Turn Restricted Mode On or Off on YouTube
YouTube’s Restricted Mode on iPhone is valuable for users seeking a more controlled and family-friendly viewing experience. It serves to screen out mature content and ensures a safer environment, especially for younger audiences. Here’s a breakdown of what YouTube’s Restricted Mode does:
Screens Out Mature Content
Restricted Mode filters content that may not be suitable for all audiences, blocking videos with explicit or sensitive material.
Comment Viewing Restrictions
With Restricted Mode enabled, users cannot view comments on videos, offering an additional layer of protection and privacy.
Browser and Device Level Functionality
YouTube’s Restricted Mode operates on both the browser and device levels. Once activated, it applies across various platforms, ensuring consistent content filtering.
Different from Age-Restricting Videos
It’s important to note that Restricted Mode differs from age-restricting videos. While age restriction applies to specific videos, Restricted Mode filters content across the entire platform, providing a broader safety net.
How To Turn Restricted Mode On or Off on YouTube
Follow the steps to learn how to disable Restricted Mode on iPhone when using YouTube.
- Step 1: Go to your profile picture on the YouTube app and tap on Settings. Next, toggle the switch next to Restricted Mode on or off.

- Step 2: Go to the YouTube website if you’re on a browser. Next, scroll down to the bottom of the page and click on Restricted Mode. Toggle the switch on or off.
You May Also Like:
How to Turn Off Screen Time without Passcode
100% Working - Screen Time Passcode Not Working Solutions
Conclusion
Managing how to disable Restricted Mode on iPhone and YouTube ensures a safer digital environment. On iPhone, employ various methods like navigating settings or using Dr.Fone - Screen Unlock (iOS) for forgotten passcodes. On YouTube, easily toggle Restricted Mode in-app or on the browser for a more controlled viewing experience.
Remember, Dr.Fone becomes a valuable ally when facing a passcode challenge. These versatile solutions grant you control over content accessibility and privacy, enhancing your digital experience. You can easily navigate and customize your device’s restrictions by mastering these techniques.
How To Bypass the Required Apple Store Verification For Apple iPhone 12 mini
The Apple App Store is a familiar place for anyone with an iPhone or iPad. It’s where you find all sorts of useful and fun apps. However, one thing that can be a hassle is the store’s strict verification process. Every time you make a purchase, you need to go through this step.
It’s there for a good reason – to stop fraud – but it can get annoying, especially if you forget your Apple ID or have other issues. This article will explore the ways to stop the Apple Store “Verification Required” prompt, making your app downloading experience smoother.

Part 1: Why Does Apple Require Verification in the Apple Store?
When browsing the App Store on your Apple iPhone 12 mini or iPad and looking to download the latest game or productivity tool, you might have noticed that Apple often asks for some form of verification before you can proceed with your purchase. This is not just a random step; there’s a solid reason behind it.
The primary reason Apple requires verification for App Store purchases is to ensure that you are the person authorizing the purchase. This security measure prevents unauthorized transactions and protects your account from fraud.
What does this verification usually involve? It could be entering your Apple ID password or using Face ID or Touch ID if your device supports these features. These methods are designed to confirm your identity quickly and securely.

Reasons Why the Verification Required Message Might Appear
There are several reasons why you might see an Apple Store’ Verification Required’ message when trying to download an app or make a purchase:
- New Apple ID. If you’ve just created a new Apple ID and need to download or pay for apps, Apple must verify your payment information. Thus, you’ll have to prove everything, especially on a new phone.
- **Payment method needs to be corrected.**Suppose there’s an issue with your Apple ID’s payment method, such as outdated or incorrect details. In that case, verification is required to ensure the account is secure and ready for transactions.
- Invalid credit card. Unsupported or invalid credit cards can trigger the verification notice, as Apple can’t process payments with these cards.
- Unpaid balance. If there’s an outstanding balance on your Apple ID, you can download or pay for new apps once this balance is cleared.
- Family Sharing restrictions. For those using Family Sharing, if the family organizer has placed restrictions on your account, this could result in a verification prompt.
Understanding these reasons is the first step in addressing the ‘Verification Required’ message. It’s not just a random or annoying hurdle; it’s there for your security and to ensure a smooth, safe experience when using the App Store.
Part 2: How To Fix Verification Required Prompt Using Apple ID
Having to deal with the ‘Verification Required’ prompt in the App Store can be a bit of a hassle, especially when you’re eager to get your hands on a new app or game. Fortunately, there are several methods you can use to resolve this issue, most of which are pretty straightforward and can be done right from your device. Here’s how to tackle it:
Update Payment Method
One of the most common reasons for the verification prompt is a problem with your payment method. To fix this, go to your Apple ID settings on your Apple iPhone 12 mini or iPad. Tap your name at the top of the Settings app, then go to Payment & Shipping. You can update your payment information or add a new payment method here. Make sure the details are correct and up to date.
Check Unpaid Subscriptions
Sometimes, unpaid subscriptions can trigger the verification prompt. Tap the App Store > your profile icon, and select Subscriptions. Here, you can view all your subscriptions, active or expired. Check if there are any unpaid ones and clear any outstanding payments.

Don’t Require Password for Purchases
For less frequent purchases, you should change the settings so you don’t always have to enter your password. Go to Settings, then to Screen Time. Under Content & Privacy Restrictions, select iTunes & App Store Purchases. Here, you can change the settings to Don’t Require for purchases. However, be cautious with this method as it reduces security.

Sign Out of Apple ID and Re-Sign In
Sometimes, simply signing out of your Apple ID and then signing back in can resolve the issue. Go to the Settings app, tap your name at the top, and scroll down to Sign Out. After signing out, restart your device and then sign back in. This can help refresh your account settings and clear up any minor glitches.
Remember, these methods are about bypassing the verification process and ensuring your account is up-to-date and secure. Regularly checking your Apple ID settings and payment information can prevent many common issues with the App Store, including the frustrating ‘Verification Required’ prompt.
Part 3: How To Bypass Verification Required Prompt Without Apple ID
If you need to learn how to bypass the ‘Verification Required’ prompt in the App Store but don’t have access to the Apple ID or password, there’s an alternative approach using third-party software. One such tool that can assist in this situation is Wondershare Dr.Fone - Screen Unlock (iOS), which offers a feature specifically designed for this purpose.
Introducing Dr. Fone’s Screen Unlock (iOS) Feature
Dr.Fone - Screen Unlock (iOS) function includes an Apple ID remover tool. This feature is handy when you cannot remember your Apple ID or password but need to download apps from the App Store. Here’s a step-by-step guide on how to use this feature.
Step-by-Step Guide To Bypass Verification Without Apple ID With Dr.Fone
Here’s a complete guide on bypassing the verification required on the App Store.
Step 1: Install and open Wondershare Dr.Fone on your computer.
Step 2: Navigate to Toolbox and select Screen Unlock followed by iOS.
- Step 3: In the next window, choose Remove Apple ID to proceed.

- Step 4: A connectivity status will appear on the screen with your iOS device connected to the computer. Click Unlock Now to start the process.

- Step 5: Confirm if your iOS device has a screen lock and two-factor authentication enabled. This is crucial for the process to continue smoothly.

- Step 6: Follow the on-screen instructions to put your iOS device in Recovery Mode. If necessary, you can also opt for DFU Mode by following the provided instructions. Once in Recovery Mode, the tool will recognize your device model. You’ll need to select the correct system version to proceed.

- Step 7: The tool will download the appropriate iOS firmware for your device. After the download, it will verify the firmware.

- Step 8: After firmware verification, click Unlock Now. You’ll be prompted to enter a code for confirmation. Once entered, the unlocking process will begin.

- Step 9: You’ll receive a notification once the process is complete. You may try again if the process fails to succeed the first time.

Note: After Apple ID removal, you must re-enter a new Apple ID to access the App Store. Take note of the password now if you forgot your previous one.
Conclusion
In this article, you’ve learned how to remove ‘Verification Required’ in the App Store. The primary takeaway is to try solving the issue using your Apple ID, as this approach typically prevents data loss. However, if you’re in a tight spot without access to your Apple ID, Dr.Fone - Screen Unlock (iOS) offers a reliable alternative to bypass this hurdle.
While it’s an effective solution, always consider it a secondary option to safeguard your data. Additionally, Dr.Fone can be a handy tool for various other phone-related challenges, making it a useful resource for tackling different tech problems.
Tips: Are you searching for a powerful Screen Unlock tool? No worries as Dr.Fone is here to help you. Download it and start a seamless unlock experience!
Also read:
- [New] 2024 Approved Leading PS2 Emulators Unveiled for iPhone and iPad
- [New] In 2024, How Much Video Can 64GB/128GB Holds?
- 2024 Approved Ranked The Best 5 iPhones for Effortless Podcast Access
- Boost Your Site Traffic with Dynamic Content: The Cookiebot Advantage
- Enhancing Your Gaming Experience with Social Integration on Xbox
- Forgot Locked iPhone 15 Password? Learn the Best Methods To Unlock | Dr.fone
- In 2024, A Comprehensive Guide to Apple iPhone 12 Pro Blacklist Removal Tips and Tools | Dr.fone
- In 2024, Complete Guide on Unlocking iPhone 14 Plus with a Broken Screen? | Dr.fone
- In 2024, Did Your Apple iPhone 12 Passcode Change Itself? Unlock It Now | Dr.fone
- In 2024, How To Unlock Apple iPhone 14 Plus Without Swiping Up? 6 Ways | Dr.fone
- In 2024, Things You Should Know When Unlocking Total Wireless Of Apple iPhone 11 Pro | Dr.fone
- In 2024, Unlock Your Sony Xperia 10 Vs Potential The Top 20 Lock Screen Apps You Need to Try
- Is Your Apple iPhone 12 Pro in Security Lockout? Proper Ways To Unlock | Dr.fone
- Speedy Tips for Unearthing Lost Reddit Memes
- Updated Cinematic Mastery Expert Tips for Editing in Final Cut Pro X for 2024
- Title: In 2024, How to Fix iPhone 12 mini Passcode not Working? | Dr.fone
- Author: Amelia
- Created at : 2025-01-04 20:54:02
- Updated at : 2025-01-05 17:23:19
- Link: https://iphone-unlock.techidaily.com/in-2024-how-to-fix-iphone-12-mini-passcode-not-working-drfone-by-drfone-ios/
- License: This work is licensed under CC BY-NC-SA 4.0.