
In 2024, How to Make the Most of Your Apple iPhone 15 Lock Screen with Notifications? | Dr.fone
How to Make the Most of Your Apple iPhone 15 Lock Screen with Notifications?
The Apple iPhone 15 lock screen has certainly changed a lot over the last few updates of iOS. Not only it provides an added security to the Apple iPhone 15 device, but with iPhone lock screen notifications, we can also save our time and efforts. With the introduction of iOS 18, we can also see a change in iPhone lock screen with notifications as well. To help you make the most out of lock screen notifications iPhone, we have come up with this ultimate guide. Read on and know all sorts of things you can do with iPhone notification lock screen.
Part 1: How to use iPhone lock screen notifications?
When it comes to iPhone lock screen with notifications, there are so many things that you can do. For instance, here are a handful of things you can do with iPhone lock screen notifications.
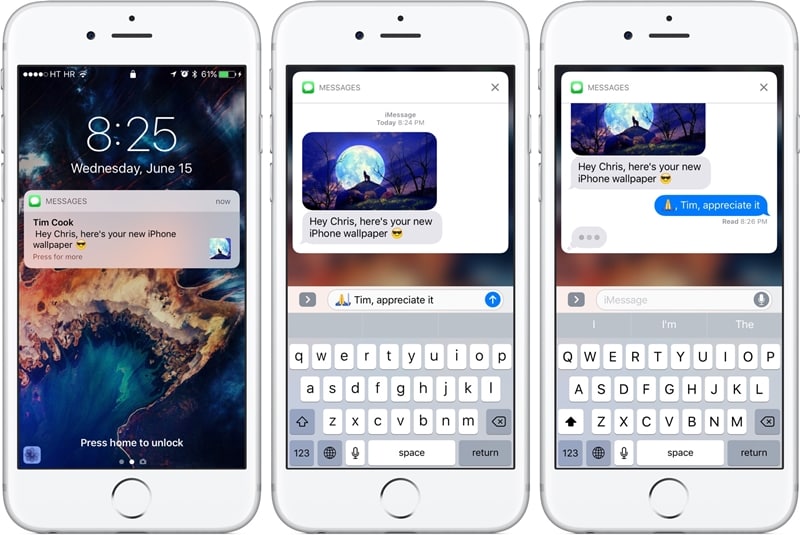
Reply to messages quickly
If you aren’t using this iPhone notification lock screen feature, then you are certainly missing out on something. You might already know that you can get a preview of messages on your home screen. Simply long press it (or 3D Touch) to interact with it. From here, you can reply to your messages without unlocking your device.
Interact with apps without unlocking your phone
Not just your messages, you can interact with other apps as well right from the lock screen notifications iPhone. After getting a list of notifications, you can simply tap on the “x” button to close them.
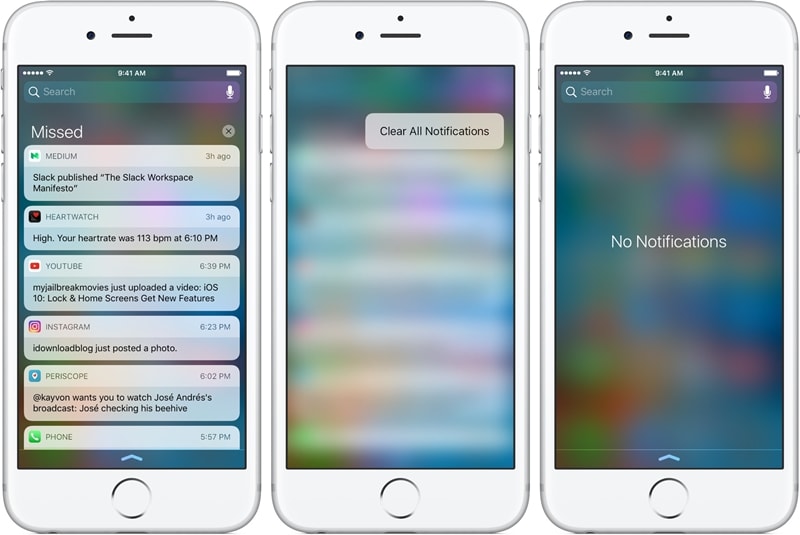
Though, if you want to know more, then just long press the notification. For instance, if you have got a notification for an email, then you can get various options just by long pressing it.

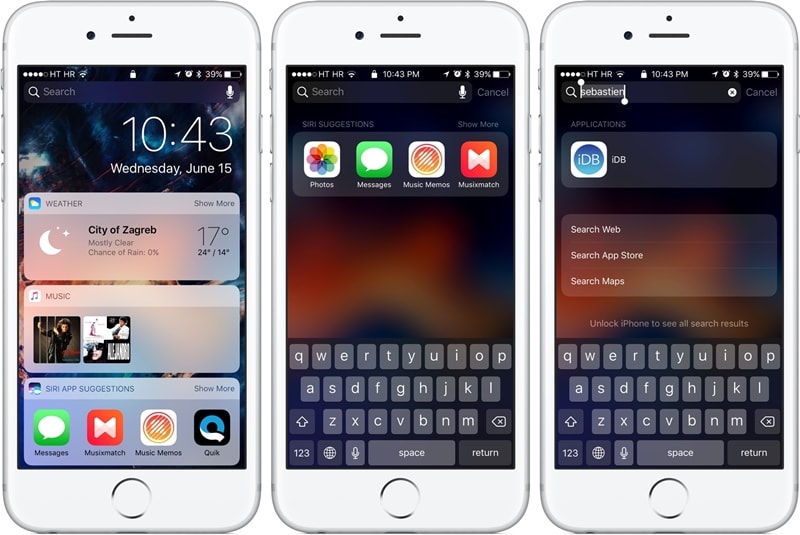
Search for anything
Besides interacting with widgets and apps, you can also search for something on your device and that too without unlocking it. Simply tap on the search bar to make it work.
Part 2: How to turn off notifications on iPhone lock screen?
Sometimes, people can access our private information just by looking at our notifications. In this way, they can get read your crucial information and that too without unlocking your device. By simply visiting your device’s settings, you can customize iPhone lock screen with notifications. In this way, you can turn on or off iPhone lock screen notifications for the apps of your choice.
1. Unlock your device and go to its Settings > Notifications to access all the features related to its notifications.
2. From here, you can view a list of all the apps that can access notifications.
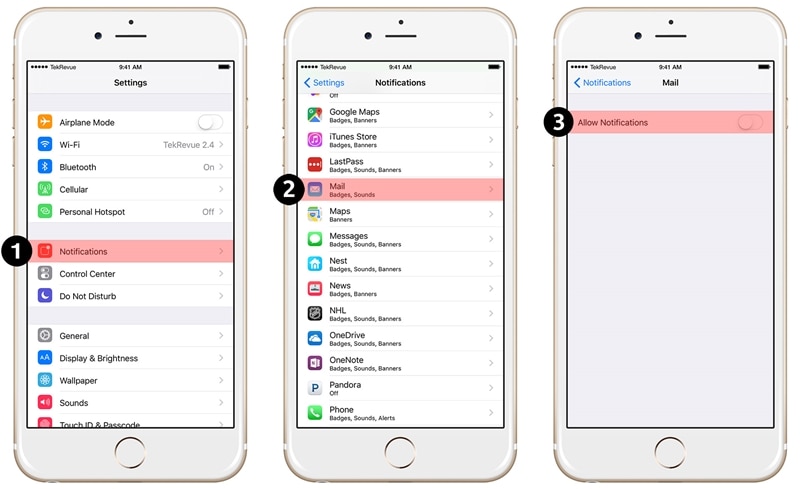
3. Simply tap on the app of your choice (Mail, Message, Photos, iTunes, etc).
4. From here, turn off the option of “Allow Notification” to completely turn off the notifications for the app.
5. If you simply want to turn off notifications on lock screen, then switch off the option of “Show on Lock Screen”.
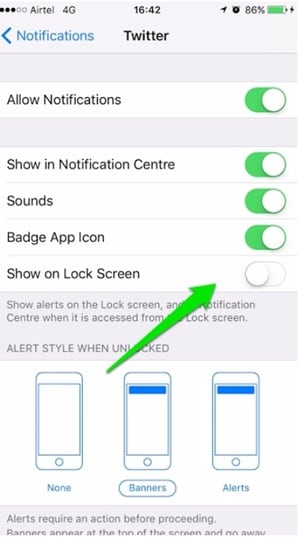
Besides that, there are a few other options as well that you can either enable or disable to customize your lock screen notifications iPhone.
Part 3: How to turn off notification view on iPhone lock screen?
The notification view can be used to see previous notifications on the Apple iPhone 15 device without unlocking it. Needless to say, most of the users don’t like to include this iPhone notification lock screen feature. To turn off the notification view of iPhone lock screen notifications, follow these steps:
1. Firstly, unlock your device and got to its Settings > Touch ID & Passcode option.
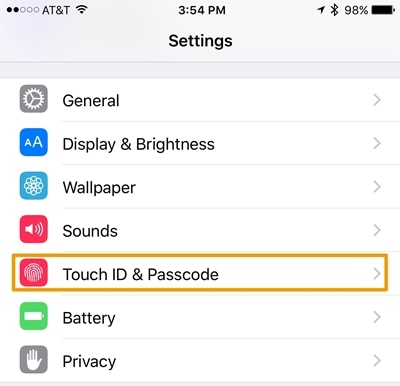
2. You would be needed to provide the passcode or your fingerprint in order to access these settings.
3. This will provide a list of features related to your passcode. Go to the section of “Allow Access When Locked”.
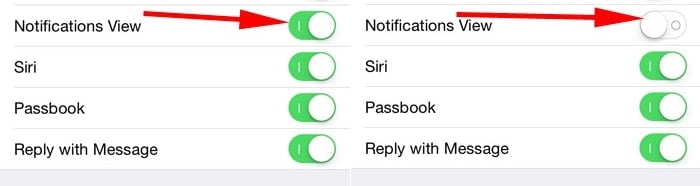
4. From here, make sure that the option of “Notification View” is turned off.
After turning the option off, you can exit from the Settings interface. In this way, your device won’t display the notification view.
Part 4: Changes on iPhone lock screen notifications on iOS 18
With the new update of iOS 18, we can see a drastic change in the Apple iPhone 15 lock screen notifications as well. Since the Apple iPhone 15 lock screen with notifications have been integrated into one, it becomes quite easier for users to access it.
Access iPhone notification lock screen on iOS 18
Some people find it a little tricky to access the lock screen notifications iPhone after the iOS 18 update. Instead of sliding the screen from the top, you need to swipe it from the middle. By swiping it from the bottom, you might get its control center.
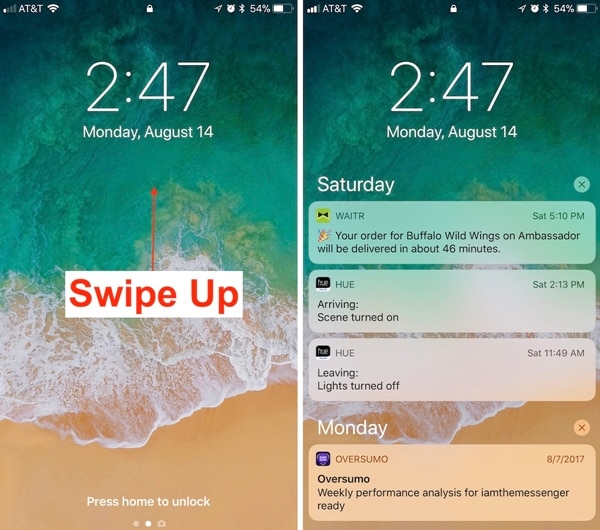
Simply swipe up from the middle of the screen to get a list of all the notifications. Now, you can slide them to access the old notifications.
Nevertheless, you can swipe from the top to access the cover sheet.
Swipe left or right
This is undoubtedly one of the most evident new features of the Apple iPhone 15 notification lock screen of iOS 18. Now, you can swipe left or right to access various features. By swiping left, you can access the Camera on your device and by swiping right, you can access your Today View.
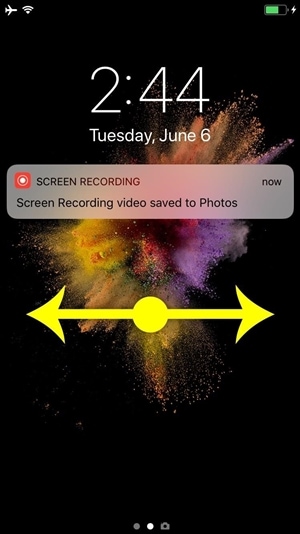
If you want to click pictures instantly, then simply swipe left the lock screen. This will launch the Camera on your device, letting you click pictures on the go. Similarly, by swiping right, you can access your Today View. This includes vital data from apps and widgets that your smartphone assumes is important for you regarding the day.
We hope that after following this guide, you would be able to gain in-depth information regarding iPhone lock screen with notifications. Apart from all the basic things you can do on the lock screen, we have also provided easy ways to customize it. Furthermore, there are so many things that you can do with the iOS 18 iPhone lock screen notifications. While most of the users loved the feature, some are quite hesitant about its application. What is your take on this? Let us know about it in the comments.
How to Unlock Apple iPhone 15 with a Mask On
Are you tired of wearing a mask in this pandemic? Apple introduced a new feature through which people can unlock iPhone face ID while wearing a mask. Before this, people either had to use other types of passwords or put off the mask to use Face ID. However, this feature is only available on iOS 15.4, depicting that iPhones containing earlier iOS versions won’t be able to enjoy this feature.
Only iPhone 12 and the latest models can use Face ID with a mask on, which reflects that models like iPhone 11, iPhone X, and the older models cannot utilize this function. Moreover, an additional way to unlock iPhone is to use Apple Watch to unlock iPhone 11, X, or earlier models.
Once you meet these requirements, you can easily unlock your Apple iPhone 15 while wearing a mask and get further details by reading this article.
Part 1: How to Unlock iPhone Face ID with a Mask on
Are you excited to unlock your Apple iPhone 15 while wearing a face mask? This section will give you detailed steps to unlock your Apple iPhone 15 with a mask on, but before proceeding, make sure that you have updated your phone’s model to iPhone 12 or iPhone 13. This iOS 15.4 version feature is only available on:
- iPhone 12
- iPhone 12 Mini
- iPhone 12 Pro
- iPhone 12 Pro Max
- iPhone 13
- iPhone 13 Pro Max
- iPhone 13 Pro
- iPhone 13 Mini
- iPhone 14
- iPhone 14 Pro
- iPhone 14 Pro Max
- iPhone 15
- iPhone 15 Pro
- iPhone 15 Pro Max
Once you have updated to iPhone 12 or iPhone 13 model, you will automatically receive the prompt to set your Face ID while wearing a mask. If you have missed the chance to scan your face during the setup of iOS 15.4, follow the below guidelines to activate this fantastic feature unlock iPhone with a mask:
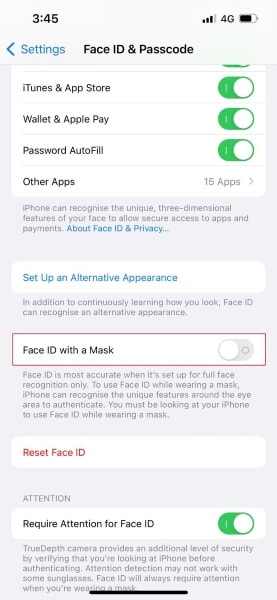
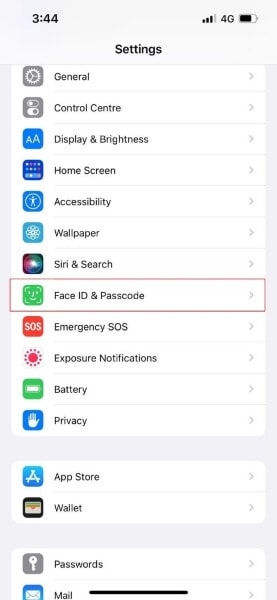
Step 1: Navigate to the app “Settings” from the home screen of your Apple iPhone 15. From the displayed menu, select “Face ID & Passcode.” Enter your passcode to give verification.

Step 2: Tap on the toggle switch of “Use Face ID with a Mask.” Afterward, select “Use Face ID with a Mask” to begin with settings.
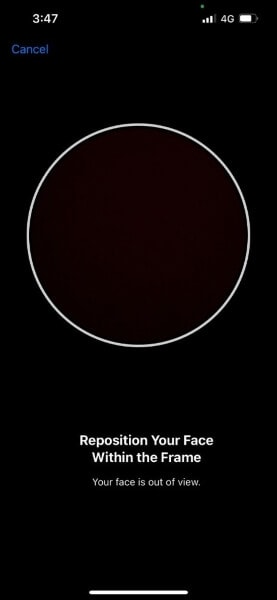
Step 3: Now, it’s time to scan your face with your Apple iPhone 15 to initiate the setup. Again, you don’t have to wear a mask at this stage, as the Apple iPhone 15 device’s main focus while scanning would be the eyes. Also, if you wear glasses, you can proceed without taking them off.
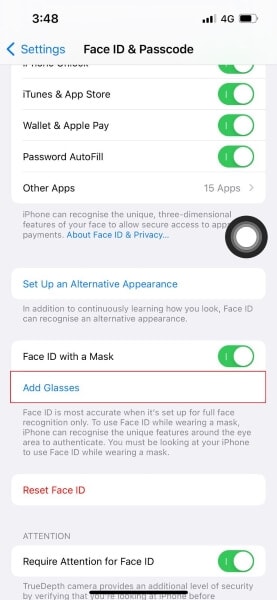
Step 4: After scanning your face twice, select “Add Glasses” by tapping on it. You can use your Face ID while wearing your regular glasses. Make sure that you scan your face with every pair of glasses daily.
After carefully following the steps mentioned above, you are ready to unlock your Face ID with a mask. Remember that Face ID will scan and focus mainly on your eyes and forehead. However, it cannot work in the scenarios if you have completely concealed your look by wearing hats or accessories that can hide your face.
Part 2: How to Unlock iPhone Face ID Using Apple Watch
Before unlocking iPhone through the Apple Watch, some requirements are necessary for security reasons. Read the following requirements to proceed further:
- First, you would need an Apple Watch that must be functioning on WatchOS 7.4 or later.
- The passcode on your Apple iPhone 15 must be enabled from the settings. If you have not enabled the passcode on your Apple iPhone 15, you can do it by navigating to the “Settings” and tapping on “Passcode.” From there, enable the passcode by turning it on.
- You should be wearing the Apple Watch on your wrist, and it must be unlocked.
- Your Apple iPhone 15 should be upgraded to iOS 14.5 or above.
- The wrist detection on your phone should be activated.
To enable the feature of unlocking the Apple iPhone 15 with an Apple Watch, the steps are:
Step 1: Head to the “ Settings “ app and choose “Face ID & Passcode.” Give your passcode for authenticity and proceed further.
Step 2: Now, on the displayed menu, scroll down to the bottom, where you will see the toggle of “Unlock with Apple Watch.” Tap on that toggle to enable this feature.
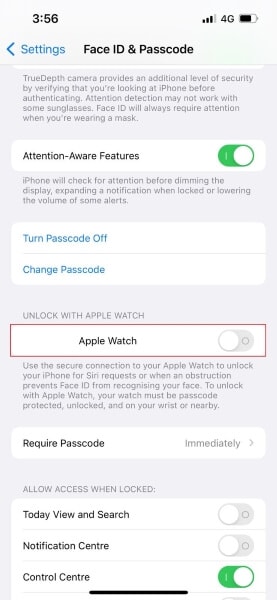
After enabling this feature, you can unlock your Apple iPhone 15 with a mask on through your Apple Watch. You need to grab your phone and hold it the same way you would in a normal Face ID scan. The phone will be unlocked, and you will feel a slight vibration on the wrist. Also, a notification will pop up on your watch, indicating that your Apple iPhone 15 has been unlocked.
Bonus Tips: Unlock iPhone Without Any Experience
Are you stuck with your locked iPhone? Don’t worry, as Dr.Fone - Screen Unlock can unlock any screen passcode, Face ID, Touch ID, and PINs. You don’t need any technical experience to use this tool, as the user interface is pretty simple and understandable. Moreover, it works perfectly well on all iOS devices at the best possible speed.
Dr.Fone - Screen Unlock (iOS)
Unlock iPhone/iPad Lock Screen Without Hassle.
- Intuitive instructions to unlock iPhone without the passcode.
- Removes the iPhone’s lock screen whenever it is disabled.
- Works for all models of iPhone, iPad and iPod touch.
- Fully compatible with the latest iOS 11,12,13.


3981454 people have downloaded it
You can also unlock Apple ID and iCloud passwords without losing the data. Also, while unlocking iPhone Screen Time Passcode through this platform, all of your data and information will be kept intact, and you can function your phone normally again.
Conclusion
We all can relate that unlocking an iPhone on Face ID while wearing a face mask in a pandemic era is annoying. That’s why Apple introduced a new feature of unlocking the Apple iPhone 15 Face ID with a mask on to help individuals who rely entirely on Face ID. Find out about enabling this feature to easily unlock your Apple iPhone 15 Face ID while wearing a mask.
Easy Steps on How To Create a New Apple ID Account On Apple iPhone 15
Your Apple ID is your gateway to a world of apps and services, making it an essential part of your Apple experience. Whether you’re a new Apple user or simply looking to start fresh, creating a new Apple ID can open the doors to endless possibilities.
This guide will walk you through creating a new account for Apple devices in an easy-to-understand manner. From setting up your email address to securing your account, this article covered you every step of the way. Embark on this journey and learn how to create a new Apple ID account effortlessly.
Part 1: Why Create a New Apple ID?
You might need to create a new Apple ID to enhance your Apple experience. Let’s dive into why it’s a good idea:
A. Reasons for Creating a New Apple ID Account
Here’s a breakdown of the reasons why you should create a new Apple ID for your Apple iPhone 15:
- Your Apple ID is like your digital identity. Creating a new one lets you choose a unique email address that suits you, adding a personal touch to your Apple journey.
- Maybe you’ve been using an email for your Apple ID that you don’t want to use anymore. Creating a new one helps keep your personal and Apple-related emails separate.
- **Switching Devices.**When you switch to a new Apple device, like getting a new iPhone or iPad, creating a unique Apple ID ensures a fresh start tailored to your new gadget.
- **Separation of Accounts.**Sometimes, you may want to keep your work-related apps and data separate from your ones. Creating a new Apple ID helps you achieve this separation.
- If you’re using Apple services for different purposes, such as work and personal use, having separate Apple IDs can help keep everything organized and distinct.
B. Scenarios Where a New ID Is Needed
Below are the common scenarios where a new Apple ID might be needed:
- **New Apple Device.**When you purchase a new Apple device, like an iPhone or iPad, you’ll need a new Apple ID to set it up and make it truly yours.
- **Shared Device.**If multiple people use the same device, creating a new Apple ID for each user ensures that everyone has their own personalized experience.
- **Change of Email.**If your current email address associated with your Apple ID is changed or you prefer a new one, creating a unique Apple ID with the updated email is the solution.
- **Work and Personal.**To keep your work-related apps and data separate from your personal ones, having separate Apple IDs for each purpose is practical and organized.
- **Starting Fresh.**Sometimes, you might want a fresh start with your Apple experience, and creating a new Apple ID provides a clean slate.
Creating a new Apple ID isn’t just about getting a new email; it’s about tailoring your Apple experience to your needs, whether for personalization, privacy, or organization. Now that you know why it’s essential, let’s explore how to create it in the next section.
Part 2: Step-by-Step Guide: How To Create a New Apple ID Account
Creating a new Apple ID for free is a straightforward process. Let’s break it down into simple steps:
A. Registering a New Apple ID
These are the steps for registering a new Apple ID:
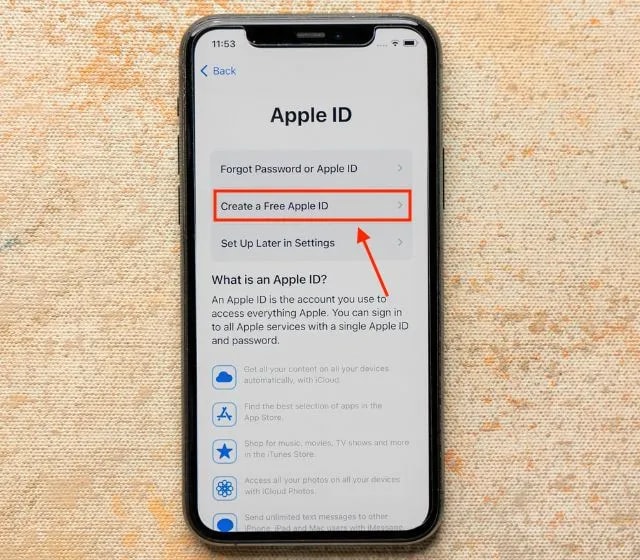
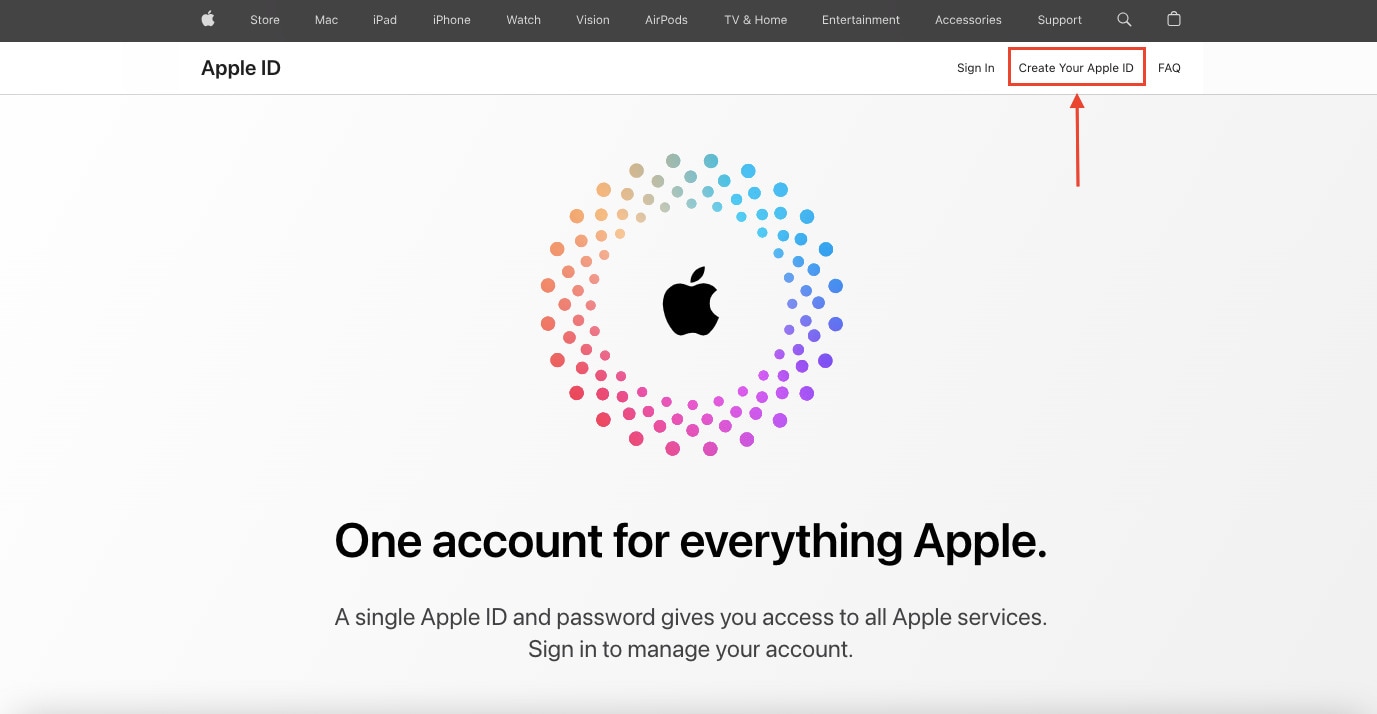
- Step 1: Open your web browser and visit the Apple ID account management page. Click the Create Your Apple ID button to begin.
- Step 2: On the registration page, you’ll be asked to provide your First name and Last name. Make sure to use the name associated with your new Apple ID. Next, you’ll need to enter your preferred email address. This one will be your new Apple ID.
Tip: Choose an email that’s easy to remember and access.
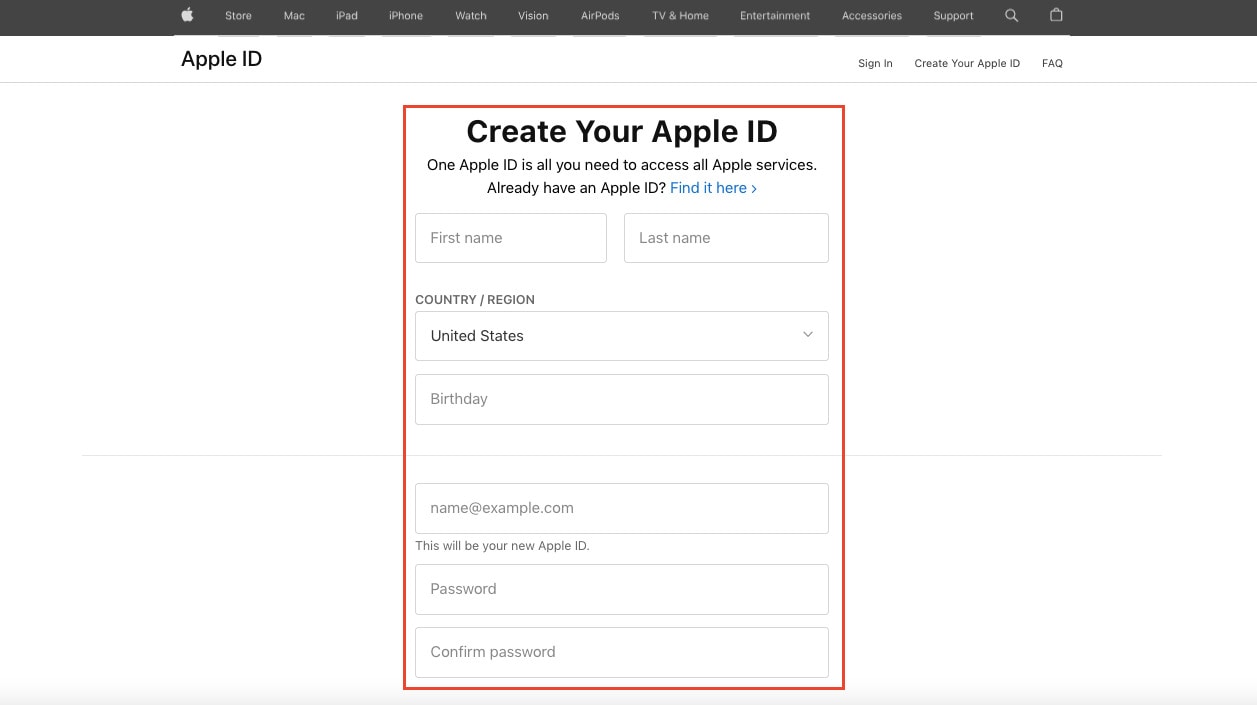
- Step 3: Create a strong password that combines letters, numbers, and symbols. This password is essential for the security of your account, so make it unique and hard to guess. Confirm your password by entering it again in the designated field.
B. Verifying Your Identity
The next step is verifying your identity. Check out the steps below:
- Step 4: Apple takes your security seriously. You may be asked to provide a phone number to verify your identity. This number can be used for account recovery or two-factor authentication. The phone number you provided will receive a verification code. Enter this code in the space provided to confirm your identity.
Note: It’s crucial to ensure that your phone number is accurate and accessible. This number will help you recover your account in case you forget your password or encounter any issues. Apple may use this phone number for two-factor authentication, adding an extra layer of security to your account.
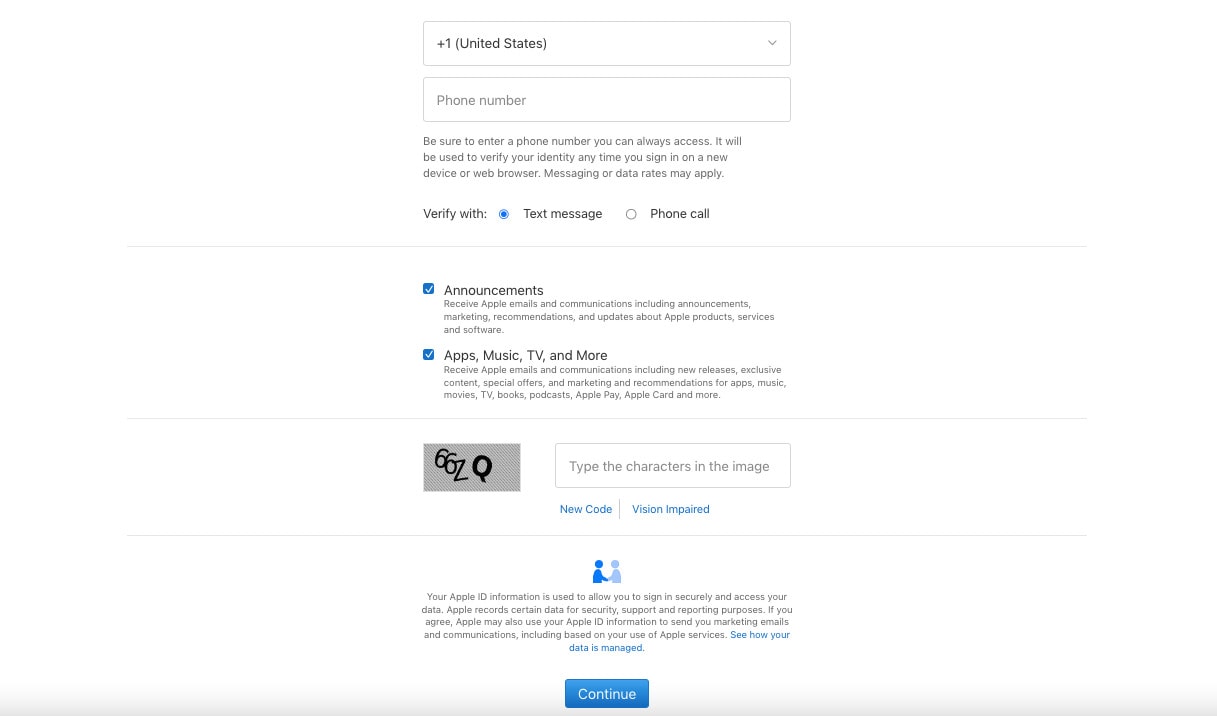
- Step 5: Apple may sometimes ask you to complete a CAPTCHA or verify your identity to prevent automated account creation.
C. Setting Up Security Questions
The next process will be setting up security questions for your account:
- Step 6: Apple asks you to choose and answer security questions. These questions provide an additional layer of protection for your account. Select questions that you can easily remember and that others can’t guess.
D. Finalizing the Process
To finalize the creation process, refer to the steps given below:
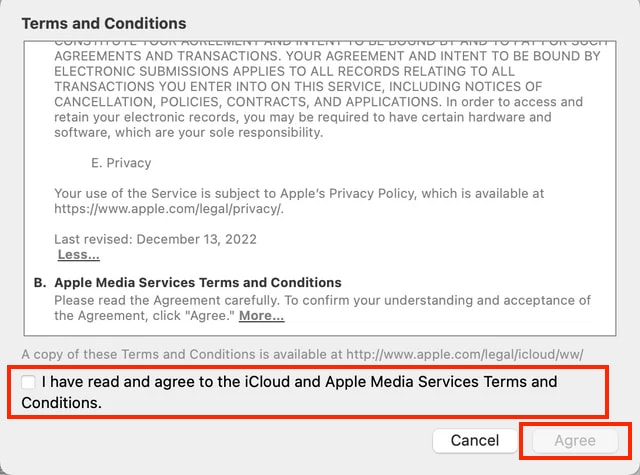
- Step 7: Read through Apple’s Terms and Conditions and Privacy Policy. Once you’ve understood them, tick the box to confirm that you’ve read and agree to the iCloud and Apple Media Services Terms and Conditions. Then click Agree to proceed. Remember that it’s essential to be familiar with Apple’s policies to ensure a secure and smooth experience.
- Step 8: After completing these steps, Apple will send a confirmation email to the address you provided. Go to your email and open the verification link to confirm your new Apple ID.
Congratulations! You’ve successfully created a new Apple ID. With this account, you can now access Apple’s services, including the App Store, iCloud, and more. Remember to keep your login credentials secure and use them to personalize your Apple experience fully.
Part 3: Effortlessly Remove Your Apple ID Using Wondershare Dr.Fone - Screen Unlock (iOS)
You can embark on an enhanced Apple experience after successfully creating your new Apple ID. Removing the previous one is essential when you create it, especially if you’ve acquired a second-hand device or no longer want the previous user’s associated credentials.
This step ensures that your new Apple ID takes center stage, granting you full control over your device and its associated services. But if you encounter difficulties when removing the previous Apple ID from your device, Dr.Fone - Screen Unlock (iOS) is a reliable and user-friendly solution.

Key Features of Dr.Fone - Screen Unlock (iOS)
This versatile tool offers the following key features in the context of Apple ID issues:
- **User-Friendly Interface.**Fone - Screen Unlock (iOS) is designed to be straightforward, making it accessible to users of all levels of technical expertise.
- It is usable with a wide range of iOS devices, ensuring you can remove the previous Apple ID from your device, regardless of the model.
- **Multiple Unlock Modes.**Fone offers various unlock modes to cater to different scenarios, including removing the previous Apple ID. This flexibility ensures that you have the right solution for your specific situation.
- **Data Security.**Fone - Screen Unlock (iOS) prioritizes data security, ensuring that your personal information and content remain intact during the Apple ID removal process.
Step-by-Step Guide on Using Dr.Fone Screen Unlock (iOS)
Check out the steps on how to remove an Apple ID account using Dr.Fone below:
- Step 1: Launch Wondershare Dr.Fone on your PC to use the Screen Unlock function and then navigate to Toolbox. Click the Screen Unlock section, then choose iOS.

- Step 2: If you want to proceed with deleting your Apple ID, you’ll need to go to the next window and select the Remove AppleID option from the menu.
- Step 3: When you hook up your iOS device to a computer, the next screen will report on its connectivity. Select the Unlock Now button to proceed.

- Step 4: Before the Apple ID can be unlocked, the next step is for the platform to ask a series of questions. Verify that a screen lock is active on your iOS device. However, please lock your iOS device before proceeding with the Yes option.

- Step 5: Check if Two-Factor Authentication is set up on all your iOS devices. If not, switch it on before confirming your decision to unlock your Apple ID.

- Step 6: After you have confirmed these settings, you will be taken to a screen with on-screen instructions for entering Recovery Mode on your iDevice. If the steps for your specific iOS device don’t work, try tapping Try DFU Mode in the app’s bottom left corner. To continue with the unlocking process, this will launch the DFU Mode instructions.

- Step 7: Once Recovery Mode has been activated, the Apple iPhone 15 device’s information will be shown on the subsequent screen. Once the Device Model has been identified, all that remains is to choose the appropriate System Version and click Start. However, if there are disagreements in recognition, pick the details by hand and move forward.

- Step 8: The appropriate iOS firmware begins downloading, showing its status on the following screen. Click the Copy button to copy the direct URL to download iOS firmware for systems with sluggish firmware download speeds.
- Step 9: The platform checks the downloaded firmware and displays its details on the following screen. To proceed with unlocking your Apple ID, click the Unlock Now button. To proceed, you will be prompted to input a code into a confirmation window. Enter the code and then click the Unlock button.

- Step 10: The following screen shows the unlocking status of your Apple ID. Don’t let the Apple iPhone 15 device lose its connection under any circumstances. The screen prompts the process of completing the Apple ID once the ID has been unlocked. If the Apple ID has been unlocked, click Done to proceed. If that fails, click the Try Again button and give it another shot.

Conclusion
This guide has simplified the process of creating a new Apple ID, ensuring you can effortlessly personalize, secure, and organize your digital experience. Creating a new Apple ID is easy, and it allows you to tailor your Apple journey to your preferences. Remember, it’s all about you, your privacy, and your convenience.
Should you encounter any challenges while managing your Apple ID, such as removing a previous one, consider Dr.Fone - iOS Screen Unlock tool. This user-friendly resource stands ready to assist, ensuring a seamless and secure Apple experience. Explore the possibilities and make the most of your Apple adventure!
Also read:
- [New] Streamer's Toolkit Beyond Streamlabs OBS
- [New] Streaming Showdown Best Channels for Your Audience for 2024
- [Updated] 2024 Approved Bring a Smile with Adobe Creations
- 8 Popular Oculus Rift Games
- 高速かつ高品質で3G2とMP3ファイルを同期する最適手法
- How To Unlock iPhone 13 Pro Without Passcode? 4 Easy Methods | Dr.fone
- In 2024, Complete Fixes To Solve Apple iPhone 14 Randomly Asking for Apple ID Password | Dr.fone
- In 2024, How to Cast Oppo Reno 10 Pro 5G to Computer for iPhone and Android? | Dr.fone
- Top Long-Range WiFi Router Picks for 2N4
- Trouble with iPhone 7 Plus Swipe-Up? Try These 11 Solutions | Dr.fone
- Unlocking iPhone 12 mini Lock Screen 3 Foolproof Methods that Actually Work | Dr.fone
- Windows 10 - Restaurez Gratuitement Vos Fichiers Supprimés Avec Notre Logiciel Gratuit
- Title: In 2024, How to Make the Most of Your Apple iPhone 15 Lock Screen with Notifications? | Dr.fone
- Author: Amelia
- Created at : 2024-10-23 16:41:02
- Updated at : 2024-10-26 16:34:14
- Link: https://iphone-unlock.techidaily.com/in-2024-how-to-make-the-most-of-your-apple-iphone-15-lock-screen-with-notifications-drfone-by-drfone-ios/
- License: This work is licensed under CC BY-NC-SA 4.0.