
In 2024, How to Make the Most of Your iPhone XS Lock Screen with Notifications? | Dr.fone
How to Make the Most of Your Apple iPhone XS Lock Screen with Notifications?
The Apple iPhone XS lock screen has certainly changed a lot over the last few updates of iOS. Not only it provides an added security to the Apple iPhone XS device, but with iPhone lock screen notifications, we can also save our time and efforts. With the introduction of iOS 18, we can also see a change in iPhone lock screen with notifications as well. To help you make the most out of lock screen notifications iPhone, we have come up with this ultimate guide. Read on and know all sorts of things you can do with iPhone notification lock screen.
Part 1: How to use iPhone lock screen notifications?
When it comes to iPhone lock screen with notifications, there are so many things that you can do. For instance, here are a handful of things you can do with iPhone lock screen notifications.
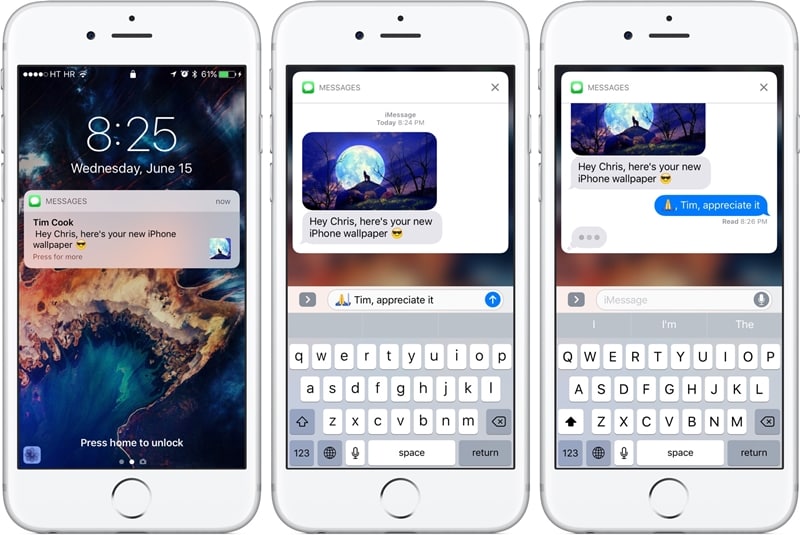
Reply to messages quickly
If you aren’t using this iPhone notification lock screen feature, then you are certainly missing out on something. You might already know that you can get a preview of messages on your home screen. Simply long press it (or 3D Touch) to interact with it. From here, you can reply to your messages without unlocking your device.
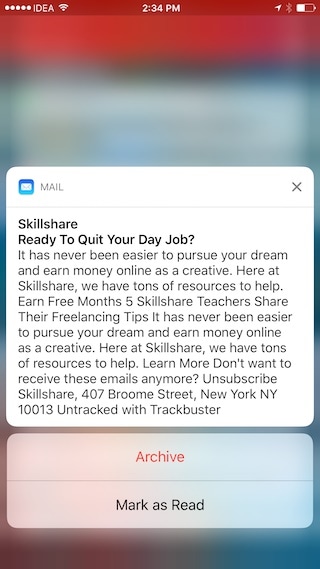
Interact with apps without unlocking your phone
Not just your messages, you can interact with other apps as well right from the lock screen notifications iPhone. After getting a list of notifications, you can simply tap on the “x” button to close them.
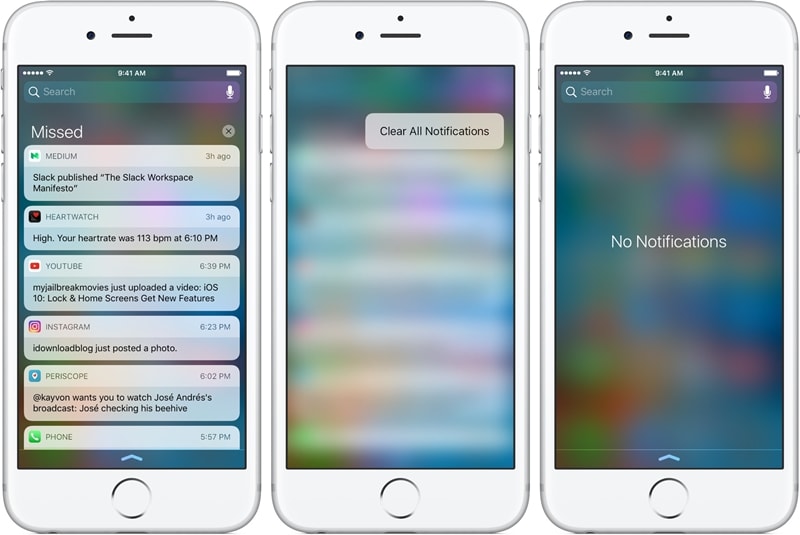
Though, if you want to know more, then just long press the notification. For instance, if you have got a notification for an email, then you can get various options just by long pressing it.
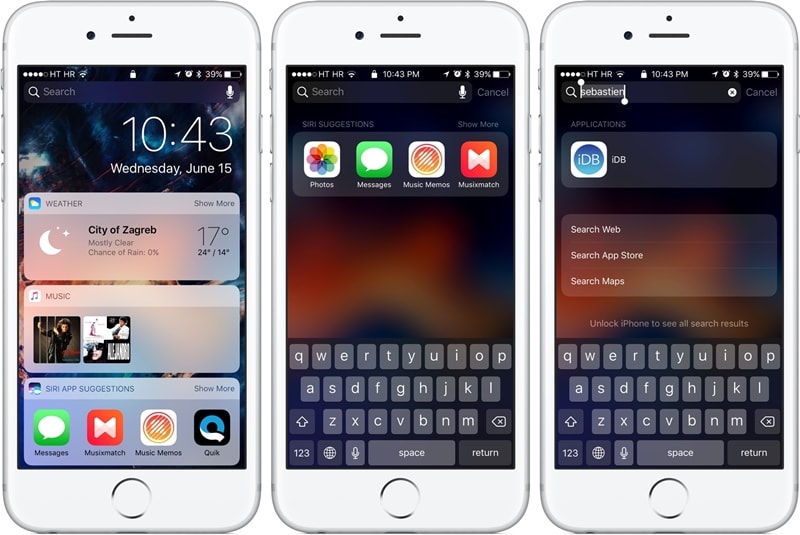
Search for anything
Besides interacting with widgets and apps, you can also search for something on your device and that too without unlocking it. Simply tap on the search bar to make it work.
Part 2: How to turn off notifications on iPhone lock screen?
Sometimes, people can access our private information just by looking at our notifications. In this way, they can get read your crucial information and that too without unlocking your device. By simply visiting your device’s settings, you can customize iPhone lock screen with notifications. In this way, you can turn on or off iPhone lock screen notifications for the apps of your choice.
1. Unlock your device and go to its Settings > Notifications to access all the features related to its notifications.
2. From here, you can view a list of all the apps that can access notifications.
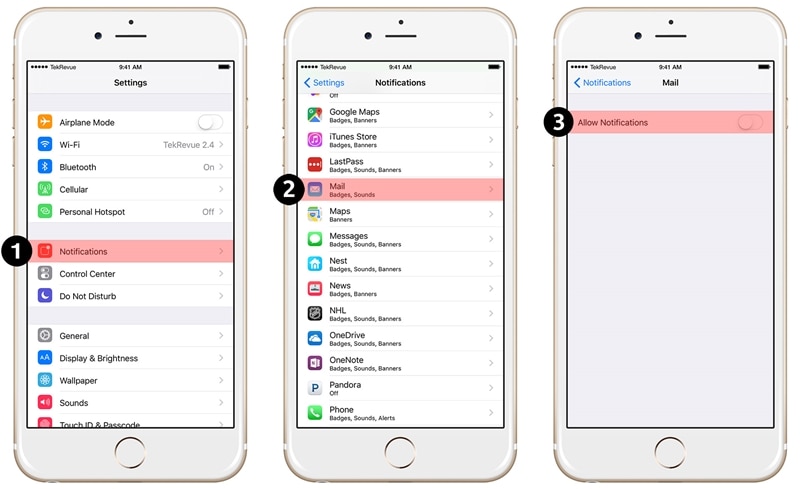
3. Simply tap on the app of your choice (Mail, Message, Photos, iTunes, etc).
4. From here, turn off the option of “Allow Notification” to completely turn off the notifications for the app.
5. If you simply want to turn off notifications on lock screen, then switch off the option of “Show on Lock Screen”.
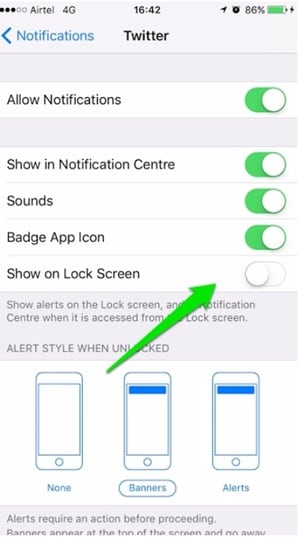
Besides that, there are a few other options as well that you can either enable or disable to customize your lock screen notifications iPhone.
Part 3: How to turn off notification view on iPhone lock screen?
The notification view can be used to see previous notifications on the Apple iPhone XS device without unlocking it. Needless to say, most of the users don’t like to include this iPhone notification lock screen feature. To turn off the notification view of iPhone lock screen notifications, follow these steps:
1. Firstly, unlock your device and got to its Settings > Touch ID & Passcode option.
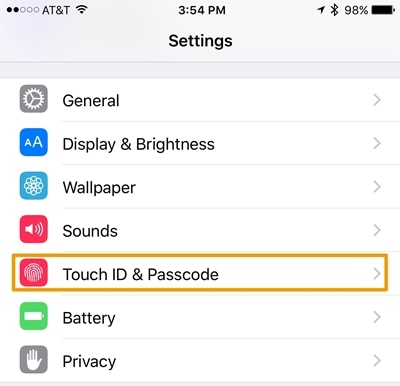
2. You would be needed to provide the passcode or your fingerprint in order to access these settings.
3. This will provide a list of features related to your passcode. Go to the section of “Allow Access When Locked”.
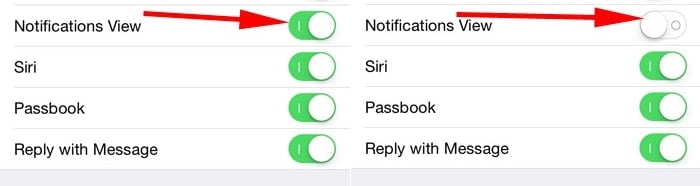
4. From here, make sure that the option of “Notification View” is turned off.
After turning the option off, you can exit from the Settings interface. In this way, your device won’t display the notification view.
Part 4: Changes on iPhone lock screen notifications on iOS 18
With the new update of iOS 18, we can see a drastic change in the Apple iPhone XS lock screen notifications as well. Since the Apple iPhone XS lock screen with notifications have been integrated into one, it becomes quite easier for users to access it.
Access iPhone notification lock screen on iOS 18
Some people find it a little tricky to access the lock screen notifications iPhone after the iOS 18 update. Instead of sliding the screen from the top, you need to swipe it from the middle. By swiping it from the bottom, you might get its control center.
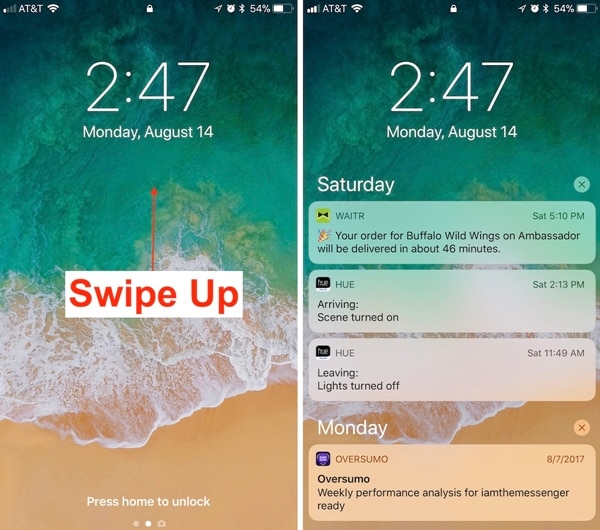
Simply swipe up from the middle of the screen to get a list of all the notifications. Now, you can slide them to access the old notifications.
Nevertheless, you can swipe from the top to access the cover sheet.
Swipe left or right
This is undoubtedly one of the most evident new features of the Apple iPhone XS notification lock screen of iOS 18. Now, you can swipe left or right to access various features. By swiping left, you can access the Camera on your device and by swiping right, you can access your Today View.
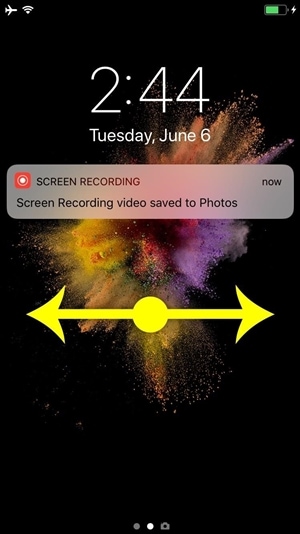
If you want to click pictures instantly, then simply swipe left the lock screen. This will launch the Camera on your device, letting you click pictures on the go. Similarly, by swiping right, you can access your Today View. This includes vital data from apps and widgets that your smartphone assumes is important for you regarding the day.
We hope that after following this guide, you would be able to gain in-depth information regarding iPhone lock screen with notifications. Apart from all the basic things you can do on the lock screen, we have also provided easy ways to customize it. Furthermore, there are so many things that you can do with the iOS 18 iPhone lock screen notifications. While most of the users loved the feature, some are quite hesitant about its application. What is your take on this? Let us know about it in the comments.
How to Access Your Apple iPhone XS When You Forget the Passcode?
We all have secrets in our iPhone or some important financial or business data that we all wish to protect from unwanted access. For this, we set up a passcode. But what if Apple iPhone XS passcode is forgotten by you? Well, you may now wonder how to perform Apple iPhone XS passcode bypass, right? Worry no more! We’re right here to help you with the proven solutions for Apple iPhone XS passcode reset without iTunes or with it too. Let’s explore.
Part 1. Unlock Apple iPhone XS screen passcode in one click (unlock tool needed)
The first and the ultimate measure for Apple iPhone XS passcode removal in just a matter of a single click is Dr.Fone - Screen Unlock (iOS) . With the help of this mighty tool, performing Apple iPhone XS passcode reset is even easier than any other alternative. Not only it can perform Apple iPhone XS passcode bypass, you can also make use of this tool to bypass lock screen of an Android smartphone too. Isn’t it amazing? Moreover, this powerful tool works effortlessly with the latest iOS 13 version and even with the most recent iPhone models as well. Here is the step by step tutorial on Apple iPhone XS passcode bypass.
Step 1: Install and launch Dr.Fone - Screen Unlock (iOS)
Get the tool Dr.Fone - Screen Unlock (iOS) downloaded and installed over your computer system. Then establish a connection between your computer and iPhone.
Now, launch the tool and then opt for the “Unlock” tile from the main screen.

Step 2: Boot in Recovery/DFU mode
Next move that you need to perform is to opt for the correct mode, i.e. “Unlock iOS Screen”. Then, you’ll be prompted to boot your device in Recovery/DFU mode. The on-screen instructions will guide you on how to do it.

Step 3: Double-Check iPhone information
On the upcoming screen, you’ll be displayed the “Device Model” and most recent “System Version” which is compatible with your Apple iPhone XS. Simply, hit the “Start” button here.

Step 4: Perform Apple iPhone XS passcode removal
Once, the software downloads the firmware automatically, you can then proceed to Apple iPhone XS passcode reset. Hit the “Unlock Now” button over the next screen and in a short while you’ll be notified that Apple iPhone XS passcode removal is completed.

 safe & secure
Part 2. Restore an iTunes backup for Apple iPhone XS
Here we’re going to be familiar with the Apple iPhone XS passcode reset using the renowned iOS data management tool, iTunes. But be sure that iTunes version installed over your computer is up to date or else unknown errors may crop up in between. Eventually, your all-new Apple iPhone XS may even get bricked. Think this is it? Well, here’s another problem with iTunes, you need to get your Apple iPhone XS connected only to a pre-synced or pre-trusted computer. Or else, this tutorial won’t bring any good to you.
Step 1: First, get your Apple iPhone XS connected to your PC. Then, launch the iTunes most recent version. It will automatically detect your Apple iPhone XS. Once detected, tap the “Device” icon over the left top corner of iTunes.
Step 2: Then, hit the “Summary” option from the left panel and then you need to hit the “Restore iPhone” button. Confirm your actions by simply pushing the “Restore” button on the pop-up message and you’re done. Now, just wait for the process to complete.

Part 3. Restore Apple iPhone XS in recovery mode to remove screen passcode
If somehow, the above solution fails and you’re just not able to get Apple iPhone XS passcode reset. You need to boot your device into recovery mode and then perform the factory reset. This would certainly wipe off everything from your Apple iPhone XS including the passcode as well. Here are the steps involved in booting your Apple iPhone XS in recovery mode.
- First things first, power off your Apple iPhone XS by pushing the “Side” button down along with either of the “Volume” button. Keep them pressed till you get to see “Power-off” slider over your screen. Now, simply drag it to power off your device.
- Next, connect your Apple iPhone XS and your computer firmly with the help of an authentic cable. Please make sure to press and hold the “Side” button meanwhile.
- Ensure not to let go the Side button till the recovery mode screen appears over your Apple iPhone XS.

- Once the Apple iPhone XS device is booted in recovery mode, iTunes will throw a pop up message that “iTunes has detected an iPhone in recovery mode”. Simply, hit the “OK” button over the message and then push the “Restore iPhone” button followed by confirming your actions.

Part 4. Use “Find iPhone” from iCloud
The next pro tutorial for Apple iPhone XS passcode removal is via iCloud. For this, grad access to any computer available on your side. Or, you can also make use of any other smartphone device but ensure it must be connected to a WiFi network or have an active data pack. Moreover, the locked iPhone on which you’re going to perform Apple iPhone XS passcode reset should also have an active internet connection to make this tutorial work.
Note: Since we’re going to unlock your Apple iPhone XS using Find My iPhone service of iCloud. It is important that “Find My iPhone” service was enabled beforehand over your Apple iPhone XS.
Step 1: Launch the browser over any other smartphone device or computer. Then, visit the official web page iCloud.com.
Step 2: Now, make use of same Apple account configured with your Apple iPhone XS to sign in to iCloud. Then, opt for the “Find My iPhone” icon over the launch pad.

Step 3: Next, tap on the “All Devices” drop-down menu available over the top midsection and then select the Apple iPhone XS that you wish to bypass the passcode off.
Step 4: Then, you’ll get to witness a pop-up window over your screen. Tap the “Erase iPhone” button over it and then confirm your actions. All the settings and data will be wiped off remotely from your Apple iPhone XS now.

Step 5: Lastly, wait for the process to complete and upon completion set up your device as usual.
Part 5. How about Apple iPhone XS restrictions passcode?
Apple iPhone XS restrictions is a vital setting that is used to lock down a set of functions of the iPhone. These iPhone restrictions are also known as Parental Controls. That implies one can make use of these settings to block or hide songs that have explicit lyrics/content or barring YouTube from running, etc.
It is vital to set up a 4 digit passcode if you want to use iPhone restriction settings. Now, if you somehow forgot the passcode that was set to make use of iPhone restrictions, you need to restore your Apple iPhone XS with the help of iTunes to remove the previous passcode. But ensure not to restore an old backup of iPhone or else, the old passcode which you may not know will also get activated. Eventually, making your situation even worse.
Reset/Change Apple iPhone XS restrictions passcode
Now, in case you know the Apple iPhone XS restrictions passcode and just wish to reset it. Then follow the streak of steps mentioned below.
- Launch “Settings” of your Apple iPhone XS and then get into “General” followed by “Restrictions”. Now, you’ll be asked to key in the current passcode.

- Once you’ve entered the current passcode, hit on the “Disable Restrictions” and to confirm your actions, key in your passcode when prompted.

- Lastly, hit on “Enable Restrictions”. You’ll be asked to set up a new passcode now. Do it and you’re done.

How To Change Your Apple ID Password On your Apple iPhone XS
Are you aware of the common mistakes people make when creating their Apple ID passwords, such as using weak passwords and personal information? And how often should you change your Apple ID password? If it’s been a while since your last update, stay in this article to learn how to change your Apple ID password on your account.
Part 1: Is Your Apple ID Safe? Watch Out for These Signs
Despite your best efforts, there’s always a risk of password compromise. If this happens, a hacker could access all your personal information. They could steal your photos, videos, contacts, and financial data.
They could also use your account to make unauthorized purchases or spread malware. That’s why knowing the signs of a hacked Apple ID password is crucial. If you notice any of the following, you should change your account password immediately:
- Frequent Login Requests
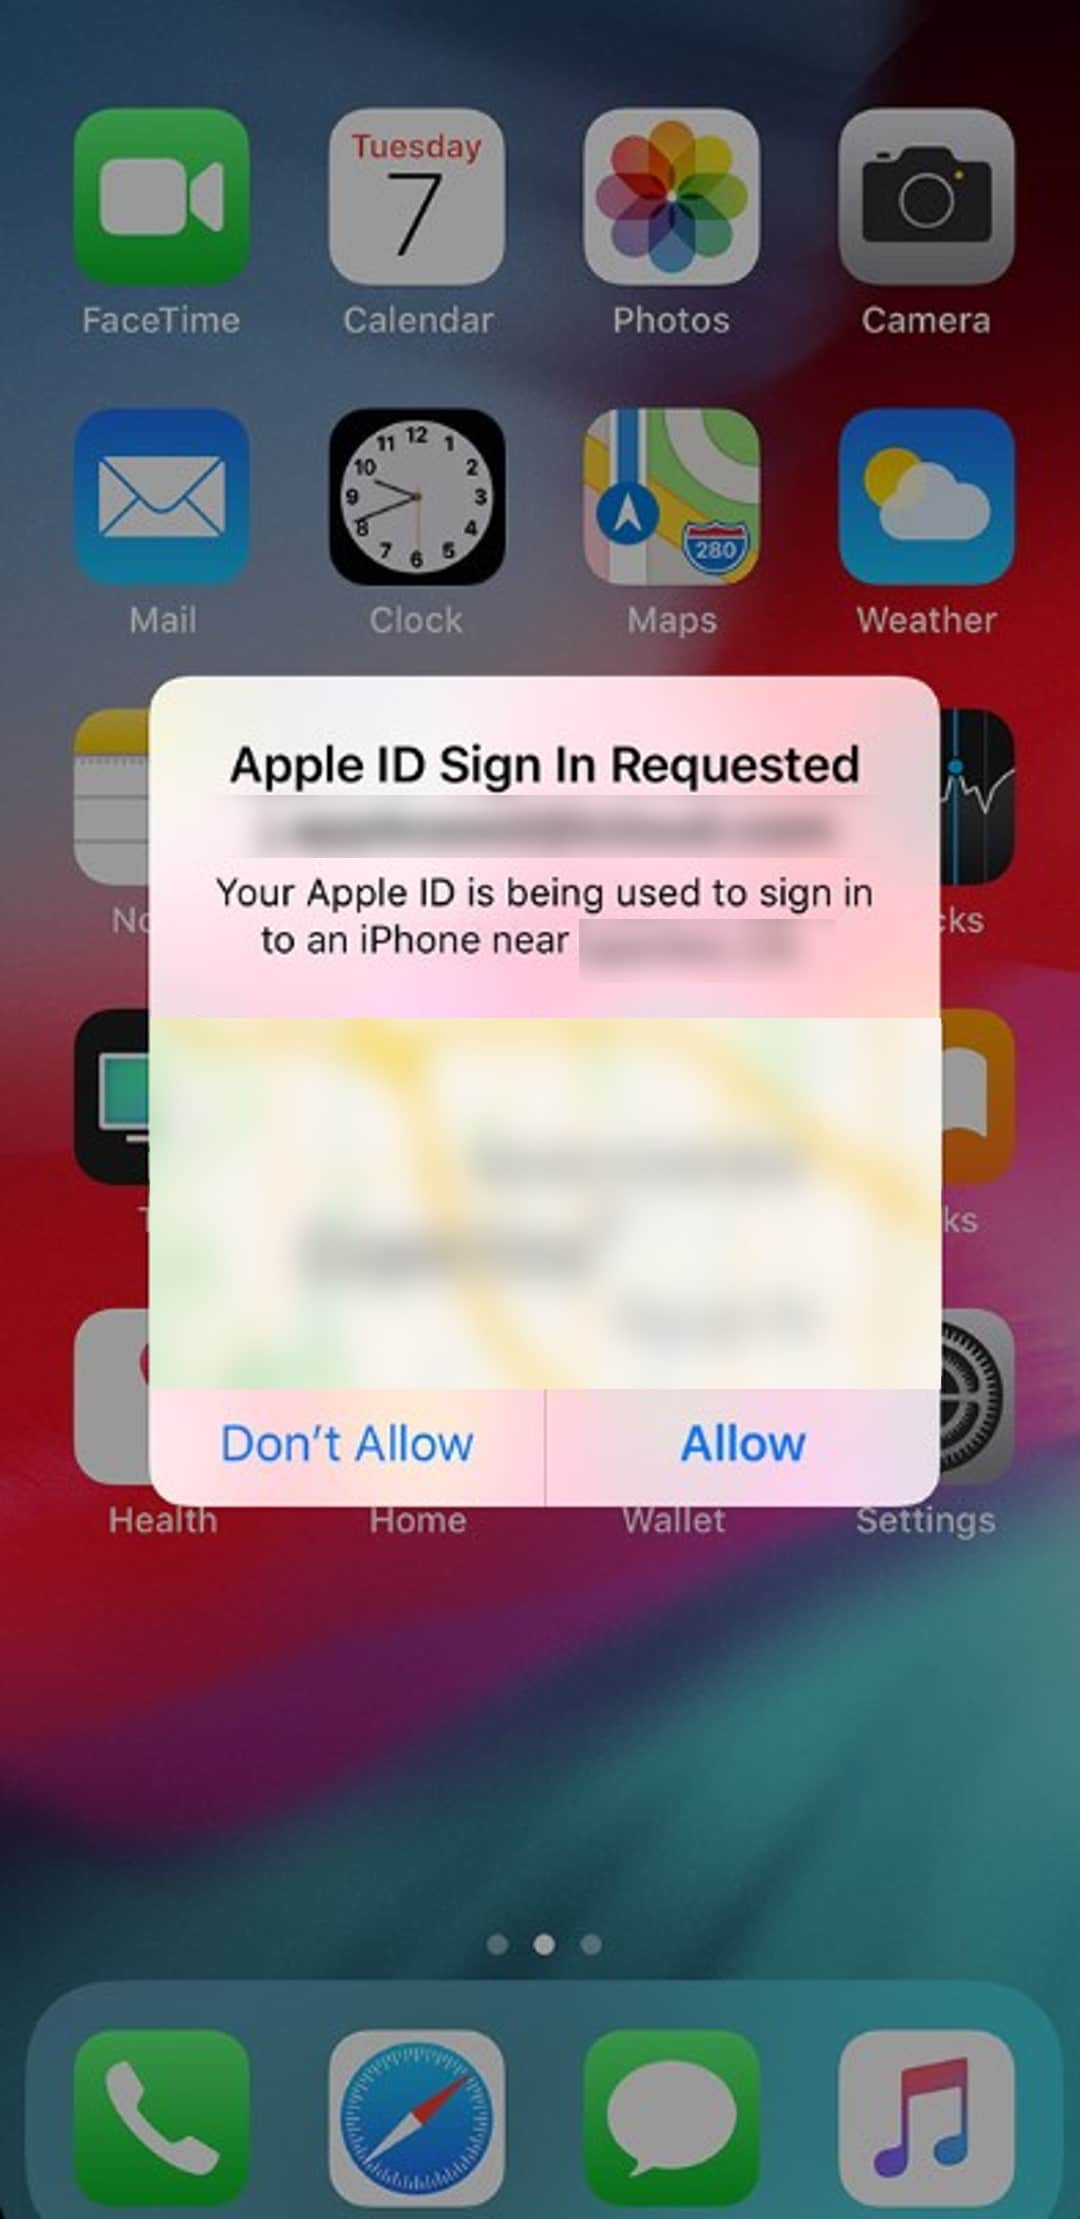
If you notice unusual login attempts or receive notifications from Apple about new sign-ins from unknown devices or locations, it’s a red flag. Someone may be trying to open your Apple account.
- Unexpected Purchases
Unexplained app or content purchases on your account may indicate unauthorized access. Review your purchase history regularly.
- Password Reset Emails
Receiving emails notifying you of a password change when you didn’t make one is a major concern. It indicates unauthorized access attempts.
- Unusual Emails Sent from Your Account
Friends and family receiving strange emails from your Apple ID should raise suspicion. Phishing attempts often involve emails or messages that appear to be from Apple, asking for your login credentials. Be cautious and verify the source.
- Difficult Logging In
To protect your account from unauthorized access, Apple may lock or disable your account if your password or other account information is entered incorrectly several times.
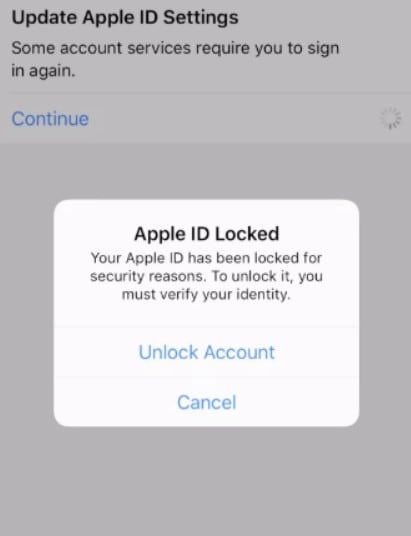
Now that you’re aware of these signs, it’s crucial to know how to change your Apple ID password to fortify your account’s security. Don’t worry; the next section will guide you through the process step by step.
Part 2: How To Change Your Password on Apple ID on Different Devices?
But first, are you now wondering if your Apple ID password is strong enough? Or if it is even secure?
If so, you’re not alone. Millions of people use the same password for multiple accounts. That makes it easy for hackers to break into their accounts. And even if you use a different password for each account, it’s still important to change your passwords regularly. So, before you discover how to change your Apple ID password on your Apple account, here are three things you should consider:
- Complexity
Vary the types of characters in your password to make it more complex and difficult to crack – mix the numbers, uppercase and lowercase letters, and special characters.
- Uniqueness
Be creative, and don’t use publicly available information about you, such as your phone number or birthday. Avoid using common words or phrases that are easy to guess, such as “123456” or “password.”
- Length
Use a password at least 12 characters long, or even longer if possible.
Now that you have a solid foundation for creating a secure Apple ID password. Read on to get to the heart of the matter – how to change the password on Apple ID. Doing it is easy; you can do it on your Apple iPhone XS, iPad, Mac, or the web.
Step-by-Step Guide: Change Your Apple ID Password on iOS Devices
If you’re looking for a quick and easy way to update your password on your Apple account, you can do it right from your iOS device. It is convenient if you don’t have computer access or are more comfortable using your Apple iPhone XS, iPad, or Apple Watch. Here’s a guide on how to change your password for your Apple ID account on these devices:
- Step 1: Open the Settings app, then tap [your account name].
- Step 2: Go to Sign-In & Security and tap Change Password.
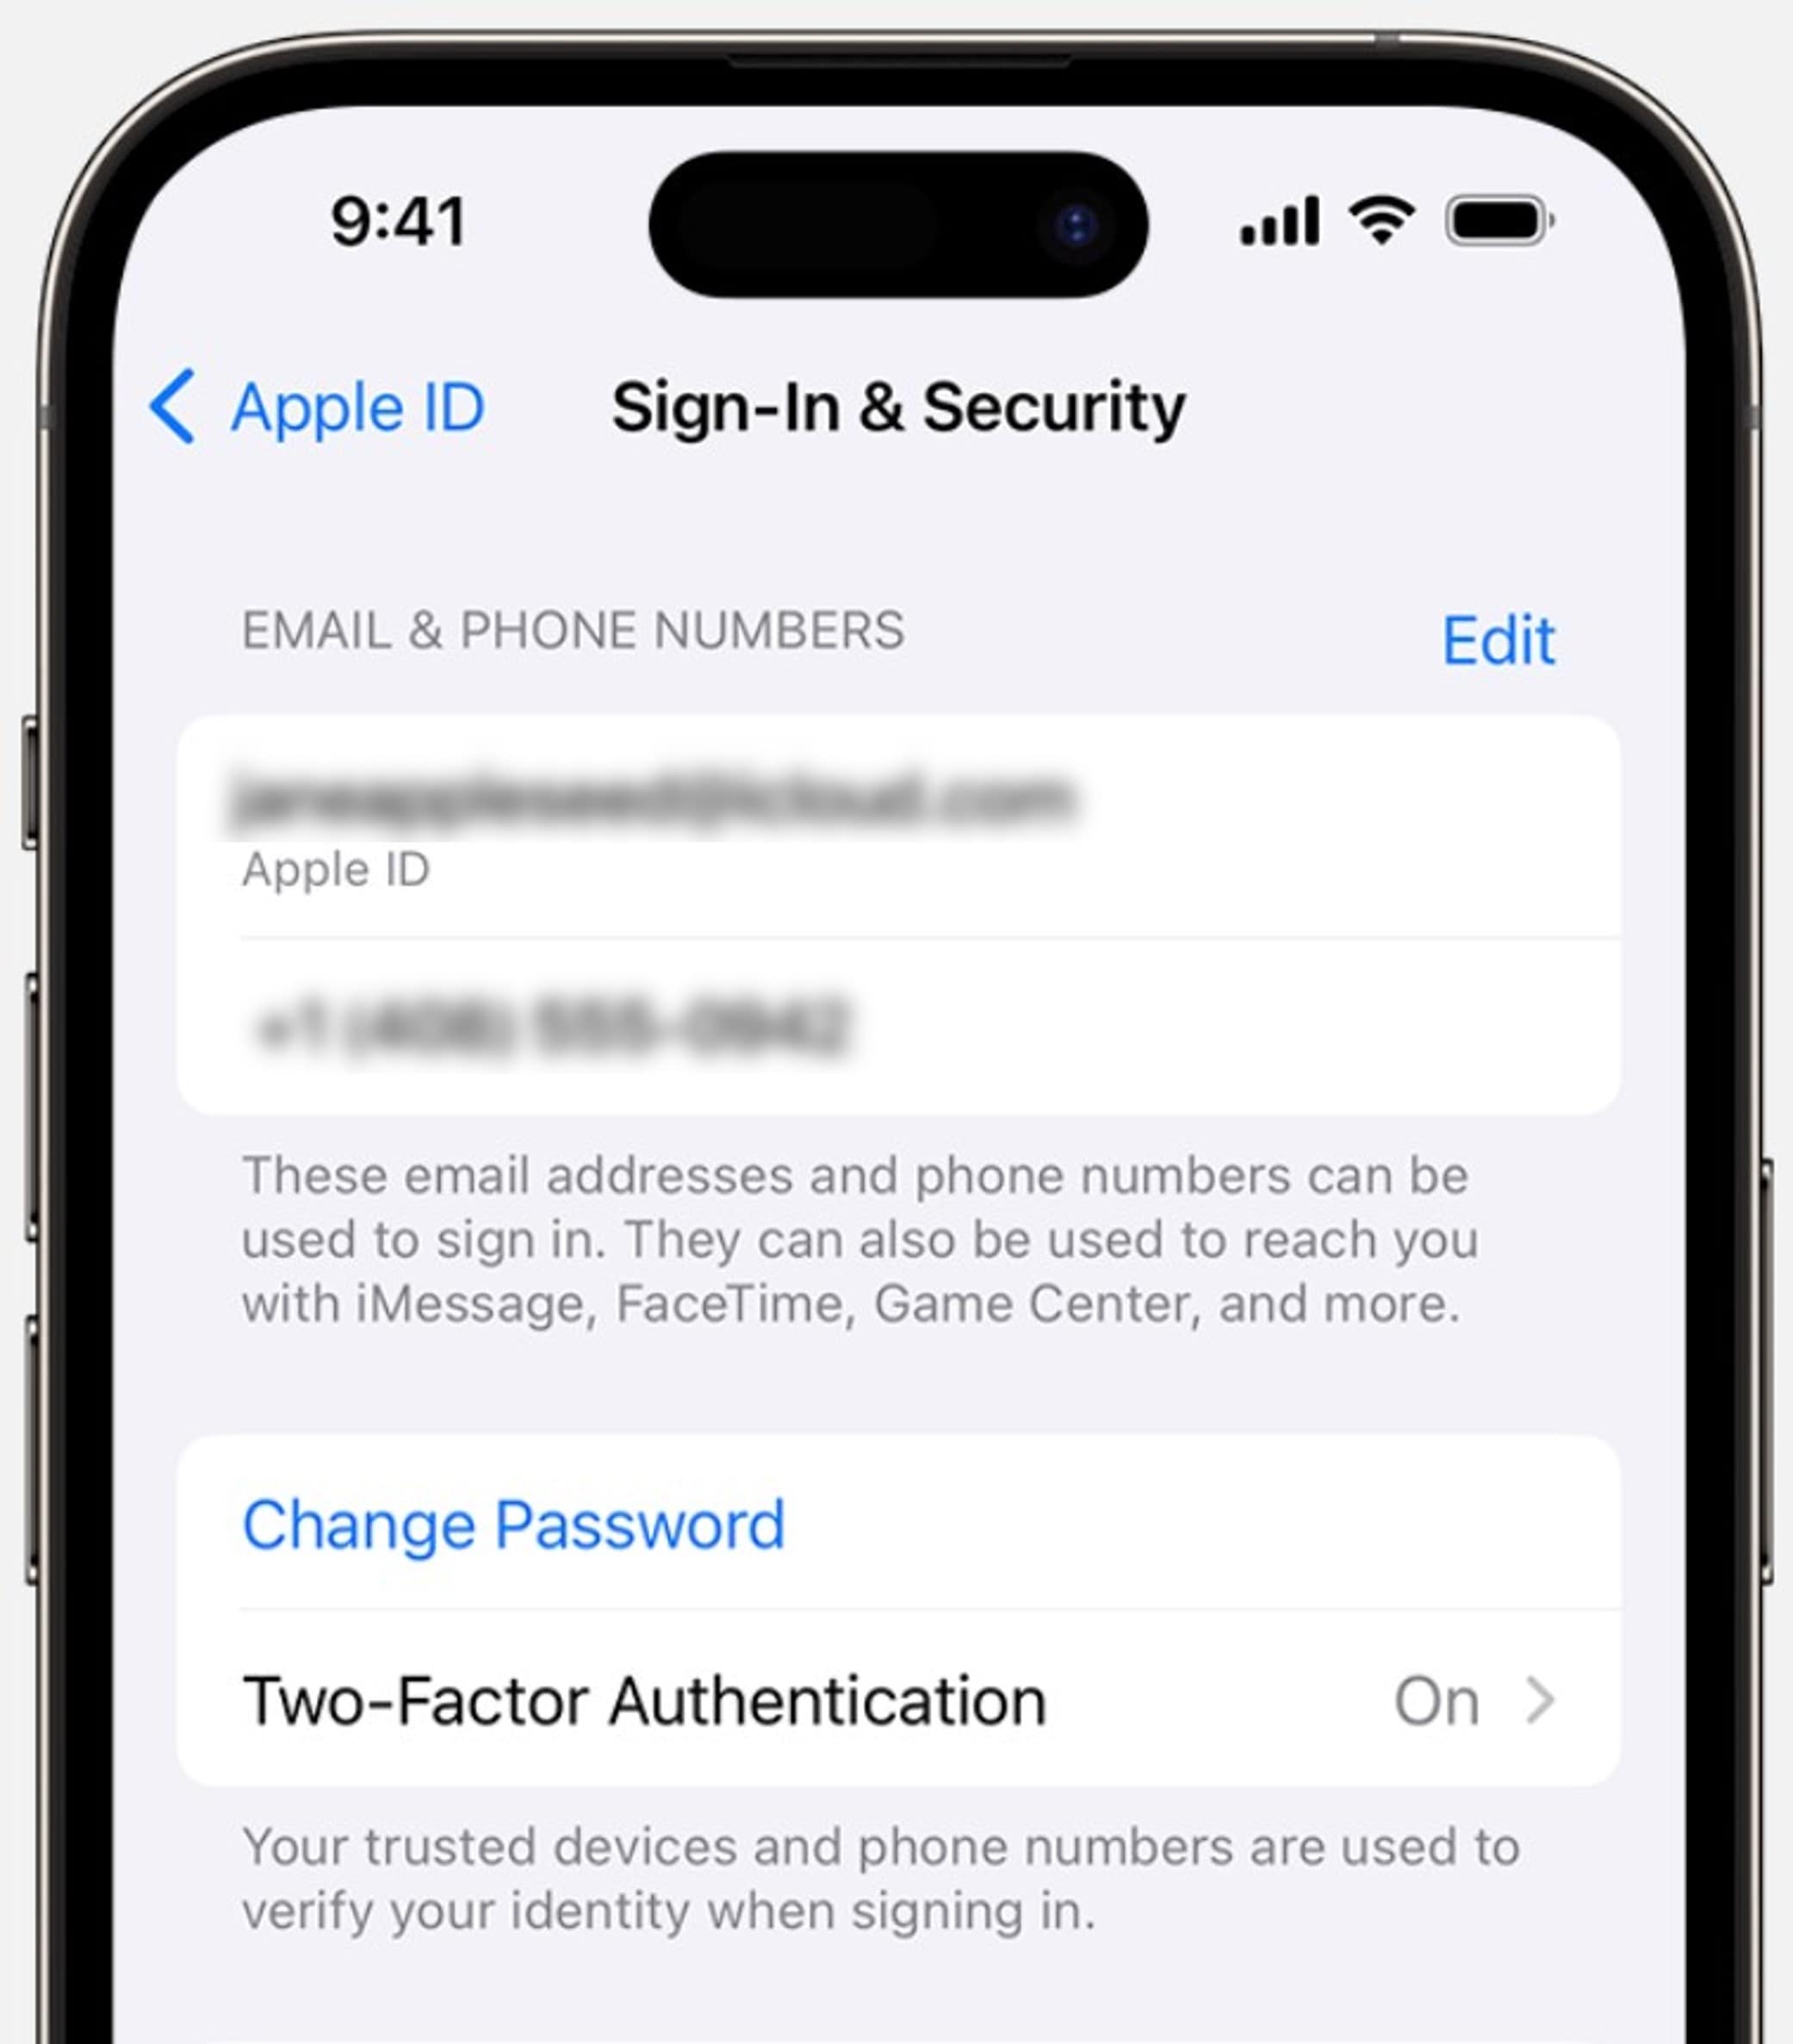
- Step 3: Verify your identity with your current password or device passcode. Then input a new password and re-enter it to confirm.
- Step 4: Tap Change Password or Change.
Step-by-Step Guide: Change Your Apple ID Password on macOS
Mac computers typically have larger screens than other iPhone or iPad devices, so it’s easier to see and enter your password. If you would like to know how to change your Apple ID password on your Mac, follow the steps below:
- Step 1: Go to Apple Menu > System Settings > [your name].
- Step 2: From the Sign-In & Security section, click Change Password.
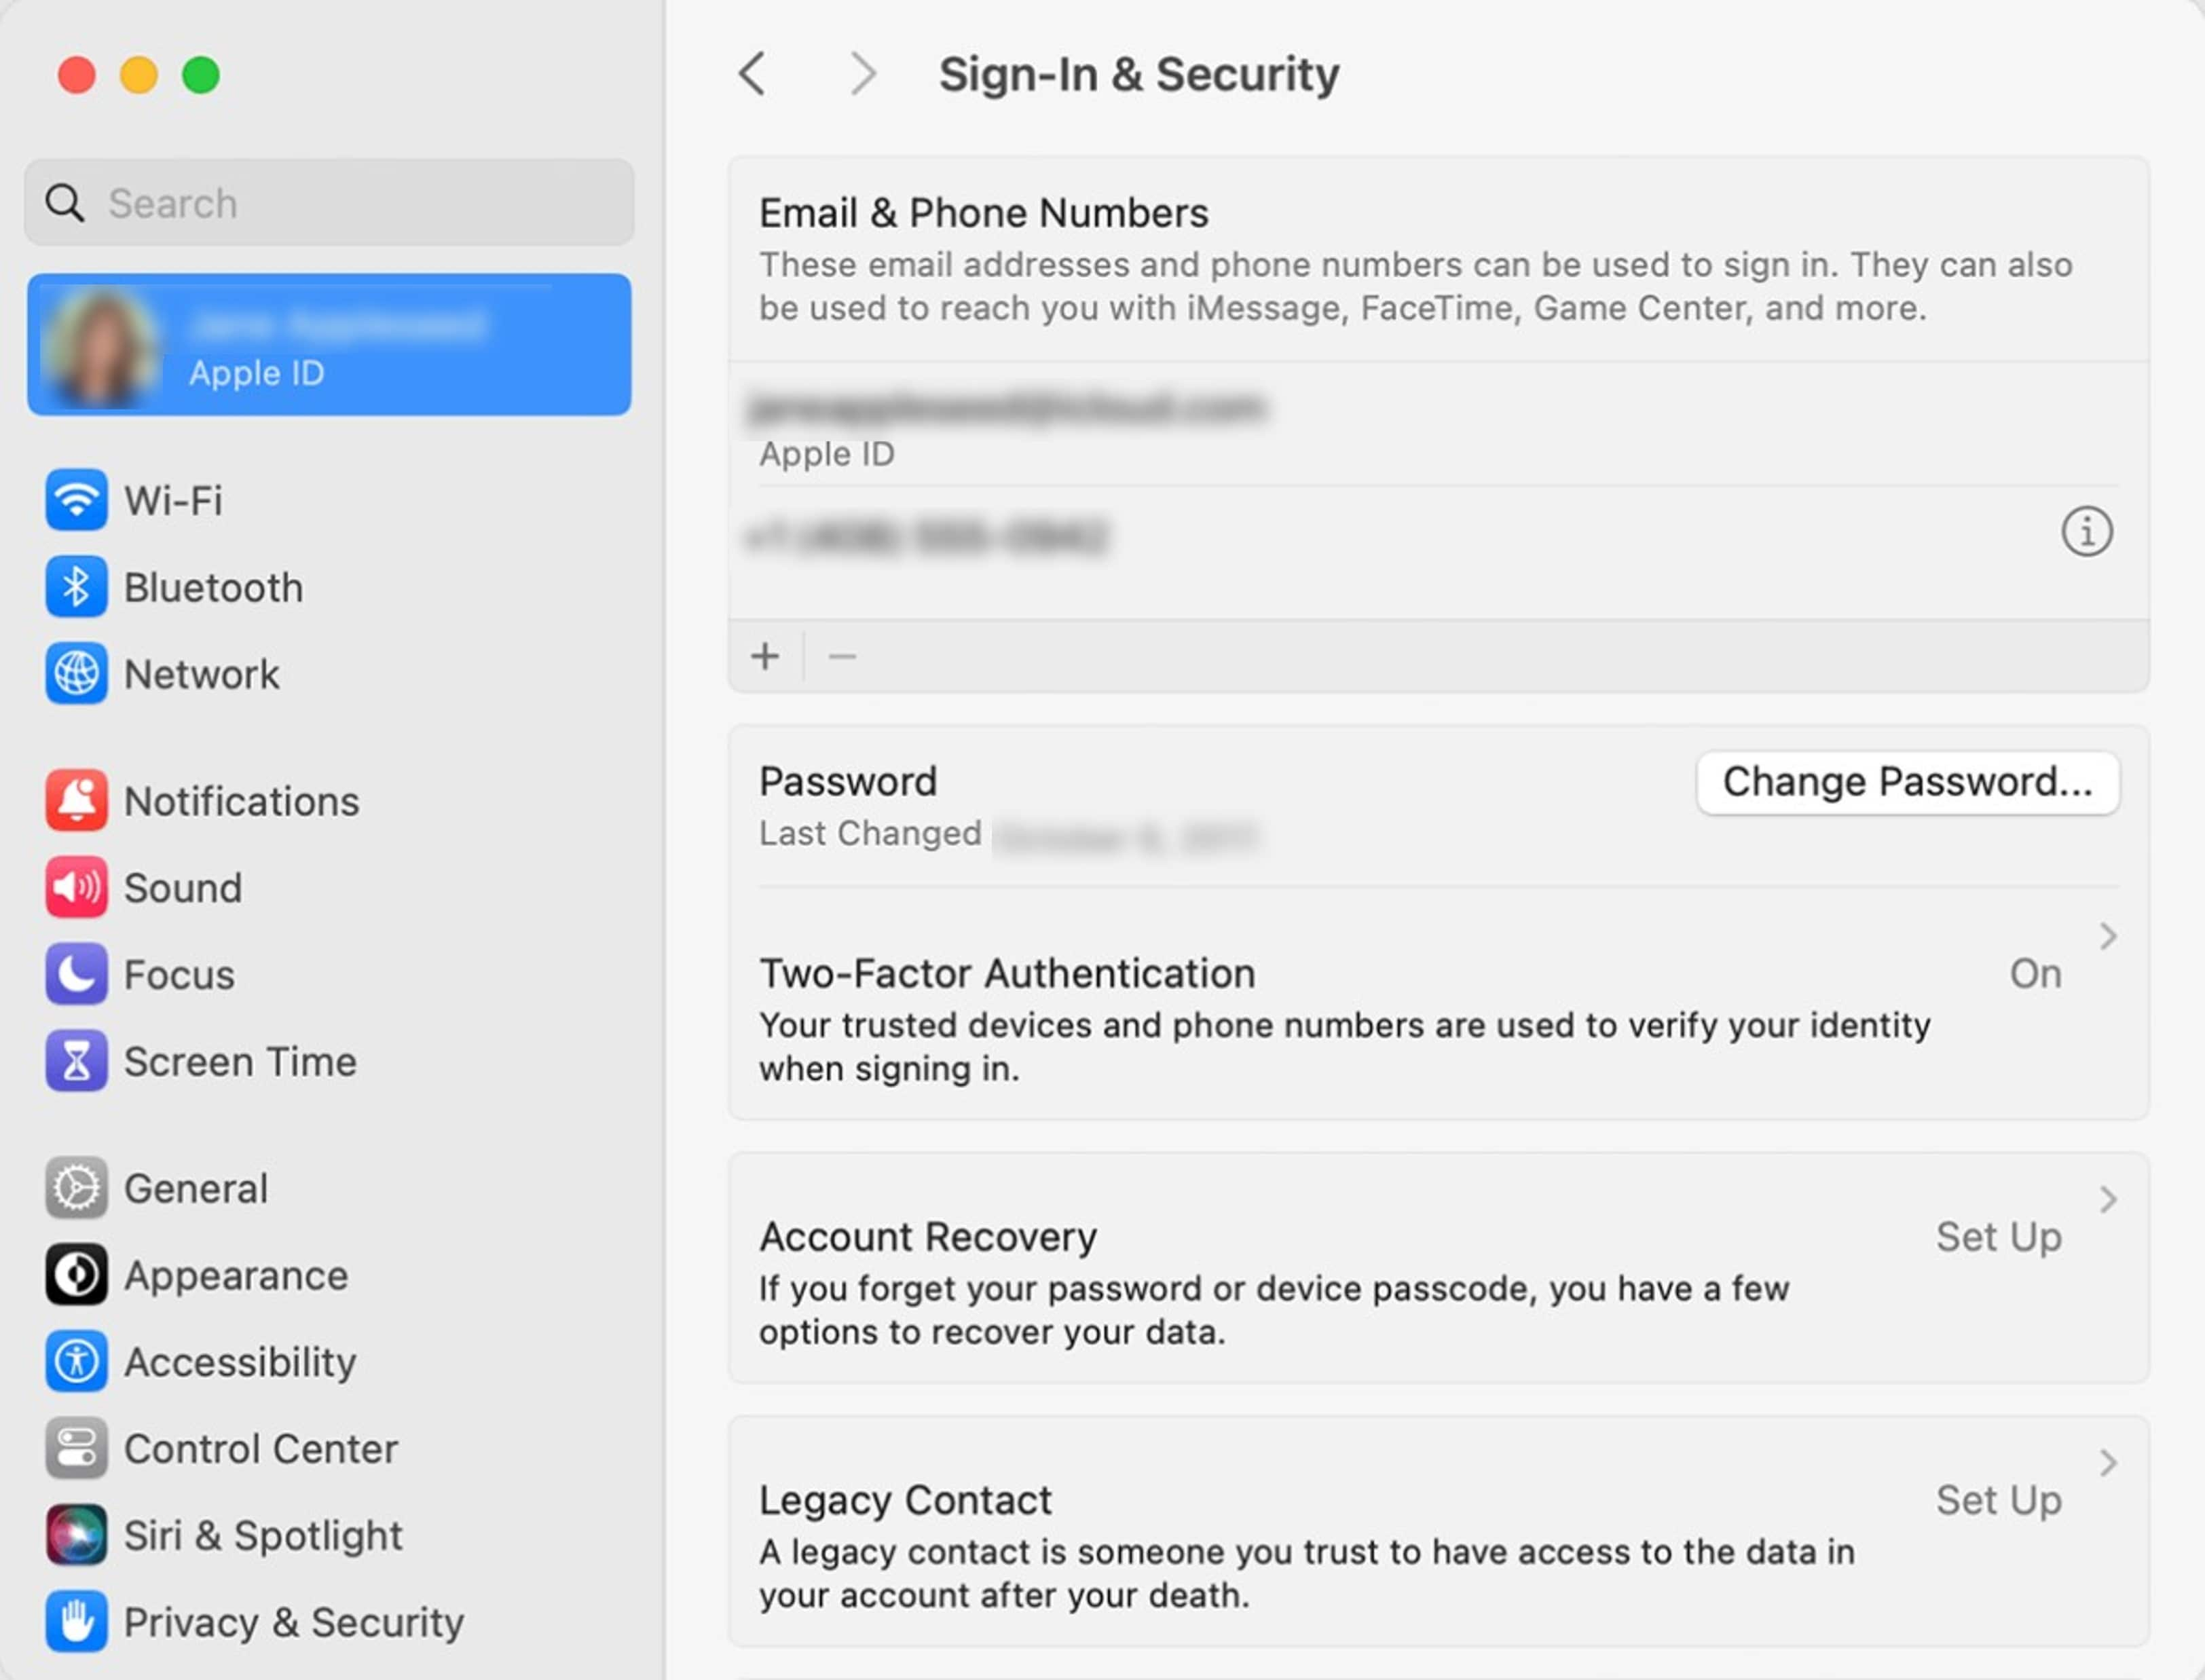
- Step 3: Enter your Mac’s login password to reset your Apple ID password.
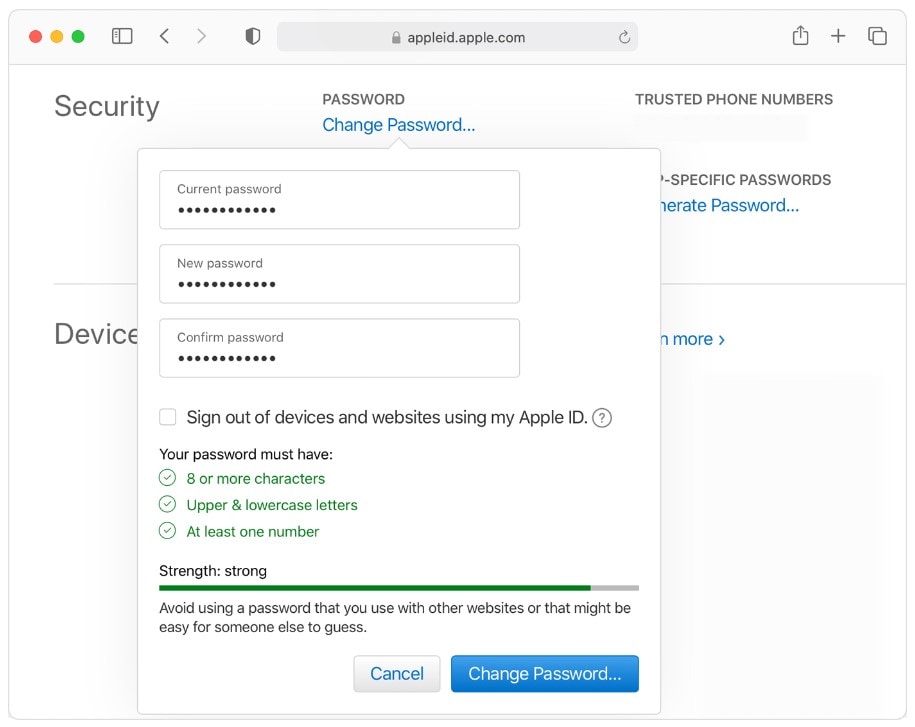
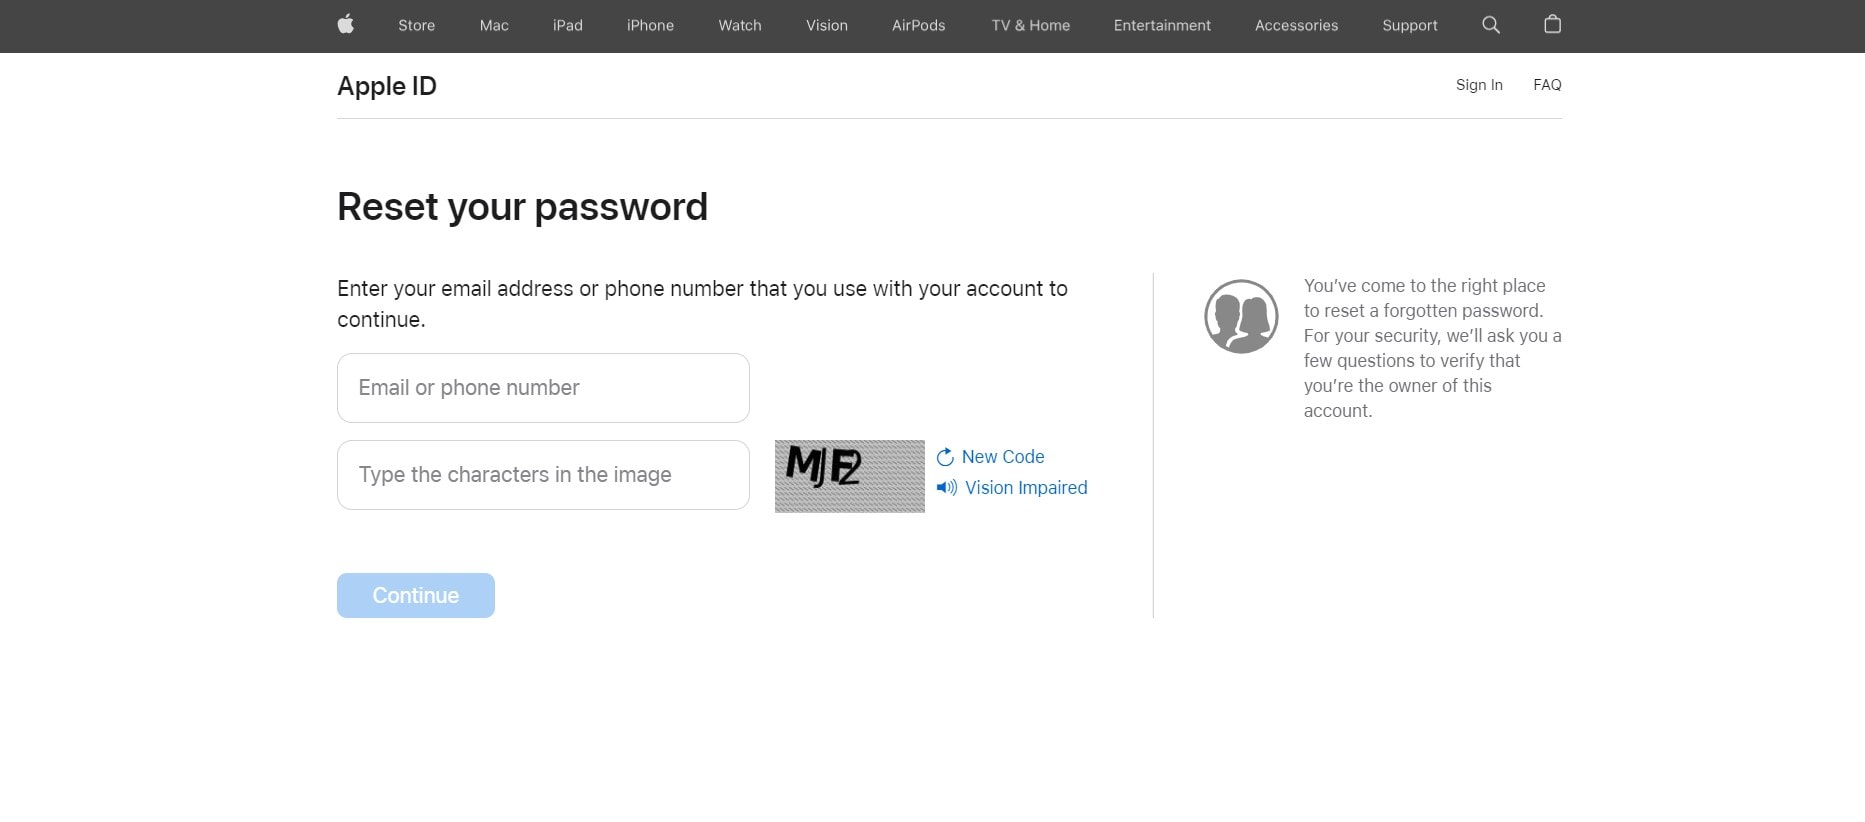
Step-by-Step Guide: Change Your Apple ID Password Online
Web browsers are available on a wider range of devices than iOS devices. If you want to learn how to change your Apple ID password on Chrome, Safari, and other browsers, here’s how you do it:
- Step 1: On a web browser, visit the website of Apple ID and sign in to your Apple account.
- Step 2: Click Password below the Sign-In and Security section.
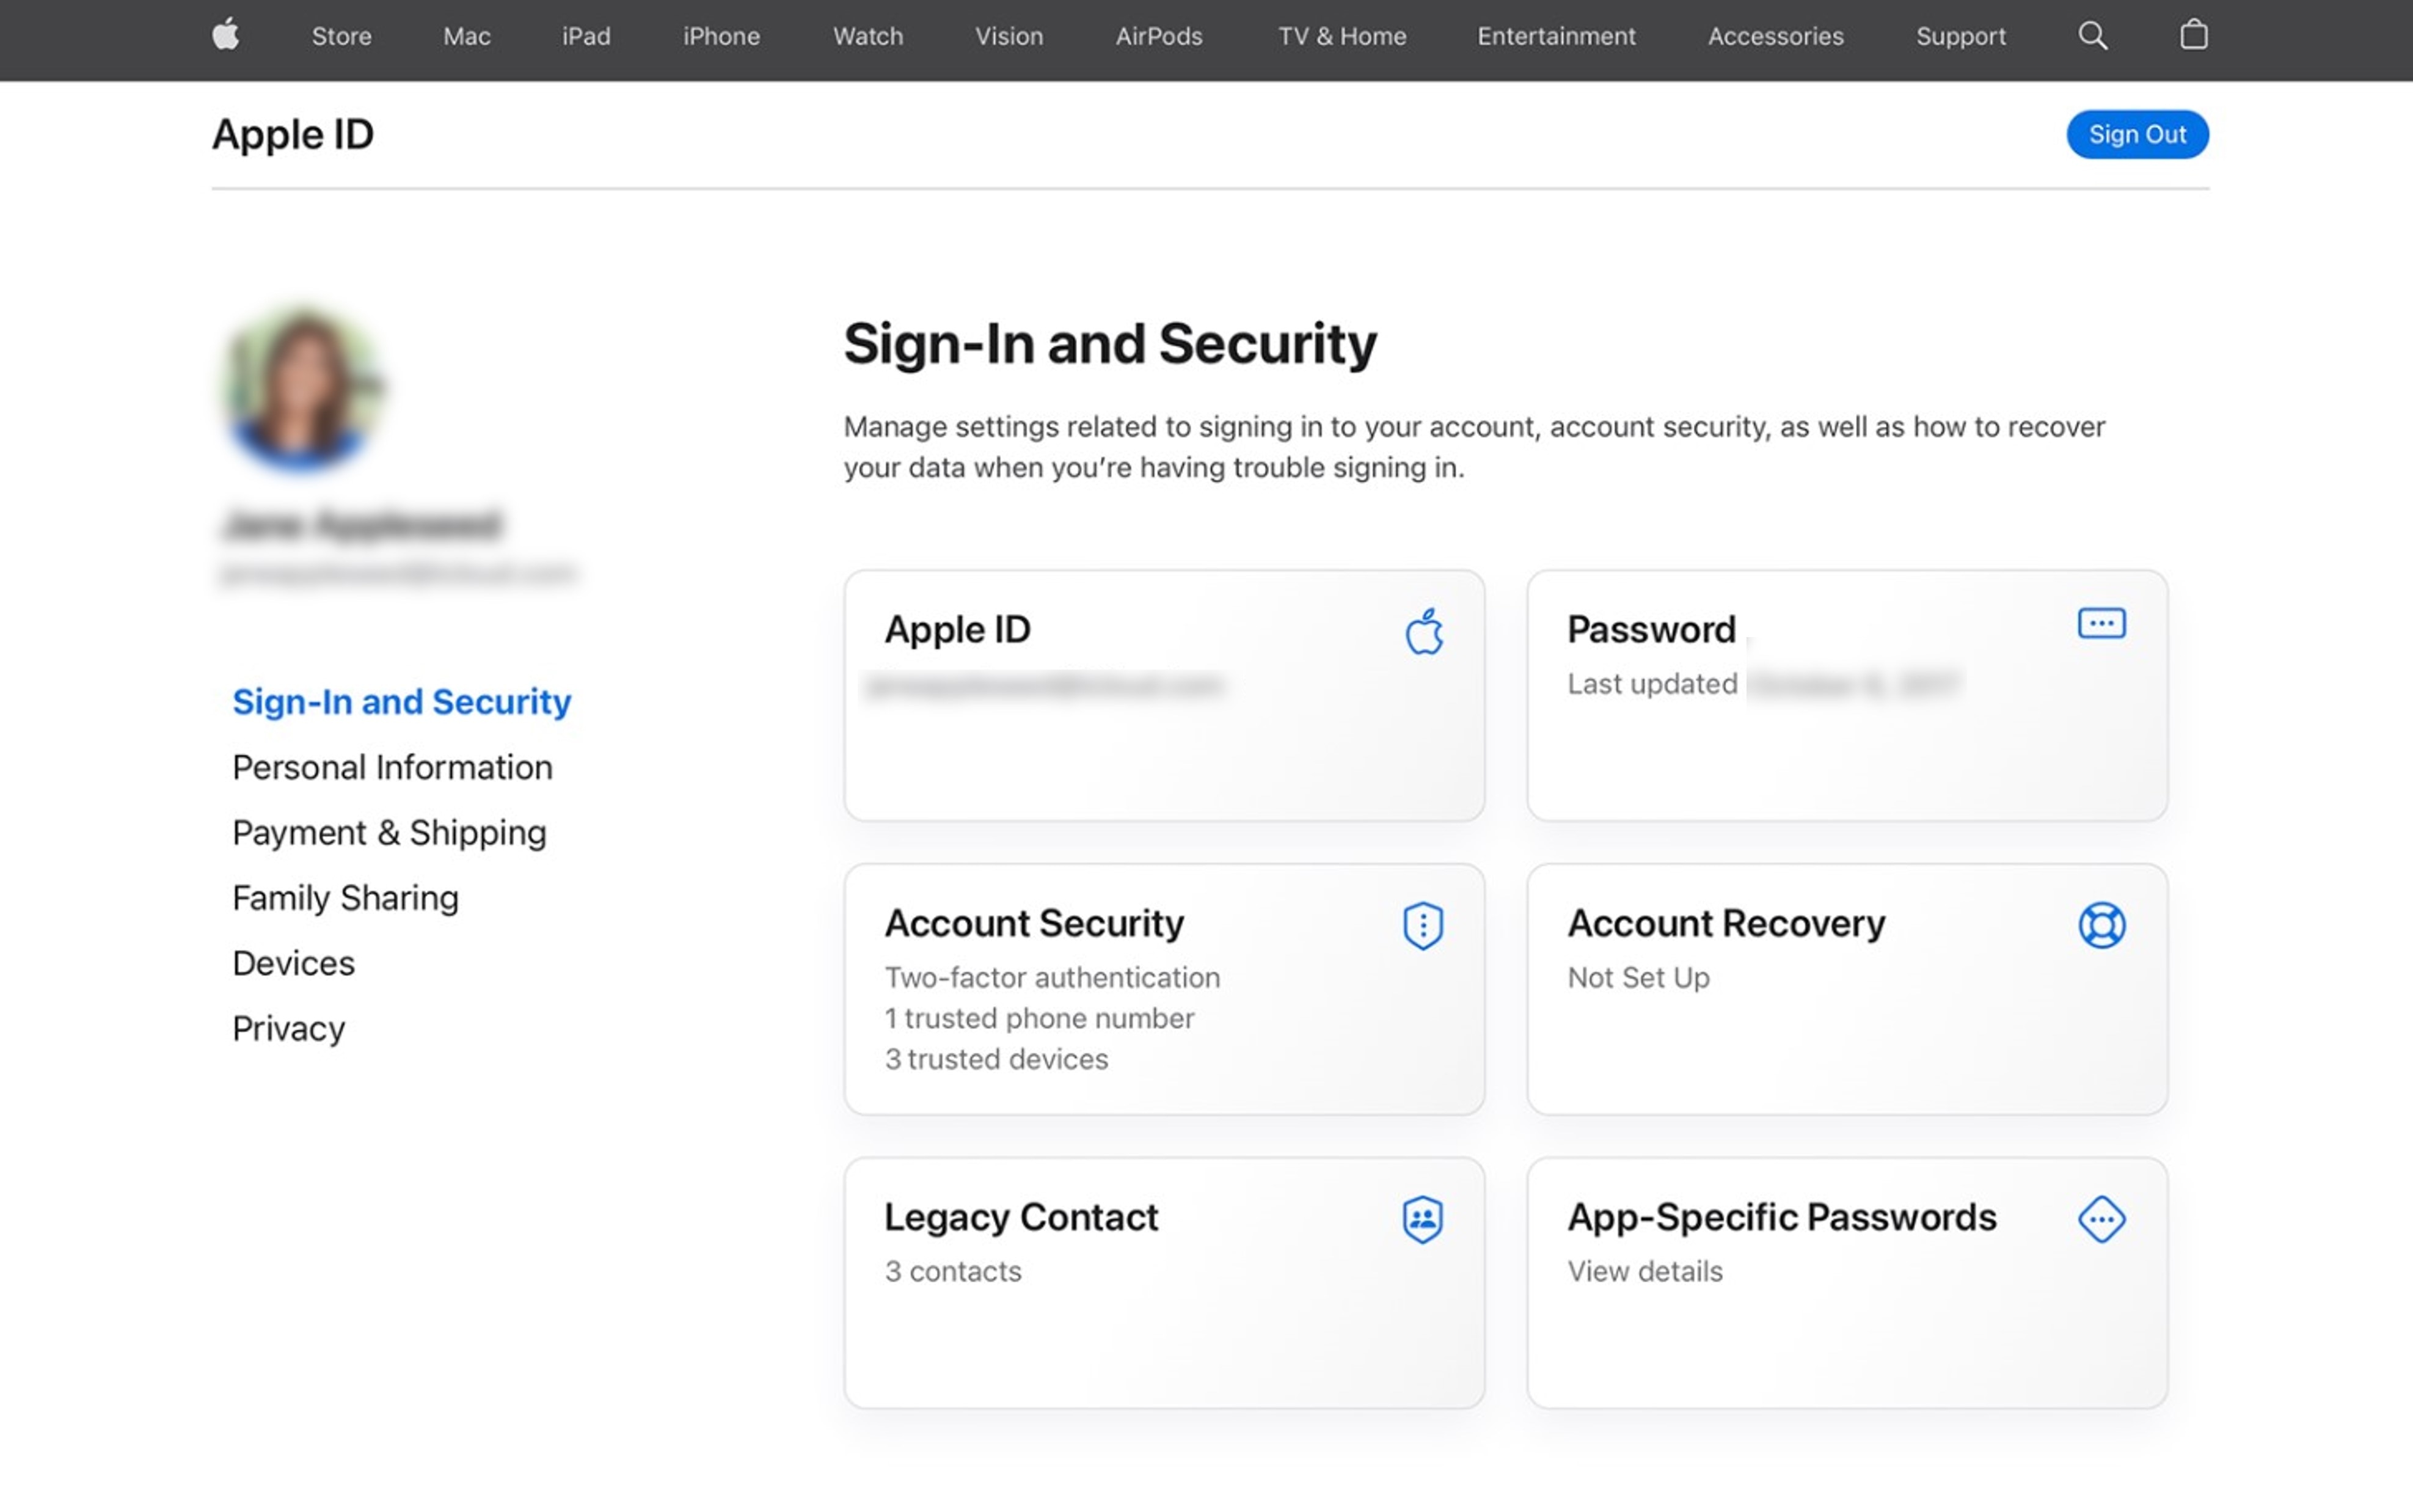
- Step 3: Authenticate with the current Apple ID password, then enter a new password.
- Step 4: Once confirmed, select Change Password.
Password updated! You’re one step closer to keeping your Apple account safe and secure. However, if you’re still having trouble changing your Apple ID password, the next section might help you.
Part 3: Can’t Change Your Apple ID Password? Here’s What You Should Do
It’s happened to everyone: you try to change your Apple ID password, but something goes wrong. Maybe you get an error message or can’t remember your current password. Whatever the reason, there are a few workarounds to change your Apple account password.
Change Your Apple ID Password on a New Device
Did you get a new Apple device or forgot your Apple ID password? No problem! Try these two things before and after setting up your new iOS device.
Before Your Device Setup
Click Forgot password on the Apple ID sign-in page on the web browser. This option is typically found during the setup process for a new Apple device or when you try to sign in to an Apple service on an unsigned-in device.
After You Setup Your Device
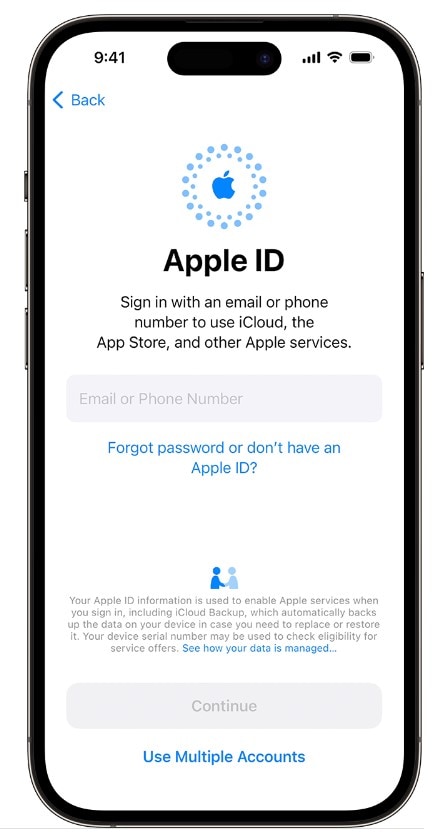
Need to create a new Apple ID or reset your password after setup? You can find the “Forgot password or don’t have an Apple ID?” in your Settings app. Here’s how to find it:
On an iPhone or iPad
For iOS users:
- Step 1: Open the Settings application and tap Sign-In to your Apple iPhone XS or iPad.
- Step 2: Tap Forgot password or don’t have an Apple ID? and follow the in-app guide to proceed.
On a Mac Computer
If you prefer to use your desktop:
- Step 1: From the Apple menu, go to System Settings.
- Step 2: Click Sign in with your Apple ID and click Forgot password.
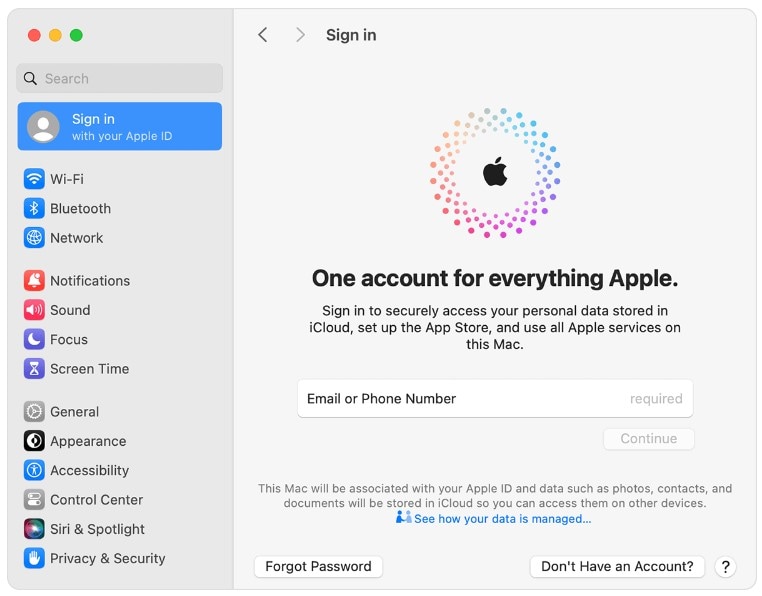
- Step 3: Follow the on-screen instructions to reset your password or recover your account.
Reset Your Apple ID Password Using a Family Device
Losing your phone or being unable to access your iOS device can be a major inconvenience. But it doesn’t have to mean you’re locked out of your Apple ID account. Even if you don’t have your Apple device with you, you can still reset your password and get back to using your family’s Apple devices.
- Step 1: Open the Apple Support app or download it from the App Store if not yet installed.
- Step 2: From the Support Tools section, select Reset Password.
- Step 3: Select A different Apple ID and tap Continue.
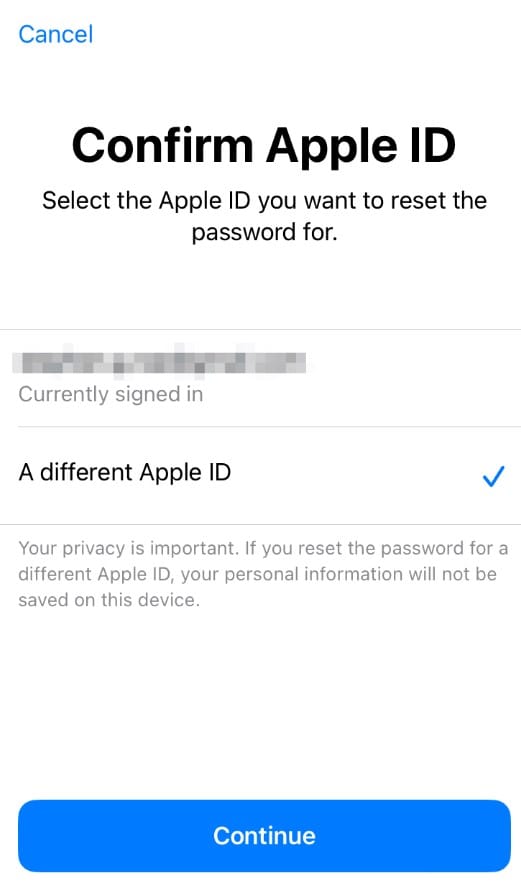
- Step 4: Follow the in-app guide to reset your Apple ID password.
You can also designate a friend or family member you trust as your account recovery contact. They can help you reset your password if you forget it by providing a recovery code upon request.
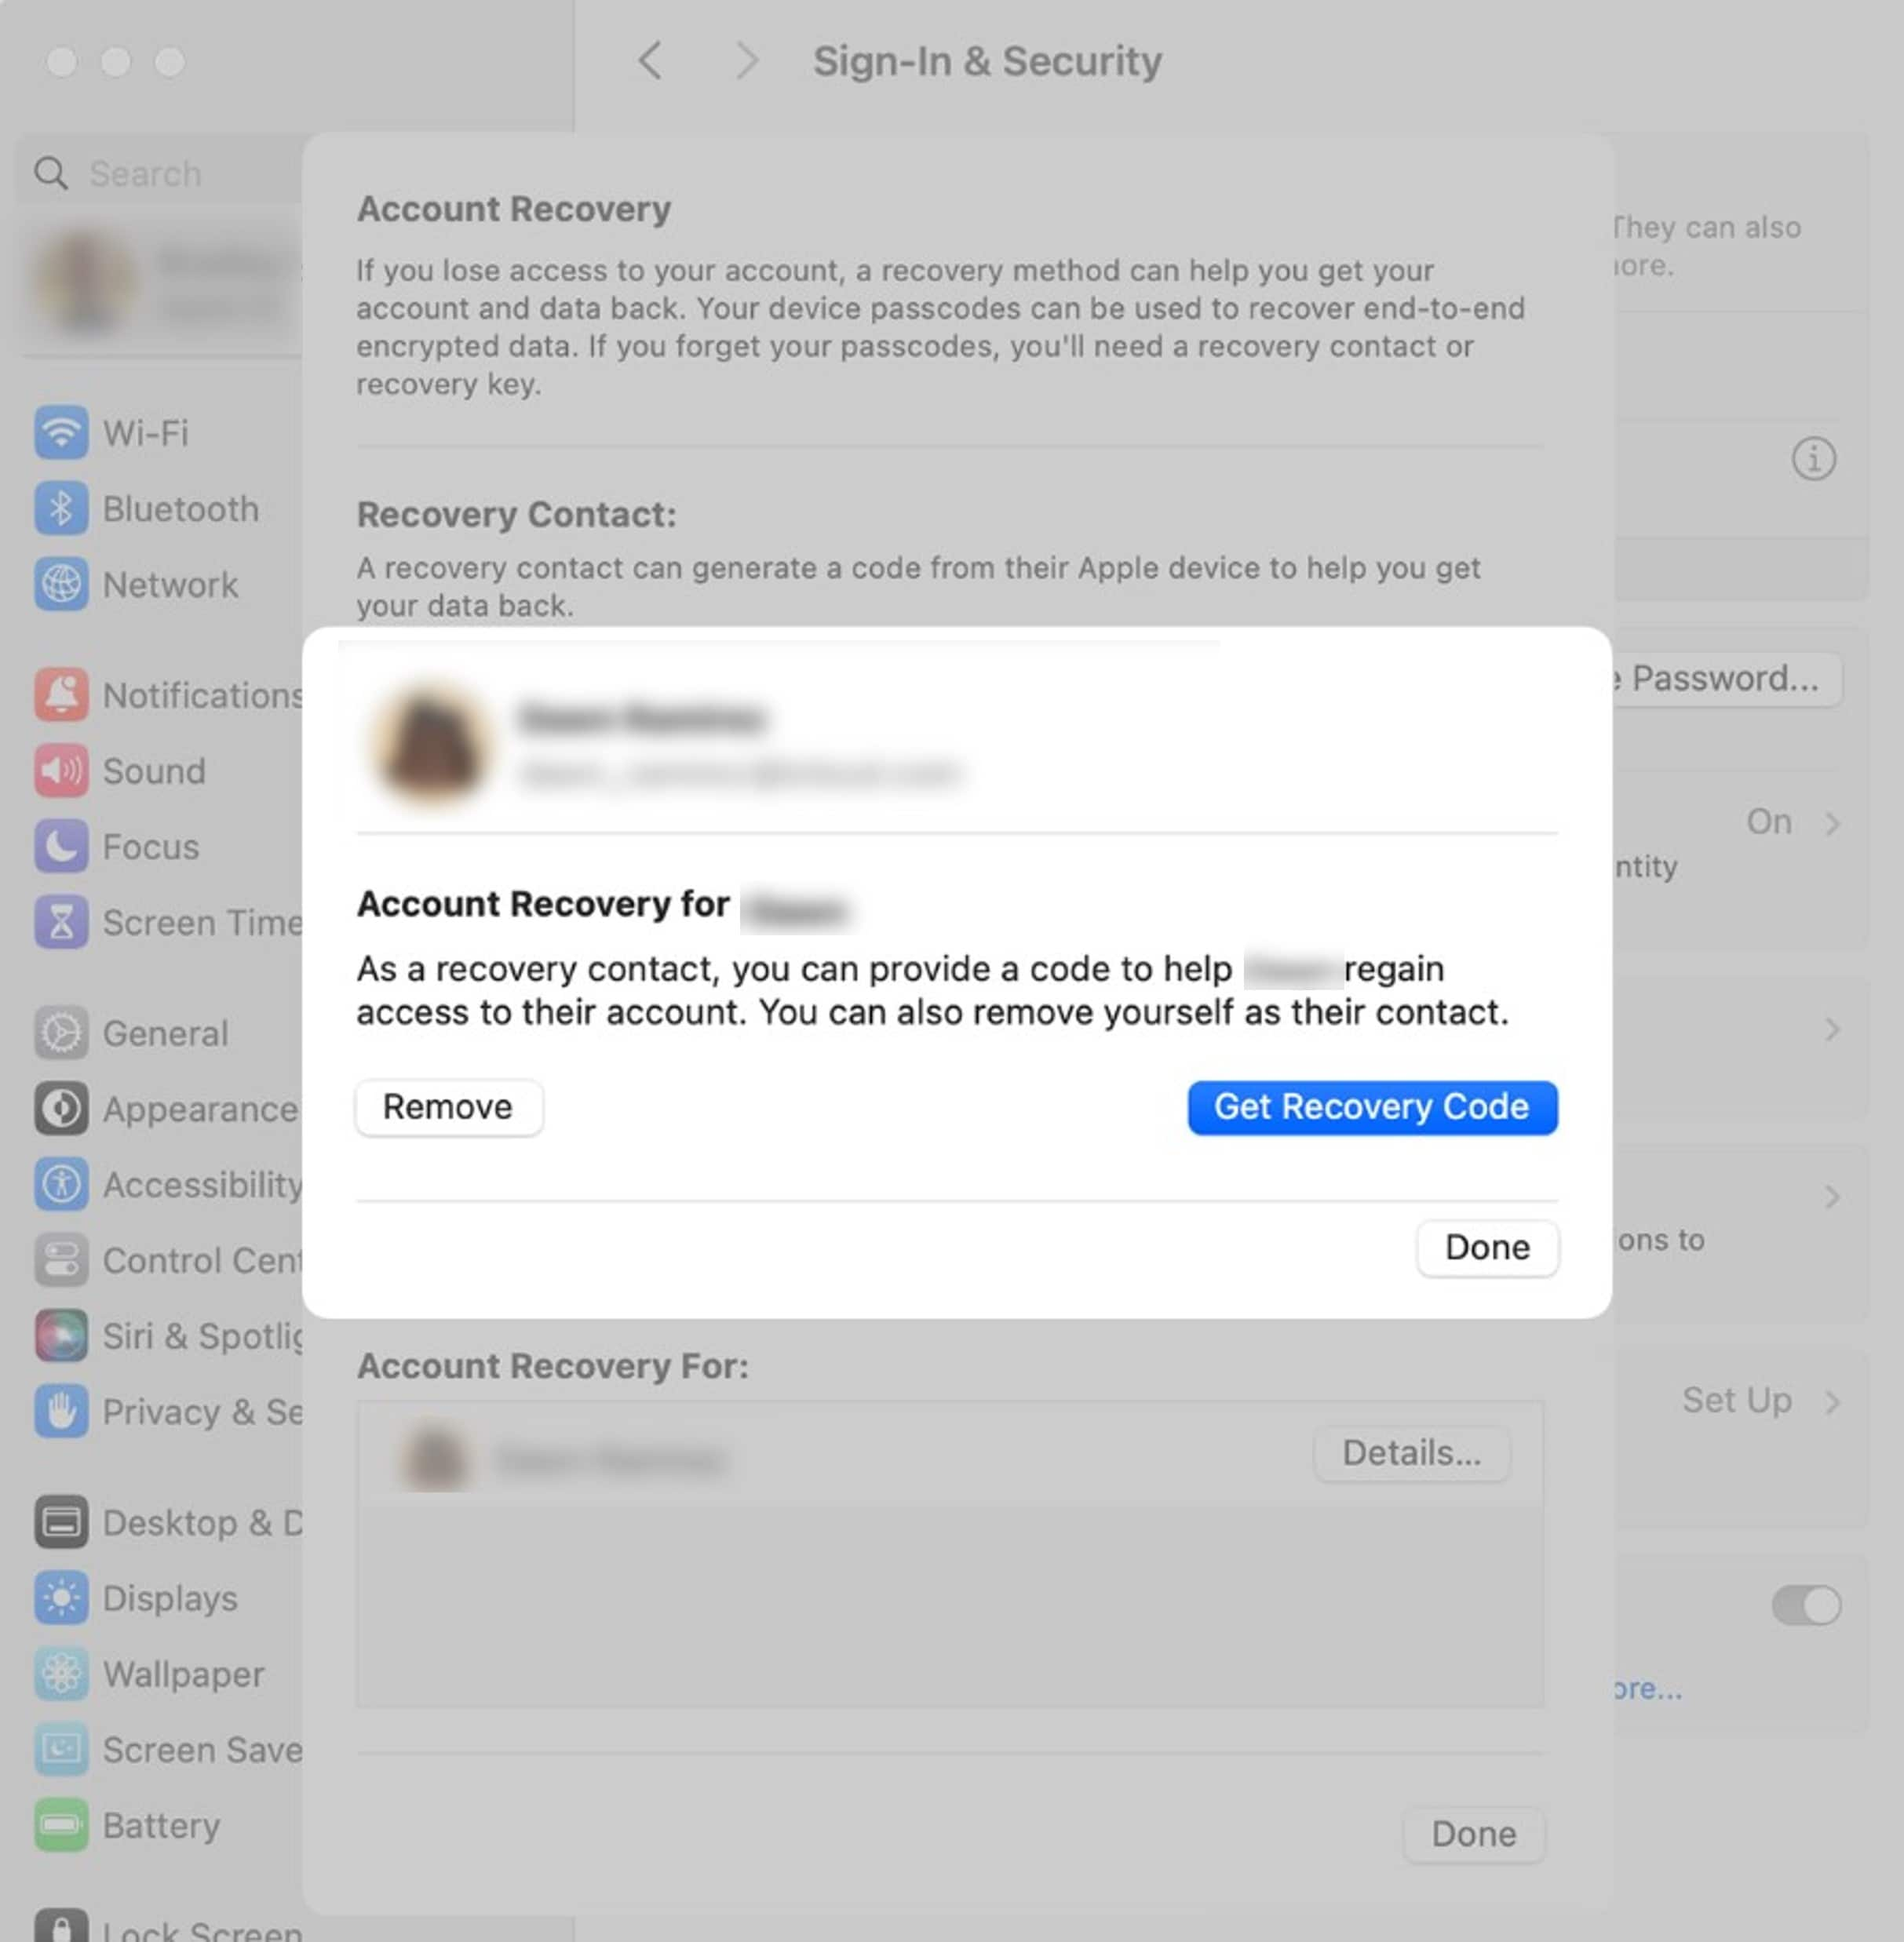
Still Can’t Change Your Apple ID Password? Try Account Recovery
The previous section showed you how to change your Apple ID password on any device if you cannot reset it. But what if you’ve tried all the steps in that section and you’re still having trouble?
There’s still one more option available: submit an account recovery request to Apple.
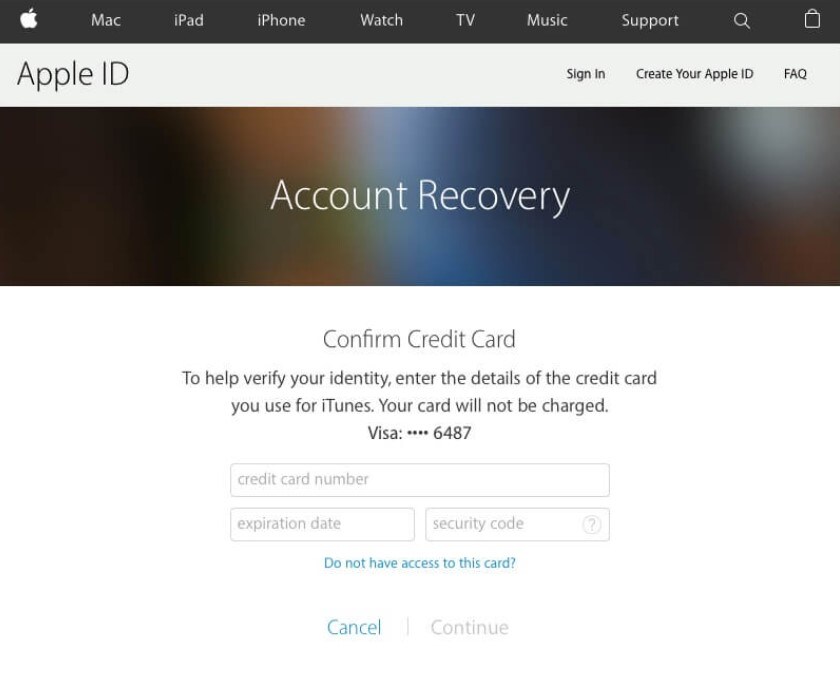
Account recovery is a process that can help you regain access to your Apple ID account if you don’t have enough details to change your password or if you use two-factor authentication. The caveat? Account recovery can be lengthy and might take several days or longer. However, there are a few ways to expedite the recovery process:
- Confirm the six-digit code sent to your primary email address to prove that you’re the account’s rightful owner.
- Provide your credit card details. Apple will send an authorization request to your credit card issuer, which will help verify your identity.
If you need to access iCloud services and Apple ID features faster, a third-party tool like Wondershare Dr.Fone may help.
You May Also Like:
3 Ways to Recover iCloud Password
Complete Guide to Unlock Mi Account Without Password In 2023
[2023 Updated] How to Sign Out of Apple ID without Password?
Part 4: Using Dr.Fone Unlock Tool To Access Your Apple Account Sooner
Dr.Fone Unlock can help you remove your Apple ID from your Apple devices without a password, even with the enabled Find My/Find My iPhone feature. It’s compatible with all iOS devices running iOS 17/iPadOS 17 and iPhone 14.
How To Remove Your Apple ID if You Forgot Your Apple ID Password?
Dr.Fone is easy to use and intuitive, even for users with no technical experience. Here’s a step-by-step guide on how to use Dr. Fone’s iOS Screen Unlock feature and remove your Apple ID:
Step 1: Download Dr.Fone from their official website and install it on your computer.
Step 2: From the Toolbox homepage, select Screen Unlock > iOS.
- Step 3: Select Remove AppleID and click Unlock Now on the next screen.

- Step 4: For the question, “Have you set up a screen lock on your Phone?” click Yes. Then, on the next screen, click Yes again to verify you enabled the two-factor authentication.

- Step 5: Follow the in-app instructions to put your iOS device into Recovery Mode.

- Step 6: Select an option from the System Version dropdown list for the Device Model, then click Start.
- Step 7: Wait while the iOS firmware is downloading, then click Unlock Now once done.

- Step 8: Enter the code given in the Warning dialogue box and click Unlock to continue.

- Step 9: Wait and do not use your device while the Apple ID removal is in progress to avoid being a bricked device.

- Step 10: Click Done once the process is successful or click Try again to repeat.
Conclusion
Creating a strong Apple ID password is simple: mix letters and numbers, make it lengthy, and keep it unique. Regularly changing your Apple ID password using the steps above is key to protecting your digital data. And if you ever find yourself locked out, consider the Dr.Fone Unlock Tool, a reliable mobile solution. Stay private and secure to enjoy your Apple experience with peace of mind.
Also read:
- [New] Secrets Unlocked The Top 10 Shopping Spots for Boxes
- [Updated] Mastering the Art of Motion Creating Engaging, Profitable FB Ads for 2024
- [Updated] Mastering Visual Narratives Essential Snapchat Video Editors
- 2024 Approved An Intuitive Approach to Easily Observing Loved YouTube Feedback
- 2024総合手引書:世界でトップのDropbox代替サービス5選
- 3 Ways to Unlock Apple iPhone X without Passcode or Face ID | Dr.fone
- Free Web-Based MP4/MKV/MPE Transformation to WMV Format with MoveAvii
- How To Change Your Apple ID Password On your Apple iPhone XR | Dr.fone
- How To Remove Flashlight From iPhone 11 Lock Screen | Dr.fone
- How To Remove Flashlight From iPhone 11 Pro Max Lock Screen | Dr.fone
- How to Unlock Apple iPhone 15 Pro Max Without Passcode? | Dr.fone
- How to Unlock Disabled iPhone 15 Pro/iPad Without Computer | Dr.fone
- How to Unlock Your iPhone X Passcode 4 Easy Methods (With or Without iTunes) | Dr.fone
- In 2024, How To Open Your iPhone 12 mini Without a Home Button | Dr.fone
- Marseille Tarot | Free Book
- Spoofing Life360 How to Do it on Motorola G54 5G? | Dr.fone
- What is the best Pokemon for pokemon pvp ranking On Lava Yuva 3 Pro? | Dr.fone
- Title: In 2024, How to Make the Most of Your iPhone XS Lock Screen with Notifications? | Dr.fone
- Author: Amelia
- Created at : 2025-03-01 12:06:27
- Updated at : 2025-03-04 06:15:02
- Link: https://iphone-unlock.techidaily.com/in-2024-how-to-make-the-most-of-your-iphone-xs-lock-screen-with-notifications-drfone-by-drfone-ios/
- License: This work is licensed under CC BY-NC-SA 4.0.