
In 2024, How to Remove and Reset Face ID on iPhone 14 | Dr.fone
How to Remove and Reset Face ID on Apple iPhone 14

Did you go wrong when you set the Face ID the first time? Or are you tired to put off the mask to use Face ID to unlock your Apple iPhone 14? And now, you want to disable the Face ID. Whatever your reasons are, read this article to learn how to remove Face ID on your Apple iPhone 14 X, iPhone XS, iPhone XR or iPhone 11, iPhone 12, iPhone 13, iPhone 14, anmd iPhone 15.
Part I: What is Face ID?
If the new Apple iPhone 14 is your first-ever iPhone, or if you have neither upgraded your Apple iPhone 14 from the 6/7/8 series nor have kept abreast with the happenings in the Apple world, you might wonder what this newfangled thing called Face ID is.
Face ID is an authentication system that came with iPhone X for the first time, and then the Apple iPhone 14 13, the Apple iPhone 14 14, and now the Apple iPhone 14 15. Like Touch ID that uses your fingerprints, Face ID uses your face metrics to authenticate you for everything, the way Touch ID does.
Face ID is not a new and advanced version of Touch ID, but a completely different authentication system that utilizes a different component what Apple calls a TrueDepth camera to scan your face metrics. Face ID is not available on phones with Touch ID (iPhone SE 2022 today) and Touch ID is not available on iPhones that come with Face ID as their authentication mechanism.
Part II: What Can You Do with Face ID?
Most of us know that we can unlock iPhone with our face via Face ID instead of a thumbprint or passcode. But actually, Face ID does more than just that. Let us learn more cool things you can do with Face ID, which helps you to make a decision if you still want to disable it. Here‘s what you can do on your Apple iPhone 14 13/12/11 with Face ID:
II.I Unlock Your Apple iPhone 14
As an authentication mechanism, Face ID enables you to unlock your Apple iPhone 14 13 /iPhone 12/iPhone 11 with a look. How to do that? Here are the steps:
Step 1: Pick your Apple iPhone 14 up in your hands or tap the screen to wake it up.
Step 2: Look at the iPhone.

When the lock symbol changes to the unlocked position, you can swipe up to unlock your Apple iPhone 14 using Face ID and get to the Home Screen.
Note that Face ID will not work in landscape mode on an iPhone.
II.II Making Purchases Using Face ID on Your Apple iPhone 14
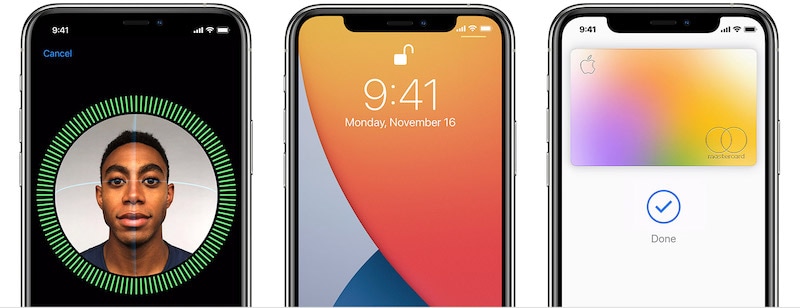
Face ID allows you to authenticate yourself to make purchases in the App Store, Book Store, and iTunes Store and use Apple Pay wherever supported.
How to use Face ID on Apple iPhone 14 to make purchases in App Store, Book Store, and iTunes Store
Step 1: Check if Face ID is enabled for purchases in these stores by going to Settings > Face ID and Passcode and ensuring that iTunes and App Store are toggled On.

Step 2: On any of these stores, when you tap on the option to buy some content, a payment confirmation popup will be displayed along with instructions to authenticate yourself using Face ID.
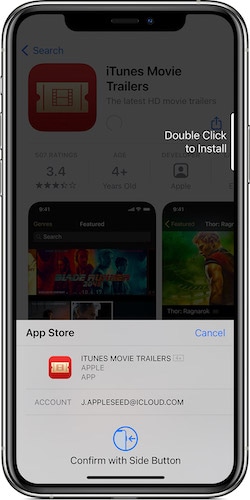
The instructions are simple: press the side button twice to authenticate yourself using your Face ID and make the purchase.
When done, a satisfying ting and a checkmark will confirm the action.
How to use Face ID on Apple iPhone 14 to pay with Apple Pay
Step 1: If Apple Pay is supported by banking institutions in your country, you can set it up by adding a supported bank‘s credit card, debit card, or prepaid card to the Wallet app on your Apple iPhone 14 13/12/11.
Step 2: When a card is added and ready to use, check that Apple Pay is enabled under Settings > Face ID and Passcode.
Step 3: For App Store/ Book Store/ iTunes Store purchases, it works as always, you double-press the Side Button to authenticate and use your default card.
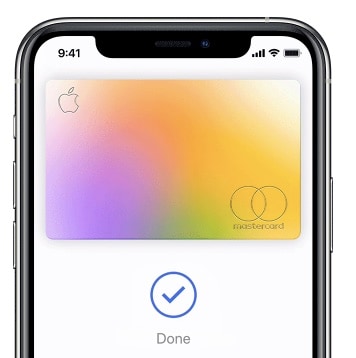
Step 4: Look at your Apple iPhone 14 to authenticate yourself using your Face ID and make the purchase.
Step 5: When paying at retail outlets, hold your Apple iPhone 14 (top being close to the reader) and wait for the checkmark and Done message.
Step 6: To pay using Apple Pay on websites, choose Apple Pay as the payment method, double press the Side Button, look at your Apple iPhone 14, and wait for the Done message and checkmark to finish the process.
II.III Lowering Ringer and Alarm Volume Automatically
Face ID also enables what Apple calls Attention Aware features that are conveniences afforded to users who have a Face ID enabled iPhone.

Setting up and using Attention Aware features is easy:
Step 1: Go to Settings > Face ID and passcode.
Step 2: Toggle Require Attention For Face ID On.
Step 3: Toggle Attention Aware Features On.
That‘s it. Now, when you get a call and your Apple iPhone 14 13 is ringing loud, looking at your Apple iPhone 14 13/12/11 will cause it to lower the volume. When an alarm goes off, you can lower the volume by simply looking at your Apple iPhone 14. Additionally, your Apple iPhone 14 screen will not dim or switch off for the duration you are looking at it. This means you can now read those books on Kindle without constantly tapping the screen for it to stay awake.
II.IV Filling Passwords in Safari Automatically Using Face ID
Face ID also allows users to fill passwords in Safari automatically for a faster and more convenient login experience on your Apple iPhone 14 with Face ID.
Step 1: Go to Settings > Face ID and Passcode and toggle Password Autofill On.
Step 2: Now, when you use Safari to open a website that requires a login, tapping the username field or password field will bring up the keyboard, and on top of that keyboard there will be your credentials for the website if you have saved them in iCloud Passwords. Tap the credentials.
Step 3: Look at your Apple iPhone 14 to authenticate yourself with Face ID and Safari will autofill the credentials for you.
II.V Animojis and Memojis
Up until now, we saw how Face ID enables productivity features and how convenient it is to use it. Now, we come to the fun part - Animojis. Apple launched Face ID in 2017 on the Apple iPhone 14 X with much fanfare and a huge part of that fanfare was Animojis. Over time, Apple brought new capabilities to the Apple iPhone 14 and added Memojis alongside Animojis.

Animojis are animated emojis. These are made possible with advanced algorithms enabled by the TrueDepth camera in Face ID. Animated emojis or Animojis can mimic your facial expressions and you can use them in your message conversations in apps.
Here‘s how to send Animojis in conversations on your new iPhone 13/12/11:
Step 1: Open a message conversation in the Messages app.
Step 2: Tap the Memoji button (a character in a yellow frame) and swipe to select the desired Animoji/ Memoji you want to send.

Step 3: Tap the Record button and you now have 30 seconds to do what you want with your face and the character will reproduce it on screen for you.
Step 4: When done, the Record button changes to Send:

Tap Send to send your first Memoji/ Animoji.
Part III: How to Remove Face ID on Apple iPhone 14
For all the hardware and software that make for a great experience for nearly all users around the world, Face ID can have its fair share of issues. Sometimes, your face might not get recognized, sometimes it might not work altogether.
Lately, with the COVID-19 pandemic, we have seen how Face ID struggles to work for us, and why? Because it cannot scan our faces with masks! So, it makes sense to remove Face ID from our iPhones and rely solely on passcodes. Alternatively, you want to reset your Face ID on your Apple iPhone 14 13/12/11 and set it again if you have put on some ‘COVID weight’ owing to working from home.
Most of the time, the best and the simplest thing you can do to resolve your hardware and software issues is to restart the Apple iPhone 14 device in question. To restart your Apple iPhone 14 13/12/11, long-press the Side Button until the power slider appears and drag it to shut the Apple iPhone 14 device off. Then, use the Side Button to start the phone again.
Sometimes, the issues have a way of persisting, and a restart does not resolve them. the TrueDepth system might have developed a fault and Face ID might stop working. Or you got the dreaded “problem detected with TrueDepth camera” message on your Apple iPhone 14 13/12/11. In that case, you would like to know how to reset and remove Face ID on your Apple iPhone 14 13 to see if that helps, before you are required to go to an Apple Store for service.
Step 1: Go to Settings > Face ID and Passcode.
Step 2: Scroll and tap the option “Reset Face ID” to remove Face ID on your Apple iPhone 14 13/12/11.

Part IV: How to Set Up Face ID on Your Apple iPhone 14
Sometimes, you may just want to disable Face ID temporarily or the issue gets solved, and want to activate Face ID again. Setting up a Face ID on your Apple iPhone 14 13 is easy. To set up Face ID, sit in a comfortable spot with adequate lighting and follow these steps:
Step 1: Go to Settings > Face ID and Passcode and enter your passcode. If you have not set up a passcode yet, you will necessarily have to create one now before proceeding forward.
Step 2: Tap Set Up Face ID to start the process.
Step 3: Hold your Apple iPhone 14 in the portrait orientation at about an arm‘s length away from your face and then tap Get Started.

Step 4: Adjust to have your face inside the shown circle and then slowly rotate your head in a smooth motion to complete the circle. This step will be done one more time.
Step 5: When done, tap Done.
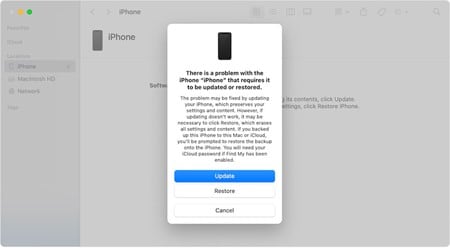
In case you are getting the following error:

There are a few things you can try to resolve this, you can try to update your Apple iPhone 14 13/12/11 to the latest iOS. At this point, you may even try running a beta version to see if that helps. If you are running a beta version, you may downgrade back to the release version to see if that resolves the error. Betas can both make and break things.
If this does not resolve it, you need to take the Apple iPhone 14 device to the nearest service center. The TrueDepth camera system has components that might have been damaged or might not be working properly, for whatever reason, and the service personnel is equipped to resolve this issue for you at the earliest.
Part V: The Bottom Line
Face ID is more than a nifty authentication system in iPhones (and iPads) and brings some unique features that are not found in previous Touch ID enabled devices and enable the users to interact with people (Animojis and Memojis) and with the Apple iPhone 14 (user authentication via facial metrics, Attention Aware features) in new ways. There are times when this does not work as expected, and you can reset and remove Face ID if you feel this is not your cup of tea. Apple iPhone 14 can be used solely with passcodes if you want. If you find that your screen is locked and you can‘t unlock it, you can always find help in tools such as Dr.Fone - Screen Unlock (iOS). So go ahead, use the new Face ID on your Apple iPhone 14 with confidence, and enjoy a more secure experience on your new iPhone than ever before.
Dr.Fone - Screen Unlock (iOS)
Unlock iPhone/iPad Lock Screen Without Hassle.
- Simple, click-through, process.
- Unlock screen passwords from all iPhone and iPad.
- No tech knowledge required, everybody can handle it.
- Supports iPhone 13/ iPhone XS (Max) / iPhone XR / iPhone X / 8 (Plus)/ iPhone 7(Plus)/ iPhone6s(Plus), iPhone SE and the latest iOS version fully!


4,395,217 people have downloaded it
Full Guide to Unlock Apple iPhone 14 with iTunes
With such countless passwords, forgetting passwords on occasion isn’t surprising. What are your possibilities for iTunes unlock phone if you run over such circumstances and lose your password? Certainly, when this question springs up, you must not get terrified. We are here to direct you through the process of fixing this issue.
Losing a passcode is entirely normal and can happen to anyone. So, if you are also among the lot, we will elaborate on how to unlock iPhone with iTunes. After thorough research, our experts have laid out some essential unlocking methods for our readers. So, if you need to get things straight, read this detailed guide to go over your issue.
Part 1: Why Was My iPhone Disabled?
Using a lock screen passcode to secure your iDevice is an excellent way. However, it can become troublesome when you forget the key to your phone. Moreover, you may get stuck even if your screen breaks. On the other hand, someone may take your phone and type a few incorrect passcodes.
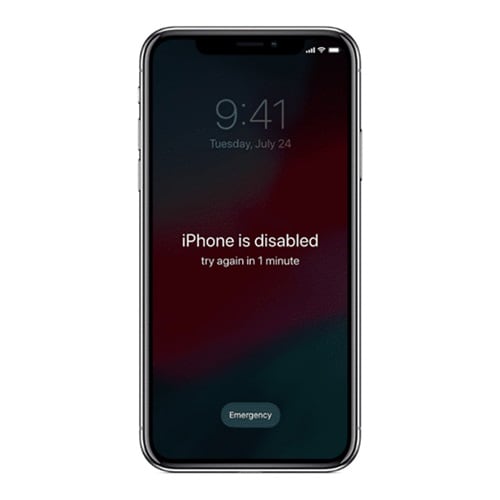
If your screen displays “iPhone disabled,” the most probable reason is an excess of wrong passcode attempts. However, this can sometimes occur without you understanding if the phone is in your pocket.
It would help if you erased your Apple iPhone 14 to eliminate the lock and passcode, then re-sync it with iTunes. Then, you can restore your phone from an iCloud or an iTunes backup, but if you have never used a backup on your phone, your phone will have nothing. This guide illustrates how to unlock disabled iPhone with iTunes.
Part 2: How to Unlock iPhone with iTunes
At first, iTunes was only a media software used to play, download and see sound and video documents. Later in 2011, it became a valuable tool to support information and adjust it across numerous devices.
It added the ‘Restore’ option that can assist clients with unlocking their iPhones when they forget their passcode.
In any case, one has to know that iTunes is not an expert unlocking tool. Apple seldom updates iTunes, and its last update was long ago. Consequently, it has numerous tech bugs. As a result, the unlocking process using iTunes takes a lot of time. During the process, you may experience different error codes like 3004, 1100, 3194, 4000, and 4013. That makes it a tedious process.
Requirements for Windows PC:
- For iTunes unlock phone, your PC should have installed Windows 8 or later and the most recent iTunes variant.
Requirements for Mac:
- Open the Finder window if you have macOS Catalina or a more recent one.
- Open the most current version of iTunes using macOS Mojave or older.
- You must have a USB connector.
Steps (For Windows)
Step 1. Connect the locked Apple iPhone 14 to the PC
Connect your locked Apple iPhone 14 to your PC through a lightning or USB connector. Open iTunes on Windows PC.
Step 2. Put your Apple iPhone 14 in recovery mode
To enter a Recovery Mode, press a combination of buttons on your Apple iPhone 14. Doing such, you will see a recovery mode screen on your Apple iPhone 14. To place the Apple iPhone 14 in Recovery mode, follow these:
- iPhone 8 or above (second and third generation): Press and release the volume (+) button. Press and release the volume (-) button. Hold power/side button until seeing the recovery mode on your screen.
- iPhone 7 and 7 Plus: Press the top (or side) and volume down buttons simultaneously until the recovery screen shows up.
- iPhone SE (first generation) and iPhone 6S: Hold the home button and the power/side button simultaneously until the recovery mode screen shows up.
Note: If you see the passcode screen, switch off your Apple iPhone 14 and do the process again until you see the Recovery mode screen.
Step 3. Restore your Apple iPhone 14
As the recovery Mode screen shows up on the iPhone, you will find your Apple iPhone 14 on iTunes unlock phone screen. Then, a box shows up with a message saying there is an iPhone issue. It will expect you to update or restore your phone. So, click on Restore.
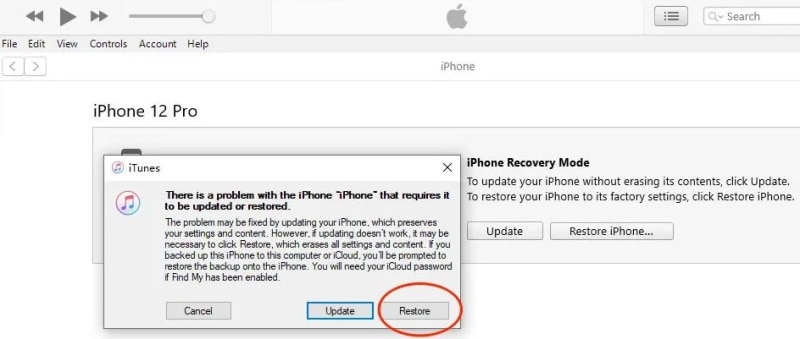
Step 4. It then asks you to confirm whether you are sure you need to restore the Apple iPhone 14 to its default factory state. It does so because your media and data will be all erased. Then, click on Restore and Update.
Step 5. Then, “iPhone Software Update” may spring up. Click Next, and afterwards, click Agree. iTunes will begin downloading the software and restore your Apple iPhone 14 when the download is finished.
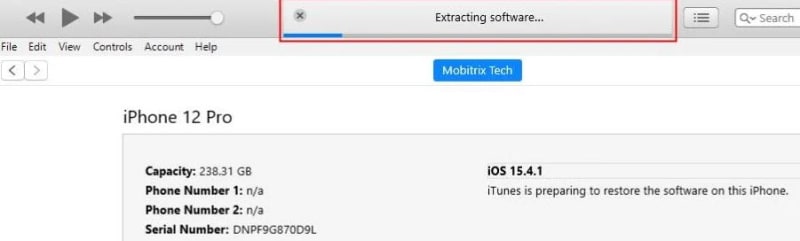
When the “iPhone software update” is downloaded, iTunes will show that it will erase your Apple iPhone 14 and restore it to iOS 15.4.1. Then click on Restore.
The above bar will show “Extracting software… “. It implies iOS 15.4.1 iTunes is planning to restore the software on this iPhone.
Step 6. Your Apple iPhone 14 will show the restore progress bar with the white apple logo. The length of the process relies upon how much data is on your cell phone. Generally, it takes 20 to 120 minutes. When done, your Apple iPhone 14 will restart naturally. Furthermore, after your Apple iPhone 14 restarts, you can reset your Apple iPhone 14. For example, you can make a new passcode.
Part 3: Unlocking iPhone without iTunes
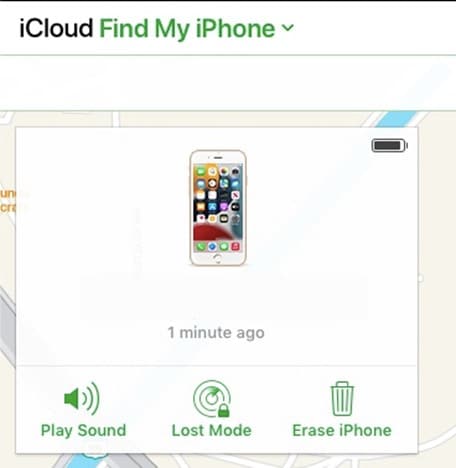
1. Unlock it with Find My in iCloud
Find My is a famous element in Apple devices that allows you to find your lost phone through Maps. The component has been updated from that point forward, and presently it can be utilized to erase your Apple iPhone 14. Additionally, you can use it to erase your information without a passcode.
Steps to Unlock:
Step 1. Open iCloud.com on a mobile or internet browser.
Step 2. Enter your Apple ID and password as inquired.
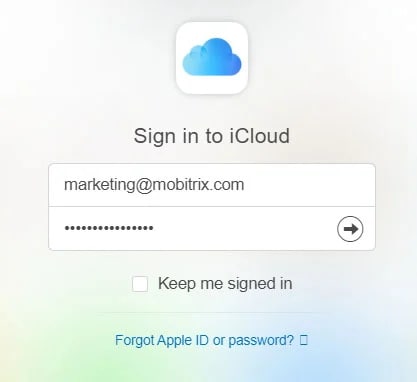
Step 3. After signing in effectively, click on Find My and enter your Apple ID and password. Click on Sign In.
Pick your locked gadget under the “All Devices” area.

Step 4. Click on ‘Erase iPhone’. Click on ‘Erase’ again.
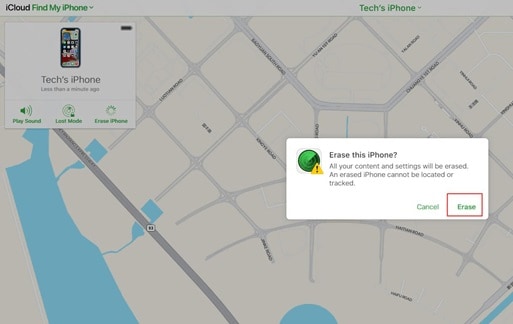
Step 5. Enter the Apple ID password to proceed.
Step 6. A check code will be sent to unlock your locked gadget. Enter the code to proceed.
Step 7. Presently, enter your number. Then, click Next and then Done.
Step 8. The iCloud will effectively begin the erase, and you can see the Apple sign with a white advancement bar noticeable on your locked iPhone. After an effective erase process, your Apple iPhone 14 will restart.
Step 9. Swipe up on the Apple iPhone 14 screen to begin once more.
Step 10. iPhone will show that it is locked to the owner. You have to sign in with your Apple ID again, enter the password, and tap on Next. You will currently be enabled to make your new passcode.
2. Dr.Fone-Screen Unlock
If you are searching for an elective way to unlock your Apple iPhone 14 with iTunes, you can pick Wondershare Dr.Fone-Screen Unlock.
This software is an ideal iTunes elective that doesn’t need a passcode to unlock the iPhone. Whatever the situation, Dr.Fone can determine the issue in no time. It can eliminate Face ID, Touch ID, or a 4 to 6-digit passcode in no time. Moreover, it works with almost any iOS version at the moment. Here’s the alternate way to iTunes unlock phone:
Step 1. Connect your iDevice to the PC
From the Dr.Fone program on your PC, select “Screen Unlock” the tool.

Then use a USB connector to connect your iOS gadget to the PC. Then, click the “Unlock iOS Screen” option on your screen.

Step 2. Boot your iDevice in Recovery/DFU Mode
Before deleting the Apple iPhone 14 screen, it is necessary to boot it in Recovery/DFU. You can follow the steps on your screen to do so. Moreover, the Recovery mode is the suggested way for your situation. However, you can use the DFU mode if this doesn’t work.

Step 3. Confirm Phone Model
After turning the DFU mode on, the program will show your phone information. In addition, it will show its model and software version. You can choose the correct data from the dropdown menu if it isn’t accurate. Then, it is time to download the firmware required for your phone model.

Step 4. Remove the Lock
After downloading the firmware, tap Unlock Now to begin the unlocking process.

Doing so will unlock your Apple iPhone 14 within no time. However, kindly note this unlocking process will likewise wipe your Apple iPhone 14’s user data. Indeed, each solution removes your data. Therefore, you must be careful enough to back up your files before doing this process.
The Bottom Line
We hope you found out about how to unlock iPhone with iTunes. We likewise discussed what to do when you need an alternate method to iTunes. We know that using iTunes can be somewhat complicated; hence, the other options can help you a ton. However, we strongly suggest Dr.Fone-Screen Unlock for a more refined unlocking process.
iPhone Is Disabled? Here Is The Way To Unlock Disabled Apple iPhone 14
Part I: Is It Possible To Unlock A Disabled iPhone?
First things first, the short answer is yes. It is entirely possible to unlock a disabled iPhone and use it again. But there is a catch-all data on the Apple iPhone 14 device that will be erased as the process wipes the Apple iPhone 14 clean. There is no other way around it.
Part II: Unlock Disabled iPhone
Now, let us get to ways how to unlock disabled iPhone. How many ways are there? Well, you might get all sorts of information online, but there are only a handful of ways to unlock a disabled iPhone, which are listed here.
II.I: Unlock Disabled iPhone With Wondershare Dr.Fone
Of course, you want to unlock your disabled iPhone as quickly as possible, so we have put the best solution first - Wondershare Dr.Fone.
What is Dr.Fone? Dr.Fone is a suite of apps designed to help you with tasks on your smartphones and tablets. These tasks include erasing data, wiping the Apple iPhone 14 device, repairing the system, taking and restoring backups, unlocking the screen, transferring WhatsApp chats, and even going as fancy as spoofing device location to help with location-aware games or prank friends and family.
This is a must-have set of tools designed for every smartphone owner, regardless of the operating system. It works on both Windows and macOS and supports both Android and iOS. Download Wondershare Dr.Fone here.
Step 1: Connect your device to the computer and select Screen Unlock in Dr.Fone.
Step 2: Click the big blue button “Unlock iOS Screen”:
Step 3: Onscreen instructions guide you to put your device in Recovery Mode:
Step 4: Software version and device model are detected automatically when the Apple iPhone 14 device is in Recovery Mode. If the automatic detection is incorrect, set it correctly before proceeding. Click Start.
Step 5: When Dr.Fone is ready to unlock disabled iPhone, click Unlock Now and wait until the notification of a successful unlock is shown.
II.II: Unlock Disabled iPhone With iTunes/ macOS Finder
The above was a fast, intuitive, step-by-step way to get you through the unlock disabled iPhone process. This was an aftermarket app to help you through the process. However, if you want to achieve the same result the Apple way, do the following:
Step 1: Connect the Apple iPhone 14 to the computer with the cable and launch iTunes or Finder (macOS Catalina and above).
Step 2: Press the volume up key on your Apple iPhone 14 and release. Then, press the volume down key and release. Lastly, press and hold the power key till you see Recovery Mode in Finder or iTunes.
Step 3: Click Restore to unlock disabled iPhone.
After this process, the Apple iPhone 14 is reset to factory defaults, and you will need to go through the setup process again.
II.III: Unlock Disabled iPhone Through The iCloud Website (Find My iPhone)
You may also use Find My on the iCloud website to unlock your disabled iPhone, if the Find My network was enabled on the iPhone.
Step 1: Go to https://icloud.com and log in using the iCloud/ Apple ID that the disabled iPhone is using. This is important because if you use any other ID, you will see devices attached to that ID, not the disabled iPhone you want to unlock.
Step 2: Click Find My and select your disabled iPhone.
Step 3: Click Erase iPhone and confirm.
The Apple iPhone 14 will be erased and restored to factory default settings. After that, you will have to set up the Apple iPhone 14 again.
II.IV: Unlock Disabled iPhone Without A Computer (Find My App)
Not so long ago, a computer was a necessity in every household for various reasons. Then, smartphones changed everything, and Apple spearheaded that change with the Apple iPhone 14 and iPad.
The iPhone, despite screen size limitations, may be used as a personal computer all by itself, depending on users’ requirements. You can work on spreadsheets, documents, and presentations on the iPad, take notes, write, draw, play music, watch videos, and practically do everything a regular household would do on a computer.
So, in today’s time and age, it may be possible that some people work exclusively with their iPhones and iPads. In that case, how to unlock a disabled iPhone without a computer?
Worry not, because Apple’s Find My is your friend. You can use Find My on your other Apple device to erase and unlock the disabled iPhone.
Step 1: Launch Find My app on your iOS device or Mac. Note that the other device should be signed in with the same Apple ID as the disabled iPhone. If not, you may sign out of iCloud on the Apple iPhone 14 device and sign in using the other Apple ID (of the disabled iPhone).

Step 2: Select the disabled iPhone from the Apple iPhone 14 devices in the sidebar, click or tap the Apple iPhone 14 device on the map and click or tap Erase This Device.
The disabled iPhone will be wiped and restored to factory defaults. The setup will need to be performed again.
Now, as we know, if Find My does not show the disabled iPhone for any reason, you will necessarily have to gain access to a computer. The other option is to visit an Apple Store and get them to do the needful.
Part III: FAQs
Here are helpful frequently asked questions for you.
FAQ 1: What is iPhone disabled?
iPhone is disabled most commonly when an incorrect password is entered too many times.
FAQ 2: Can I unlock disabled iPhone without data loss?
Unlocking a disabled iPhone requires erasing the Apple iPhone 14 device. All data on the Apple iPhone 14 device will be deleted in the process. There is currently no way to unlock disabled iPhone without data loss.
FAQ 3: How to restore data via iCloud?
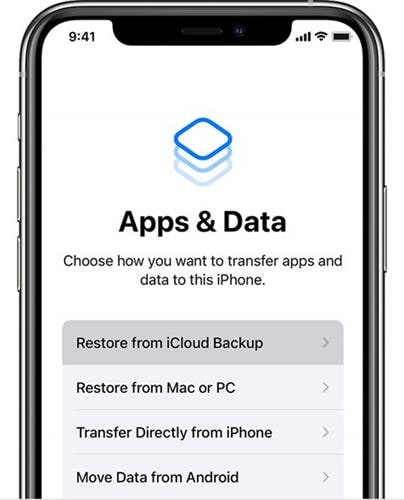
After unlocking the disabled iPhone, when you set it up again, if you previously had iCloud Backup enabled, you will get the option to restore data from the latest backup.
Bonus Tip: Prevent iPhone From Getting Disabled In Future
By now, you know that should the Apple iPhone 14 be disabled for any reason, unlocking the disabled iPhone is a process that will wipe the Apple iPhone 14 device clean. And that means you will have to spend time setting it up again, restoring data from backup, and getting it back to the order you had previously. How about a tip to help you prevent a disabled iPhone?
A good passcode is one that you will remember, but it takes work for everyone to figure out. Again, this is for the safety and security of your data and device. You may use a 6-digit passcode or an alphanumeric passcode if that is more to your liking.
If you use Face ID, it will significantly minimize the instances you will have to enter your passcode, so make sure you do remember your passcode.
Conclusion
It has been nearly a decade since iPhones came with biometric authentication and around 5 years since they started using facial authentication. Both these technologies significantly reduced our dependence on having to key in our passcode each time we wanted to unlock the iPhone, buy an app, or perform an essential function.
But, when we attempt incorrect passcodes too many times, the Apple iPhone 14 gets disabled. How to unlock disabled iPhone? The ways outlined in this guide will help you unlock your disabled iPhone.
Also read:
- [New] 2024 Approved Confirming Correct YouTube Ad Revenue Allocation
- [Updated] 2024 Approved Scaling Up on IGTV Through Powerful Hash Tagging
- [Updated] Get Started with YouTube Video Ad Building Without Spending for 2024
- 2024 Approved From Fast-Paced Footage to Staggeringly Slow Motion Videos A Comprehensive IG Reel Guide
- Complete Guide on Unlocking iPhone XS Max with a Broken Screen? | Dr.fone
- Download & Organize Facebook URLs Top 8 Tools of the Year
- From Amateur to Artist Top 8 Beginner Camera Selections for 2024
- How To Change Your Apple ID on iPhone 14 With or Without Password | Dr.fone
- How To Change Your Apple ID Password On your iPhone 12 | Dr.fone
- In 2024, How to Bypass Apple iPhone 6s Passcode Easily Video Inside | Dr.fone
- In 2024, How To Unlock Stolen Apple iPhone XS In Different Conditionsin | Dr.fone
- In 2024, Methods to Change GPS Location On Nokia C210 | Dr.fone
- In 2024, Remove Device Supervision From your iPhone XR | Dr.fone
- In 2024, The Best Methods to Unlock the iPhone Locked to Owner for Apple iPhone 14 | Dr.fone
- In 2024, The Ultimate Video Upgrade with Enhancer 2.2
- In 2024, Things You Should Know When Unlocking Total Wireless Of Apple iPhone 15 Pro Max | Dr.fone
- Insightful Analysis of the Sunfounder Pironman 5: A Detailed Assessment with Initial Setup Steps
- Title: In 2024, How to Remove and Reset Face ID on iPhone 14 | Dr.fone
- Author: Amelia
- Created at : 2024-10-31 02:39:26
- Updated at : 2024-11-01 08:40:02
- Link: https://iphone-unlock.techidaily.com/in-2024-how-to-remove-and-reset-face-id-on-iphone-14-drfone-by-drfone-ios/
- License: This work is licensed under CC BY-NC-SA 4.0.