
:max_bytes(150000):strip_icc():format(webp)/espnplus-6d79c347f2df42d7a38cdb0ba9a2472b.jpg)
In 2024, How to Unlock Disabled iPhone XS/iPad Without Computer | Dr.fone
How to Unlock Disabled Apple iPhone XS/iPad Without Computer
Forgetting the Apple iPhone XS or iPad passcode could be the worst nightmare for plenty of iOS users. If you are also locked out of your Apple iPhone XS, then don’t worry. There are several ways to learn how to unlock a disabled Apple iPhone XS without a computer. Surprisingly, you don’t need to take the assistance of a computer to unlock your iOS device. This guide will make you familiar with how to unlock the iPad passcode without a computer. Read on and learn how to unlock the disabled Apple iPhone XS without a computer right away.
Part 1: How to unlock disabled Apple iPhone XS without computer using Siri?
Accessing Siri is the first thing that comes to iOS users’ minds whenever they get locked out of their Apple iPhone XS . It might surprise you, but you can also take the assistance of Siri to unlock your phone. Most users prefer this technique, as it doesn’t require a computer and can unlock an iOS device without erasing its data.
Though, before you proceed, you need to know the limitations of this method. Since it is considered a loophole in iOS, it doesn’t always yield desirable results. It has been observed that the method only works on devices running from iOS 8.0 to iOS 10.1. To learn how to unlock iPad passcode without a computer, follow these stepwise instructions:
Step 1. Activate Siri on your iOS device by holding the Home button. Ask for the present time by giving a command like “Hey Siri, what time is it?” to proceed. Siri will let you know the current time by displaying a clock. Tap on it.

Step 2. Tap on the Add (plus) icon.

Step 3. From here, you can search for a city. Just type anything you want and tap again to get various options. Choose the “Select all” button to get more options.

Step 4. Select the feature of “Share.”

Step 5. Tap on the message icon.

Step 6. It will open another interface to draft a new message. Wait for a while and write something in the “To” field. Once you are done, tap on the return button on the keyboard.

Step 7. This will highlight your text in green. Now, tap on the add icon located nearby.

Step 8. A new interface would be launched to add a new contact. From here, tap on the “Create New Contact” button.

Step 9. Instead of adding information regarding a new contact, tap on the photo icon, and choose the option of “Add Photo.”

Step 10. This will open your device’s gallery. You can browse your photo library from here.

Step 11. After a while, press the Home button. If everything goes right, you will enter the Home screen of your iOS device after unlocking it.

By following this technique, you would also learn how to unlock the disabled Apple iPhone XS 4. Though, you need to ensure that the iOS device you are using would support this feature.
Part 2: How to unlock disabled Apple iPhone XS using Find My Apple iPhone XS?
The chances are that your iOS device might not work with the above-stated solution, or it’s latest iOS version. Therefore, you would be required to take the assistance of another method to unlock your device. With the help of Apple’s official Find My Apple iPhone XS service, you can easily restore your device remotely. It is also used to locate an iOS device, play a sound, and lock it remotely.
After implementing this solution, your iOS device will reset, and your data would be erased. Nevertheless, in the end, it will automatically reset its lock as well. Follow these steps:
Step 1. Open iCloud’s website on any other handheld device of your choice. Not just your system, you can open the website on any other smart device as well. Use your Apple ID and password to log in to your iCloud account.
Step 2. Visit the Find My Apple iPhone XS service. Under the “All Devices” category, you can view all the iOS devices linked to your Apple ID. Select the Apple iPhone XS device you want to reset.

Step 3. Select the feature of the Erase device and confirm your choice. Wait for a while as your Apple iPhone XS or iPad would be restored remotely.

By following this method, you can learn how to unlock the iPad passcode without a computer remotely.
Part 3: Unlock disabled Apple iPhone XS/iPad using Dr.Fone - Screen Unlock?
Dr.Fone can help you to remove the screen from the disabled Apple iPhone XS or iPad. It can also unlock the Apple ID after you forgot the Apple ID email or password.
- Easy operations to unlock the Apple iPhone XS without the passcode.
- Removes the Apple iPhone XS lock screen without relying on iTunes.
- Works for all models of Apple iPhone XS, iPad, and iPod touch.
- Fully compatible with the latest iOS 14.


Step 1. Install Dr.Fone on your computer.
Step 2. Open ‘Screen Unlock’. Select ‘Unlock iOS Screen.’

Step 3. Follow the on-screen instruction.
Boot your Apple iPhone XS into DFU mode.

Select device information on Dr.Fone

Step 4. Start to Unlock. The phone will be unlocked after that.

Part 4: Tips to protect your Apple iPhone XS from being unlocked by thieves
As you can see, anyone can learn how to unlock the disabled Apple iPhone XS 4 without a computer and other iOS devices as well. Therefore, if you don’t want your Apple iPhone XS and iPad to be misused by thieves, you should take some added measures. Follow these suggestions to increase security on your iOS device.
1. Disable Siri from the lock screen
If someone can’t access Siri from the lock screen, then they won’t be able to follow the above-mentioned process to unlock an iOS device. Therefore, it is highly recommended to disable Siri from the lock screen. To do this, visit your device’s Settings > Touch ID & Passcode, and under the “Allow access when locked” section, disable the option of “Siri.”

2. Enable Find My Apple iPhone XS service
There are times when users forget to enable the Find My Apple iPhone XS feature on their iOS device. To access this feature, make sure that it is turned on. To do this, go to your device’s Settings > iCloud > Find My Apple iPhone XS and turn on the feature of “Find My Apple iPhone XS.” Additionally, you should turn on the “Send the last location” option as well.

3. Set a strong alphanumeric password
One of the best ways to secure your iOS device is by adding secure passwords. To do this, visit your device’s Settings > Touch ID & Passcode > Change Passcode and select the option of “Custom Alphanumeric Code.” Provide a strong alphanumeric passcode to boost the security of your device.

Conclusion
By implementing the above suggestions, you can easily make your iOS device more secure. Additionally, we have also listed two stepwise solutions that can unlock your iPad or Apple iPhone XS without taking the assistance of a computer. Now when you know how to unlock a disabled Apple iPhone XS without a computer, you can easily make the most out of your iOS device.
Disabled Apple iPhone XS: How to Unlock a Disabled Apple iPhone XS?

Apple iPhone XS Disabled?
Because of using face masks, Face ID on iPhone does not always work correctly, and we are entering our passcodes more than before. If we enter it incorrectly a few times in succession, the phone will disable itself to prevent unauthorized access. It can seem like the end of the world because in so many ways smartphones have become our world. Here are ways you can unlock your Apple iPhone XS disabled due to too many incorrect passcode attempts.
Part 1: Unlock Disabled Apple iPhone XS Without iTunes/ iCloud Using Dr.Fone - Screen Unlock (iOS)
We know and understand that the word troubleshooting can remind you of long telephone calls with support or making appointments and driving down to specialists and spending obscene amounts of money to get solutions. You do not want that. How about a way you could unlock your Apple iPhone XS in a simple, 1-click way instead?
Dr.Fone - Screen Unlock is a unique tool designed to help you avoid all hassles and get back on track quickly. It comprises modules designed to help you with all the issues that you might encounter during smartphone use. Naturally, there is something to help you when your Apple iPhone XS is disabled. You don’t need to use anything else, no other software or special cable or support. All you need is this one software you can download on your computer (both macOS and Windows supported) and you’re good to go.
Dr.Fone - Screen Unlock (iOS)
Unlock Disabled Apple iPhone XS Without iTunes/ iCloud.
- Intuitive instructions to unlock iPhone without the passcode.
- Removes the iPhone’s lock screen whenever it is disabled.
- Easy to use with detailed guides.
- Compatible with the latest iOS/iPadOS version.
3981454 people have downloaded it
Do note that all methods that unlock your Apple iPhone XS will necessarily wipe your Apple iPhone XS and remove all data from the Apple iPhone XS device, essentially booting it up as new.
Step 1: Launch Dr.Fone and click the module titled “Screen Unlock”.
Step 2: Choose the “iOS” option, then select “Unlock iOS Screen” on the subsequent screen to continue unlocking your Apple iPhone XS.

Step 3: Follow the provided instructions to start the disabled Apple iPhone XS in Recovery Mode to unlock it. If for any reason the phone does not boot in Recovery Mode, there are instructions provided at the bottom to enter what is called DFU mode.
Step 4: Dr.Fone will read and display your phone model and the software installed on it. If the model displayed is incorrect, use the dropdown to pick the correct detail. Click “Start” to download the specific firmware file for your particular Apple iPhone XS model.
Step 5: After the download completes, please click Unlock Now to start unlocking the disabled Apple iPhone XS.

Your Apple iPhone XS will be unlocked in a short span of time. Please note that all data would have been wiped out from the Apple iPhone XS device. When you set the Apple iPhone XS device up again, if you set it to use iCloud, data such as Contacts, iCloud Photos, iCloud Drive data, etc. will be downloaded onto your device again. The apps you had on your Apple iPhone XS prior to it getting disabled can be downloaded again from the App Store. If you did not use iCloud but backed up the data manually, you will have to manually restore that data onto the Apple iPhone XS device again.
 safe & secure
Part 2: Unlock Disabled Apple iPhone XS Using iTunes or macOS Finder
Of course, there is an official way that Apple provides for users to restore device firmware using iTunes or macOS Finder. For this, iPhone is put under Recovery Mode manually and Finder or iTunes is used to reinstall software on it directly from Apple. This process is fine for people who are conversant in tech, since this process can throw up a lot of errors that are just numbers, and people can get confused as to what they mean, resulting in frustration.
Step 1: Connect your Apple iPhone XS to a Windows/ macOS device and launch iTunes. If you are on a Mac that runs macOS Catalina or higher, open Finder since you would not have access to iTunes anymore.
Step 2: Pick your Apple iPhone XS and do the following:
(2.1) Press the volume up button and let it go.
(2.2) Press the volume down button and let it go.
(2.3) Press the Side Button (power button, on the right side of your Apple iPhone XS) and keep it pressed till Finder or iTunes detects the phone in Recovery Mode.
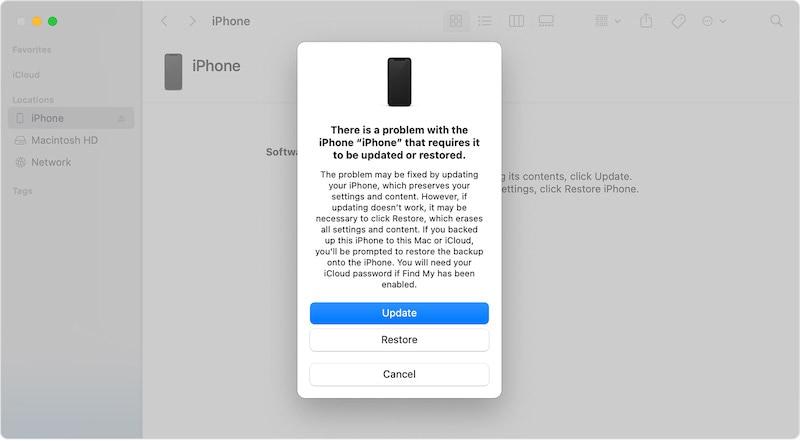
Step 3: Choose Restore to download and reinstall the latest iOS on your Apple iPhone XS and unlock your Apple iPhone XS.
When the Apple iPhone XS reboots, it will be reset to factory settings, and you can set it up again as you did when brand new.
Part 3: Unlock Disabled Apple iPhone XS Using iCloud Website (Find iPhone method)
Another method you may go with to unlock your disabled Apple iPhone XS is using the iCloud website to gain access back. This is a fairly easy way and doesn’t require going through complex hoops.
Find My is available both online via the iCloud website and on iOS devices and on Macs. In case the only Apple product you own is the currently disabled Apple iPhone XS, you can use Find My on the iCloud website from any other computer you may have to unlock your disabled Apple iPhone XS.
Step 1: Visit https://icloud.com and log in into the same iCloud account/ Apple ID as the disabled Apple iPhone XS.
Step 2: Go to Find My, select your Apple iPhone XS.
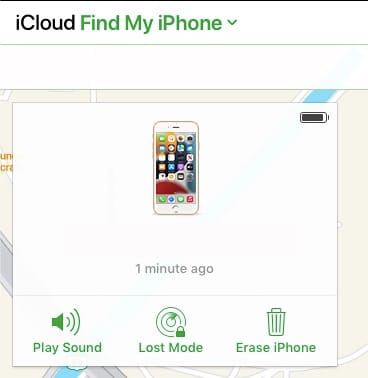
Step 3: Click Erase iPhone and confirm.
This will start the wipe process on your Apple iPhone XS remotely and your Apple iPhone XS will be reset to factory settings. You can now proceed to setup your Apple iPhone XS once again.
Part 4: Unlock Disabled Apple iPhone XS Using Find My iPhone App
There are times you have another iOS device in the family or just lying around, you can use that device to unlock your disabled Apple iPhone XS. This method is particularly useful if you’re traveling with family or alone, and only have family members with their own iOS devices or, say, your iPad with you. As always, note that all these methods will wipe your data from your Apple iPhone XS.
Step 1: Open the Find My app on your other iOS device or Mac
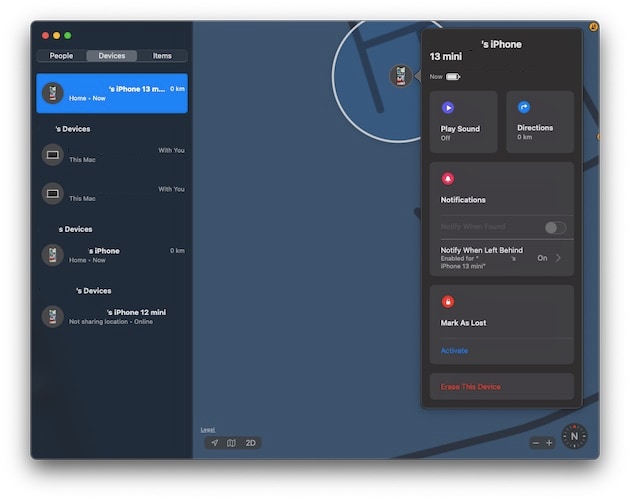
Step 2: Select your disabled Apple iPhone XS from the Apple iPhone XS devices from the left pane, click/ tap your disabled Apple iPhone XS and click/ tap Erase This Device
The disabled iPhone will be wiped and reset to factory settings. You can then set it up again.
Part 5: Unlock Disabled Apple iPhone XS Without A Computer
There are millions in the world who do not use the traditional computer so to speak. They have entered the post-PC era as they say, and their needs are met without a regular desktop or a laptop. They live wirelessly. They travel the world. Are you one of them? How would you unlock disabled Apple iPhone XS with no desktop/ laptop computer around? You have a few options.
You can use your other iOS device with Find My iPhone app to unlock your disabled Apple iPhone XS or you can use the iCloud website from your other device and Find iPhone app to unlock your disabled Apple iPhone XS.
The second option is to get a loaner device from someone you know. A loaner device is a device you borrow from someone to use for a purpose and return it when you are done with it. In this case, you can ask for a computer from someone you know and use it to unlock your disabled Apple iPhone XS and return the Apple iPhone XS device back. That way, you can use iTunes or macOS Finder if you’re more favorable to using that method.
When using a computer, the simplest, easiest, most flexible, and robust method to unlock disabled Apple iPhone XS is using third-party tools such as Dr.Fone – Screen Unlock (iOS). However, Dr.Fone is not just for troubleshooting and unlocking your disabled devices. Dr.Fone is like that multi-utility knife that can do a variety of things.
Using Dr.Fone you can not only unlock your Apple iPhone XS with ease, you can also use it periodically as a backup and restore tool that gives power in your hands. How does it do that? When you launched Dr.Fone, you had several modules to choose from and you chose Screen Unlock to unlock your disabled device. Instead of that, you can choose the Phone Backup module to backup and restore data from and to your device. Why would you use a third-party tool to backup and restore?
As you may be aware, using iTunes or macOS Finder allows you to backup and restore data onto your Apple iPhone XS easily, but, the one glaring omission here is that it does not allow you to choose what you want to backup and what you want to restore. This is a much-coveted feature that is glaringly absent from the Apple world so far, and with Dr.Fone’s iOS Phone Backup feature you can have that choice in your hands, just like you do with Android. Dr.Fone allows you to choose what you want to backup, so, you can back up just your photos, just your text messages, just your files, or any combination thereof, for the matter. And, when it comes to restore, you can restore selectively as well. So, suppose you backed up your entire data using Dr.Fone, now you can restore just the text messages if you so want.
safe & secure
Part 6: Prevent iPhone From Getting Disabled Again
After all this to get access back, you might think let’s go passcode-less and prevent the hassle. Don’t do that - that’s worse and unsafe. Instead, here are tips you can use to make sure you don’t accidentally disable your Apple iPhone XS again.
Tip 1: About Passcodes
- 1.1 Set a passcode that is easier to remember for you but difficult to think of for thieves and others.
- 1.2 Never use birthdates, years, vehicle numbers or any such numbers that may be easily tried by others.
- 1.3 Never use repeating numbers.
- 1.4 Do not use your ATM PIN as your phone passcode either. Think of some digits or combination that makes sense to you and only you. And then use it.
Tip 2: Use Face ID
Along with Passcode comes the option of Face ID on your Apple iPhone XS, so use that. That will minimize instances for you to enter your passcode, and may make you forget it again, though. So, make sure that the passcode you set does make sense to you and you can remember it always without effort.
Conclusion
Not all of us have the memory of elephants. With Touch ID and Face ID on our iPhones minimizing the use of passcodes, we may forget them. Another factor in forgetting passcodes is being too smart for our own good and trying to set up such a secure passcode that even we are not able to remember it. If we enter incorrect passcode too many times, the Apple iPhone XS disables itself and we need to restore it to factory settings to unlock it again. There are several ways to do that, depending on the time you are willing to spend on the job and your proficiency level, along with the resources that you have with you right now. For example, if a method requires use of another iOS device and you do not have it, that method is not useful to you right now, pick another. Lastly, when the Apple iPhone XS device is reset, instead of going passcode-less to make sure that you do not forget the passcode again, it is best to set up a passcode that you can somehow remember.
safe & secure
Resolve Your Apple iPhone XS Keeps Asking for Outlook Password
Individuals and organizations use a diverse range of mail platforms to exchange information. Gmail, Outlook, or any alternative service is consistently utilized. While email platforms have revolutionized communication, they aren’t present without their challenges. Users often encounter issues that range from sync errors to authentication problems.
Among these challenges, iPhone users specifically grapple with a persistent issue. It often appears as “iPhone keeps asking for Outlook password.” This issue disrupts the user experience and raises security concerns. To address this problem, this guide presents a detailed guide featuring effective fixes.

Part 1. Why Does My iPhone Keep Asking for Outlook Password
The iPhone asking for Outlook password arises from a combination of factors. Understanding these reasons is crucial in diagnosing and resolving the problem effectively:
1. Incorrect Password Entry
Users might unknowingly enter the wrong password. They may have changed their Outlook password without updating it on their iPhones. This mismatch can trigger continuous password prompts.
2. Outdated Mail App
An outdated Outlook mail app on your Apple iPhone XS may struggle to communicate with its latest security protocols. This can lead to performance issues like the Apple iPhone XS keeps asking for passwords.
3. Network Connectivity Issues
Upholding a stable internet connection is necessary for effortless communication. An unreliable or unstable network can disrupt the synchronization process in Outlook.
4. Corrupted Email Account Profile
A corrupted email account profile on the Apple iPhone XS can cause disruptions during the authentication process. Resetting the email account on the Apple iPhone XS device might be necessary to resolve the issue.
5. Third-Party App Interference
Other mail applications installed on the Apple iPhone XS can also cause an issue. They might interfere with the Outlook app’s proper functioning. Identifying and temporarily disabling such apps can help diagnose and resolve the issue.
6. Excessive Email Fetching
Configuring the Outlook mail app to fetch emails too frequently causes the issue. It can strain the connection with Outlook servers, leading to authentication challenges. That causes issues like the Apple iPhone XS asking for a password.
7. iOS Software Glitches
The smooth functioning of the Mail app may be disrupted by problems and malfunctions present in the iOS software. Compatibility issues could emerge if your device is not operating on the latest iOS version.
Part 2. [Fixes] Solve iPhone/iPad Keeps Asking for Outlook Password
Now that we have explored why the iPad keeps asking for an Outlook password, it is time for practical solutions. These 13 fixes discussed below are designed to address the root causes comprehensively:
Fix 1. Add Password Once and Let the Prompt Disappear
If your Apple iPhone XS continuously prompts you for the Outlook password, a simple solution is to re-enter the password. Follow these steps to potentially resolve the issue once and for all by accessing the respective settings:
- Step 1. You begin by accessing your iDevice’s “Settings” app and scrolling down to tap the “Mail” option. Next, press “Accounts,” and on the following screen, select the Outlook account.

- Step 2. Encountering the error message “Account not authenticated” is what you will come across. Now, tap the “Re-enter Password” option to enter your correct Outlook password.

Fix 2. Change the Password to Your Outlook Mail
Sometimes, the email service provider may force users to change their passwords for security reasons. There is a chance that it is why your iPhone asks for an Outlook password. To modify your Outlook password from the desktop platform, adhere to the following steps:
- Step 1. Open your preferred web browser and go to the Outlook login page. Sign in to your Outlook account, locate, and click on your profile picture in the upper-right corner. There, click “My Profile,” and on the next screen, tap “Change Password” near the upper right corner.

- Step 2. Upon reaching the verification page, provide your password and tap the “Sign In” button. Afterward, you will be asked for other verification methods. Upon verifying, the “Change your password” window will appear. Here, you will need to enter your “Current password,” “New password,” and re-enter it to proceed. Then, hit the “Save” button, and your password will be changed.

Fix 3. Checking the Network Connection
Network inconsistencies can often disrupt the authentication process. This can be the leading cause behind persistent password prompts. To ensure a stable connection, ensure that you are connected to a reliable and stable Wi-Fi network. You can also try toggling the Wi-Fi and mobile data switches on and off.
Another way to confirm if network errors are the problem is to try enabling Airplane Mode. After a while, disable the Airplane Mode and check if the issue is resolved.

Fix 4. Using the Mail Toggle as a Remedy
A strategic approach to resolving authentication issues involves using the Mail toggle. You can use it to disable and re-enable the email services. This action essentially resets the Outlook app’s connection and can be performed as follows:
- Step 1. Within your Apple iPhone XS’s “Settings” app, scroll down and tap “Mail.” On the following screen, press “Accounts” and choose the “Outlook” account.

- Step 2. Here, you will find the toggle switch for “Mail.” Now, turn off the email service and wait for a few moments. Toggle the switch back on to re-enable the email service.

Fix 5. Delete and Re-Insert Outlook Account
Deleting and re-inserting your Outlook account on your Apple iPhone XS can provide a fresh start to the email integration. Follow these steps if the persistent iPhone keeps asking for an Outlook password:
- Step 1. Navigate to the “Mail” tab within the “Settings” app on your Apple iPhone XS, and choose “Accounts” to observe the roster of email accounts. Here, tap on your Outlook account, and the following screen, press “Delete Account.”

- Step 2. Once you have deleted the account, return to the “Accounts” tab. Select “Outlook.com” after tapping on “Add Account.” Now, follow the on-screen instructions to re-enter your account details.

Fix 6. Re-Check Sync Settings
Ensuring that your sync settings align with Outlook’s recommended configurations is crucial. Follow these steps to re-check and adjust your sync settings on your Apple iPhone XS:
- Step 1. After accessing the “Mail” tab within the Settings app, tap “Accounts.” Here, find and choose the “Fetch New Data” option, followed by selecting the “Outlook” account.

- Step 2. Confirm that the “Push” or “Fetch” settings are configured to your preference. “Push” enables real-time updates, while “Fetch” allows you to set specific intervals for email updates.

Fix 7. Uninstall and Re-Install Outlook App
Is the Outlook app generally showing a lot of glitches on your Apple iPhone XS? If yes, uninstalling and then re-installing it can address potential “iPhone**/iPad keeps asking for Outlook password”** issues:
Instructions: On your Apple iPhone XS’s home screen, navigate to the Outlook mail app. Long-press the Outlook app icon and choose “Remove App” from the pop-up menu. Then, tap “Delete App” and follow it by pressing “Delete” to uninstall the app. Afterward, access the App Store and download the Microsoft Outlook app again.

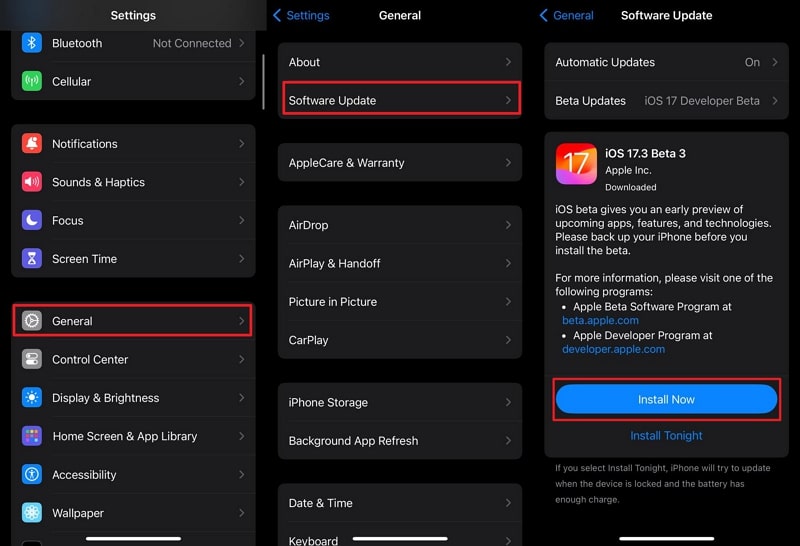
Fix 8. Update iOS From Settings
Outdated iOS versions can contribute to compatibility issues and glitches. This can affect the proper functioning of the Mail app and its integration with Outlook. Follow these steps to ensure your iOS is up to date:
Instructions. Access your device’s “General” settings from the Settings app. Tap “Software Update” on the next screen and check if an update is available. Tap “Install Now” to kick-start the iOS updating process if an update is available. Make sure your device is adequately charged and maintains a stable internet connection.
Fix 9. Try Other Alternatives to Outlook
Exploring alternative mail applications may offer a viable workaround. This is especially true if the iPhone asking for the Outlook password proves resistant to previous solutions. Consider using other email platforms such as Apple Mail, Gmail, and Yahoo Mail. This solution might not directly resolve the issue with Outlook. Yet, an alternative can provide a temporary workaround until a solution is found.
=

Fix 10. Try Disabling Privacy Protection
Certain privacy protection features on your Apple iPhone XS may interfere with the integration of Outlook. To troubleshoot this, consider temporarily disabling privacy protection settings:
Instructions. On your Apple iPhone XS, access “Mail” settings through the Settings application. Now, scroll down to find and tap the “Privacy Protection” option in the “Messages” section. Next, you will come across the “Protect Mail Activity” switch. Here, toggle off the switch to check if it is resolved.

Fix 11. Reset All Settings of the iPhone
If the persistent password prompts remain unresolved, resetting all settings on your Apple iPhone XS can be the solution. It acts as a comprehensive solution to potential configuration issues. This action does not erase your data but resets system settings to default. To reset all settings on your Apple iPhone XS, you can follow these steps:
- Step 1. Navigate to the “General” tab in the “Settings” app on your Apple iPhone XS after you open it. Move down the screen, and at the bottom, choose “Transfer or Reset iPhone.”

- Step 2. On the following screen, tap “Reset” and select “Reset All Settings” from the available options. Enter your device passcode if prompted and confirm the action by selecting “Reset All Settings” again.

Fix 12. Add an Account by Switching to IMAP
In some cases, switching the account type to IMAP during the setup process can help resolve issues. For many users, it has worked to resolve issues related to Outlook password prompts. Follow these steps to add your Outlook account using the IMAP protocol:
- Step 1. Begin by accessing the “Settings” app on your Apple iPhone XS, then scroll down to locate and tap on “Mail.” Within this section, choose “Accounts” to display the roster of email accounts, and proceed to tap on “Add Account.”

- Step 2. Choose “Other” as the account type and select “Add Mail Account.” Enter your Name, full Outlook email address, descriptive description, and unique password, and hit “Next.”

- Step 3. Utilize the specified settings for the “Incoming Mail Server” and “Outgoing Mail Server” sections under the “IMAP” tab:
Incoming Mail Server
Hostname: imap-mail.outlook.com
Username: Your full Outlook email address
Password: Your Outlook password
Outgoing Mail Server
Hostname: smtp-mail.outlook.com
Username: Your full Outlook email address
Password: Your Outlook password
At last, hit the “Next” button at the top-right side of the screen.

Fix 13. Contact Support of Outlook To Resolve
If none of the previous fixes resolve the issue, seek help directly from Outlook Support. Outlook’s support is capable of addressing a broad spectrum of issues. It is adept at delivering personalized assistance tailored to your circumstances.
Bonus Part. Can’t Access Outlook Because iPhone Is Locked? A Quick Solution
The iPhone keeps asking for an Outlook password, which isn’t the only password-related problem. Forgetting the screen locks of their iPhones is a common phenomenon. It is especially prevalent among iPhone users. You can no longer access important Outlook emails when your Apple iPhone XS is locked. That is where Wondershare Dr.Fone emerges as your savior. This powerful tool can bypass all types of iOS screen locks within minutes.
It can remove lock screens on your Apple iPhone XS, iPad, and iPod. You can say goodbye to the hassle of dealing with iCloud activation locks. Moreover, it helps remove your Apple ID if you have forgotten your Apple ID password. Dr.Fone allows you to bypass them effortlessly without requiring a password.
Prime Features of Wondershare Dr.Fone
- It can circumvent Mobile Device Management and screen time restrictions without data loss.
- This tool completely supports the most recent iOS 17, iPadOS 17, and iPhone 15.
- Additionally, this software effortlessly bypasses carrier locks on your Apple iPhone XS.
Steps To Unlock Your Apple iPhone XS via Wondershare Dr.Fone
Unlocking your Apple iPhone XS using Wondershare Dr.Fone is a straightforward process. That is made possible with its intuitive interface and a simple 3-step procedure. You can use the following steps to bypass your Apple iPhone XS’s screen lock within minutes:
- Step 1: Access Screen Unlock by Launching Dr.Fone
Once you’ve launched Dr.Fone on your computer, go to Toolbox. Here, tap “Screen Unlock” and choose “iOS.” In the opened window, choose the “Unlock iOS Screen” option to unlock your iOS device’s screen. On the subsequent screen, click “Start” to commence the iOS device unlocking process.

- Step 2: Initiating iPhone Recovery Mode and Device Identification
Subsequently, you need to place your Apple iPhone XS into Recovery Mode. Adhere to the on-screen instructions corresponding to the model of your iDevice. Afterward, the tool will automatically detect the “Device Model.” If necessary, adjust the model and choose the “System Version.” Once these steps are completed, click “Start” to initiate the unlocking process.
- Step 3: Finalizing iOS Device Unlock
Monitor the iOS firmware download progress on the screen. After successful download and verification, proceed by selecting “Unlock Now.” A confirmation window will appear, prompting you to input the necessary code. Enter the code and tap Unlock to proceed to the outcome. Upon unlocking the iDevice, click the “Done” button to finalize the process.

Conclusion
To summarize, resolving an iPhone asking for an Outlook password requires a systematic approach. From re-entering passwords to adjusting settings, this guide has covered 13 comprehensive fixes. For those facing the challenge of a locked iPhone, Dr.Fone offers a reliable solution. Users can ensure integration between their iPhones and Outlook by addressing these issues. This will enhance their overall email experience.
Tips: Are you searching for a powerful Screen Unlock tool? No worries as Dr.Fone is here to help you. Download it and start a seamless unlock experience!
Also read:
- Trouble with iPhone 8 Plus Swipe-Up? Try These 11 Solutions | Dr.fone
- In 2024, How to Unlock Apple iPhone X Passcode without Computer? | Dr.fone
- In 2024, How to Bypass iPhone 12 Passcode Easily Video Inside | Dr.fone
- In 2024, How to Unlock iPhone SE without Passcode or Face ID | Dr.fone
- 3 Ways to Unlock iPhone 14 without Passcode or Face ID | Dr.fone
- In 2024, How to Unlock iPhone XS Max Passcode Screen? | Dr.fone
- In 2024, Locked Out of iPhone 7? 5 Ways to get into a Locked iPhone 7 | Dr.fone
- In 2024, How to Unlock Disabled iPhone 13 mini/iPad Without Computer | Dr.fone
- Reset iTunes Backup Password Of Apple iPhone 8 Plus Prevention & Solution | Dr.fone
- Guide on How To Change Your Apple ID Email Address On Apple iPhone SE | Dr.fone
- In 2024, How to Unlock Disabled Apple iPhone XR/iPad Without Computer | Dr.fone
- How To Unlock Apple iPhone 12 Pro Max Without Swiping Up? 6 Ways | Dr.fone
- In 2024, How to Unlock iPhone 12 Pro Passcode without iTunes without Knowing Passcode? | Dr.fone
- Complete Guide For Apple iPhone X Lock Screen | Dr.fone
- How to Unlock iPhone SE Passcode without iTunes without Knowing Passcode? | Dr.fone
- In 2024, How To Open Your iPhone 15 Pro Max Without a Home Button | Dr.fone
- iPhone Is Disabled? Here Is The Way To Unlock Disabled Apple iPhone 8 Plus | Dr.fone
- How to Unlock Apple iPhone 13 Without Passcode? | Dr.fone
- How Many Attempts To Unlock Apple iPhone 12 mini | Dr.fone
- In 2024, A Comprehensive Guide to iPhone 6 Plus Blacklist Removal Tips and Tools | Dr.fone
- In 2024, How to Access Your Apple iPhone XS When You Forget the Passcode? | Dr.fone
- Guide on How To Change Your Apple ID Email Address On Apple iPhone 8 | Dr.fone
- In 2024, How To Unlock A Found iPhone 15 Plus? | Dr.fone
- In 2024, Full Guide to Unlock Apple iPhone 11 Pro with iTunes | Dr.fone
- How to Remove and Reset Face ID on Apple iPhone 13 Pro | Dr.fone
- How to Unlock Apple iPhone SE Passcode without Computer? | Dr.fone
- Can You Unlock iPhone 11 Pro Max After Forgetting the Passcode? | Dr.fone
- In 2024, Remove Device Supervision From your iPhone 6 | Dr.fone
- In 2024, 7 Ways to Lock Apps on Apple iPhone 12 mini and iPad Securely | Dr.fone
- How To Open Your iPhone 7 Without a Home Button | Dr.fone
- In 2024, Unlocking Apple iPhone 11 Pro Max Lock Screen 3 Foolproof Methods that Actually Work | Dr.fone
- In 2024, Full Guide to Unlock Apple iPhone 13 mini with iTunes | Dr.fone
- In 2024, How to Unlock iPhone 14 Pro with a Mask On | Dr.fone
- Complete Guide on Unlocking iPhone SE (2022) with a Broken Screen? | Dr.fone
- In 2024, What Does Jailbreaking iPhone 14 Plus i Do? Get Answers here | Dr.fone
- In 2024, How To Change Your Apple ID on iPhone 14 Pro With or Without Password | Dr.fone
- In 2024, How to Unlock Apple iPhone SE (2022) without Passcode or Face ID | Dr.fone
- In 2024, Disabled Apple iPhone SE How to Unlock a Disabled Apple iPhone SE? | Dr.fone
- In 2024, How to Turn Off Find My iPhone 15 when Phone is Broken? | Dr.fone
- In 2024, Can You Unlock iPhone SE (2022) After Forgetting the Passcode? | Dr.fone
- In 2024, How to Turn Off Find My iPhone 8 when Phone is Broken? | Dr.fone
- In 2024, Trouble with Apple iPhone 6 Plus Swipe-Up? Try These 11 Solutions | Dr.fone
- Complete Fixes To Solve Apple iPhone 13 Randomly Asking for Apple ID Password | Dr.fone
- Complete Guide on Unlocking iPhone 13 mini with a Broken Screen? | Dr.fone
- Complete Guide For Apple iPhone 13 Lock Screen | Dr.fone
- Unlocking Apple iPhone 13 Pro Passcode without a Computer | Dr.fone
- 3 Easy Ways to Factory Reset a Locked iPhone 6s Plus Without iTunes | Dr.fone
- How Do You Unlock your iPhone 14 Pro Max? Learn All 4 Methods | Dr.fone
- Remove FRP Lock on Infinix Hot 30i
- In 2024, Sim Unlock Xiaomi Redmi Note 12 Pro 4G Phones without Code 2 Ways to Remove Android Sim Lock
- Super Easy Ways To Deal with Xiaomi Redmi Note 12 Pro+ 5G Unresponsive Screen | Dr.fone
- New Relive the Past Top VHS Playback Apps for iPhone and Android
- How to Transfer Photos from Oppo A38 to Laptop Without USB | Dr.fone
- Updated Vloggers Paradise 14 Best Video Editing Software for Hot Platforms
- Is GSM Flasher ADB Legit? Full Review To Bypass Your ZTEFRP Lock
- What is Fake GPS Location Pro and Is It Good On Oppo K11x? | Dr.fone
- How To Fix Part of the Touch Screen Not Working on Itel A60 | Dr.fone
- In 2024, Top 10 Vivo Y56 5G Android SIM Unlock APK
- In 2024, Step-by-Step Tutorial How To Bypass Nokia C22 FRP
- In 2024, Top 10 AirPlay Apps in Xiaomi Redmi Note 12R for Streaming | Dr.fone
- In 2024, Best Slow-Mo Video Editors for Stunning Visuals
- In 2024, 9 Mind-Blowing Tricks to Hatch Eggs in Pokemon Go Without Walking On Sony Xperia 1 V | Dr.fone
- In 2024, 6 Methods for Switching from Apple iPhone SE (2022) to Samsung | Dr.fone
- In 2024, Where Is the Best Place to Catch Dratini On Honor V Purse | Dr.fone
- 11 Best Pokemon Go Spoofers for GPS Spoofing on Apple iPhone 14 | Dr.fone
- Reasons why Pokémon GPS does not Work On Honor Magic V2? | Dr.fone
- Spotify Keeps Crashing A Complete List of Fixes You Can Use on Infinix Note 30 Pro | Dr.fone
- In 2024, How Can I Catch the Regional Pokémon without Traveling On Gionee F3 Pro | Dr.fone
- Title: In 2024, How to Unlock Disabled iPhone XS/iPad Without Computer | Dr.fone
- Author: Amelia
- Created at : 2024-05-19 07:27:30
- Updated at : 2024-05-20 07:27:30
- Link: https://iphone-unlock.techidaily.com/in-2024-how-to-unlock-disabled-iphone-xsipad-without-computer-drfone-by-drfone-ios/
- License: This work is licensed under CC BY-NC-SA 4.0.
