
In 2024, How to Unlock Your iPhone 13 Passcode 4 Easy Methods (With or Without iTunes) | Dr.fone
How to Unlock Your Apple iPhone 13 Passcode: 4 Easy Methods (With or Without iTunes)
“How to unlock iPhone passcode without iTunes? I have been locked out of my iPhone and can’t remember its passcode. Is there an easy solution to learn how to unlock iPhone 6 passcode?”
If you are having a similar experience with your Apple iPhone 13, then you have certainly come to the right place. There are times when iPhone users don’t remember the passcode of their device and are locked out of it. Even though you can learn how to unlock iPhone 5 passcode in different ways, you might have to suffer from some unwanted data loss. In this guide, we will make you familiar with different solutions to do the same. Read on and learn how to unlock iPhone 6 without password using different techniques.
Part 1: How to unlock iPhone passcode with iTunes?
If you have already synced your Apple iPhone 13 with iTunes, then you can follow this technique and learn how to unlock iPhone passcode effortlessly. Since it will restore your device, you can later use a backup file to get your data back.
1. Launch iTunes on your system and make sure that it is an updated version which is compatible with your Apple iPhone 13.
2. Now, connect your Apple iPhone 13 to your system and wait for it to detect it.
3. Go to the Apple iPhone 13 devices section to select your Apple iPhone 13 and visit its Summary page.
4. From here, click on the “Restore iPhone” button on the right.

Part 2: How to unlock iPhone passcode with Dr.Fone - Screen Unlock (iOS)?
Too many times, users don’t get the desired results with iTunes. Therefore, we recommend using Dr.Fone - Screen Unlock (iOS) tool to learn how to unlock iPhone 6 without a passcode . The tool is compatible with all the leading iOS versions and devices. It provides a seamless solution to fix all the major issues related to an iOS device and that too within minutes. You can learn how to unlock iPhone 5 passcode by following these instructions. Though, the same steps would work with other iOS versions as well.
Tips: Backup all your data before unlocking the phone with Dr.Fone - Screen Unlock.
Dr.Fone - Screen Unlock (iOS)
Unlock iPhone/iPad Lock Screen Without Hassle.
- Remove Apple ID on iOS devices without Password.
- Support removing 4-digit/6-digit passcode, Touch ID & Face ID.
- Easy to use it, with no technology background required.
- Compatible with the latest iPhone XS, X, iPhone 8 (Plus) and iOS 12.


3981454 people have downloaded it
1. Install Dr.Fone - Screen Unlock (iOS) from its website right here and launch it on your system. Select the “Screen Unlock” option from its homepage.

2. You can attach your Apple iPhone 13 to a computer and the “Start” button at the interface at the same moment.
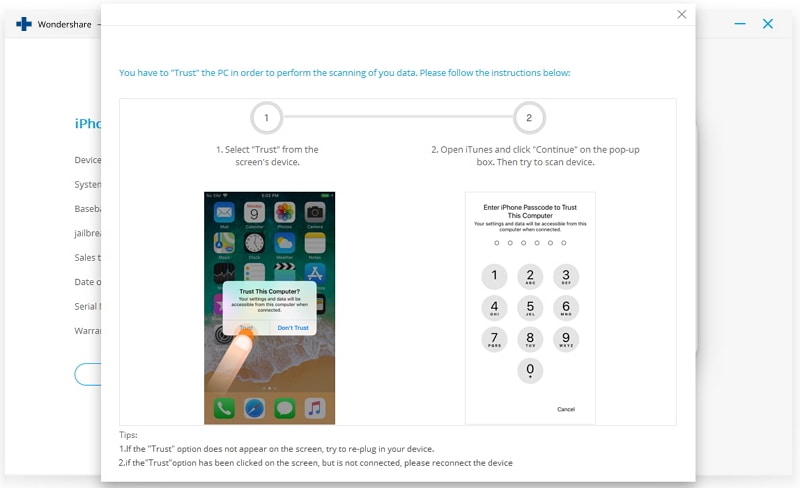
3. When the system detects your Apple iPhone 13, it displays a prompt to trust the computer. Don’t accept it, and instead close it.
4. Now you have to provide a few important information about your Apple iPhone 13 on the next window.
5. To update your firmware, click on the “Download” button. Wait for a while to finish the download.

6. You will get the following interface once the firmware update is downloaded. Click “Unlock Now” to determine the option “Contain Native Data.”

7. In addition, by typing the on-screen code you need to verify your choice.
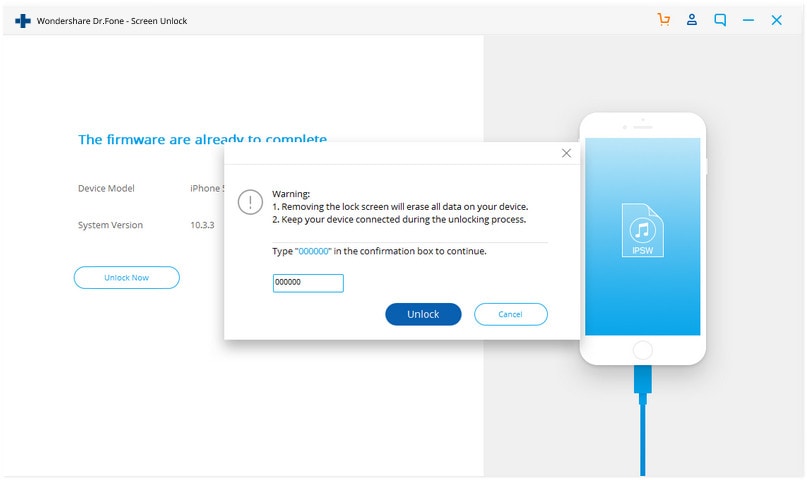
8. After agreeing with the confirmation message, the application will start fixing your Apple iPhone 13. You might need to wait for a few minutes.
9. You will be notified by showing the following window once the process is effectively finished.
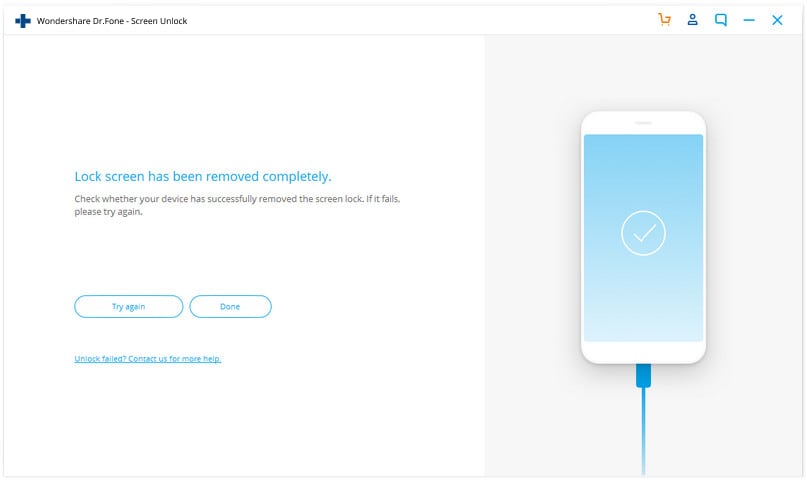
Now when you know how to unlock iPhone 6 without password, you can disconnect your Apple iPhone 13 and use it as per your needs.
Part 3: How to unlock iPhone passcode without iTunes using iCloud?
If your Apple iPhone 13 is already in sync with iCloud and you have enabled the Find My iPhone feature, then you can easily learn how to unlock iPhone passcode remotely. The service was originally introduced to locate a lost iPhone. Though, it can also erase an iPhone entirely without much trouble. To learn how to unlock iPhone 6 passcode using iCloud, follow these steps:
1. Visit the official website of iCloud and sign-in using your account credentials. This should be the same account that is in sync with your Apple iPhone 13.
2. On the home page, you will find various options. Click on “Find iPhone” to learn how to unlock iPhone 5 passcode.

3. If you have linked several devices with your iCloud account, then simply click on the “All Devices” option and select your Apple iPhone 13.

4. This will provide various options related to your Apple iPhone 13. Simply click on the “Erase iPhone” button and confirm your choice.

This will restart your Apple iPhone 13 while wiping it entirely. You need to set up your Apple iPhone 13 as a new device without any lock screen.
Part 4: How to unlock iPhone passcode by tricking Siri?
As you can see, in all the above-stated solutions, your Apple iPhone 13 data would be lost. Therefore, we recommend trying this technique beforehand. For iOS 8.0 to iOS 10.1 versions, it has been observed that Siri has a loophole which can be exploited to unlock the iOS device. It might be a little tricky and doesn’t provide guaranteed results. Nevertheless, you can give it a try and learn how to unlock iPhone 6 without a password by following these steps:
1. Unlock your Apple iPhone 13 and press the Home button to activate Siri.
2. Provide a command like “What time is it” to get the current time with the display of the clock icon.

3. Tap on the clock icon to open the world clock interface.
4. Here, you need to add another clock. Tap on the “+” icon to do it.

5. To add another city, simply provide any text and tap on it. Choose the “Select all” option.

6. As the entire text would be selected, you will get various options. Choose the “Share” option to proceed.

7. This will provide different ways to share the selected text. Go with the message option.

8. A new interface will be opened to draft a message. Type something in the “To” field.
9. After typing, tap on the Return button.

10. This will turn the text in green colour. Now, you need to tap on the add icon beside it.

11. As it will launch a new interface, you can just select the “Create new contact” option.

12. This will again provide a new interface to add new content. Tap on the “Add Photo” option and select to choose an existing photo instead.
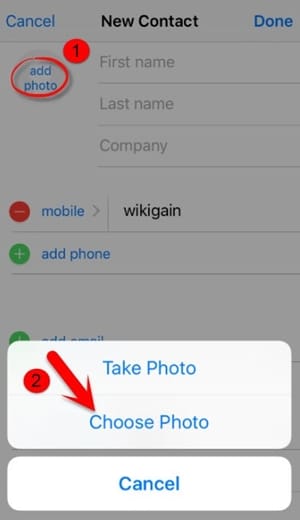
13. The photo library on your phone will be launched. You can simply tap on any album you wish to open.

14. After waiting for a while, slightly press the home button. If you are lucky, you will land on the home screen on your Apple iPhone 13 and can access it without any trouble.

As you can see, there are plenty of ways to learn how to unlock iPhone passcode without much trouble. Ideally, you should go with Dr.Fone - Screen Unlock (iOS) to resolve any kind of issue related to your Apple iPhone 13. Easy to use, the application provides highly reliable results and will certainly come handy to you on numerous occasions. Now when you know how to unlock iPhone 6 passcode, you can share this guide with your friends and family as well and help them resolve this issue.
How to Unlock Apple iPhone 13 without Passcode or Face ID
You can’t access your Apple iPhone 13 because the Face ID isn’t working, and you forgot your passcode? So you are considering how to unlock iPhone without face ID or passcode. If so, this article will walk you through how to do that.
Firstly, one ought to realize that it is impossible to hack an iPhone passcode. Therefore, the primary way that attempts to unlock your device without a PIN or Face ID is to erase it. After reading this guide, you will figure out how to unlock iPhone without passcode or face ID. Keep reading to find out more and learn about the best tools in the business.
Part 1: Best Ways to Unlock iPhone without a Passcode or Face ID
1. Unlock it via Find My
- Go to the iCloud official site, and sign in to your iCloud account. The site will give you two or three choices when you log in. Click on “Find iPhone” to proceed.
- You will be taken to another interface. Click “All devices” and select the Apple iPhone 13 on which you need to erase the passcode.
- Click on “Erase iPhone”, and afterwards affirm the decision. That’s the simplest solution for how to unlock iPhone without passcode or face ID.

2. Via iTunes
Step 1. Go to Recovery Mode
Entering the recovery mode requires various steps, given your Apple iPhone 13 model or settings. Assuming you’re uncertain which one you have, check the rear of your phone or the client manual you got in the first box.
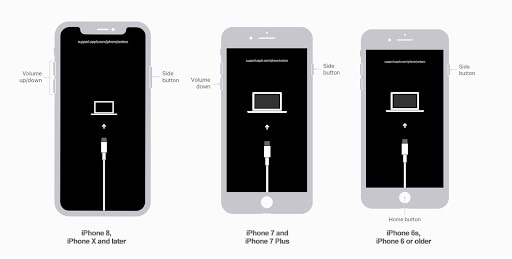
iPhone 8 and Above:
- Hold the Side button used to lock your screen and both Volume buttons. The power-off slider will show up on the screen.
- Drag the slider to one side to switch off your Apple iPhone 13.
- Use a lightning connector to plug your Apple iPhone 13 into a Macintosh or PC while holding the Side button.
- Keep holding the button until the recovery screen shows up.
iPhone 7/7 Plus:
- Hold the Side button used to lock your screen until the power-off slider shows up.
- Switch off your Apple iPhone 13.
- Connect your Apple iPhone 13 to a Macintosh or PC through a connector while holding the Volume (-) button.
- Continue to press the button until you get to recovery mode.
iPhone 6 or Below:
- Hold the Side or Top button and trust that the power-off slider will appear.
- Switch off your Apple iPhone 13.
- Connect your Apple iPhone 13 to a system through a connector while holding the Home button.
- Keep the Home button held until you see the recovery screen.
Step 2. Select your Device on your System
After entering recovery mode, you’ll have to continue on your Macintosh or PC. Then, contingent upon your OS, follow the aide underneath to begin unlocking your Apple iPhone 13.
macOS Catalina
- Go to the Finder window.
- Your Apple iPhone 13 will appear on the left half of the Finder window under Locations. You can tap on it to choose it.

macOS Mojave or a Windows with iTunes
If your gadget isn’t running macOS Catalina or later, you’ll need to involve iTunes to connect your Apple iPhone 13. In the first place, download iTunes on your PC. Then, take the appropriate steps depending on which iTunes version you’re running:
- On iTunes 12 and newer, click on the Apple iPhone 13 symbol in the upper-left corner of the iTunes window.
- On iTunes 11, click on the Apple iPhone 13 tab on the right half of the iTunes window.
- On iTunes 10, the Apple iPhone 13 will be in the sidebar on the left.
Step 3. Pick the Choice to Restore
When you’ve effectively connected and chosen your Apple iPhone 13 on a Mac or a PC, tap on the Restore button. And that’s how to unlock iPhone without passcode or face ID.
3. DNS Server
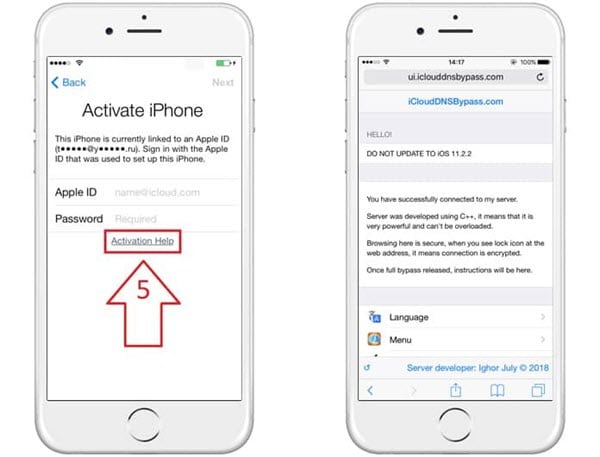
The following steps explain how to unlock iPhone without face ID or passcode using a DNS server:
Step 1. Pick your LANGUAGE and COUNTRY from the lock screen menu after switching on a locked device.
Step 2. Click “Continue” to enter the WiFi settings page. Whenever requested to connect to WiFi, search for the “I” next to the WiFi tab.
Step 3. Disconnect your current network, go to “Network/connection Settings”, and click Forget.
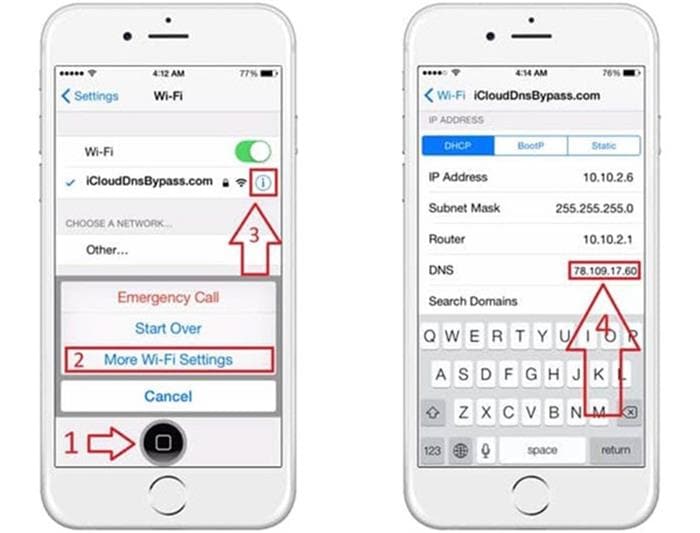
Step 4. Click the “I” and enter a DNS server IP address to bypass the lock. IP addresses of different regions are given below:
- USA: 104.154.51.7
- South America: 35.199.88.219
- Europe: 104.155.28.90
- Asia: 104.155.220.58
- Australia and Oceania: 35.189.47.23
- Others: 78.100.17.60
Step 5. Then, click the “Back” choice at the left half of your screen, turn the WiFi on and select your network. Enter your WiFi passcode.
Step 6. Click Next Page > Back to enter the lock bypass screen. These are all the required steps for how to unlock iPhone without passcode or face ID 2022.
4. Dr.Fone-Screen Unlock
This section will introduce you to our most important solution. Yes, you heard it right. If you need a hassle-free method to unlock your iDevice without a passcode or face ID, use Wondershare Dr.Fone Screen Unlock.
Dr.Fone will not only remove the screen lock but also make sure to keep your identity safe. In addition, it is the easiest method and requires no prior knowledge. So if you are someone new to this technology, we suggest you follow the steps below:
Step 1. Launch the Software on your PC
After successfully installing Dr.Fone on your PC, open it and select the “Screen Unlock” tool from the main interface.
Next, connect your locked phone to the system through a wired connection. Then go for the iOS screen unlock feature.

Step 2. Recovery or DFU Mode Boot
It is necessary to first boot your locked device in recovery or DFU mode. Follow the guidelines on your screen to do so. The Recovery mode is the suggested way for iOS screen locks. If you can’t actuate this mode, go for the DFU mode boot.

Step 3. Select your Apple iPhone 13 Model
After the phone is in recovery/DFU mode, the program will show the locked device’s information. Here you can see the model and iOS variant of the Apple iPhone 13 device. If it isn’t correct, you could choose the right one from the dropdown menu next to it. After that, click the Download button to get the required firmware for your locked phone.
Step 4. Remove the Screen Lock
After downloading the firmware effectively, click the “Unlock Now” button to let Dr.Fone unlock your Apple iPhone 13.
Simply in no time, Dr.Fone will successfully unlock your device.
Note: This unlocking process will erase everything off your Apple iPhone 13 and bring it to the factory default state. Indeed, no other method that doesn’t allow data erasure at the moment.
Part 2: How to Turn Off Passcode or Face ID on My Device?
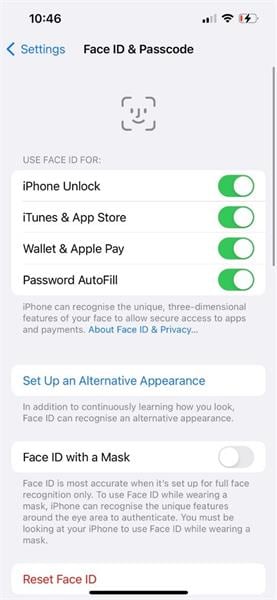
Face ID can be a helpful method for unlocking your Apple iPhone 13 - by simply looking at your phone. However, a few clients might worry that it’s not as secure as utilizing a PIN to open your phone. If that is the best case for you, you can follow this manual to disable Face ID and depend on a passcode.
Here’s the step-by-step guide to the most effective method to switch off Face ID on the iPhone:
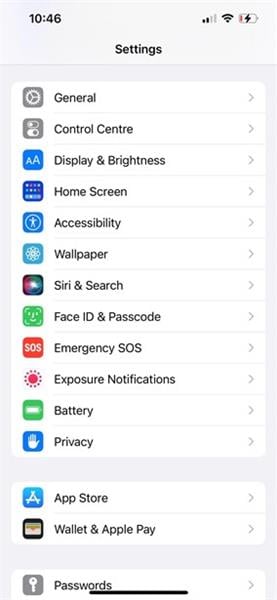
1. Open the Settings application
First, tap on your Settings app to open it. That is the one on the home screen with a symbol like the mechanical gear.
2. Tap on Face ID and Passcode
On the Settings menu, tap on the Face ID and Passcode menu.
3. Enter your passcode
At this stage, you’ll be approached to enter your passcode, so do this to get to the Face ID and Passcode menu.
4. Switch off Face ID
You’ll have the option to turn off the switch for Face ID across different activities, including the phone unlock.
Part 3: Can I bypass my iPhone Face ID with a picture?
As indicated by Apple, the short and obvious answer is no.
FaceID isn’t simply a camera snapping a picture. It utilizes an exceptional chip to filter the face with many spots. It makes a 3D contour of the look that works in low, glorious light around evening time, and your eyes must be opened. The opportunity to randomly unlock an iPhone with FaceID is 1/1 million, compared to 1/50000 with Touch ID.
It doesn’t work by snapping a picture of your face, but by taking a contour of your face if you utilize a camera that can see infrared. However, a photograph is a level and cannot give a dab matrix required for Face ID to work. You may be holding a clear piece of paper before the phone.
The Bottom Line
That’s all about our take on how to unlock iPhone without passcode or face ID 2022. We have worked hard to make sure you get the right solutions in hand. However, we strongly suggest Dr.Fone if you still face issues with our solutions. Even if the above methods fail, Dr.Fone will ensure you unlock your phone.
Apple iPhone 13 Backup Password Never Set But Still Asking? Here’s the Fix
Part 1: Why Do iTunes Ask Me for iPhone Backup Password?
When you use iTunes to create a backup, the backup will probably have a password that iTunes automatically create. This is for privacy reasons. Hence, it might ask for an iTunes backup password never set by you!
In most cases, this occurs when the Encrypt Backup option is activated. As an official iOS feature, its purpose is to provide iOS users with the iTunes backup encryption for further security.
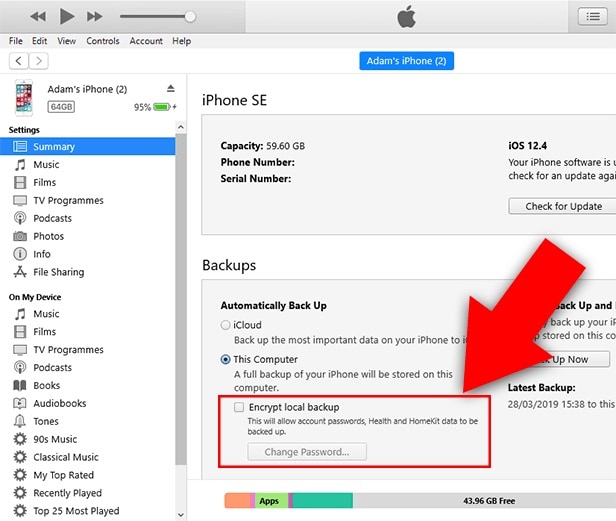
Unfortunately, this capability may also become problematic if you inadvertently take a backup without being able to provide the password. For example, you may have to enter the password for your Apple iPhone 13 backup unlocking never set by you.
But the good news is you have some possible fixes. So, let’s talk about them.
Part 2: 4 Possible Ways to Fix Asking for iPhone Backup Password
Many iPhone users have problems with iTunes when they back up their devices.
One of the most common issues is that people are asked for their iPhone backup password never set, but they need to know what it is. This can be frustrating because you can only back up your device if you have the password.
There are a few possible ways to fix this problem. Try resetting your password or using a different computer to back up your device. You could also try using a third-party software tool like Dr.Fone - Screen Unlock.
1. Try all passwords you use on iPhone
When iTunes prompts you for an iPhone backup password never set, what should your initial course of action be?
To get out of this predicament in the simplest way possible, try entering every potential password you will likely have used. In most cases, individuals will use the same password for many accounts.
A significant possibility is that you encrypted the iTunes backup with the same password from the iCloud account.
Therefore, before doing anything further, try all passwords to configure your iTunes account. For example, try entering 0000, 123456, name123, or 1111.
2. Find the password from Keychain on macOS
You may also attempt to find the password for the iTunes backup using the keychain approach if you are working on a Mac.
The likelihood of success with this approach is relatively low. However, it is still worthwhile to try it, particularly if you have also synchronized your iTunes account with your Mac.
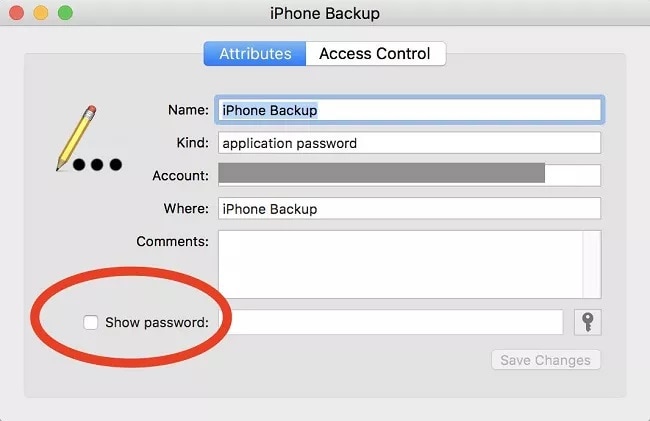
- On your macOS, go to Utilities by clicking the Applications menu item. At this point, launch the Keychain Access app and look for your Apple iPhone 13 backup.
- To open a new dialogue box, double-click the most recent backup file, and you will see one appear before you.
- On this page, choose Show Password to get the password for the Apple iPhone 13 backup. However, you will first be prompted to provide the administrator password associated with your iCloud account to recover the password.
3. “Reset All Settings”
Resetting the password is another option at your disposal if you encounter the Apple iPhone 13 backup password never set problem. How you do this will be different depending on the version of iOS that you have installed.
Here are what you can do with your iOS smartphone if it has iOS 11 or a later version:
Step 1: Unlock your Apple iPhone 13, and then open the Settings app on your device.
Step 2: After locating the General menu, go to the Reset menu and then hit the Reset All Settings button. Please confirm your action by providing the password for your Apple iPhone 13.
Step 3: Once the reset has been completed, your previous password will be deleted.
Step 4: The next thing you should do is take a fresh backup of your Apple iPhone 13 using iTunes, and then establish a new password for the backup that iTunes creates.
You will need to use an alternative strategy, which includes a factory reset if you use an older version of the iOS firmware than iOS 11.
Step 1: Before continuing, it is highly recommended that you create a backup of the data on your Apple iPhone 13 using iCloud.
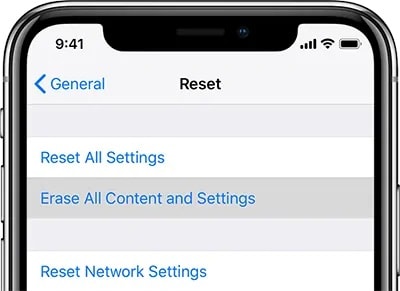
Step 2: After you have opened the Settings app, go to the General menu, then to the Reset menu, and finally to the Erase All Content and Settings option.
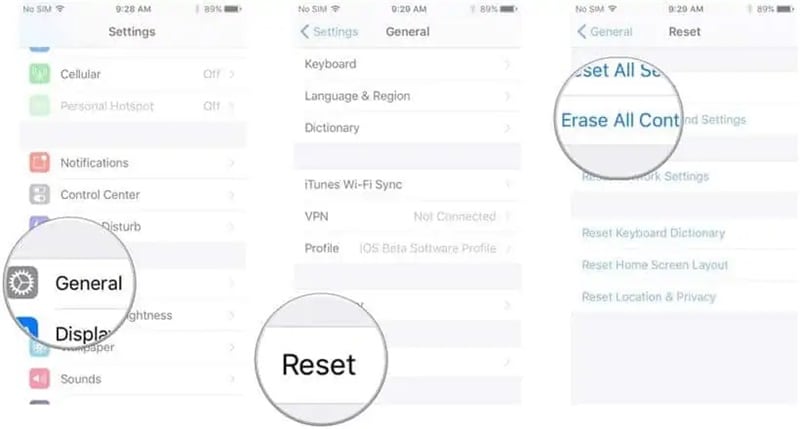
Step 3: Confirm that you want to reset your Apple iPhone 13 to factory settings, and wait until it is done.
Step 4: Once the factory data reset is finished, you must restore your iCloud backup. To do this, follow the steps for setting up iOS until you reach the Apps & Data option.
Step 5: Create a new backup in iTunes and change the password for the existing backup in iTunes.
You should be aware that resetting the Apple iPhone 13 device to factory settings will not make your encrypted backups accessible again.
On the other hand, it does make it possible for you to generate a fresh backup in iTunes that is not encrypted.
4. Dr.Fone-Screen Unlock
First step: After installing Dr.Fone on your device, please run the program and look for the red button labeled “Screen Unlock.”
Step 2: While in the interface for Screen Unlock, navigate to the bottom right of the screen and tap on the feature labeled “Remove iTunes BackUp Encryption.” This will allow you to proceed.
Step 3: When brought to this screen, please use a USB cord to connect your iOS device to your personal computer. If Dr.Fone can identify this relationship, the following picture will appear for you to see.
Please read the following three notes carefully before clicking the “Remove Now” button:
- Check to ensure that “Find My iPhone” is not turned on.
- During this procedure, you should not launch “iTunes.”
- During the process, your Apple iPhone 13 will restart.

Step 4: If you have an iTunes backup, Dr.Fone may automatically verify it and delete it. This encryption will be removed once the percentage on the progress meter reaches the end. This procedure won’t take a lot of time at all.

Step 5: The encryption of the iTunes backup has been successfully erased! Your backed-up data may be quickly restored, transferred, wiped clean, and backed up again. Hence, you can enter the password to unlock your Apple iPhone 13 backup never set in the first place!

The Bottom Line
There are four ways to fix the problem if iTunes keeps asking for your Apple iPhone 13 backup password. The first method is to try all the passwords you use on your Apple iPhone 13. You can try finding the password from Keychain on macOS if this does not work. Another option is to “Reset All Settings” on your Apple iPhone 13.
Lastly, Dr.Fone-Screen Unlock is a program that can help you bypass the passcode and get into your backups. So, what are you waiting for? It’s time to avoid the problem of iTunes backup password never set.
Also read:
- [New] Excellence Unleashed - Top Tech For Your Workspace for 2024
- [Updated] Youtube’s Image Files Made Simple Online, Desktop & Terminal Steps
- Become a Master at Crafting Engaging Podcast Content (Techniques & Samples) for 2024
- Forgot iPhone Passcode Again? Unlock iPhone SE Without Passcode Now | Dr.fone
- How To Remove Flashlight From iPhone 6s Lock Screen | Dr.fone
- In 2024, 5 Most Effective Methods to Unlock iPhone 13 Pro in Lost Mode | Dr.fone
- In 2024, How to Unlock iPhone 7 without Passcode or Face ID | Dr.fone
- In-Depth HP ZBook Firefly 15 G8 Assessment: The Epitome of Portable Power
- Locked Out of Apple iPhone 12? 5 Ways to get into a Locked Apple iPhone 12 | Dr.fone
- NBA 2K23 Freezing Up? Discover These 7 Ultimate Solutions for PC
- Overcoming Discord Video Stream Stalls: A Comprehensive Guide for Smooth Broadcasting
- The Perfect Movie Night Plan: Watching The Matrix Series Step-By-Step
- Unlock iPhone 11 With Forgotten Passcode Different Methods You Can Try | Dr.fone
- What to Do When PowerDVD Is Unavailable on Mac - Top Substitutes & Downloads
- Title: In 2024, How to Unlock Your iPhone 13 Passcode 4 Easy Methods (With or Without iTunes) | Dr.fone
- Author: Amelia
- Created at : 2024-12-18 01:48:52
- Updated at : 2024-12-21 22:12:17
- Link: https://iphone-unlock.techidaily.com/in-2024-how-to-unlock-your-iphone-13-passcode-4-easy-methods-with-or-without-itunes-drfone-by-drfone-ios/
- License: This work is licensed under CC BY-NC-SA 4.0.