
In 2024, How to Unlock Your iPhone XS Passcode 4 Easy Methods (With or Without iTunes) | Dr.fone
How to Unlock Your Apple iPhone XS Passcode: 4 Easy Methods (With or Without iTunes)
“How to unlock iPhone passcode without iTunes? I have been locked out of my iPhone and can’t remember its passcode. Is there an easy solution to learn how to unlock iPhone 6 passcode?”
If you are having a similar experience with your Apple iPhone XS, then you have certainly come to the right place. There are times when iPhone users don’t remember the passcode of their device and are locked out of it. Even though you can learn how to unlock iPhone 5 passcode in different ways, you might have to suffer from some unwanted data loss. In this guide, we will make you familiar with different solutions to do the same. Read on and learn how to unlock iPhone 6 without password using different techniques.
Part 1: How to unlock iPhone passcode with iTunes?
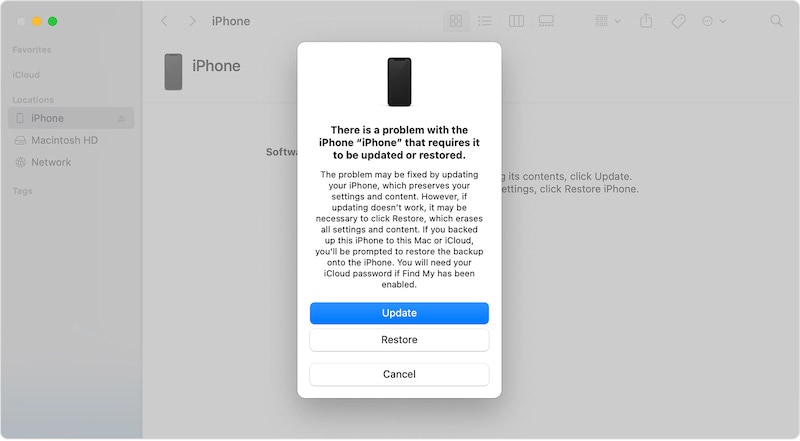
If you have already synced your Apple iPhone XS with iTunes, then you can follow this technique and learn how to unlock iPhone passcode effortlessly. Since it will restore your device, you can later use a backup file to get your data back.
1. Launch iTunes on your system and make sure that it is an updated version which is compatible with your Apple iPhone XS.
2. Now, connect your Apple iPhone XS to your system and wait for it to detect it.
3. Go to the Apple iPhone XS devices section to select your Apple iPhone XS and visit its Summary page.
4. From here, click on the “Restore iPhone” button on the right.

Part 2: How to unlock iPhone passcode with Dr.Fone - Screen Unlock (iOS)?
Too many times, users don’t get the desired results with iTunes. Therefore, we recommend using Dr.Fone - Screen Unlock (iOS) tool to learn how to unlock iPhone 6 without a passcode . The tool is compatible with all the leading iOS versions and devices. It provides a seamless solution to fix all the major issues related to an iOS device and that too within minutes. You can learn how to unlock iPhone 5 passcode by following these instructions. Though, the same steps would work with other iOS versions as well.
Tips: Backup all your data before unlocking the phone with Dr.Fone - Screen Unlock.
Dr.Fone - Screen Unlock (iOS)
Unlock iPhone/iPad Lock Screen Without Hassle.
- Remove Apple ID on iOS devices without Password.
- Support removing 4-digit/6-digit passcode, Touch ID & Face ID.
- Easy to use it, with no technology background required.
- Compatible with the latest iPhone XS, X, iPhone 8 (Plus) and iOS 12.


3981454 people have downloaded it
1. Install Dr.Fone - Screen Unlock (iOS) from its website right here and launch it on your system. Select the “Screen Unlock” option from its homepage.

2. You can attach your Apple iPhone XS to a computer and the “Start” button at the interface at the same moment.
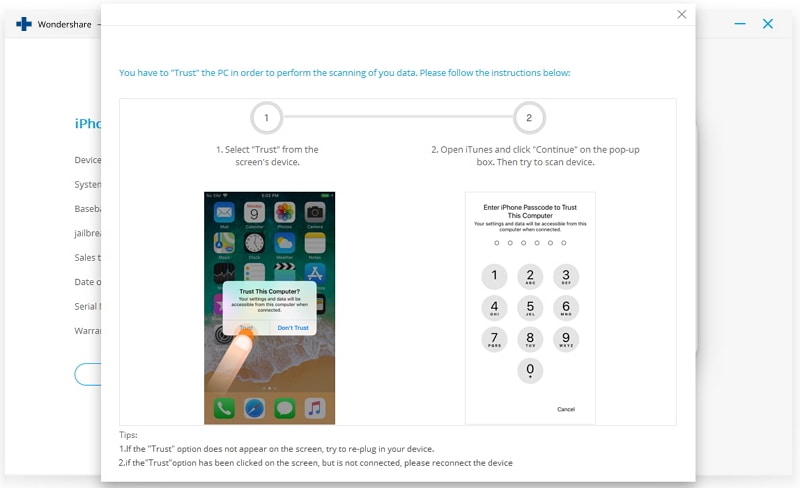
3. When the system detects your Apple iPhone XS, it displays a prompt to trust the computer. Don’t accept it, and instead close it.
4. Now you have to provide a few important information about your Apple iPhone XS on the next window.
5. To update your firmware, click on the “Download” button. Wait for a while to finish the download.

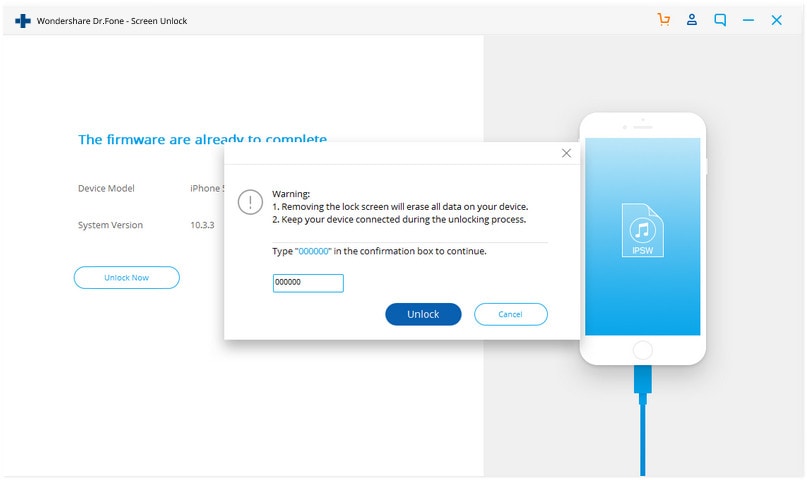
6. You will get the following interface once the firmware update is downloaded. Click “Unlock Now” to determine the option “Contain Native Data.”

7. In addition, by typing the on-screen code you need to verify your choice.
8. After agreeing with the confirmation message, the application will start fixing your Apple iPhone XS. You might need to wait for a few minutes.
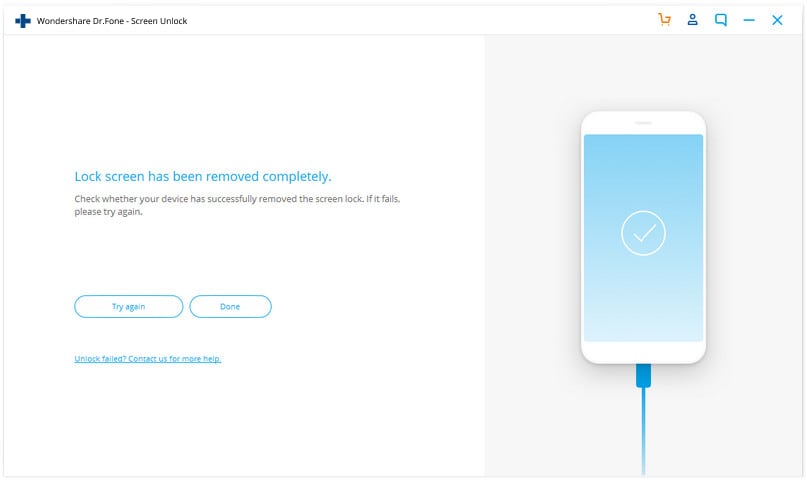
9. You will be notified by showing the following window once the process is effectively finished.
Now when you know how to unlock iPhone 6 without password, you can disconnect your Apple iPhone XS and use it as per your needs.
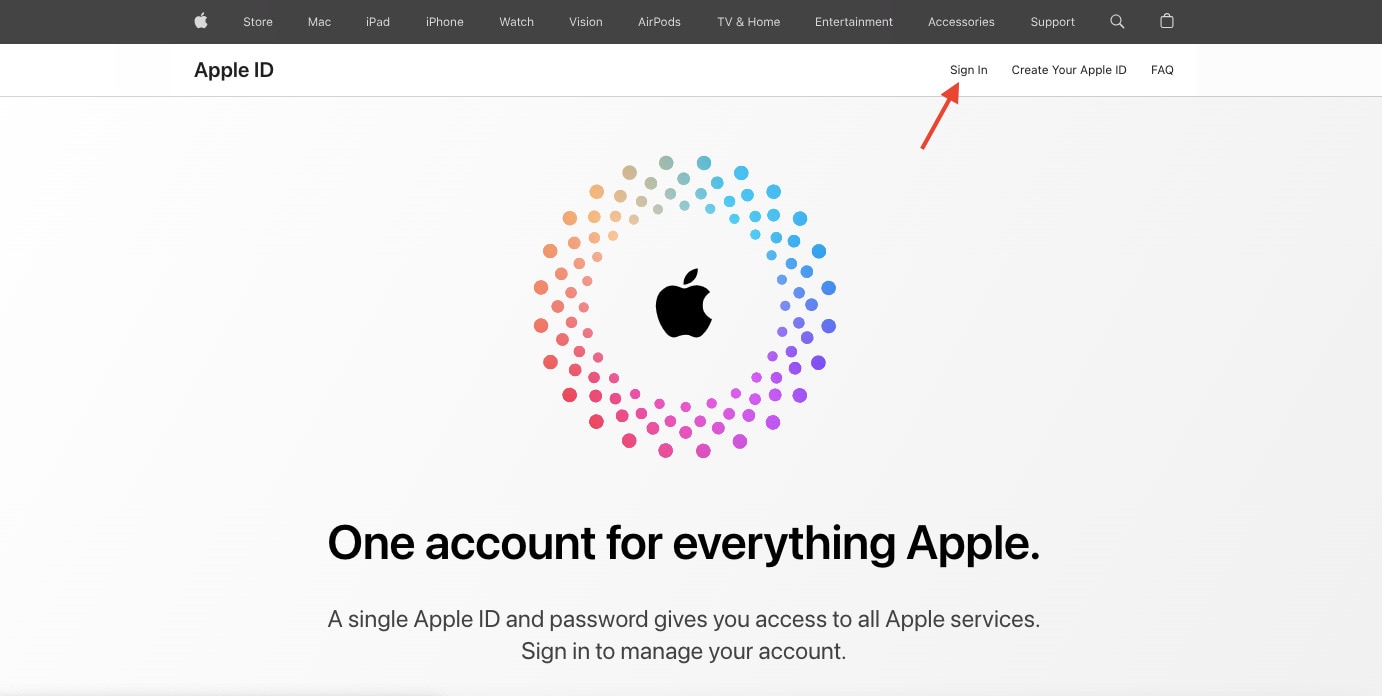
Part 3: How to unlock iPhone passcode without iTunes using iCloud?
If your Apple iPhone XS is already in sync with iCloud and you have enabled the Find My iPhone feature, then you can easily learn how to unlock iPhone passcode remotely. The service was originally introduced to locate a lost iPhone. Though, it can also erase an iPhone entirely without much trouble. To learn how to unlock iPhone 6 passcode using iCloud, follow these steps:
1. Visit the official website of iCloud and sign-in using your account credentials. This should be the same account that is in sync with your Apple iPhone XS.
2. On the home page, you will find various options. Click on “Find iPhone” to learn how to unlock iPhone 5 passcode.

3. If you have linked several devices with your iCloud account, then simply click on the “All Devices” option and select your Apple iPhone XS.

4. This will provide various options related to your Apple iPhone XS. Simply click on the “Erase iPhone” button and confirm your choice.

This will restart your Apple iPhone XS while wiping it entirely. You need to set up your Apple iPhone XS as a new device without any lock screen.
Part 4: How to unlock iPhone passcode by tricking Siri?
As you can see, in all the above-stated solutions, your Apple iPhone XS data would be lost. Therefore, we recommend trying this technique beforehand. For iOS 8.0 to iOS 10.1 versions, it has been observed that Siri has a loophole which can be exploited to unlock the iOS device. It might be a little tricky and doesn’t provide guaranteed results. Nevertheless, you can give it a try and learn how to unlock iPhone 6 without a password by following these steps:
1. Unlock your Apple iPhone XS and press the Home button to activate Siri.
2. Provide a command like “What time is it” to get the current time with the display of the clock icon.

3. Tap on the clock icon to open the world clock interface.
4. Here, you need to add another clock. Tap on the “+” icon to do it.

5. To add another city, simply provide any text and tap on it. Choose the “Select all” option.

6. As the entire text would be selected, you will get various options. Choose the “Share” option to proceed.

7. This will provide different ways to share the selected text. Go with the message option.

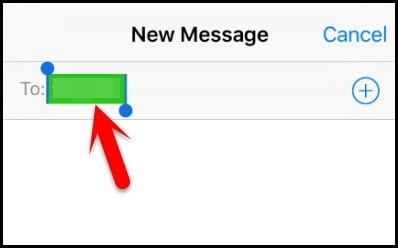
8. A new interface will be opened to draft a message. Type something in the “To” field.
9. After typing, tap on the Return button.

10. This will turn the text in green colour. Now, you need to tap on the add icon beside it.
11. As it will launch a new interface, you can just select the “Create new contact” option.

12. This will again provide a new interface to add new content. Tap on the “Add Photo” option and select to choose an existing photo instead.
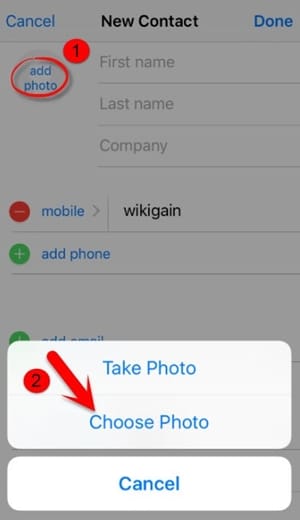
13. The photo library on your phone will be launched. You can simply tap on any album you wish to open.

14. After waiting for a while, slightly press the home button. If you are lucky, you will land on the home screen on your Apple iPhone XS and can access it without any trouble.

As you can see, there are plenty of ways to learn how to unlock iPhone passcode without much trouble. Ideally, you should go with Dr.Fone - Screen Unlock (iOS) to resolve any kind of issue related to your Apple iPhone XS. Easy to use, the application provides highly reliable results and will certainly come handy to you on numerous occasions. Now when you know how to unlock iPhone 6 passcode, you can share this guide with your friends and family as well and help them resolve this issue.
Guide on How To Change Your Apple ID Email Address On Apple iPhone XS
Your Apple ID email is the key to your digital world with Apple devices. It’s the address Apple recognizes you by, allowing you to access your apps, music, and more. But sometimes, life brings changes, and your Apple ID email may need an update.
This guide will take you through the simple process of changing your Apple ID email address, ensuring it’s easy to understand every step. Explore why you might want to make this change, shedding light on common scenarios where this adjustment can enhance your Apple experience. So dive in and explore!

Part I: Why Change Your Apple ID Email?
Your Apple ID email helps you access your apps, music, and more. But sometimes, you might need to change it for simple reasons. Let’s look at why you might want to change your Apple ID email in easy-to-understand terms.
- Your email address is part of your identity. Changing it to something that better suits you can make your Apple experience more personal.
- If you think someone else knows your old email password, changing it can keep your Apple account safer. A fresh email means a new layer of security.
- Maybe you used an old email you don’t want to use anymore. Changing it lets you keep your personal life separate from your Apple stuff.
- **Email Problems.**If your old email is full of spam or not working well, switching to a new one is a good idea. You’ll get a cleaner and more reliable inbox.
- **Sharing Devices.**If you share Apple devices with someone and want to keep your stuff separate, changing your Apple ID email can help you do that easily.
- Using a more professional email address for your Apple ID can make a better impression when using Apple services for work or business.
These are the simple reasons why you might want to change your Apple ID email. It’s all about making your Apple experience better, safer, and more suited to your needs.
Part II: Step-by-Step Guide: How to Change Apple ID Email
Before you jump into changing your Apple ID email address, there’s an essential step to take. Just like you’d secure your valuables before embarking on a journey, backing up your device before going through the email change process is vital. This step ensures that none of your precious data is lost during the transition.
A. How To Change Your Apple Email Address on Various Devices
Now, let’s explore three different methods of how to change your Apple ID email address, tailored to various user preferences.
Method 1: For Mac Users
If you’re a Mac enthusiast, changing your Apple ID email is straightforward:
- Step 1: Click the Apple logo at the top left corner of your screen.
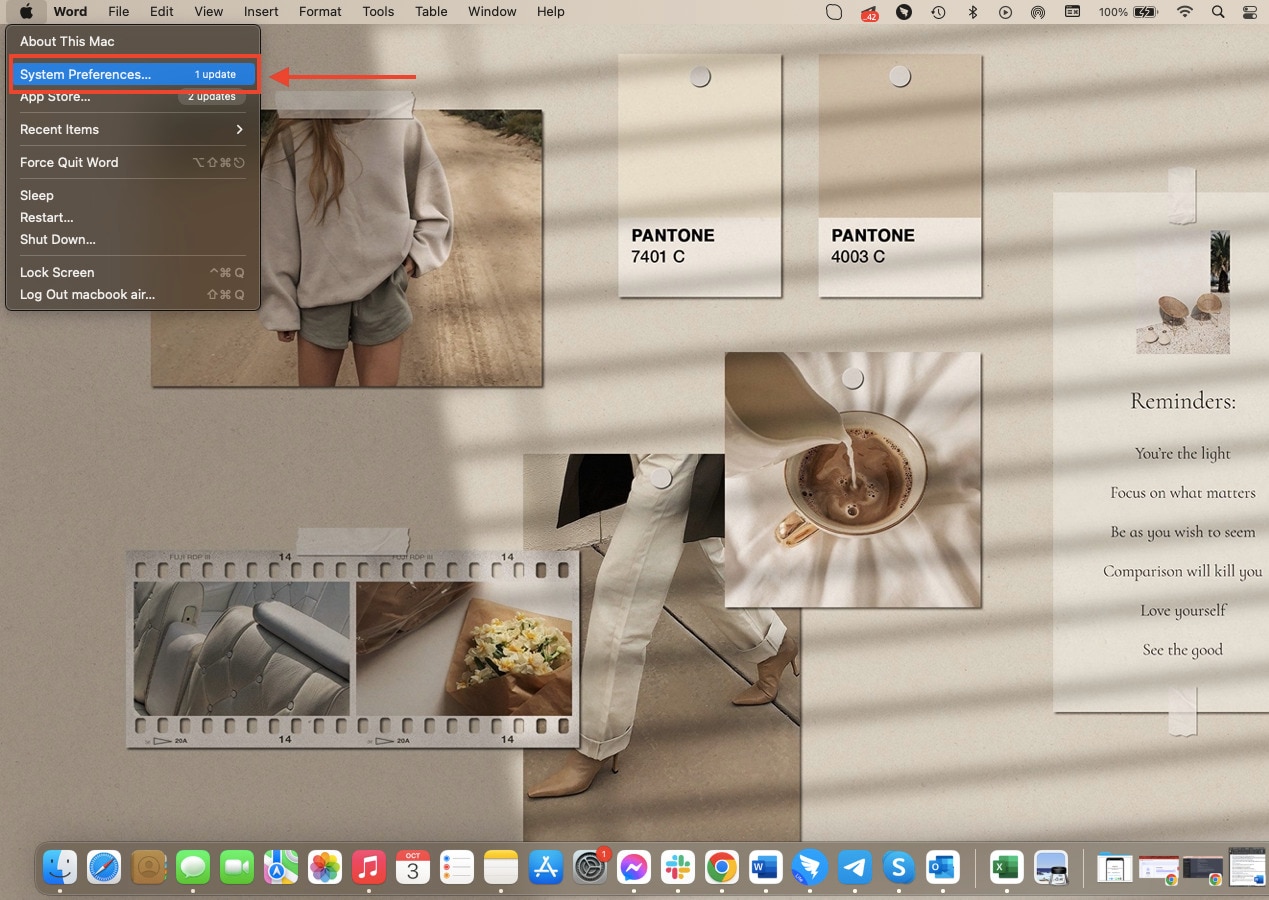
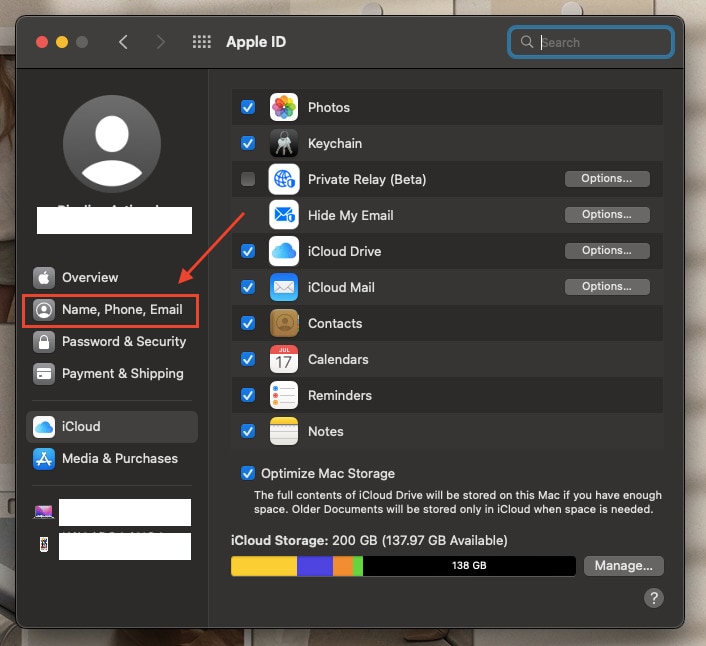
- Step 2: Click System Preferences, and then select Apple ID.
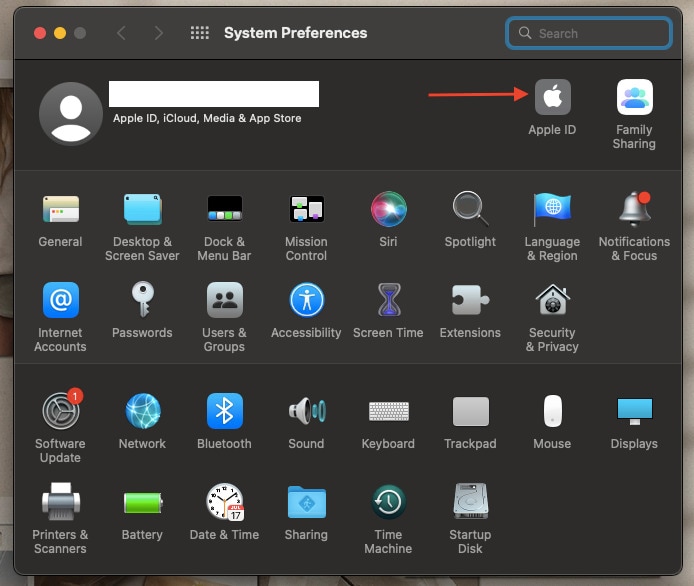
- Step 3: Navigate to the Name, Phone, Email section, then click Edit next to your email address.
- Step 4: Input your new email address, and Apple will send a verification code to it.
- Step 5: Check your new email for the verification code, enter it, and voilà! Your Apple ID email is updated on your Mac.
Method 2: For Mobile Device Users
For those who prefer the convenience of mobile devices:
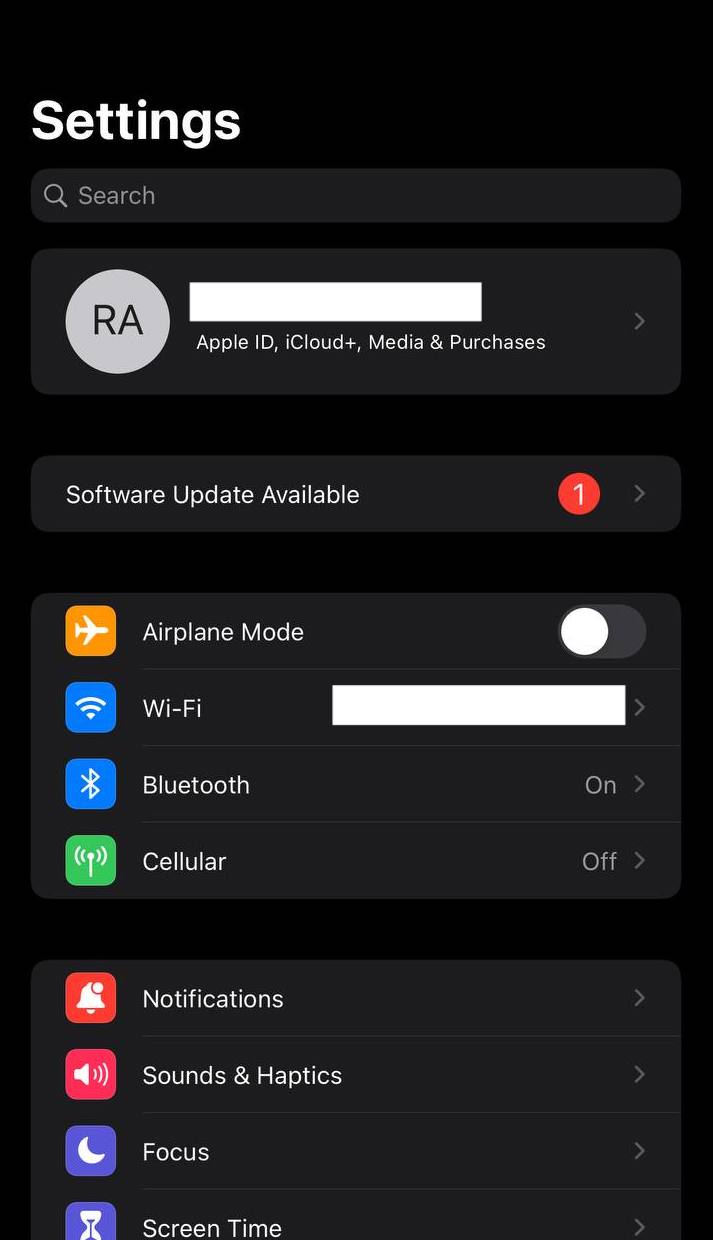
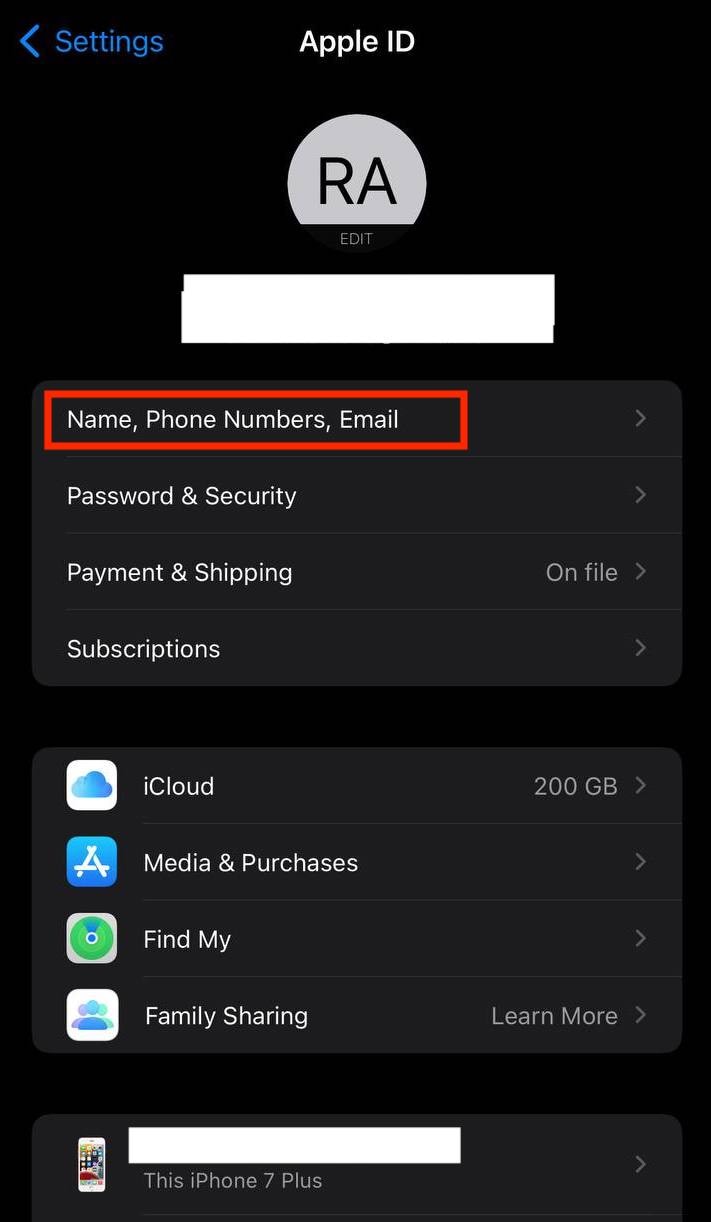
- Step 1: Open the Settings app on your Apple iPhone XS or iPad, then tap your Apple ID at the top of the screen.
- Step 2: Tap Name, Phone Numbers, Email.
- Step 3: Tap Edit next to your email address, enter your new one, then tap Next.
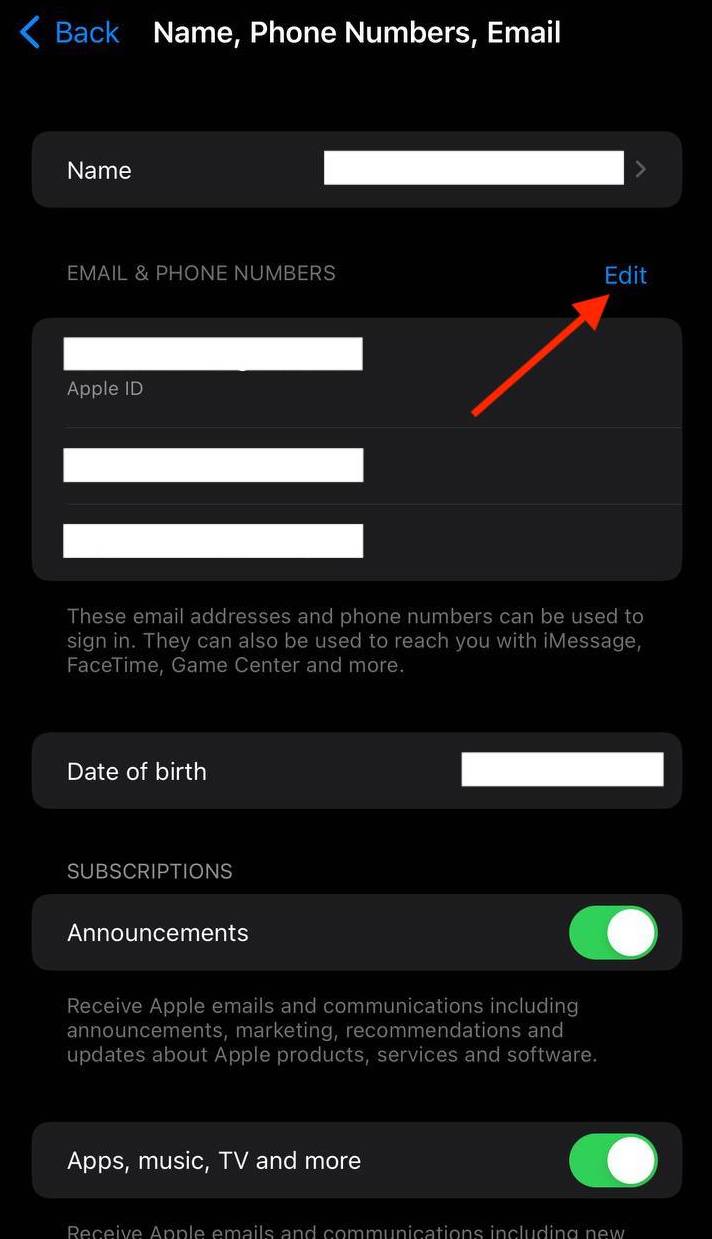
- Step 4: Apple will send a verification code to the new email. Enter it, and your Apple ID email on your mobile device is updated.
Method 3: For Browser Users
If you prefer the simplicity of a web browser:
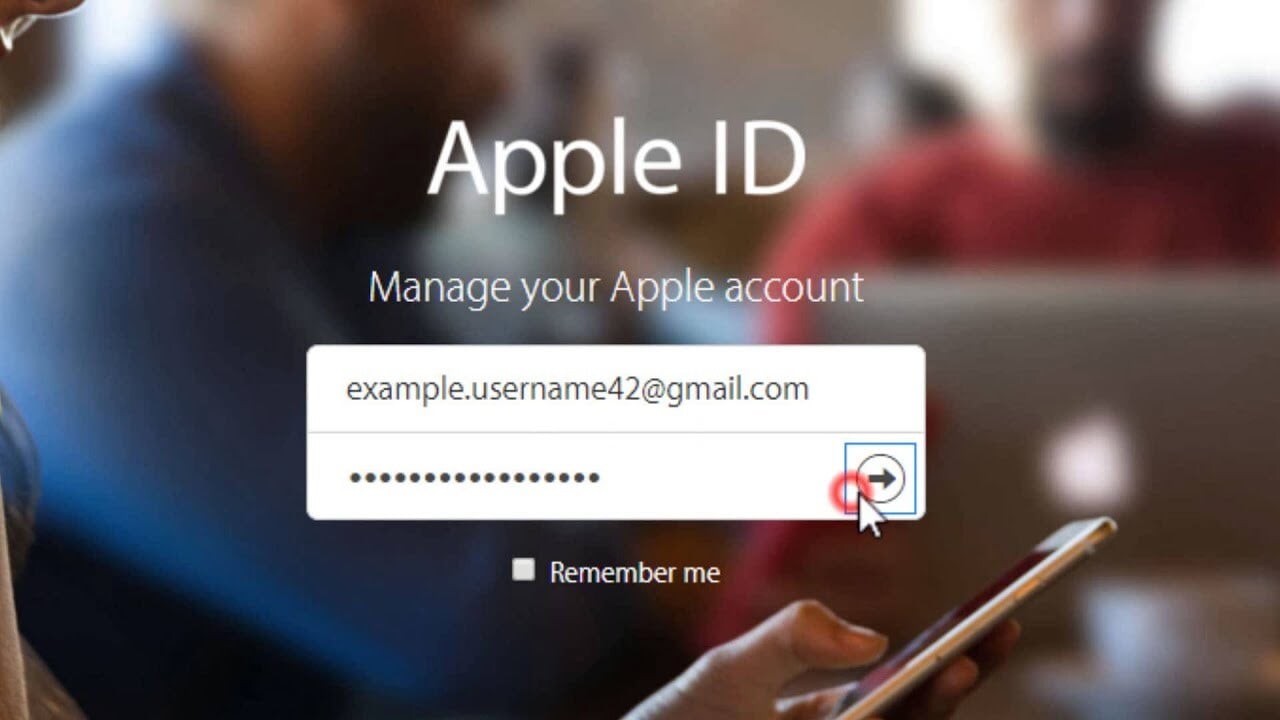
- Step 1: Open the web browser your prefer and go to the Apple ID account management page.
- Step 2: Click Sign In and tap your Email or Phone Number and Password.
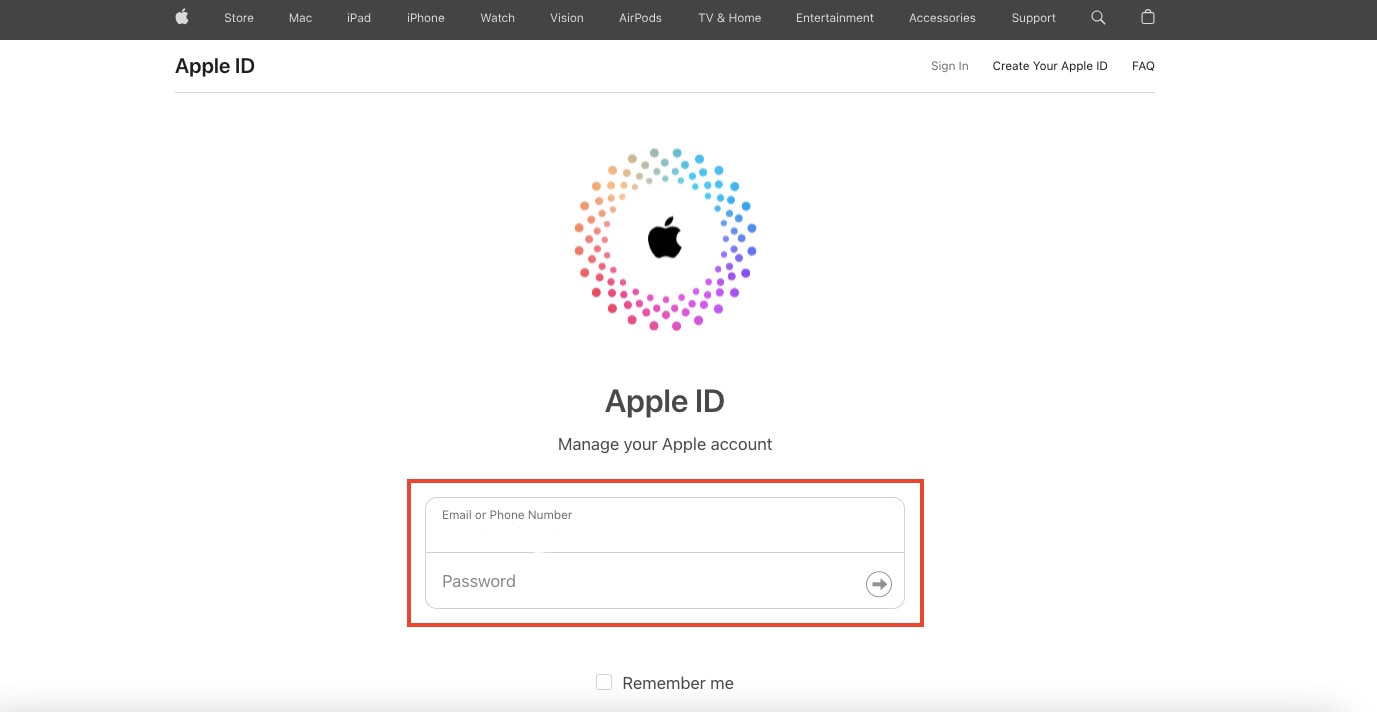
- Step 3: Click Edit next to your email address in the Account section.
- Step 4: Input your new email address and click Continue.
- Step 5: A verification code will be sent to your new email. Enter it to confirm your email change.
B. Updating Your Apple ID
Now that you’ve successfully changed your Apple ID email, it’s crucial to ensure that all your Apple devices are on the same page:
- Step 1: Tap the Settings application on your Apple iPhone XS or iPad.
- Step 2: Go to Update Apple ID Settings below your Apple ID settings.
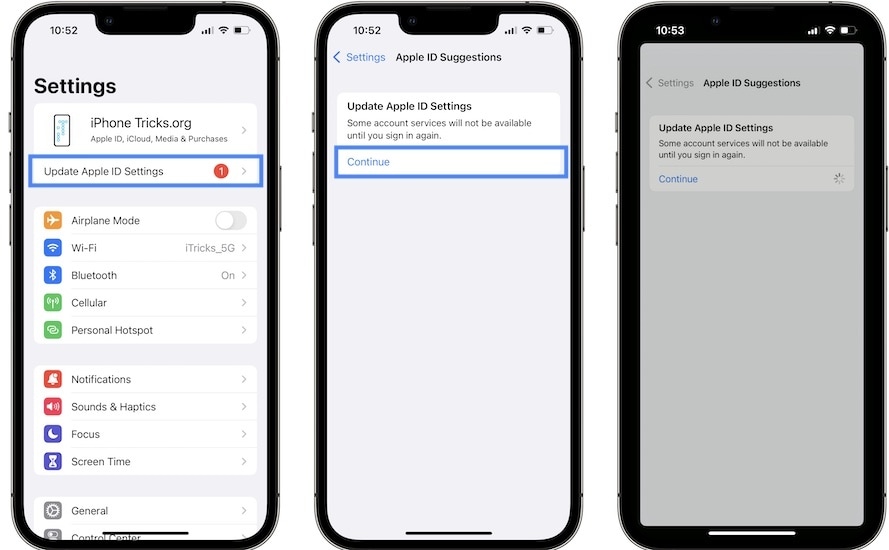
- Step 3: Tap Continue, then wait for a few moments. Your Apple ID will then get updated.
By following these steps, you’ll ensure that all your Apple devices are synced with your updated email address, providing a seamless and consistent Apple experience across all your gadgets. Now, with your new Apple ID email, you’re ready to explore the Apple ecosystem with renewed convenience and security.
Part III: Unlock iOS Screen With Wondershare Dr.Fone - Screen Unlock (iOS)
What if you find yourself in a situation where you want to change your Apple ID email address on your iOS device, but you’re locked out? Don’t worry; Dr.Fone - Screen Unlock (iOS) can rescue you. This handy tool is designed to help you unlock your iOS device, allowing you to change your Apple ID email address smoothly.
Key Features of Dr.Fone - Screen Unlock (iOS)
Check out the key features that Dr.Fone has to offer:
- **User-Friendly Interface.**Fone - Screen Unlock (iOS) is designed to be easy to use, making it accessible for users of all levels of technical expertise.
- It fits a wide range of iOS devices, including iPhones and iPads, ensuring that you can unlock your device no matter which one you have.
- **Multiple Unlock Modes.**Fone offers different unlock modes to cater to various scenarios. Whether you’ve forgotten your passcode, have a disabled device, or are dealing with a locked Apple ID, Dr.Fone has a solution.
- **No Data Loss.**One of the most significant advantages of Dr.Fone is that it unlocks your device without causing any data loss. Your photos, apps, and important information remain intact.
Step-by-Step Guide on Using Dr.Fone - Screen Unlock (iOS)
Outlined below is the step-by-step guide on how to use Dr.Fone – Screen Unlock for iOS devices:
- Step 1: When you’ve finished downloading and installing Wondershare Dr.Fone on your computer, go to Toolbox, then Screen Unlock, and choose iOS to open the tool in a new window.
- Step 2: Begin to pick the Unlock iOS Screen button in the new window to begin unlocking the screen of your iOS device. On the following screen, click the Start button to begin unlocking the iOS device.
Note: Ensure your device’s battery levels are enough before proceeding.

- Step 3: Following that, place your iDevice in Recovery Mode. Follow the on-screen instructions to set your iDevice into mode based on your phone model.
Note: If Recovery Mode does not work, try hitting the Try DFU Mode button at the bottom to access the instructions for putting the iDevice in DFU mode.

- Step 4: After successfully entering your device into Recovery Mode, the platform automatically recognizes the Device Model and shows it in the appropriate section. Modify the model and select the System Version to meet your needs if necessary. After that, select Start to begin unlocking your device’s screen.
- Step 5: The next screen shows the progress of your iOS firmware download. If at any point you decide you’d rather call it quits, hit the Stop button. If the iOS firmware takes a long time to download on your platform, you can copy the download link by clicking the Copy option.

- Step 6: After a successful download, the iOS firmware is checked and shown on the next screen. Select the Unlock Now option again to proceed with the unlocking procedure. A confirmation popup displays, requesting you to confirm the action. Enter the unlock code and press the Unlock button to continue.

- Step 7: You’ll see the unlocking status of your iOS device on the following screen. Don’t forget that keeping the gadget plugged in is necessary to avoid bricking it.
- Step 8: Click the Done button once the iDevice has been unlocked. If you’re still stuck with a locked iPhone, iPad, or iPod, select Try Again to retry the process.

By using Dr.Fone - Screen Unlock (iOS), you can regain access to your iOS device and continue with the process of changing your Apple ID email address hassle-free. It’s a reliable and user-friendly solution that ensures you can enjoy the benefits of the new email address without losing any of your precious data.
You May Also Like:
How to Show Email Password on iPhone and Find It Back
A Detailed Guide to Fix All iPad Email Problems [2023]
How to Fix Email Disappeared from iPhone?
Conclusion
This guide easily explored the process of changing your Apple ID email address. It started by understanding why this change might be necessary and provided straightforward methods for Mac, mobile, and browser users to accomplish it seamlessly.
But what if you’re locked out of your iOS device? Don’t fret; Dr.Fone - Screen Unlock (iOS) is a user-friendly tool that can help you regain access to your device. It ensures a smooth transition to your new email. Unlock new possibilities with Dr.Fone, a reliable companion in managing your iOS device. Explore its features and simplify your Apple journey today!
How to Unlock Apple iPhone XS, Apple’s New iPhone
It has happened to all of us at some point in the other. The chances of it happening are notoriously higher when you just started using it. We are talking of passcodes on iPhones. Apple requires setting up a 6-digit passcode to use some features such as Face ID on your Apple iPhone XS. So, you thought it was a great idea to set up your new Apple iPhone XS with a new passcode, right? The only problem is that the 6 digits you thought are bulletproof and no one will be able to come up with them in relation to you, are not coming to you either. You forgot the newly set passcode, entered the incorrect passcode more times than the software was happy about, and the Apple iPhone XS is locked now. What to do? Read on.
Part I: Why Is Your Apple iPhone XS Locked?
There can be a few reasons why your Apple iPhone XS is locked, the primary ones being that you bought a second-hand Apple iPhone XS from someone who set it up with a passcode and decided it wasn’t for them and was nonchalant enough to sell it to you without removing the passcode from the Apple iPhone XS, or that you forgot the passcode to your new Apple iPhone XS and entered it incorrectly a few times. In any case, help is at hand.
We understand how frustrating it can be when your newly purchased Apple iPhone XS does not unlock because of a passcode entry issue, and all you want to do is get the screen unlocked. At Wondershare, we strive to create meaningful differences in the lives of the people that use our software and keeping that in mind, we have a solution for you to unlock your Apple iPhone XS passcode screen using Dr.Fone - Screen Unlock (iOS).
II.I Using Dr.Fone - Screen Unlock (iOS) to Unlock the Locked Apple iPhone XS
Dr.Fone - Screen Unlock (iOS)
Unlock iPhone/iPad Lock Screen Without Hassle.
- Simple, click-through, process.
- Unlock screen passwords from all iPhone and iPad.
- No tech knowledge is required, everybody can handle it.
- Supports iPhone XS (Max) / iPhone XR / iPhone X / 8 (Plus)/ iPhone 7(Plus)/ iPhone6s(Plus), iPhone SE and the latest iOS version fully!
4,395,217 people have downloaded it
Dr.Fone is a set of modules that make life easy for you. Any kind of problem you can think of, it is likely that Dr.Fone has a remedy for it ready in its arsenal. A locked Apple iPhone XS is no different. Here is how to use Dr.Fone - Screen Unlock (iOS) to unlock Apple iPhone XS passcode:
Step 1: Install Dr.Fone - Screen Unlock (iOS) on your computer.
Step 2: Connect your locked Apple iPhone XS to the computer.
Step 3: Launch Dr.Fone and select the Screen Unlock module.

Step 4: Select Unlock iOS Screen.
Step 5: Follow the on-screen instructions to boot the Apple iPhone XS in Recovery Mode. If for some reason you are unable to boot into Recovery Mode, there are instructions at the bottom to enter DFU mode.
Step 6: Dr.Fone will tell you the phone model and the software installed on it. If it is incorrect, use the dropdown lists to select the correct information.
Click Download to download the firmware file for your device.
Step 7: Select the firmware package after the download completes. After the download completes, you can click Unlock Now to start unlocking the Apple iPhone XS.
In a short while, your Apple iPhone XS will be unlocked. It is important to note that unlocking a locked Apple iPhone XS cannot be done without wiping data.
II.II How to Unlock Apple iPhone XS with Find My (iPhone)
Find My allows you to unlock your Apple iPhone XS remotely if you want to. So, if you have forgotten the passcode and are unable to unlock your Apple iPhone XS, there is a way you can unlock it using Find My. Doing this will wipe your data from the Apple iPhone XS device and set it up as new, though. Here is how to do that:
Step 1: If you have any other Apple device that is logged in with the same Apple ID as the Apple iPhone XS, you can launch Find My on that device. Else, you can visit https://icloud.com and log into the same iCloud account/ Apple ID as the locked Apple iPhone XS.
Step 2: Under Find My (or Find My iPhone if you are using the iCloud website), select your Apple iPhone XS and click Erase iPhone and confirm.
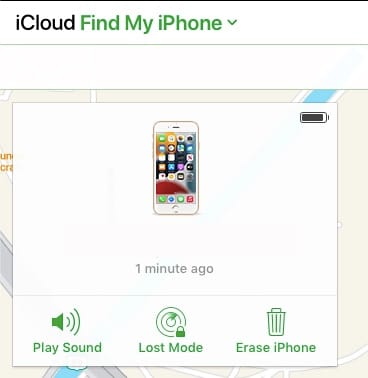
That’s it. You will have wiped and unlocked your Apple iPhone XS and it will start with factory settings. Note that this works only if the Apple iPhone XS was connected to Find My in the first place. If not, then you always have Dr.Fone - Screen Unlock (iOS) to help you out.
II.III Put The Apple iPhone XS in Recovery Mode
You can unlock your Apple iPhone XS using Recovery Mode, yourself.
Step 1: Connect your Apple iPhone XS to the computer and open iTunes. If you are on a Mac that runs macOS Catalina or higher, open Finder.
Step 2: Press the volume up button and let go. Press the volume down button and let go. Press the side button (power button) and keep holding it till Finder or iTunes detects the phone in Recovery Mode.
Step 3: Select Restore to download and reinstall the latest iOS on your Apple iPhone XS and unlock Apple iPhone XS.
Part III: How to Turn Off Passcodes in Apple iPhone XS
If after reading all this and going through so much hassle to unlock the Apple iPhone XS, you feel that passcodes are not worth your time, we feel you. We designed Dr.Fone to help you be at ease and be safe with passcodes for when you forget them, but if you would rather not use passcodes at all, we understand where you’re coming from. Here is how to turn off passcodes for good on Apple iPhone XS:
Step 1: Launch Settings.
Step 2: Scroll down to Face ID and Passcode.
Step 3: Enter your passcode.
Step 4: Scroll down and select Turn Passcode Off.
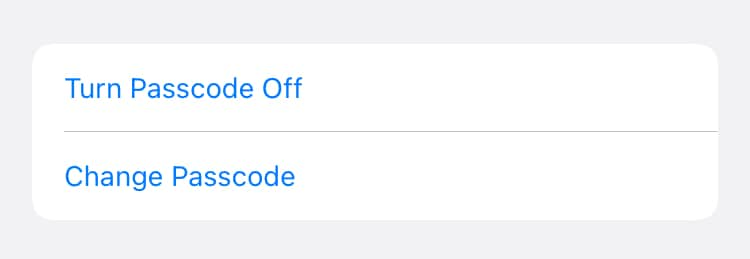
Step 5: Enter your passcode one last time.
You’re done. Now go ahead and forget the passcode forever. You will not need it again. Do note, however, that not using a passcode on your Apple iPhone XS leaves not only your data but your Apple iPhone XS itself in a highly vulnerable state. Anyone with access to your device can do anything on the Apple iPhone XS device that you could, including setting up a passcode that you will then have to use this guide to unlock.
Part IV: More information about Apple iPhone XS/Apple iPhone XS mini/Apple iPhone XS Pro
The ways mentioned before should help you get out of the locked Apple iPhone XS now. Here is a shortlist of the features of the Apple iPhone XS range. You may learn more information about Apple iPhone XS range that you may never know before.
5G Capability and Dual eSIM Support
The Apple iPhone XS range builds on the Apple iPhone XS 12 range for 5G capability by supporting more bands than the Apple iPhone XS 12 lineup. 5G modems are the same across the Apple iPhone XS lineup. the Apple iPhone XS lineup supports dual eSIM for the first time ever in iPhones. You do get a physical SIM tray for one nano-SIM though, so don’t sit up.
Cinematic Mode
You might be wondering if you will get the highlight Cinematic Mode if you were to pick the cheapest of the Apple iPhone XS lineup, that is, the Apple iPhone XS mini. The answer is yes, you will. All Apple iPhone XS models support Cinematic Mode.
Water Resistance and Charging
All Apple iPhone XS models feature the same IP68 water resistance (that is a depth of 6 meters for up to 30 minutes) and feature MagSafe charging. No differences here, except that the Apple iPhone XS mini is still capped at 12W charging with MagSafe, just like the Apple iPhone XS 12 mini was.
Part V: The Bottom Line
A locked Apple iPhone XS is never a pretty sight. Fortunately, there are a couple of things you can do to try and unlock your Apple iPhone XS and remove the passcode from your Apple iPhone XS. There is also Wondershare Dr.Fone - Screen Unlock (iOS) to unlock your Apple iPhone XS for you when you need help removing the passcode from your Apple iPhone XS and unlocking it.
Also read:
- [New] 2024 Approved Veiled Glance at Digital Diary (FB)
- [New] In 2024, From Streams to Statements Decoding the 3-Step Process for Calculating YouTube Earnings
- Expert Reviews on VisionX Pro: Prescription-Strength Anti-Blue Light Eyewear
- In 2024, Detailed Review of doctorSIM Unlock Service For iPhone 11 | Dr.fone
- In 2024, Enduring Seamlessness Direct Profile URL Insertion Guide
- In 2024, How To Unlock A Found iPhone 13 Pro Max? | Dr.fone
- In 2024, How to Unlock Apple iPhone SE without Passcode or Face ID | Dr.fone
- In 2024, Unlock Your Disabled iPhone 13 Without iTunes in 5 Ways | Dr.fone
- Massive Savings on Samsung's 4TB Portable SSD - Over 50% Discount Exclusively at Amazon for Labor Day | Tech Deals Blog
- Title: In 2024, How to Unlock Your iPhone XS Passcode 4 Easy Methods (With or Without iTunes) | Dr.fone
- Author: Amelia
- Created at : 2025-02-26 02:44:57
- Updated at : 2025-03-03 19:28:02
- Link: https://iphone-unlock.techidaily.com/in-2024-how-to-unlock-your-iphone-xs-passcode-4-easy-methods-with-or-without-itunes-drfone-by-drfone-ios/
- License: This work is licensed under CC BY-NC-SA 4.0.