
In 2024, iPhone 13 Pro Asking for Passcode after iOS 17/14 Update, What to Do? | Dr.fone
Apple iPhone 13 Pro Asking for Passcode after iOS 17/14 Update, What to Do?
If you’ve recently updated your iOS iPhone and iPad to the iOS 17/14 operating system, you may notice a bit of a bug where the Apple iPhone 13 Pro displays the passcode lock, even if you haven’t got a security code in place.
This obviously means you won’t be able to access your phone, and in many cases, you’re going to want to get back into your phone as quickly as possible. However, this may be easier said than done. Fortunately, today we’re going to go through multiple solutions to help you get your device working as it should!
Part 1. Don’t try passcodes blindly
One of the worst things you can do when faced with this situation is to enter passcodes blindly. Perhaps you’re trying random numbers and letters, or you’re trying passwords you’ve used in the past. If you get it wrong, you’re going to be locked out of your device for a long time.
The more times you get your code wrong, the longer you’ll be locked out, so avoid doing this at all costs, so make sure you move straight onto these approaches to get your phone working as quickly as possible.
Part 2. 5 ways to unlock iPhone after iOS 17/14 Update
2.1 Try a default passcode in your family
While we said, you shouldn’t type in random numbers to try and guess the password, of course, if you have a standard family passcode that you use across all iOS devices, perhaps an admin password or just something you use for everything, it can be well worth a try.

In reality, you get three attempts to put a passcode in before it locks you out, so try two passcodes that your family uses to see whether this will easily unlock your device. If you brought your device preowned and still have contact with the owner, they may have a passcode you can try.
2.2 Unlock iPhone with an unlock tool
The second approach you can take if you don’t know the passcode and can’t get it unlocked is to use a powerful software solution known as Dr.Fone - Screen Unlock (iOS) . This Wondershare software application completely unlocks your phone, even if you don’t know the passcode.
This software is easy to use and incredibly simple, yet it gets the job done. If you’re looking for a quick way to get your iOS device back up and running with full access after an iOS 17/14 update, it doesn’t get much better than this. Here’s how it works;
Step 1. Download and install the Dr.Fone - Screen Unlock (iOS) software to either your Mac or Windows PC and open it, so you’re on the homepage. Connect your iOS device to your computer using the USB cable and wait for the software to recognize your device.
When it does, close iTunes if it automatically opens and clicks the Screen Unlock option from the main menu.

Step 2. Click the Unlock iOS Screen option.

Step 3. You will now need to put your device in DFU mode, also known as Recovery Mode. Fortunately, this is easy thanks to the on-screen instructions where you will hold down the volume down and power button for a few seconds.

Step 4. Once Dr.Fone - Screen Unlock (iOS) has detected your device in DFU Mode. You’ll be able to select which device you’re using and what firmware you want to be repaired; in this case, iOS 17/14.

Step 5. Once everything has been confirmed and you’re happy to continue, press the Unlock option. The program will do its thing, and when it’s done, the software will say you’re able to disconnect your Apple iPhone 13 Pro and use it without a lock screen!
That’s how easy Dr.Fone - Screen Unlock (iOS) makes the entire unlock process!

2.3 Restore an old backup from iTunes
Another key way that some users have found to unlock their device after an update is to restore their device to an older version, aiming to put your device back into a position where it didn’t have a lock screen.
It’s only possible to do this if you’ve backed up your iOS device in the past (which is why you’re encouraged to back up regularly), and it can all be done through the iTunes software on either your Mac or Windows computer. Here’s how it works;
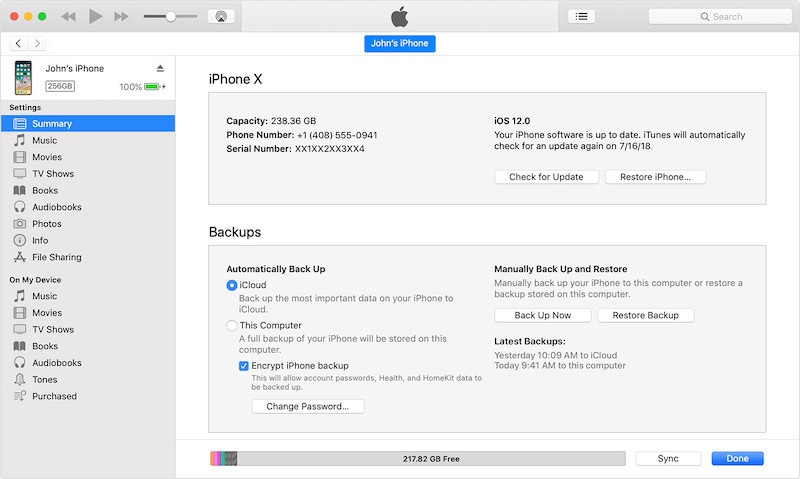
Step 1. Ensure you’re running the latest version of iTunes and then connect your iOS device to your Mac or Windows computer using the official USB cable. This should automatically open the iTunes window.
Step 2. In iTunes, click the symbol representing your device and then click Summary. On this screen, you’ll be able to choose the Restore iPhone option at the top to begin the restoring process.
Step 3. Follow the onscreen instructions where you’ll choose which backup file you want to use before iTunes, then restores your device. When the software has completed the process, you’ll be able to disconnect your Apple iPhone 13 Pro and use it without a lock screen!
2.4 Restore in recovery mode
In some cases, restoring your device using just iTunes will not be good enough, and it won’t have the effect you’re looking for; in this case, restoring your device with no lock screen after an iOS 17/14 update.
If the above method of restoring your device via iTunes doesn’t work, or you haven’t got a backup file to load, you’ll need to restore your device using a move known as Recovery Mode, or DFU mode. This will hard reset your device and get it working to its full potential.
Here’s how to do it. (Note, the process will differ slightly depending on which model of iPhone you’re using).
Step 1. Press and hold the volume up button for about one second, and then switch and press the Volume Down button for the same amount of time. You can then hold the side button (on devices without a home button), and the following screen should appear after a few seconds.
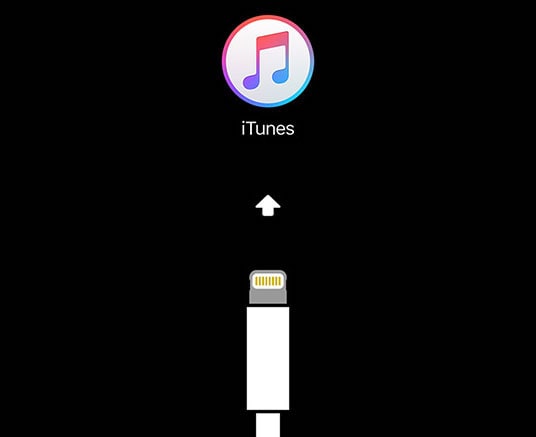
Step 2. Now connect your Apple iPhone 13 Pro to your computer with iTunes and wait for iTunes to open. Make sure you’re running the latest version of iTunes before connecting up your device. Also, make sure you’re using the official USB cable for the most stability.
Step 3. iTunes should automatically detect that your device is in Recovery Mode and automatically restore your device to a default state without a lock screen. Wait until this process is completed before disconnecting your device and using it as normal.
2.5 Use Find My iPhone feature in iCloud
The fifth and final approach you can take to removing a lock screen from your recently updated iPhone or iPad when faced with the iOS 17/14 glitch is taking advantage of the integrated Apple technology and features are known as Find My iPhone.
While this feature originally allows you to literally find your Apple iPhone 13 Pro in the situation where it’s lost and offers many other security features to help ensure your device and data don’t fall into the wrong hands, you can also use it to remove your device unwanted lock screen.
Of course, this will only work if the Find My iPhone features have been enabled in the past, so make sure you’re using it to get it to work. Here’s how to use the feature to get your phone access back.
Step 1. From your computer, iPad, tablet, or mobile web browser, head over to iCloud.com and log into your iCloud account using the login in button at the top of the screen.

Step 2. Once signed in, scroll down the menu of features and select the Find iPhone feature. Click on the All Devices option at the top.
Step 3. From the list of devices connected to your account, click the Apple iPhone 13 Pro device name with the locked screen and then click the Erase option. This will clear everything from your device, much like the process we’ve spoken about in the methods above.
Leave the Apple iPhone 13 Pro device to erase, and once completed, you’ll be able to pick up and use your phone as normal without a lock screen. You should also now be able to update to iOS 17/14 without any problems!
Summary
And there you go, the five key ways you need to know when it comes to removing an unwanted lock screen from your iOS device after an iOS 17/14 update. We highly recommend the Dr.Fone - Screen Unlock (iOS) since the software makes the whole process incredibly easy, especially when managing any problems you may have on your iOS device!
How To Unlock Apple iPhone 13 Pro Without Swiping Up? 6 Ways
Part 1: What’s Swipe Up To Unlock on iPhone?
The Swipe Up Unlock function has been a fundamental aspect of iPhone functionality for a long time. It enables swift access to your phone by swiping upward from the screen’s bottom. This gesture grants entry to all your applications and data on your Apple iPhone 13 Pro. It was initially introduced to replace the physical Home button. However, it significantly simplified the user experience with iPhones.
It streamlined various tasks without the need for excessive button pressing. Moreover, its simplicity and speed became vital in how individuals utilized their iPhones. Yet, as preferences evolve, not everyone finds the exclusive Swipe Up Unlock feature appealing. Hence, exploring alternative methods to unlock your Apple iPhone 13 Pro is advisable.
Part 2: Why Do You Need To Swipe Up to Unlock on iPhone?
Swipe up to unlock the iPhone holds significant importance in its user interface and accessibility. This intuitive gesture serves as the primary means of gaining access to the Apple iPhone 13 Pro device. Here are several reasons why the Swipe Up to Unlock iPhone feature has been a cornerstone:
1. Simplicity and Ease of Use
The swipe gesture replaced the physical Home button, simplifying the unlocking process. Users could effortlessly swipe up from the bottom of the screen. It eliminates the need for pressing multiple buttons to access their devices.
2. Streamlined Navigation
Beyond unlocking the iPhone, the swipe gesture also allowed for quick navigation to the home screen. This streamlined access enabled users to jump straight into their apps, messages, or other functions.
3. Visual Aesthetics and User Experience
Apple’s design philosophy often revolves around clean, intuitive interfaces. The swipe up to unlock gesture aligns smoothly with this philosophy. It contributes to a visually appealing and user-friendly experience.
4. Security and Privacy
The gesture served as a security measure, preventing accidental or unauthorized access to the iPhone. Moreover, users can confidently rely on this unlocking method to safeguard their personal data.
Part 3: 6 Common Ways To Unlock iPhone Without Swiping Up
For an extended period, the primary method to unlock an iPhone involved swiping up. Nonetheless, if you wish to explore alternative methods, it’s entirely feasible. Various methods have emerged over time to open the Apple iPhone 13 Pro without swiping up.
Method 1: Unlock iPhone without Swiping Up with Enable Back Tap
With the debut of iOS 14, Apple unveiled an innovative feature called Back Tap. It provides users with a method to engage with their iPhones by tapping the Apple iPhone 13 Pro device’s rear surface. This innovative functionality can be configured to perform various actions. It includes unlocking the phone without a swiping-up gesture. Follow these steps to set up and use the Back Tap feature for unlocking your Apple iPhone 13 Pro:
Step 1. To start, access the “Settings” on your iOS device. Once there, scroll down until you locate the “Accessibility” option and tap on it. On the following screen, select “Touch” to access Touch settings under the “Physical and Motor” section.

Step 2. On the following screen, scroll down to the bottom and press “Back Tap.” Now, either choose “Double Tap” or “Triple Tap” and select “Lock Screen” from the options under the “System” section.

Method 2: Unlock iPhone Without Swiping Up Using iPhone Screen Unlocker: Dr.Fone - Screen Unlock
If you’ve forgotten the passcode for your Apple iPhone 13 Pro and are unable to access it anymore, there is no need to panic. We have the perfect tool for you that can unlock any lock on your screen in a few moments. The tool we are talking about is Wondershare Dr.Fone - Screen Unlock (iOS) , an industry leader in smartphones. Dr.Fone, a pioneering tool for iOS lock screen removal, assists in unlocking various iPhone/iPad/iPod touch lock screens.
Dr.Fone - Screen Unlock (iOS)
Unlock iPhone Without Swiping Up!
- Simple, click-through, process.
- Unlock screen passwords from all iPhones and iPads.
- No tech knowledge is required, everybody can handle it.
- Supports iPhone 15 /iPhone 14 /iPhone 13, iPhone 12, … and the latest iOS version fully!


4,395,218 people have downloaded it
It can handle 4-digit / 6-digit passcodes, custom numeric codes, alphanumeric passcodes, Face ID, Touch ID, Screen Time Passcodes, and more within minutes. Wondershare Dr.Fone also offers a swift and simple iCloud activation lock removal feature within its iPhone unlocking capabilities.
Key Features of Wondershare Dr.Fone
- Capable of bypassing Mobile Device Management (MDM) and Screen Time restrictions without causing any data loss.
- Compatible with iOS 17/iPadOS 17 and iPhone 15, ensuring its functionality with the latest Apple OS.
- Offers a simple 3-step procedure, making it accessible even for users without technical expertise.
Steps To Unlock iPhone Without Swiping Up Using Wondershare Dr.Fone
Here is how to open your Apple iPhone 13 Pro without swiping up with the help of Wondershare Dr.Fone:
Step 1: Navigate to Unlock iOS Screen
Download and install Wondershare Dr.Fone on your computer. Go to “Toolbox,” tap “Screen Unlock,” and finally choose “iOS” to access the screen unlock tools. Once the window appears, choose the “Unlock iOS Screen” button to proceed with unlocking your iOS device’s screen. In the following screen, click “Start” to begin the process of unlocking your iOS device.
Step 2: Initiate the iDevice into Recovery Mode
After this step, enter Recovery Mode on your iDevice by following the specific on-screen instructions. Once your iDevice is in Recovery Mode, the system automatically identifies and displays the “Device Model.” You can make adjustments to the model if necessary and choose the “System Version” as per your needs. When finished, click on “Start” to initiate the unlocking process for your device’s screen.
Step 3: Successfully Unlock Your Locked iPhone
The screen will showcase the download progress of the iOS firmware on the platform. Once the iOS firmware download is completed, it undergoes verification. Proceed by selecting the “Unlock Now” button to initiate the unlocking process. A prompt window will appear, requesting confirmation for the process. Enter the necessary code and tap on “Unlock” to proceed. Upon successful unlocking of the iDevice, click “Done” to complete the process.
Method 3: Unlock the Apple iPhone 13 Pro Without Swiping Up via Touch ID/Face ID
Apple’s advanced biometric authentication systems, Touch ID and Face ID, are also reliable options. These offer smooth and secure methods to unlock the Apple iPhone 13 Pro 11 without swiping up. The following are the models that support Touch ID and Face ID:
Models with Touch ID
- iPhone SE (2022)
- iPhone SE (2020)
- iPhone SE (2016)
- iPhone 8 Plus
- iPhone 8
- iPhone 7 Plus
- iPhone 7
- iPhone 6s Plus
- iPhone 6s
- iPhone 6 Plus
- iPhone 6
- iPhone 5s
Models with Face ID
- iPhone 15 Pro Max
- iPhone 15 Pro
- iPhone 15 Plus
- iPhone 15
- iPhone 14 Pro Max
- iPhone 14 Pro
- iPhone 14 Plus
- iPhone 14
- iPhone 13 Pro Max
- iPhone 13 Pro
- iPhone 13 mini
- iPhone 13
- iPhone 12 Pro Max
- iPhone 12 Pro
- iPhone 12 mini
- iPhone 12
- iPhone 11 Pro Max
- iPhone 11 Pro
- iPhone 11
- iPhone XS Max
- iPhone XS
- iPhone XR
- iPhone X
Method 4: Unlock Your Apple iPhone 13 Pro Without Swiping Up via AutoUnlockX
AutoUnlockX is a tweak designed for jailbroken iPhones. It enhances the Apple iPhone 13 Pro device’s unlocking experience by automatically bypassing the lock screen. That is when certain conditions are met. Jailbreaking involves bypassing the software restrictions imposed by Apple. Here are the steps to iPhone 11 unlock screen without swiping:
Step 1. Begin by adding an external repository like Sileo or Cydia, which will serve as an emulator. Remember, it won’t be automatically added to your applications; you’ll need to do this manually. So, download the repository from the SparkDev website (it’s not available on the App Store). Head to the “Tweaks” tab, find “AutoUnlockX,” and download it to your device.
Step 2. Following this, go to “Sources” in your Apple iPhone 13 Pro’s Settings, select “Edit,” and manually add the external repo to Cydia or Sileo. Open Sileo or Cydia and navigate to the “Search” page. In the search bar, type “AutoUnlockX.” Once the tweak appears, select it, and then tap “Get (Sileo)” or “Install (Cydia).”
Step 3. Confirm the selected repo by tapping the “Confirm” option and allow the tweak to install. Once installed, tap “Restart SpringBoard” to complete the download. After your Apple iPhone 13 Pro resprings, proceed to enable AutoUnlockX.
Step 4. Open Settings, tap on “App,” and then select “AutoUnlockX.” Toggle on “Enable Auto Unlock.” Customize other settings as desired by tapping on them to turn them on or off.
Step 5. When finished, tap the “Respring” option at the bottom to apply your changes. At last, unlock your Apple iPhone 13 Pro using your Face ID effortlessly.
Method 5: Unlock iPhone Without Swiping Up via Voice Control
Utilizing Voice Control to unlock your Apple iPhone 13 Pro offers a hands-free approach to accessing your device. It is especially helpful for individuals with accessibility needs. There are situations where manual interaction might be challenging. Here’s a guide on how to set up and use “Voice Control” to unlock your Apple iPhone 13 Pro:
Step 1. Open the Settings app on your Apple iPhone 13 Pro and scroll down to tap “Accessibility.” On the following screen, press “Voice Control” to proceed further.

Step 2. To set up voice control, you need to ensure that the “Voice Control” option is toggled on. After activating Voice Control, use a voice command to unlock your device.

Method 6: Unlock iPhone Without Swiping Up with Switch Control
Utilizing Switch Control is an excellent accessibility feature on iOS devices. It allows users to interact with their iPhones using adaptive switches or the Apple iPhone 13 Pro device’s screen itself. Moreover, it can provide an alternative way to navigate the Apple iPhone 13 Pro and access the Home screen. You no longer have to rely solely on the conventional swipe gesture. Here is how you can set up switch control to iPhone swipe to unlock:
Step 1. Access your Apple iPhone 13 Pro’s Settings, then tap on “Accessibility.” Now find and select “Switch Control,” and within it, navigate to “Switches.” Now, tap “Add New Switch” and choose “Camera.”

Step 2. Set Left Head Movement and Right Head Movement separately to “Home.” This action will lock the screen when tilting your head left or right. Now go back to “Recipes” in Switch Control, select “Edit,” and delete all existing recipes.

Step 3. Set “Scanning Style” to “Single Switch Step Scanning” and adjust “Dwell Time” to the shortest duration. Then, turn off the remaining settings under Switch Control.

Step 4. Save your switch, return to Accessibility Settings, and locate “Accessibility Shortcut.” Now, set triple-clicking the side button to activate “Switch Control.” On the home screen, triple-click the Side button, as previously set, to activate the switch on your Apple iPhone 13 Pro. Now, lock the Apple iPhone 13 Pro screen and then wake the Apple iPhone 13 Pro device without looking at it.

Conclusion
To conclude, we have explored different ways to unlock iPhones without swiping up beyond just using the usual swipe-up method. We’ve talked about using your fingerprint or face to unlock, using voice commands or special controls. The swipe-up gesture on iPhones is great, but these other methods give you more options.
While these methods are helpful, there’s a software called Wondershare Dr.Fone that’s particularly useful for iPhone issues. It does things like recovering data, fixing problems with your phone, and unlocking it when you can’t get in. Dr.Fone has a feature called “Screen Unlock” that was specifically made to help with different ways of unlocking iPhones.
Resolve Your Apple iPhone 13 Pro Keeps Asking for Outlook Password
Individuals and organizations use a diverse range of mail platforms to exchange information. Gmail, Outlook, or any alternative service is consistently utilized. While email platforms have revolutionized communication, they aren’t present without their challenges. Users often encounter issues that range from sync errors to authentication problems.
Among these challenges, iPhone users specifically grapple with a persistent issue. It often appears as “iPhone keeps asking for Outlook password.” This issue disrupts the user experience and raises security concerns. To address this problem, this guide presents a detailed guide featuring effective fixes.

Part 1. Why Does My iPhone Keep Asking for Outlook Password
The iPhone asking for Outlook password arises from a combination of factors. Understanding these reasons is crucial in diagnosing and resolving the problem effectively:
1. Incorrect Password Entry
Users might unknowingly enter the wrong password. They may have changed their Outlook password without updating it on their iPhones. This mismatch can trigger continuous password prompts.
2. Outdated Mail App
An outdated Outlook mail app on your Apple iPhone 13 Pro may struggle to communicate with its latest security protocols. This can lead to performance issues like the Apple iPhone 13 Pro keeps asking for passwords.
3. Network Connectivity Issues
Upholding a stable internet connection is necessary for effortless communication. An unreliable or unstable network can disrupt the synchronization process in Outlook.
4. Corrupted Email Account Profile
A corrupted email account profile on the Apple iPhone 13 Pro can cause disruptions during the authentication process. Resetting the email account on the Apple iPhone 13 Pro device might be necessary to resolve the issue.
5. Third-Party App Interference
Other mail applications installed on the Apple iPhone 13 Pro can also cause an issue. They might interfere with the Outlook app’s proper functioning. Identifying and temporarily disabling such apps can help diagnose and resolve the issue.
6. Excessive Email Fetching
Configuring the Outlook mail app to fetch emails too frequently causes the issue. It can strain the connection with Outlook servers, leading to authentication challenges. That causes issues like the Apple iPhone 13 Pro asking for a password.
7. iOS Software Glitches
The smooth functioning of the Mail app may be disrupted by problems and malfunctions present in the iOS software. Compatibility issues could emerge if your device is not operating on the latest iOS version.
Part 2. [Fixes] Solve iPhone/iPad Keeps Asking for Outlook Password
Now that we have explored why the iPad keeps asking for an Outlook password, it is time for practical solutions. These 13 fixes discussed below are designed to address the root causes comprehensively:
Fix 1. Add Password Once and Let the Prompt Disappear
If your Apple iPhone 13 Pro continuously prompts you for the Outlook password, a simple solution is to re-enter the password. Follow these steps to potentially resolve the issue once and for all by accessing the respective settings:
- Step 1. You begin by accessing your iDevice’s “Settings” app and scrolling down to tap the “Mail” option. Next, press “Accounts,” and on the following screen, select the Outlook account.

- Step 2. Encountering the error message “Account not authenticated” is what you will come across. Now, tap the “Re-enter Password” option to enter your correct Outlook password.

Fix 2. Change the Password to Your Outlook Mail
Sometimes, the email service provider may force users to change their passwords for security reasons. There is a chance that it is why your iPhone asks for an Outlook password. To modify your Outlook password from the desktop platform, adhere to the following steps:
- Step 1. Open your preferred web browser and go to the Outlook login page. Sign in to your Outlook account, locate, and click on your profile picture in the upper-right corner. There, click “My Profile,” and on the next screen, tap “Change Password” near the upper right corner.

- Step 2. Upon reaching the verification page, provide your password and tap the “Sign In” button. Afterward, you will be asked for other verification methods. Upon verifying, the “Change your password” window will appear. Here, you will need to enter your “Current password,” “New password,” and re-enter it to proceed. Then, hit the “Save” button, and your password will be changed.

Fix 3. Checking the Network Connection
Network inconsistencies can often disrupt the authentication process. This can be the leading cause behind persistent password prompts. To ensure a stable connection, ensure that you are connected to a reliable and stable Wi-Fi network. You can also try toggling the Wi-Fi and mobile data switches on and off.
Another way to confirm if network errors are the problem is to try enabling Airplane Mode. After a while, disable the Airplane Mode and check if the issue is resolved.

Fix 4. Using the Mail Toggle as a Remedy
A strategic approach to resolving authentication issues involves using the Mail toggle. You can use it to disable and re-enable the email services. This action essentially resets the Outlook app’s connection and can be performed as follows:
- Step 1. Within your Apple iPhone 13 Pro’s “Settings” app, scroll down and tap “Mail.” On the following screen, press “Accounts” and choose the “Outlook” account.

- Step 2. Here, you will find the toggle switch for “Mail.” Now, turn off the email service and wait for a few moments. Toggle the switch back on to re-enable the email service.

Fix 5. Delete and Re-Insert Outlook Account
Deleting and re-inserting your Outlook account on your Apple iPhone 13 Pro can provide a fresh start to the email integration. Follow these steps if the persistent iPhone keeps asking for an Outlook password:
- Step 1. Navigate to the “Mail” tab within the “Settings” app on your Apple iPhone 13 Pro, and choose “Accounts” to observe the roster of email accounts. Here, tap on your Outlook account, and the following screen, press “Delete Account.”

- Step 2. Once you have deleted the account, return to the “Accounts” tab. Select “Outlook.com” after tapping on “Add Account.” Now, follow the on-screen instructions to re-enter your account details.

Fix 6. Re-Check Sync Settings
Ensuring that your sync settings align with Outlook’s recommended configurations is crucial. Follow these steps to re-check and adjust your sync settings on your Apple iPhone 13 Pro:
- Step 1. After accessing the “Mail” tab within the Settings app, tap “Accounts.” Here, find and choose the “Fetch New Data” option, followed by selecting the “Outlook” account.

- Step 2. Confirm that the “Push” or “Fetch” settings are configured to your preference. “Push” enables real-time updates, while “Fetch” allows you to set specific intervals for email updates.

Fix 7. Uninstall and Re-Install Outlook App
Is the Outlook app generally showing a lot of glitches on your Apple iPhone 13 Pro? If yes, uninstalling and then re-installing it can address potential “iPhone**/iPad keeps asking for Outlook password”** issues:
Instructions: On your Apple iPhone 13 Pro’s home screen, navigate to the Outlook mail app. Long-press the Outlook app icon and choose “Remove App” from the pop-up menu. Then, tap “Delete App” and follow it by pressing “Delete” to uninstall the app. Afterward, access the App Store and download the Microsoft Outlook app again.

Fix 8. Update iOS From Settings
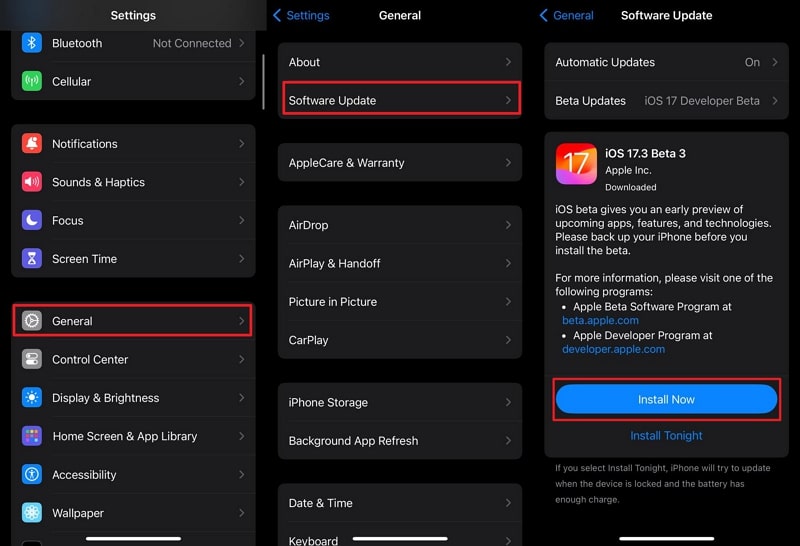
Outdated iOS versions can contribute to compatibility issues and glitches. This can affect the proper functioning of the Mail app and its integration with Outlook. Follow these steps to ensure your iOS is up to date:
Instructions. Access your device’s “General” settings from the Settings app. Tap “Software Update” on the next screen and check if an update is available. Tap “Install Now” to kick-start the iOS updating process if an update is available. Make sure your device is adequately charged and maintains a stable internet connection.
Fix 9. Try Other Alternatives to Outlook
Exploring alternative mail applications may offer a viable workaround. This is especially true if the iPhone asking for the Outlook password proves resistant to previous solutions. Consider using other email platforms such as Apple Mail, Gmail, and Yahoo Mail. This solution might not directly resolve the issue with Outlook. Yet, an alternative can provide a temporary workaround until a solution is found.
=

Fix 10. Try Disabling Privacy Protection
Certain privacy protection features on your Apple iPhone 13 Pro may interfere with the integration of Outlook. To troubleshoot this, consider temporarily disabling privacy protection settings:
Instructions. On your Apple iPhone 13 Pro, access “Mail” settings through the Settings application. Now, scroll down to find and tap the “Privacy Protection” option in the “Messages” section. Next, you will come across the “Protect Mail Activity” switch. Here, toggle off the switch to check if it is resolved.

Fix 11. Reset All Settings of the iPhone
If the persistent password prompts remain unresolved, resetting all settings on your Apple iPhone 13 Pro can be the solution. It acts as a comprehensive solution to potential configuration issues. This action does not erase your data but resets system settings to default. To reset all settings on your Apple iPhone 13 Pro, you can follow these steps:
- Step 1. Navigate to the “General” tab in the “Settings” app on your Apple iPhone 13 Pro after you open it. Move down the screen, and at the bottom, choose “Transfer or Reset iPhone.”

- Step 2. On the following screen, tap “Reset” and select “Reset All Settings” from the available options. Enter your device passcode if prompted and confirm the action by selecting “Reset All Settings” again.

Fix 12. Add an Account by Switching to IMAP
In some cases, switching the account type to IMAP during the setup process can help resolve issues. For many users, it has worked to resolve issues related to Outlook password prompts. Follow these steps to add your Outlook account using the IMAP protocol:
- Step 1. Begin by accessing the “Settings” app on your Apple iPhone 13 Pro, then scroll down to locate and tap on “Mail.” Within this section, choose “Accounts” to display the roster of email accounts, and proceed to tap on “Add Account.”

- Step 2. Choose “Other” as the account type and select “Add Mail Account.” Enter your Name, full Outlook email address, descriptive description, and unique password, and hit “Next.”

- Step 3. Utilize the specified settings for the “Incoming Mail Server” and “Outgoing Mail Server” sections under the “IMAP” tab:
Incoming Mail Server
Hostname: imap-mail.outlook.com
Username: Your full Outlook email address
Password: Your Outlook password
Outgoing Mail Server
Hostname: smtp-mail.outlook.com
Username: Your full Outlook email address
Password: Your Outlook password
At last, hit the “Next” button at the top-right side of the screen.

Fix 13. Contact Support of Outlook To Resolve
If none of the previous fixes resolve the issue, seek help directly from Outlook Support. Outlook’s support is capable of addressing a broad spectrum of issues. It is adept at delivering personalized assistance tailored to your circumstances.
Bonus Part. Can’t Access Outlook Because iPhone Is Locked? A Quick Solution
The iPhone keeps asking for an Outlook password, which isn’t the only password-related problem. Forgetting the screen locks of their iPhones is a common phenomenon. It is especially prevalent among iPhone users. You can no longer access important Outlook emails when your Apple iPhone 13 Pro is locked. That is where Wondershare Dr.Fone emerges as your savior. This powerful tool can bypass all types of iOS screen locks within minutes.
It can remove lock screens on your Apple iPhone 13 Pro, iPad, and iPod. You can say goodbye to the hassle of dealing with iCloud activation locks. Moreover, it helps remove your Apple ID if you have forgotten your Apple ID password. Dr.Fone allows you to bypass them effortlessly without requiring a password.
Prime Features of Wondershare Dr.Fone
- It can circumvent Mobile Device Management and screen time restrictions without data loss.
- This tool completely supports the most recent iOS 17, iPadOS 17, and iPhone 15.
- Additionally, this software effortlessly bypasses carrier locks on your Apple iPhone 13 Pro.
Steps To Unlock Your Apple iPhone 13 Pro via Wondershare Dr.Fone
Unlocking your Apple iPhone 13 Pro using Wondershare Dr.Fone is a straightforward process. That is made possible with its intuitive interface and a simple 3-step procedure. You can use the following steps to bypass your Apple iPhone 13 Pro’s screen lock within minutes:
- Step 1: Access Screen Unlock by Launching Dr.Fone
Once you’ve launched Dr.Fone on your computer, go to Toolbox. Here, tap “Screen Unlock” and choose “iOS.” In the opened window, choose the “Unlock iOS Screen” option to unlock your iOS device’s screen. On the subsequent screen, click “Start” to commence the iOS device unlocking process.

- Step 2: Initiating iPhone Recovery Mode and Device Identification
Subsequently, you need to place your Apple iPhone 13 Pro into Recovery Mode. Adhere to the on-screen instructions corresponding to the model of your iDevice. Afterward, the tool will automatically detect the “Device Model.” If necessary, adjust the model and choose the “System Version.” Once these steps are completed, click “Start” to initiate the unlocking process.
- Step 3: Finalizing iOS Device Unlock
Monitor the iOS firmware download progress on the screen. After successful download and verification, proceed by selecting “Unlock Now.” A confirmation window will appear, prompting you to input the necessary code. Enter the code and tap Unlock to proceed to the outcome. Upon unlocking the iDevice, click the “Done” button to finalize the process.

Conclusion
To summarize, resolving an iPhone asking for an Outlook password requires a systematic approach. From re-entering passwords to adjusting settings, this guide has covered 13 comprehensive fixes. For those facing the challenge of a locked iPhone, Dr.Fone offers a reliable solution. Users can ensure integration between their iPhones and Outlook by addressing these issues. This will enhance their overall email experience.
Tips: Are you searching for a powerful Screen Unlock tool? No worries as Dr.Fone is here to help you. Download it and start a seamless unlock experience!
Also read:
- [New] 2024 Approved Explore Exceptional, Economically-Priced ASMR Gear
- [Updated] 2024 Approved Mellow Your Playlist Device-Specific Techniques
- [Updated] In 2024, 10+ Top Videos & Tutorials on Best iPhone/iPad Editing Tools
- [Updated] The Ultimate 2024 Guide to Enable Monetization on YouTube Videos
- 2024 Approved Unifying Social Media Platforms TikTok & FB Connected
- Boost Audio Quality: Win10's Realtek Update
- Different Methods To Unlock Your iPhone 14 Pro | Dr.fone
- Dissecting the Process of Windows 11'S Automated Backups
- How Can I Unlock My iPhone SE (2020) After Forgetting my PIN Code? | Dr.fone
- How To Fix Apple iPhone 12 Pro Max Unavailable Issue With Ease | Dr.fone
- In 2024, 5 Most Effective Methods to Unlock iPhone XS Max in Lost Mode | Dr.fone
- In 2024, Can You Unlock iPhone 12 mini After Forgetting the Passcode? | Dr.fone
- In 2024, Disabled iPhone SE (2020) How to Unlock a Disabled iPhone SE (2020)? | Dr.fone
- In 2024, Perfecting Your View The 10 Finest iPhone/iPad Videoplays
- In 2024, Trouble with Apple iPhone 6s Plus Swipe-Up? Try These 11 Solutions | Dr.fone
- In 2024, Unlock iPhone 11 Pro Max With Forgotten Passcode Different Methods You Can Try | Dr.fone
- Oui, Bienvenue! En France: Une Douceur Exprimée
- Title: In 2024, iPhone 13 Pro Asking for Passcode after iOS 17/14 Update, What to Do? | Dr.fone
- Author: Amelia
- Created at : 2024-12-10 16:41:48
- Updated at : 2024-12-12 17:07:57
- Link: https://iphone-unlock.techidaily.com/in-2024-iphone-13-pro-asking-for-passcode-after-ios-1714-update-what-to-do-drfone-by-drfone-ios/
- License: This work is licensed under CC BY-NC-SA 4.0.