
In 2024, iPhone Is Disabled? Here Is The Way To Unlock Disabled Apple iPhone X | Dr.fone
iPhone Is Disabled? Here Is The Way To Unlock Disabled Apple iPhone X
Part I: Is It Possible To Unlock A Disabled iPhone?
First things first, the short answer is yes. It is entirely possible to unlock a disabled iPhone and use it again. But there is a catch-all data on the Apple iPhone X device that will be erased as the process wipes the Apple iPhone X clean. There is no other way around it.
Part II: Unlock Disabled iPhone
Now, let us get to ways how to unlock disabled iPhone. How many ways are there? Well, you might get all sorts of information online, but there are only a handful of ways to unlock a disabled iPhone, which are listed here.
II.I: Unlock Disabled iPhone With Wondershare Dr.Fone
Of course, you want to unlock your disabled iPhone as quickly as possible, so we have put the best solution first - Wondershare Dr.Fone.
What is Dr.Fone? Dr.Fone is a suite of apps designed to help you with tasks on your smartphones and tablets. These tasks include erasing data, wiping the Apple iPhone X device, repairing the system, taking and restoring backups, unlocking the screen, transferring WhatsApp chats, and even going as fancy as spoofing device location to help with location-aware games or prank friends and family.
This is a must-have set of tools designed for every smartphone owner, regardless of the operating system. It works on both Windows and macOS and supports both Android and iOS. Download Wondershare Dr.Fone here.
Step 1: Connect your device to the computer and select Screen Unlock in Dr.Fone.

Step 2: Click the big blue button “Unlock iOS Screen”:

Step 3: Onscreen instructions guide you to put your device in Recovery Mode:

Step 4: Software version and device model are detected automatically when the Apple iPhone X device is in Recovery Mode. If the automatic detection is incorrect, set it correctly before proceeding. Click Start.

Step 5: When Dr.Fone is ready to unlock disabled iPhone, click Unlock Now and wait until the notification of a successful unlock is shown.

II.II: Unlock Disabled iPhone With iTunes/ macOS Finder
The above was a fast, intuitive, step-by-step way to get you through the unlock disabled iPhone process. This was an aftermarket app to help you through the process. However, if you want to achieve the same result the Apple way, do the following:
Step 1: Connect the Apple iPhone X to the computer with the cable and launch iTunes or Finder (macOS Catalina and above).
Step 2: Press the volume up key on your Apple iPhone X and release. Then, press the volume down key and release. Lastly, press and hold the power key till you see Recovery Mode in Finder or iTunes.
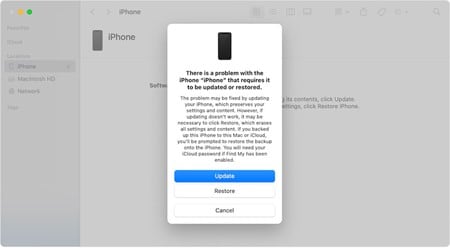
Step 3: Click Restore to unlock disabled iPhone.
After this process, the Apple iPhone X is reset to factory defaults, and you will need to go through the setup process again.
II.III: Unlock Disabled iPhone Through The iCloud Website (Find My iPhone)
You may also use Find My on the iCloud website to unlock your disabled iPhone, if the Find My network was enabled on the iPhone.
Step 1: Go to https://icloud.com and log in using the iCloud/ Apple ID that the disabled iPhone is using. This is important because if you use any other ID, you will see devices attached to that ID, not the disabled iPhone you want to unlock.
Step 2: Click Find My and select your disabled iPhone.
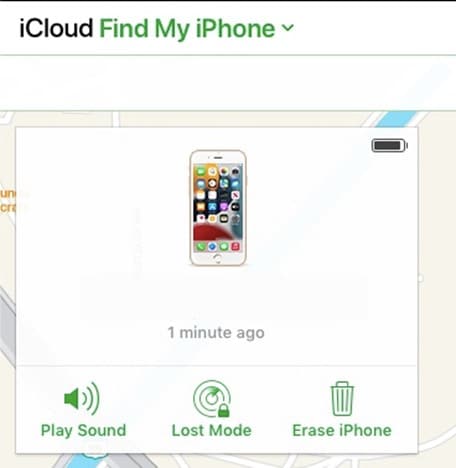
Step 3: Click Erase iPhone and confirm.
The Apple iPhone X will be erased and restored to factory default settings. After that, you will have to set up the Apple iPhone X again.
II.IV: Unlock Disabled iPhone Without A Computer (Find My App)
Not so long ago, a computer was a necessity in every household for various reasons. Then, smartphones changed everything, and Apple spearheaded that change with the Apple iPhone X and iPad.
The iPhone, despite screen size limitations, may be used as a personal computer all by itself, depending on users’ requirements. You can work on spreadsheets, documents, and presentations on the iPad, take notes, write, draw, play music, watch videos, and practically do everything a regular household would do on a computer.
So, in today’s time and age, it may be possible that some people work exclusively with their iPhones and iPads. In that case, how to unlock a disabled iPhone without a computer?
Worry not, because Apple’s Find My is your friend. You can use Find My on your other Apple device to erase and unlock the disabled iPhone.
Step 1: Launch Find My app on your iOS device or Mac. Note that the other device should be signed in with the same Apple ID as the disabled iPhone. If not, you may sign out of iCloud on the Apple iPhone X device and sign in using the other Apple ID (of the disabled iPhone).

Step 2: Select the disabled iPhone from the Apple iPhone X devices in the sidebar, click or tap the Apple iPhone X device on the map and click or tap Erase This Device.
The disabled iPhone will be wiped and restored to factory defaults. The setup will need to be performed again.
Now, as we know, if Find My does not show the disabled iPhone for any reason, you will necessarily have to gain access to a computer. The other option is to visit an Apple Store and get them to do the needful.
Part III: FAQs
Here are helpful frequently asked questions for you.
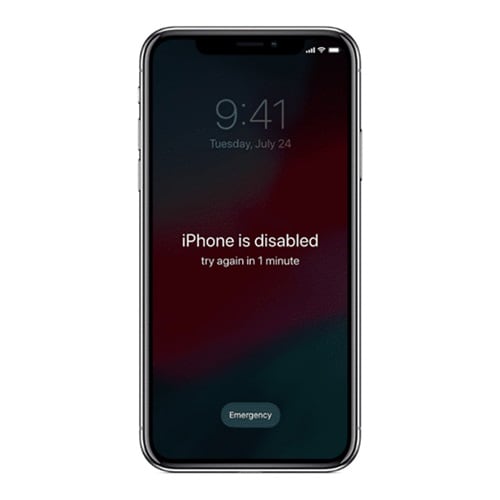
FAQ 1: What is iPhone disabled?
iPhone is disabled most commonly when an incorrect password is entered too many times.
FAQ 2: Can I unlock disabled iPhone without data loss?
Unlocking a disabled iPhone requires erasing the Apple iPhone X device. All data on the Apple iPhone X device will be deleted in the process. There is currently no way to unlock disabled iPhone without data loss.
FAQ 3: How to restore data via iCloud?
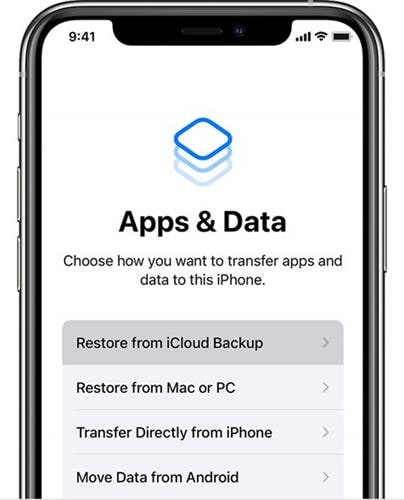
After unlocking the disabled iPhone, when you set it up again, if you previously had iCloud Backup enabled, you will get the option to restore data from the latest backup.
Bonus Tip: Prevent iPhone From Getting Disabled In Future
By now, you know that should the Apple iPhone X be disabled for any reason, unlocking the disabled iPhone is a process that will wipe the Apple iPhone X device clean. And that means you will have to spend time setting it up again, restoring data from backup, and getting it back to the order you had previously. How about a tip to help you prevent a disabled iPhone?
A good passcode is one that you will remember, but it takes work for everyone to figure out. Again, this is for the safety and security of your data and device. You may use a 6-digit passcode or an alphanumeric passcode if that is more to your liking.
If you use Face ID, it will significantly minimize the instances you will have to enter your passcode, so make sure you do remember your passcode.
Conclusion
It has been nearly a decade since iPhones came with biometric authentication and around 5 years since they started using facial authentication. Both these technologies significantly reduced our dependence on having to key in our passcode each time we wanted to unlock the iPhone, buy an app, or perform an essential function.
But, when we attempt incorrect passcodes too many times, the Apple iPhone X gets disabled. How to unlock disabled iPhone? The ways outlined in this guide will help you unlock your disabled iPhone.
7 Ways to Lock Apps on Apple iPhone X and iPad Securely
Are you concerned about your privacy and would like to secure certain apps on your iOS device? Don’t worry! There are plenty of ways to app lock the Apple iPhone X and protect your privacy. You can follow the same drill to restrict the usage of certain apps for your kids as well by taking the assistance of the Apple iPhone X app lock feature. The app lock for iPhone and iPad options can be used pretty easily. There are plenty of native and third-party solutions out there that you can use. In this post, we will make you familiar with seven different techniques on how to lock apps on iPhones and iPads.
Part 1: How to Lock Apps on iPhone with Screen Time?
Utilizing Screen Time on your Apple iPhone X offers a versatile way to manage app access. It is done through time restrictions and a dedicated passcode. By implementing Screen Time settings, you can exercise control over app usage. It ensures added security and regulated access to your preferred applications. Now, let’s walk through the steps to learn how to lock apps on iPhone Screen Time:
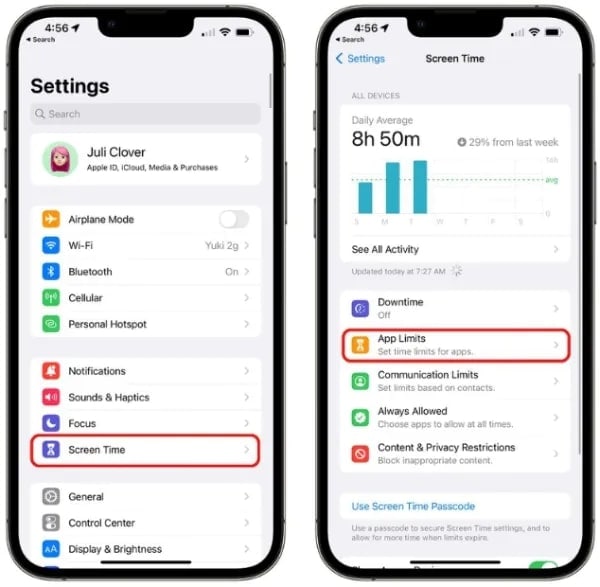
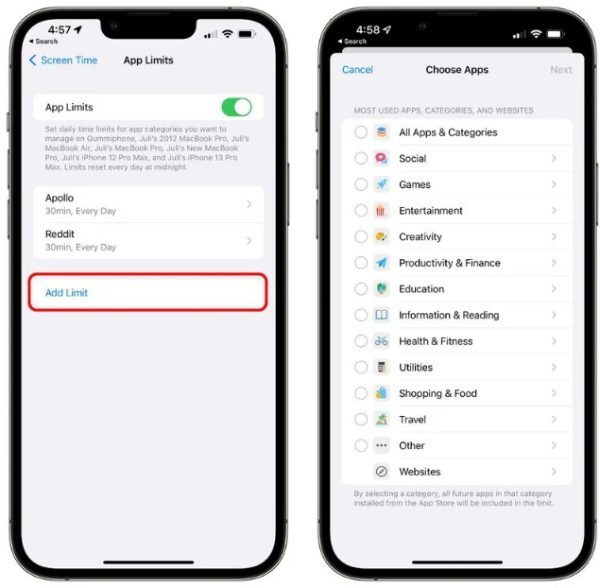
Step 1. Begin by accessing the Settings on your iOS device and tapping on the “Screen Time” option. On the ensuing screen, tap “App Limits,” followed by “Add Limit.”
Step 2. Select the apps or categories of the apps, tap “Next,” and choose the “Time Limit” for the selected apps. After deciding the time limit, press “Add” from the top right corner to add an app limitation.
Part 2: How to Lock Apps on iPhone with Face ID & Passcode?
Leveraging the advanced security capabilities of Face ID or Passcode on your Apple iPhone X X or later models effectively fortifies app access. By using facial recognition or passcodes, you can put in place an extra layer of protection. It can be done for specific apps, safeguarding your sensitive data from unauthorized access. Now, let’s proceed with the detailed steps to lock apps using Face ID or Passcode on your iOS device:
Step 1. After opening the Settings app on your Apple iPhone X, scroll down to access “Face ID & Passcode.” Here, you will be required to provide the passcode of your device.
Step 2. After providing the passcode, select “Other Apps” and check the apps that have Face ID enabled. Remember, you’re unable to manually include apps in the list. Only those apps that have sought access to the feature will appear here automatically.

Part 3: How to Lock Apps on iPhone Using Shortcuts?
If you are unable to lock the targeted app directly with Face ID, there is no need to worry. There exist workarounds that you can use, and one of them is using the Shortcuts app. It won’t directly lock apps with the Face ID. Instead, it provides a workaround by creating a shortcut that redirects to the lock screen.
When activated, it takes you to the lock screen, prompting Face ID, Touch ID, or Passcode to access the Apple iPhone X device again. Use the following steps to lock your apps using the Shortcuts app:
Step 1. On your Apple iPhone X, launch the Shortcuts app and select the “Automation” tab from the bottom toolbar. There, tap “New Automation” and use the search bar to look for and select “App.”

Step 2. Now, tap “Choose” in front of the “App” and select the app you want to lock. Now, move down and select “Is Opened,” then move further down to choose “Run Immediately.” Here, leave “Notify when Run” deactivated.

Step 3. Proceed forward by tapping “Next” from the top right corner, and on the following screen, tap “New Blank Automation.” Then, press “Add Action” and enter “Lock Screen” into the Search field, then choose “Lock Screen” from the search results.

Step 4. Finally, tap “Done” to finalize the shortcut. Now, upon accessing the targeted app, the shortcut will activate in the background, causing your Apple iPhone X to be locked. You can then use the Face ID, Touch ID, or passcode to unlock it.

Part 4: How to Lock Apps on iPhone Using Restrictions?
By taking the assistance of Apple’s native Restrictions feature, you can app lock the Apple iPhone X without any trouble. In this way, you can set up a passcode that needs to be matched before accessing any app. This iPhone app lock is also a great way to restrict your kids from accessing certain apps or making purchases. To learn how to lock apps on iPhone or iPad using Restrictions, follow these steps:
Step 1. Unlock your device and go to its Settings > General > Restrictions.

Step 2. Turn the feature on and set up a passcode for app restrictions. To provide added security, you can set up a passcode that is not similar to your lock screen passcode.
Step 3. Now, you can set up an app lock for iPhone using Restrictions. Simply go to General > Restrictions and turn this feature on for any app of your choice.
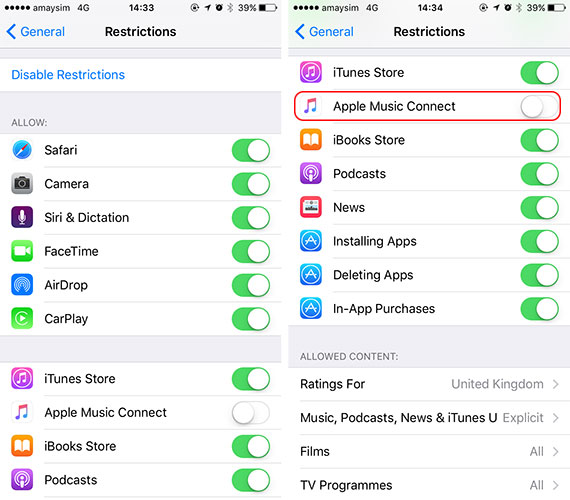
Step 4. If you want, then you can also switch this feature off for any app using the same method.
Bonus Tip: How to Unlock iPhone withoutScreen Locks (PIN/pattern/fingerprints/face)
It can be a trouble if you forget your Apple iPhone X passcode since there are many restrictions on using iPhone. Also, if you are still unable to verify your Apple ID by using the above ways you may consider removing your Apple ID on your iOS devices. Here is an easy way to help you bypass Apple ID without a password and 100% working, which is to use Dr.Fone - Screen Unlock (iOS). It’s a professional iOS unlocker tool that can help you remove various locks on iPhones and iPads. With only a few steps, you can easily remove your Apple ID.
Dr.Fone - Screen Unlock (iOS)
Remove iPhone iPhone-locked screen without Hassle.
- Unlock an iPhone whenever the passcode is forgotten.
- Save your Apple iPhone X quickly from the disabled state.
- Free your sim out of any carrier worldwide.
- Works for all models of iPhone, iPad, and iPod touch.
- Fully compatible with the latest iOS.


4,008,670 people have downloaded it
Part 5: How to Lock Apps on iPhone Using Guided Access?
Besides the Restrictions feature, you can also take the assistance of Guided Access to lock a certain app on your device. It was originally introduced in iOS 6 and can be used to restrict your device temporarily with the usage of a single app. It is mostly used by parents who would like to restrict their kids from using a single app while lending their devices. Teachers and people with special needs also use Guided Access pretty frequently. To learn how to lock apps on iPhone using Guided Access, follow these steps:
Step 1. To start with, go to your device’s Settings > General > Accessibility and tap on the “Guided Access” option.

Step 2. Turn on the “Guided Access” feature and tap on the “Passcode Settings”.

Step 3. After selecting the “Set Guided Access Passcode” option, you can set up a passcode to use it as an app lock for iPhone.
Step 4. Now, simply launch the app that you want to restrict and tap the Home button three times. This will start the Guided Access mode.

Step 5. Your phone would now be restricted to this app. You can further restrict the usage of certain app features as well.
Step 6. To exit the Guided Access mode, tap the Home screen three times and provide the respective passcode.

Part 6: How to Lock Apps on iPhone with Touch ID?
On the Apple iPhone X 8 Series and iPhone SE, Apple offers Touch ID for security. In the process, it is similar to the Face ID available on the later iPhones. If you have an iOS device with Touch ID, here are the steps you can follow for the app lock iPhone process:
Instructions: To start, open the Settings application. Now scroll down to locate and select the “Touch ID & Passcode” option. On the following screen, you can deactivate or activate Touch ID for apps.

Part 7: How to Lock Apps on iPhone Using Third-Party Apps?
1. Lock Apps onApple iPhone X & iPad via Famisafe
If the reason you want to lock the apps on your Apple iPhone X has to do with managing your kid’s phone usage, we have an excellent alternative for you. FamiSafe is a reliable parental control app that offers features to monitor and manage a child’s device usage. It focuses on parental controls, including features like screen time management, location tracking, web filtering, and activity monitoring.
It offers robust controls to restrict overall device usage, set screen time limits, and monitor app usage. This helps parents guide and regulate their children’s activities on iOS devices. You can use the following steps to lock apps using FamiSafe:
Step 1: Install FamiSafe and FamiSafe Jr on Respective Devices
Get FamiSafe from the App Store and log in using your Wondershare ID or your Apple, Google, or Facebook account. Select the parent mode and link your child’s phone by installing FamiSafe Jr on their devices using either the QR code or the pairing code. Once the pairing is done, input details about your children and allow FamiSafe Jr to oversee their devices.

Step 2: Provide the Necessary Permissions to FamiSafe
Now, activate Accessibility for FamiSafe by accessing “Settings,” tapping “FamiSafe,” and enabling “Location.” Then, grant access to the Apple iPhone X device’s photos, microphone, and motion & fitness activity. Now, use a computer and connect your child’s device with a USB cable. Activate content blockers in Safari to prevent kids from accessing inappropriate content.

Step 3: Connect the Kid’s Device to the Computer
To do that, access “Safari” in “Settings” and move to”Content Blockers” to enable FamiSafe. To get started, connect your kids’ iOS devices to your PC. Once connected, navigate to the main interface and select “Features” located at the bottom. This will display available features, and you can proceed by tapping on “App Blocker.”

Step 4: Block Any App Using the App Blocker Feature
Establish the connection between your kids’ iOS devices and your PC by pairing them with your phone. From there, effortlessly choose and block any unwanted apps on your kids’ phones. Additionally, you have the option to block apps based on their App Store ratings for added control and security.

2. Lock apps onApple iPhone X & iPad using App Locker
Besides the native iPhone app lock solutions, you can also take the assistance of a third-party tool. However, most of these apps only support jailbroken devices. Therefore, if you wish to use a dedicated app lock for your Apple iPhone X, then you need to jailbreak your device. Needless to say, getting your device jailbroken has its perks and demerits. If you don’t want to jailbreak your device, then you can simply take the assistance of the above-mentioned solutions.
However, if you have a jailbroken device and would like to app lock the iPhone, then you can also use AppLocker. It is available at Cydia’s repository and can be purchased for just $0.99. It can be installed on your jailbroken device to get an added level of security. Not just apps, it can also be used to lock certain settings, folders, accessibilities, and more. To learn how to lock apps on iPhone using AppLocker, follow these steps:
Step 1. Firstly, get AppLocker on your device from http://www.cydiasources.net/applocker . As of now, it works on iOS 6 to 10 versions.
Step 2. After installing the tweak, you can go to Settings > Applocker to access it.

Step 3. To access the feature, make sure that you have “Enabled” it (by turning it on).
Step 4. This will let you set up a passcode to lock the apps and settings of your choice.
Step 5. To app lock, the iPhone, visit the “Application Locking” feature on your device.
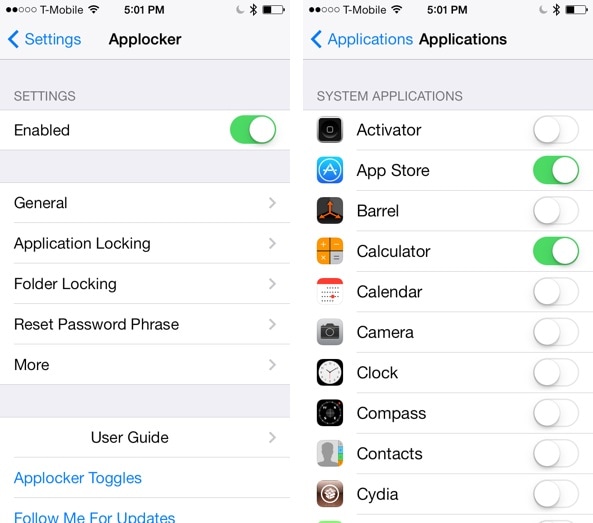
Step 6. From here, you can turn on (or off) the locking feature for apps of your choice.
This will let your app lock the Apple iPhone X without any trouble. You can also go to the “Reset Password Phrase” to change the passcode.
3. Lock Apps onApple iPhone X & iPad using BioProtect
Just like Applocker, BioProtect is another third-party tool that works only on jailbroken devices. It can also be downloaded from Cydia’s repository. Apart from apps, you can also use BioProtect to lock settings, SIM features, folders, and more. It is linked to the Touch ID of the Apple iPhone X device and scans the fingerprint of a user to grant (or deny) access to any app. The app only works on iPhone 5s and later devices, having a Touch ID. However, you can also set a passcode as well if your Touch ID is not working. To use the BioProtect app lock for iPhone, follow these steps:
Step 1. Firstly, get the BioProtect app to lock iPhone on your device from the right http://cydia.saurik.com/package/net.limneos.bioprotect/ .
Step 2. To access the tweak’s panel, you need to provide your fingerprint access.
Step 3. Place your finger on your Touch ID and match its print.

Step 4. This will let you access the BioProtect app settings.
Step 5. Firstly, enable the app by turning the respective feature on.
Step 6. Under the “Protected Applications” section, you can see a list of all the major apps.

Step 7. Simply turn on (or off) the feature of the app that you wish to lock.
Step 8. You can also go to the “Touch ID” feature to further calibrate the app.
Step 9. After setting the lock, you would be asked to authenticate using your fingerprint to access the protected app.

Wrap it up
By following these solutions, you would be able to learn how to lock apps on the Apple iPhone X without much trouble. We have provided both, third-party as well as native solutions to app lock the Apple iPhone X in a secure manner. You can go with your preferred option and provide an added layer of security on your device to keep it safe.
Remove Device Supervision From your Apple iPhone X
Supervising devices is a proven technique for companies to monitor their employees. With this, they keep track of their performance on all associated devices. If you’ve decided to leave an organization, ensure that you retain the Apple iPhone X device’s ownership by removing supervision access. If you’re looking for a guide on how to remove device supervision from your Apple iPhone X, you can find some effective methods here.

Part 1. Answering Top Queries About Removing Device Supervision From iPhone
Many questions often pop up in users’ minds when considering removing device supervision. This section unveils some top queries with authoritative answers before heading to the main guide:
|
You May Want to Ask
|
Authoritative Answer
|
| — | — |
|
1. Does removing device supervision impact the iPhone’s functionality?
|
Removing device supervision does not compromise the fundamental functionality of your Apple iPhone X. It is important to note that any administrative restrictions or configurations will be lifted. However, it might result in losing access to specific apps related to that organization.
|
|
2. Can device supervision be reinstated after removal?
|
Device supervision can be re-applied by the designated supervisor or IT administrator. However, this process usually involves resetting the Apple iPhone X device to its factory settings if needed.
|
|
3. What information can be accessed through device supervision on iOS?
|
Once user’s devices are supervised, organizations can conveniently check settings, apps, and accounts being managed. They can also apply extra restrictions such as disabling Apple Music or putting the Apple iPhone X device into Single App Mode.
|
Part 2. Remove Device Supervision With Perfection Using Wondershare Dr.Fone - Screen Unlock
Undoubtedly, device supervision is the most reliable method for organizations to monitor connected devices and analyze reports. If you have left a company where the administrator supervises your iOS device, your device needs to be unsupervised. For this process, you can bypass the MDM lock on your iOS device through a reliable tool.
Here, Wondershare Dr.Fone stands tall to help out your ventures and provide executable techniques explaining how to remove supervision from iPhone. This tool allows you to bypass the MDM lock without data loss on your Apple iPhone X using easy steps. Consequently, you can also use other advanced functions, such as removing lock screens and unlocking Apple ID in different instances.
Features of Wondershare Dr.Fone To Consider
- Wondershare Dr.Fone lets you bypass iCloud Activation Lock completely and set a new Apple ID on the Apple iPhone X device.
- This tool is compatible with all iOS devices, even iOS 17, and helps users experience creative features.
- Users can remove iTunes backup encryption by changing the encryption setting without losing data.
Step-by-Step Guide to Remove MDM Lock Using Wondershare Dr.Fone
Wondershare Dr.Fone provides the simplest method to remove the MDM lock and bypass device supervision access. Here is a comprehensive step-by-step guide to help users remove supervision from iPhones.
- Step 1. Initiate and Proceed With the Screen Unlock Feature
First, launch Wondershare Dr.Fone on the computer and connect it to your Apple iPhone X. Move into the “Toolbox” tab and select the “Screen Unlock” function.
- Step 2: Select iOS and Head To Unlock MDM
After that, choose “iOS” as the Apple iPhone X device type to open the related tool. Once the tool starts working, select the “Unlock MDM iPhone” option from the list.

- Step 3. Select Remove MDM Function To Start the Process
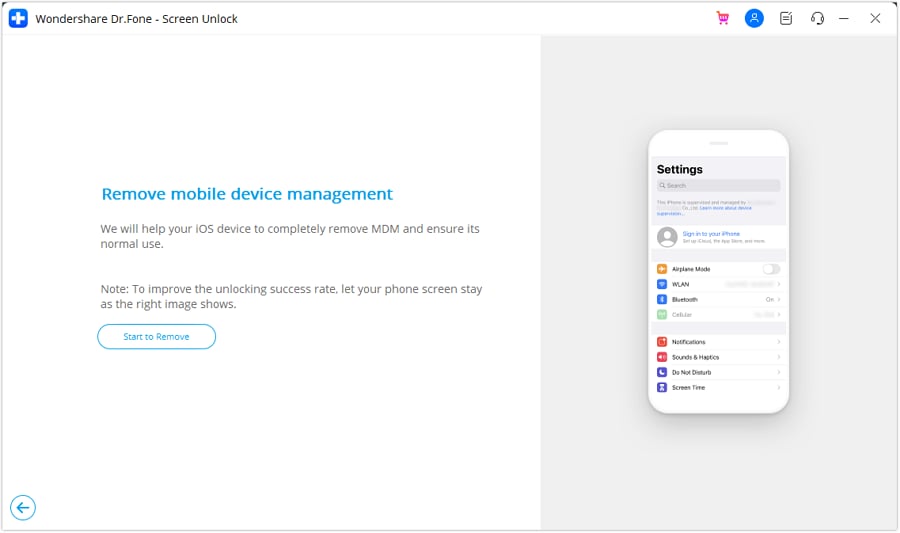
On the next screen, you will see two options, “Bypass MDM” and “Remove MDM.” Select “Remove MDM” and hit the “Get Start” button. After that, you will be taken to another screen where you need to tap on “Start to Remove” to execute the process.
- Step 4. Disable Find My Feature and Complete the Process
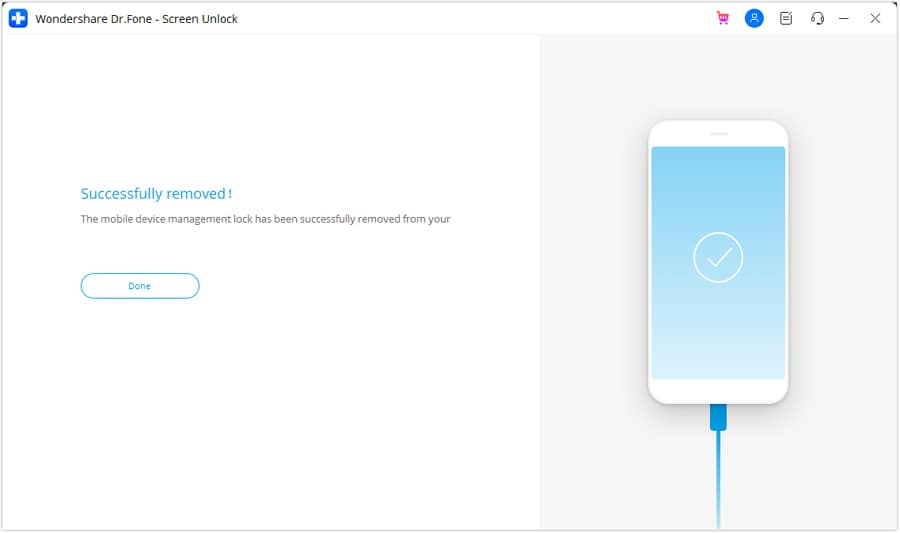
A prompt will pop up stating that you need to turn off the Find My feature on your iOS device. For this, open your device “Settings” and choose the “iCloud” option. Lastly, disable the “Find My iPhone” feature and hit the “OK” button. Wait a few seconds to complete the process and click “Done” to conclude the MDM removal process.
Part 3. Easy Removal of Device Supervision From Settings
Looking for other conventional methods about how to remove supervision from iPad or iPhone? If you wish to perform such actions, you can access some options in your Apple iPhone X settings. However, to utilize this method, you should know the login information and password of the Apple iPhone X device. If you have them with you, follow the given steps to remove device supervision from iPhone settings:
- Step 1. Initially, open the “Settings” and move into the “General” section. After that, select the “VPN & Device Management” option to see which MDM profiles supervise your iOS device.

- Step 2. Select the MDM profile you want to remove and tap on “Remove Management” to delete that profile from your iDevice. Then, you will be prompted to enter your login info or password and type your information to bypass supervision access.

Part 4. Using Apple Configurator 2 for Removing iPhone Supervision System
Apple Configurator is a free tool for Mac users that provides a simple technique for removing iPhone supervision. To use this method, you must have a password for the Apple iPhone X device; otherwise, you will need to contact the organization to get the necessary permissions. Below are easy steps about how to remove device supervision from iPad and iPhone through your Mac:
Instructions. First, download and launch the Apple Configurator tool on your Mac. Connect the iDevice to the Mac using a compatible USB-C cable. Click on “Actions” from the top bar of the tool. In the drop-down list, choose the “Advanced” option and select “Erase All Content and Settings” to remove iPhone device supervision. Enter your device password to start using your Apple iPhone X normally.

Part 5. Directly Contact Administration for Removing Device Supervision
If you’ve forgotten the username and password of your management profiles, you cannot remove MDM profiles from iPhone settings. In that situation, you can only seek help from the company admin, as this iPhone is supervised and managed by them.
You can contact the administrator and share a valid reason why you want to remove supervision access. They can remove your device directly from their system or provide you with the correct password to proceed with the login process.
Conclusion
Removing device supervision is simple, but getting familiar with the safest method is necessary. Considering this, we have covered some techniques to bypass MDM locks on your iOS device. These can easily resolve your issue of how to remove device supervision from iPhone queries. Conclusively, Wondershare Dr.Fone is the recommended tool to bypass the MDM lock without data loss.
Tips: Are you searching for a powerful Screen Unlock tool? No worries as Dr.Fone is here to help you. Download it and start a seamless unlock experience!
Also read:
- [New] 2024 Approved Mastering Android Screen Captures
- [New] In 2024, Tips for Effective Screen Broadcasts on FB Live
- [Updated] In 2024, FB Pages Made Simple Top 8 Tools for Free & Online Use
- 专业DVD到MP3转换器工具 - 高效从DVD中抓取并保存音频成MP3格式
- All You Need to Know About Elon Musk’s Robotaxi Venture - Release Timeline, Pricing, and Specs Revealed!
- Gmail Setup Made Simple: A User's Manual to Connect with Your Apple Watch
- How To Remove Flashlight From Apple iPhone 14 Plus Lock Screen | Dr.fone
- In 2024, Complete Fixes To Solve Apple iPhone 12 mini Randomly Asking for Apple ID Password | Dr.fone
- In 2024, How Can I Unlock My Apple iPhone 8 After Forgetting my PIN Code? | Dr.fone
- In 2024, How To Bypass the Required Apple Store Verification For Apple iPhone 7 | Dr.fone
- In 2024, How To Open Your iPhone 15 Without a Home Button | Dr.fone
- In 2024, iPhone 13 mini Backup Password Never Set But Still Asking? Heres the Fix | Dr.fone
- In 2024, Learn How To Lock Stolen Your iPhone 12 Properly | Dr.fone
- In 2024, Resolve Your iPhone 12 Keeps Asking for Outlook Password | Dr.fone
- Introducing Low-Tier Sound Diminution Tricks with Audacity for 2024
- Step-by-Step Guide: Resolve Missing cygwin1.dll Error Messages
- The New Kitchen Mystic | Free Book
- Top 4 Ways to Trace Realme GT Neo 5 SE Location | Dr.fone
- What Does Jailbreaking iPhone XS i Do? Get Answers here | Dr.fone
- Title: In 2024, iPhone Is Disabled? Here Is The Way To Unlock Disabled Apple iPhone X | Dr.fone
- Author: Amelia
- Created at : 2025-02-25 15:17:21
- Updated at : 2025-03-04 09:23:26
- Link: https://iphone-unlock.techidaily.com/in-2024-iphone-is-disabled-here-is-the-way-to-unlock-disabled-apple-iphone-x-drfone-by-drfone-ios/
- License: This work is licensed under CC BY-NC-SA 4.0.