
In 2024, PassFab iPhone 6 Plus Backup Unlocker Top 4 Alternatives | Dr.fone
PassFab Apple iPhone 6 Plus Backup Unlocker: Top 4 Alternatives
Losing the password to your Apple iPhone 6 Plus backup would be a nightmare for you. There are, thankfully, methods to retrieve lost data and unlock the contents that have been saved up on your Apple iPhone 6 Plus. So, you may recover your password and regain access to your backed-up data with several different iPhone backup unlockers available.
These solutions are all relatively simple to implement and pose very little threat to the user. Thus, keep hope if you ever find you have forgotten the password for the backup of your Apple iPhone 6 Plus. There are several methods by which your data may get back! So, let’s talk about them.

Part 1: iPhone Backup Unlocker Specifications
What is an iPhone backup password?
A passcode encrypts your Apple iPhone 6 Plus’s backups, allowing only you to access them. This passcode is referred to as an iPhone backup password.
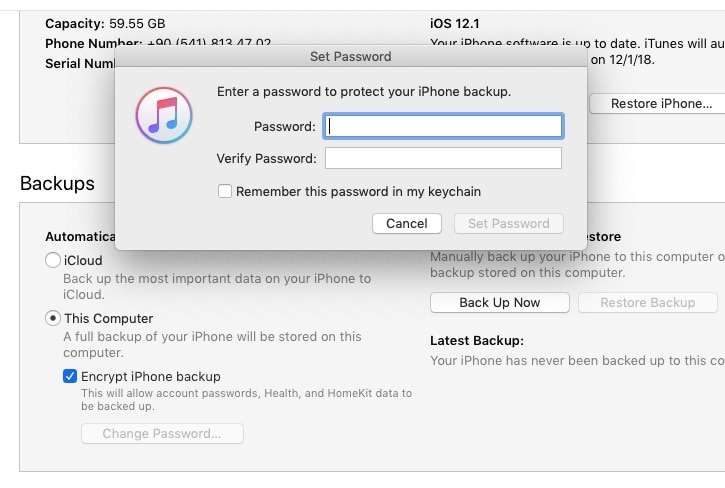
If you do not remember your password, you cannot view any data in your backup or restore it.
A few methods allow you to guess or brute-force your way into the password. Still, the most reliable method to unlock your backup is to use a professional tool such as Dr.Fone - Screen Unlock, Passfab iPhone Backup Unlocker, or other iPhone backup unlockers. This group of software employs a sophisticated algorithm to figure out your password for you, and it has a high percentage of success.
Additionally, it is simple and can be finished in minutes rather than hours.
What is iPhone backup unlocker?

An iPhone backup unlocker is software that, if you forget the password for your Apple iPhone 6 Plus, may assist you in regaining access to your device.
A brute-force assault is the most popular strategy for accomplishing this goal, while many other approaches may also work. To do this, one must iterate through every conceivable combination of letters and digits until one reaches the proper passcode.
If the password for an iPhone has been forgotten, this is often the only option to recover access to the Apple iPhone 6 Plus device, even though it may be time-consuming.
We are fortunate to have access to a wide variety of software applications that, when used together, may significantly streamline and simplify the process. So, let’s talk about them!
Part 2: 5 Useful iPhone Backup Unlockers
| Pricing Plans | |
|---|---|
| Dr.Fone-Screen Unlock | Starting at $39.95/year |
| PassFab-iPhone Backup Unlocker | 1-Year Licence ($34.95) |
| Lifetime Licence ($49.95) | |
| 4uKey-iTunes Backup | Starting from $29.95 |
| UltFone-iPhone Backup Unlock | 1-Month License ($29.95) |
| 1-Year License ($39.95) | |
| Lifetime License ($49.95) | |
| Softonic-Free iPhone Backup Unlocker | Free |
1. Dr.Fone-Screen Unlock
After downloading Dr.Fone, please run it and locate the red button “Screen Unlock.”

To start, tap “Remove iTunes BackUp Encryption” in the bottom right corner of the Screen Unlock window.
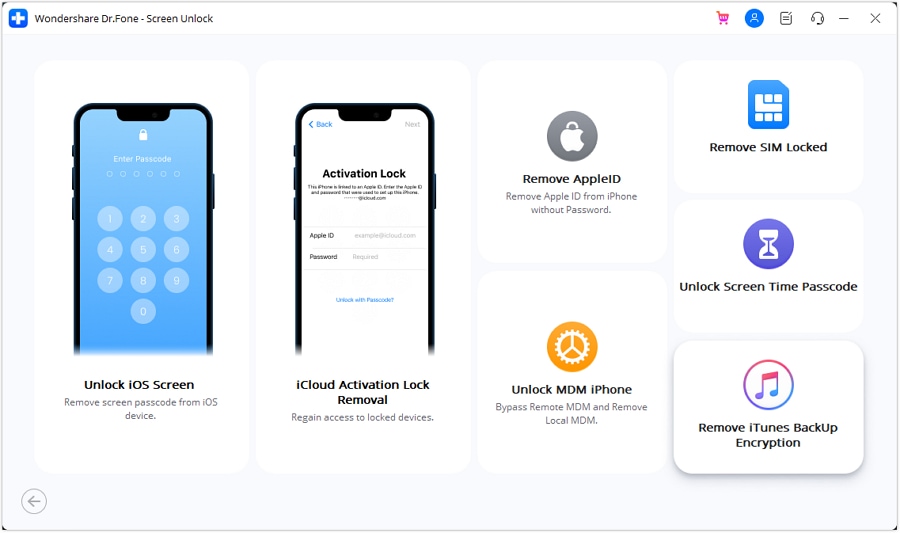
When you reach this screen, connect your iOS device to your computer using a USB connection. If Dr.Fone can identify this link, the graphic below will display.
Before choosing “Remove Now,” please read the 3 notes carefully:
- Verify that “Find My iPhone” is disabled.
- Do not launch “iTunes” at this time.
- Your device will reboot in the process of deleting

Dr.Fone can automatically verify your iTunes backup and erase it. Once the progress indicator reaches 100 percent, this encryption will be removed. This procedure will not need much time.
Step 5: The iTunes backup encryption now disappears! You may use your Apple iPhone 6 Plus freely.

Why do Users like it? (Review)
The costs are manageable. A plethora of options for controlling iOS and Android gadgets. An intuitive and well-designed user interface and user experience will make any software popular. The staff at Wondershare responds quickly to emails.
Pros
- Many functions let you do many different things.
- Versions for iOS, Android, Mac, and Windows are different.
- The interface is easy to use and perfect for people who aren’t tech-savvy.
- Works well with systems and devices that use iOS.
Cons
- Android phones need to be in “developer mode.”
- Data that has been permanently deleted can’t be recovered from iPhones
- It’s not free
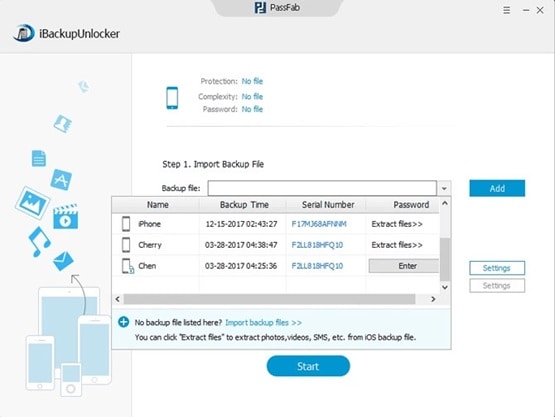
2. PassFab iPhone Backup Unlocker
PassFab iPhone Backup Unlocker is considerably different from other iPhone backup unlocking tools that are commercially accessible. The application utilizes GPU acceleration technologies. As a result, the password cracking speed is over a thousand times faster, or at the speed of light.
Why do Users like it? (Review)
PassFab is an iPhone backup unlocker that works well and is safe to use. It comes with three different and robust password attack methods. This powerful program gets the job done quickly, with as few steps as possible, and without hurting your data. PassFab also has a free trial version that users can use to try.
Pros
- PassFab, unlike other unlocking tools, is contemporary.
- It works on Mac and Windows systems, making it adaptable. The tool has a free trial.
- It can unlock several iPhone and iOS functions.
- Easy, click-based method.
- Customers trust the website’s 256-bit SSL security.
- Free online tech help and a 30-day money-back guarantee are offered.
Cons
- Customer service may be frustrating and time-consuming.
- Activation locks need the PassFab Activation Unlocker, which is sold separately.
3. 4uKey-iTunes Backup
A free version of Tenorshare iPhone backup password recovery is available, enabling you to test the program. However, this version has limitations absent in the paid versions of the program.
The trial option is only available for a limited time and does not grant access to most of the features available in the full version.
Why do Users like it? (Review)
When recovering forgotten passwords from iTunes backups, Apple device owners recommend Tenorshare 4uKey - iTunes Backup. This is a well-thought-out utility that gets frequent updates to ensure compatibility with the most recent iPhone, iPad, and iPod models.
It employs a hybrid approach, combining targeted attacks with graphics processing unit (GPU) technology, a structured technique that accelerates decryption over 30 times. Many people have used and endorsed Tenorshare 4uKey iPhone Backup Unlocker, which is enough to warrant confidence in the product.
Pros
- Finds the iTunes backup password Turns off iTunes encrypts its backups
- It takes away your screen time code
- It doesn’t cause essential or personal data to be lost.
- Has a 100% success rate for decrypting iTunes backups or getting back passwords
- Some ways of decrypting work 30 times faster than others
- Compatible with the most recent versions of iOS, such as iOS 14 and iPhone 12
Cons
- The latest version of iTunes needs to be installed before use
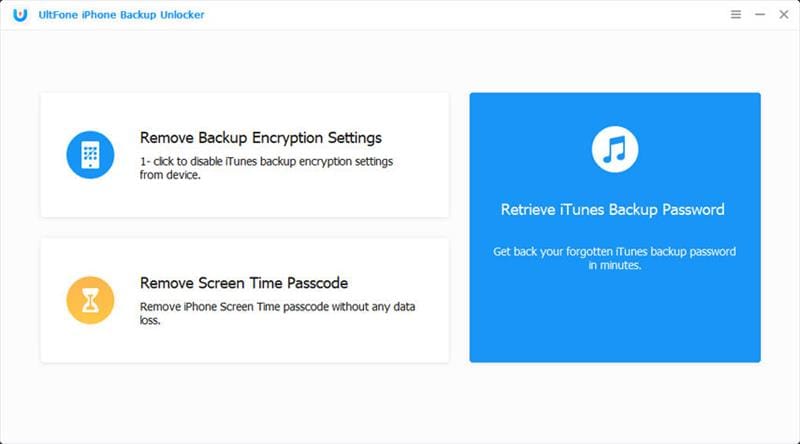
4. UltFone iPhone Backup Unlock
This iPhone backup recovery program is compatible with Mac OS X and Windows computers. In addition, it can recover the password for an iTunes backup, even if you have no clue what the password is.
Why do Users like it? (Review)
It is a professional tool for recovering lost iTunes backup passwords, UltFone iPhone Backup Unlocker was explicitly developed for iOS users to remove iTunes backup encryption settings and unlocking forgotten iTunes backup passwords efficiently.
Because of its industry-leading recovery rate, extensive compatibility, and intuitive user experience, it is now ranked as the number one iPhone backup password recovery tool on the market.
Pros
- Click to remove the iTunes backup encryption settings from your iDevice. This way, the backup file for this device won’t be encrypted in the future without your knowledge.
- Recover iTunes backup password with the methods that have the best chance of working.
- You can remove the screen time passcode from an iPhone, iPad, or iPod without losing data.
- It works with all iPhone, iPad, and iPod touch models.
- The latest iOS 14 and iTunes 12.0 are supported.
- Recovery of iTunes backup password is lightning fast and sped up by GPU.
Cons
- No surely of privacy
- Not a very good performance
- Interface is not user-friendly
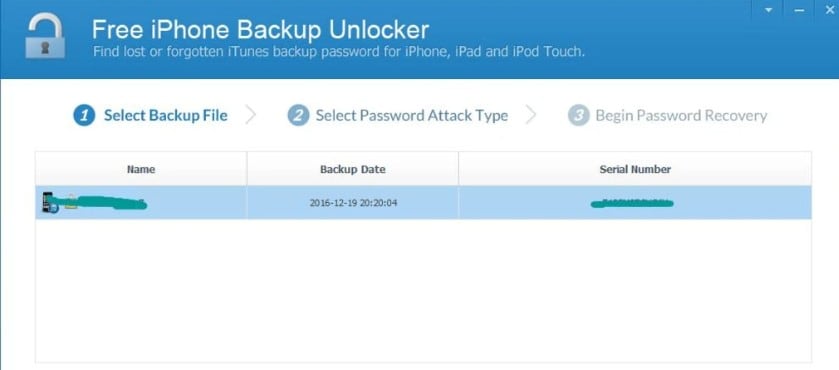
5. Softonic Free iPhone Backup Unlocker
This free iPhone backup unlocker can be used to recover passwords for iTunes backups that have been forgotten due to a malfunctioning computer or a lost or stolen iPhone.
Why do Users like it? (Review)
It is possible to retrieve forgotten iTunes backup passwords with this Free iPhone backup unlocker, even if the passwords were lost due to a computer breakdown or because the Apple iPhone 6 Plus was misplaced or stole
Pros
- Free tool
Cons
- Not user-friendly
The Bottom Line
I have high hopes that this list will enable you to get the very finest iPhone backup Unlocker Software. This list is vetted and narrowed down to include just those items with advanced features and outstanding performance.
All of the software that was described is accessible for both Mac and Windows operating systems, and some of it even has a trial version that you can use to test it out. However, Dr.Fone-Screen Unlock is the ideal option as an iPhone backup unlocker you should try first!
Easy Steps on How To Create a New Apple ID Account On Apple iPhone 6 Plus
Your Apple ID is your gateway to a world of apps and services, making it an essential part of your Apple experience. Whether you’re a new Apple user or simply looking to start fresh, creating a new Apple ID can open the doors to endless possibilities.
This guide will walk you through creating a new account for Apple devices in an easy-to-understand manner. From setting up your email address to securing your account, this article covered you every step of the way. Embark on this journey and learn how to create a new Apple ID account effortlessly.
Part 1: Why Create a New Apple ID?
You might need to create a new Apple ID to enhance your Apple experience. Let’s dive into why it’s a good idea:
A. Reasons for Creating a New Apple ID Account
Here’s a breakdown of the reasons why you should create a new Apple ID for your Apple iPhone 6 Plus:
- Your Apple ID is like your digital identity. Creating a new one lets you choose a unique email address that suits you, adding a personal touch to your Apple journey.
- Maybe you’ve been using an email for your Apple ID that you don’t want to use anymore. Creating a new one helps keep your personal and Apple-related emails separate.
- **Switching Devices.**When you switch to a new Apple device, like getting a new iPhone or iPad, creating a unique Apple ID ensures a fresh start tailored to your new gadget.
- **Separation of Accounts.**Sometimes, you may want to keep your work-related apps and data separate from your ones. Creating a new Apple ID helps you achieve this separation.
- If you’re using Apple services for different purposes, such as work and personal use, having separate Apple IDs can help keep everything organized and distinct.
B. Scenarios Where a New ID Is Needed
Below are the common scenarios where a new Apple ID might be needed:
- **New Apple Device.**When you purchase a new Apple device, like an iPhone or iPad, you’ll need a new Apple ID to set it up and make it truly yours.
- **Shared Device.**If multiple people use the same device, creating a new Apple ID for each user ensures that everyone has their own personalized experience.
- **Change of Email.**If your current email address associated with your Apple ID is changed or you prefer a new one, creating a unique Apple ID with the updated email is the solution.
- **Work and Personal.**To keep your work-related apps and data separate from your personal ones, having separate Apple IDs for each purpose is practical and organized.
- **Starting Fresh.**Sometimes, you might want a fresh start with your Apple experience, and creating a new Apple ID provides a clean slate.
Creating a new Apple ID isn’t just about getting a new email; it’s about tailoring your Apple experience to your needs, whether for personalization, privacy, or organization. Now that you know why it’s essential, let’s explore how to create it in the next section.
Part 2: Step-by-Step Guide: How To Create a New Apple ID Account
Creating a new Apple ID for free is a straightforward process. Let’s break it down into simple steps:
A. Registering a New Apple ID
These are the steps for registering a new Apple ID:
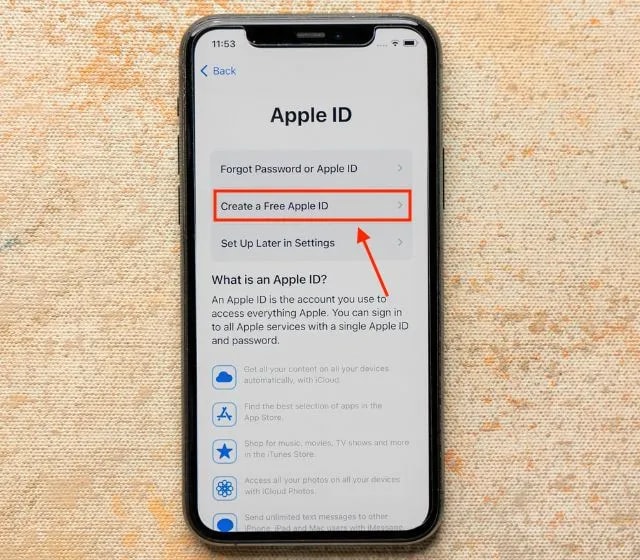
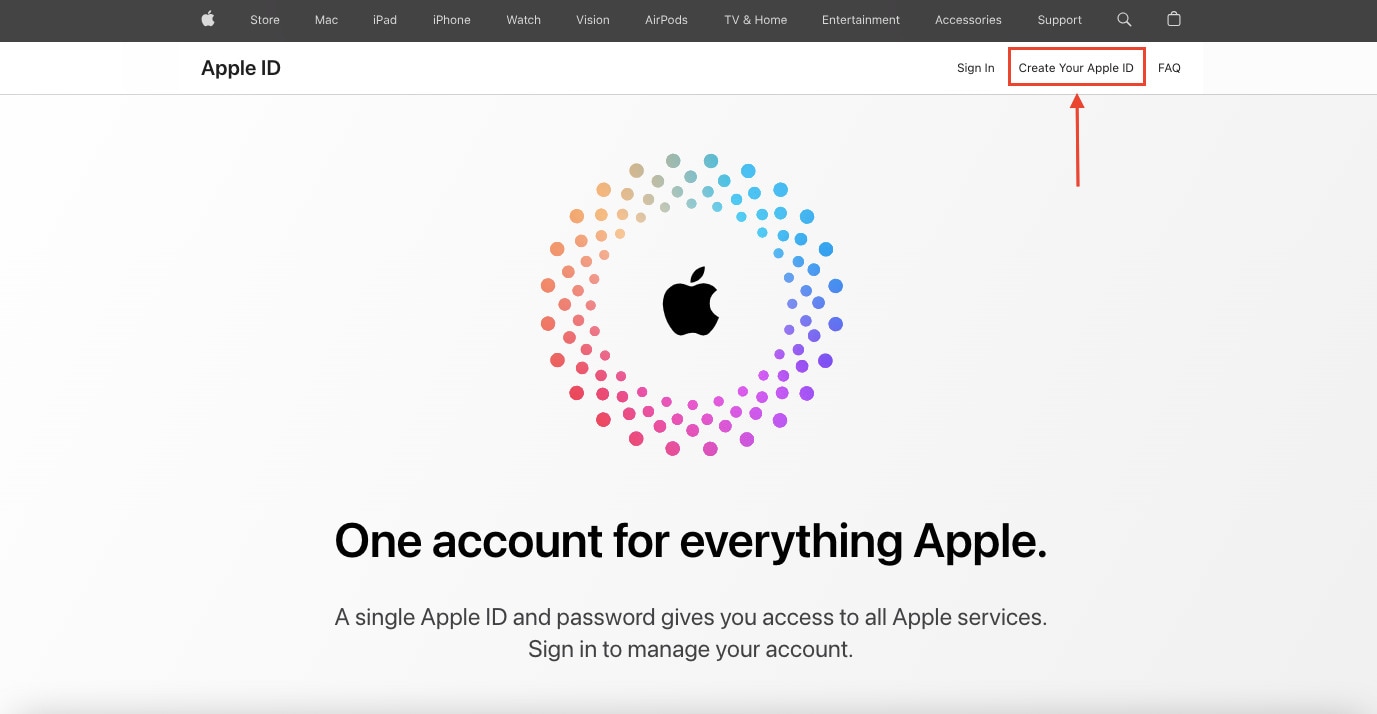
- Step 1: Open your web browser and visit the Apple ID account management page. Click the Create Your Apple ID button to begin.
- Step 2: On the registration page, you’ll be asked to provide your First name and Last name. Make sure to use the name associated with your new Apple ID. Next, you’ll need to enter your preferred email address. This one will be your new Apple ID.
Tip: Choose an email that’s easy to remember and access.

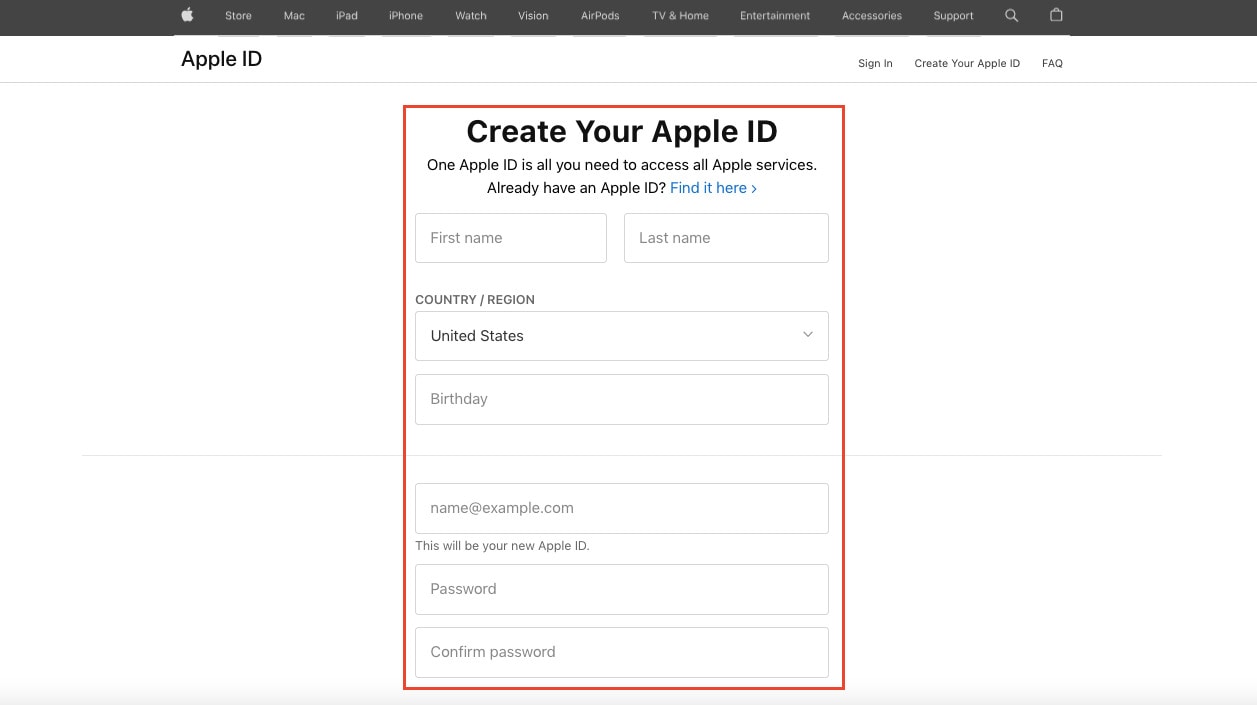
- Step 3: Create a strong password that combines letters, numbers, and symbols. This password is essential for the security of your account, so make it unique and hard to guess. Confirm your password by entering it again in the designated field.
B. Verifying Your Identity
The next step is verifying your identity. Check out the steps below:
- Step 4: Apple takes your security seriously. You may be asked to provide a phone number to verify your identity. This number can be used for account recovery or two-factor authentication. The phone number you provided will receive a verification code. Enter this code in the space provided to confirm your identity.
Note: It’s crucial to ensure that your phone number is accurate and accessible. This number will help you recover your account in case you forget your password or encounter any issues. Apple may use this phone number for two-factor authentication, adding an extra layer of security to your account.
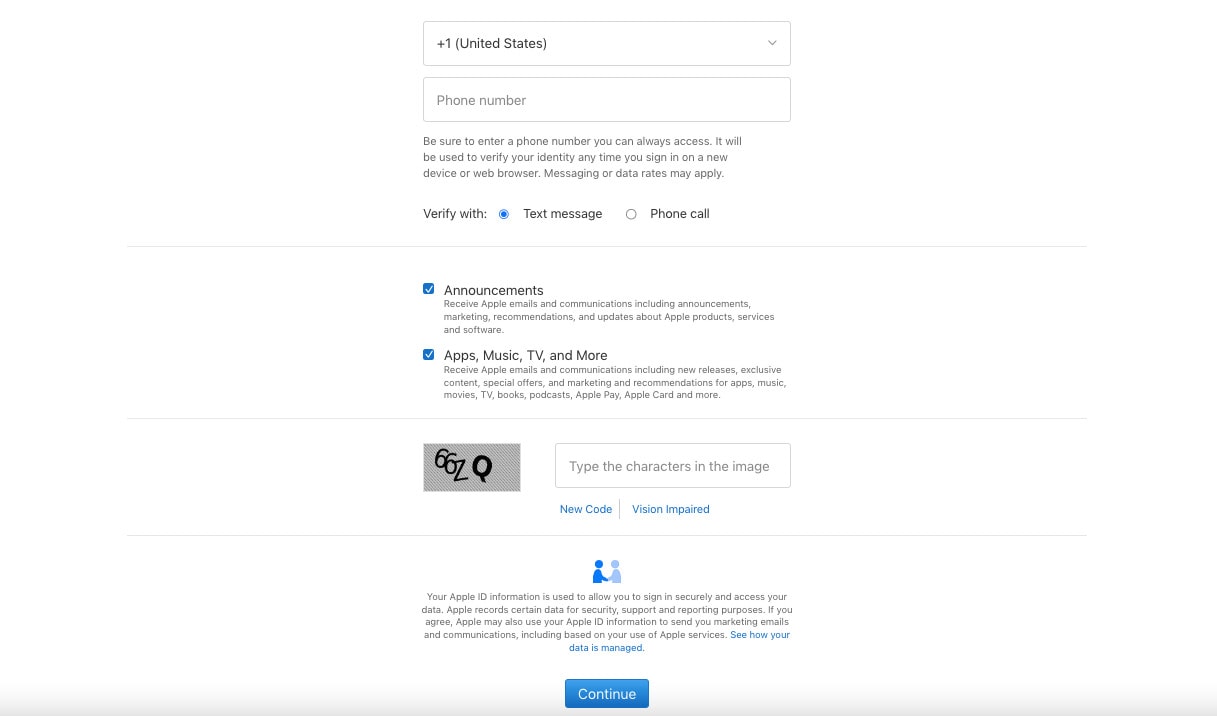
- Step 5: Apple may sometimes ask you to complete a CAPTCHA or verify your identity to prevent automated account creation.
C. Setting Up Security Questions
The next process will be setting up security questions for your account:
- Step 6: Apple asks you to choose and answer security questions. These questions provide an additional layer of protection for your account. Select questions that you can easily remember and that others can’t guess.
D. Finalizing the Process
To finalize the creation process, refer to the steps given below:
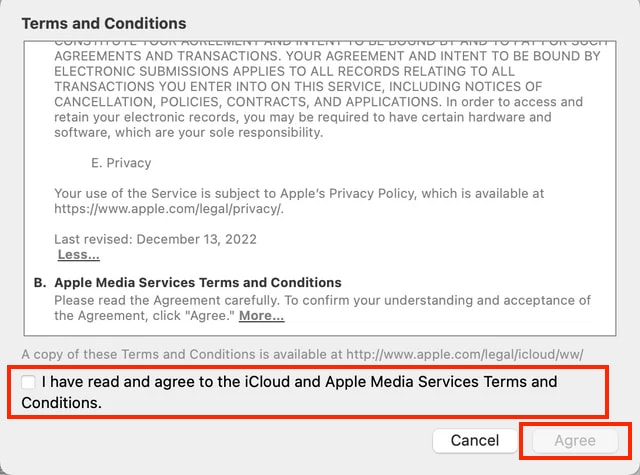
- Step 7: Read through Apple’s Terms and Conditions and Privacy Policy. Once you’ve understood them, tick the box to confirm that you’ve read and agree to the iCloud and Apple Media Services Terms and Conditions. Then click Agree to proceed. Remember that it’s essential to be familiar with Apple’s policies to ensure a secure and smooth experience.
- Step 8: After completing these steps, Apple will send a confirmation email to the address you provided. Go to your email and open the verification link to confirm your new Apple ID.
Congratulations! You’ve successfully created a new Apple ID. With this account, you can now access Apple’s services, including the App Store, iCloud, and more. Remember to keep your login credentials secure and use them to personalize your Apple experience fully.
Part 3: Effortlessly Remove Your Apple ID Using Wondershare Dr.Fone - Screen Unlock (iOS)
You can embark on an enhanced Apple experience after successfully creating your new Apple ID. Removing the previous one is essential when you create it, especially if you’ve acquired a second-hand device or no longer want the previous user’s associated credentials.
This step ensures that your new Apple ID takes center stage, granting you full control over your device and its associated services. But if you encounter difficulties when removing the previous Apple ID from your device, Dr.Fone - Screen Unlock (iOS) is a reliable and user-friendly solution.

Key Features of Dr.Fone - Screen Unlock (iOS)
This versatile tool offers the following key features in the context of Apple ID issues:
- **User-Friendly Interface.**Fone - Screen Unlock (iOS) is designed to be straightforward, making it accessible to users of all levels of technical expertise.
- It is usable with a wide range of iOS devices, ensuring you can remove the previous Apple ID from your device, regardless of the model.
- **Multiple Unlock Modes.**Fone offers various unlock modes to cater to different scenarios, including removing the previous Apple ID. This flexibility ensures that you have the right solution for your specific situation.
- **Data Security.**Fone - Screen Unlock (iOS) prioritizes data security, ensuring that your personal information and content remain intact during the Apple ID removal process.
Step-by-Step Guide on Using Dr.Fone Screen Unlock (iOS)
Check out the steps on how to remove an Apple ID account using Dr.Fone below:
- Step 1: Launch Wondershare Dr.Fone on your PC to use the Screen Unlock function and then navigate to Toolbox. Click the Screen Unlock section, then choose iOS.
- Step 2: If you want to proceed with deleting your Apple ID, you’ll need to go to the next window and select the Remove AppleID option from the menu.
- Step 3: When you hook up your iOS device to a computer, the next screen will report on its connectivity. Select the Unlock Now button to proceed.

- Step 4: Before the Apple ID can be unlocked, the next step is for the platform to ask a series of questions. Verify that a screen lock is active on your iOS device. However, please lock your iOS device before proceeding with the Yes option.

- Step 5: Check if Two-Factor Authentication is set up on all your iOS devices. If not, switch it on before confirming your decision to unlock your Apple ID.

- Step 6: After you have confirmed these settings, you will be taken to a screen with on-screen instructions for entering Recovery Mode on your iDevice. If the steps for your specific iOS device don’t work, try tapping Try DFU Mode in the app’s bottom left corner. To continue with the unlocking process, this will launch the DFU Mode instructions.

- Step 7: Once Recovery Mode has been activated, the Apple iPhone 6 Plus device’s information will be shown on the subsequent screen. Once the Device Model has been identified, all that remains is to choose the appropriate System Version and click Start. However, if there are disagreements in recognition, pick the details by hand and move forward.

- Step 8: The appropriate iOS firmware begins downloading, showing its status on the following screen. Click the Copy button to copy the direct URL to download iOS firmware for systems with sluggish firmware download speeds.
- Step 9: The platform checks the downloaded firmware and displays its details on the following screen. To proceed with unlocking your Apple ID, click the Unlock Now button. To proceed, you will be prompted to input a code into a confirmation window. Enter the code and then click the Unlock button.

- Step 10: The following screen shows the unlocking status of your Apple ID. Don’t let the Apple iPhone 6 Plus device lose its connection under any circumstances. The screen prompts the process of completing the Apple ID once the ID has been unlocked. If the Apple ID has been unlocked, click Done to proceed. If that fails, click the Try Again button and give it another shot.

Conclusion
This guide has simplified the process of creating a new Apple ID, ensuring you can effortlessly personalize, secure, and organize your digital experience. Creating a new Apple ID is easy, and it allows you to tailor your Apple journey to your preferences. Remember, it’s all about you, your privacy, and your convenience.
Should you encounter any challenges while managing your Apple ID, such as removing a previous one, consider Dr.Fone - iOS Screen Unlock tool. This user-friendly resource stands ready to assist, ensuring a seamless and secure Apple experience. Explore the possibilities and make the most of your Apple adventure!
How to Access Your Apple iPhone 6 Plus When You Forget the Passcode?
We all have secrets in our iPhone or some important financial or business data that we all wish to protect from unwanted access. For this, we set up a passcode. But what if Apple iPhone 6 Plus passcode is forgotten by you? Well, you may now wonder how to perform Apple iPhone 6 Plus passcode bypass, right? Worry no more! We’re right here to help you with the proven solutions for Apple iPhone 6 Plus passcode reset without iTunes or with it too. Let’s explore.
Part 1. Unlock Apple iPhone 6 Plus screen passcode in one click (unlock tool needed)
The first and the ultimate measure for Apple iPhone 6 Plus passcode removal in just a matter of a single click is Dr.Fone - Screen Unlock (iOS) . With the help of this mighty tool, performing Apple iPhone 6 Plus passcode reset is even easier than any other alternative. Not only it can perform Apple iPhone 6 Plus passcode bypass, you can also make use of this tool to bypass lock screen of an Android smartphone too. Isn’t it amazing? Moreover, this powerful tool works effortlessly with the latest iOS 13 version and even with the most recent iPhone models as well. Here is the step by step tutorial on Apple iPhone 6 Plus passcode bypass.
Step 1: Install and launch Dr.Fone - Screen Unlock (iOS)
Get the tool Dr.Fone - Screen Unlock (iOS) downloaded and installed over your computer system. Then establish a connection between your computer and iPhone.
Now, launch the tool and then opt for the “Unlock” tile from the main screen.
Step 2: Boot in Recovery/DFU mode
Next move that you need to perform is to opt for the correct mode, i.e. “Unlock iOS Screen”. Then, you’ll be prompted to boot your device in Recovery/DFU mode. The on-screen instructions will guide you on how to do it.

Step 3: Double-Check iPhone information
On the upcoming screen, you’ll be displayed the “Device Model” and most recent “System Version” which is compatible with your Apple iPhone 6 Plus. Simply, hit the “Start” button here.
Step 4: Perform Apple iPhone 6 Plus passcode removal
Once, the software downloads the firmware automatically, you can then proceed to Apple iPhone 6 Plus passcode reset. Hit the “Unlock Now” button over the next screen and in a short while you’ll be notified that Apple iPhone 6 Plus passcode removal is completed.

 safe & secure
Part 2. Restore an iTunes backup for Apple iPhone 6 Plus
Here we’re going to be familiar with the Apple iPhone 6 Plus passcode reset using the renowned iOS data management tool, iTunes. But be sure that iTunes version installed over your computer is up to date or else unknown errors may crop up in between. Eventually, your all-new Apple iPhone 6 Plus may even get bricked. Think this is it? Well, here’s another problem with iTunes, you need to get your Apple iPhone 6 Plus connected only to a pre-synced or pre-trusted computer. Or else, this tutorial won’t bring any good to you.
Step 1: First, get your Apple iPhone 6 Plus connected to your PC. Then, launch the iTunes most recent version. It will automatically detect your Apple iPhone 6 Plus. Once detected, tap the “Device” icon over the left top corner of iTunes.
Step 2: Then, hit the “Summary” option from the left panel and then you need to hit the “Restore iPhone” button. Confirm your actions by simply pushing the “Restore” button on the pop-up message and you’re done. Now, just wait for the process to complete.

Part 3. Restore Apple iPhone 6 Plus in recovery mode to remove screen passcode
If somehow, the above solution fails and you’re just not able to get Apple iPhone 6 Plus passcode reset. You need to boot your device into recovery mode and then perform the factory reset. This would certainly wipe off everything from your Apple iPhone 6 Plus including the passcode as well. Here are the steps involved in booting your Apple iPhone 6 Plus in recovery mode.
- First things first, power off your Apple iPhone 6 Plus by pushing the “Side” button down along with either of the “Volume” button. Keep them pressed till you get to see “Power-off” slider over your screen. Now, simply drag it to power off your device.
- Next, connect your Apple iPhone 6 Plus and your computer firmly with the help of an authentic cable. Please make sure to press and hold the “Side” button meanwhile.
- Ensure not to let go the Side button till the recovery mode screen appears over your Apple iPhone 6 Plus.

- Once the Apple iPhone 6 Plus device is booted in recovery mode, iTunes will throw a pop up message that “iTunes has detected an iPhone in recovery mode”. Simply, hit the “OK” button over the message and then push the “Restore iPhone” button followed by confirming your actions.

Part 4. Use “Find iPhone” from iCloud
The next pro tutorial for Apple iPhone 6 Plus passcode removal is via iCloud. For this, grad access to any computer available on your side. Or, you can also make use of any other smartphone device but ensure it must be connected to a WiFi network or have an active data pack. Moreover, the locked iPhone on which you’re going to perform Apple iPhone 6 Plus passcode reset should also have an active internet connection to make this tutorial work.
Note: Since we’re going to unlock your Apple iPhone 6 Plus using Find My iPhone service of iCloud. It is important that “Find My iPhone” service was enabled beforehand over your Apple iPhone 6 Plus.
Step 1: Launch the browser over any other smartphone device or computer. Then, visit the official web page iCloud.com.
Step 2: Now, make use of same Apple account configured with your Apple iPhone 6 Plus to sign in to iCloud. Then, opt for the “Find My iPhone” icon over the launch pad.

Step 3: Next, tap on the “All Devices” drop-down menu available over the top midsection and then select the Apple iPhone 6 Plus that you wish to bypass the passcode off.
Step 4: Then, you’ll get to witness a pop-up window over your screen. Tap the “Erase iPhone” button over it and then confirm your actions. All the settings and data will be wiped off remotely from your Apple iPhone 6 Plus now.

Step 5: Lastly, wait for the process to complete and upon completion set up your device as usual.
Part 5. How about Apple iPhone 6 Plus restrictions passcode?
Apple iPhone 6 Plus restrictions is a vital setting that is used to lock down a set of functions of the iPhone. These iPhone restrictions are also known as Parental Controls. That implies one can make use of these settings to block or hide songs that have explicit lyrics/content or barring YouTube from running, etc.
It is vital to set up a 4 digit passcode if you want to use iPhone restriction settings. Now, if you somehow forgot the passcode that was set to make use of iPhone restrictions, you need to restore your Apple iPhone 6 Plus with the help of iTunes to remove the previous passcode. But ensure not to restore an old backup of iPhone or else, the old passcode which you may not know will also get activated. Eventually, making your situation even worse.
Reset/Change Apple iPhone 6 Plus restrictions passcode
Now, in case you know the Apple iPhone 6 Plus restrictions passcode and just wish to reset it. Then follow the streak of steps mentioned below.
- Launch “Settings” of your Apple iPhone 6 Plus and then get into “General” followed by “Restrictions”. Now, you’ll be asked to key in the current passcode.
- Once you’ve entered the current passcode, hit on the “Disable Restrictions” and to confirm your actions, key in your passcode when prompted.

- Lastly, hit on “Enable Restrictions”. You’ll be asked to set up a new passcode now. Do it and you’re done.

- Title: In 2024, PassFab iPhone 6 Plus Backup Unlocker Top 4 Alternatives | Dr.fone
- Author: Amelia
- Created at : 2024-07-15 04:57:48
- Updated at : 2024-07-16 04:57:48
- Link: https://iphone-unlock.techidaily.com/in-2024-passfab-iphone-6-plus-backup-unlocker-top-4-alternatives-drfone-by-drfone-ios/
- License: This work is licensed under CC BY-NC-SA 4.0.