
In 2024, Remove Device Supervision From your Apple iPhone XS Max | Dr.fone
Remove Device Supervision From your Apple iPhone XS Max
Supervising devices is a proven technique for companies to monitor their employees. With this, they keep track of their performance on all associated devices. If you’ve decided to leave an organization, ensure that you retain the Apple iPhone XS Max device’s ownership by removing supervision access. If you’re looking for a guide on how to remove device supervision from your Apple iPhone XS Max, you can find some effective methods here.

Part 1. Answering Top Queries About Removing Device Supervision From iPhone
Many questions often pop up in users’ minds when considering removing device supervision. This section unveils some top queries with authoritative answers before heading to the main guide:
|
You May Want to Ask
|
Authoritative Answer
|
| — | — |
|
1. Does removing device supervision impact the iPhone’s functionality?
|
Removing device supervision does not compromise the fundamental functionality of your Apple iPhone XS Max. It is important to note that any administrative restrictions or configurations will be lifted. However, it might result in losing access to specific apps related to that organization.
|
|
2. Can device supervision be reinstated after removal?
|
Device supervision can be re-applied by the designated supervisor or IT administrator. However, this process usually involves resetting the Apple iPhone XS Max device to its factory settings if needed.
|
|
3. What information can be accessed through device supervision on iOS?
|
Once user’s devices are supervised, organizations can conveniently check settings, apps, and accounts being managed. They can also apply extra restrictions such as disabling Apple Music or putting the Apple iPhone XS Max device into Single App Mode.
|
Part 2. Remove Device Supervision With Perfection Using Wondershare Dr.Fone - Screen Unlock
Undoubtedly, device supervision is the most reliable method for organizations to monitor connected devices and analyze reports. If you have left a company where the administrator supervises your iOS device, your device needs to be unsupervised. For this process, you can bypass the MDM lock on your iOS device through a reliable tool.
Here, Wondershare Dr.Fone stands tall to help out your ventures and provide executable techniques explaining how to remove supervision from iPhone. This tool allows you to bypass the MDM lock without data loss on your Apple iPhone XS Max using easy steps. Consequently, you can also use other advanced functions, such as removing lock screens and unlocking Apple ID in different instances.
Features of Wondershare Dr.Fone To Consider
- Wondershare Dr.Fone lets you bypass iCloud Activation Lock completely and set a new Apple ID on the Apple iPhone XS Max device.
- This tool is compatible with all iOS devices, even iOS 17, and helps users experience creative features.
- Users can remove iTunes backup encryption by changing the encryption setting without losing data.
Step-by-Step Guide to Remove MDM Lock Using Wondershare Dr.Fone
Wondershare Dr.Fone provides the simplest method to remove the MDM lock and bypass device supervision access. Here is a comprehensive step-by-step guide to help users remove supervision from iPhones.
- Step 1. Initiate and Proceed With the Screen Unlock Feature
First, launch Wondershare Dr.Fone on the computer and connect it to your Apple iPhone XS Max. Move into the “Toolbox” tab and select the “Screen Unlock” function.

- Step 2: Select iOS and Head To Unlock MDM
After that, choose “iOS” as the Apple iPhone XS Max device type to open the related tool. Once the tool starts working, select the “Unlock MDM iPhone” option from the list.

- Step 3. Select Remove MDM Function To Start the Process
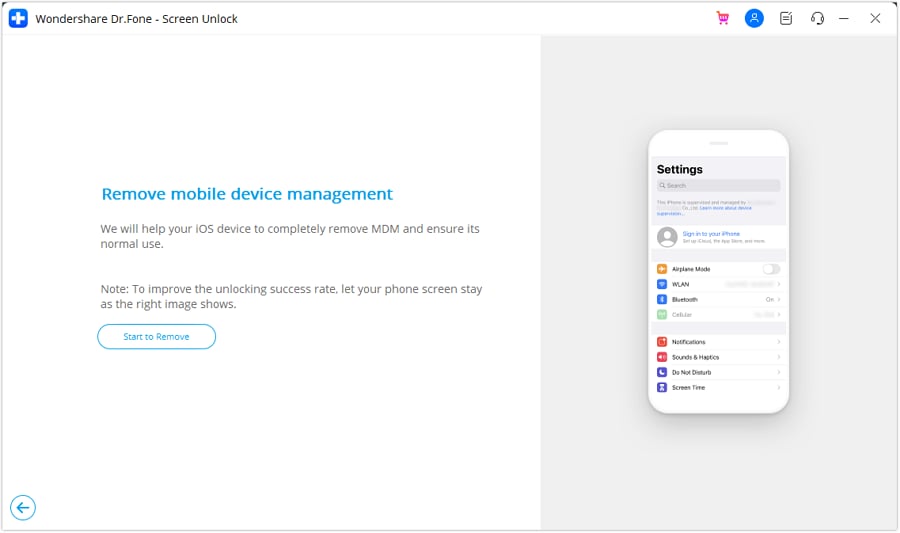
On the next screen, you will see two options, “Bypass MDM” and “Remove MDM.” Select “Remove MDM” and hit the “Get Start” button. After that, you will be taken to another screen where you need to tap on “Start to Remove” to execute the process.
- Step 4. Disable Find My Feature and Complete the Process
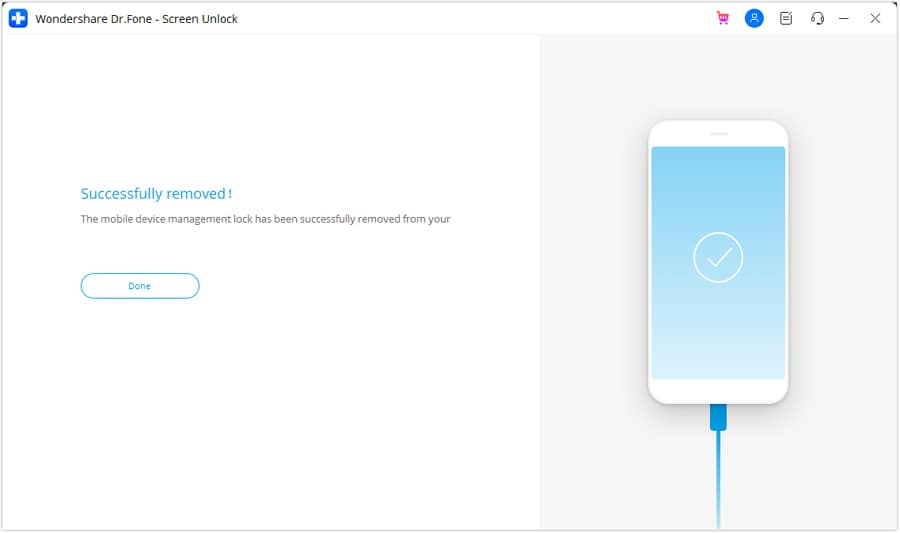
A prompt will pop up stating that you need to turn off the Find My feature on your iOS device. For this, open your device “Settings” and choose the “iCloud” option. Lastly, disable the “Find My iPhone” feature and hit the “OK” button. Wait a few seconds to complete the process and click “Done” to conclude the MDM removal process.
Part 3. Easy Removal of Device Supervision From Settings
Looking for other conventional methods about how to remove supervision from iPad or iPhone? If you wish to perform such actions, you can access some options in your Apple iPhone XS Max settings. However, to utilize this method, you should know the login information and password of the Apple iPhone XS Max device. If you have them with you, follow the given steps to remove device supervision from iPhone settings:
- Step 1. Initially, open the “Settings” and move into the “General” section. After that, select the “VPN & Device Management” option to see which MDM profiles supervise your iOS device.

- Step 2. Select the MDM profile you want to remove and tap on “Remove Management” to delete that profile from your iDevice. Then, you will be prompted to enter your login info or password and type your information to bypass supervision access.

Part 4. Using Apple Configurator 2 for Removing iPhone Supervision System
Apple Configurator is a free tool for Mac users that provides a simple technique for removing iPhone supervision. To use this method, you must have a password for the Apple iPhone XS Max device; otherwise, you will need to contact the organization to get the necessary permissions. Below are easy steps about how to remove device supervision from iPad and iPhone through your Mac:
Instructions. First, download and launch the Apple Configurator tool on your Mac. Connect the iDevice to the Mac using a compatible USB-C cable. Click on “Actions” from the top bar of the tool. In the drop-down list, choose the “Advanced” option and select “Erase All Content and Settings” to remove iPhone device supervision. Enter your device password to start using your Apple iPhone XS Max normally.

Part 5. Directly Contact Administration for Removing Device Supervision
If you’ve forgotten the username and password of your management profiles, you cannot remove MDM profiles from iPhone settings. In that situation, you can only seek help from the company admin, as this iPhone is supervised and managed by them.
You can contact the administrator and share a valid reason why you want to remove supervision access. They can remove your device directly from their system or provide you with the correct password to proceed with the login process.
Conclusion
Removing device supervision is simple, but getting familiar with the safest method is necessary. Considering this, we have covered some techniques to bypass MDM locks on your iOS device. These can easily resolve your issue of how to remove device supervision from iPhone queries. Conclusively, Wondershare Dr.Fone is the recommended tool to bypass the MDM lock without data loss.
Tips: Are you searching for a powerful Screen Unlock tool? No worries as Dr.Fone is here to help you. Download it and start a seamless unlock experience!
Forgot Apple iPhone XS Max Backup Password? Here’s What to Do
Forgetting your Apple iPhone XS Max backup password can be a real pain. Not only does it mean you can’t access your data, but it also means you can’t restore your phone if something goes wrong.
There are still chances that you could forget your Apple iPhone XS Max backup password. Fortunately, you have a chance to recover your password. So, if you’re having trouble remembering your Apple iPhone XS Max backup password, don’t despair. There are still ways to get it back!
Part 1: Overview of iPhone Backup Password
The Apple iPhone XS Max is secured using a combination that is the backup password. Passwords, Wi-Fi settings, browser history, and health records are sensitive information that an encrypted device may back up.
Remember that this is not the same as your Apple ID or passcode (the sequence you input to unlock the iPhone).
Note:
The encryption of backups is not turned on by default. You will only need to activate the Encrypt Backup option the first time you use either iTunes or Finder. After that, each of your backups will encrypt on its own automatically.
So, if you choose to store your backups in iCloud, it will automatically encrypt all of your data each and every time.
To get the password for the encrypted backup of iTunes:
Step 1: Open iTunes
Launching iTunes is the first thing to do if you have a Mac computer running Mojave 10.14 or an older operating system version. On the other hand, if you use the Mac operating system known as Catalina 10.15, you need to run the Finder application.
Step 2: Link your Apple iPhone XS Max to your PC
At this point, a USB cable should be used to connect the Apple iPhone XS Max device to a computer. The next step is to find the widget on your desktop computer or portable device.
Step 3: Begin the Encryption Process
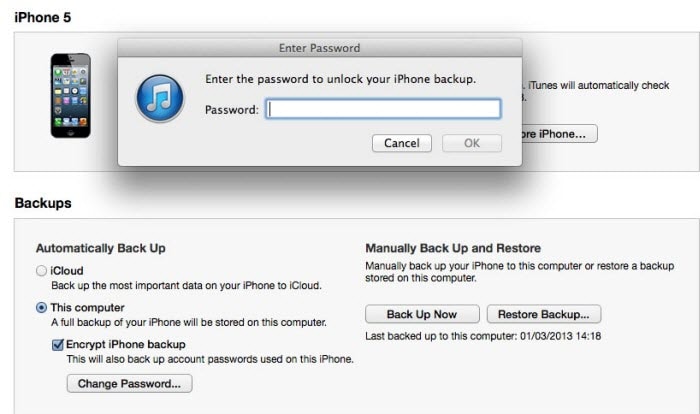
Select the Encrypt Local Backup option in the Backups section directly from either the Summary or General tab of the Backups section.
Step 4: Create a Password
When prompted in the window, create a password for the account. Make it powerful yet that is simple for you to remember. You might also save it somewhere secure to help you recall it later.
After establishing the password, all your previous backups will immediately undergo an automated overwrite and encryption. Make it a priority to ensure that the encryption procedure is finished effectively.
Part 2: 5 Fixes When We Forgot iPhone Backup Password
1. Try all passwords you used on your Apple iPhone XS Max
The typical method that each individual attempts for the first time is to input all of the available passcodes. Even if it is the most straightforward technique, there is still a possibility that you miss one of them. Therefore, think about all of the passwords you may input, which are listed below.
- The password to log in to the computer
- The password to access Apple ID
- The password to access the encrypted data on the hard disk
- The password to access various websites
- The password to log in to the computer
- Password for the wireless network
- Password for the email account
- Passcode for the administrator
- Passcode for the iPhone
2. “Reset All Settings” via “Settings”
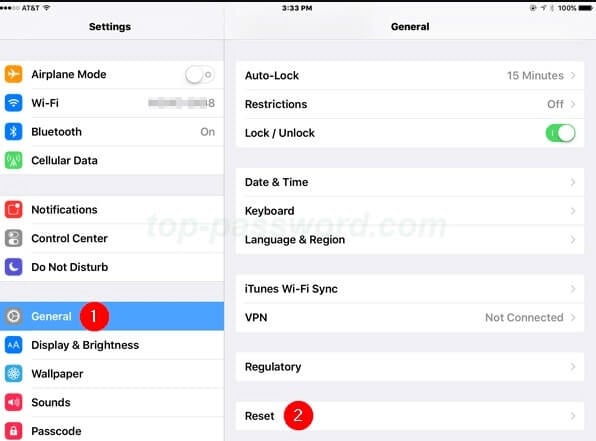
To begin, go to the Settings app on your iOS device, then choose General, followed by Reset.
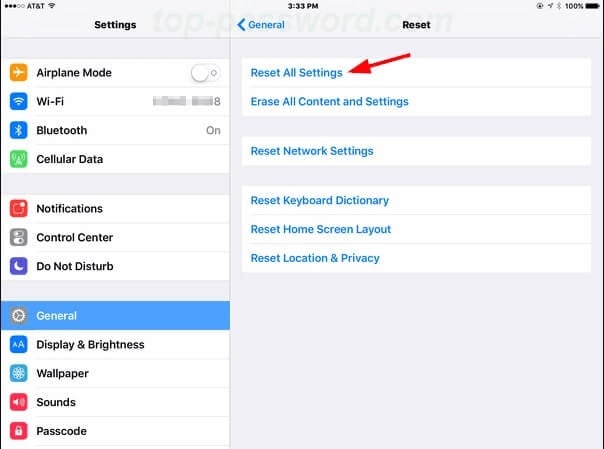
You may now go to Reset All Settings and confirm by entering the security passcode when prompted. Then, your phone will automatically go through the process of resetting and returning to its default settings.
You can also get rid of the password for the last backup without deleting any other apps or data.
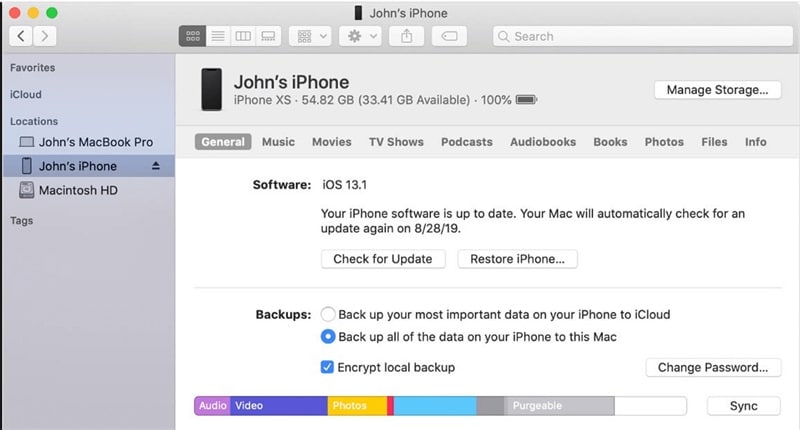
Use a USB cable to link your Apple iPhone XS Max to your PC. Look at the small iOS icon in the figure below. Just click on it.
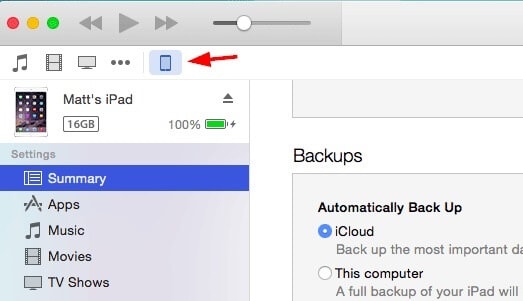
Proceed to the Summary Page and make your selection there for The Computer. After selecting Encrypt Local Backup, you must create a new password. After you have pressed the Backup Now option, wait for iTunes to create a new password for you.
3. Find your password in the macOS keychain
Step 1: Launch Keychain Access by going to Application > Utilities > Keychain Access once your Mac has booted up.
Step 2: Check for a backup of your Apple iPhone XS Max by entering it into the search box and looking for it there.
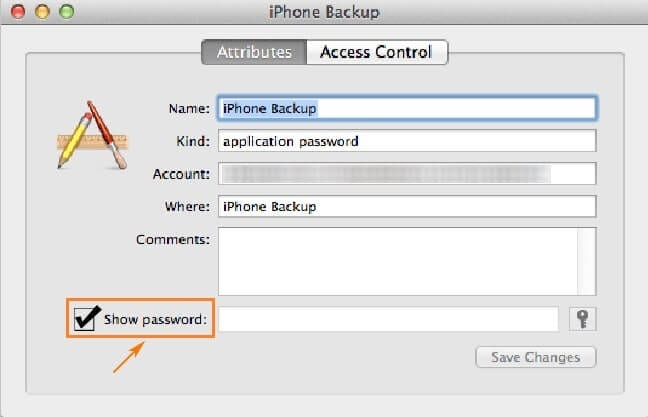
Step 3: Double-click the Show Password option, and then choose it from the drop-down menu. After that, type in the password for the keychain. At long last, the password for your Apple iPhone XS Max backup will be shown.
4. Select “Back Up Now” via iCloud to remove password
If you already have a backup stored in iCloud, you may use iCloud for recovery.
First, power up the gadget and look for the “Hello” screen. If you have previously set up your Apple iPhone XS Max, you must delete or remove all of the material before continuing.
Navigate to the Apps & Data menu and choose the Restore from iCloud Backup option.
After successfully signing in with your Apple ID, choose Backup.

During the time that the system is being restored, it is essential that the Wi-Fi connection remains active.
5. Dr.Fone-Screen Unlock
With Dr.Fone - Screen Unlock, it’s easy to follow all the steps to get rid of the iTunes backup password.
Step 1: After installing Dr.Fone, open it and look for the red Screen Unlock button.
Step 2: In the Screen Unlock interface, tap Remove iTunes BackUp Encryption in the bottom right corner to move forward.

Step 3: When you get to this page, use a USB cable to connect your iOS device to the PC. If Dr.Fone can find this connection, you will see the picture below.
Before you click Remove Now, please carefully read the following three notes:
- Make sure to turn off Find My iPhone.
- Don’t open iTunes while doing this.
- Your device will reboot

Step 4: Dr.Fone can check your iTunes backup and delete it by itself. This encryption will be erased when the progress bar reaches 100%. This will take a short time to do.

Step 5: The encryption on the iTunes backup has been removed successfully! Now you can easily back up, restore, move, or wipe your device.

Part 3: 3 Tricks to Help You Remember the Passwords
If you have an iPhone, you know it can be tricky to keep track of all your passwords. From your email password to your banking login, there are a lot of different codes to remember.
Here are three tricks to help you keep track of your passwords so you don’t have to stress the next time you can’t log in to your account.
- Turn on “AutoFill” in “Settings”
You can turn on AutoFill in the Settings app. This will allow your Apple iPhone XS Max to fill in passwords when you visit websites and apps automatically. All you need to do is ensure you’ve entered the correct username and password once, and your Apple iPhone XS Max will save the information, so you don’t have to enter it again.
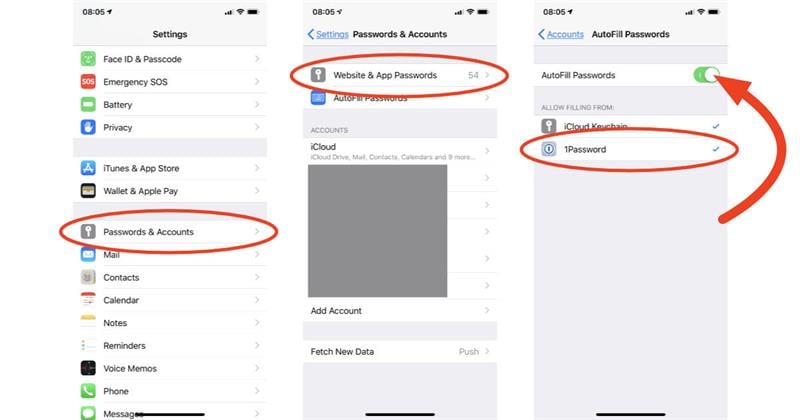
- Try iCloud Keychain to keep your passwords
iCloud Keychain is a great way to keep all your passwords in one place. Once you’ve turned on the iCloud Keychain, all your passwords will be synced across your devices. That means if you create a new password on your laptop, it will automatically appear on your Apple iPhone XS Max.
- Use Notes for passwords
If you’re finding a simple way to keep all your passwords, try using the Notes app. Create a new note and title it “Passwords.” Then, add it to the note whenever you create a new password.
You can even add a description of the password, so you remember which account it’s for.
The Bottom Line
As a last piece of advice, please safely save your newly created passwords. Rather than writing them down in the iPhone’s notepad, you should save the passwords in a secure location.
However, no matter how secure your gadget is, password leakage may happen, sending you to unpleasant situations that you can’t even conceive. It’s best to use Dr.Fone - Screen Unlock as soon as you encounter any problem!
Forgot Locked Apple iPhone XS Max Password? Learn the Best Methods To Unlock
The note-taking apps are pivotal in organizing thoughts, reminders, and sensitive data. Notably, Apple’s Notes app stands out for smooth blending into the Apple ecosystem while boasting a user-friendly interface. It is recognized for its effortless integration and robust security.
This app offers a reliable and secure platform for storing personal and confidential information. Users can safeguard their notes by setting up separate passwords. Yet, it’s not uncommon to encounter a situation where one forgets a note password on an iPhone. This can be frustrating, but don’t worry, as this article will discuss how to unlock a note on iPhone.
Part 1. Best Method To Unlock Forgotten Notes Password iPhone: Wondershare Dr.Fone
Apple allows users to create a separate password for notes or use their iPhone passcode. Many users choose the second option to avoid remembering a new password. Forgetting the Apple iPhone XS Max device passcode poses a drawback, making your notes inaccessible. Wondershare Dr.Fone stands out as one of the most straightforward solutions for addressing this scenario.
It offers an absolute way to regain access to your notes and device if you forgot locked Notes password. However, it’s essential to note that this method will remove all data from your Apple iPhone XS Max. That allows you to set your device as new and restore the old data using backups. Dr.Fone offers a comprehensive solution with the ability to bypass or remove most of the locks on iOS devices.
Focusing Features of Wondershare Dr.Fone
- For users who have forgotten their Screen Time passcode , Dr.Fone allows them to remove it without causing data loss.
- Fone has the ability to remove Apple ID from your iOS device if you have forgotten its credentials.
- Buying a second-hand might involve iCloud Activation Lock, which Dr.Fone can bypass in minutes.
Steps To Unlock Forgotten Notes Password iPhone via Wondershare Dr.Fone
Dr.Fone is a robust tool tailored to aid users in unlocking their iOS devices. It incorporates multiple pivotal features necessary for facilitating the unlocking procedure. Here are the steps imperative for unlocking your iOS device:
Note: This method is suitable when Notes password is same as iPhone passcode.
- Step 1. Initiate iOS Screen Unlock With Dr.Fone
Once Wondershare Dr.Fone is downloaded and installed on your computer, launch it. Then navigate to “Toolbox,” access “Screen Unlock,” and finally choose “iOS” as the Apple iPhone XS Max device type. Now, select the “Unlock iOS Screen” button to begin the process.

- Step 2. Enter Recovery Mode and Download Firmware
The next step is to put your device into Recovery Mode after selecting “Start,” for which the instructions are given on the screen. Once your device is in Recovery Mode, Dr.Fone will detect it and show its model. Now select the “System Version” and tap “Start” to proceed. Dr.Fone will now start downloading the firmware, which it will later verify.

- Step 3. Unlock the iOS Device and Complete the Process
When the firmware is displayed after verification, press “Unlock Now.” Upon triggering, an immediate prompt will appear. It will need the insertion of the “000000” code for compliance with the data loss warning. Following the code entry, tap “Unlock” to start the unlocking process. Upon unlocking the Apple iPhone XS Max device successfully, complete the procedure by tapping “Done.”

Tips: Are you searching for a powerful iPhone Unlock tool? No worries as Dr.Fone is here to help you. Download it and start a seamless unlock experience!
Part 2. How To Unlock Notes on iPhone Through Settings
If you’ve locked a note on your Apple iPhone XS Max but forgot the password, there is no need to worry. You can unlock the notes through “Settings” on your device as long as you have your Apple ID credentials. The following are the steps for what to do if you forgot your notes password:
Note: This method is suitable when you remember your Apple iPhone XS Max passcode.
- Step 1. Begin the process by accessing Settings and then navigating to “Notes.” Within the “Notes” tab, press “Password” followed by tapping “Reset Password.”

- Step 2. You will be prompted to enter the Apple ID password for confirmation. After entering the Apple ID password, tap “Reset Password” again to reset the password. Finalize the process by setting up a new “Password,” “Verify” it, set a “Hint,” and press “Done.”

Part 3. How To Unlock Notes on iPhone Using Touch ID/Face ID
Even if you’ve forgotten the password to your Notes on iPhone, there’s an alternative method available. You can unlock them by enabling Face ID or Touch ID for Notes. This feature allows users to access locked notes through biometric authentication. Here’s how to unlock a note on iPhone using Touch ID/Face ID:
Note: This method is suitable when Touch ID or Face ID is enabled.
- Step 1. Before starting, ensure you have Touch ID/Face ID already enabled. Now, open the Notes app and navigate to the locked note. Tap the note followed by pressing “View Note.” Then, you will be required to use Touch ID or Face ID to unlock the note.

- Step 2. If you want to save the content of the locked note without re-locking it, select all the content. Now, “Copy” the note’s content and paste it on a new note to recover the data from a locked note.

Bonus Tip. Learn How To Lock Notes on iPhone Easily
Locking notes on your Apple iPhone XS Max provides extra security for your sensitive information. Regularly reviewing and updating your password settings can enhance the security of your locked notes. Here’s a simple and effective method to lock notes on your Apple iPhone XS Max:
- Step 1. Open the “Note” you want to lock and tap the “three dots” near the top right corner. From the appearing menu, press the “Lock” icon.

- Step 2. If it is the first time, you will be asked to set a new password or use the same one as the Apple iPhone XS Max device. After your note is locked, hide its content by tapping the “open lock” icon at the top of the screen.

Conclusion
In conclusion, this article addressed methods for how to recover locked notes on iPhones. It explored options such as using Settings to remove note locks, leveraging Touch ID/Face ID for access, and introducing Wondershare Dr.Fone as a comprehensive solution. Dr.Fone offers a direct approach to unlocking devices when passwords are inaccessible.
Also read:
- [New] Propel Your Video' Writes The AI Way for 2024
- [Updated] Discovering How to Engage in Discord Calls Easily
- [Updated] The Film-Maker’s Quick Guide to Perfect Sea Scenes
- 2024 Approved Insider's Guide to Superior Apps for Vocal Transformation
- Art of Chocolate Chips: Quantity Queries Answered
- Enhance Your AI Experience with These 5 ChatGPT Features You're Missing Out On
- How to Unlock Apple iPhone SE (2020) Without Passcode? | Dr.fone
- In 2024, Forgot Apple iPhone 12 Pro Max Backup Password? Heres What to Do | Dr.fone
- In 2024, How to jailbreak iCloud locked Apple iPhone XR
- In 2024, How To Unlock A Found iPhone 15 Plus? | Dr.fone
- In 2024, How To Unlock Apple iPhone 14 Plus Without Passcode? 4 Easy Methods | Dr.fone
- In 2024, Inverted Video Playback on Android Made Simple
- In 2024, iPhone Is Disabled? Here Is The Way To Unlock Disabled Apple iPhone 6 | Dr.fone
- In 2024, Unlocking iPhone 15 Pro Passcode without a Computer | Dr.fone
- Unlocking Apple iPhone 7 Plus Lock Screen 3 Foolproof Methods that Actually Work | Dr.fone
- Title: In 2024, Remove Device Supervision From your Apple iPhone XS Max | Dr.fone
- Author: Amelia
- Created at : 2025-02-25 14:17:16
- Updated at : 2025-03-03 19:00:13
- Link: https://iphone-unlock.techidaily.com/in-2024-remove-device-supervision-from-your-apple-iphone-xs-max-drfone-by-drfone-ios/
- License: This work is licensed under CC BY-NC-SA 4.0.