
In 2024, Remove Device Supervision From your iPhone SE | Dr.fone
Remove Device Supervision From your Apple iPhone SE
Supervising devices is a proven technique for companies to monitor their employees. With this, they keep track of their performance on all associated devices. If you’ve decided to leave an organization, ensure that you retain the Apple iPhone SE device’s ownership by removing supervision access. If you’re looking for a guide on how to remove device supervision from your Apple iPhone SE, you can find some effective methods here.

Part 1. Answering Top Queries About Removing Device Supervision From iPhone
Many questions often pop up in users’ minds when considering removing device supervision. This section unveils some top queries with authoritative answers before heading to the main guide:
|
You May Want to Ask
|
Authoritative Answer
|
| — | — |
|
1. Does removing device supervision impact the iPhone’s functionality?
|
Removing device supervision does not compromise the fundamental functionality of your Apple iPhone SE. It is important to note that any administrative restrictions or configurations will be lifted. However, it might result in losing access to specific apps related to that organization.
|
|
2. Can device supervision be reinstated after removal?
|
Device supervision can be re-applied by the designated supervisor or IT administrator. However, this process usually involves resetting the Apple iPhone SE device to its factory settings if needed.
|
|
3. What information can be accessed through device supervision on iOS?
|
Once user’s devices are supervised, organizations can conveniently check settings, apps, and accounts being managed. They can also apply extra restrictions such as disabling Apple Music or putting the Apple iPhone SE device into Single App Mode.
|
Part 2. Remove Device Supervision With Perfection Using Wondershare Dr.Fone - Screen Unlock
Undoubtedly, device supervision is the most reliable method for organizations to monitor connected devices and analyze reports. If you have left a company where the administrator supervises your iOS device, your device needs to be unsupervised. For this process, you can bypass the MDM lock on your iOS device through a reliable tool.
Here, Wondershare Dr.Fone stands tall to help out your ventures and provide executable techniques explaining how to remove supervision from iPhone. This tool allows you to bypass the MDM lock without data loss on your Apple iPhone SE using easy steps. Consequently, you can also use other advanced functions, such as removing lock screens and unlocking Apple ID in different instances.
Features of Wondershare Dr.Fone To Consider
- Wondershare Dr.Fone lets you bypass iCloud Activation Lock completely and set a new Apple ID on the Apple iPhone SE device.
- This tool is compatible with all iOS devices, even iOS 17, and helps users experience creative features.
- Users can remove iTunes backup encryption by changing the encryption setting without losing data.
Step-by-Step Guide to Remove MDM Lock Using Wondershare Dr.Fone
Wondershare Dr.Fone provides the simplest method to remove the MDM lock and bypass device supervision access. Here is a comprehensive step-by-step guide to help users remove supervision from iPhones.
- Step 1. Initiate and Proceed With the Screen Unlock Feature
First, launch Wondershare Dr.Fone on the computer and connect it to your Apple iPhone SE. Move into the “Toolbox” tab and select the “Screen Unlock” function.

- Step 2: Select iOS and Head To Unlock MDM
After that, choose “iOS” as the Apple iPhone SE device type to open the related tool. Once the tool starts working, select the “Unlock MDM iPhone” option from the list.

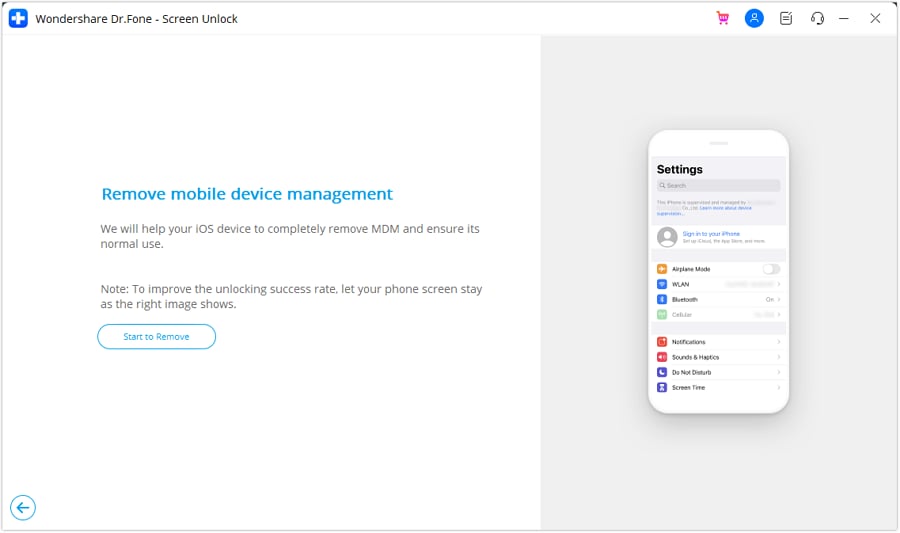
- Step 3. Select Remove MDM Function To Start the Process
On the next screen, you will see two options, “Bypass MDM” and “Remove MDM.” Select “Remove MDM” and hit the “Get Start” button. After that, you will be taken to another screen where you need to tap on “Start to Remove” to execute the process.
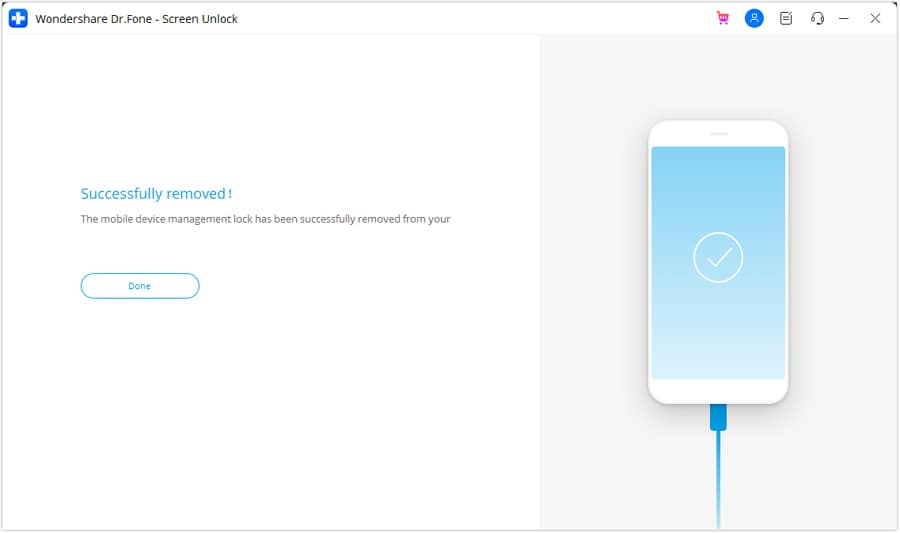
- Step 4. Disable Find My Feature and Complete the Process
A prompt will pop up stating that you need to turn off the Find My feature on your iOS device. For this, open your device “Settings” and choose the “iCloud” option. Lastly, disable the “Find My iPhone” feature and hit the “OK” button. Wait a few seconds to complete the process and click “Done” to conclude the MDM removal process.
Part 3. Easy Removal of Device Supervision From Settings
Looking for other conventional methods about how to remove supervision from iPad or iPhone? If you wish to perform such actions, you can access some options in your Apple iPhone SE settings. However, to utilize this method, you should know the login information and password of the Apple iPhone SE device. If you have them with you, follow the given steps to remove device supervision from iPhone settings:
- Step 1. Initially, open the “Settings” and move into the “General” section. After that, select the “VPN & Device Management” option to see which MDM profiles supervise your iOS device.

- Step 2. Select the MDM profile you want to remove and tap on “Remove Management” to delete that profile from your iDevice. Then, you will be prompted to enter your login info or password and type your information to bypass supervision access.

Part 4. Using Apple Configurator 2 for Removing iPhone Supervision System
Apple Configurator is a free tool for Mac users that provides a simple technique for removing iPhone supervision. To use this method, you must have a password for the Apple iPhone SE device; otherwise, you will need to contact the organization to get the necessary permissions. Below are easy steps about how to remove device supervision from iPad and iPhone through your Mac:
Instructions. First, download and launch the Apple Configurator tool on your Mac. Connect the iDevice to the Mac using a compatible USB-C cable. Click on “Actions” from the top bar of the tool. In the drop-down list, choose the “Advanced” option and select “Erase All Content and Settings” to remove iPhone device supervision. Enter your device password to start using your Apple iPhone SE normally.

Part 5. Directly Contact Administration for Removing Device Supervision
If you’ve forgotten the username and password of your management profiles, you cannot remove MDM profiles from iPhone settings. In that situation, you can only seek help from the company admin, as this iPhone is supervised and managed by them.
You can contact the administrator and share a valid reason why you want to remove supervision access. They can remove your device directly from their system or provide you with the correct password to proceed with the login process.
Conclusion
Removing device supervision is simple, but getting familiar with the safest method is necessary. Considering this, we have covered some techniques to bypass MDM locks on your iOS device. These can easily resolve your issue of how to remove device supervision from iPhone queries. Conclusively, Wondershare Dr.Fone is the recommended tool to bypass the MDM lock without data loss.
Tips: Are you searching for a powerful Screen Unlock tool? No worries as Dr.Fone is here to help you. Download it and start a seamless unlock experience!
Complete Guide on Unlocking Apple iPhone SE with a Broken Screen?
Is your Apple iPhone SE screen broken, and you’re wondering how to unlock iPhone with broken screen? Then don’t worry; this guide is all you need to unlock iPhone with broken screen.
Locking an iPhone with a passcode is a great way to prevent it from getting into the wrong hands. However, some misfortunes can happen, and you might be left with a broken screen. In such cases, you won’t be able to get the data inside your phone. So, to get back at your files or to reset your device, you will need to unlock your phone first.
In this detailed guide, we will elaborate on the best possible methods you can employ to unlock iPhone with broken screen. Moreover, we will introduce you to the best unlocking tools available for your situation. So stay with us till the end.
Part 1: Use the Feature “Find My iPhone” to Unlock an iPhone with Broken Screen
Find My is a famous component in Apple devices that allows you to find your lost devices through GPS. The option has been revitalized much from that point forward. Presently it can be utilized to erase your Apple iPhone SE from a distance. You can erase your information without a password) to save its data.
Also, if your Apple iPhone SE screen is broken, you can use this feature to unlock or erase it. We will call this feature “Erase it effortlessly,” as it erases iPhones without a password.
Prerequisites:
- The locked iPhone ought to have the Find My element enabled.
- The locked iPhone ought to be signed in to your iCloud account
- It must have an internet connection.
- Apple ID and password are also required.
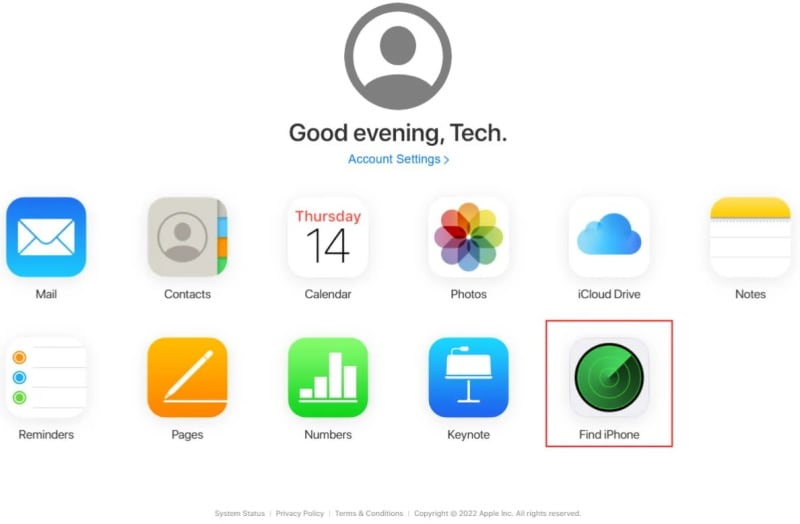
Step 1. Open iCloud.com on an internet browser.
Step 2. Enter your Apple account details as inquired.
Step 3. After signing in effectively, click on Find My and enter your Apple ID and password. Click on Sign In.
Step 4. Pick your locked phone under the “All Devices” segment.

Step 5. Click on ‘Erase iPhone’. Click on ‘Erase’ again after the confirmation text.
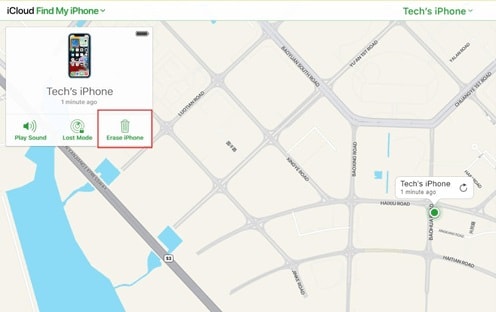
Step 6. Enter the password to proceed.
Step 7. A code will be sent to you. Enter the code to proceed.
Step 8. Presently, enter your mobile number. Then, click on the Next button and then “Done.”
Step 9. The iCloud will effectively begin the deletion, and you can see the Apple logo with a white bar noticeable on your locked iPhone. After an effective erase process, your Apple iPhone SE will restart.
Step 10. Swipe up on the Apple iPhone SE screen to begin once more.
Again, iPhone will show the Apple iPhone SE locked message. You then need to remerge your Apple ID details and click on Next. You will then get the chance to make your new passcode.
Step 1. To begin, you ought to put your gadget in Recovery Mode. Here’s what you must do:
On iPhone 8 or Above: Long-press the side/power button until the phone gives you the slider to close down. Drag the slider across the screen and turn it off. Then, press the volume (+) button, then the volume (-). Then, at that point, long-press the side button again while connecting it to your PC to put your phone in recovery mode.
On iPhone 7: Connect it to your system while tapping the volume down button. Hold the button until this mode appears.
On iPhone 6S or Older: Switch off your Apple iPhone SE, plug it into your PC and hold the home button until the phone shows this screen.
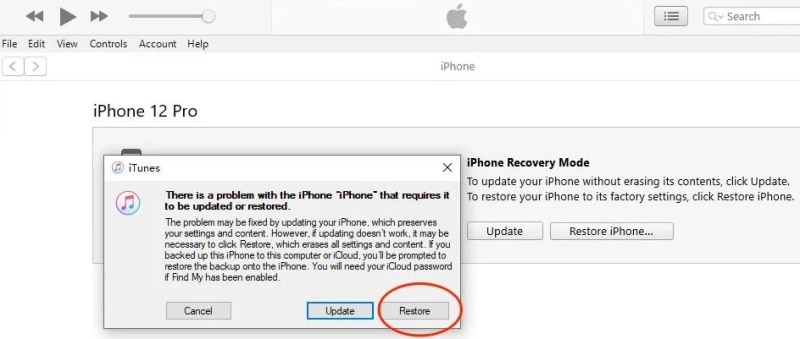
Step 2. Connect your Apple iPhone SE and your system and open iTunes. After clicking, force restarts it by holding down both the volume and power buttons. You’ll then get an option to Restore. Select this choice, and your Apple iPhone SE will download the required software. When done, you can set up and use your Apple iPhone SE.
Use iTunes
You can erase your Apple iPhone SE and its password once you synchronize it with iTunes. Follow these steps:
- Connect it to the PC you sync with, and open iTunes. If they request a password, use another PC you’ve connected with. If that also doesn’t work, go for the recovery mode.
- iTunes will coordinate your Apple iPhone SE and make a backup. When the sync and backup are done, click Restore iPhone.
- Select your Apple iPhone SE in iTunes and pick the latest backup.
- You’ll then see the “Set Up” screen after that. Here, tape on the “Restore from iTunes Backup” choice.
Part 3: How to Unlock iPhone with Siri If its Screen is broken
Siri is a voice assistant on Apple devices. Like other devices have Alexa and Google Assistant, iPhone has Siri. It empowers you to use the Apple iPhone SE through voice commands. You can converse with Siri to unlock your Apple iPhone SE password.
How might Siri unlock iPhone? One can use bugs in Siri to unlock iPhone. However, it is only possible in a few iOS versions.
Step 1. First and foremost, enable Siri. You should hold the home button of your locked iPhone and say ‘Hello Siri’ to enact her.
You need to ask Siri, “Siri, what time is it?” or “Siri, what time is it in the USA”? That will permit Siri to open the World Clock on your home screen.
Step 2. Presently, tap on the world clock symbol. Now, tap on the + sign in the upper right corner to add the clock feature to the home screen.

Step 3. At the point when another clock is added, you will have the choice to share the new clock.
Step 4. Click on the share button and Pick the Message choice.
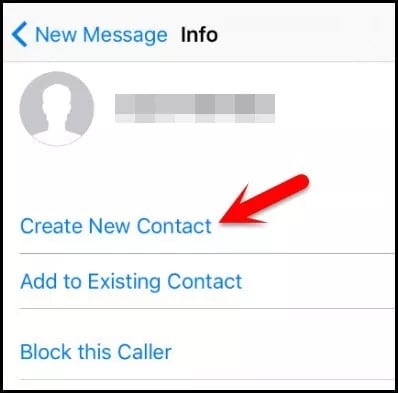
Step 5. You don’t need to text a message. Instead, add something arbitrary in the “To” field.
Step 6. Add Siri to make another contact by tapping on the new or + symbol. Siri will open the New Contact interface with details like adding the name, photo, etc.
Step 7. Add the photo from the photo library. Tap on “Add Photo,” and it will open the library for you. Tap on Select Photo, and Siri will unlock the Apple iPhone SE device and let you pick a photo.
Step 8. When the photo library is open, tap on the home button or return button to get back to the unlock screen to get to the Settings symbol.
Step 9. When you open your settings, you can now refresh your credentials. This might work by making a Face ID rather than a password to unlock your Apple iPhone SE.
Besides, it works for iPhones with iOS 8.0 to 10.1. These bugs are fixed in the later versions of the Apple iPhone SE and won’t assist you with fooling Siri into unlocking your Apple iPhone SE.
Bonus Tips: Easy Broken iPhone Unlock Tool
Dr.Fone-Screen Unlock
The quickest way to unlock iPhone with broken screen is to use an unlocking tool. However, there are tons of tools available in the market, but it is our responsibility to suggest you the best way.
We strongly recommend you install the Wondershare Dr.Fone-Screen Unlock tool. It is a safe and easy-to-use tool with an excellent success rate. With years of service in the unlocking industry, the experts at Wondershare thrive to provide outstanding services to its customers.
Moreover, Dr.Fone will keep your data from being exposed to threats. It is a fast tool that requires no prior knowledge to use. However, this tool will erase your data forever. So before further ado, let’s see how to unlock iPhone with broken screen:
Step 1. Launch the Software and Connect your Device
Click the “Screen Unlock” option from the main homepage and connect your iDevice to your computer. Then go for the “Unlock iOS Screen” option on the program.
Step 2. Access the Recovery or DFU mode
Removing the lock screen requires you to boot your Apple iPhone SE in Recovery or DFU mode. The Recuperation mode is suggested for iOS devices. But if you can’t, you can go for the DFU mode.

Step 3. Confirm your Phone Model
Dr.Fone will now show you the phone Model and OS version. You can choose the right information from the dropdown menu if the one on your screen isn’t right. Then, at that point, download and install the required firmware for your Apple iPhone SE.

Step 4. Unlock the Screen Now
After the firmware is downloaded effectively, click Unlock Now.

In almost no time, the software will unlock your Apple iPhone SE effectively. However, note that this unlocking will likewise wipe your user data.
The Bottom Line
Having an iPhone with a broken screen can make your life hard. It keeps you from communicating and carrying out important tasks on the phone. But we can make this situation work your way. Therefore, we have furnished the above list to help you unlock iPhone with broken screen. Even if none of the methods work, Dr.Fone can still get our phone unlocked.
Forgot Locked Apple iPhone SE Password? Learn the Best Methods To Unlock
The note-taking apps are pivotal in organizing thoughts, reminders, and sensitive data. Notably, Apple’s Notes app stands out for smooth blending into the Apple ecosystem while boasting a user-friendly interface. It is recognized for its effortless integration and robust security.
This app offers a reliable and secure platform for storing personal and confidential information. Users can safeguard their notes by setting up separate passwords. Yet, it’s not uncommon to encounter a situation where one forgets a note password on an iPhone. This can be frustrating, but don’t worry, as this article will discuss how to unlock a note on iPhone.
Part 1. Best Method To Unlock Forgotten Notes Password iPhone: Wondershare Dr.Fone
Apple allows users to create a separate password for notes or use their iPhone passcode. Many users choose the second option to avoid remembering a new password. Forgetting the Apple iPhone SE device passcode poses a drawback, making your notes inaccessible. Wondershare Dr.Fone stands out as one of the most straightforward solutions for addressing this scenario.
It offers an absolute way to regain access to your notes and device if you forgot locked Notes password. However, it’s essential to note that this method will remove all data from your Apple iPhone SE. That allows you to set your device as new and restore the old data using backups. Dr.Fone offers a comprehensive solution with the ability to bypass or remove most of the locks on iOS devices.
Focusing Features of Wondershare Dr.Fone
- For users who have forgotten their Screen Time passcode , Dr.Fone allows them to remove it without causing data loss.
- Fone has the ability to remove Apple ID from your iOS device if you have forgotten its credentials.
- Buying a second-hand might involve iCloud Activation Lock, which Dr.Fone can bypass in minutes.
Steps To Unlock Forgotten Notes Password iPhone via Wondershare Dr.Fone
Dr.Fone is a robust tool tailored to aid users in unlocking their iOS devices. It incorporates multiple pivotal features necessary for facilitating the unlocking procedure. Here are the steps imperative for unlocking your iOS device:
Note: This method is suitable when Notes password is same as iPhone passcode.
- Step 1. Initiate iOS Screen Unlock With Dr.Fone
Once Wondershare Dr.Fone is downloaded and installed on your computer, launch it. Then navigate to “Toolbox,” access “Screen Unlock,” and finally choose “iOS” as the Apple iPhone SE device type. Now, select the “Unlock iOS Screen” button to begin the process.

- Step 2. Enter Recovery Mode and Download Firmware
The next step is to put your device into Recovery Mode after selecting “Start,” for which the instructions are given on the screen. Once your device is in Recovery Mode, Dr.Fone will detect it and show its model. Now select the “System Version” and tap “Start” to proceed. Dr.Fone will now start downloading the firmware, which it will later verify.
- Step 3. Unlock the iOS Device and Complete the Process
When the firmware is displayed after verification, press “Unlock Now.” Upon triggering, an immediate prompt will appear. It will need the insertion of the “000000” code for compliance with the data loss warning. Following the code entry, tap “Unlock” to start the unlocking process. Upon unlocking the Apple iPhone SE device successfully, complete the procedure by tapping “Done.”

Tips: Are you searching for a powerful iPhone Unlock tool? No worries as Dr.Fone is here to help you. Download it and start a seamless unlock experience!
Part 2. How To Unlock Notes on iPhone Through Settings
If you’ve locked a note on your Apple iPhone SE but forgot the password, there is no need to worry. You can unlock the notes through “Settings” on your device as long as you have your Apple ID credentials. The following are the steps for what to do if you forgot your notes password:
Note: This method is suitable when you remember your Apple iPhone SE passcode.
- Step 1. Begin the process by accessing Settings and then navigating to “Notes.” Within the “Notes” tab, press “Password” followed by tapping “Reset Password.”

- Step 2. You will be prompted to enter the Apple ID password for confirmation. After entering the Apple ID password, tap “Reset Password” again to reset the password. Finalize the process by setting up a new “Password,” “Verify” it, set a “Hint,” and press “Done.”

Part 3. How To Unlock Notes on iPhone Using Touch ID/Face ID
Even if you’ve forgotten the password to your Notes on iPhone, there’s an alternative method available. You can unlock them by enabling Face ID or Touch ID for Notes. This feature allows users to access locked notes through biometric authentication. Here’s how to unlock a note on iPhone using Touch ID/Face ID:
Note: This method is suitable when Touch ID or Face ID is enabled.
- Step 1. Before starting, ensure you have Touch ID/Face ID already enabled. Now, open the Notes app and navigate to the locked note. Tap the note followed by pressing “View Note.” Then, you will be required to use Touch ID or Face ID to unlock the note.

- Step 2. If you want to save the content of the locked note without re-locking it, select all the content. Now, “Copy” the note’s content and paste it on a new note to recover the data from a locked note.

Bonus Tip. Learn How To Lock Notes on iPhone Easily
Locking notes on your Apple iPhone SE provides extra security for your sensitive information. Regularly reviewing and updating your password settings can enhance the security of your locked notes. Here’s a simple and effective method to lock notes on your Apple iPhone SE:
- Step 1. Open the “Note” you want to lock and tap the “three dots” near the top right corner. From the appearing menu, press the “Lock” icon.

- Step 2. If it is the first time, you will be asked to set a new password or use the same one as the Apple iPhone SE device. After your note is locked, hide its content by tapping the “open lock” icon at the top of the screen.

Conclusion
In conclusion, this article addressed methods for how to recover locked notes on iPhones. It explored options such as using Settings to remove note locks, leveraging Touch ID/Face ID for access, and introducing Wondershare Dr.Fone as a comprehensive solution. Dr.Fone offers a direct approach to unlocking devices when passwords are inaccessible.
Also read:
- [New] In 2024, Effortless Image Capturing on Chrome Devices (Method #4)
- [New] In 2024, Tailoring Tutorials for Square-Shaped Video Sharing
- [Updated] 2024 Approved Elevate Your Content From Instagram Vids to Crisp MP4 Files
- 7 Top Ways To Resolve Apple ID Not Active Issue For iPhone 13 mini | Dr.fone
- Bringing the Web to Reality Embedding YouTube Videos in Slides
- How Many Attempts To Unlock iPhone 13 | Dr.fone
- How To Unlock Any Samsung Galaxy A14 4G Phone Password Using Emergency Call
- How To Unlock Stolen Apple iPhone XS Max In Different Conditionsin | Dr.fone
- In 2024, 3 Ways to Erase iPhone 14 When Its Locked Within Seconds | Dr.fone
- In 2024, How To Create an Apple Developer Account From Apple iPhone XS Max
- In 2024, How to Remove and Reset Face ID on iPhone 6s Plus | Dr.fone
- In 2024, How to Unlock Apple iPhone 13 Pro Passcode without iTunes without Knowing Passcode? | Dr.fone
- In 2024, Integrating Secondary Shots A Filmmaker's Blueprint
- Reinvigorate Windows Search: Top 11 Remedies Explored
- Title: In 2024, Remove Device Supervision From your iPhone SE | Dr.fone
- Author: Amelia
- Created at : 2025-02-26 12:11:30
- Updated at : 2025-03-03 17:40:29
- Link: https://iphone-unlock.techidaily.com/in-2024-remove-device-supervision-from-your-iphone-se-drfone-by-drfone-ios/
- License: This work is licensed under CC BY-NC-SA 4.0.