
In 2024, Trouble with Apple iPhone 14 Plus Swipe-Up? Try These 11 Solutions | Dr.fone
Trouble with Apple iPhone 14 Plus Swipe-Up? Try These 11 Solutions
Part 1: Why Is My iPhone Screen Not Swiping?
The iPhone’s swipe-up gesture serves as a fundamental navigation tool. It allows users to access various functions and features swiftly. Yet, when this functionality encounters issues, it can be perplexing and disruptive. That’s why learning the reasons behind I can’t swipe up on my iPhone is essential. Summarized below are some of the common reasons behind frozen swipe-up issues:
1. Software Glitches
Updates or software bugs can occasionally interfere with the swipe-up gesture. It leads to unresponsiveness or delays.
2. Touch Screen Calibration
Sometimes, the touch screen may need recalibration. This can cause the swipe-up feature to become unresponsive.
3. Physical Damage
Physical damage, like heavy falls, can impact the phone’s touch sensitivity. Moreover, it affects swipe gestures as a result.
4. Full Memory or Background Apps
Insufficient memory or many background apps running simultaneously can overload the Apple iPhone 14 Plus device. This leads to performance issues, including unresponsive gestures.
5. Water Exposure
Sudden exposure to moisture or water damage can also cause the screen to malfunction. This can cause the screen to become unresponsive, leading to swipe-up issues.
Part 2: 11 Ways To Fix iPhone Swipe up Not Working
Encountering an unresponsive swipe-up gesture on your Apple iPhone 14 Plus can be exasperating. However, you no longer need to worry. There are numerous troubleshooting techniques available to address this problem. Explained below are the 11 effective ways to address the problem:
Fix 1. Fix iOS System Error Without Data Loss: Dr.Fone – System Repair (iOS)
Wondershare Dr.Fone - System Repair (iOS) is a reliable solution designed to resolve iOS system issues. It also includes unresponsive gestures like the swipe-up problem on iPhones. This tool specializes in repairing iOS system errors without causing data loss. It offers a comprehensive solution for resolving iOS system issues conveniently from home. With this tool, you can address over 150 iOS system problems.
![]()
Dr.Fone - System Repair (iOS)
Repair iOS System Errors Without data loss.
- Only fix your iOS to normal, no data loss at all.
- Fix various iOS system issues stuck in recovery mode , white Apple logo , black screen , looping on start, etc.
- Downgrade iOS without iTunes at all.
- Works for all models of iPhone, iPad, and iPod touch.
- Fully compatible with the latest iOS version.


3981454 people have downloaded it
These include the Apple logo, boot loop, and the 1110 error, among others. It enables you to downgrade or update iOS versions without needing to jailbreak your device. Additionally, it allows you to enter or exit DFU and Recovery Mode at no cost.
Key Features of Wondershare Dr.Fone
- This user-friendly iOS system repair solution doesn’t typically lead to data loss.
- It doesn’t require users to have advanced technical skills to operate it.
- Wondershare Dr.Fone is compatible with all iPhone, iPad, and iPod Touch models, regardless of the iOS version.
Steps to Fix iPhone Swipe up Not Working via Wondershare Dr.Fone
Here’s how to use Wondershare Dr.Fone to address the swipe-up not working on iPhone problem:
Step 1: Initiate System Repair with Dr.Fone
After successfully downloading Dr.Fone on your device, navigate towards the left side panel and click “Toolbox.” From the many options appearing on the main window, select “System Repair.” Then, establish a connection between your iOS and your current device.

Step 2: Opt for iOS Restoration and Enable Recovery Mode
Select the Apple iPhone 14 Plus device type from the available options and select “iPhone.” From the new window, select “iOS Repair,” and following that, select “Standard Repair.” Now, follow the instructions available and enable recovery mode for your iOS.

Step 3: Select iOS Firmware to Initiate the Repair Process
After that, you’ll reach a window showing different iOS firmware alternatives. Pick any as per your preferences and click “Download.” Once the download is complete, click “Repair Now” and “Done” to end the repair process.

Fix 2. Force Restart iPhone
Performing a force restart, also known as a hard reset, can troubleshoot minor software glitches. These can cause unresponsive swipe-up issues on your Apple iPhone 14 Plus. Here’s a guide on how to perform a force restart on various iDevice models to fix the iPhone won’t swipe up:
For iPhone 8 and Later Devices
Instructions: Begin by moving your finger towards the left side of your Apple iPhone 14 Plus and tap on the “Volume Up.” Then, release the button after some points. Proceed similarly with the “Volume Down” button. Then, navigate towards the right side and press the “Side” button there. Keep on forcing the “Side” button up until the screen shows the Apple logo. This will indicate that a force restart is initiated.
For iPhone 7 Series
Instructions: Begin by reaching both sides of your Apple iPhone 14 Plus at once. Press the “Volume Down” button situated on the left side using your left hand while simultaneously using your right hand to press the “Sleep/Wake” button on the right side. Stay firm with the grip on both buttons and release them when you see the signature Apple logo glowing on the screen. This will indicate that the force restart operation has been successful.
For iPhone 6 and Older Devices
Instructions: To restart your Apple iPhone 14 Plus 6, press the “Wake/Sleep” button on the top edge of the phone. Hold the other “Home” button at the bottom center screen of the phone. Continue holding the buttons until the Apple logo becomes visible on the display. Then, press the “Wake/Sleep” button and the “Home” button.

Fix 3. Remove the Cover or Case
Sometimes, an unresponsive swipe-up gesture on your Apple iPhone 14 Plus could be due to interference caused by a protective cover or case. The cover might be too thick, improperly aligned, or interfering with the touch sensitivity of the screen. Gently remove the protective cover or case from your Apple iPhone 14 Plus. Inspect the screen for any dust, debris, or smudges while the cover is removed. Utilize a clean, soft cloth to wipe the screen.
Fix 4. Clean iPhone Screen or Remove Screen Protector
An unresponsive swipe-up gesture on your Apple iPhone 14 Plus might be due to dirt, smudges, or interference caused by a screen protector. Power off your Apple iPhone 14 Plus to prevent accidental taps during the cleaning process. Carefully clean the screen by softly rubbing it with a fresh and dry microfiber cloth. In addition, ensure the cloth is soft and free from any debris that might scratch the screen.
Fix 5. Activate Control Center Access on the Lock Screen
If your Apple iPhone 14 Plus swipe-up gesture isn’t working specifically on the lock screen to access the Control Center, it might be due to settings restricting its accessibility. Enabling Control Center access on the lock screen allows you to swipe up from the bottom edge. Follow these steps to ensure Control Center access is enabled on the lock screen and fix the iPhone swipe up not working:
Step 1. On your iOS device, access the “Settings” app and launch it. Now scroll down to find and tap “Face ID & Passcode.”

Step 2. Head to the “Allow Access When Locked” section, toggle on the “Control Center” switch, then return to the lock screen to verify if the problem has been resolved.

Fix 6. Enable Control Center Within Apps
Are you experiencing issues with accessing the Control Center via the swipe-up gesture while using certain apps? If yes, ensuring that Control Center access is enabled within apps is essential. It ensures that the swipe-up gesture from the bottom edge of the screen functions. Here’s how to enable Control Center access within apps:
Instructions: Navigate to Settings on your Apple iPhone 14 Plus and access “Control Center.” On the following screen, activate the toggle next to “Access Within Apps.” It will allow you to access the Control Center when using apps.

Fix 7. Update to the Latest iOS Version
Running an outdated iOS version can sometimes lead to various software issues. These include unresponsive gestures like the swipe-up function on your Apple iPhone 14 Plus. Updating your device to the latest iOS version can often resolve such problems. Here’s how to check for and update your Apple iPhone 14 Plus to the latest iOS version:
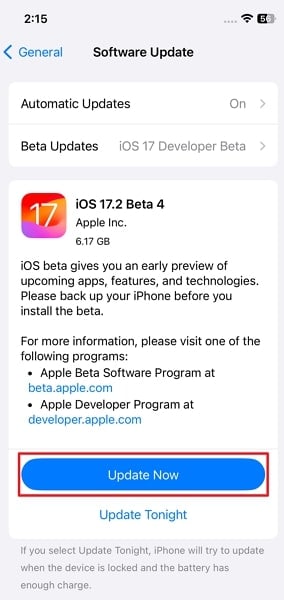
Step 1. Unlock your Apple iPhone 14 Plus and open the “Settings” app to access “General” settings. Simply touch the “Software Update” option to verify if an update is accessible.

Step 2. If an update is available, press the “Update Now” button to commence the updating process. During the process, make sure to follow the prompts carefully to avoid issues.
Fix 8. Turn Off VoiceOver
VoiceOver is an accessibility feature on iPhones. It assists users with visual impairments by providing spoken feedback for actions on the Apple iPhone 14 Plus device. Sometimes, VoiceOver settings can interfere with normal touchscreen gestures like the swipe-up function. Here’s how to turn off VoiceOver to resolve iPhone 13 won’t swipe up to unlock:
Step 1. You will need to open the Settings app and scroll down to select the “Accessibility” menu. There, tap “VoiceOver” to get access to the “VoiceOver” settings.

Step 2. On the following screen, toggle off the “VoiceOver” switch if it is enabled. Afterward, check if the swipe-up gesture issue is resolved.

Fix 9. Customize Touch Accommodations
Touch Accommodations is an accessibility feature on iPhones. It is designed to modify touch sensitivity and enhance touchscreen interactions for users. Customizing these settings might resolve issues with unresponsive gestures like the swipe-up function. Here’s how to customize Touch Accommodations to fix the Apple iPhone 14 Plus 12 won’t swipe up to unlock:
Step 1. Move to the “Accessibility” settings of your Apple iPhone 14 Plus and select “Touch.” On the following screen, scroll down and tap “Touch Accommodations.”

Step 2. Now, first, enable the “Touch Accommodation” option from the top of the next screen. Then, scroll down and set the “Tap Assistance” option to “Use Initial Touch Location.”

Fix 10. Turn Off Reduce Motion
Reduce Motion is an accessibility setting on iPhones designed to reduce animations and visual effects. It is particularly for users sensitive to motion effects. However, enabling this feature might affect certain gestures or animations on the Apple iPhone 14 Plus device. Thus potentially causing issues with the swipe-up function. Here’s how to turn off Reduce Motion to fix the iPhone 11 won’t swipe up to unlock:
Step 1. Go through your iOS device Settings to open the “Accessibility” tab. Here, find and tap the “Motion” option to proceed.

Step 2. Now, on the following screen, turn off the toggle next to the “Reduce Motion” option. Then, go and check if the swipe-up gesture issue is fixed or not.

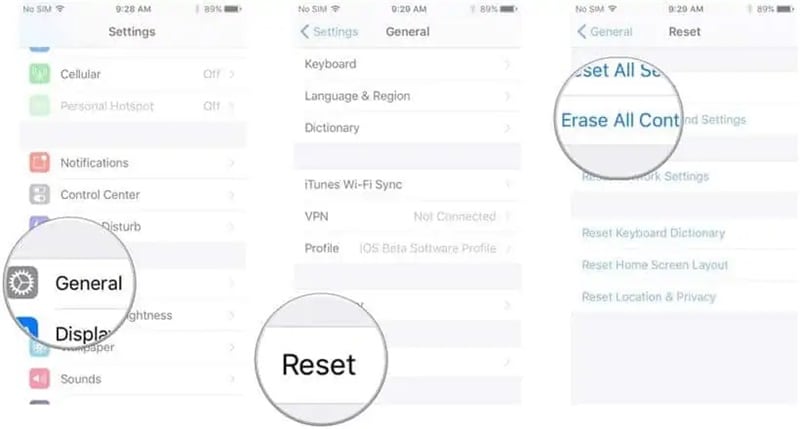
Fix 11. Reset iPhone All Settings
Resetting all settings on your Apple iPhone 14 Plus can help resolve software-related issues. It can help remove conflicts that might be affecting the swipe-up gesture. Note that this action will reset all settings on your device, but it won’t delete your data. Here’s how to reset all settings to fix iPhone swipe not working:
Step 1. Go to your device’s “General” settings and scroll down to tap the second last option, “Transfer or Reset iPhone.” On the following screen, press “Reset” from the available two options.

Step 2. Now, choose “Reset All Settings” from the pop-up options and confirm it by providing the passcode. Then, wait for a few moments as your Apple iPhone 14 Plus is restored to its original settings.

Part 3: Unlock iPhone Without Swiping Up
Encountering swipe not working on iPhone can sometimes lead to difficulties. This is especially the case in unlocking the Apple iPhone 14 Plus device or accessing essential functions. In such scenarios, using Wondershare Dr.Fone - Screen Unlock (iOS) provides a reliable solution. It bypasses the swipe-up need and regains access to your Apple iPhone 14 Plus without relying on the problematic gesture. This tool offers a solution to unlock iPhone/iPad devices without the passcode.
Dr.Fone - Screen Unlock (iOS)
Unlock iPhone/iPad Lock Screen Without Swiping Up.
- Simple, click-through, process.
- Unlock screen passwords from all iPhones and iPads.
- No tech knowledge is required, everybody can handle it.
- Supports iPhone 15 / iPhone 14 / iPhone 13 / 12, iPhone 11, … and the latest iOS version fully!
4,395,216 people have downloaded it
It allows the removal of various lock screens present on iPhone, iPad, and iPod touch. Additionally, it provides the capability to bypass the iCloud activation lock. Users can also bypass MDM and screen time restrictions without experiencing any data loss.
Key Features of Wondershare Dr.Fone
- This software is compatible with the latest iOS 17 and iPadOS 17, including iPhone 15 models.
- The unlocking process involves a simple 3-step procedure.
- With it, you can remove Apple ID from your device without the password.
Steps To Unlock iPhone Without Swiping Up via Wondershare Dr.Fone
You can use the simple steps explained below to unlock your Apple iPhone 14 Plus and fix the Apple iPhone 14 Plus 11 swipe-up not working:
Step 1: Connect Your Device and Choose Unlock iOS Screen
Upon downloading and installing Wondershare Dr.Fone onto your computer, access the “Toolbox” menu. Here, proceed to select “Screen Unlock” followed by “iOS.” Within this window, choose the “Unlock iOS Screen” option to proceed with unlocking your iOS device’s screen. Subsequently, connect your Apple iPhone 14 Plus and click Start to initiate the unlocking process.
Step 2: Ensure Your Device is in Recovery Mode
Now, adhere to the on-screen prompts provided to enter Recovery Mode based on the specific model of your iDevice. Then, the platform automatically recognizes and exhibits the Apple iPhone 14 Plus device Model. If necessary, change the model and choose the system version as per your preferences. Upon completion, click on “Start” to continue the process.

Step 3: Unlock Your iOS Device Successfully
Once the iOS firmware has been successfully downloaded, it undergoes verification. Proceed by selecting the “Unlock Now” button to initiate the unlocking process. A prompt window will emerge on the screen, requesting confirmation of the process. Enter the code and tap “Unlock” to proceed to the final step. Upon successfully unlocking the iDevice, click the “Done” button to finish the process.

Conclusion
Having trouble with swipe up not working on an iPhone can be annoying. It stops you from using important stuff and moving around your phone quickly. This guide has lots of ways to fix it. We’ve covered simple things like restarting your Apple iPhone 14 Plus and cleaning the screen, as well as more complex stuff like changing settings and using unique options for accessibility. These fixes can help make the swipe-up gesture work again.
We’ve also talked about a helpful tool called Wondershare Dr.Fone. It’s made to fix problems with the lock screen, including issues with swiping on your Apple iPhone 14 Plus. Moreover, Dr.Fone - Screen Unlock lets you get into your Apple iPhone 14 Plus even when gestures aren’t working properly.
Apple iPhone 14 Plus Backup Password Never Set But Still Asking? Here’s the Fix
Part 1: Why Do iTunes Ask Me for iPhone Backup Password?
When you use iTunes to create a backup, the backup will probably have a password that iTunes automatically create. This is for privacy reasons. Hence, it might ask for an iTunes backup password never set by you!
In most cases, this occurs when the Encrypt Backup option is activated. As an official iOS feature, its purpose is to provide iOS users with the iTunes backup encryption for further security.
Unfortunately, this capability may also become problematic if you inadvertently take a backup without being able to provide the password. For example, you may have to enter the password for your Apple iPhone 14 Plus backup unlocking never set by you.
But the good news is you have some possible fixes. So, let’s talk about them.
Part 2: 4 Possible Ways to Fix Asking for iPhone Backup Password
Many iPhone users have problems with iTunes when they back up their devices.
One of the most common issues is that people are asked for their iPhone backup password never set, but they need to know what it is. This can be frustrating because you can only back up your device if you have the password.
There are a few possible ways to fix this problem. Try resetting your password or using a different computer to back up your device. You could also try using a third-party software tool like Dr.Fone - Screen Unlock.
1. Try all passwords you use on iPhone
When iTunes prompts you for an iPhone backup password never set, what should your initial course of action be?
To get out of this predicament in the simplest way possible, try entering every potential password you will likely have used. In most cases, individuals will use the same password for many accounts.
A significant possibility is that you encrypted the iTunes backup with the same password from the iCloud account.
Therefore, before doing anything further, try all passwords to configure your iTunes account. For example, try entering 0000, 123456, name123, or 1111.
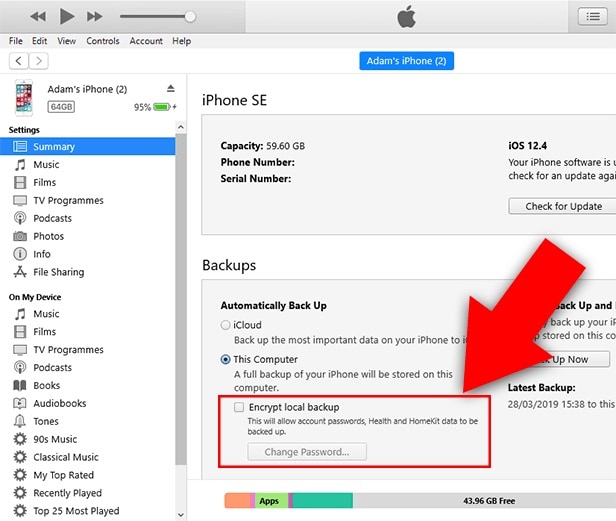
2. Find the password from Keychain on macOS
You may also attempt to find the password for the iTunes backup using the keychain approach if you are working on a Mac.
The likelihood of success with this approach is relatively low. However, it is still worthwhile to try it, particularly if you have also synchronized your iTunes account with your Mac.
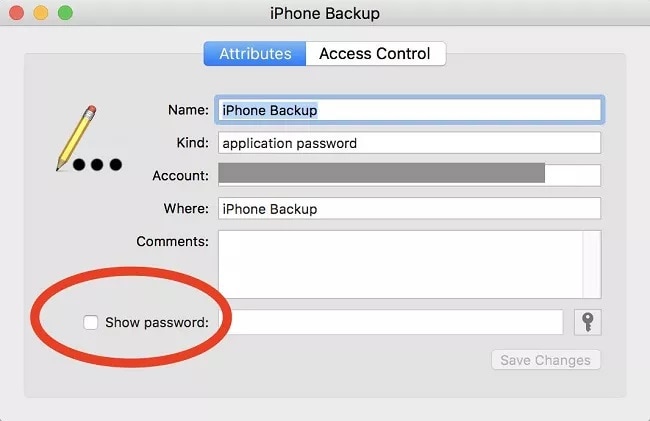
- On your macOS, go to Utilities by clicking the Applications menu item. At this point, launch the Keychain Access app and look for your Apple iPhone 14 Plus backup.
- To open a new dialogue box, double-click the most recent backup file, and you will see one appear before you.
- On this page, choose Show Password to get the password for the Apple iPhone 14 Plus backup. However, you will first be prompted to provide the administrator password associated with your iCloud account to recover the password.
3. “Reset All Settings”
Resetting the password is another option at your disposal if you encounter the Apple iPhone 14 Plus backup password never set problem. How you do this will be different depending on the version of iOS that you have installed.
Here are what you can do with your iOS smartphone if it has iOS 11 or a later version:
Step 1: Unlock your Apple iPhone 14 Plus, and then open the Settings app on your device.
Step 2: After locating the General menu, go to the Reset menu and then hit the Reset All Settings button. Please confirm your action by providing the password for your Apple iPhone 14 Plus.
Step 3: Once the reset has been completed, your previous password will be deleted.
Step 4: The next thing you should do is take a fresh backup of your Apple iPhone 14 Plus using iTunes, and then establish a new password for the backup that iTunes creates.
You will need to use an alternative strategy, which includes a factory reset if you use an older version of the iOS firmware than iOS 11.
Step 1: Before continuing, it is highly recommended that you create a backup of the data on your Apple iPhone 14 Plus using iCloud.
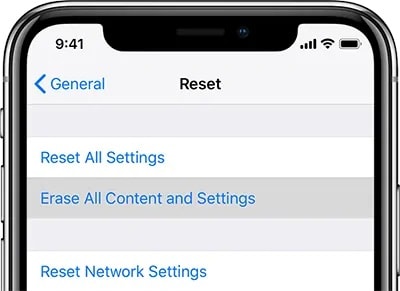
Step 2: After you have opened the Settings app, go to the General menu, then to the Reset menu, and finally to the Erase All Content and Settings option.
Step 3: Confirm that you want to reset your Apple iPhone 14 Plus to factory settings, and wait until it is done.
Step 4: Once the factory data reset is finished, you must restore your iCloud backup. To do this, follow the steps for setting up iOS until you reach the Apps & Data option.
Step 5: Create a new backup in iTunes and change the password for the existing backup in iTunes.
You should be aware that resetting the Apple iPhone 14 Plus device to factory settings will not make your encrypted backups accessible again.
On the other hand, it does make it possible for you to generate a fresh backup in iTunes that is not encrypted.
4. Dr.Fone-Screen Unlock
First step: After installing Dr.Fone on your device, please run the program and look for the red button labeled “Screen Unlock.”
Step 2: While in the interface for Screen Unlock, navigate to the bottom right of the screen and tap on the feature labeled “Remove iTunes BackUp Encryption.” This will allow you to proceed.

Step 3: When brought to this screen, please use a USB cord to connect your iOS device to your personal computer. If Dr.Fone can identify this relationship, the following picture will appear for you to see.
Please read the following three notes carefully before clicking the “Remove Now” button:
- Check to ensure that “Find My iPhone” is not turned on.
- During this procedure, you should not launch “iTunes.”
- During the process, your Apple iPhone 14 Plus will restart.

Step 4: If you have an iTunes backup, Dr.Fone may automatically verify it and delete it. This encryption will be removed once the percentage on the progress meter reaches the end. This procedure won’t take a lot of time at all.

Step 5: The encryption of the iTunes backup has been successfully erased! Your backed-up data may be quickly restored, transferred, wiped clean, and backed up again. Hence, you can enter the password to unlock your Apple iPhone 14 Plus backup never set in the first place!

The Bottom Line
There are four ways to fix the problem if iTunes keeps asking for your Apple iPhone 14 Plus backup password. The first method is to try all the passwords you use on your Apple iPhone 14 Plus. You can try finding the password from Keychain on macOS if this does not work. Another option is to “Reset All Settings” on your Apple iPhone 14 Plus.
Lastly, Dr.Fone-Screen Unlock is a program that can help you bypass the passcode and get into your backups. So, what are you waiting for? It’s time to avoid the problem of iTunes backup password never set.
How Can I Unlock My Apple iPhone 14 Plus After Forgetting my PIN Code?
Unlocking a phone using a passcode is a great way to keep your data safe. To secure your device, you can set a 4-digit, 6-digit, fingerprint, or Face ID. However, what will happen if you forgot iPhone PIN? You will not be able to unlock and use the services of your device.
Furthermore, you can’t manage any vital task if you have scheduled it. In such cases, you need to unlock the lock through an efficient procedure. This article elaborates on such practical techniques for iPhone PIN code removal. We will also introduce the top tool available in the market.
All the solutions mentioned here are highly secure and work almost every time. So, if you are worried about the security of your device, we suggest you use Dr.Fone-Screen Unlock. It is the best tool in case of a forgotten iPhone PIN.
Part 1: 4 Simple Ways to Unlock iPhone without Pin
1. “Erase iPhone” option
The steps below work if your Apple iPhone 14 Plus or iPad runs iOS 15.2 or later and is connected to the internet. Here’s what you need to do when you forgot iPhone PIN:
- Please enter your password a few times from your device’s Lock Screen until it requests that you attempt another time. Then repeat this activity until you see the Erase iPhone choice in the corner of the screen.
- Tap Erase iPhone, then click again to confirm your activity.
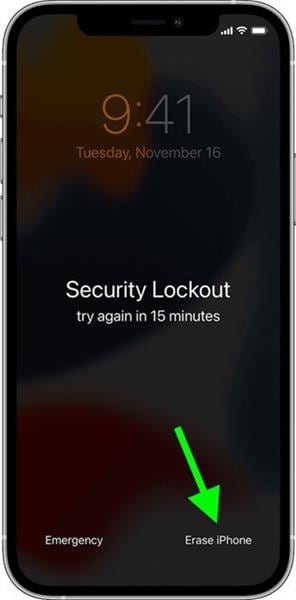
- Enter your Apple account details to sign out of your Apple ID on the phone.
- Tap Erase iPhone back to erase all your user data and settings for all time.
- At the point when the iOS device restarts, adhere to the on-screen directions. Set your phone once more, and restore your data and settings from a backup. Now set a new password for your device.
Instructions to Restore a Locked iPhone Running iOS 15.1 or Prior
- To begin with, put your Apple iPhone 14 Plus into DFU recovery mode.
- Then, connect it to a PC or Macintosh through a Lightning link.
- Select your Apple iPhone 14 Plus in the Finder sidebar on Mac or iTunes on the PC.
- Pick Restore when you see the choice to Restore. Let the download finish if the download takes over 15 minutes and your device leaves the recovery mode screen. Then, at that point, turn off your Apple iPhone 14 Plus and start once more.
- Disconnect your Apple iPhone 14 Plus, then, at that point, turn it on and set it up. That’s all you need to do.
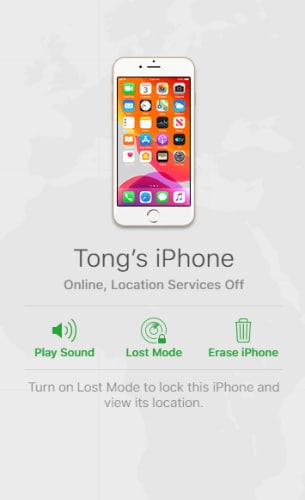
2. Use Find My iPhone in iCloud
Apple allows clients to erase iPhone data to safeguard it from others remotely. However, your lock screen can still protect your data if you don’t erase the iPhone. No one can unlock the screen unless they enter the correct password. After too many wrong password attempts, your Apple iPhone 14 Plus will be locked. So no one can then touch your user data.
If you have enabled the “Find My” option before forgotten iPhone PIN, there is a chance for you to remove the lock. That is to utilize iCloud.
To unlock iPhone through iCloud:
Step 1. Visit the iCloud.com web page and log in with your Apple ID and passcode.
Step 2. Click the “Find iPhone” option from the different choices available.
Step 3. Click “All Devices” and pick the Apple iPhone 14 Plus device you need to unlock.
Step 4. Click the “Erase iPhone” button. Subsequently, set up the Apple iPhone 14 Plus device and set another lock screen PIN. With iCloud, you can unlock your iDevice without even touching your device.
3. Unlock it with iTunes
Suppose you use iTunes to restore the Apple iPhone 14 Plus in recovery mode; it will install the latest iOS to your device. Doing so will erase all user data from the Apple iPhone 14 Plus device, including the lock screen. So, this is also an excellent way to unlock your Apple iPhone 14 Plus. However, you must keep a backup of your important files before doing so.
Utilizing iTunes will wipe out the iPhone. You can restore the data from there if you have a previous backup. If you have nothing, you will lose every data on the iPhone.
Additionally, ensure that you keep your iDevices’ Apple ID details safe. Else, you will not have the option to use the iDevice again. Using iTunes will erase the screen’s password but not the firmware. Considering that, you must keep the information in mind to set up and utilize the Apple iPhone 14 Plus device.
To sidestep iPhone password with iTunes:
Step 1. Go to Recovery mode
On iPhone 8/8 Or more and Above: Hold the power/side button and press any of the volume buttons until a slider appears. Move the slider to turn off the Apple iPhone 14 Plus device. Next, press and hold the power button and connect your Apple iPhone 14 Plus to the PC. Hold the button until the Apple iPhone 14 Plus device shows the recovery mode screen.
On iPhone 7/7 Or Below: Press and hold the power button until you see the power off slider. Next, move the slider to turn off the iPhone. Then, press the Volume (-) button and connect the Apple iPhone 14 Plus device to the PC. Continue to hold the button until you see the recovery mode screen.
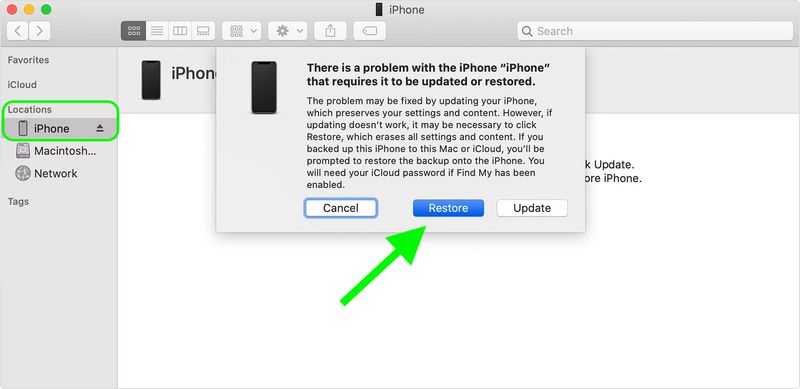
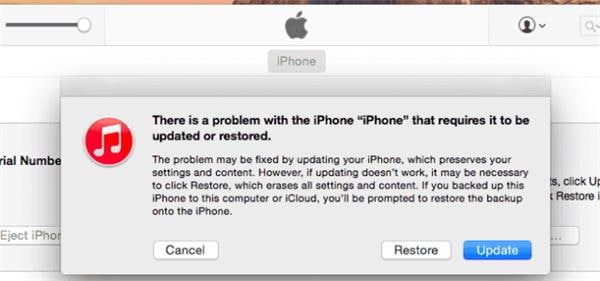
Step 2. Restore your Apple iPhone 14 Plus.
After you connect your Apple iPhone 14 Plus to the PC, you will see a popup window in iTunes. It will warn about an issue with the “Your iPhone name” and ask you to restore it. In that window, select “Restore” to erase the iPhone. If iTunes doesn’t run naturally, open iTunes by double tapping it.
Step 3. Set up iPhone.
Keep waiting until the restoration completes. Then, a short time later, go to your Apple iPhone 14 Plus and follow the on-screen directions. That will allow you to set up and utilize your device.
4. Dr.Fone-Screen Unlock
What to do if you forgot iPhone PIN code? As a reference, you have to erase your device to remove the lock. Aside from iTunes, you can use an outsider iPhone unlocker like Dr.Fone-Screen Unlock to unlock your device without a code.
With such software, you don’t have to master some professional skills. Instead, stick to the on-screen directions in Wondershare Dr.Fone-Screen Unlock. Then, you can reset your locked device without any problem. Dr.Fone will eliminate it for you, whether it’s a four-digit code, six-digit code, Contact ID, or Face ID. Here’s how:
Step 1. Get your Device Connected
Install and open the program on a computer, i.e., Mac or Windows. Then, tap the “Screen Unlock” option.
Get your locked iPhone connected to the system utilizing a lightning USB connector. Following these steps, click the “Unlock iOS Screen” feature on the program.
Step 2. Boot the Recovery/DFU Mode on your Device
To unlock iPhone, you need to boot it in Recovery/DFU mode by following the guidelines on your screen. Therefore, the Recovery mode is a better choice for iPhone unlock. Yet, if you face problems while going for the Recovery mode, you may enact the DFU mode.
Step 3. Confirm Your Apple iPhone 14 Plus Model
After opening the recovery mode, you can see your Device Model and iOS version. You must select the correct data from the dropdown menu if the information is incorrect. After doing so, click download to download the suitable firmware package for your phone model.

Step 4. Remove the Screen Lock Passcode
After getting the required firmware, click the “Unlock Now” button to begin the process.
Simply in almost no time, your Apple iPhone 14 Plus will be unlocked effectively. However, kindly note this unlocking system will likewise wipe all the files and settings on your device. Therefore, you must have a backup of your essential documents beforehand.
Part 2: FAQs
How can I change my PIN on my iPhone?
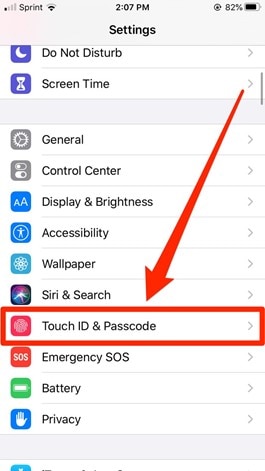
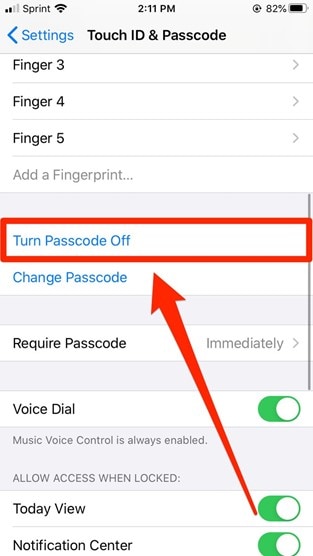
- Open your Settings app and peer down until you see the passcode menu. On iPhones with a home button, this will be named “Touch ID and Passcode.” On new ones, it is “Face ID and Passcode.”
- Enter your existing code or create a new one.
- Toggle on the “Turn Passcode Off” option.
- Click again to agree, and you’re good to go.
What to do after unlocking my iPhone?
There are certain things you must do after unlocking your iDevice. First, you must immediately set a new PIN for your iDevice. Apart from that, restore your previous data if you have a backup. Having done so, you are good to go.
Can I access my locked iPhone without data loss?
No, you cannot unlock a locked iDevice without losing your data. Apple has made some outstanding security features in their phones. Therefore, you must erase all its content and settings if you need to get your hands on an unlocked phone again.
The Bottom Line
Due to one reason or another, you may have forgotten iPhone PIN. However, it is not that big a deal. In this article, we have proposed some of the best ways you can employ to erase this issue. However, we strongly recommend you use Dr.Fone for a quick solution.
Also read:
- [New] In 2024, IPhone Tips for Time-Dilation in Videography
- [New] X-Studio Voice Processor, Windows for 2024
- [Updated] Creative Edge Essential AFX Templates Without Investment for 2024
- [Updated] The Insider's Guide to Musical Enhancements on IG
- 線上無限制自由轉換AVI成3GP影片 - Movavi 專業解決方案
- Best Ways to Screen Record on Android
- Guide on How To Change Your Apple ID Email Address On iPhone 15 Plus | Dr.fone
- How to Unlock Your iPhone 12 Pro Max Passcode 4 Easy Methods (With or Without iTunes) | Dr.fone
- In 2024, 3 Ways to Erase Apple iPhone XS When Its Locked Within Seconds | Dr.fone
- In 2024, How to Make the Most of Your Apple iPhone 14 Pro Lock Screen with Notifications? | Dr.fone
- In 2024, Remove Device Supervision From your iPhone 13 mini | Dr.fone
- In 2024, Trouble with iPhone SE (2022) Swipe-Up? Try These 11 Solutions | Dr.fone
- Samsung Galaxy Watch 7 Details: Unpacking Its Price Tag, Availability, and Cutting-Edge Specs
- Title: In 2024, Trouble with Apple iPhone 14 Plus Swipe-Up? Try These 11 Solutions | Dr.fone
- Author: Amelia
- Created at : 2024-11-01 04:26:59
- Updated at : 2024-11-07 02:10:34
- Link: https://iphone-unlock.techidaily.com/in-2024-trouble-with-apple-iphone-14-plus-swipe-up-try-these-11-solutions-drfone-by-drfone-ios/
- License: This work is licensed under CC BY-NC-SA 4.0.