
In 2024, Trouble with iPhone 13 mini Swipe-Up? Try These 11 Solutions | Dr.fone
Trouble with Apple iPhone 13 mini Swipe-Up? Try These 11 Solutions
Part 1: Why Is My iPhone Screen Not Swiping?
The iPhone’s swipe-up gesture serves as a fundamental navigation tool. It allows users to access various functions and features swiftly. Yet, when this functionality encounters issues, it can be perplexing and disruptive. That’s why learning the reasons behind I can’t swipe up on my iPhone is essential. Summarized below are some of the common reasons behind frozen swipe-up issues:
1. Software Glitches
Updates or software bugs can occasionally interfere with the swipe-up gesture. It leads to unresponsiveness or delays.
2. Touch Screen Calibration
Sometimes, the touch screen may need recalibration. This can cause the swipe-up feature to become unresponsive.
3. Physical Damage
Physical damage, like heavy falls, can impact the phone’s touch sensitivity. Moreover, it affects swipe gestures as a result.
4. Full Memory or Background Apps
Insufficient memory or many background apps running simultaneously can overload the Apple iPhone 13 mini device. This leads to performance issues, including unresponsive gestures.
5. Water Exposure
Sudden exposure to moisture or water damage can also cause the screen to malfunction. This can cause the screen to become unresponsive, leading to swipe-up issues.
Part 2: 11 Ways To Fix iPhone Swipe up Not Working
Encountering an unresponsive swipe-up gesture on your Apple iPhone 13 mini can be exasperating. However, you no longer need to worry. There are numerous troubleshooting techniques available to address this problem. Explained below are the 11 effective ways to address the problem:
Fix 1. Fix iOS System Error Without Data Loss: Dr.Fone – System Repair (iOS)
Wondershare Dr.Fone - System Repair (iOS) is a reliable solution designed to resolve iOS system issues. It also includes unresponsive gestures like the swipe-up problem on iPhones. This tool specializes in repairing iOS system errors without causing data loss. It offers a comprehensive solution for resolving iOS system issues conveniently from home. With this tool, you can address over 150 iOS system problems.
![]()
Dr.Fone - System Repair (iOS)
Repair iOS System Errors Without data loss.
- Only fix your iOS to normal, no data loss at all.
- Fix various iOS system issues stuck in recovery mode , white Apple logo , black screen , looping on start, etc.
- Downgrade iOS without iTunes at all.
- Works for all models of iPhone, iPad, and iPod touch.
- Fully compatible with the latest iOS version.


3981454 people have downloaded it
These include the Apple logo, boot loop, and the 1110 error, among others. It enables you to downgrade or update iOS versions without needing to jailbreak your device. Additionally, it allows you to enter or exit DFU and Recovery Mode at no cost.
Key Features of Wondershare Dr.Fone
- This user-friendly iOS system repair solution doesn’t typically lead to data loss.
- It doesn’t require users to have advanced technical skills to operate it.
- Wondershare Dr.Fone is compatible with all iPhone, iPad, and iPod Touch models, regardless of the iOS version.
Steps to Fix iPhone Swipe up Not Working via Wondershare Dr.Fone
Here’s how to use Wondershare Dr.Fone to address the swipe-up not working on iPhone problem:
Step 1: Initiate System Repair with Dr.Fone
After successfully downloading Dr.Fone on your device, navigate towards the left side panel and click “Toolbox.” From the many options appearing on the main window, select “System Repair.” Then, establish a connection between your iOS and your current device.

Step 2: Opt for iOS Restoration and Enable Recovery Mode
Select the Apple iPhone 13 mini device type from the available options and select “iPhone.” From the new window, select “iOS Repair,” and following that, select “Standard Repair.” Now, follow the instructions available and enable recovery mode for your iOS.

Step 3: Select iOS Firmware to Initiate the Repair Process
After that, you’ll reach a window showing different iOS firmware alternatives. Pick any as per your preferences and click “Download.” Once the download is complete, click “Repair Now” and “Done” to end the repair process.

Fix 2. Force Restart iPhone
Performing a force restart, also known as a hard reset, can troubleshoot minor software glitches. These can cause unresponsive swipe-up issues on your Apple iPhone 13 mini. Here’s a guide on how to perform a force restart on various iDevice models to fix the iPhone won’t swipe up:
For iPhone 8 and Later Devices
Instructions: Begin by moving your finger towards the left side of your Apple iPhone 13 mini and tap on the “Volume Up.” Then, release the button after some points. Proceed similarly with the “Volume Down” button. Then, navigate towards the right side and press the “Side” button there. Keep on forcing the “Side” button up until the screen shows the Apple logo. This will indicate that a force restart is initiated.
For iPhone 7 Series
Instructions: Begin by reaching both sides of your Apple iPhone 13 mini at once. Press the “Volume Down” button situated on the left side using your left hand while simultaneously using your right hand to press the “Sleep/Wake” button on the right side. Stay firm with the grip on both buttons and release them when you see the signature Apple logo glowing on the screen. This will indicate that the force restart operation has been successful.
For iPhone 6 and Older Devices
Instructions: To restart your Apple iPhone 13 mini 6, press the “Wake/Sleep” button on the top edge of the phone. Hold the other “Home” button at the bottom center screen of the phone. Continue holding the buttons until the Apple logo becomes visible on the display. Then, press the “Wake/Sleep” button and the “Home” button.

Fix 3. Remove the Cover or Case
Sometimes, an unresponsive swipe-up gesture on your Apple iPhone 13 mini could be due to interference caused by a protective cover or case. The cover might be too thick, improperly aligned, or interfering with the touch sensitivity of the screen. Gently remove the protective cover or case from your Apple iPhone 13 mini. Inspect the screen for any dust, debris, or smudges while the cover is removed. Utilize a clean, soft cloth to wipe the screen.
Fix 4. Clean iPhone Screen or Remove Screen Protector
An unresponsive swipe-up gesture on your Apple iPhone 13 mini might be due to dirt, smudges, or interference caused by a screen protector. Power off your Apple iPhone 13 mini to prevent accidental taps during the cleaning process. Carefully clean the screen by softly rubbing it with a fresh and dry microfiber cloth. In addition, ensure the cloth is soft and free from any debris that might scratch the screen.
Fix 5. Activate Control Center Access on the Lock Screen
If your Apple iPhone 13 mini swipe-up gesture isn’t working specifically on the lock screen to access the Control Center, it might be due to settings restricting its accessibility. Enabling Control Center access on the lock screen allows you to swipe up from the bottom edge. Follow these steps to ensure Control Center access is enabled on the lock screen and fix the iPhone swipe up not working:
Step 1. On your iOS device, access the “Settings” app and launch it. Now scroll down to find and tap “Face ID & Passcode.”

Step 2. Head to the “Allow Access When Locked” section, toggle on the “Control Center” switch, then return to the lock screen to verify if the problem has been resolved.

Fix 6. Enable Control Center Within Apps
Are you experiencing issues with accessing the Control Center via the swipe-up gesture while using certain apps? If yes, ensuring that Control Center access is enabled within apps is essential. It ensures that the swipe-up gesture from the bottom edge of the screen functions. Here’s how to enable Control Center access within apps:
Instructions: Navigate to Settings on your Apple iPhone 13 mini and access “Control Center.” On the following screen, activate the toggle next to “Access Within Apps.” It will allow you to access the Control Center when using apps.

Fix 7. Update to the Latest iOS Version
Running an outdated iOS version can sometimes lead to various software issues. These include unresponsive gestures like the swipe-up function on your Apple iPhone 13 mini. Updating your device to the latest iOS version can often resolve such problems. Here’s how to check for and update your Apple iPhone 13 mini to the latest iOS version:
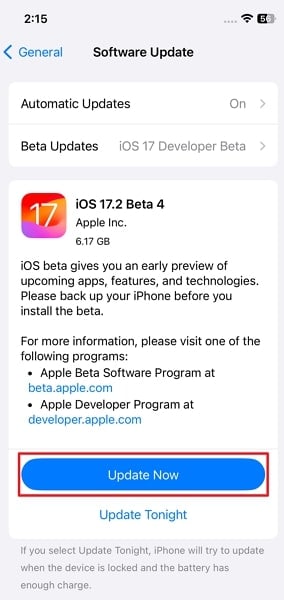
Step 1. Unlock your Apple iPhone 13 mini and open the “Settings” app to access “General” settings. Simply touch the “Software Update” option to verify if an update is accessible.

Step 2. If an update is available, press the “Update Now” button to commence the updating process. During the process, make sure to follow the prompts carefully to avoid issues.
Fix 8. Turn Off VoiceOver
VoiceOver is an accessibility feature on iPhones. It assists users with visual impairments by providing spoken feedback for actions on the Apple iPhone 13 mini device. Sometimes, VoiceOver settings can interfere with normal touchscreen gestures like the swipe-up function. Here’s how to turn off VoiceOver to resolve iPhone 13 won’t swipe up to unlock:
Step 1. You will need to open the Settings app and scroll down to select the “Accessibility” menu. There, tap “VoiceOver” to get access to the “VoiceOver” settings.

Step 2. On the following screen, toggle off the “VoiceOver” switch if it is enabled. Afterward, check if the swipe-up gesture issue is resolved.

Fix 9. Customize Touch Accommodations
Touch Accommodations is an accessibility feature on iPhones. It is designed to modify touch sensitivity and enhance touchscreen interactions for users. Customizing these settings might resolve issues with unresponsive gestures like the swipe-up function. Here’s how to customize Touch Accommodations to fix the Apple iPhone 13 mini 12 won’t swipe up to unlock:
Step 1. Move to the “Accessibility” settings of your Apple iPhone 13 mini and select “Touch.” On the following screen, scroll down and tap “Touch Accommodations.”

Step 2. Now, first, enable the “Touch Accommodation” option from the top of the next screen. Then, scroll down and set the “Tap Assistance” option to “Use Initial Touch Location.”

Fix 10. Turn Off Reduce Motion
Reduce Motion is an accessibility setting on iPhones designed to reduce animations and visual effects. It is particularly for users sensitive to motion effects. However, enabling this feature might affect certain gestures or animations on the Apple iPhone 13 mini device. Thus potentially causing issues with the swipe-up function. Here’s how to turn off Reduce Motion to fix the iPhone 11 won’t swipe up to unlock:
Step 1. Go through your iOS device Settings to open the “Accessibility” tab. Here, find and tap the “Motion” option to proceed.

Step 2. Now, on the following screen, turn off the toggle next to the “Reduce Motion” option. Then, go and check if the swipe-up gesture issue is fixed or not.

Fix 11. Reset iPhone All Settings
Resetting all settings on your Apple iPhone 13 mini can help resolve software-related issues. It can help remove conflicts that might be affecting the swipe-up gesture. Note that this action will reset all settings on your device, but it won’t delete your data. Here’s how to reset all settings to fix iPhone swipe not working:
Step 1. Go to your device’s “General” settings and scroll down to tap the second last option, “Transfer or Reset iPhone.” On the following screen, press “Reset” from the available two options.

Step 2. Now, choose “Reset All Settings” from the pop-up options and confirm it by providing the passcode. Then, wait for a few moments as your Apple iPhone 13 mini is restored to its original settings.

Part 3: Unlock iPhone Without Swiping Up
Encountering swipe not working on iPhone can sometimes lead to difficulties. This is especially the case in unlocking the Apple iPhone 13 mini device or accessing essential functions. In such scenarios, using Wondershare Dr.Fone - Screen Unlock (iOS) provides a reliable solution. It bypasses the swipe-up need and regains access to your Apple iPhone 13 mini without relying on the problematic gesture. This tool offers a solution to unlock iPhone/iPad devices without the passcode.
Dr.Fone - Screen Unlock (iOS)
Unlock iPhone/iPad Lock Screen Without Swiping Up.
- Simple, click-through, process.
- Unlock screen passwords from all iPhones and iPads.
- No tech knowledge is required, everybody can handle it.
- Supports iPhone 15 / iPhone 14 / iPhone 13 / 12, iPhone 11, … and the latest iOS version fully!
4,395,216 people have downloaded it
It allows the removal of various lock screens present on iPhone, iPad, and iPod touch. Additionally, it provides the capability to bypass the iCloud activation lock. Users can also bypass MDM and screen time restrictions without experiencing any data loss.
Key Features of Wondershare Dr.Fone
- This software is compatible with the latest iOS 17 and iPadOS 17, including iPhone 15 models.
- The unlocking process involves a simple 3-step procedure.
- With it, you can remove Apple ID from your device without the password.
Steps To Unlock iPhone Without Swiping Up via Wondershare Dr.Fone
You can use the simple steps explained below to unlock your Apple iPhone 13 mini and fix the Apple iPhone 13 mini 11 swipe-up not working:
Step 1: Connect Your Device and Choose Unlock iOS Screen
Upon downloading and installing Wondershare Dr.Fone onto your computer, access the “Toolbox” menu. Here, proceed to select “Screen Unlock” followed by “iOS.” Within this window, choose the “Unlock iOS Screen” option to proceed with unlocking your iOS device’s screen. Subsequently, connect your Apple iPhone 13 mini and click Start to initiate the unlocking process.
Step 2: Ensure Your Device is in Recovery Mode
Now, adhere to the on-screen prompts provided to enter Recovery Mode based on the specific model of your iDevice. Then, the platform automatically recognizes and exhibits the Apple iPhone 13 mini device Model. If necessary, change the model and choose the system version as per your preferences. Upon completion, click on “Start” to continue the process.

Step 3: Unlock Your iOS Device Successfully
Once the iOS firmware has been successfully downloaded, it undergoes verification. Proceed by selecting the “Unlock Now” button to initiate the unlocking process. A prompt window will emerge on the screen, requesting confirmation of the process. Enter the code and tap “Unlock” to proceed to the final step. Upon successfully unlocking the iDevice, click the “Done” button to finish the process.

Conclusion
Having trouble with swipe up not working on an iPhone can be annoying. It stops you from using important stuff and moving around your phone quickly. This guide has lots of ways to fix it. We’ve covered simple things like restarting your Apple iPhone 13 mini and cleaning the screen, as well as more complex stuff like changing settings and using unique options for accessibility. These fixes can help make the swipe-up gesture work again.
We’ve also talked about a helpful tool called Wondershare Dr.Fone. It’s made to fix problems with the lock screen, including issues with swiping on your Apple iPhone 13 mini. Moreover, Dr.Fone - Screen Unlock lets you get into your Apple iPhone 13 mini even when gestures aren’t working properly.
How To Bypass the Required Apple Store Verification For Apple iPhone 13 mini
The Apple App Store is a familiar place for anyone with an iPhone or iPad. It’s where you find all sorts of useful and fun apps. However, one thing that can be a hassle is the store’s strict verification process. Every time you make a purchase, you need to go through this step.
It’s there for a good reason – to stop fraud – but it can get annoying, especially if you forget your Apple ID or have other issues. This article will explore the ways to stop the Apple Store “Verification Required” prompt, making your app downloading experience smoother.

Part 1: Why Does Apple Require Verification in the Apple Store?
When browsing the App Store on your Apple iPhone 13 mini or iPad and looking to download the latest game or productivity tool, you might have noticed that Apple often asks for some form of verification before you can proceed with your purchase. This is not just a random step; there’s a solid reason behind it.
The primary reason Apple requires verification for App Store purchases is to ensure that you are the person authorizing the purchase. This security measure prevents unauthorized transactions and protects your account from fraud.
What does this verification usually involve? It could be entering your Apple ID password or using Face ID or Touch ID if your device supports these features. These methods are designed to confirm your identity quickly and securely.

Reasons Why the Verification Required Message Might Appear
There are several reasons why you might see an Apple Store’ Verification Required’ message when trying to download an app or make a purchase:
- New Apple ID. If you’ve just created a new Apple ID and need to download or pay for apps, Apple must verify your payment information. Thus, you’ll have to prove everything, especially on a new phone.
- **Payment method needs to be corrected.**Suppose there’s an issue with your Apple ID’s payment method, such as outdated or incorrect details. In that case, verification is required to ensure the account is secure and ready for transactions.
- Invalid credit card. Unsupported or invalid credit cards can trigger the verification notice, as Apple can’t process payments with these cards.
- Unpaid balance. If there’s an outstanding balance on your Apple ID, you can download or pay for new apps once this balance is cleared.
- Family Sharing restrictions. For those using Family Sharing, if the family organizer has placed restrictions on your account, this could result in a verification prompt.
Understanding these reasons is the first step in addressing the ‘Verification Required’ message. It’s not just a random or annoying hurdle; it’s there for your security and to ensure a smooth, safe experience when using the App Store.
Part 2: How To Fix Verification Required Prompt Using Apple ID
Having to deal with the ‘Verification Required’ prompt in the App Store can be a bit of a hassle, especially when you’re eager to get your hands on a new app or game. Fortunately, there are several methods you can use to resolve this issue, most of which are pretty straightforward and can be done right from your device. Here’s how to tackle it:
Update Payment Method
One of the most common reasons for the verification prompt is a problem with your payment method. To fix this, go to your Apple ID settings on your Apple iPhone 13 mini or iPad. Tap your name at the top of the Settings app, then go to Payment & Shipping. You can update your payment information or add a new payment method here. Make sure the details are correct and up to date.
Check Unpaid Subscriptions
Sometimes, unpaid subscriptions can trigger the verification prompt. Tap the App Store > your profile icon, and select Subscriptions. Here, you can view all your subscriptions, active or expired. Check if there are any unpaid ones and clear any outstanding payments.

Don’t Require Password for Purchases
For less frequent purchases, you should change the settings so you don’t always have to enter your password. Go to Settings, then to Screen Time. Under Content & Privacy Restrictions, select iTunes & App Store Purchases. Here, you can change the settings to Don’t Require for purchases. However, be cautious with this method as it reduces security.

Sign Out of Apple ID and Re-Sign In
Sometimes, simply signing out of your Apple ID and then signing back in can resolve the issue. Go to the Settings app, tap your name at the top, and scroll down to Sign Out. After signing out, restart your device and then sign back in. This can help refresh your account settings and clear up any minor glitches.
Remember, these methods are about bypassing the verification process and ensuring your account is up-to-date and secure. Regularly checking your Apple ID settings and payment information can prevent many common issues with the App Store, including the frustrating ‘Verification Required’ prompt.
Part 3: How To Bypass Verification Required Prompt Without Apple ID
If you need to learn how to bypass the ‘Verification Required’ prompt in the App Store but don’t have access to the Apple ID or password, there’s an alternative approach using third-party software. One such tool that can assist in this situation is Wondershare Dr.Fone - Screen Unlock (iOS), which offers a feature specifically designed for this purpose.
Introducing Dr. Fone’s Screen Unlock (iOS) Feature
Dr.Fone - Screen Unlock (iOS) function includes an Apple ID remover tool. This feature is handy when you cannot remember your Apple ID or password but need to download apps from the App Store. Here’s a step-by-step guide on how to use this feature.
Step-by-Step Guide To Bypass Verification Without Apple ID With Dr.Fone
Here’s a complete guide on bypassing the verification required on the App Store.
Step 1: Install and open Wondershare Dr.Fone on your computer.
Step 2: Navigate to Toolbox and select Screen Unlock followed by iOS.
- Step 3: In the next window, choose Remove Apple ID to proceed.

- Step 4: A connectivity status will appear on the screen with your iOS device connected to the computer. Click Unlock Now to start the process.

- Step 5: Confirm if your iOS device has a screen lock and two-factor authentication enabled. This is crucial for the process to continue smoothly.

- Step 6: Follow the on-screen instructions to put your iOS device in Recovery Mode. If necessary, you can also opt for DFU Mode by following the provided instructions. Once in Recovery Mode, the tool will recognize your device model. You’ll need to select the correct system version to proceed.

- Step 7: The tool will download the appropriate iOS firmware for your device. After the download, it will verify the firmware.

- Step 8: After firmware verification, click Unlock Now. You’ll be prompted to enter a code for confirmation. Once entered, the unlocking process will begin.

- Step 9: You’ll receive a notification once the process is complete. You may try again if the process fails to succeed the first time.

Note: After Apple ID removal, you must re-enter a new Apple ID to access the App Store. Take note of the password now if you forgot your previous one.
Conclusion
In this article, you’ve learned how to remove ‘Verification Required’ in the App Store. The primary takeaway is to try solving the issue using your Apple ID, as this approach typically prevents data loss. However, if you’re in a tight spot without access to your Apple ID, Dr.Fone - Screen Unlock (iOS) offers a reliable alternative to bypass this hurdle.
While it’s an effective solution, always consider it a secondary option to safeguard your data. Additionally, Dr.Fone can be a handy tool for various other phone-related challenges, making it a useful resource for tackling different tech problems.
Tips: Are you searching for a powerful Screen Unlock tool? No worries as Dr.Fone is here to help you. Download it and start a seamless unlock experience!
The Best Methods to Unlock the ‘iPhone Locked to Owner’ for Apple iPhone 13 mini
Being locked out of your new iPhone can be a frustrating experience. It could be due to a forgotten passcode, a second-hand purchase with an activation lock, or any other reason. Facing the “iPhone Locked to Owner” scenario can be hard as the fault doesn’t lie with you. Regardless of the fact, finding a solution to unlock an “iPhone Locked to Owner“ can be a daunting task.
We bring you a comprehensive guide that explores the best methods to unlock an “iPhone Locked to Owner.” This article provides a detailed guide covering official and unofficial methods.
Part 1: A Brief Overview of the Functionality of Activation Lock
Activation Lock is a strong and innovative security feature introduced by Apple. This lock is available on Apple devices, including iPhones, iPads, and Macs. It is designed to prevent unauthorized access and use of a device in case it is lost, stolen, or misplaced. Here’s a brief overview of the features of Activation Lock:

Device Association
The Activation Lock works by associating a device with the iCloud account of the owner. When the Apple iPhone 13 mini device is set up or restored, it prompts the user to sign in with their Apple ID and activates Activation Lock.
Activation Lock Status
Once enabled, Activation Lock securely stores the Apple iPhone 13 mini device’s unique identifier (IMEI or serial number). It also stores the associated iCloud account details on Apple’s servers. This information is used to verify the Apple iPhone 13 mini device’s status during activation and prevent unauthorized use.
Locking Mechanism
If a device with Activation Lock is lost or stolen, the owner can activate Lost Mode using the Find My app or iCloud website. Lost Mode remotely locks the Apple iPhone 13 mini device, preventing anyone from accessing the user’s data. It also prevents device use without the owner’s Apple ID and password.
Device Recovery
In Lost Mode, the owner can provide contact information and display a custom message on the Apple iPhone 13 mini device’s screen. These can help in facilitating its return. The device remains locked until the owner either unlocks it through iCloud or erases its data remotely.
iCloud Activation Lock Bypass
With Activation Lock, you get an added layer of security. This makes it challenging for unauthorized individuals to use a locked device. Apple’s servers confirm the Apple iPhone 13 mini device’s activation status before allowing access to the OS. Thus, bypassing Activation Lock requires the original owner’s Apple ID and password.
Activation Lock on Used Devices
When purchasing a used Apple device, you should ensure that Activation Lock is disabled. Otherwise, the Apple iPhone 13 mini device will remain locked to the previous owner’s iCloud account. Apple provides guidelines and procedures for sellers to remove Activation Lock.
Part 2: 5 Best Methods To Remove the Apple iPhone 13 mini Locked to Owner Security
Having an iPhone locked to its previous owner’s security can be frustrating. That’s why finding effective methods to remove the lock is crucial. Luckily, various methods exist to bypass the Apple iPhone 13 mini locked to the owner for free. Given below are the top 5 methods to resolve this issue:
Method 1: Use the Old iOS Passcode To Unlock the Apple iPhone 13 mini device
If you’ve recently obtained a used iPhone, there is a possibility that the old iOS passcode might still be effective. When an iPhone is locked to its owner, you will find an option to unlock the Apple iPhone 13 mini device using the passcode. It presents another viable option to remove the lock.
To proceed, you will need to contact the previous owner of the Apple iPhone 13 mini device and request the passcode. Use the following guide after getting the old passcode of your Apple iPhone 13 mini:
Step: Access your locked iPhone and tap “Unlock with Passcode.” On the following screen, enter the old passcode to remove the Activation Lock.

Method 2: Ask the Owner To Erase the Apple iPhone 13 mini device Using iCloud
The passcode is not the only thing you can ask from the previous owner of the iPhone. You can also ask the previous owner to erase your device remotely. It can be helpful if the previous owner doesn’t remember the passcode or you are unable to meet them in person.
To make this procedure work, the owner will need to use the Find My Device feature from the iCloud website. Here is what the owner needs to do to resolve Activation Lock from your Apple iPhone 13 mini:
- Step 1: Access the iCloud website on your computer’s browser and log in using Apple ID. Afterward, click the “Find My” option.
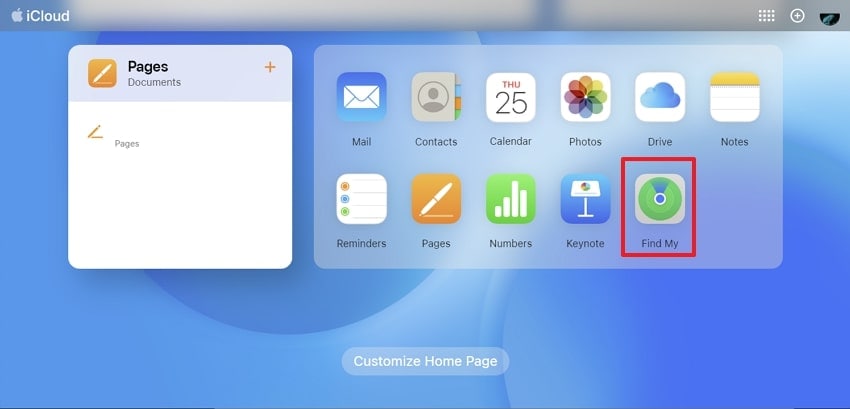
- Step 2: On the following screen, select your Apple iPhone 13 mini from “All Devices.” Now choose “Erase iPhone” from the available options to erase the Apple iPhone 13 mini device and remove the Activation Lock.

Method 3: Use the DNS Method To Unlock the Apple iPhone 13 mini Locked to Owner
When you are unable to access the Apple iPhone 13 mini device, the DNS method can be an alternative solution. This method involves changing the DNS settings on your Apple iPhone 13 mini to bypass the activation lock screen. However, the procedure works only for devices running on older iOS versions.
The reason is that the process uses a loophole to allow you access to the Apple iPhone 13 mini device. This loophole has now been patched by Apple. Given below is the detailed process to unlock your Apple iPhone 13 mini Activation Lock:
Step 1: Power on your iDevice or restart it if your Apple iPhone 13 mini is already powered on. Access your Apple iPhone 13 mini Settings to tap “Wi-Fi” and navigate to the “Choose Wi-Fi Network” option.
Step 2: Select “More Wi-Fi Settings” using the “i” symbol next to the displayed Wi-Fi network. Here, choose “Configure DNS” and follow it by selecting the “Manual” option.
Step 3: Afterward, press “Add Server,” located under “DNS Servers.” Now enter the appropriate DNS server address based on your location:
For users in the United States/North America: 104.154.51.7
For users in Europe: 104.155.28.90
For users in Asia: 104.155.220.58
For users in the rest of the world: 78.109.17.60

- Step 4: Save the changes by selecting “Save.” Use the back arrow button to go back and choose “Ask to Join Networks.” Enter the network password and tap “Join.” Press the back arrow button when your Apple iPhone 13 mini attempts to activate. Afterward, continue to set up your Apple iPhone 13 mini.
Method 4: Take Help From the Online iCloud Activation Lock Removal Service
What to do if you have been unable to contact the previous owner and the DNS method isn’t working? The answer is you can also employ an online iCloud Activation removal service. These services charge you some money and unlock your Apple iPhone 13 mini. All you need to provide them is your Apple iPhone 13 mini IMEI number. The process is done remotely and takes 24 to 48 hours to complete.
Ensure your device IMEI is not blacklisted before sending it for the unlocking process. Described below are steps to use DirectUnlocks, an iCloud Activation removal service:
- Step 1: Use your computer’s browser to visit the official DriectUnlocks website. Enter your Apple iPhone 13 mini’s IMEI number and select the Apple iPhone 13 mini model in the provided box.
- Step 2: Once you have entered the details, tap “Remove Activation Lock.” Afterward, select a payment method to pay for the service. It will take up to 48 hours to unlock your device.

Method 5: Remove the iCloud Activation Lock With the Best Screen Unlock Tool – Wondershare Dr.Fone
Not having access to your purchased iPhone and no solution working to resolve the locked-to-owner iPhone issue can be disheartening. However, worrying is unnecessary as we have the best solution. To bypass the iCloud Activation lock, the best tool to use is Wondershare Dr.Fone. With this tool’s help, you can remove the lock and access your Apple iPhone 13 mini without restrictions.
Aside from bypassing the iCloud Activation lock, it can also help you remove or bypass MDM. Furthermore, it also excels at unlocking iPhone screen locks. This tool has the ability to unlock all types of screen locks like a passcode, Touch ID, and Face ID.
Key Features of Wondershare Dr.Fone
- Wondershare Dr.Fone lets you remove the Screen Time Passcode without needing the actual password.
- With this tool, you can also remove your Apple ID from your Apple iPhone 13 mini if you have forgotten the password.
- This tool can also remove SIM locks or carrier restrictions placed on the iPhone.
Steps To Remove the iCloud Activation Lock With Wondershare Dr.Fone
Removing the iCloud Activation Lock with Wondershare Dr.Fone is simple and fast. You don’t need any technical skills to unlock your Apple iPhone 13 mini. Follow these steps to remove iCloud Activation Lock with Dr.Fone:
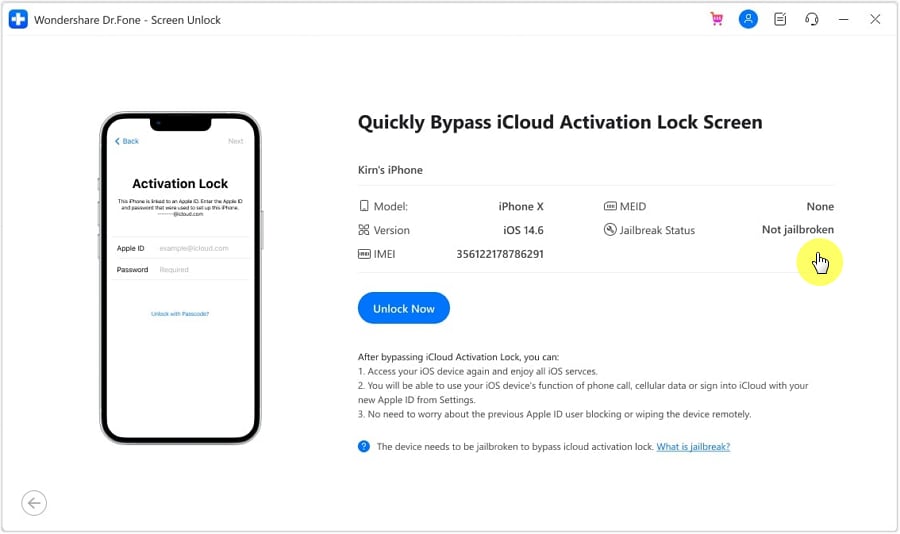
- Step 1: Choose iCloud Activation Lock Removal
After launching the Dr.Fone on your computer, move to “Screen Unlock” in the “Toolbox” tab. Here, choose “iOS” and click “iCloud Activation Lock Removal.” Now connect your locked Apple iPhone 13 mini to the computer using a reliable USB cable.

- Step 2: Initiate the iCloud Activation Lock Removal Process
Afterward, tap “Start” to begin the iCloud Activation Lock bypassing process. You will first have to confirm whether your device is GSM or CDMA. If the Apple iPhone 13 mini device is GSM, the unlocking process won’t harm it. However, you will lose calling or other cellular functions if it is CDMA.

- Step 3: Bypass the iCloud Activation Lock Removal
After thoroughly considering the ramifications, tap “Unlock Now” to proceed. Now you will need to jailbreak your Apple iPhone 13 mini, which you can do using the guides provided in the program. Once you have jailbroken your Apple iPhone 13 mini, the iCloud Activation Lock bypassing process will start. Wait for the process to complete; once it does, tap “Done.”
Conclusion
To summarize, Wondershare Dr.Fone stands out as the best choice when it comes to unlocking an “iPhone Locked to Owner.” It has advanced features, a dynamic interface, and a proven track record. Wondershare Dr.Fone offers the most reliable and effective methods to regain access to your locked iPhone.
Wondershare Dr.Fone’s comprehensive toolkit provides a range of options to cater to different scenarios. Whether you’ve forgotten your passcode, purchased a second-hand iPhone with an activation lock , or encountered other locked-out situations, Wondershare Dr.Fone offers tailored solutions to meet your needs. Moreover, Wondershare Dr.Fone’s approach ensures a seamless and secure unlocking process.
Also read:
- [New] 2024 Approved Breaking Down TSeries' Income Strategy on YouTube Platform
- [New] 9 Fitness Trends to Captivate Your Online Audience with Action
- [New] Video Vouchers for Trust in Brands for 2024
- 3 Ways to Unlock iPhone 11 Pro Max without Passcode or Face ID | Dr.fone
- Complete Guide on Unlocking iPhone 14 Plus with a Broken Screen? | Dr.fone
- How To Open Your iPhone 13 Pro Without a Home Button | Dr.fone
- In 2024, Guide on How To Change Your Apple ID Email Address On Apple iPhone 7 | Dr.fone
- In 2024, How Can You Stream A Pre-Recorded Video Live on Facebook?
- In 2024, How to Fix Apple iPhone 12 Pro Max Passcode not Working? | Dr.fone
- In 2024, How to Fix Apple iPhone 13 Pro Max Passcode not Working? | Dr.fone
- iPhone Is Disabled? Here Is The Way To Unlock Disabled Apple iPhone SE (2020) | Dr.fone
- Mac's Visionary Picks The #10 Elite Monitors with 4K
- Tailor Your Text Experience – OpenAI's GPT Custom Shops
- The Next Decade of Defenses: Top Cybersecurity Forecasts
- Tips and Tricks for Setting Up your Nokia 105 Classic Phone Pattern Lock
- Ultimate How-To Manual for Unlocking and Rebooting Your Laptop with Windows Tenth Using Factory Settings
- Title: In 2024, Trouble with iPhone 13 mini Swipe-Up? Try These 11 Solutions | Dr.fone
- Author: Amelia
- Created at : 2024-12-15 16:08:16
- Updated at : 2024-12-20 16:25:57
- Link: https://iphone-unlock.techidaily.com/in-2024-trouble-with-iphone-13-mini-swipe-up-try-these-11-solutions-drfone-by-drfone-ios/
- License: This work is licensed under CC BY-NC-SA 4.0.