
:max_bytes(150000):strip_icc():format(webp)/edit-tweet-after-publish-3476767-34af9aa3b62b4bf4b11891460076916b.png)
In 2024, Unlocking Apple iPhone XS Lock Screen 3 Foolproof Methods that Actually Work | Dr.fone
Unlocking Apple iPhone XS Lock Screen: 3 Foolproof Methods that Actually Work

The competition in the market between Android and iOS has been increased ever since the features are increasing. People get attracted by anything that is new and unique. The competitive brands are taking things seriously and are coming up with the eye-catching mobile body and mesmerizing features.
Someone who is new in the Apple world must not be aware of the security activation lock and many other different features. No one can use your Apple device without the activation lock. The fact that user can remove all the data from iPhone whenever they want and can even restore it instantly gets user attention.
Looking more into the Apple iPhone XS world, people might be confused between the lock screen and activation lock. Also, they might be facing the problem of how to bypass the lock screen of iPhone Apple iPhone XS . Let us answer your questions and provide you some knowledge.
Part 1. Can Someone Bypass the Apple iPhone XS Activation Lock?
Protecting user’s information is among the core objectives of Apple. For this purpose, an activation lock has been developed for iPhone, iPad, iPod, and Apple Watch users. The lock prevents any other person from using your apple device in case it’s lost or stolen.
The phones that are iOS 7 or above versions do not need to manually enable the lock because it is auto-enabled once the phone is switched on. The strong security concerns behind this lock do not allow your device’s misuse from someone who is using it for the wrong purpose.
Apple’s activation server saves your Apple ID, and in case the phone is turned off, or any erasing activity is observed, then the Apple iPhone XS device will ask to unlock the iCloud activation. Suppose you have purchased a phone from someone, and it asks for an activation lock. That is because the Apple iPhone XS device is still linked with the old owner and hence, will not allow you to access the phone.
For this, if the Apple iPhone XS device is asking for an activation lock, the user cannot bypass the Apple iPhone XS activation lock. The only way to get rid of that is to break the link between the Apple device and the prior owner, but that requires Apple ID.
Part 2. Bypass iPhone Lock Screen Apple iPhone XS without Passcode [No iTunes]
The major difference between the lock screen and activation lock is that the lock screen can be bypassed without the password but, the user can never bypass the activation lock as it marks the security boundary of Apple.
You might be wondering how to escape the lock screen without a password because it is possible that you might forget the password, and now you can’t open your phone. Let’s look at how you can do this;
The commonly faced problem of many iOS users was that they forget the password but later, an amazing solution to this problem as Dr.Fone – Screen Unlock application was known and used by almost all iOS users. Some of its features are;
- The application is easy to use. It does not need any technical skill to use it, and everyone can handle the application.
- It can unlock a disabled iPhone even if the user doesn’t have the passcode.
- It fully supports iPhone 8, iPhone X, and all the latest models of iPhone.
- You don’t have to worry if you got a second-hand phone because Dr.Fone can unlock it.
Let us now show you how to use the application and enjoy life with iPhone;
Step 1: Download Dr.Fone
The user is requested to download Dr.Fone – Screen Unlock on Windows or Mac system from its official website. Once it’s downloaded, you should install it and then, it will be ready to use. Launch it whenever you want to bypass the Apple iPhone XS lock screen.
As you will launch the application, the home page will appear from that, and you have to select ‘Screen Unlock’ that is on the left.

Step 2: Make a Connection
The user is now supposed to make the connection between iPhone and the system and let the application automatically detect it. When you are ready to initiate the action, just click on the button ‘Unlock iOS Screen.’

Step 3: Activate DFU Mode
Once the system has detected the phone, the user is advised to activate the DFU mode by turning off the phone and connecting it to the computer.

Step 4: Information for Confirmation
The next window will ask for some basic information regarding the iOS device and version.

Step 5: Firmware Update
Click on the ‘Download’ button at the bottom to get the firmware update for your phone. This might take some time as the firmware update for your phone is being downloaded. As that’s done, click on the ‘Unlock Now’ button on the screen.
Step 3: Select the Path
Select the saving path where you want to save your screenshots. For this, click on the “Settings” and go to “Screenshots and recording settings.”
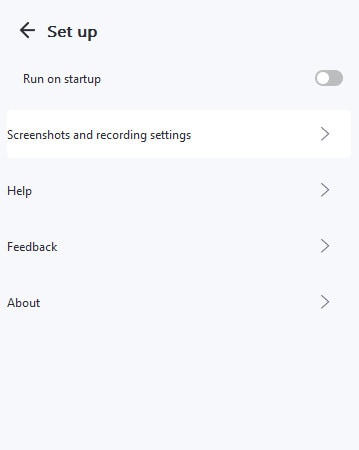
You will see the option “Save to.” Guide the path, and all taken screenshots will be stored at the selected location.

Provide the system with an on-screen confirmation code to continue the process. When that is done, the interface will notify you. By clicking on the ‘Try Again’ button, you can repeat the process.

Part 3. Erase iPhone from iCloud [Apple ID & Password]
People keep on switching between Android and iOS. Not everyone sticks to one thing, and so do passionate mobile users do. But suppose someone is changing their phone and they want to delete the Apple iPhone XS from iCloud, both the Apple ID and its password; what should be done in such a scenario?
The user can easily bypass the lock screen on their iPhone from iCloud only if their Find My iPhone feature is turned on. Let us take you through the steps that will help you to do the task;
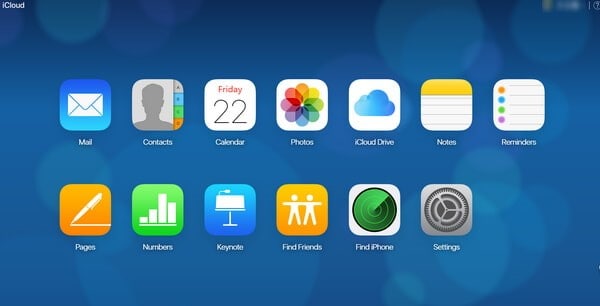
User is firstly supposed to log in to iCloud.com on their computer or any other device in use by using the Apple ID and password.

In case the user has enabled the two-factor authentication on iPhone, then they should hit ‘Trust’ and enter the six-digit verification code sent to their iPhones on the iCloud web.
Once that is done, and you have logged in to iCloud, select the option of ‘Find iPhone.’
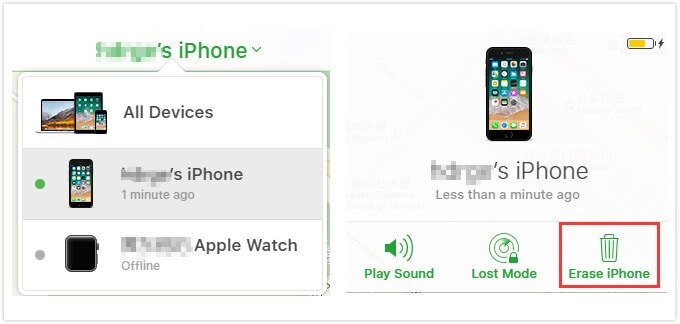
Now, the user should select and click on ‘All Devices, located at the top of the browser.
The system will now ask for your Apple ID and password; provide that.
After you have done that, a list of all the Apple iPhone XS devices will appear. You are now supposed to select your device and click on the option of ‘Erase iPhone.’
Doing this will wipe all the data, settings and, also the password.
Part 4. Restore Apple iPhone XS Apple iPhone XS to Factory Reset by iTunes
Most iPhone users have synced the Apple device to iTunes. This helps them to recover the data in case it is lost. If the user has created an appropriate backup across iTunes, they can easily carry out the process of bypassing the lock screen. In other words, iPhone users have everything saved without the fear of being lost.
iPhone users can even restore their phones to factory settings without losing anything and by just using iTunes. Let us show you how it is done;
Users should start the process by turning their phone off and connecting it to the computer.
Now, the user should press and hold the ‘Home’ button and ‘Power’ button together. Release them when you see ‘Connect to iTunes’ on the screen.
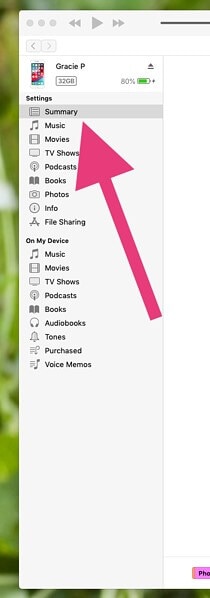
Once that is done, the user is now requested that from the menu on the left side of the screen, select ‘Summary.’
A new window will appear, the Summary window. From this, the user is supposed to select the option of ‘Restore iPhone.’
Selecting the restore option, a confirmation window will appear on the screen, asking the user to confirm the decision of the restore process.
As soon as iTunes has finished the restoring process, the phone is ready and reset.
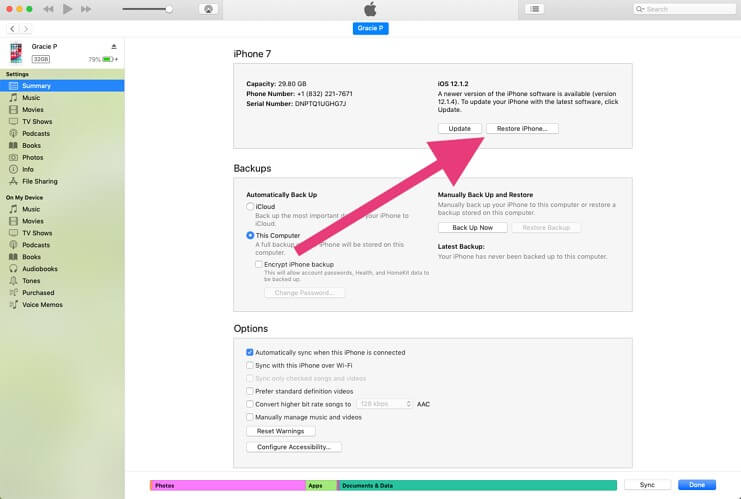
Users can now retrieve all the data that has been backed up on iTunes.
Conclusion
The article has covered a sufficient portion of knowledge for the user regarding how they can bypass iPhone lock screen Apple iPhone XS . The difference between the common confusion of lock screen and activation screen and also a few tips and tricks have been discussed.
Apple iPhone XS Backup Password Never Set But Still Asking? Here’s the Fix
Part 1: Why Do iTunes Ask Me for iPhone Backup Password?
When you use iTunes to create a backup, the backup will probably have a password that iTunes automatically create. This is for privacy reasons. Hence, it might ask for an iTunes backup password never set by you!
In most cases, this occurs when the Encrypt Backup option is activated. As an official iOS feature, its purpose is to provide iOS users with the iTunes backup encryption for further security.
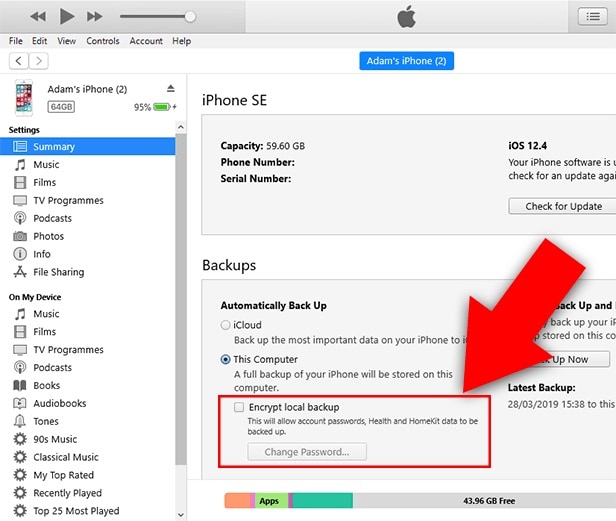
Unfortunately, this capability may also become problematic if you inadvertently take a backup without being able to provide the password. For example, you may have to enter the password for your Apple iPhone XS backup unlocking never set by you.
But the good news is you have some possible fixes. So, let’s talk about them.
Part 2: 4 Possible Ways to Fix Asking for iPhone Backup Password
Many iPhone users have problems with iTunes when they back up their devices.
One of the most common issues is that people are asked for their iPhone backup password never set, but they need to know what it is. This can be frustrating because you can only back up your device if you have the password.
There are a few possible ways to fix this problem. Try resetting your password or using a different computer to back up your device. You could also try using a third-party software tool like Dr.Fone - Screen Unlock.
1. Try all passwords you use on iPhone
When iTunes prompts you for an iPhone backup password never set, what should your initial course of action be?
To get out of this predicament in the simplest way possible, try entering every potential password you will likely have used. In most cases, individuals will use the same password for many accounts.
A significant possibility is that you encrypted the iTunes backup with the same password from the iCloud account.
Therefore, before doing anything further, try all passwords to configure your iTunes account. For example, try entering 0000, 123456, name123, or 1111.
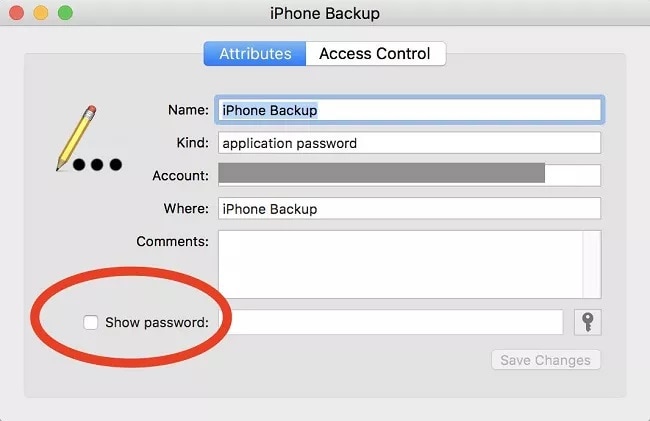
2. Find the password from Keychain on macOS
You may also attempt to find the password for the iTunes backup using the keychain approach if you are working on a Mac.
The likelihood of success with this approach is relatively low. However, it is still worthwhile to try it, particularly if you have also synchronized your iTunes account with your Mac.
- On your macOS, go to Utilities by clicking the Applications menu item. At this point, launch the Keychain Access app and look for your Apple iPhone XS backup.
- To open a new dialogue box, double-click the most recent backup file, and you will see one appear before you.
- On this page, choose Show Password to get the password for the Apple iPhone XS backup. However, you will first be prompted to provide the administrator password associated with your iCloud account to recover the password.
3. “Reset All Settings”
Resetting the password is another option at your disposal if you encounter the Apple iPhone XS backup password never set problem. How you do this will be different depending on the version of iOS that you have installed.
Here are what you can do with your iOS smartphone if it has iOS 11 or a later version:
Step 1: Unlock your Apple iPhone XS, and then open the Settings app on your device.
Step 2: After locating the General menu, go to the Reset menu and then hit the Reset All Settings button. Please confirm your action by providing the password for your Apple iPhone XS.
Step 3: Once the reset has been completed, your previous password will be deleted.
Step 4: The next thing you should do is take a fresh backup of your Apple iPhone XS using iTunes, and then establish a new password for the backup that iTunes creates.
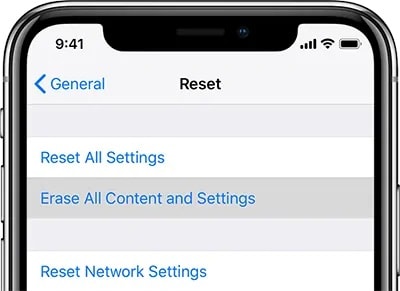
You will need to use an alternative strategy, which includes a factory reset if you use an older version of the iOS firmware than iOS 11.
Step 1: Before continuing, it is highly recommended that you create a backup of the data on your Apple iPhone XS using iCloud.
Step 2: After you have opened the Settings app, go to the General menu, then to the Reset menu, and finally to the Erase All Content and Settings option.
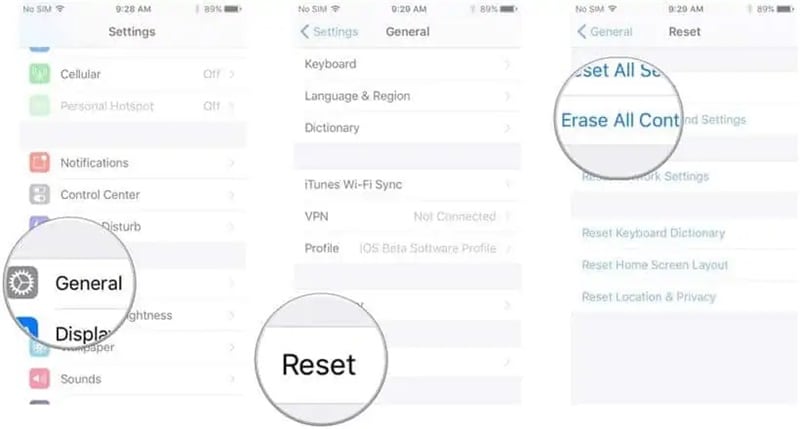
Step 3: Confirm that you want to reset your Apple iPhone XS to factory settings, and wait until it is done.
Step 4: Once the factory data reset is finished, you must restore your iCloud backup. To do this, follow the steps for setting up iOS until you reach the Apps & Data option.
Step 5: Create a new backup in iTunes and change the password for the existing backup in iTunes.
You should be aware that resetting the Apple iPhone XS device to factory settings will not make your encrypted backups accessible again.
On the other hand, it does make it possible for you to generate a fresh backup in iTunes that is not encrypted.
4. Dr.Fone-Screen Unlock
First step: After installing Dr.Fone on your device, please run the program and look for the red button labeled “Screen Unlock.”
Step 2: While in the interface for Screen Unlock, navigate to the bottom right of the screen and tap on the feature labeled “Remove iTunes BackUp Encryption.” This will allow you to proceed.
Step 3: When brought to this screen, please use a USB cord to connect your iOS device to your personal computer. If Dr.Fone can identify this relationship, the following picture will appear for you to see.
Please read the following three notes carefully before clicking the “Remove Now” button:
- Check to ensure that “Find My iPhone” is not turned on.
- During this procedure, you should not launch “iTunes.”
- During the process, your Apple iPhone XS will restart.

Step 4: If you have an iTunes backup, Dr.Fone may automatically verify it and delete it. This encryption will be removed once the percentage on the progress meter reaches the end. This procedure won’t take a lot of time at all.

Step 5: The encryption of the iTunes backup has been successfully erased! Your backed-up data may be quickly restored, transferred, wiped clean, and backed up again. Hence, you can enter the password to unlock your Apple iPhone XS backup never set in the first place!

The Bottom Line
There are four ways to fix the problem if iTunes keeps asking for your Apple iPhone XS backup password. The first method is to try all the passwords you use on your Apple iPhone XS. You can try finding the password from Keychain on macOS if this does not work. Another option is to “Reset All Settings” on your Apple iPhone XS.
Lastly, Dr.Fone-Screen Unlock is a program that can help you bypass the passcode and get into your backups. So, what are you waiting for? It’s time to avoid the problem of iTunes backup password never set.
How To Change Country on App Store for Apple iPhone XS With 7 Methods
Changing your App Store country can give you access to apps that are not available in your region. Whether getting region-specific apps, accessing exclusive content, or switching to a country with better app offerings, it’s a valuable capability.
The article below guides you through seven methods on how to change the country of your App Store.Following the guide ensures access to a world of apps and content tailored to your preferences. Keep reading the page below to achieve this.

Part 1. Pros and Cons of Changing Your App Store Country
Changing your App Store country on your Apple iPhone XS can offer various benefits, but it also comes with certain drawbacks. It’s necessary to consider the pros and cons before making this decision.
Pros
- **Access to Region-Specific Apps.**Different countries have unique apps tailored to their markets. By changing your App Store country, you can access apps that might not be available in your current region. For example, some popular Chinese and Japanese apps are unavailable in the US App Store. If you want to use these apps, you will need to change your App Store country.
- **Getting App Updates.**Sometimes, apps receive updates and features in certain regions before others. Changing your App Store country can give you early access to these updates, improving your app experience. For example, a gaming app might first release new levels or features in select countries.
- **Access Exclusive Content.**Some apps and content are exclusive to certain countries. By switching your App Store country, you can enjoy movies, music, or TV shows unavailable in your current region. For instance, certain Netflix shows are restricted to specific countries due to licensing agreements.
Cons
- **Loss of Access to Purchases.**If you’ve made purchases in your current App Store country, changing it can result in losing access to those purchases. The loss includes paid apps, in-app purchases, and subscriptions. For example, if you switch from the US to the UK store, you may lose access to US-specific subscriptions.
- **Offload Apps.**When you change your App Store country, your device may prompt you to offload apps that are not available in your new region. This can be inconvenient if you rely on specific apps for daily use. For instance, a banking app may be region-specific and unavailable in your new country.
- **Family Sharing Issues.**If you’re part of a Family Sharing group, changing your App Store country can affect the access and sharing of purchased apps and subscriptions. Family members may lose access to content tied to your previous country. For example, if you switch from the UK to the US store, your family members might no longer have access to UK-specific content.
Part 2. Different Methods to Change Your App Store Country
Changing your App Store country can be done through various methods. Below are different ways to achieve that, along with step-by-step instructions for each technique.
Method 1: Changing Apple ID Region via iPhone
It is the most common and straightforward way to change your App Store country. To do this, follow these steps:
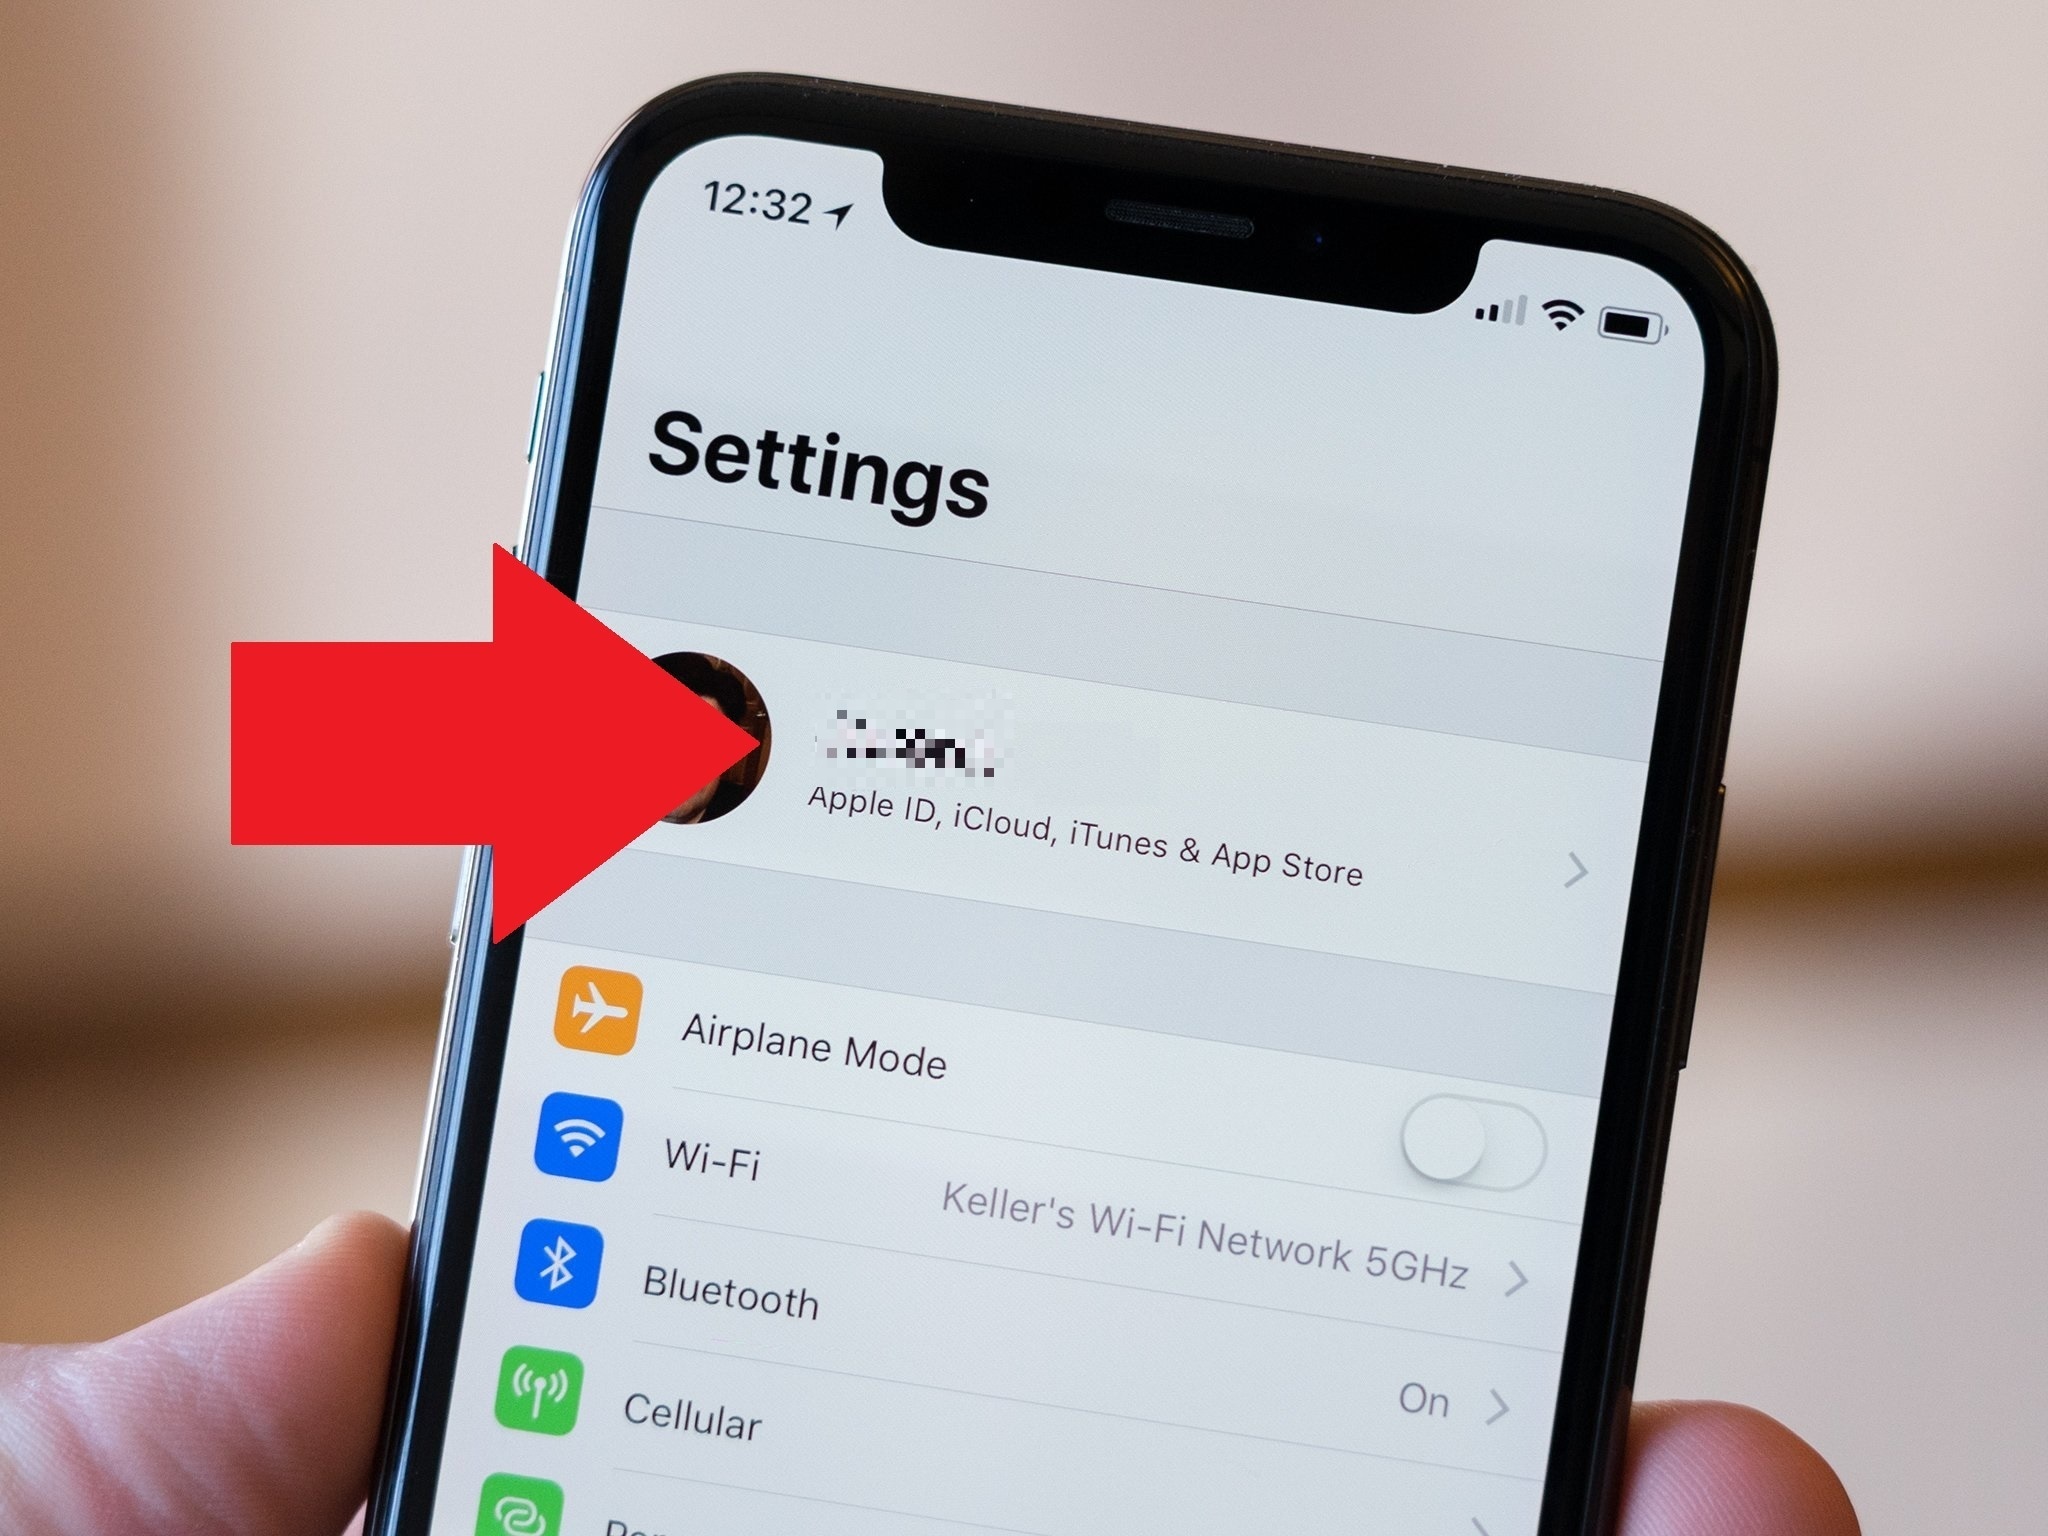
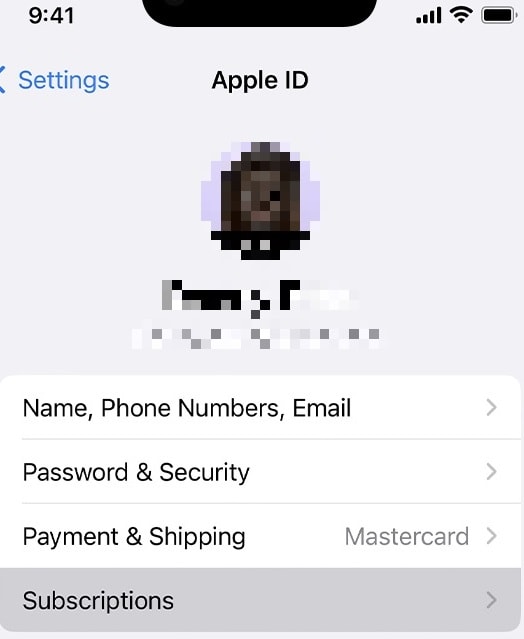
- Step 1: Open Settings on your Apple iPhone XS and tap your Apple ID at the top.
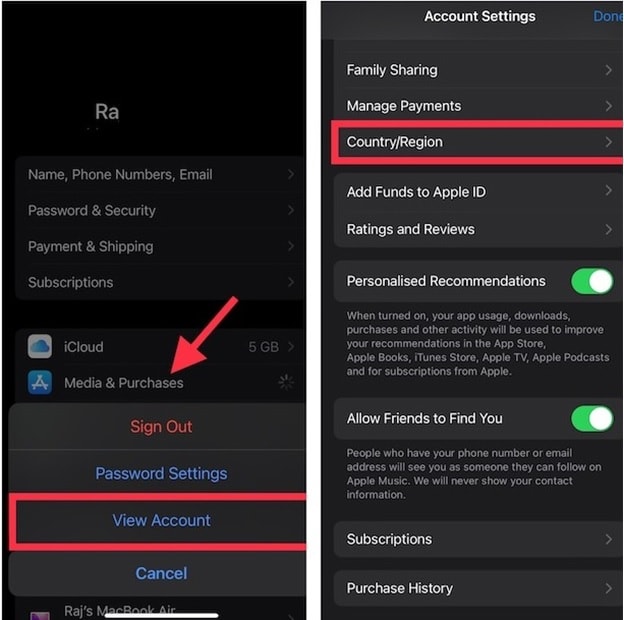
- Step 2: Tap on Media & Purchases > View Account. Sign in with your Apple ID. Next, Tap Country/Region > Change Country or Region and choose your desired country. Follow the on-screen prompts.
Method 2: Changing Apple ID Region via Mac/Windows
To change your Apple ID region via Mac/Windows, follow these steps:
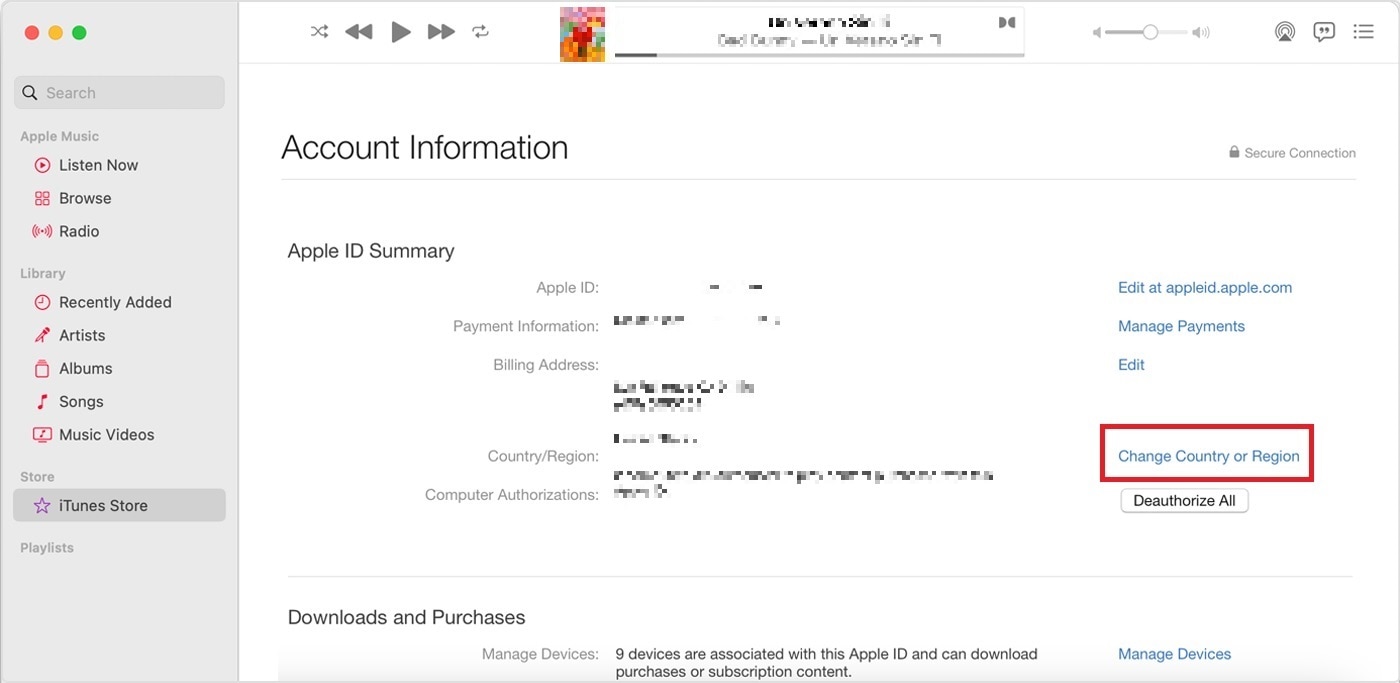
- Step 1: Open iTunes (on Windows) or Music (on Mac). Sign in with your Apple ID.
- Step 2: Go to Account > View My Account. Under Apple ID Summary, click Change Country or Region. Click your desired country and follow the instructions.
Method 3: Changing Apple ID Region via Web
The steps below are to change your Apple ID region via the web.
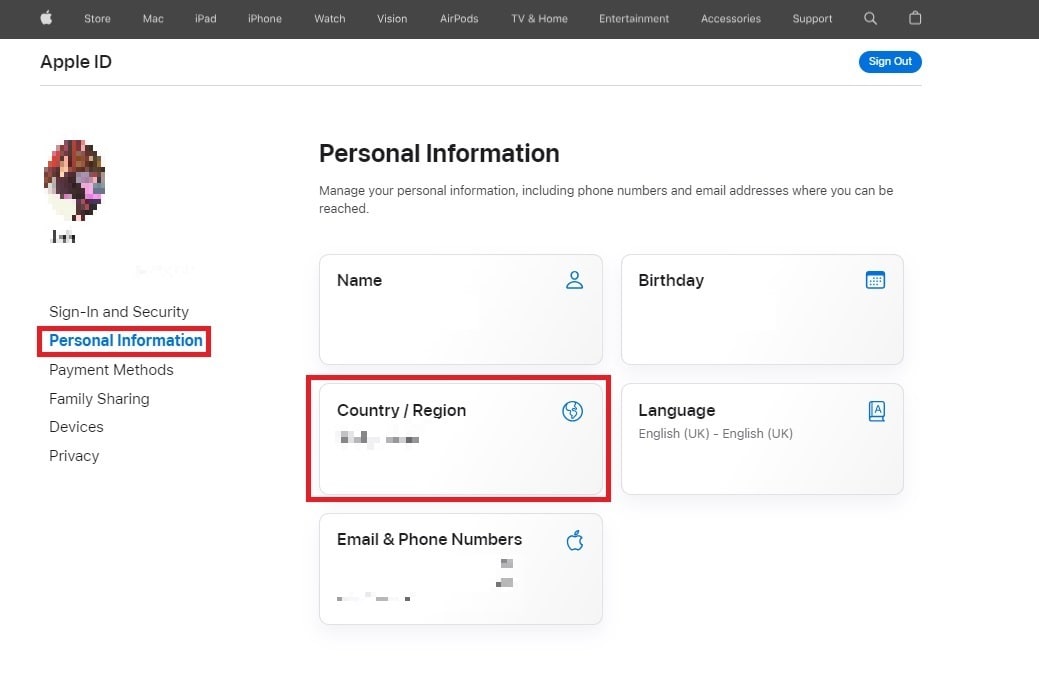
- Step 1: Open a web browser on your desktop or mobile device. Next, go to appleid.apple.com. Sign in with your Apple ID.
- Step 2: Under Personal Information, click the Country/Region button. Next, click the Change country or region and choose your preferred country.
Method 4: Leaving a Family-Sharing Group
If you’re part of a family sharing group, you need to leave the group before you can change your App Store country. To leave a family sharing group and change your app store country, follow the steps below.
- Step 1: Open the Settings app on your Apple iPhone XS and tap Family.
- Step 2: Tap your name and tap Stop Using Family Sharing. Once you have left the family sharing group, you can change your App Store country by following the aforementioned manners.

Method 5: Cancel All Subscriptions
If you have any subscriptions, you must cancel them before changing your App Store country. Here are the steps below.
- Step 1: Open Settings on your Apple iPhone XS. Next, tap your name at the top of the screen.
- Step 2: Tap Subscriptions > Cancel Subscription. Once you cancel all of your subscriptions, you can change your App Store country.
Method 6: Using a VPN
You can also use a VPN to change your App Store country. However, this method is not recommended, as it can be unreliable and may result in your account being banned. Here are the steps below.
- Step 1: Install a VPN app from the App Store.
- Step 2: Connect to a server in your desired country. Open the App Store and see content from the connected country.
Method 7: Creating a New Apple ID
Finally, you can create a new Apple ID account with the country you want your App Store country to be. Here are the steps below.
- Step 1: Sign out of your current Apple ID in Settings.
- Step 2: Create a new Apple ID with your desired country as the region.
Sometimes, changing your App Store country can lead to issues. It can lock you out of your Apple ID, or you’re forgetting your password. During these events, it can restrict your App Store access. In such cases, a tool like Dr.Fone - Screen Unlock (iOS) can come to the rescue.
Part 3. Changing Countries Not Going Your Way? Use Wondershare Dr.Fone – Screen Unlock
Dr.Fone - Screen Unlock (iOS) helps you regain access to your Apple ID and fix any login-related problems. It ensures that you can continue enjoying your App Store without any hindrance. It’s a safe and reliable software tool that is used by millions of people to unlock their devices. It is also easy to use, even if you are not tech-savvy.
Key Features
Dr.Fone - Screen Unlock (iOS) is a powerful tool that can help you to:
- **Unlock iOS Device Without Passcode.**Regain access to your locked iPhone or iPad without needing the passcode.
- **Remove All Lock Screen Types.**Versatile unlock support for 4-digit/6-digit passcodes, Touch ID, and Face ID lock screens.
- **Unlock Apple ID Without Password.**Effortlessly unlock your Apple ID without requiring the password, simplifying access.
How To Unlock Your Apple iPhone XS in Seconds
Dr.Fone’s Screen Unlock tool offers a streamlined solution to get you back into your device within seconds. Here’s a simple guide on how to do it.
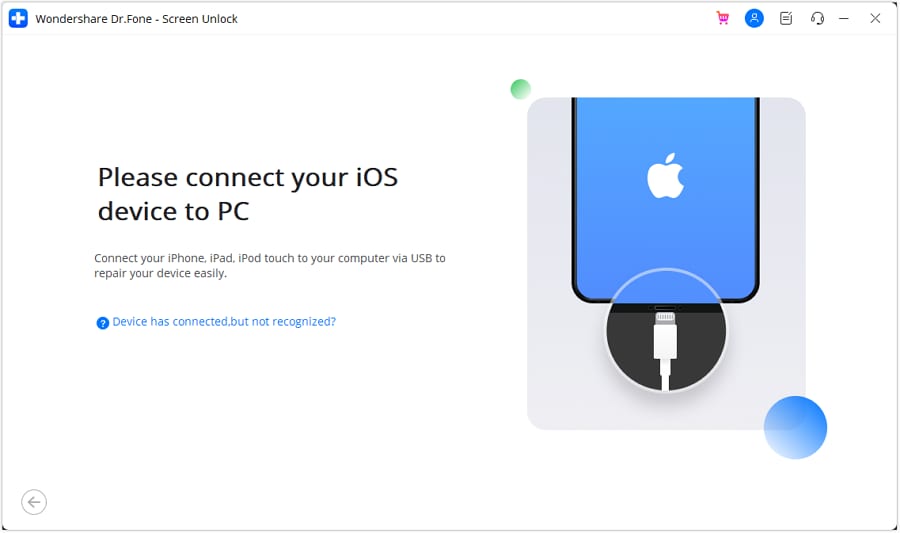
- Step 1: Download Dr.Fone - Screen Unlock (iOS) on your computer and install it. Next, launch the app.
- Step 2: Connect your locked Apple iPhone XS to your computer using a compatible USB cable. Afterward, click Start on the program. Follow the on-screen prompts on Dr.Fone. It will tell you to boot differently into DFU mode. Once your device enters DFU mode, Dr.Fone will present device details, including phone generation, iOS version, and more.
- Step 3: Dr.Fone will download the necessary firmware for your device. Follow the on-screen instructions to finish the unlocking process. Once done, Dr.Fone will remove the activation lock from your device.

Conclusion
Changing your App Store country can open doors to region-specific apps, exclusive content, and timely updates. However, it’s important to consider the potential drawbacks, such as losing previous purchases.
When changing the App Store country on your Apple iPhone XS, it’s important to consider Apple ID access issues. You never know when you will get locked out or suddenly forget your password. Wondershare Dr.Fone - Screen Unlock (iOS) offers a reliable solution during these instances. The tool ensures uninterrupted access to your App Store and Apple ID account, making it a valuable resource for managing your digital experience seamlessly.
Also read:
- In 2024, 3 Ways to Erase iPhone 15 Pro Max When Its Locked Within Seconds | Dr.fone
- How to Unlock Your Apple iPhone 8 Passcode 4 Easy Methods (With or Without iTunes) | Dr.fone
- iPhone Is Disabled? Here Is The Way To Unlock Disabled Apple iPhone SE | Dr.fone
- In 2024, How to Fix iPhone 11 Pro Passcode not Working? | Dr.fone
- What Does Jailbreaking Apple iPhone 6s i Do? Get Answers here | Dr.fone
- In 2024, How To Change Country on App Store for iPhone 12 With 7 Methods | Dr.fone
- In 2024, Complete Guide on Unlocking Apple iPhone 12 Pro with a Broken Screen? | Dr.fone
- Apple iPhone 13 mini Asking for Passcode after iOS 17/14 Update, What to Do? | Dr.fone
- In 2024, How to Access Your Apple iPhone 14 Plus When You Forget the Passcode? | Dr.fone
- 7 Top Ways To Resolve Apple ID Not Active Issue For iPhone SE (2020) | Dr.fone
- In 2024, Disabled Apple iPhone SE How to Unlock a Disabled Apple iPhone SE? | Dr.fone
- How To Change Your Apple ID on iPhone 13 Pro Max With or Without Password | Dr.fone
- 7 Top Ways To Resolve Apple ID Not Active Issue For Apple iPhone SE (2020) | Dr.fone
- In 2024, Things You Should Know When Unlocking Total Wireless Of Apple iPhone 6 | Dr.fone
- Did Your Apple iPhone XR Passcode Change Itself? Unlock It Now | Dr.fone
- In 2024, Forgot iPhone 8 Plus Backup Password? Heres What to Do | Dr.fone
- How Many Attempts To Unlock Apple iPhone 7 Plus | Dr.fone
- Disabling iPhone 11 Parental Restrictions With/Without Password | Dr.fone
- How to Unlock iPhone 6 Plus with a Mask On | Dr.fone
- 5 Most Effective Methods to Unlock iPhone X in Lost Mode | Dr.fone
- How To Open Your Apple iPhone 14 Without a Home Button | Dr.fone
- In 2024, 7 Ways to Lock Apps on iPhone 14 Pro Max and iPad Securely | Dr.fone
- Resolve Your iPhone X Keeps Asking for Outlook Password | Dr.fone
- 7 Ways to Lock Apps on Apple iPhone 14 Plus and iPad Securely | Dr.fone
- In 2024, How To Change Your Apple ID on Apple iPhone 15 Pro Max With or Without Password | Dr.fone
- In 2024, Forgot Apple iPhone 6s Backup Password? Heres What to Do | Dr.fone
- Unlock Apple iPhone 12 With Forgotten Passcode Different Methods You Can Try | Dr.fone
- Everything You Need To Know About Unlocked iPhone 15 Plus | Dr.fone
- In 2024, How To Unlock A Found Apple iPhone 14 Pro Max? | Dr.fone
- How to Unlock Apple iPhone 6s Plus, Apples New iPhone | Dr.fone
- In 2024, Everything You Need To Know About Unlocked iPhone 14 Pro Max | Dr.fone
- Complete Guide on Unlocking Apple iPhone SE with a Broken Screen? | Dr.fone
- How to Remove and Reset Face ID on iPhone 8 Plus | Dr.fone
- In 2024, 4 Ways to Unlock Apple iPhone XS Max to Use USB Accessories Without Passcode | Dr.fone
- Complete Guide For Apple iPhone SE (2020) Lock Screen | Dr.fone
- In 2024, Reset iTunes Backup Password Of iPhone 14 Prevention & Solution | Dr.fone
- In 2024, 7 Ways to Lock Apps on Apple iPhone XS Max and iPad Securely | Dr.fone
- How to Unlock Disabled iPhone XS Max/iPad Without Computer | Dr.fone
- In 2024, How To Bypass the Required Apple Store Verification For Apple iPhone 6 | Dr.fone
- Trouble with iPhone 13 Pro Swipe-Up? Try These 11 Solutions | Dr.fone
- Easy Steps on How To Create a New Apple ID Account On iPhone 12 Pro | Dr.fone
- In 2024, Did Your iPhone 12 Passcode Change Itself? Unlock It Now | Dr.fone
- 3 Easy Ways to Factory Reset a Locked Apple iPhone 14 Pro Max Without iTunes | Dr.fone
- In 2024, Complete Guide on Unlocking iPhone 15 Pro Max with a Broken Screen? | Dr.fone
- Apple iPhone XR Asking for Passcode after iOS 17/14 Update, What to Do? | Dr.fone
- Full Tutorial to Bypass Your Vivo Y56 5G Face Lock?
- In 2024, How to Come up With the Best Pokemon Team On Vivo T2x 5G? | Dr.fone
- Full Guide to Hard Reset Your Tecno Pova 5 | Dr.fone
- In 2024, 9 Best Phone Monitoring Apps for Lava Blaze Pro 5G | Dr.fone
- In 2024, The Ultimate Guide How to Bypass Swipe Screen to Unlock on ZTE Blade A73 5G Device
- How to Unlock Vivo S18 Phone Password Without Factory Reset?
- In 2024, The Most Useful Tips for Pokemon Go Ultra League On Samsung Galaxy A25 5G | Dr.fone
- How To Restore Missing Contacts Files from G310.
- In 2024, Ultimate Guide from iPhone SE (2020) iCloud Activation Lock Bypass
- How To Track IMEI Number Of Realme 12 Pro 5G Through Google Earth?
- In 2024, Hassle-Free Ways to Remove FRP Lock from Infinix Note 30 Phones with/without a PC
- How to Unlock Nokia C22 Phone without Google Account?
- In 2024, How To Stream Anything From Gionee F3 Pro to Apple TV | Dr.fone
- Fake the Location to Get Around the MLB Blackouts on OnePlus Nord N30 5G | Dr.fone
- Issues playing MOV videos on Redmi 13C 5G
- How to Use Phone Clone to Migrate Your Honor Magic V2 Data? | Dr.fone
- In 2024, How Can I Use a Fake GPS Without Mock Location On Nokia 130 Music? | Dr.fone
- Samsung Galaxy M34 won’t play MKV movies
- Things You Dont Know About Infinix Hot 40 Pro Reset Code | Dr.fone
- How to Reset Vivo Y36 without Losing Data | Dr.fone
- In 2024, Top 4 SIM Location Trackers To Easily Find Your Lost Samsung Galaxy F04 Device
- How to Unlock Apple iPhone 14 Pro Passcode Screen?
- How To Revive Your Bricked Xiaomi 14 in Minutes | Dr.fone
- 9 Best Free Android Monitoring Apps to Monitor Phone Remotely For your Honor Play 7T | Dr.fone
- Updated Mac Movie Making Made Easy A Beginners Guide to Selecting the Right Software for 2024
- Title: In 2024, Unlocking Apple iPhone XS Lock Screen 3 Foolproof Methods that Actually Work | Dr.fone
- Author: Amelia
- Created at : 2024-04-30 17:48:09
- Updated at : 2024-05-01 17:48:09
- Link: https://iphone-unlock.techidaily.com/in-2024-unlocking-apple-iphone-xs-lock-screen-3-foolproof-methods-that-actually-work-drfone-by-drfone-ios/
- License: This work is licensed under CC BY-NC-SA 4.0.
