
iPhone Is Disabled? Here Is The Way To Unlock Disabled Apple iPhone 8 Plus | Dr.fone
iPhone Is Disabled? Here Is The Way To Unlock Disabled Apple iPhone 8 Plus
Part I: Is It Possible To Unlock A Disabled iPhone?
First things first, the short answer is yes. It is entirely possible to unlock a disabled iPhone and use it again. But there is a catch-all data on the Apple iPhone 8 Plus device that will be erased as the process wipes the Apple iPhone 8 Plus clean. There is no other way around it.
Part II: Unlock Disabled iPhone
Now, let us get to ways how to unlock disabled iPhone. How many ways are there? Well, you might get all sorts of information online, but there are only a handful of ways to unlock a disabled iPhone, which are listed here.
II.I: Unlock Disabled iPhone With Wondershare Dr.Fone
Of course, you want to unlock your disabled iPhone as quickly as possible, so we have put the best solution first - Wondershare Dr.Fone.
What is Dr.Fone? Dr.Fone is a suite of apps designed to help you with tasks on your smartphones and tablets. These tasks include erasing data, wiping the Apple iPhone 8 Plus device, repairing the system, taking and restoring backups, unlocking the screen, transferring WhatsApp chats, and even going as fancy as spoofing device location to help with location-aware games or prank friends and family.
This is a must-have set of tools designed for every smartphone owner, regardless of the operating system. It works on both Windows and macOS and supports both Android and iOS. Download Wondershare Dr.Fone here.
Step 1: Connect your device to the computer and select Screen Unlock in Dr.Fone.

Step 2: Click the big blue button “Unlock iOS Screen”:

Step 3: Onscreen instructions guide you to put your device in Recovery Mode:

Step 4: Software version and device model are detected automatically when the Apple iPhone 8 Plus device is in Recovery Mode. If the automatic detection is incorrect, set it correctly before proceeding. Click Start.

Step 5: When Dr.Fone is ready to unlock disabled iPhone, click Unlock Now and wait until the notification of a successful unlock is shown.

II.II: Unlock Disabled iPhone With iTunes/ macOS Finder
The above was a fast, intuitive, step-by-step way to get you through the unlock disabled iPhone process. This was an aftermarket app to help you through the process. However, if you want to achieve the same result the Apple way, do the following:
Step 1: Connect the Apple iPhone 8 Plus to the computer with the cable and launch iTunes or Finder (macOS Catalina and above).
Step 2: Press the volume up key on your Apple iPhone 8 Plus and release. Then, press the volume down key and release. Lastly, press and hold the power key till you see Recovery Mode in Finder or iTunes.
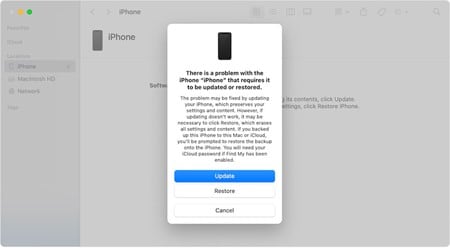
Step 3: Click Restore to unlock disabled iPhone.
After this process, the Apple iPhone 8 Plus is reset to factory defaults, and you will need to go through the setup process again.
II.III: Unlock Disabled iPhone Through The iCloud Website (Find My iPhone)
You may also use Find My on the iCloud website to unlock your disabled iPhone, if the Find My network was enabled on the iPhone.
Step 1: Go to https://icloud.com and log in using the iCloud/ Apple ID that the disabled iPhone is using. This is important because if you use any other ID, you will see devices attached to that ID, not the disabled iPhone you want to unlock.
Step 2: Click Find My and select your disabled iPhone.
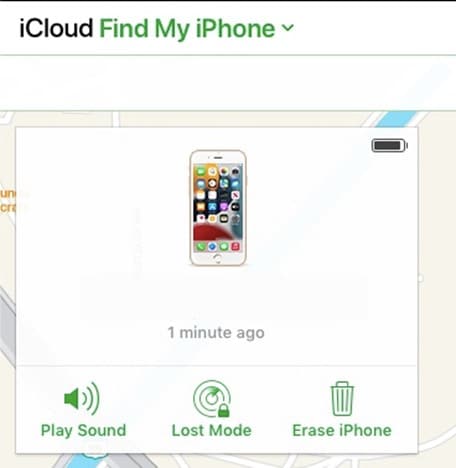
Step 3: Click Erase iPhone and confirm.
The Apple iPhone 8 Plus will be erased and restored to factory default settings. After that, you will have to set up the Apple iPhone 8 Plus again.
II.IV: Unlock Disabled iPhone Without A Computer (Find My App)
Not so long ago, a computer was a necessity in every household for various reasons. Then, smartphones changed everything, and Apple spearheaded that change with the Apple iPhone 8 Plus and iPad.
The iPhone, despite screen size limitations, may be used as a personal computer all by itself, depending on users’ requirements. You can work on spreadsheets, documents, and presentations on the iPad, take notes, write, draw, play music, watch videos, and practically do everything a regular household would do on a computer.
So, in today’s time and age, it may be possible that some people work exclusively with their iPhones and iPads. In that case, how to unlock a disabled iPhone without a computer?
Worry not, because Apple’s Find My is your friend. You can use Find My on your other Apple device to erase and unlock the disabled iPhone.
Step 1: Launch Find My app on your iOS device or Mac. Note that the other device should be signed in with the same Apple ID as the disabled iPhone. If not, you may sign out of iCloud on the Apple iPhone 8 Plus device and sign in using the other Apple ID (of the disabled iPhone).

Step 2: Select the disabled iPhone from the Apple iPhone 8 Plus devices in the sidebar, click or tap the Apple iPhone 8 Plus device on the map and click or tap Erase This Device.
The disabled iPhone will be wiped and restored to factory defaults. The setup will need to be performed again.
Now, as we know, if Find My does not show the disabled iPhone for any reason, you will necessarily have to gain access to a computer. The other option is to visit an Apple Store and get them to do the needful.
Part III: FAQs
Here are helpful frequently asked questions for you.
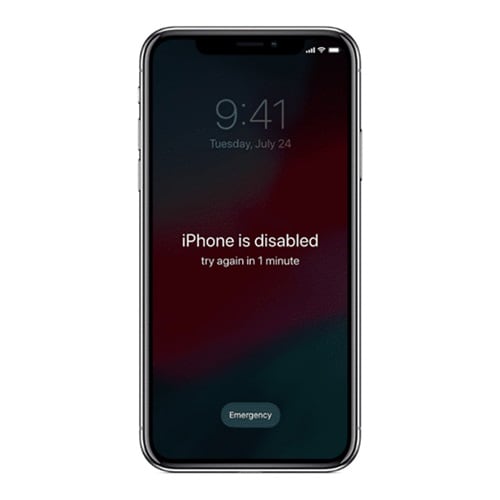
FAQ 1: What is iPhone disabled?
iPhone is disabled most commonly when an incorrect password is entered too many times.
FAQ 2: Can I unlock disabled iPhone without data loss?
Unlocking a disabled iPhone requires erasing the Apple iPhone 8 Plus device. All data on the Apple iPhone 8 Plus device will be deleted in the process. There is currently no way to unlock disabled iPhone without data loss.
FAQ 3: How to restore data via iCloud?
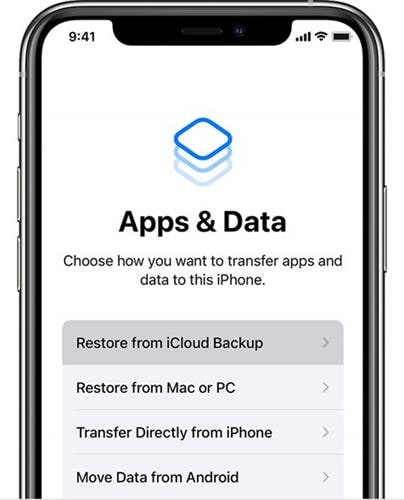
After unlocking the disabled iPhone, when you set it up again, if you previously had iCloud Backup enabled, you will get the option to restore data from the latest backup.
Bonus Tip: Prevent iPhone From Getting Disabled In Future
By now, you know that should the Apple iPhone 8 Plus be disabled for any reason, unlocking the disabled iPhone is a process that will wipe the Apple iPhone 8 Plus device clean. And that means you will have to spend time setting it up again, restoring data from backup, and getting it back to the order you had previously. How about a tip to help you prevent a disabled iPhone?
A good passcode is one that you will remember, but it takes work for everyone to figure out. Again, this is for the safety and security of your data and device. You may use a 6-digit passcode or an alphanumeric passcode if that is more to your liking.
If you use Face ID, it will significantly minimize the instances you will have to enter your passcode, so make sure you do remember your passcode.
Conclusion
It has been nearly a decade since iPhones came with biometric authentication and around 5 years since they started using facial authentication. Both these technologies significantly reduced our dependence on having to key in our passcode each time we wanted to unlock the iPhone, buy an app, or perform an essential function.
But, when we attempt incorrect passcodes too many times, the Apple iPhone 8 Plus gets disabled. How to unlock disabled iPhone? The ways outlined in this guide will help you unlock your disabled iPhone.
How To Bypass the Required Apple Store Verification For Apple iPhone 8 Plus
The Apple App Store is a familiar place for anyone with an iPhone or iPad. It’s where you find all sorts of useful and fun apps. However, one thing that can be a hassle is the store’s strict verification process. Every time you make a purchase, you need to go through this step.
It’s there for a good reason – to stop fraud – but it can get annoying, especially if you forget your Apple ID or have other issues. This article will explore the ways to stop the Apple Store “Verification Required” prompt, making your app downloading experience smoother.

Part 1: Why Does Apple Require Verification in the Apple Store?
When browsing the App Store on your Apple iPhone 8 Plus or iPad and looking to download the latest game or productivity tool, you might have noticed that Apple often asks for some form of verification before you can proceed with your purchase. This is not just a random step; there’s a solid reason behind it.
The primary reason Apple requires verification for App Store purchases is to ensure that you are the person authorizing the purchase. This security measure prevents unauthorized transactions and protects your account from fraud.
What does this verification usually involve? It could be entering your Apple ID password or using Face ID or Touch ID if your device supports these features. These methods are designed to confirm your identity quickly and securely.

Reasons Why the Verification Required Message Might Appear
There are several reasons why you might see an Apple Store’ Verification Required’ message when trying to download an app or make a purchase:
- New Apple ID. If you’ve just created a new Apple ID and need to download or pay for apps, Apple must verify your payment information. Thus, you’ll have to prove everything, especially on a new phone.
- **Payment method needs to be corrected.**Suppose there’s an issue with your Apple ID’s payment method, such as outdated or incorrect details. In that case, verification is required to ensure the account is secure and ready for transactions.
- Invalid credit card. Unsupported or invalid credit cards can trigger the verification notice, as Apple can’t process payments with these cards.
- Unpaid balance. If there’s an outstanding balance on your Apple ID, you can download or pay for new apps once this balance is cleared.
- Family Sharing restrictions. For those using Family Sharing, if the family organizer has placed restrictions on your account, this could result in a verification prompt.
Understanding these reasons is the first step in addressing the ‘Verification Required’ message. It’s not just a random or annoying hurdle; it’s there for your security and to ensure a smooth, safe experience when using the App Store.
Part 2: How To Fix Verification Required Prompt Using Apple ID
Having to deal with the ‘Verification Required’ prompt in the App Store can be a bit of a hassle, especially when you’re eager to get your hands on a new app or game. Fortunately, there are several methods you can use to resolve this issue, most of which are pretty straightforward and can be done right from your device. Here’s how to tackle it:
Update Payment Method
One of the most common reasons for the verification prompt is a problem with your payment method. To fix this, go to your Apple ID settings on your Apple iPhone 8 Plus or iPad. Tap your name at the top of the Settings app, then go to Payment & Shipping. You can update your payment information or add a new payment method here. Make sure the details are correct and up to date.
Check Unpaid Subscriptions
Sometimes, unpaid subscriptions can trigger the verification prompt. Tap the App Store > your profile icon, and select Subscriptions. Here, you can view all your subscriptions, active or expired. Check if there are any unpaid ones and clear any outstanding payments.

Don’t Require Password for Purchases
For less frequent purchases, you should change the settings so you don’t always have to enter your password. Go to Settings, then to Screen Time. Under Content & Privacy Restrictions, select iTunes & App Store Purchases. Here, you can change the settings to Don’t Require for purchases. However, be cautious with this method as it reduces security.

Sign Out of Apple ID and Re-Sign In
Sometimes, simply signing out of your Apple ID and then signing back in can resolve the issue. Go to the Settings app, tap your name at the top, and scroll down to Sign Out. After signing out, restart your device and then sign back in. This can help refresh your account settings and clear up any minor glitches.
Remember, these methods are about bypassing the verification process and ensuring your account is up-to-date and secure. Regularly checking your Apple ID settings and payment information can prevent many common issues with the App Store, including the frustrating ‘Verification Required’ prompt.
Part 3: How To Bypass Verification Required Prompt Without Apple ID
If you need to learn how to bypass the ‘Verification Required’ prompt in the App Store but don’t have access to the Apple ID or password, there’s an alternative approach using third-party software. One such tool that can assist in this situation is Wondershare Dr.Fone - Screen Unlock (iOS), which offers a feature specifically designed for this purpose.
Introducing Dr. Fone’s Screen Unlock (iOS) Feature
Dr.Fone - Screen Unlock (iOS) function includes an Apple ID remover tool. This feature is handy when you cannot remember your Apple ID or password but need to download apps from the App Store. Here’s a step-by-step guide on how to use this feature.
Step-by-Step Guide To Bypass Verification Without Apple ID With Dr.Fone
Here’s a complete guide on bypassing the verification required on the App Store.
Step 1: Install and open Wondershare Dr.Fone on your computer.
Step 2: Navigate to Toolbox and select Screen Unlock followed by iOS.
- Step 3: In the next window, choose Remove Apple ID to proceed.

- Step 4: A connectivity status will appear on the screen with your iOS device connected to the computer. Click Unlock Now to start the process.

- Step 5: Confirm if your iOS device has a screen lock and two-factor authentication enabled. This is crucial for the process to continue smoothly.

- Step 6: Follow the on-screen instructions to put your iOS device in Recovery Mode. If necessary, you can also opt for DFU Mode by following the provided instructions. Once in Recovery Mode, the tool will recognize your device model. You’ll need to select the correct system version to proceed.

- Step 7: The tool will download the appropriate iOS firmware for your device. After the download, it will verify the firmware.

- Step 8: After firmware verification, click Unlock Now. You’ll be prompted to enter a code for confirmation. Once entered, the unlocking process will begin.

- Step 9: You’ll receive a notification once the process is complete. You may try again if the process fails to succeed the first time.

Note: After Apple ID removal, you must re-enter a new Apple ID to access the App Store. Take note of the password now if you forgot your previous one.
Conclusion
In this article, you’ve learned how to remove ‘Verification Required’ in the App Store. The primary takeaway is to try solving the issue using your Apple ID, as this approach typically prevents data loss. However, if you’re in a tight spot without access to your Apple ID, Dr.Fone - Screen Unlock (iOS) offers a reliable alternative to bypass this hurdle.
While it’s an effective solution, always consider it a secondary option to safeguard your data. Additionally, Dr.Fone can be a handy tool for various other phone-related challenges, making it a useful resource for tackling different tech problems.
Tips: Are you searching for a powerful Screen Unlock tool? No worries as Dr.Fone is here to help you. Download it and start a seamless unlock experience!
How To Fix Apple iPhone 8 Plus Unavailable Issue With Ease
The Apple iPhone 8 Plus stands out as an impressive device that integrates technology and practicality. Nonetheless, even the most cutting-edge devices experience occasional setbacks. Among these, one major problem for iPhone users is the “iPhone Unavailable” message. This problem typically arises when many incorrect passcode attempts have locked the Apple iPhone 8 Plus device. It renders the Apple iPhone 8 Plus device inaccessible, displaying the “iPhone Unavailable” prompt.
Yet, worry not, for reliable methods exist to address this problem efficiently. In this guide, we’ll explore the best and proven techniques for how to fix iPhone unavailable. We will also walk you through step-by-step solutions and provide clear instructions to resolve your unavailable iPhone.

Part 1. iPhone is Unavailable: Explaining the Basics
The “iPhone Unavailable” issue is a distressing fix encountered by users. It occurs when their iPhone becomes unavailable with a black screen and inaccessible due to many incorrect passcode attempts. This problem arises as a security measure implemented by Apple. Its primary aim is to protect the data on the Apple iPhone 8 Plus device and deter unauthorized access.
The iPhone’s security mechanism typically activates after six wrong attempts. It starts with making the Apple iPhone 8 Plus unavailable for a specific period. The device becomes permanently locked when the incorrect code is entered consecutively for the 10th time. This lock manifests as the “iPhone Unavailable” message on the screen.
This acts as a shield against potential intruders trying to gain access by guessing or brute-forcing the passcode. However, this protective measure can affect users who forget their passcodes or insert incorrect entries mistakenly. For example, there are cases of children playing with the Apple iPhone 8 Plus device, leading to accidental key presses. All of this makes learning how to unlock the Apple iPhone 8 Plus unavailable an essential thing to learn.
Part 2. [Top Fix] Unlock iPhone Unavailable Without Lossing Data By Wondershare Dr.Fone
When faced with the “iPhone Unavailable” issue, the most common cause is forgetfulness. The other major cause is the accidental incorrect entries of the Apple iPhone 8 Plus device’s passcode. This predicament leaves users locked out of their iPhones and functionalities. Wondershare Dr.Fone emerges as a leading solution to tackle this frustrating problem.
It is designed to address various iOS-related issues, including unlocking disabled iPhones. Dr.Fone offers a user-friendly approach to regaining access to your device. The tool offers a smooth process that bypasses the locked screen, allowing users to regain entry into their iPhones. It can remove all screen locks like passcode, password, Touch ID, and Face ID.
Key Highlights of Wondershare Dr.Fone
- You can remove the iCloud activation lock swiftly and effortlessly with Dr.Fone’s iPhone unlocking function.
- It effectively bypasses the Apple ID lock permanently, irrespective of the activation of Find My/Find My iPhone on the Apple iPhone 8 Plus device.
- Fone empowers you to bypass MDM restrictions from your device without data loss or the necessity to jailbreak your device.
Steps To Unlock Your Apple iPhone 8 Plus Unavailable With Wondershare Dr.Fone
With Dr.Fone, even users with no tech prowess can easily unlock their devices. Below is the guide to iPhone unavailable how to fix using Wondershare Dr.Fone - Screen Unlock (iOS):
Here is a video for you to learn how to unlock your Apple iPhone 8 Plus screen:
- Step 1. Dr.Fone Installation and iOS Screen Unlock Setup
After installing Wondershare Dr.Fone onto your computer, launch it. Proceed by accessing “Toolbox,” followed by “Screen Unlock.” Now choose “iOS” as the Apple iPhone 8 Plus device type and choose the “Unlock iOS Screen” option. Click “Start” on the next screen to start the unlocking process for your iOS device.

- Step 2. iDevice Recovery Mode and Firmware Download
Afterward, place your iDevice into Recovery Mode by following the on-screen instructions. Then, the platform will detect the “Device Model” and showcase it. If necessary, change the model and choose the “System Version.” Once these adjustments are made, click on “Start “to continue. The next screen will display the download progress of the iOS firmware.
- Step 3. iOS Firmware Verification and Unlocking Confirmation
After ensuring the iOS firmware is downloaded and validated, you’re ready to proceed. To begin unlocking, click the “Unlock Now” button. This action will trigger a confirmation prompt asking you to enter the necessary code. Once entered, tap “Unlock” to advance to the last stage. Click the “Done” button to complete the process when your device is unlocked.

Tips: Are you searching for a powerful iPhone Unlock tool? No worries as Dr.Fone is here to help you. Download it and start a seamless unlock experience!
Part 3. How To Unlock iPhone Unavailable Using Find My
When encountering the Apple iPhone 8 Plus Unavailable issue, a method to regain access is Apple’s Find My feature. This method allows users to erase their device remotely and set it up again. Nevertheless, it’s important to emphasize that this procedure will delete all information on the Apple iPhone 8 Plus device while unlocking it. Below is a detailed, step-by-step guide on unlocking your Apple iPhone 8 Plus Unavailable using Find My:
- Step 1. Using a web browser, access the iCloud website and “Sign In” using your Apple ID and password. Once logged in, scroll down and click the “Find My” option on the website.

- Step 2. On the following screen, select the unavailable iPhone from the “All Devices” section on the left side. Once you access the Apple iPhone 8 Plus device options, tap the “Erase this Device” option. Afterward, follow the on-screen prompts to erase the Apple iPhone 8 Plus device completely.

Part 4. How To Unlock iPhone Unavailable Using Erase iPhone Feature
One potential solution to resolve the Apple iPhone 8 Plus Unavailable issue is the “Erase iPhone” feature. It is available for users running iOS 15.2 or higher via the Apple iPhone 8 Plus device itself. This method is straightforward but requires you to have your device’s Apple ID password. Using this method will result in all data deletion on your Apple iPhone 8 Plus. The following is how to unlock unavailable iPhone using Erase iPhone:
- Step 1. To begin, look for the “Erase iPhone” option in the bottom right corner of your Apple iPhone 8 Plus.

- Step 2. A prompt will appear on the screen, warning you about the data loss or trying again in 15 minutes. Here, tap “ Erase iPhone” again, and on the following screen, enter the Apple ID “Password.” This will kickstart the process of erasing your Apple iPhone 8 Plus, and it will become available.

Part 5. How To Unlock iPhone Unavailable Using Other Device
If another device uses the same Apple ID as your locked device, you can use it to unlock it. You can remotely erase the locked device using the Find My app on this trusted device. It’s important to note that this action necessitates your Apple ID credentials.
Moreover, it will result in deleting all data on the locked device. These are the steps to remove the “Unavailable” iPhone from another device:
- Step 1. Access the Find My app on your reliable iOS device and log in with your Apple ID details. Within the Find My interface, expand the “Devices” tab from the bottom side of the screen.

- Step 2. Within “Devices,” locate and select the “Unavailable” iPhone from the list of devices. Once you have selected the Apple iPhone 8 Plus device, choose “Erase This Device” from the available options after scrolling down.

- Step 3. Afterward, press the “Continue” button to confirm your choice. On the following screen, “Enter Phone Number” if needed and tap the “Erase” option at the top right corner. Next, write your “Apple ID password for verification purposes and again hit the “Erase” option to erase the Apple iPhone 8 Plus device quickly.

Part 6. How To Unlock iPhone Unavailable Using iTunes
Consider utilizing iTunes as a solution for the “iPhone Unavailable” issue. It involves the restoration of your device to its factory settings. While effective, note that it leads to complete data loss. Unlocking your Apple iPhone 8 Plus Unavailable via iTunes is detailed in the following step-by-step guide:
- Step 1. Make certain your computer has the most recent version of iTunes installed. Afterward, connect your Apple iPhone 8 Plus to it via a USB cable. To place your device into Recovery Mode, refer to the appropriate guide based on your Apple iPhone 8 Plus model.
- **For iPhone 8 or Later:**Press the Volume Up button momentarily, followed by the Volume Down button similarly. Press the Side button until the recovery mode screen is displayed.
- For iPhone 7 and 7 Plus: Simultaneously press the Volume Down and Sleep/Wake buttons and hold them until the recovery mode screen comes up.
- **For iPhone 6s and Earlier:**Simultaneously press the Home and Sleep/Wake buttons until the recovery mode screen emerges.

- Step 2. In iTunes, a notification will appear, signaling a problem with the Apple iPhone 8 Plus that needs to be updated or restored. Select the “Restore” option to commence the restoration procedure. This action will delete all data and configurations on the Apple iPhone 8 Plus and install the most recent iOS version.

Conclusion
In conclusion, several helpful methods exist for how to unlock unavailable iPhone. Various techniques offer solutions, including iTunes, Find My, and other device removal methods. Dr.Fone distinguishes itself as the most effective choice. This is due to its user-friendly interface and capability to bypass the lock, making it the optimal solution.
Also read:
- [New] 2024 Approved Mastering Video Cover Updates on Facebook
- [Updated] LG's UltraFine Vision A Thorough 4K Screen Evaluation
- Expertise Guide for Effective Text Overlays on Images
- Fixing HP Sound Card Problems on Windows 11, 8 & 7: Comprehensive Guide
- How Do You Unlock your iPhone 14 Plus? Learn All 4 Methods | Dr.fone
- How to Unlock iPhone 14 Plus with a Mask On | Dr.fone
- In 2024, How to Fix Apple iPhone 11 Passcode not Working? | Dr.fone
- In 2024, How to Fix when Apple Account Locked From Apple iPhone X?
- In 2024, How to use Pokemon Go Joystick on Realme C33 2023? | Dr.fone
- In 2024, iPhone 13 Pro Max Backup Password Never Set But Still Asking? Heres the Fix | Dr.fone
- In 2024, iPhone Is Disabled? Here Is The Way To Unlock Disabled Apple iPhone 8 Plus | Dr.fone
- Revitalize Your Content 3 Advanced Methods for Changing TikTok Backdrops
- Uncovering Reasons Behind Memory Issues in Windows Systems - Insights by YL Computing
- Title: iPhone Is Disabled? Here Is The Way To Unlock Disabled Apple iPhone 8 Plus | Dr.fone
- Author: Amelia
- Created at : 2025-02-27 07:55:59
- Updated at : 2025-03-03 21:29:18
- Link: https://iphone-unlock.techidaily.com/iphone-is-disabled-here-is-the-way-to-unlock-disabled-apple-iphone-8-plus-drfone-by-drfone-ios/
- License: This work is licensed under CC BY-NC-SA 4.0.