
Remove Device Supervision From your Apple iPhone XR | Dr.fone
Remove Device Supervision From your Apple iPhone XR
Supervising devices is a proven technique for companies to monitor their employees. With this, they keep track of their performance on all associated devices. If you’ve decided to leave an organization, ensure that you retain the Apple iPhone XR device’s ownership by removing supervision access. If you’re looking for a guide on how to remove device supervision from your Apple iPhone XR, you can find some effective methods here.

Part 1. Answering Top Queries About Removing Device Supervision From iPhone
Many questions often pop up in users’ minds when considering removing device supervision. This section unveils some top queries with authoritative answers before heading to the main guide:
|
You May Want to Ask
|
Authoritative Answer
|
| — | — |
|
1. Does removing device supervision impact the iPhone’s functionality?
|
Removing device supervision does not compromise the fundamental functionality of your Apple iPhone XR. It is important to note that any administrative restrictions or configurations will be lifted. However, it might result in losing access to specific apps related to that organization.
|
|
2. Can device supervision be reinstated after removal?
|
Device supervision can be re-applied by the designated supervisor or IT administrator. However, this process usually involves resetting the Apple iPhone XR device to its factory settings if needed.
|
|
3. What information can be accessed through device supervision on iOS?
|
Once user’s devices are supervised, organizations can conveniently check settings, apps, and accounts being managed. They can also apply extra restrictions such as disabling Apple Music or putting the Apple iPhone XR device into Single App Mode.
|
Part 2. Remove Device Supervision With Perfection Using Wondershare Dr.Fone - Screen Unlock
Undoubtedly, device supervision is the most reliable method for organizations to monitor connected devices and analyze reports. If you have left a company where the administrator supervises your iOS device, your device needs to be unsupervised. For this process, you can bypass the MDM lock on your iOS device through a reliable tool.
Here, Wondershare Dr.Fone stands tall to help out your ventures and provide executable techniques explaining how to remove supervision from iPhone. This tool allows you to bypass the MDM lock without data loss on your Apple iPhone XR using easy steps. Consequently, you can also use other advanced functions, such as removing lock screens and unlocking Apple ID in different instances.
Features of Wondershare Dr.Fone To Consider
- Wondershare Dr.Fone lets you bypass iCloud Activation Lock completely and set a new Apple ID on the Apple iPhone XR device.
- This tool is compatible with all iOS devices, even iOS 17, and helps users experience creative features.
- Users can remove iTunes backup encryption by changing the encryption setting without losing data.
Step-by-Step Guide to Remove MDM Lock Using Wondershare Dr.Fone
Wondershare Dr.Fone provides the simplest method to remove the MDM lock and bypass device supervision access. Here is a comprehensive step-by-step guide to help users remove supervision from iPhones.
- Step 1. Initiate and Proceed With the Screen Unlock Feature
First, launch Wondershare Dr.Fone on the computer and connect it to your Apple iPhone XR. Move into the “Toolbox” tab and select the “Screen Unlock” function.

- Step 2: Select iOS and Head To Unlock MDM
After that, choose “iOS” as the Apple iPhone XR device type to open the related tool. Once the tool starts working, select the “Unlock MDM iPhone” option from the list.

- Step 3. Select Remove MDM Function To Start the Process
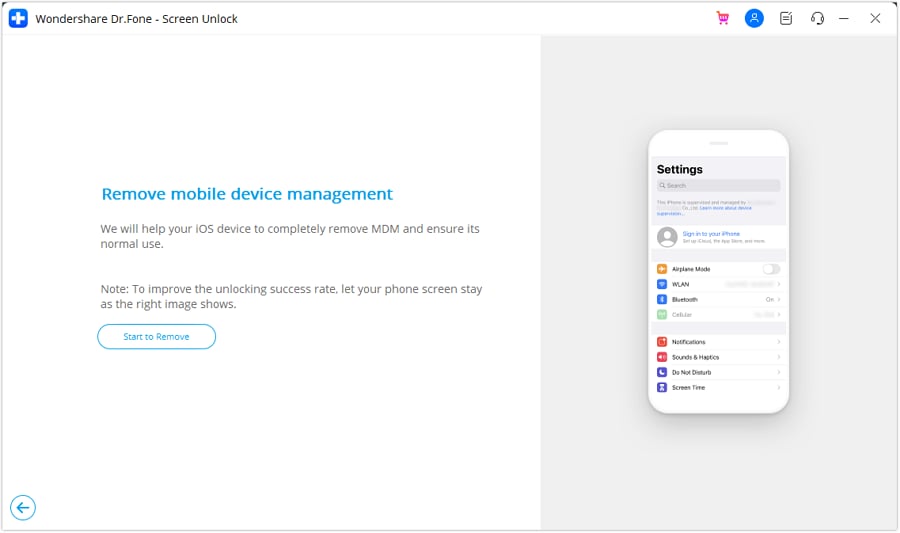
On the next screen, you will see two options, “Bypass MDM” and “Remove MDM.” Select “Remove MDM” and hit the “Get Start” button. After that, you will be taken to another screen where you need to tap on “Start to Remove” to execute the process.
- Step 4. Disable Find My Feature and Complete the Process
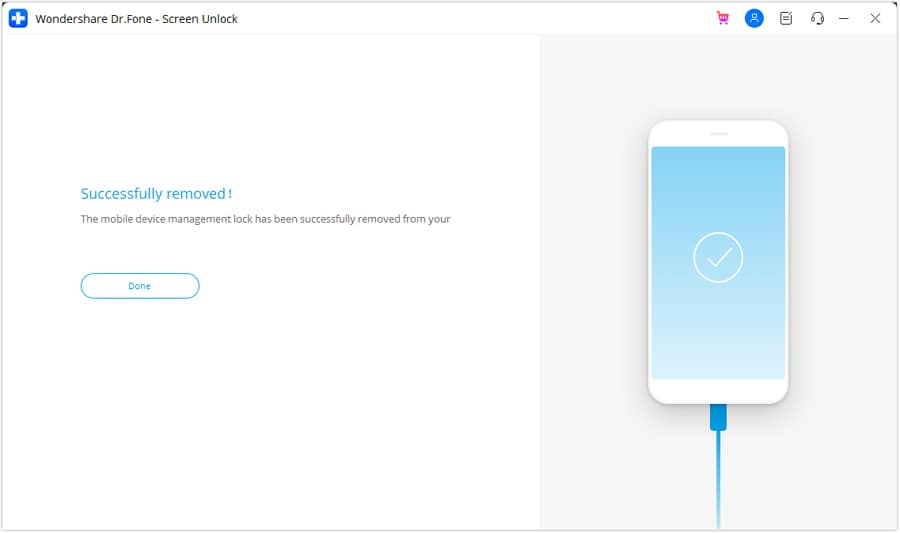
A prompt will pop up stating that you need to turn off the Find My feature on your iOS device. For this, open your device “Settings” and choose the “iCloud” option. Lastly, disable the “Find My iPhone” feature and hit the “OK” button. Wait a few seconds to complete the process and click “Done” to conclude the MDM removal process.
Part 3. Easy Removal of Device Supervision From Settings
Looking for other conventional methods about how to remove supervision from iPad or iPhone? If you wish to perform such actions, you can access some options in your Apple iPhone XR settings. However, to utilize this method, you should know the login information and password of the Apple iPhone XR device. If you have them with you, follow the given steps to remove device supervision from iPhone settings:
- Step 1. Initially, open the “Settings” and move into the “General” section. After that, select the “VPN & Device Management” option to see which MDM profiles supervise your iOS device.

- Step 2. Select the MDM profile you want to remove and tap on “Remove Management” to delete that profile from your iDevice. Then, you will be prompted to enter your login info or password and type your information to bypass supervision access.

Part 4. Using Apple Configurator 2 for Removing iPhone Supervision System
Apple Configurator is a free tool for Mac users that provides a simple technique for removing iPhone supervision. To use this method, you must have a password for the Apple iPhone XR device; otherwise, you will need to contact the organization to get the necessary permissions. Below are easy steps about how to remove device supervision from iPad and iPhone through your Mac:
Instructions. First, download and launch the Apple Configurator tool on your Mac. Connect the iDevice to the Mac using a compatible USB-C cable. Click on “Actions” from the top bar of the tool. In the drop-down list, choose the “Advanced” option and select “Erase All Content and Settings” to remove iPhone device supervision. Enter your device password to start using your Apple iPhone XR normally.

Part 5. Directly Contact Administration for Removing Device Supervision
If you’ve forgotten the username and password of your management profiles, you cannot remove MDM profiles from iPhone settings. In that situation, you can only seek help from the company admin, as this iPhone is supervised and managed by them.
You can contact the administrator and share a valid reason why you want to remove supervision access. They can remove your device directly from their system or provide you with the correct password to proceed with the login process.
Conclusion
Removing device supervision is simple, but getting familiar with the safest method is necessary. Considering this, we have covered some techniques to bypass MDM locks on your iOS device. These can easily resolve your issue of how to remove device supervision from iPhone queries. Conclusively, Wondershare Dr.Fone is the recommended tool to bypass the MDM lock without data loss.
Tips: Are you searching for a powerful Screen Unlock tool? No worries as Dr.Fone is here to help you. Download it and start a seamless unlock experience!
How to Unlock Apple iPhone XR, Apple’s New iPhone
It has happened to all of us at some point in the other. The chances of it happening are notoriously higher when you just started using it. We are talking of passcodes on iPhones. Apple requires setting up a 6-digit passcode to use some features such as Face ID on your Apple iPhone XR. So, you thought it was a great idea to set up your new Apple iPhone XR with a new passcode, right? The only problem is that the 6 digits you thought are bulletproof and no one will be able to come up with them in relation to you, are not coming to you either. You forgot the newly set passcode, entered the incorrect passcode more times than the software was happy about, and the Apple iPhone XR is locked now. What to do? Read on.
Part I: Why Is Your Apple iPhone XR Locked?
There can be a few reasons why your Apple iPhone XR is locked, the primary ones being that you bought a second-hand Apple iPhone XR from someone who set it up with a passcode and decided it wasn’t for them and was nonchalant enough to sell it to you without removing the passcode from the Apple iPhone XR, or that you forgot the passcode to your new Apple iPhone XR and entered it incorrectly a few times. In any case, help is at hand.
We understand how frustrating it can be when your newly purchased Apple iPhone XR does not unlock because of a passcode entry issue, and all you want to do is get the screen unlocked. At Wondershare, we strive to create meaningful differences in the lives of the people that use our software and keeping that in mind, we have a solution for you to unlock your Apple iPhone XR passcode screen using Dr.Fone - Screen Unlock (iOS).
II.I Using Dr.Fone - Screen Unlock (iOS) to Unlock the Locked Apple iPhone XR
Dr.Fone - Screen Unlock (iOS)
Unlock iPhone/iPad Lock Screen Without Hassle.
- Simple, click-through, process.
- Unlock screen passwords from all iPhone and iPad.
- No tech knowledge is required, everybody can handle it.
- Supports iPhone XS (Max) / iPhone XR / iPhone X / 8 (Plus)/ iPhone 7(Plus)/ iPhone6s(Plus), iPhone SE and the latest iOS version fully!


4,395,217 people have downloaded it
Dr.Fone is a set of modules that make life easy for you. Any kind of problem you can think of, it is likely that Dr.Fone has a remedy for it ready in its arsenal. A locked Apple iPhone XR is no different. Here is how to use Dr.Fone - Screen Unlock (iOS) to unlock Apple iPhone XR passcode:
Step 1: Install Dr.Fone - Screen Unlock (iOS) on your computer.
Step 2: Connect your locked Apple iPhone XR to the computer.
Step 3: Launch Dr.Fone and select the Screen Unlock module.

Step 4: Select Unlock iOS Screen.

Step 5: Follow the on-screen instructions to boot the Apple iPhone XR in Recovery Mode. If for some reason you are unable to boot into Recovery Mode, there are instructions at the bottom to enter DFU mode.
Step 6: Dr.Fone will tell you the phone model and the software installed on it. If it is incorrect, use the dropdown lists to select the correct information.

Click Download to download the firmware file for your device.

Step 7: Select the firmware package after the download completes. After the download completes, you can click Unlock Now to start unlocking the Apple iPhone XR.
In a short while, your Apple iPhone XR will be unlocked. It is important to note that unlocking a locked Apple iPhone XR cannot be done without wiping data.
II.II How to Unlock Apple iPhone XR with Find My (iPhone)
Find My allows you to unlock your Apple iPhone XR remotely if you want to. So, if you have forgotten the passcode and are unable to unlock your Apple iPhone XR, there is a way you can unlock it using Find My. Doing this will wipe your data from the Apple iPhone XR device and set it up as new, though. Here is how to do that:
Step 1: If you have any other Apple device that is logged in with the same Apple ID as the Apple iPhone XR, you can launch Find My on that device. Else, you can visit https://icloud.com and log into the same iCloud account/ Apple ID as the locked Apple iPhone XR.
Step 2: Under Find My (or Find My iPhone if you are using the iCloud website), select your Apple iPhone XR and click Erase iPhone and confirm.
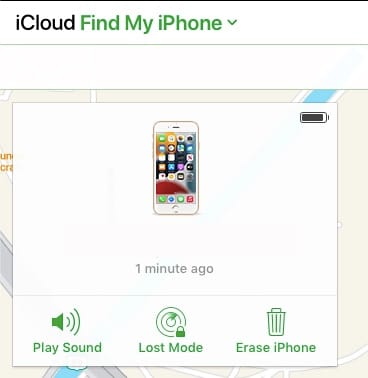
That’s it. You will have wiped and unlocked your Apple iPhone XR and it will start with factory settings. Note that this works only if the Apple iPhone XR was connected to Find My in the first place. If not, then you always have Dr.Fone - Screen Unlock (iOS) to help you out.
II.III Put The Apple iPhone XR in Recovery Mode
You can unlock your Apple iPhone XR using Recovery Mode, yourself.
Step 1: Connect your Apple iPhone XR to the computer and open iTunes. If you are on a Mac that runs macOS Catalina or higher, open Finder.
Step 2: Press the volume up button and let go. Press the volume down button and let go. Press the side button (power button) and keep holding it till Finder or iTunes detects the phone in Recovery Mode.
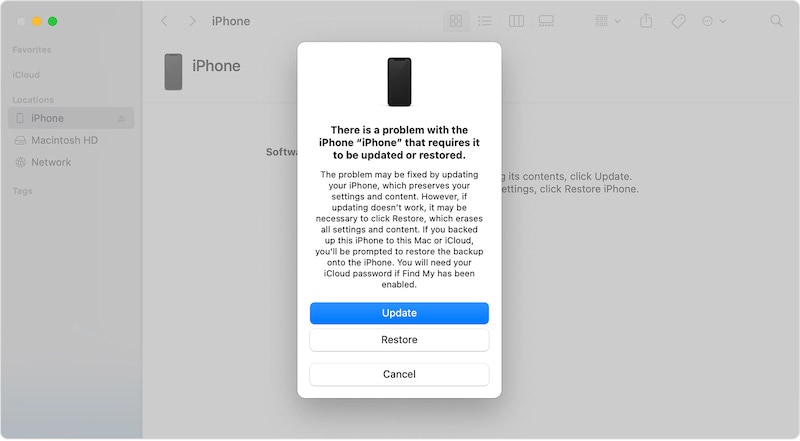
Step 3: Select Restore to download and reinstall the latest iOS on your Apple iPhone XR and unlock Apple iPhone XR.
Part III: How to Turn Off Passcodes in Apple iPhone XR
If after reading all this and going through so much hassle to unlock the Apple iPhone XR, you feel that passcodes are not worth your time, we feel you. We designed Dr.Fone to help you be at ease and be safe with passcodes for when you forget them, but if you would rather not use passcodes at all, we understand where you’re coming from. Here is how to turn off passcodes for good on Apple iPhone XR:
Step 1: Launch Settings.
Step 2: Scroll down to Face ID and Passcode.
Step 3: Enter your passcode.
Step 4: Scroll down and select Turn Passcode Off.
Step 5: Enter your passcode one last time.
You’re done. Now go ahead and forget the passcode forever. You will not need it again. Do note, however, that not using a passcode on your Apple iPhone XR leaves not only your data but your Apple iPhone XR itself in a highly vulnerable state. Anyone with access to your device can do anything on the Apple iPhone XR device that you could, including setting up a passcode that you will then have to use this guide to unlock.
Part IV: More information about Apple iPhone XR/Apple iPhone XR mini/Apple iPhone XR Pro
The ways mentioned before should help you get out of the locked Apple iPhone XR now. Here is a shortlist of the features of the Apple iPhone XR range. You may learn more information about Apple iPhone XR range that you may never know before.
5G Capability and Dual eSIM Support
The Apple iPhone XR range builds on the Apple iPhone XR 12 range for 5G capability by supporting more bands than the Apple iPhone XR 12 lineup. 5G modems are the same across the Apple iPhone XR lineup. the Apple iPhone XR lineup supports dual eSIM for the first time ever in iPhones. You do get a physical SIM tray for one nano-SIM though, so don’t sit up.
Cinematic Mode
You might be wondering if you will get the highlight Cinematic Mode if you were to pick the cheapest of the Apple iPhone XR lineup, that is, the Apple iPhone XR mini. The answer is yes, you will. All Apple iPhone XR models support Cinematic Mode.
Water Resistance and Charging
All Apple iPhone XR models feature the same IP68 water resistance (that is a depth of 6 meters for up to 30 minutes) and feature MagSafe charging. No differences here, except that the Apple iPhone XR mini is still capped at 12W charging with MagSafe, just like the Apple iPhone XR 12 mini was.
Part V: The Bottom Line
A locked Apple iPhone XR is never a pretty sight. Fortunately, there are a couple of things you can do to try and unlock your Apple iPhone XR and remove the passcode from your Apple iPhone XR. There is also Wondershare Dr.Fone - Screen Unlock (iOS) to unlock your Apple iPhone XR for you when you need help removing the passcode from your Apple iPhone XR and unlocking it.
How To Unlock Apple iPhone XR Without Swiping Up? 6 Ways
Part 1: What’s Swipe Up To Unlock on iPhone?
The Swipe Up Unlock function has been a fundamental aspect of iPhone functionality for a long time. It enables swift access to your phone by swiping upward from the screen’s bottom. This gesture grants entry to all your applications and data on your Apple iPhone XR. It was initially introduced to replace the physical Home button. However, it significantly simplified the user experience with iPhones.
It streamlined various tasks without the need for excessive button pressing. Moreover, its simplicity and speed became vital in how individuals utilized their iPhones. Yet, as preferences evolve, not everyone finds the exclusive Swipe Up Unlock feature appealing. Hence, exploring alternative methods to unlock your Apple iPhone XR is advisable.
Part 2: Why Do You Need To Swipe Up to Unlock on iPhone?
Swipe up to unlock the iPhone holds significant importance in its user interface and accessibility. This intuitive gesture serves as the primary means of gaining access to the Apple iPhone XR device. Here are several reasons why the Swipe Up to Unlock iPhone feature has been a cornerstone:
1. Simplicity and Ease of Use
The swipe gesture replaced the physical Home button, simplifying the unlocking process. Users could effortlessly swipe up from the bottom of the screen. It eliminates the need for pressing multiple buttons to access their devices.
2. Streamlined Navigation
Beyond unlocking the iPhone, the swipe gesture also allowed for quick navigation to the home screen. This streamlined access enabled users to jump straight into their apps, messages, or other functions.
3. Visual Aesthetics and User Experience
Apple’s design philosophy often revolves around clean, intuitive interfaces. The swipe up to unlock gesture aligns smoothly with this philosophy. It contributes to a visually appealing and user-friendly experience.
4. Security and Privacy
The gesture served as a security measure, preventing accidental or unauthorized access to the iPhone. Moreover, users can confidently rely on this unlocking method to safeguard their personal data.
Part 3: 6 Common Ways To Unlock iPhone Without Swiping Up
For an extended period, the primary method to unlock an iPhone involved swiping up. Nonetheless, if you wish to explore alternative methods, it’s entirely feasible. Various methods have emerged over time to open the Apple iPhone XR without swiping up.
Method 1: Unlock iPhone without Swiping Up with Enable Back Tap
With the debut of iOS 14, Apple unveiled an innovative feature called Back Tap. It provides users with a method to engage with their iPhones by tapping the Apple iPhone XR device’s rear surface. This innovative functionality can be configured to perform various actions. It includes unlocking the phone without a swiping-up gesture. Follow these steps to set up and use the Back Tap feature for unlocking your Apple iPhone XR:
Step 1. To start, access the “Settings” on your iOS device. Once there, scroll down until you locate the “Accessibility” option and tap on it. On the following screen, select “Touch” to access Touch settings under the “Physical and Motor” section.

Step 2. On the following screen, scroll down to the bottom and press “Back Tap.” Now, either choose “Double Tap” or “Triple Tap” and select “Lock Screen” from the options under the “System” section.

Method 2: Unlock iPhone Without Swiping Up Using iPhone Screen Unlocker: Dr.Fone - Screen Unlock
If you’ve forgotten the passcode for your Apple iPhone XR and are unable to access it anymore, there is no need to panic. We have the perfect tool for you that can unlock any lock on your screen in a few moments. The tool we are talking about is Wondershare Dr.Fone - Screen Unlock (iOS) , an industry leader in smartphones. Dr.Fone, a pioneering tool for iOS lock screen removal, assists in unlocking various iPhone/iPad/iPod touch lock screens.
Dr.Fone - Screen Unlock (iOS)
Unlock iPhone Without Swiping Up!
- Simple, click-through, process.
- Unlock screen passwords from all iPhones and iPads.
- No tech knowledge is required, everybody can handle it.
- Supports iPhone 15 /iPhone 14 /iPhone 13, iPhone 12, … and the latest iOS version fully!
4,395,218 people have downloaded it
It can handle 4-digit / 6-digit passcodes, custom numeric codes, alphanumeric passcodes, Face ID, Touch ID, Screen Time Passcodes, and more within minutes. Wondershare Dr.Fone also offers a swift and simple iCloud activation lock removal feature within its iPhone unlocking capabilities.
Key Features of Wondershare Dr.Fone
- Capable of bypassing Mobile Device Management (MDM) and Screen Time restrictions without causing any data loss.
- Compatible with iOS 17/iPadOS 17 and iPhone 15, ensuring its functionality with the latest Apple OS.
- Offers a simple 3-step procedure, making it accessible even for users without technical expertise.
Steps To Unlock iPhone Without Swiping Up Using Wondershare Dr.Fone
Here is how to open your Apple iPhone XR without swiping up with the help of Wondershare Dr.Fone:
Step 1: Navigate to Unlock iOS Screen
Download and install Wondershare Dr.Fone on your computer. Go to “Toolbox,” tap “Screen Unlock,” and finally choose “iOS” to access the screen unlock tools. Once the window appears, choose the “Unlock iOS Screen” button to proceed with unlocking your iOS device’s screen. In the following screen, click “Start” to begin the process of unlocking your iOS device.
Step 2: Initiate the iDevice into Recovery Mode
After this step, enter Recovery Mode on your iDevice by following the specific on-screen instructions. Once your iDevice is in Recovery Mode, the system automatically identifies and displays the “Device Model.” You can make adjustments to the model if necessary and choose the “System Version” as per your needs. When finished, click on “Start” to initiate the unlocking process for your device’s screen.
Step 3: Successfully Unlock Your Locked iPhone
The screen will showcase the download progress of the iOS firmware on the platform. Once the iOS firmware download is completed, it undergoes verification. Proceed by selecting the “Unlock Now” button to initiate the unlocking process. A prompt window will appear, requesting confirmation for the process. Enter the necessary code and tap on “Unlock” to proceed. Upon successful unlocking of the iDevice, click “Done” to complete the process.

Method 3: Unlock the Apple iPhone XR Without Swiping Up via Touch ID/Face ID
Apple’s advanced biometric authentication systems, Touch ID and Face ID, are also reliable options. These offer smooth and secure methods to unlock the Apple iPhone XR 11 without swiping up. The following are the models that support Touch ID and Face ID:
Models with Touch ID
- iPhone SE (2022)
- iPhone SE (2020)
- iPhone SE (2016)
- iPhone 8 Plus
- iPhone 8
- iPhone 7 Plus
- iPhone 7
- iPhone 6s Plus
- iPhone 6s
- iPhone 6 Plus
- iPhone 6
- iPhone 5s
Models with Face ID
- iPhone 15 Pro Max
- iPhone 15 Pro
- iPhone 15 Plus
- iPhone 15
- iPhone 14 Pro Max
- iPhone 14 Pro
- iPhone 14 Plus
- iPhone 14
- iPhone 13 Pro Max
- iPhone 13 Pro
- iPhone 13 mini
- iPhone 13
- iPhone 12 Pro Max
- iPhone 12 Pro
- iPhone 12 mini
- iPhone 12
- iPhone 11 Pro Max
- iPhone 11 Pro
- iPhone 11
- iPhone XS Max
- iPhone XS
- iPhone XR
- iPhone X
Method 4: Unlock Your Apple iPhone XR Without Swiping Up via AutoUnlockX
AutoUnlockX is a tweak designed for jailbroken iPhones. It enhances the Apple iPhone XR device’s unlocking experience by automatically bypassing the lock screen. That is when certain conditions are met. Jailbreaking involves bypassing the software restrictions imposed by Apple. Here are the steps to iPhone 11 unlock screen without swiping:
Step 1. Begin by adding an external repository like Sileo or Cydia, which will serve as an emulator. Remember, it won’t be automatically added to your applications; you’ll need to do this manually. So, download the repository from the SparkDev website (it’s not available on the App Store). Head to the “Tweaks” tab, find “AutoUnlockX,” and download it to your device.
Step 2. Following this, go to “Sources” in your Apple iPhone XR’s Settings, select “Edit,” and manually add the external repo to Cydia or Sileo. Open Sileo or Cydia and navigate to the “Search” page. In the search bar, type “AutoUnlockX.” Once the tweak appears, select it, and then tap “Get (Sileo)” or “Install (Cydia).”
Step 3. Confirm the selected repo by tapping the “Confirm” option and allow the tweak to install. Once installed, tap “Restart SpringBoard” to complete the download. After your Apple iPhone XR resprings, proceed to enable AutoUnlockX.
Step 4. Open Settings, tap on “App,” and then select “AutoUnlockX.” Toggle on “Enable Auto Unlock.” Customize other settings as desired by tapping on them to turn them on or off.
Step 5. When finished, tap the “Respring” option at the bottom to apply your changes. At last, unlock your Apple iPhone XR using your Face ID effortlessly.
Method 5: Unlock iPhone Without Swiping Up via Voice Control
Utilizing Voice Control to unlock your Apple iPhone XR offers a hands-free approach to accessing your device. It is especially helpful for individuals with accessibility needs. There are situations where manual interaction might be challenging. Here’s a guide on how to set up and use “Voice Control” to unlock your Apple iPhone XR:
Step 1. Open the Settings app on your Apple iPhone XR and scroll down to tap “Accessibility.” On the following screen, press “Voice Control” to proceed further.

Step 2. To set up voice control, you need to ensure that the “Voice Control” option is toggled on. After activating Voice Control, use a voice command to unlock your device.

Method 6: Unlock iPhone Without Swiping Up with Switch Control
Utilizing Switch Control is an excellent accessibility feature on iOS devices. It allows users to interact with their iPhones using adaptive switches or the Apple iPhone XR device’s screen itself. Moreover, it can provide an alternative way to navigate the Apple iPhone XR and access the Home screen. You no longer have to rely solely on the conventional swipe gesture. Here is how you can set up switch control to iPhone swipe to unlock:
Step 1. Access your Apple iPhone XR’s Settings, then tap on “Accessibility.” Now find and select “Switch Control,” and within it, navigate to “Switches.” Now, tap “Add New Switch” and choose “Camera.”

Step 2. Set Left Head Movement and Right Head Movement separately to “Home.” This action will lock the screen when tilting your head left or right. Now go back to “Recipes” in Switch Control, select “Edit,” and delete all existing recipes.

Step 3. Set “Scanning Style” to “Single Switch Step Scanning” and adjust “Dwell Time” to the shortest duration. Then, turn off the remaining settings under Switch Control.

Step 4. Save your switch, return to Accessibility Settings, and locate “Accessibility Shortcut.” Now, set triple-clicking the side button to activate “Switch Control.” On the home screen, triple-click the Side button, as previously set, to activate the switch on your Apple iPhone XR. Now, lock the Apple iPhone XR screen and then wake the Apple iPhone XR device without looking at it.

Conclusion
To conclude, we have explored different ways to unlock iPhones without swiping up beyond just using the usual swipe-up method. We’ve talked about using your fingerprint or face to unlock, using voice commands or special controls. The swipe-up gesture on iPhones is great, but these other methods give you more options.
While these methods are helpful, there’s a software called Wondershare Dr.Fone that’s particularly useful for iPhone issues. It does things like recovering data, fixing problems with your phone, and unlocking it when you can’t get in. Dr.Fone has a feature called “Screen Unlock” that was specifically made to help with different ways of unlocking iPhones.
Also read:
- [New] 2024 Approved Mastering Quick Profile Retrieval on Facebook
- [New] 2024 Approved Mastery of Video Sharing A Guide to Utilizing Zoom on the YouTube Platform
- [New] QuickFireRecorder Firefox Plugin for 2024
- [Updated] In 2024, Innovative Approaches for Rising Through the Rankings
- [Updated] The Art of Creating Smooth Audio Cuts for 2024
- Complete Guide on Unlocking iPhone 15 Pro Max with a Broken Screen? | Dr.fone
- Fixing the Damaged Cache Problem on Windows Platforms - A Step-by-nStep Solution
- How to Unlock Disabled iPhone 14 Plus/iPad Without Computer | Dr.fone
- In 2024, Easy Steps on How To Create a New Apple ID Account On iPhone 11 | Dr.fone
- In 2024, The Ultimate Step-by-Step Guide to Uploading Videos on YouTube
- Solution Guide for TOTAL WAR: WARHAMMER II Game Malfunctions
- Trending Tracks A List of Popular Audio for Cutting-Edge Video Shorts
- What Does Jailbreaking iPhone 12 i Do? Get Answers here | Dr.fone
- Title: Remove Device Supervision From your Apple iPhone XR | Dr.fone
- Author: Amelia
- Created at : 2025-02-13 23:08:31
- Updated at : 2025-02-15 05:27:53
- Link: https://iphone-unlock.techidaily.com/remove-device-supervision-from-your-apple-iphone-xr-drfone-by-drfone-ios/
- License: This work is licensed under CC BY-NC-SA 4.0.