
Remove Device Supervision From your iPhone 14 Pro | Dr.fone
Remove Device Supervision From your Apple iPhone 14 Pro
Supervising devices is a proven technique for companies to monitor their employees. With this, they keep track of their performance on all associated devices. If you’ve decided to leave an organization, ensure that you retain the Apple iPhone 14 Pro device’s ownership by removing supervision access. If you’re looking for a guide on how to remove device supervision from your Apple iPhone 14 Pro, you can find some effective methods here.

Part 1. Answering Top Queries About Removing Device Supervision From iPhone
Many questions often pop up in users’ minds when considering removing device supervision. This section unveils some top queries with authoritative answers before heading to the main guide:
|
You May Want to Ask
|
Authoritative Answer
|
| — | — |
|
1. Does removing device supervision impact the iPhone’s functionality?
|
Removing device supervision does not compromise the fundamental functionality of your Apple iPhone 14 Pro. It is important to note that any administrative restrictions or configurations will be lifted. However, it might result in losing access to specific apps related to that organization.
|
|
2. Can device supervision be reinstated after removal?
|
Device supervision can be re-applied by the designated supervisor or IT administrator. However, this process usually involves resetting the Apple iPhone 14 Pro device to its factory settings if needed.
|
|
3. What information can be accessed through device supervision on iOS?
|
Once user’s devices are supervised, organizations can conveniently check settings, apps, and accounts being managed. They can also apply extra restrictions such as disabling Apple Music or putting the Apple iPhone 14 Pro device into Single App Mode.
|
Part 2. Remove Device Supervision With Perfection Using Wondershare Dr.Fone - Screen Unlock
Undoubtedly, device supervision is the most reliable method for organizations to monitor connected devices and analyze reports. If you have left a company where the administrator supervises your iOS device, your device needs to be unsupervised. For this process, you can bypass the MDM lock on your iOS device through a reliable tool.
Here, Wondershare Dr.Fone stands tall to help out your ventures and provide executable techniques explaining how to remove supervision from iPhone. This tool allows you to bypass the MDM lock without data loss on your Apple iPhone 14 Pro using easy steps. Consequently, you can also use other advanced functions, such as removing lock screens and unlocking Apple ID in different instances.
Features of Wondershare Dr.Fone To Consider
- Wondershare Dr.Fone lets you bypass iCloud Activation Lock completely and set a new Apple ID on the Apple iPhone 14 Pro device.
- This tool is compatible with all iOS devices, even iOS 17, and helps users experience creative features.
- Users can remove iTunes backup encryption by changing the encryption setting without losing data.
Step-by-Step Guide to Remove MDM Lock Using Wondershare Dr.Fone
Wondershare Dr.Fone provides the simplest method to remove the MDM lock and bypass device supervision access. Here is a comprehensive step-by-step guide to help users remove supervision from iPhones.
- Step 1. Initiate and Proceed With the Screen Unlock Feature
First, launch Wondershare Dr.Fone on the computer and connect it to your Apple iPhone 14 Pro. Move into the “Toolbox” tab and select the “Screen Unlock” function.

- Step 2: Select iOS and Head To Unlock MDM
After that, choose “iOS” as the Apple iPhone 14 Pro device type to open the related tool. Once the tool starts working, select the “Unlock MDM iPhone” option from the list.

- Step 3. Select Remove MDM Function To Start the Process
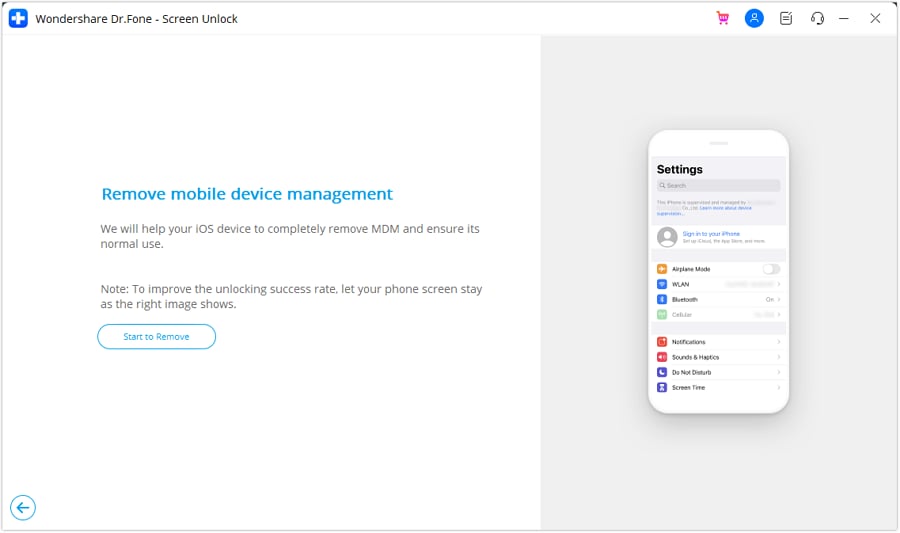
On the next screen, you will see two options, “Bypass MDM” and “Remove MDM.” Select “Remove MDM” and hit the “Get Start” button. After that, you will be taken to another screen where you need to tap on “Start to Remove” to execute the process.
- Step 4. Disable Find My Feature and Complete the Process
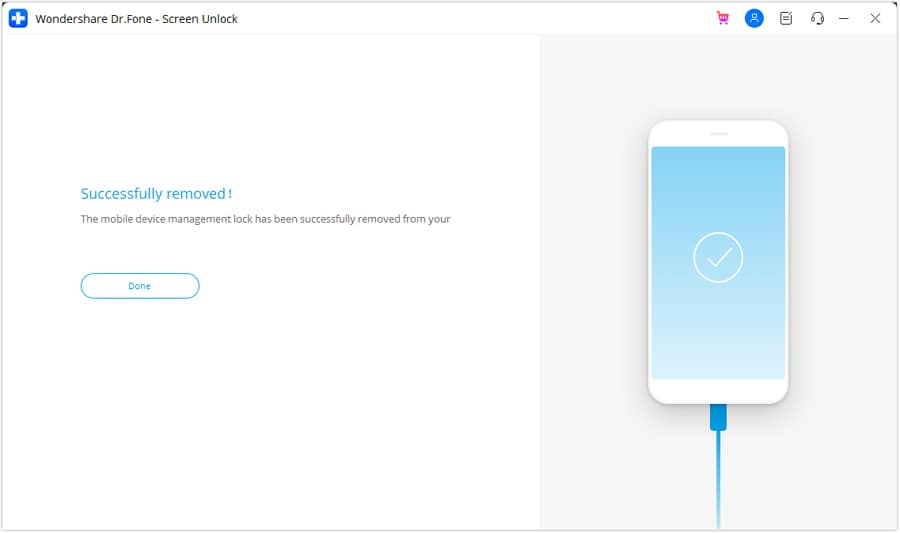
A prompt will pop up stating that you need to turn off the Find My feature on your iOS device. For this, open your device “Settings” and choose the “iCloud” option. Lastly, disable the “Find My iPhone” feature and hit the “OK” button. Wait a few seconds to complete the process and click “Done” to conclude the MDM removal process.
Part 3. Easy Removal of Device Supervision From Settings
Looking for other conventional methods about how to remove supervision from iPad or iPhone? If you wish to perform such actions, you can access some options in your Apple iPhone 14 Pro settings. However, to utilize this method, you should know the login information and password of the Apple iPhone 14 Pro device. If you have them with you, follow the given steps to remove device supervision from iPhone settings:
- Step 1. Initially, open the “Settings” and move into the “General” section. After that, select the “VPN & Device Management” option to see which MDM profiles supervise your iOS device.

- Step 2. Select the MDM profile you want to remove and tap on “Remove Management” to delete that profile from your iDevice. Then, you will be prompted to enter your login info or password and type your information to bypass supervision access.

Part 4. Using Apple Configurator 2 for Removing iPhone Supervision System
Apple Configurator is a free tool for Mac users that provides a simple technique for removing iPhone supervision. To use this method, you must have a password for the Apple iPhone 14 Pro device; otherwise, you will need to contact the organization to get the necessary permissions. Below are easy steps about how to remove device supervision from iPad and iPhone through your Mac:
Instructions. First, download and launch the Apple Configurator tool on your Mac. Connect the iDevice to the Mac using a compatible USB-C cable. Click on “Actions” from the top bar of the tool. In the drop-down list, choose the “Advanced” option and select “Erase All Content and Settings” to remove iPhone device supervision. Enter your device password to start using your Apple iPhone 14 Pro normally.

Part 5. Directly Contact Administration for Removing Device Supervision
If you’ve forgotten the username and password of your management profiles, you cannot remove MDM profiles from iPhone settings. In that situation, you can only seek help from the company admin, as this iPhone is supervised and managed by them.
You can contact the administrator and share a valid reason why you want to remove supervision access. They can remove your device directly from their system or provide you with the correct password to proceed with the login process.
Conclusion
Removing device supervision is simple, but getting familiar with the safest method is necessary. Considering this, we have covered some techniques to bypass MDM locks on your iOS device. These can easily resolve your issue of how to remove device supervision from iPhone queries. Conclusively, Wondershare Dr.Fone is the recommended tool to bypass the MDM lock without data loss.
Tips: Are you searching for a powerful Screen Unlock tool? No worries as Dr.Fone is here to help you. Download it and start a seamless unlock experience!
How to Unlock Apple iPhone 14 Pro?

Human life completely changed since the advent of technology. Today, life is not the same as it used to be. Communication and traveling became so easy. People can fly and within few hours reach the destination. The time span that was once calculated in days has now shrunk to just a few hours. In the early days, no one would have imagined that they could carry the computer in small bags, but laptops were invented to their surprise.
Today, all those computer and laptop qualities are being shifted into a small phone. Something that can fit in a pocket, and a human can carry it anywhere without feeling its weight. A small device, the mobile phone has great competition in the market. Android phones are coming up with brilliant features to stand equally with iPhones, but iOS has its own customers and a powerful market value. Talking about iPhone, let’s discuss how a user can unlock Apple iPhone 14 Pro without a passcode.
Part 1. Unlock Apple iPhone 14 Pro without Passcode or Face ID
A problem commonly faced by all iPhone users is that they forget the password, and then they are stuck because they cannot use their phone anymore. This might seem impossible because iPhone users cannot use the phone without a passcode, but let us show you a magical application that makes this impossible.
Dr.Fone - Screen Unlock (iOS) , the well-known application among most iPhone users, can resolve the problem quickly. This is a very secure platform for iPhone users because it promises to safeguard user’s personal information. The application is easy to use, that even a new person can use it without facing any trouble. Let us highlight its features;
Dr.Fone - Screen Unlock (iOS)
Fix iPhone Lock Screen Password Forgot Issue
- Unlock Face ID, Touch ID, Apple ID without password.
- Bypass the iCloud activation lock without hassle.

- Remove iPhone carrier restrictions for unlimited usage.
- No tech knowledge required, Simple, click-through, process.

3,981,454 people have downloaded it
This might be possible that not all iPhone users know about Dr.Fone – Screen Unlock, so, for such users, let us take you through the steps that are required to unlock iPhone 12 or 12 Pro Max using Dr.Fone – Screen Unlock without a passcode.
Step 1: Download and Install the Application
First of all, the user is supposed to download Dr.Fone – Screen Unlock and install it on your Windows or Mac system. Once it is installed, the application is all set and ready to use; launch it in the time of need and unlock your Apple iPhone 14 Pro without a passcode .
After the application is launched, the Welcome Screen will appear with different options. The user is requested to select the option of ‘Screen Unlock’.
Step 2: Connect Phone with System
In the second step, the user should connect their phone to the system and let Dr.Fone’s application automatically detect it. Whenever you are ready to initiate the process, click on the button ‘Unlock iOS Screen.’

Step 3: Recovery Mode Activation
Once the application has detected your Apple iPhone 14 Pro, you now need to activate the Recovery mode. A step by step illustration on how to activate Recovery mode is shared on-screen.

Step 4: Download Firmware Update
A new window will appear now, on which the application will ask for some information regarding your iOS device. Provide the application with asked information and click on the ‘Download’ button to get the firmware update for your Apple iPhone 14 Pro.

The user is requested to wait for some time, as the firmware update is being downloaded for your phone. Once that is done, now click on the ‘Unlock Now’ button to complete the process.

Step 5: Confirmation Code
The application will now ask for the confirmation code. Just provide the on-screen confirmation code and let the process complete itself. As soon as that is done, the application will notify you through the interface. The process can also be repeated by clicking on the ‘Try Again’ button.

 safe & secure
Part 2. Unlock Locked iPhone 12 by Restoring it to Default Settings – iTunes
iPhone users make sure that they connect and sync their devices with iTunes because their data is safe. iPhone users live without the fear of losing their data because it is backed up. Taking more advantage of this, iPhone users can restore their phone to default settings and can even unlock their iPhone without using a passcode.
Let us show you how to unlock Apple iPhone 14 Pro without using a passcode;
Start the process by turning off your Apple iPhone 14 Pro.
After that, plug in your phone to the computer and open iTunes.
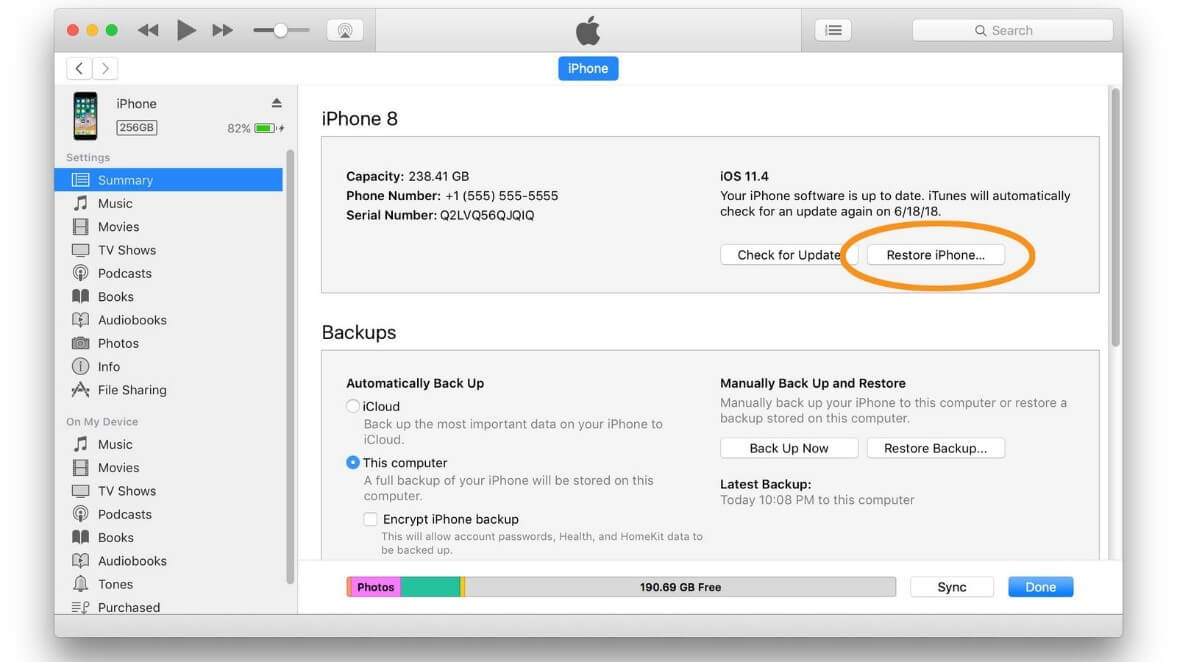
Once the phone is connected with iTunes, click on ‘Summary’ that will appear on the screen’s left side.
After the summary screen is opened, you will see the option of ‘Restore iPhone’; click on that option.
This option will bring you to a new window that will be asking for your confirmation on the decision to restore your device.
As soon as that is done and iTunes has finished the process, your Apple iPhone 14 Pro 12 will be restored to default settings.

Part 3. Unlock Disabled iPhone 12 by Erasing iPhone in iCloud
IOS world is different from the Android world, and so, both have different and unique problems to deal with. For example, an android user can never imagine unlocking a disabled phone, but iPhone users surely know how to do it. It might be possible that someone doesn’t know how they can erase the Apple iPhone 14 Pro from iCloud, so for such users, let’s provide a step-by-step guideline;
Firstly, the user is requested to visit icloud.com on your computer or any other device that is in use. Then log in by using the Apple ID and password.
If two-factor authentication is enabled on your Apple iPhone 14 Pro, then hit ‘Trust’ and enter the 6-digit verification code that will be sent to your Apple iPhone 14 Pro.
Once you are logged in, choose ‘Find iPhone’ and enter your Apple ID and password again.
4. Then, you are requested to click on ‘All Devices’ that will appear on the top of the browser and select your device’s name from the list provided.
When you have selected your Apple iPhone 14 Pro, click on the ‘Erase iPhone’ button visible towards the screen’s right side. This will erase all the data and settings from your device. It will also wipe the password.


Part 4. Pros and Cons of Every Method
Different methods have been discussed that use different platforms regarding how a user can unlock an iPhone if a passcode is missing. The user might be confused about selecting the appropriate method, so let’s help the users by sharing some advantages and disadvantages of all the methods discussed above. This will help the user to select the best possible method;
1. Using Dr.Fone - Screen Unlock (iOS)
The known and famous application among iPhone users helps them recover data, unlock a phone even if its passcode is missing, and whatnot. Let us now discuss its amazing pros;
Pros
- The process is completed within few seconds. Users can easily handle the application because of the guidelines that are shared on the screen.
- The application is very convenient to use, and it works on both Windows and Mac.
- Dr.Fone can remove the Apple or iCloud passwords even if they do not have any account details.
- The application can easily unlock a 4-digit or even 6-digit screen passcode, Face ID, or Touch ID.
Cons:
- The Apple iPhone 14 Pro in use will be updated to the latest iOS version as soon as the unlocking process is completed.
- The Apple iPhone 14 Pro must be in DFU mode for the process to unlock the screen.
safe & secure
2. Using iTunes
iPhone users can unlock the phone by using iTunes. Following are its pros and cons;
Pros:
- Most iPhones are synced with iTunes, which benefits the user as it restores the latest backup on iPhone after removing the screen lock.
- iTunes is easy to understand and simple to use.
Cons:
- The biggest drawback people face with iTunes is that the data can be erased if no latest backup is taken.
- Another factor that causes the problem is iTunes’ slow functionality, as it consumes a lot of time to complete a process.
3. Using iCloud
Another known platform for iPhone users is iCloud, which allows users to unlock the screen without using the passcode. Let us share its pros and cons;
Pros:
- The biggest benefit of using iCloud is that the user doesn’t have to connect the Apple iPhone 14 Pro with the system. Just login is required for iCloud.
- Another factor is that no technical skills are needed to use iCloud. The user needs access to their iCloud account.
Cons:
- User requires a strong and stable internet connection to log in to iCloud and in case internet is not available, they cannot unlock the screen.
- Another disadvantage is that if ‘Find my iPhone’ is not enabled on the Apple iPhone 14 Pro device, then the user cannot unlock the screen through iCloud.
Conclusion
The article aimed to provide users with maximum information and knowledge about unlock the Apple iPhone 14 Pro even if you don’t have the passcode. Several methods have been discussed alongside their pros and cons so that the user can select the best.
safe & secure
How to Remove and Reset Face ID on Apple iPhone 14 Pro

Did you go wrong when you set the Face ID the first time? Or are you tired to put off the mask to use Face ID to unlock your Apple iPhone 14 Pro? And now, you want to disable the Face ID. Whatever your reasons are, read this article to learn how to remove Face ID on your Apple iPhone 14 Pro X, iPhone XS, iPhone XR or iPhone 11, iPhone 12, iPhone 13, iPhone 14, anmd iPhone 15.
Part I: What is Face ID?
If the new Apple iPhone 14 Pro is your first-ever iPhone, or if you have neither upgraded your Apple iPhone 14 Pro from the 6/7/8 series nor have kept abreast with the happenings in the Apple world, you might wonder what this newfangled thing called Face ID is.
Face ID is an authentication system that came with iPhone X for the first time, and then the Apple iPhone 14 Pro 13, the Apple iPhone 14 Pro 14, and now the Apple iPhone 14 Pro 15. Like Touch ID that uses your fingerprints, Face ID uses your face metrics to authenticate you for everything, the way Touch ID does.
Face ID is not a new and advanced version of Touch ID, but a completely different authentication system that utilizes a different component what Apple calls a TrueDepth camera to scan your face metrics. Face ID is not available on phones with Touch ID (iPhone SE 2022 today) and Touch ID is not available on iPhones that come with Face ID as their authentication mechanism.
Part II: What Can You Do with Face ID?
Most of us know that we can unlock iPhone with our face via Face ID instead of a thumbprint or passcode. But actually, Face ID does more than just that. Let us learn more cool things you can do with Face ID, which helps you to make a decision if you still want to disable it. Here‘s what you can do on your Apple iPhone 14 Pro 13/12/11 with Face ID:
II.I Unlock Your Apple iPhone 14 Pro
As an authentication mechanism, Face ID enables you to unlock your Apple iPhone 14 Pro 13 /iPhone 12/iPhone 11 with a look. How to do that? Here are the steps:
Step 1: Pick your Apple iPhone 14 Pro up in your hands or tap the screen to wake it up.
Step 2: Look at the iPhone.

When the lock symbol changes to the unlocked position, you can swipe up to unlock your Apple iPhone 14 Pro using Face ID and get to the Home Screen.
Note that Face ID will not work in landscape mode on an iPhone.
II.II Making Purchases Using Face ID on Your Apple iPhone 14 Pro
Face ID allows you to authenticate yourself to make purchases in the App Store, Book Store, and iTunes Store and use Apple Pay wherever supported.
How to use Face ID on Apple iPhone 14 Pro to make purchases in App Store, Book Store, and iTunes Store
Step 1: Check if Face ID is enabled for purchases in these stores by going to Settings > Face ID and Passcode and ensuring that iTunes and App Store are toggled On.

Step 2: On any of these stores, when you tap on the option to buy some content, a payment confirmation popup will be displayed along with instructions to authenticate yourself using Face ID.

The instructions are simple: press the side button twice to authenticate yourself using your Face ID and make the purchase.
When done, a satisfying ting and a checkmark will confirm the action.
How to use Face ID on Apple iPhone 14 Pro to pay with Apple Pay
Step 1: If Apple Pay is supported by banking institutions in your country, you can set it up by adding a supported bank‘s credit card, debit card, or prepaid card to the Wallet app on your Apple iPhone 14 Pro 13/12/11.
Step 2: When a card is added and ready to use, check that Apple Pay is enabled under Settings > Face ID and Passcode.
Step 3: For App Store/ Book Store/ iTunes Store purchases, it works as always, you double-press the Side Button to authenticate and use your default card.
Step 4: Look at your Apple iPhone 14 Pro to authenticate yourself using your Face ID and make the purchase.
Step 5: When paying at retail outlets, hold your Apple iPhone 14 Pro (top being close to the reader) and wait for the checkmark and Done message.
Step 6: To pay using Apple Pay on websites, choose Apple Pay as the payment method, double press the Side Button, look at your Apple iPhone 14 Pro, and wait for the Done message and checkmark to finish the process.
II.III Lowering Ringer and Alarm Volume Automatically
Face ID also enables what Apple calls Attention Aware features that are conveniences afforded to users who have a Face ID enabled iPhone.

Setting up and using Attention Aware features is easy:
Step 1: Go to Settings > Face ID and passcode.
Step 2: Toggle Require Attention For Face ID On.
Step 3: Toggle Attention Aware Features On.
That‘s it. Now, when you get a call and your Apple iPhone 14 Pro 13 is ringing loud, looking at your Apple iPhone 14 Pro 13/12/11 will cause it to lower the volume. When an alarm goes off, you can lower the volume by simply looking at your Apple iPhone 14 Pro. Additionally, your Apple iPhone 14 Pro screen will not dim or switch off for the duration you are looking at it. This means you can now read those books on Kindle without constantly tapping the screen for it to stay awake.
II.IV Filling Passwords in Safari Automatically Using Face ID
Face ID also allows users to fill passwords in Safari automatically for a faster and more convenient login experience on your Apple iPhone 14 Pro with Face ID.
Step 1: Go to Settings > Face ID and Passcode and toggle Password Autofill On.
Step 2: Now, when you use Safari to open a website that requires a login, tapping the username field or password field will bring up the keyboard, and on top of that keyboard there will be your credentials for the website if you have saved them in iCloud Passwords. Tap the credentials.
Step 3: Look at your Apple iPhone 14 Pro to authenticate yourself with Face ID and Safari will autofill the credentials for you.
II.V Animojis and Memojis
Up until now, we saw how Face ID enables productivity features and how convenient it is to use it. Now, we come to the fun part - Animojis. Apple launched Face ID in 2017 on the Apple iPhone 14 Pro X with much fanfare and a huge part of that fanfare was Animojis. Over time, Apple brought new capabilities to the Apple iPhone 14 Pro and added Memojis alongside Animojis.

Animojis are animated emojis. These are made possible with advanced algorithms enabled by the TrueDepth camera in Face ID. Animated emojis or Animojis can mimic your facial expressions and you can use them in your message conversations in apps.
Here‘s how to send Animojis in conversations on your new iPhone 13/12/11:
Step 1: Open a message conversation in the Messages app.
Step 2: Tap the Memoji button (a character in a yellow frame) and swipe to select the desired Animoji/ Memoji you want to send.

Step 3: Tap the Record button and you now have 30 seconds to do what you want with your face and the character will reproduce it on screen for you.
Step 4: When done, the Record button changes to Send:

Tap Send to send your first Memoji/ Animoji.
Part III: How to Remove Face ID on Apple iPhone 14 Pro
For all the hardware and software that make for a great experience for nearly all users around the world, Face ID can have its fair share of issues. Sometimes, your face might not get recognized, sometimes it might not work altogether.
Lately, with the COVID-19 pandemic, we have seen how Face ID struggles to work for us, and why? Because it cannot scan our faces with masks! So, it makes sense to remove Face ID from our iPhones and rely solely on passcodes. Alternatively, you want to reset your Face ID on your Apple iPhone 14 Pro 13/12/11 and set it again if you have put on some ‘COVID weight’ owing to working from home.
Most of the time, the best and the simplest thing you can do to resolve your hardware and software issues is to restart the Apple iPhone 14 Pro device in question. To restart your Apple iPhone 14 Pro 13/12/11, long-press the Side Button until the power slider appears and drag it to shut the Apple iPhone 14 Pro device off. Then, use the Side Button to start the phone again.
Sometimes, the issues have a way of persisting, and a restart does not resolve them. the TrueDepth system might have developed a fault and Face ID might stop working. Or you got the dreaded “problem detected with TrueDepth camera” message on your Apple iPhone 14 Pro 13/12/11. In that case, you would like to know how to reset and remove Face ID on your Apple iPhone 14 Pro 13 to see if that helps, before you are required to go to an Apple Store for service.
Step 1: Go to Settings > Face ID and Passcode.
Step 2: Scroll and tap the option “Reset Face ID” to remove Face ID on your Apple iPhone 14 Pro 13/12/11.

Part IV: How to Set Up Face ID on Your Apple iPhone 14 Pro
Sometimes, you may just want to disable Face ID temporarily or the issue gets solved, and want to activate Face ID again. Setting up a Face ID on your Apple iPhone 14 Pro 13 is easy. To set up Face ID, sit in a comfortable spot with adequate lighting and follow these steps:
Step 1: Go to Settings > Face ID and Passcode and enter your passcode. If you have not set up a passcode yet, you will necessarily have to create one now before proceeding forward.
Step 2: Tap Set Up Face ID to start the process.
Step 3: Hold your Apple iPhone 14 Pro in the portrait orientation at about an arm‘s length away from your face and then tap Get Started.

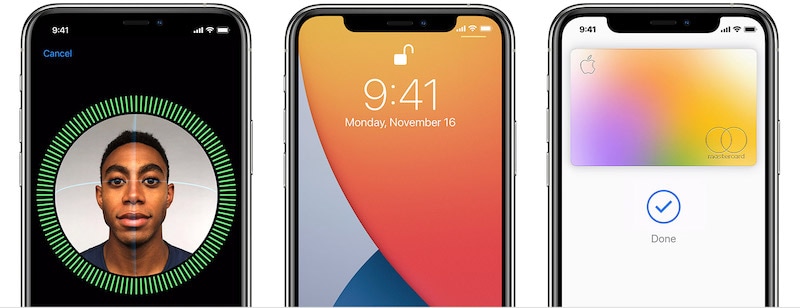
Step 4: Adjust to have your face inside the shown circle and then slowly rotate your head in a smooth motion to complete the circle. This step will be done one more time.
Step 5: When done, tap Done.
In case you are getting the following error:

There are a few things you can try to resolve this, you can try to update your Apple iPhone 14 Pro 13/12/11 to the latest iOS. At this point, you may even try running a beta version to see if that helps. If you are running a beta version, you may downgrade back to the release version to see if that resolves the error. Betas can both make and break things.
If this does not resolve it, you need to take the Apple iPhone 14 Pro device to the nearest service center. The TrueDepth camera system has components that might have been damaged or might not be working properly, for whatever reason, and the service personnel is equipped to resolve this issue for you at the earliest.
Part V: The Bottom Line
Face ID is more than a nifty authentication system in iPhones (and iPads) and brings some unique features that are not found in previous Touch ID enabled devices and enable the users to interact with people (Animojis and Memojis) and with the Apple iPhone 14 Pro (user authentication via facial metrics, Attention Aware features) in new ways. There are times when this does not work as expected, and you can reset and remove Face ID if you feel this is not your cup of tea. Apple iPhone 14 Pro can be used solely with passcodes if you want. If you find that your screen is locked and you can‘t unlock it, you can always find help in tools such as Dr.Fone - Screen Unlock (iOS). So go ahead, use the new Face ID on your Apple iPhone 14 Pro with confidence, and enjoy a more secure experience on your new iPhone than ever before.
Dr.Fone - Screen Unlock (iOS)
Unlock iPhone/iPad Lock Screen Without Hassle.
- Simple, click-through, process.
- Unlock screen passwords from all iPhone and iPad.
- No tech knowledge required, everybody can handle it.
- Supports iPhone 13/ iPhone XS (Max) / iPhone XR / iPhone X / 8 (Plus)/ iPhone 7(Plus)/ iPhone6s(Plus), iPhone SE and the latest iOS version fully!
4,395,217 people have downloaded it
Also read:
- [New] From Live Events to Records The Pathway with 4 Key Steps on FB for 2024
- [New] In 2024, Elevate Your Online Presence Audios for Your Channel
- [New] Unleashing Creativity with Magix Video Pro X for 2024
- [Updated] In 2024, Visionaries Shaping Marvel Online Experience
- Complete Fixes To Solve iPhone SE (2022) Randomly Asking for Apple ID Password | Dr.fone
- Complete Guide on Unlocking iPhone 12 Pro Max with a Broken Screen? | Dr.fone
- How to Unlock Apple iPhone 13 Pro without Passcode or Face ID | Dr.fone
- Identifying and Handling ChatGPT-Based Phishing Websites: Steps to Take
- In 2024, 7 Top Ways To Resolve Apple ID Not Active Issue For Apple iPhone 11 Pro Max | Dr.fone
- In 2024, Everything You Need To Know About Unlocked Apple iPhone 8 Plus | Dr.fone
- In 2024, How to Transfer Videos from Tecno Camon 20 to iPad | Dr.fone
- In 2024, Reset iTunes Backup Password Of Apple iPhone XS Prevention & Solution | Dr.fone
- In 2024, Trouble with Apple iPhone XS Max Swipe-Up? Try These 11 Solutions | Dr.fone
- New 2024 Approved From WebM to MP4 Top 10 Converters for Smooth Video Playback
- Step-by-Step Guide to Transferring Content From Samsung Phone to Laptop/PC
- Transforming the Future of Automated Efficiency: A Look at the Successful Alliance Between ABBYY and UiPath
- Title: Remove Device Supervision From your iPhone 14 Pro | Dr.fone
- Author: Amelia
- Created at : 2024-11-11 11:28:09
- Updated at : 2024-11-17 03:16:22
- Link: https://iphone-unlock.techidaily.com/remove-device-supervision-from-your-iphone-14-pro-drfone-by-drfone-ios/
- License: This work is licensed under CC BY-NC-SA 4.0.